Health O Meter Proplus 2101KGWA User Instructions
- Kategoria
- Wagi osobiste
- Typ
- User Instructions

0
PROPLUS
®
2101KGWA
USER INSTRUCTIONS
INSTRUCCIÓNES DE USO
MODE D'EMPLOI
INSTRUÇÕES DE USO
BEDIENUNGSANLEITUNG
INSTRUCTIES VOOR DE GEBRUIKER
BRUGSVEJLEDNING
KÄYTTÖOHJEET
ISTRUZIONI PER L'USO
BRUKSANVISNING
POLSKI
SVENSKI
使用说明
PELSTAR, LLC 11800 Austin Ave. Alsip, IL 60803 Distributed by:
www.welchallyn.com
Patents D523367, 7550682B2 and D508655 (US); Patents Pending and 0149984/1-8 (EU);
Patents 806658, 879866, ZL200480031711X and 200430004551.2 (PRC) © Pelstar, LLC 2010
0459
Rev. 20101105

1
PROPLUS
®
2101KGWA
TABLE OF CONTENTS
ENGLISH.................................................................................................................... 2
ESPAÑOL .................................................................................................................. 14
FRANÇAIS ................................................................................................................. 26
PORTUGUÊS ............................................................................................................. 38
DANSK ...................................................................................................................... 50
DEUTSCH .................................................................................................................. 62
NEDERLANDS ........................................................................................................... 74
SUOMI ....................................................................................................................... 86
ITALIANO................................................................................................................... 98
NORSK ..................................................................................................................... 110
POLSKI ..................................................................................................................... 122
SVENSKI .................................................................................................................... 134
简体中文 ..................................................................................................................... 146

2
PROPLUS
®
2101KGWA
DIGITAL BARIATRIC SCALE WITH HANDRAILS
USER INSTRUCTIONS
Thank you for your purchase of this Health o meter
®
Professional scale.
Please read this manual carefully and keep it for easy reference or training.
TABLE OF CONTENTS
CAUTIONS AND WARNINGS ............................................................................................. 3
SPECIFICATIONS .............................................................................................................. 3
CERTIFICATIONS / CONNECTIVITY / DISPOSAL / SERVICE .......................................... 4
ASSEMBLY INSTRUCTIONS ............................................................................................. 5
SET UP / BATTERIES ......................................................................................................... 6
QUICK START INSTRUCTIONS ......................................................................................... 7
MAINTENANCE / CALIBRATION ........................................................................................ 9
TROUBLESHOOTING ........................................................................................................ 10
DETAILED VIEW OF SCALE .............................................................................................. 11
PARTS FOR MAINTENANCE ............................................................................................. 12
WARRANTY ........................................................................................................................ 13

3
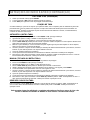
CAUTIONS AND WARNINGS
To prevent injury and damage to your scale, please follow these instructions very carefully.
• Do not transport the scale while the platform is loaded. Unplug the adapter and store both the
adapter and cord on the adapter holder before moving the scale. Be sure the scale is tilted
enough to assure it is rolling properly on its wheels when it is moved for cleaning or transported
from one room to another.
• For accurate weighing the scale must be placed on a flat, stable surface.
• For accurate weighing, verify proper operation according to the procedure described in this manual
before each use.
• Do not use in the presence of flammable materials.
• Operating at other voltages and frequencies than specified could damage the equipment.
• If the “LOW BAT” indicator activates, for accurate weighing, replace the batteries or connect the
scale to a power source, using the power adapter, as soon as possible.
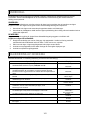
SPECIFICATIONS
GENERAL
The ProPlus
®
2101KGWA Digital Handrail Scale uses highly sophisticated microprocessor
technology. Each precision scale is designed to provide accurate, reliable and repeatable weight
measurements and features that make the weighing process simple, fast and convenient.
This scale is set up to use motion-sensing weighing technology, to determine the actual weight of a
moving patient. The scale may be changed to measure live weight (see the ProPlus
®
Display
Module User Manual for instructions on how to change the scale settings).
Weight is displayed in kilograms. The scale features a wrap-around handrail for patient comfort
and safety. It also has a 180° swivel display head for privacy and easy operator reading from
either side of the scale. It has two wheels built in for easy mobility. The scale can be operated
using its power adapter (included) or by 6-D cell batteries (not included), depending on use—see
Connectivity section, below.
2101KGWA SPECIFICATIONS
0BCapacity and
Resolution
2101KGWA: Max 400kg / Min 1kg, e=0.1kg (Class III)
1BPower Requirements
120V-240V AC, 50-60Hz - 9V DC adapter, Adapter Model ADPT30
(INCLUDED) or 6 D-cell batteries (not included)
2BEnvironmental
Operating temperatures: 10°C to 35°C (50°F to 95°F)
Storage temperatures: 0°C to 50°C (30°F to 125°F)
Maximum Humidity: 85% RH
3BPhysical Dimensions Platform
Length: 56 cm (22”)
Width: 66 cm (26”)
Height: 5.7 cm (2-¼”)
Assembled Product Size and Weight
Length: 76 cm (30”)
Width: 70.5 cm (27-¾”)
Height: 125 cm (49-2/5”)
Weight: 32.5 kg (72 lb)

4
CERTIFICATIONS / CONNECTIVITY / DISPOSAL
CERTIFICATION DESCRIPTIONS
2101KGWA SCALE CONNECTIVITY INFORMATION
This scale is designed to connect to a computer, printer, monitor or other devices via USB or serial
ports, to allow reliable transmission of weight, height and BMI from the scale. This connectivity
helps close a source of potential medical errors caused by incorrectly copying and then recording
weight information taken. This scale is EMR-EHR compatible. For more information regarding
how to connect this scale to devices please see the ProPlus
®
Display Module User Manual for
instructions or request Customer Service through one of the numbers listed below.
2101KGWA SCALE DISPOSAL
This Health o meter
®
Professional scale must be disposed of properly as electronic waste.
Follow the national, regional or local regulations which apply to you for disposal of electronic
waste or batteries. Do not dispose of this device in domestic waste.
CUSTOMER SERVICE INFORMATION
For further information or telephone support, please contact Welch Allyn Customer Service at
one of the numbers listed below:
•
European Call Center - (+353) 46-90-67790
•
United Kingdom - (+44) 207-365-6780
•
France - (+33) 1-55-69-58-49
•
Latin America - (+1) 305-669-9003
• Germany - (+49) 695-098-5132
• Middle East - (+49) 7477-927186
•
Italy - (+39) 026-968-2425
•
South Africa - (+27) 11-777-7555
•
Netherlands- (+31) 202-061-360
•
Australia - (+61) 2-9638-3000
•
Spain - (+34)917-499-357
•
China - (+86) 21-6327-9631
•
Sweden - (+46) 85-853-6551
Scales carrying this symbol meet the Precision Class III standards of
the Directive 90/384 EEC
0459
Products carrying this symbol meet the requirements of:
1. Directive for non-automatic weighing instruments 90/384/EEC
2. Directive governing medical devices 93/42/EEC
Pelstar, LLC has been officially certified as a manufacture of Health
o meter
®
Professional medical devices to be in compliance with
stringent legal requirements. The Pelstar, LLC quality assurance
system covers the development, production, sales and service of
medical scales and measuring systems.

5
ASSEMBLY INSTRUCTIONS
Before Assembly:
The ProPlus
®
2101KGWA Digital Handrail Scale is shipped disassembled in one carton. Carefully inspect the carton for
shipping damage before unpacking. If damage is found, contact Customer Service. The following information details what you
will find inside the main carton, as you unpack the parts for assembly.
Remove each assembly from the carton and unwrap packing material carefully, to prevent scratching the unit’s parts. Set the
carton aside, for storage. To avoid damaging the scale parts when unpacking it, do not use a box cutter, knife, scissors or
any sharp object to open the protective inner packaging.
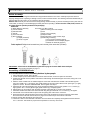
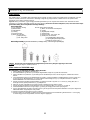
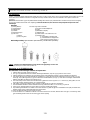
Parts List:
(1) Base (Platform) Assembly The Small, Long Box Contains:
(1) Center Handrail (1) Box Containing the Power Adapter
(2) Side Handrails (4) Feet
(1) Handle (1) Rear Cover for Display
(1) User information (1) Adapter Holder
(1) Box Containing: (3) Allen Wrenches—small, medium, large
(1) Display Assembly (1) Plastic Bag Containing:
(1) Small, Long Box (1) Front Cover for Display Support
(1) Small Rear Cover for Display Support
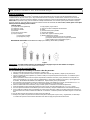
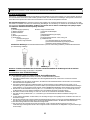
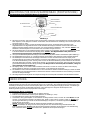
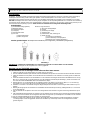
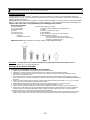
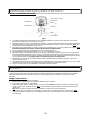
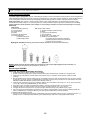
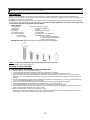
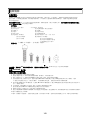
Hardware for Assembly (Figure 1)
Tools required: Phillips head screwdrivers (not included), Allen wrenches (included).
Figure 1
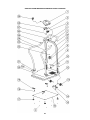
IMPORTANT: Please refer to the maintenance parts list on page 12 for more details about each part.
A detailed view of the scale is illustrated on page 11.
Assembling a 2101KGWA Scale:
It is recommended that the assembly be done by two people.
1. Place scale base on a flat, level, dry floor.
2. Locate and pick up the center handrail, then find the load cell cable, untie it and pull it out the bottom.
3. Position the handrail over the platform and feed the cable through the handrail support in the base, being sure not to
pinch the cable.
4. Slide the center handrail over the handrail supports on the base and fasten the handrail to the handrail supports
using four (4) M8 1.25 x ¾ screws (B), four (4) M8 washers (F) and the medium Allen wrench (see Figure 1). Lightly
tighten the screws. DO NOT OVERTIGHTEN. Wait to tighten until Step 6.
5. Attach the left / right side handrails to the center handrail and platform using the two (2) M10 1.5 x 1½ screws (A),
eight (8) M8 1.25 x ¾ screws (B) with eight (8) M8 washers (F), and lightly tighten.
6. Starting at the top and working down the sides and base, fully tighten all 14 screws in the handrails.
7. Attach the handle to the back of the center handrail using two (2) medium M6 1.0 x ½ screws (C), and tighten.
8. Pull forward on the side handrails to tip the scale and gently place it face down on the floor.
9. Grasp the load cell cable protruding from the bottom of the base and feed it through the protective metal shield
above the wheel in the base of the scale, then plug it into the load cell port in the center of the base.
10. Pull the excess cable through the top of the scale.
11. Thread the 4 feet into the underside of the base. Each foot should be completely hand tightened and then backed
out 1-½ full turns. This allows for proper load cell operation for accuracy of the scale.

6
ASSEMBLY INSTRUCTIONS (CONTINUED)
Assembling a 2101KGWA Scale (continued):
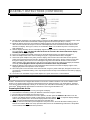
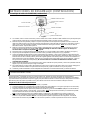
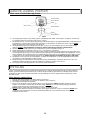
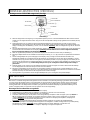
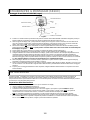
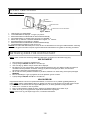
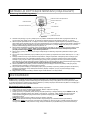
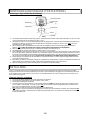
Figure 2
12. Carefully tilt the scale back to an upright position on the floor. DO NOT DROP THE SCALE. Adjust the feet, to level
the scale. Be certain that the feet are NOT completely tightened into the base (see Step 11, above).
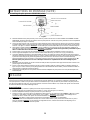
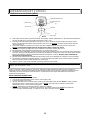
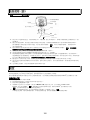
13. Rotate the display support 90˚ then position the Display Assembly close to the Display Support. Plug the load cell
cable connector into the load cell port on the rear of the Display then insert and secure the cable into the center
channel in the display. See Figure 2, above, for an illustration. Note: Do not attach the power cord at this point.
Wait until Step 19.
14. Slide the display assembly onto the metal display support insuring that the two metal tabs go into the two slots in the
rear of the display. Note: The load cell cable should now be secured in the channel between the display
assembly and the display support.
15. Insert four (4) Phillips pan head M4 screws (E) into the metal display support, and tighten (see Figure 1).
16. Attach the Adapter Holder to the center rail using two (2) #8 x ½ (D) sheet metal screws, and tighten.
17. Connect the power adapter to the power port in the display, then insert and secure the cable into the exposed
portion of the second channel from the left in the back of the display (see Figure 2, above). Hold the cord in place
through the retaining slot on the rear cover and align the large rear cover tabs with the slots on the rear of the
display assembly. Apply light pressure to snap the cover into place and secure it with two (2) Phillips pan head M4
screws (E). Do not plug the scale into a power source until the scale is fully assembled.
18. Rotate the display to align it with the center handrail then attach the front and small rear display support covers,
applying light pressure to snap these covers into place.
19. Secure the power cord to the inside of the center handrail, using the 4 plastic cable clips, arranged to hold the cord
out of the way. The adhesive backing on the clips will peel off then the clips can be fastened to the scale by applying
light pressure.
20. The scale is now assembled. Plug the scale adapter into a power source and / or insert batteries.
SET UP
ProPlus
®
2101KGWA scale is shipped with the Menu Lock function enabled. The Menu Lock function disables certain
buttons on the scale’s keypad, preventing unauthorized users from making changes to your scale settings. The Menu
Lock can be bypassed temporarily to allow you to customize your scale with the functionality you prefer. Please refer to
the ProPlus
®
Display Module User Manual for instructions on how to bypass the Menu Lock.
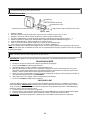
Preparing the Scale for Use
1. Remove protective plastic films covering the keypad and display.
2. Place batteries in the battery holder (see “Batteries” information in Figure 3, below).
3. Plug the scale’s power adapter into the power source.
4. Be sure all objects are removed from the scale’s platform, and then press the ON/OFF or I/O button to turn the
scale on. The display will show “Health o meter ProPlus” and then “0.0KG”. Note
: To adjust the display backlight
and/or contrast, please refer to the ProPlus
®
Display Module User Manual.
Note: The scale will always default to the settings and units last used .
5. When you disconnect the scale’s power adapter from the power source, the scale will switch to battery power, if
batteries are installed. Note: If the set up procedure failed, refer to the troubleshooting instructions. If the problem
is not corrected, refer to qualified service personnel.

7
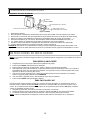
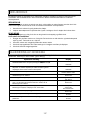
SET UP / BATTERIES
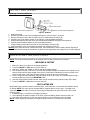
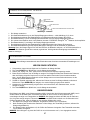
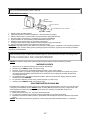
Replacing / Inserting Batteries
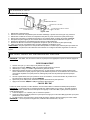
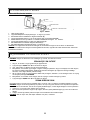
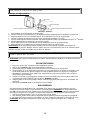
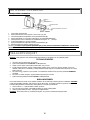
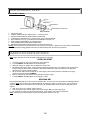
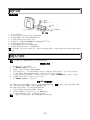
Figure 3 - Batteries
1. Unplug the scale.
2. Remove the battery cover from the display assembly—refer to Figure 3 (A) above.
3. Disconnect battery holder cable connector from the scale-battery connector (B).
4. Carefully remove the battery holder (C) by sliding it out of the display assembly.
5. Replace the batteries with new ones. We recommend EVEREADY Energizer
®
e2
TM
batteries.
6. Carefully slide the battery holder (C) into the display assembly.
7. Plug the battery holder cable connector to the scale-battery connector (B).
8. Attach the battery cover to the display assembly and install the screw (A).
Warning: If the scale will not be used for some time, remove batteries to avoid a safety hazard. Disposal of
batteries should be according to the national, regional or local regulations which apply to you for their disposal.
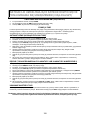
QUICK START INSTRUCTIONS
NOTE: This scale will always default to the settings and units last used when it is turned on.
WEIGHING A PATIENT
1. Make sure there is no object on the weighing platform.
2. Press the ON/OFF or I/O button to turn the scale on.
3. Wait until “0.0Kg” and “ZERO” on the left side of the display appear.
4. Ask the patient to step on the scale. The scale will calculate the patient’s weight but the display will not
show a weight until the stable weight of the person is determined. Depending on the movement of the
patient on the scale, it may take several seconds for the scale to lock onto the weight.
5. Once a weight has been displayed, while the patient is still on the scale, we recommend performing a
second weighing by pressing the REWEIGH button.
6. After the weight measurement has been taken and is recorded ask the patient to step off the scale.
7. Press the ON/OFF or I/O button to turn the scale off.
CALCULATING BMI
Body Mass Index is another name for Quetelet Index, a formula that is a convenient and reliable indicator
of obesity. NOTE
: The scale will not calculate BMI for a patient that is 12 kg or less. If a height is not
entered for the patient within 30 seconds of pressing the BMI button, the scale will return to the normal
weighing mode.
1. Complete steps 1 to 4 above for “Weighing A Patient”.
2. After obtaining the patient’s weight on the scale, press the BMI (2) button while the scale is on.
3. The scale will prompt you to enter the patient’s height. Use the keypad to enter the height.
NOTE: When weighing in kilograms, the height must be entered in 0.1 centimeter increments.

8
QUICK START INSTRUCTIONS (CONTINUED)
CALCULATING BMI (CONTINUED)
4. Once height is keyed in, press ENTER.
5. The display will show the patient’s BMI (Body Mass Index).
6. Press EXIT to return to the normal weighing mode of the scale.
TARE FUNCTION
When using the scale, the weight of an object such as shoes accompanying the patient can be subtracted
from the total weight to determine the weight of the patient alone. The Tare Function automatically performs
this subtraction. ProPlus
®
scales allow tare weight to be entered manually by using the keypad or
automatically, as outlined in this section.
AUTOMATIC (PUSH BUTTON TARE)
1. With all weight off the scale, press the ON/OFF or I/O button to turn on the scale.
2. Wait until “0.0Kg” and “ZERO” appear on the left side of the display.
3. Put the weight to be tared on the scale. The display will show a value for that weight.
4. Press the TARE (9) button. The scale will zero out and the word “TARE” will appear in the upper right side
of the display to indicate there is a tare value for this patient.
5. Remove the weight from the scale. The display will show a negative weight equal to the weight of the
shoes or other item, once that item is removed from the scale.
6. Place the patient and the tared object on the scale. The scale will automatically deduct the tared weight, as
entered, from the gross weight of the patient and tared object.
7. The weight of the patient will appear on the scale.
8. The tared value is stored in memory until changed, cleared or the scale is turned off.
9. To remove the Tare, press the TARE (9) button again. The word “TARE” will disappear from the display
and the tare value will be deleted from memory. The scale will resume normal operation.
MANUAL (KEYBOARD OR KEYPAD TARE)
1. Make sure there is no object on the weighing platform.
2. Press the ON/OFF or I/O button to turn on the scale.
3. Wait until “0.0Kg” and “ZERO” appear on the left side of the display.
4. Press the TARE (9) button. The user will be prompted to enter the tare value.
5. Use the keypad to enter the weight of the shoes or other object and then press ENTER.
6. The value entered will show as a negative value on the display.
7. Place the patient and the tared object on the scale. The scale will automatically deduct the tared weight, as
entered, from the gross weight of the patient and tared object.
8. The weight of the patient will appear on the scale.
9. The tared value is stored in memory until changed, cleared or the scale is turned off.
10. To remove the Tare, press the TARE (9) button again or EXIT. The word “TARE” will disappear from the
display and the tare value will be deleted from memory. The scale will resume normal operation.
REMOVING THE TARE VALUE
Press the TARE (9) button again to delete a tare value from memory. The word “TARE” will disappear from
the display and the tare value will be deleted from memory. You can also press the EXIT button. The scale
will resume normal operation.
Additional, complete instructions regarding all of the display and keypad functions and menus
can be found in the ProPlus
®
Display Module User Manual included with this scale.

9
MAINTENANCE
The following pages provide instructions for maintenance, cleaning, troubleshooting and
operator replaceable parts for the ProPlus
®
2101KGWA. Maintenance operations other than
those described in this manual should be performed by qualified service personnel.
MAINTENANCE
Before first use and after periods of non-use, check the scale for proper operation and function. If
the scale does not operate correctly, refer to qualified service personnel.
1. Check overall appearance of the total scale for any obvious damage, wear and tear.
2. Inspect the power adapter for cord cracking or fraying or for broken or bent prongs.
CLEANING
Proper care and cleaning is essential to ensure a long life of accurate and effective operation.
Disconnect the scale from the adapter power source.
1. Clean all external surfaces with a clean damp cloth or tissue. Mild antimicrobial or
antibacterial soap and water solution may be used. Dry with a clean soft cloth.
2. Do not immerse the scale into cleaning or other liquid solution.
3. Do not use Isopropyl Alcohol or other solutions to clean the display surface.
4. Do not use abrasive cleaners.
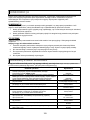
2101KGWA CALIBRATION
This scale has been factory calibrated and does not require calibration prior to use. For
maintenance, the scale can be calibrated. Calibration of your ProPlus
®
scale is performed using kilos (kg)
Operator Action Display
1. Make sure the display is turned off, then press and hold the
HOLD/RELEASE button while pressing the ON/OFF or I/O
button.
“Enter load weight:
“200.0KG”
2. Using the
keys and/or the numeric keypad, set the calibration
load to at least half the capacity of the scale (for the best results
and greater accuracy, use the full capacity of the scale.
“Enter load weight:
“200.0KG”
3. Make sure there is nothing on the scale, then press the
ENTER button.
Zero calibration:
Please clear the scale
4. Please wait 1-3 seconds, without touching or shaking the
scale, to allow the Zero Calibration to finish.
Zero calibration:
Please wait
5. No action required by operator.
Weight calibration:
Put: XXX.X
6. Load the scale with the required weight and press the ENTER
button. Please wait 1-3 seconds, without touching or shaking
the scale, to allow the Calibration to finish.
Weight calibration
Please wait
7. If calibration is successful, the display will show “Factor OK!”.
If the calibration process failed, it will show “Factor Fail!”.
Factor Update…
“Factor OK!”
or “Factor Fail!”
8. If successful, the display will begin to reboot.
Rebooting…
Please wait
9. The display will return to the start up message.
Health o meter
ProPlus
10. Please wait until the scale resumes normal operation and
then remove the weight from the scale.
Health o meter
ProPlus

10
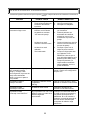
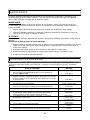
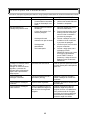
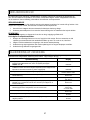
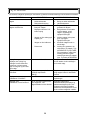
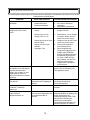
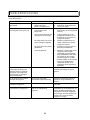
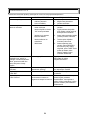
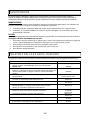
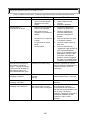
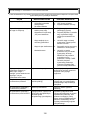
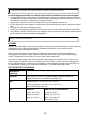
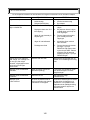
TROUBLESHOOTING
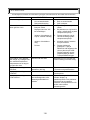
Refer to the following instructions to check and correct any failure before contacting Customer Service.
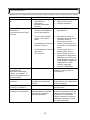
SYMPTOM POSSIBLE CAUSE CORRECTIVE ACTION
Scale does not turn on 1. Dead Battery
2. Faulty electrical outlet
3. Bad power supply
1. Replace batteries
2. Use a different outlet
3. Replace adapter
Questionable weight or
the scale does not zero
1. External object
interfering with the scale
1. Remove interfering object
from the scale
2. The display did not show
”0.0” before weighing
2. Ask the patient to get off
the scale, zero the scale
and begin weighing
process again
3. Scale is not placed on a
level floor
3. Place the scale on a level
floor and begin weighing
process again
4. Scale is out of calibration
4. Check weight with known
weight value
5. Improper Tare
5. Place the item to be tared
on the scale. Press
REWEIGH. Once the
weight of the item is
displayed, press TARE.
Place the patient and the
tared item back on the
scale. Press REWEIGH
again
Weighing is performed but
the display shows “weigh”
and “reweigh” every few
seconds; the weighing
process takes too long and
no weight is displayed.
The patient is not standing
still
Ask the patient to stand still or
you can change to live weight
setting
The display shows
“Overload” message
The load on the scale
exceeds the capacity
(400 kg)
Remove the excess weight and
use the scale according to its
limits
The display shows
“LOW BAT” message
The batteries are empty
Replace batteries according to
instructions
The display shows
“Load Cell Error” message
There is a problem with one
or more load cells or the load
cell cable is disconnected.
Check load cell cable
connection at the display and
platform assembly ports. If the
problem is not corrected, refer
to qualified service personnel to
replace the defective load cell

11
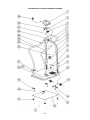
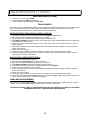
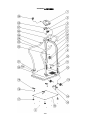
DETAILED VIEW OF 2101KGWA SCALE

12
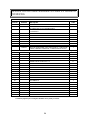
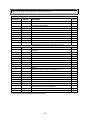
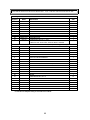
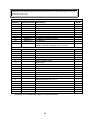
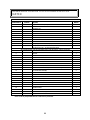
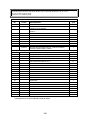
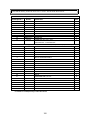
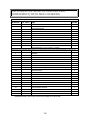
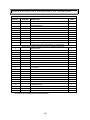
2101KGWA PARTS FOR MAINTENANCE
Field Replaceable Parts
Key No.*
Part No.
4B
Description
Qty.
1
B1109401-0
DISPLAY ASSEMBLY
1
2
B2033701-0
MAIN BOARD TO JUNCTION BOX LOAD CELL CABLE
1
4 B3822601-0
SMALL REAR COVER FOR DISPLAY SUPPORT 1
7
B3817001-0
ADAPTER HOLDER
1
14
B2138901-0
CONNNECTOR BOARD
1
17 B2266701-0 FOOT ASSEMBLY 4
19
B1304202-0
LOAD CELL
4
25
B3822501-0
FRONT COVER FOR DISPLAY SUPPORT
1
28 B3822701-0 REAR COVER 1
29
ADPT30
POWER ADAPTER 120V-240V
1
INCLUDES ADAPTER, DISPLAY ASSY, 4 LOAD CELLS,
CONNECTOR BOARD, 4 FOOT ASSEMBLY
1
Below listed items are for reference only (refer to detailed view on page 11)
3
DISPLAY SUPPORT
1
5
HANDLE
1
5a
SOCKET HEAD CAP SCREW M6 1.0 x ½
2
6
HANDRAIL
1
8
SHEET METAL SCREW #8 x ½
11
9
HEALTH O METER LABEL
1
10
MODEL LABEL
1
11
SOCKET HEAD CAP SCREW M8 1.25 x ¾
4
12
BASE ASSEMBLY (PLATFORM ASSEMBLY)
1
13
WHEEL ASSEMBLY
2
15
PHILLIPS PAN HEAD SCREW #6 x ¼
1
16
BOTTOM COVER
1
18
SOCKET HEAD CAP SCREW NC5/16-18 x ¾
8
20
MAT
1
21
SOCKET HEAD CAP SCREW M8 1.25 x ¾
12
21a
M8 WASHERS
12
22
PLASTIC CABLE CLIP WITH ADHESIVE BACK
4
23
LEFT SIDE HANDRAIL
1
24
RIGHT SIDE HANDRAIL
1
26
SOCKET HEAD SCREW M10 1.5 x 1½
2
27
PHILLIPS PAN HEAD SCREW M4
6
* See page 11 for a detailed view of parts by number.

13
WARRANTY
3- YEAR LIMITED WARRANTY
What does the Warranty Cover?
Health o meter
®
Professional ProPlus
®
scales are warranted from date of purchase against defects of
materials or in workmanship for a period of three (3) years. If you have an equipment problem that you
cannot resolve, and the Customer Service provider determines that a defect of material or in
workmanship exists, the customer’s sole remedy will be repair or replacement of the scale at no charge.
Replacement will be made with a new or remanufactured product or component. If the product is no
longer available, replacement may be made with a similar product of equal or greater value. All parts
including repaired and replaced parts are covered only for the original warranty period.
Who is Covered?
The original purchaser of the product must have proof of purchase to receive warranty service. Please
save your invoice or receipt. Authorized dealers selling Pelstar products do not have the right to alter,
or modify or any way change the terms and conditions of this warranty.
What is Excluded?
Your warranty does not cover normal wear of parts or damage resulting from any of the
following: negligent use or misuse of the product, use on improper voltage or current, use contrary to
the operating instructions, abuse including tampering, damage in transit, or unauthorized repair or
alternations. Further, the warranty does not cover Acts of God, such as fire, flood, hurricanes and
tornadoes. This warranty gives you specific legal rights, and you may also have other rights that vary
from country to country, state to state, province to province or jurisdiction to jurisdiction.
To get Warranty Service make sure you keep your sales receipt or document showing proof
of purchase. Call the Customer Service Center nearest you for assistance--please see page 4 of this
manual. Before returning a product, you must obtain authorization from Customer Service.
Customer Service personnel will give you a Service Notification number. Please note this number on
the outside of your shipping box. Returns without a Service Notification number will not be accepted for
delivery. Attach your proof of purchase to your defective product along with your name, address,
daytime telephone number and description of the problem. Carefully package the product and
send it with shipping and insurance prepaid
to the address you are given by Customer Service.
Write, “Attention SN#________”, and the shipping address, on the shipping label, following Customer
Service instructions.
PRODUCT LIFE: 10 YEARS / 100,000 CYCLES
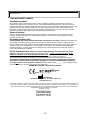
0459
PELSTAR, LLC
11800 South Austin Avenue - B • Alsip, IL 60803 • USA
www.homscales.com
ProPlus® is a registered trademark of Pelstar, LLC. Health o meter
®
is a registered trademark of Sunbeam Products,
Inc. used under license. Health o meter
®
Professional products are manufactured, designed and owned by Pelstar,
LLC and are distributed by Welch Allyn outside the US and Canada. We reserve the right to improve, enhance or
modify Health o meter
®
Professional product features or specifications without notice.
© Pelstar, LLC 2010
QNET BV
HOMMERTERWEG 286
6436 AM AMSTENRADE
THE NETHERLANDS

14
PROPLUS
®
2101KGWA
BÁSCULA DIGITAL BARIÁTRICA CON PASAMANOS
INSTRUCCIONES DE USO
Gracias por la compra de esta báscula Health o meter
®
Professional.
Lea atentamente este manual y consérvelo para referencia futura o para capacitación.
ÍNDICE DE CONTENIDOS
PRECAUCIONES Y ADVERTENCIAS ................................................................................................. 15
ESPECIFICACIONES ........................................................................................................................... 15
CERTIFICACIONES/CONECTIVIDAD/ELIMINACIÓN/SERVICIO ...................................................... 16
INSTRUCCIONES DE ENSAMBLAJE ................................................................................................. 17
CONFIGURACIÓN/BATERÍAS ............................................................................................................. 18
INSTRUCCIONES DE INICIO RÁPIDO ............................................................................................... 19
MANTENIMIENTO/CALIBRACIÓN ...................................................................................................... 21
RESOLUCIÓN DE PROBLEMAS ......................................................................................................... 22
VISTA DETALLADA DE LA BÁSCULA ................................................................................................ 23
REPUESTOS DE MANTENIMIENTO ................................................................................................... 24
GARANTÍA ............................................................................................................................................ 25

15
PRECAUCIONES Y ADVERTENCIAS
Para prevenir lesiones y daños a su báscula, siga estas instrucciones con mucho cuidado.
• No transporte la báscula mientras la plataforma está cargada. Desenchufe el adaptador y guarde el
adaptador y el cable en el soporte del adaptador antes de mover la báscula. Asegúrese de que la
inclinación de la báscula sea suficiente para garantizar que las ruedas giren correctamente cuando la
mueva para limpiarla o transportarla de una habitación a otra.
• Para que la báscula arroje un pesaje exacto se la debe colocar sobre una superficie plana y estable.
• Para obtener un pesaje exacto, verifique que el funcionamiento sea adecuado siguiendo el procedimiento
descrito en este manual antes de cada uso.
• No la use en presencia de materiales inflamables.
• Operar la báscula con voltajes y frecuencias distintos de los especificados puede dañar el equipo.
• Para obtener un pesaje exacto aunque el indicador “LOW BAT” esté activado, reemplace las baterías o
conecte la báscula a una fuente de alimentación por medio del adaptador de alimentación lo antes posible.
ESPECIFICACIONES
GENERALIDADES
La báscula digital con pasamanos ProPlus
®
2101KGWA utiliza una tecnología de microprocesador de alta
complejidad. Cada báscula de precisión ha sido diseñada para brindar un registro del peso exacto confiable y
repetible, y sus características posibilitan que el proceso de pesaje sea simple, rápido y cómodo.
Esta báscula ha sido configurada para utilizar una tecnología de pesaje con sensores de movimiento que
sirven para determinar el peso real de un paciente en movimiento. La báscula puede ajustarse para registrar
peso vivo (consulte el Manual del usuario del módulo de pantalla ProPlus
®
para obtener instrucciones sobre
cómo cambiar la configuración de la báscula).
El peso se muestra en kilogramos. La báscula cuenta con un pasamanos envolvente para comodidad y
seguridad del paciente. También tiene una pantalla giratoria de 180º para dar privacidad y facilitar la lectura
del operador desde cualquier ángulo de la báscula. Tiene dos ruedas incorporadas para moverla con
facilidad. La báscula puede ser operada mediante el adaptador de alimentación (incluido) ó 6 baterías tipo D
(no incluidas), según el uso (consulte la sección Conectividad a continuación).
ESPECIFICACIONES DEL MODELO 2101KGWA
5BCapacidad y
resolución
2101KGWA: Máx. 400 kg/Mín. 1 kg, e=0,1 kg (Clase III)
6BRequisitos de
alimentación
120 V-240 V CA, 50-60 Hz - Adaptador V CC 9 V; adaptador modelo
ADPT30 (INCLUIDO) ó 6 baterías tipo D (no incluidas)
7BAmbiente
Temperaturas de operación: 10 °C a 35 °C (50 °F a 95 °F)
Temperaturas de almacenamiento: 0 °C a 50 °C (30 °F a 125 °F)
Humedad máxima: 85% HR
8BDimensiones Plataforma
Largo: 56 cm (22")
Ancho: 66 cm (26")
Alto: 5,7 cm (2¼")
Tamaño y peso del producto ensamblado
Largo: 76 cm (30")
Ancho: 70,5 cm (27 ¾")
Alto: 125 cm (49 2/5")
Peso: 32,5 kg (72 lb)

16
CERTIFICACIONES/CONECTIVIDAD/ELIMINACIÓN
DESCRIPCIÓN DE LAS CERTIFICACIONES
INFORMACIÓN DE CONECTIVIDAD DE LA BÁSCULA 2101KGWA
Esta báscula está diseñada para conectarse a un ordenador, una impresora, un monitor u otro dispositivo
vía USB o puertos de serie, para transmitir en forma confiable el peso, la altura y el IMC desde la báscula.
Esta conectividad ayuda a reducir las posibilidades de que se produzcan errores médicos a causa del
copiado y registro incorrecto de la información del peso obtenida. Esta báscula es compatible con historias
clínicas electrónicas (EMR) y registros electrónicos de salud (EHR). Para obtener más información sobre el
modo de conectar esta báscula a los dispositivos, consulte las instrucciones del Manual del usuario del
módulo de pantalla ProPlus
®
, o solicite Atención al cliente a través de alguno de los números listados a
continuación.
ELIMINACIÓN CORRECTA DE LA BÁSCULA 2101KGWA
Esta báscula Health o meter
®
Professional debe ser eliminada como desecho electrónico. Siga la
normativa nacional, regional o local que se aplique en su caso para la eliminación de desechos
electrónicos o baterías. No arroje este dispositivo junto a los desechos domésticos.
INFORMACIÓN DE ATENCIÓN AL CLIENTE
Para obtener más información o asistencia telefónica, contáctese con Atención al cliente de Welch Allyn a
alguno de los números listados a continuación:
• Centro de atención telefónica en Europa - (+353) 46-90-67790
• Reino Unido - (+44) 207-365-6780
•
Francia - (+33) 1-55-69-58-49
•
Latinoamérica - (+1) 305-669-9003
• Alemania - (+49) 695-098-5132
• Medio Oriente - (+49) 7477-927186
• Italia - (+39) 026-968-2425
• Sudáfrica - (+27) 11-777-7555
•
Países Bajos - (+31) 202-061-360
•
Australia - (+61) 2-9638-3000
•
España - (+34) 917-499-357
•
China - (+86) 21-6327-9631
• Suecia - (+46) 85-853-6551
Las básculas que poseen este símbolo cumplen con los estándares de
precisión Clase III de la Directiva 90/384 de la CEE.
0459
Los productos que poseen este símbolo cumplen con los requisitos de:
1. La Directiva para instrumentos de pesaje no automáticos 90/384/CEE
2. La Directiva que rige los dispositivos médicos 93/42/CEE
Pelstar, LLC ha sido certificada oficialmente como fabricante de los
dispositivos médicos Health
o meter
®
Professional, para cumplir con los
requisitos legales más estrictos. El sistema de control de calidad de Pelstar,
LLC abarca el desarrollo, la producción, la venta y el servicio de básculas y
sistemas de medición para uso médico.

17
INSTRUCCIONES DE ENSAMBLAJE
Antes de ensamblar:
La báscula digital con pasamanos ProPlus
®
2101KGWA se envía desarmada en una única caja. Antes de desembalarla, examine
cuidadosamente la caja para verificar que no haya sufrido daños durante el transporte. Si existen daños, contáctese con el servicio de
Atención al cliente. La siguiente información detalla el contenido que hallará en la caja principal desembalar las piezas para ensamblarlas.
Retire todas las piezas de la caja y retire el material de embalaje cuidadosamente, a fin de evitar rayar las piezas. Guarde la caja para
almacenar la báscula. Para evitar dañar las piezas de la báscula mientras las desembala, no use un cúter, cuchillo, tijeras ni otro objeto
afilado para abrir el embalaje protector interior.
Lista de piezas:
(1) Conjunto de la base (plataforma) La caja pequeña y larga contiene:
(1) Pasamanos central (1) Caja que contiene el adaptador de alimentación
(2) Pasamanos laterales (4) Patas
(1) Barandilla (1) Cubierta trasera para la pantalla
(1) Información para el usuario (1) Soporte del adaptador
(1) Caja que contiene: (3) Llaves Allen: pequeña, mediana, grande
(1) Conjunto de la pantalla (1) Bolsa de plástico que contiene:
(1) Caja pequeña y larga (1) Cubierta frontal para el soporte de la pantalla
(1) Pequeña cubierta trasera para el soporte de la pantalla
Piezas metálicas para el ensamblaje (Figura 1)
Herramientas necesarias: Destornilladores Phillips (no incluidos), llaves Allen (incluidas).
Figura 1
IMPORTANTE: Consulte la lista de repuestos de mantenimiento en la página 24 para ver más detalles de cada pieza.
En la página 23 se presenta una ilustración detallada de la báscula.
Ensamblaje de la báscula 2101KGWA:
Se recomienda que el ensamblaje lo lleven a cabo dos personas.
1. Coloque la base de la báscula sobre un suelo plano, nivelado y seco.
2. Identifique y recoja el pasamanos central, busque el cable de la celda de carga, desátelo y sáquelo por la parte inferior.
3. Coloque el pasamanos sobre la plataforma y enhebre el cable por el soporte del pasamanos de la base, con cuidado de que el
cable no quede pinzado.
4. Deslice el pasamanos central sobre los soportes del pasamanos existentes en la base y fije el pasamanos a sus soportes con
cuatro (4) tornillos M8 de 1,25 x ¾ (B), cuatro (4) arandelas M8 (F) y la llave Allen mediana (ver la Figura 1). Ajuste ligeramente
los tornillos. NO APRIETE EN EXCESO LOS TORNILLOS. Espere hasta el paso 6 para apretarlos.
5. Fije el pasamanos de la izquierda y la derecha al pasamanos central y a la plataforma con los dos (2) tornillos M10 de 1,5 x 1½
(A), los ocho (8) tornillos M8 de 1,25 x ¾ (B) con ocho (8) arandelas M8 (F) y ajuste ligeramente.
6. Comience desde arriba hacia los laterales y luego a la base, apriete con firmeza los 14 tornillos del pasamanos.
7. Acople la barandilla a la parte trasera del pasamanos central con dos (2) tornillos M6 medianos de 1,0 x ½ (C) y apriete.
8. Tire de los pasamanos laterales hacia adelante para inclinar la báscula y colóquela cuidadosamente sobre el suelo boca abajo.
9. Tome el cable de la celda de carga que sobresale por la parte inferior de la base y páselo por la placa protectora de metal que se
encuentra encima de la rueda, en la base de la báscula. A continuación, conéctelo al puerto de la celda de carga en el centro de la
base.
10. Tire del cable sobrante para sacarlo por la parte superior de la báscula.
11. Enrosque las 4 patas en la parte inferior de la base. Cada pata se debe apretar a tope a mano y, seguidamente, se debe aflojar
1½ vueltas. Esto permite el funcionamiento adecuado de la celda de carga para que la báscula sea exacta.

18
INSTRUCCIONES DE ENSAMBLAJE (CONTINUACIÓN)
Ensamblaje de la báscula 2101KGWA (continuación):
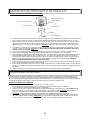
Figura 2
12. Con cuidado, vuelva a colocar la báscula en posición vertical sobre el suelo. NO DEJE CAER LA BÁSCULA. Ajuste las patas para
nivelar la báscula. Asegúrese de que las patas NO estén apretadas a tope en la base (ver paso 11 anterior).
13. Rote 90º el soporte de la pantalla y coloque el conjunto de la pantalla cerca del soporte de la pantalla. Enchufe el conector del
cable de la celda de carga en el puerto de la celda de carga situada en la parte de atrás de la pantalla. A continuación, inserte el
cable y fíjelo en el canal central de la pantalla. Consulte la ilustración de la Figura 2 anterior. Nota
: No enchufe el cable de
alimentación todavía. Espere hasta el paso 19.
14. Deslice el conjunto de la pantalla en su soporte metálico, asegurándose de que las dos lengüetas de metal entren en las dos
ranuras de la parte posterior de la pantalla. Nota
: Ahora se debe fijar el cable de la celda de carga en el canal que se
encuentra entre el conjunto de la pantalla y su soporte.
15. Introduzca cuatro (4) tornillos de cabeza plana Phillips M4 (E) en el soporte metálico de la pantalla y apriételos (ver Figura 1).
16. Acople el soporte del adaptador al pasamanos central con dos (2) tornillos de chapa Nº 8 x ½ (D) y apriételos.
17. Conecte el adaptador de alimentación al puerto de alimentación de la pantalla, y luego inserte el cable en la parte expuesta del
segundo canal desde la izquierda en la parte posterior de la pantalla (ver la Figura 2 anterior). Mantenga el cable en su lugar en la
ranura de retención de la cubierta posterior y alinee las lengüetas grandes de la cubierta posterior con las ranuras situadas en la
parte posterior del conjunto de la pantalla. Aplique un poco de presión sobre la tapa hasta que se oiga un chasquido, y fíjela con
dos (2) tornillos de cabeza plana Phillips M4 (E). No conecte la báscula a una fuente de alimentación mientras no esté
completamente ensamblada.
18. Rote la pantalla para alinearla con el pasamanos central y fije las cubiertas de soporte posterior y anterior de la pantalla. Para ello,
aplique un poco de presión hasta que se oiga un chasquido.
19. Fije el cable eléctrico a la parte interior del pasamanos central con las 4 sujeciones de plástico para que no estorbe. Despegue la
protección del adhesivo situado en la parte trasera de las sujeciones y fíjelas a la báscula con un poco de presión.
20. La báscula ya está ensamblada. Enchufe el adaptador de la báscula a una fuente de alimentación y/o inserte las baterías.
CONFIGURACIÓN
La báscula ProPlus
®
2101KGWA se envía con la función “Menu Lock” activada. La función de bloqueo de menús desactiva
determinados botones del teclado de la báscula a fin de evitar que usuarios no autorizados modifiquen la configuración de la balanza.
Es posible saltarse temporalmente el bloqueo de menús para personalizar la báscula con las funciones que usted prefiera. Consulte el
Manual del usuario del módulo de pantalla ProPlus
®
para obtener instrucciones sobre cómo saltarse el bloqueo de menús.
Preparación de la báscula para su uso
1. Retire las láminas de plástico que protegen el teclado y la pantalla.
2. Coloque las baterías en su compartimento (consulte la información sobre “Baterías” en la Figura 3 que aparece a continuación).
3. Enchufe el adaptador de alimentación de la báscula a la fuente de alimentación.
4. Asegúrese de quitar todos los objetos de la plataforma de la báscula, y pulse el botón ON/OFF o I/O para encender la báscula.
La pantalla mostrará “Health o meter ProPlus” y luego “0.0KG”. Nota
: Para ajustar la luminosidad y el contraste de la pantalla,
consulte el Manual del usuario del módulo de pantalla ProPlus
®
.
Nota: La báscula siempre tendrá como predeterminadas la configuración y las unidades que se usaron por última vez.
5. Al desconectar el adaptador de alimentación de la báscula de la fuente de alimentación, la báscula se alimentará de las
baterías, si es que están instaladas. Nota
: Si no ha sido posible completar el procedimiento de configuración, consulte las
instrucciones de resolución de problemas. Si no se resuelve el problema, consulte al personal de servicio técnico calificado.
TAPA DE LA BATERÍA
SOPORTE DE LA PANTALLA
CABLE DE LA CELDA DE CARGA
CONJUNTO DE LA PANTALLA
TORNILLOS
CUBIERTA POSTERIOR
CABLE DE ALIMENTACIÓN
TORNILLOS

19
CONFIGURACIÓN/BATERÍAS
Reemplazo/Colocación de baterías
Figura 3 - Baterías
1. Desenchufe la báscula.
2. Retire la tapa del compartimiento de las baterías del conjunto de la pantalla. Consulte la Figura 3 (A) anterior.
3. Desconecte el conector del cable del compartimiento de las baterías del conector de la batería de la báscula (B).
4. Retire con cuidado el compartimiento de la batería (C) deslizándolo fuera del conjunto de la pantalla.
5. Reemplace las baterías por unas nuevas. Recomendamos utilizar las baterías EVEREADY Energizer
®
e2
TM
.
6. Con cuidado deslice el compartimiento de la batería (C) dentro del conjunto de la pantalla.
7. Enchufe el conector del cable del compartimiento de la batería al conector de la batería de la báscula (B).
8. Acople la tapa de la batería al conjunto de la pantalla y coloque el tornillo (A).
Advertencia: Si la báscula no se utiliza durante un tiempo, retire las baterías para evitar peligros relacionados con la
seguridad. Las baterías se deben desechar de acuerdo con la normativa nacional, regional o local aplicable en su caso.
INSTRUCCIONES DE INICIO RÁPIDO
NOTA: Al encenderla, esta báscula siempre tendrá como predeterminadas la configuración y las unidades que se usaron
por última vez.
PARA PESAR A UN PACIENTE
1. Asegúrese de que no haya ningún objeto sobre la plataforma de pesaje.
2. Pulse el botón ON/OFF o I/O para encender la báscula.
3. Espere hasta que aparezcan las indicaciones “0.0Kg” y “ZERO” a la izquierda de la pantalla.
4. Pida al paciente que se suba a la báscula. La báscula calculará el peso del paciente pero éste no se mostrará en
la pantalla hasta que el peso de la persona se estabilice. Si el paciente se mueve, la báscula podría tardar varios
segundos en obtener un valor fijo para el peso.
5. Una vez que se haya mostrado el peso y mientras el paciente permanece sobre la báscula, se recomienda
realizar un segundo pesaje pulsando el botón REWEIGH.
6. Una vez tomado y registrado el peso, pida al paciente que se baje de la báscula.
7. Pulse el botón ON/OFF o I/O para apagar la báscula.
PARA CALCULAR EL IMC
El Índice de masa corporal, también conocido con el nombre de Índice de quetelet, es una fórmula que ofrece un
indicador práctico y fiable de la obesidad. NOTA: La báscula no calculará el IMC de un paciente que pese 12 kg o
menos. Si no se indica la altura del paciente en un plazo de 30 segundos tras pulsar el botón BMI (IMC), la báscula
volverá a la modalidad de pesaje normal.
1. Complete los pasos del 1 al 4 de la sección anterior “Para pesar a un paciente”.
2. Después de obtener el peso del paciente en la báscula, pulse el botón BMI (2) con la báscula encendida.
3. La báscula le pedirá que indique la altura del paciente. Utilice el teclado para introducir la altura.
NOTA: Cuando se está pesando en kilogramos, la altura se debe indicar en incrementos de 0,1 centímetros.
TAPA DE LA BATERÍA
TORNILLO
COMPARTIMIENTO DE LA BATERÍA
CONECTOR DEL CABLE DEL
COMPARTIMIENTO DE LA BATERÍA
CONECTOR DE LA BATERÍA DE LA BÁSCULA
Strona się ładuje...
Strona się ładuje...
Strona się ładuje...
Strona się ładuje...
Strona się ładuje...
Strona się ładuje...
Strona się ładuje...
Strona się ładuje...
Strona się ładuje...
Strona się ładuje...
Strona się ładuje...
Strona się ładuje...
Strona się ładuje...
Strona się ładuje...
Strona się ładuje...
Strona się ładuje...
Strona się ładuje...
Strona się ładuje...
Strona się ładuje...
Strona się ładuje...
Strona się ładuje...
Strona się ładuje...
Strona się ładuje...
Strona się ładuje...
Strona się ładuje...
Strona się ładuje...
Strona się ładuje...
Strona się ładuje...
Strona się ładuje...
Strona się ładuje...
Strona się ładuje...
Strona się ładuje...
Strona się ładuje...
Strona się ładuje...
Strona się ładuje...
Strona się ładuje...
Strona się ładuje...
Strona się ładuje...
Strona się ładuje...
Strona się ładuje...
Strona się ładuje...
Strona się ładuje...
Strona się ładuje...
Strona się ładuje...
Strona się ładuje...
Strona się ładuje...
Strona się ładuje...
Strona się ładuje...
Strona się ładuje...
Strona się ładuje...
Strona się ładuje...
Strona się ładuje...
Strona się ładuje...
Strona się ładuje...
Strona się ładuje...
Strona się ładuje...
Strona się ładuje...
Strona się ładuje...
Strona się ładuje...
Strona się ładuje...
Strona się ładuje...
Strona się ładuje...
Strona się ładuje...
Strona się ładuje...
Strona się ładuje...
Strona się ładuje...
Strona się ładuje...
Strona się ładuje...
Strona się ładuje...
Strona się ładuje...
Strona się ładuje...
Strona się ładuje...
Strona się ładuje...
Strona się ładuje...
Strona się ładuje...
Strona się ładuje...
Strona się ładuje...
Strona się ładuje...
Strona się ładuje...
Strona się ładuje...
Strona się ładuje...
Strona się ładuje...
Strona się ładuje...
Strona się ładuje...
Strona się ładuje...
Strona się ładuje...
Strona się ładuje...
Strona się ładuje...
Strona się ładuje...
Strona się ładuje...
Strona się ładuje...
Strona się ładuje...
Strona się ładuje...
Strona się ładuje...
Strona się ładuje...
Strona się ładuje...
Strona się ładuje...
Strona się ładuje...
Strona się ładuje...
Strona się ładuje...
Strona się ładuje...
Strona się ładuje...
Strona się ładuje...
Strona się ładuje...
Strona się ładuje...
Strona się ładuje...
Strona się ładuje...
Strona się ładuje...
Strona się ładuje...
Strona się ładuje...
Strona się ładuje...
Strona się ładuje...
Strona się ładuje...
Strona się ładuje...
Strona się ładuje...
Strona się ładuje...
Strona się ładuje...
Strona się ładuje...
Strona się ładuje...
Strona się ładuje...
Strona się ładuje...
Strona się ładuje...
Strona się ładuje...
Strona się ładuje...
Strona się ładuje...
Strona się ładuje...
Strona się ładuje...
Strona się ładuje...
Strona się ładuje...
Strona się ładuje...
Strona się ładuje...
Strona się ładuje...
Strona się ładuje...
Strona się ładuje...
Strona się ładuje...
Strona się ładuje...
Strona się ładuje...
Strona się ładuje...
-
 1
1
-
 2
2
-
 3
3
-
 4
4
-
 5
5
-
 6
6
-
 7
7
-
 8
8
-
 9
9
-
 10
10
-
 11
11
-
 12
12
-
 13
13
-
 14
14
-
 15
15
-
 16
16
-
 17
17
-
 18
18
-
 19
19
-
 20
20
-
 21
21
-
 22
22
-
 23
23
-
 24
24
-
 25
25
-
 26
26
-
 27
27
-
 28
28
-
 29
29
-
 30
30
-
 31
31
-
 32
32
-
 33
33
-
 34
34
-
 35
35
-
 36
36
-
 37
37
-
 38
38
-
 39
39
-
 40
40
-
 41
41
-
 42
42
-
 43
43
-
 44
44
-
 45
45
-
 46
46
-
 47
47
-
 48
48
-
 49
49
-
 50
50
-
 51
51
-
 52
52
-
 53
53
-
 54
54
-
 55
55
-
 56
56
-
 57
57
-
 58
58
-
 59
59
-
 60
60
-
 61
61
-
 62
62
-
 63
63
-
 64
64
-
 65
65
-
 66
66
-
 67
67
-
 68
68
-
 69
69
-
 70
70
-
 71
71
-
 72
72
-
 73
73
-
 74
74
-
 75
75
-
 76
76
-
 77
77
-
 78
78
-
 79
79
-
 80
80
-
 81
81
-
 82
82
-
 83
83
-
 84
84
-
 85
85
-
 86
86
-
 87
87
-
 88
88
-
 89
89
-
 90
90
-
 91
91
-
 92
92
-
 93
93
-
 94
94
-
 95
95
-
 96
96
-
 97
97
-
 98
98
-
 99
99
-
 100
100
-
 101
101
-
 102
102
-
 103
103
-
 104
104
-
 105
105
-
 106
106
-
 107
107
-
 108
108
-
 109
109
-
 110
110
-
 111
111
-
 112
112
-
 113
113
-
 114
114
-
 115
115
-
 116
116
-
 117
117
-
 118
118
-
 119
119
-
 120
120
-
 121
121
-
 122
122
-
 123
123
-
 124
124
-
 125
125
-
 126
126
-
 127
127
-
 128
128
-
 129
129
-
 130
130
-
 131
131
-
 132
132
-
 133
133
-
 134
134
-
 135
135
-
 136
136
-
 137
137
-
 138
138
-
 139
139
-
 140
140
-
 141
141
-
 142
142
-
 143
143
-
 144
144
-
 145
145
-
 146
146
-
 147
147
-
 148
148
-
 149
149
-
 150
150
-
 151
151
-
 152
152
-
 153
153
-
 154
154
-
 155
155
-
 156
156
-
 157
157
-
 158
158


Health O Meter Proplus 2101KGWA User Instructions
- Kategoria
- Wagi osobiste
- Typ
- User Instructions
w innych językach
- italiano: Health O Meter Proplus 2101KGWA
- Deutsch: Health O Meter Proplus 2101KGWA
- português: Health O Meter Proplus 2101KGWA
- français: Health O Meter Proplus 2101KGWA
- dansk: Health O Meter Proplus 2101KGWA
- Nederlands: Health O Meter Proplus 2101KGWA
Inne dokumenty
-
Beurer GS 340 XXL Instrukcja obsługi
-
Hendi 580233 Instrukcja obsługi
-
 Welch Allyn MacroView Directions For Use Manual
-
Menuett Kjøkkenvekt Instrukcja obsługi
-
Dymo M2 instrukcja
-
Seca 954 Instrukcja obsługi
-
Steinberg SBS-KW-1000/10G Instrukcja obsługi
-
Tefal TD4000K0 Instrukcja obsługi
-
-
