Silvercrest SFK 16 A1 User Manual And Service Information
- Typ
- User Manual And Service Information

Wireless Doorbell
Daljinski zvonec
Navodila za uporabo
in servisne informacije
SI
Zvonček
Používateľská príručka
a informácie o údržbe
SK
Wireless Doorbell
User manual and
service information
GB
Dzwonek do drzwi
sterowany radiowo
Manuel d‘utilisation et
informations sur les services
PL
Ajtócsengő
Felhasználói kézikönyv és
szerviz tájékoztatás
HU
Bezdrátový zvonek
Istruzioni per l’uso e
informationi di servizio
CZ
SFK 16 A1
4
TARGA GmbH
Lange Wende 41
D-59494 Soest
www.silvercrest.cc
Mod.-Nr. SFK 16 A1
Mat-No: 1618148
HOME TECH


Wireless Doorbell SFK 16 A1
English - 1
Table of Contents
Package Contents 3
Important Safety Instructions 5
Intended use 6
Children and Persons with Disabilities 7
Batteries 8
RF Interface 9
Operating Environment 10
Repair and Maintenance 12
Copyright 13
Conformity Notice 14
Introduction 15
Inserting the Batteries 15
Batteries for the Receiver 15
Replacing the transmitter battery 16
Mounting the Devices 17
Mounting the Transmitter 18
Mounting the Receiver 19
Filling out the Name Label 19
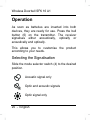
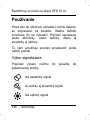
Operation 20

Wireless Doorbell SFK 16 A1
2 - English
Selecting the Signalisation 20
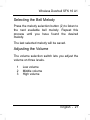
Selecting the Bell Melody 21
Adjusting the Volume 21
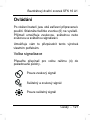
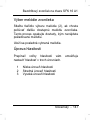
Appendix 22
Disposal of Old Devices 22
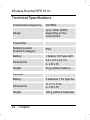
Technical Specifications 24
Warranty Information 25
Version 1.22

Wireless Doorbell SFK 16 A1
English - 3
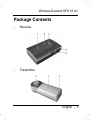
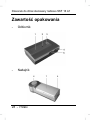
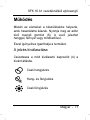
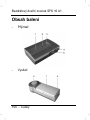
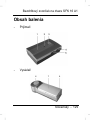
Package Contents
- Receiver
- Transmitter

Wireless Doorbell SFK 16 A1
4 - English
Not illustrated:
- 3 AA-sized batteries, 1,5V
- 1 A23-sized battery
(already fitted in transmitter)
- 3 rawlplugs, 5mm
- 3 fixation screws
- 2 rubber rings
- 5 name labels
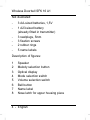
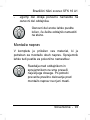
Description of figures:
1 Speaker
2 Melody selection button
3 Optical display
4 Mode selection switch
5 Volume selection switch
6 Bell button
7 Name label
8 Nose latch for upper housing piece

Wireless Doorbell SFK 16 A1
English - 5
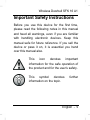
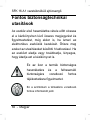
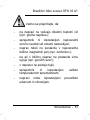
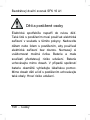
Important Safety Instructions
Before you use this device for the first time,
please read the following notes in this manual
and heed all warnings, even if you are familiar
with handling electronic devices. Keep this
manual safe for future reference. If you sell the
device or pass it on, it is essential you hand
over this manual also.
This icon denotes important
information for the safe operation of
the product and for the user’s safety.
This symbol denotes further
information on the topic.

Wireless Doorbell SFK 16 A1
6 - English
Intended use
This wireless door bell comprising a transmitter
and a receiver is designed to initiate an acoustic
and/or visual signal on the receiver when the
transmitter is actuated. This device is not
designed for commercial use or installation and
operation in a company. This device is sold for
private use only. This device meets the
requirements of all relevant norms and
standards in conjunction with conformity.
Compliance with these standards is no longer
guaranteed in the event of unauthorised
modifications to the device. The manufacturer
does not accept any liability for any resulting
damage or faults in such cases. Only use
accessories specified by the manufacturer. Any
other use is not as intended.

Wireless Doorbell SFK 16 A1
English - 7
Children and Persons with
Disabilities
Electrical appliances do not belong in the hands
of children. People with disabilities should only
use electrical devices in appropriate
circumstances. Do not allow children or persons
with disabilities to use electrical devices when
not under supervision. These may not
comprehend the presence of potential risks.
Batteries and small parts represent potential
choking hazards. Keep the batteries in a safe
place. If a battery is swallowed, seek medical
help immediately. Keep the packaging away
from children and persons with disabilities too.
as there is danger of suffocation.

Wireless Doorbell SFK 16 A1
8 - English
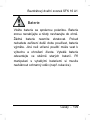
Batteries
Insert the batteries with the correct polarity.
Never try to recharge the batteries and under no
circumstances throw them into fire. Do not
short-circuit any batteries. Remove batteries
when the device is not to be used for a long
time. Non-intended use may cause explosion
and danger to life. Leaked batteries must be
handed in to a collection point for old batteries.
Make sure you wear protective clothing (such as
gloves) when manipulating leaked batteries.

Wireless Doorbell SFK 16 A1
English - 9
RF Interface
Place the device at least 20cm (8 inches) away
from pacemakers, as the RF signals may
interfere with the functionality of the pacemaker.
The transmitted RF signals can cause
interference with hearing aids. Do not place the
device with the wireless adapter turned on near
flammable gases or in an explosion-sensitive
area (e.g. a paint shop), as the transmitted RF
signals may cause explosions or fire. The range
of the radio wave signals depends on
environmental conditions.

Wireless Doorbell SFK 16 A1
10 - English
Operating Environment
Receiver
The receiver is not designed for use in
environments with a high temperature or
humidity (e.g. bathrooms), and must be kept
free from dust. Operating temperature and
operating humidity: 5°C to 40°C, max. 90% RH.
Transmitter
The transmitter is designed for use in
environments with a high humidity (e.g.
bathroom) and is protected against water
splashes. Operating temperatures and
operating air humidity: -10°C to +40°C, higher
than 90% rel. air humidity.

Wireless Doorbell SFK 16 A1
English - 11
Always make sure that:
- no direct heat sources (e.g. heating) can
affect the devices;
- the receiver is not exposed to direct
sunlight or artificial light;
- the devices are never placed in the
immediate vicinity of magnetic fields (e.g.
loudspeakers);
- no fire sources (e.g. burning candles) are
placed on or near the devices;
- no foreign bodies are introduced into the
device;
- the receiver is not exposed to extreme
temperature fluctuations;
- the devices are not subject to excessive
shocks and vibrations;

Wireless Doorbell SFK 16 A1
12 - English
Repair and Maintenance
Repair work is necessary if the device has been
damaged or if water or objects have penetrated
inside the housing, the receiver is exposed to
rain or if it does not work correctly or has been
dropped. If smoke, unusual noises or smells are
noticed, power off the device immediately. In
these cases the device should not be used
further and should be inspected by authorized
service personnel. Please contact qualified
personnel when repair is needed. Only use a
clean, dry cloth for cleaning. Never use any
corrosive liquids.

Wireless Doorbell SFK 16 A1
English - 13
Copyright
The entire content of this User’s Manual is
copyrighted and is provided to the reader for
information purposes only. Copying data and
information without the prior written and explicit
authorization from the author is strictly
forbidden. This also applies to any commercial
use of the contents and information. All texts
and figures are up-to-date as per the date of
print release. We assume no liability for any
changes.

Wireless Doorbell SFK 16 A1
14 - English
Conformity Notice
This product has been tested and
approved for compliance with the basic
and other relevant requirements of the
R&TTE Directive 1999/5/EC.
The corresponding Declaration of Conformity
can be found at the end of this User's Manual.

Wireless Doorbell SFK 16 A1
English - 15
Introduction
Thank you for buying this wireless door bell.
This device enables the installation of a wireless
door bell system. You can install this wireless
bell on an entrance door, for example. There is
no need for a manual RF synchronisation
between the transmitter and the receiver.
Inserting the Batteries
Both devices are battery-powered. Insert the
supplied batteries into the receiver. The battery
of the transmitter is already fitted.
Batteries for the Receiver
- Open the receiver’s battery compartment
by pushing the back panel cover in the
direction of the arrow mark.
- Insert the supplied batteries (size AA) into
the receiver. Make sure that the batteries
are properly aligned according to the
polarity (+ and -). The correct polarity is

Wireless Doorbell SFK 16 A1
16 - English
labelled on the batteries and inside the
battery compartment.
- Slide the battery compartment cover onto
the receiver housing.
Replacing the transmitter battery
- The transmitter battery is already fitted and
only requires replacement when it is empty.
-
To open the transmitter housing, use a flat
screwdriver. Insert the screwdriver carefully
into the transmitter housing side and press
it slightly inwards to release the nose latch
(8). Then pull the upper housing piece
upwards.
- Remove the type A23 12 V battery from the
top section of the transmitter and replace
the empty battery with a new battery of the
same type. Always ensure correct polarity
of the battery (pay attention to the + and –
marks). The correct polarity is labelled on
the battery and inside the transmitter
housing.

Wireless Doorbell SFK 16 A1
English - 17
- Replace the upper housing piece onto the
transmitter base unit.
You may also leave the base unit
piece separated if you want to
mount the transmitter on the wall.
Mounting the Devices
The package includes all necessary material for
mounting both devices. Alternatively you may
simply leave the receiver for stand-up
installation.
Make sure that the distance between
transmitter and receive does not
exceed the maximum range. If
necessary, test their proper
functionality prior to mounting the
devices in their position.

Wireless Doorbell SFK 16 A1
18 - English
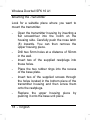
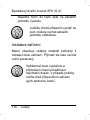
Mounting the Transmitter
Look for a suitable place where you want to
mount the transmitter.
- Open the transmitter housing by inserting a
flat screwdriver into the notch on the
housing side. Carefully push the nose latch
(8) inwards. You can then remove the
upper housing piece.
- Drill two 5mm holes at a distance of 50mm
in the wall.
- Insert two of the supplied rawlplugs into
these holes.
- Place the two rubber rings into the recess
of the base plate.
- Insert two of the supplied screws through
the holes located in the bottom piece of the
transmitter housing and then screw them
onto the rawlplugs.
- Replace the upper housing piece by
pushing it onto the base unit piece.
Strona się ładuje...
Strona się ładuje...
Strona się ładuje...
Strona się ładuje...
Strona się ładuje...
Strona się ładuje...
Strona się ładuje...
Strona się ładuje...
Strona się ładuje...
Strona się ładuje...
Strona się ładuje...
Strona się ładuje...
Strona się ładuje...
Strona się ładuje...
Strona się ładuje...
Strona się ładuje...
Strona się ładuje...
Strona się ładuje...
Strona się ładuje...
Strona się ładuje...
Strona się ładuje...
Strona się ładuje...
Strona się ładuje...
Strona się ładuje...
Strona się ładuje...
Strona się ładuje...
Strona się ładuje...
Strona się ładuje...
Strona się ładuje...
Strona się ładuje...
Strona się ładuje...
Strona się ładuje...
Strona się ładuje...
Strona się ładuje...
Strona się ładuje...
Strona się ładuje...
Strona się ładuje...
Strona się ładuje...
Strona się ładuje...
Strona się ładuje...
Strona się ładuje...
Strona się ładuje...
Strona się ładuje...
Strona się ładuje...
Strona się ładuje...
Strona się ładuje...
Strona się ładuje...
Strona się ładuje...
Strona się ładuje...
Strona się ładuje...
Strona się ładuje...
Strona się ładuje...
Strona się ładuje...
Strona się ładuje...
Strona się ładuje...
Strona się ładuje...
Strona się ładuje...
Strona się ładuje...
Strona się ładuje...
Strona się ładuje...
Strona się ładuje...
Strona się ładuje...
Strona się ładuje...
Strona się ładuje...
Strona się ładuje...
Strona się ładuje...
Strona się ładuje...
Strona się ładuje...
Strona się ładuje...
Strona się ładuje...
Strona się ładuje...
Strona się ładuje...
Strona się ładuje...
Strona się ładuje...
Strona się ładuje...
Strona się ładuje...
Strona się ładuje...
Strona się ładuje...
Strona się ładuje...
Strona się ładuje...
Strona się ładuje...
Strona się ładuje...
Strona się ładuje...
Strona się ładuje...
Strona się ładuje...
Strona się ładuje...
Strona się ładuje...
Strona się ładuje...
Strona się ładuje...
Strona się ładuje...
Strona się ładuje...
Strona się ładuje...
Strona się ładuje...
Strona się ładuje...
Strona się ładuje...
Strona się ładuje...
Strona się ładuje...
Strona się ładuje...
Strona się ładuje...
Strona się ładuje...
Strona się ładuje...
Strona się ładuje...
Strona się ładuje...
Strona się ładuje...
Strona się ładuje...
Strona się ładuje...
Strona się ładuje...
Strona się ładuje...
Strona się ładuje...
Strona się ładuje...
Strona się ładuje...
Strona się ładuje...
Strona się ładuje...
Strona się ładuje...
Strona się ładuje...
Strona się ładuje...
Strona się ładuje...
Strona się ładuje...
Strona się ładuje...
Strona się ładuje...
Strona się ładuje...
Strona się ładuje...
Strona się ładuje...
Strona się ładuje...
Strona się ładuje...
Strona się ładuje...
Strona się ładuje...
Strona się ładuje...
Strona się ładuje...
Strona się ładuje...
Strona się ładuje...
Strona się ładuje...
Strona się ładuje...
Strona się ładuje...
Strona się ładuje...
-
 1
1
-
 2
2
-
 3
3
-
 4
4
-
 5
5
-
 6
6
-
 7
7
-
 8
8
-
 9
9
-
 10
10
-
 11
11
-
 12
12
-
 13
13
-
 14
14
-
 15
15
-
 16
16
-
 17
17
-
 18
18
-
 19
19
-
 20
20
-
 21
21
-
 22
22
-
 23
23
-
 24
24
-
 25
25
-
 26
26
-
 27
27
-
 28
28
-
 29
29
-
 30
30
-
 31
31
-
 32
32
-
 33
33
-
 34
34
-
 35
35
-
 36
36
-
 37
37
-
 38
38
-
 39
39
-
 40
40
-
 41
41
-
 42
42
-
 43
43
-
 44
44
-
 45
45
-
 46
46
-
 47
47
-
 48
48
-
 49
49
-
 50
50
-
 51
51
-
 52
52
-
 53
53
-
 54
54
-
 55
55
-
 56
56
-
 57
57
-
 58
58
-
 59
59
-
 60
60
-
 61
61
-
 62
62
-
 63
63
-
 64
64
-
 65
65
-
 66
66
-
 67
67
-
 68
68
-
 69
69
-
 70
70
-
 71
71
-
 72
72
-
 73
73
-
 74
74
-
 75
75
-
 76
76
-
 77
77
-
 78
78
-
 79
79
-
 80
80
-
 81
81
-
 82
82
-
 83
83
-
 84
84
-
 85
85
-
 86
86
-
 87
87
-
 88
88
-
 89
89
-
 90
90
-
 91
91
-
 92
92
-
 93
93
-
 94
94
-
 95
95
-
 96
96
-
 97
97
-
 98
98
-
 99
99
-
 100
100
-
 101
101
-
 102
102
-
 103
103
-
 104
104
-
 105
105
-
 106
106
-
 107
107
-
 108
108
-
 109
109
-
 110
110
-
 111
111
-
 112
112
-
 113
113
-
 114
114
-
 115
115
-
 116
116
-
 117
117
-
 118
118
-
 119
119
-
 120
120
-
 121
121
-
 122
122
-
 123
123
-
 124
124
-
 125
125
-
 126
126
-
 127
127
-
 128
128
-
 129
129
-
 130
130
-
 131
131
-
 132
132
-
 133
133
-
 134
134
-
 135
135
-
 136
136
-
 137
137
-
 138
138
-
 139
139
-
 140
140
-
 141
141
-
 142
142
-
 143
143
-
 144
144
-
 145
145
-
 146
146
-
 147
147
-
 148
148
-
 149
149
-
 150
150
-
 151
151
-
 152
152
-
 153
153
-
 154
154
-
 155
155


Silvercrest SFK 16 A1 User Manual And Service Information
- Typ
- User Manual And Service Information
w innych językach
- slovenčina: Silvercrest SFK 16 A1
Powiązane artykuły
-
Silvercrest 60113 Operation and Safety Notes
-
Silvercrest SFK 36 A1 Operating Instructions Manual
-
-
-
-
-