
www.ghibliwirbel.com
Professional Cleaning Machines Since 1968
O 143 U10
U10 SPRAY
U13
EN
Use and Maintenance
GH30-931
Copertina GH30-931_6ed_03-2021_11lingue.indd 1Copertina GH30-931_6ed_03-2021_11lingue.indd 1 24/03/2021 12:50:2624/03/2021 12:50:26
ed.

www.ghibliwirbel.com
Professional Cleaning Machines Since 1968
2
IT
DATI IDENTIFICATIVI
I dati identificativi e la marcatura “CE” della macchina sono posizionati sulla targhetta posta
sul corpo macchina.
Si consiglia di trascrivere il modello della macchina e il relativo numero di matricola nella ta-
bella riportata nella pagina seguente.
EN
IDENTIFICATION DATA
The machine identification data and “CE” marking are located on the plate on the machine
body.
It is advisable to note the machine model and serial number on the table on the next page.
FR
DONNÉES D’IDENTIFICATION
Les données d’identification et le marquage « CE » de la machine se trouvent sur la plaque
située sur le corps de la machine.
Nous vous conseillons de recopier le modèle de la machine et le numéro de matricule corres-
pondant dans le tableau reporté sur la page suivante.
DE
KENNDATEN
Die Maschinenkenndaten und die Aufprägung “CE” befinden sich auf dem Schild an der Ma-
schine.
Wir empfehlen, das Maschinenmodell und die dazugehörige Seriennummer in die Tabelle auf
der nachfolgenden Seite einzutragen.
ES
DATOS DE IDENTIFICACIÓN
Los datos de identificación y la marca “CE” de la máquina están grabados en la placa coloca-
da sobre la estructura de la máquina.
Se recomienda transcribir el modelo y el número de matrícula de la máquina en la tabla des-
crita en la siguiente página.
PT
DADOS IDENTIFICATIVOS
Os dados identificativos e a marcação “CE” da máquina estão na placa colocada no corpo
da máquina.
Aconselha-se transcrever o modelo da máquina e o relativo número de série na tabela refe-
rida na página seguinte.
NL
IDENTIFICATIEGEGEVENS
De identificatiegegevens en de “CE”-markering van de machine bevinden zich op het plaatje
dat opde machine is aangebracht.
We raden u aan het model en het serienummer van de machine in de tabel op de volgende
pagina te vermelden.
Copertina GH30-931_6ed_03-2021_11lingue.indd 2Copertina GH30-931_6ed_03-2021_11lingue.indd 2 24/03/2021 12:50:2624/03/2021 12:50:26

www.ghibliwirbel.com
Professional Cleaning Machines Since 1968
3
PL
DANE IDENTYFIKACYJNE
Dane identyfikacyjne i oznakowanie “CE” urządzenia umieszczone są na tabliczce znamiono-
wej znajdującej się na korpusie urządzenia.
Zaleca się wpisać model i numer seryjny urządzenia do tabeli znajdującej się na kolejnej
stronie.
CS
IDENTIFIKAČNÍ ÚDAJE
Identifikační údaje a označení stroje „CE“ jsou uvedeny na štítku umístěném na tělesu stroje.
Doporučujeme, abyste model stroje a jeho příslušné výrobní číslo přepsali do tabulky uvede-
né na následující straně.
RU
-
AR
Copertina GH30-931_6ed_03-2021_11lingue.indd 3Copertina GH30-931_6ed_03-2021_11lingue.indd 3 24/03/2021 12:50:2624/03/2021 12:50:26

www.ghibliwirbel.com
Professional Cleaning Machines Since 1968
4
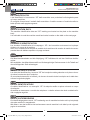
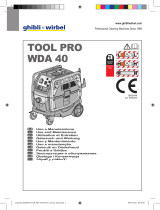
MADE IN ITALY
IPX4
Single Disc
............... V ~ ..... Hz
........... W
Working Ø: ...... mm Speed: ....... rpm
Weight: ...... kg
Mod: ......................
Art.: ......................
Year: ..........
S/N: ..........................
3
2
8
7
1
54 69
Copertina GH30-931_6ed_03-2021_11lingue.indd 4Copertina GH30-931_6ed_03-2021_11lingue.indd 4 24/03/2021 12:50:2624/03/2021 12:50:26

www.ghibliwirbel.com
Professional Cleaning Machines Since 1968
5
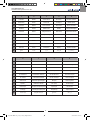
12345
IT Produttore Modello Codice articolo Ø di lavoro Velocità di rotazione
EN Manufacturer Model Article code Working Ø Rotation speed
FR Producteur Modèle Code de l’article Ø de travail Vitesse de rotation
DE Hersteller Modell Artikelnummer Ø Arbeit Drehgeschwindigkeit
ES Fabricante Modelo Código del artículo Ø de trabajo Velocidad de rotación
PT Fabricante Modelo Código do artigo Ø de trabalho Velocidade de rotação
NL Producent Model Artikelcode Ø bewerking Rotatiesnelheid
CS Výrobce Model Kód výrobku Pracovní Ø Rychlost rotace
RU Изготовитель Модель Код изделия Рабочий Ø Скорость вращения
PL Producent Model Kod artykułu Ø pracy Prędkość obrotów
AR
6 7 8 9
IT N° Matricola Caratteristiche elettriche Anno di costruzione Peso macchina
EN Serial number Electrical characteristics Year of construction Machine weight
FR N° de Matricule Caractéristiques électriques Année de construction Poids de la machine
DE Serien-Nr. Elektrische Eigenschaften Baujahr Maschinengewicht
ES Nº de Matrícula Características eléctricas Año de fabricación Peso de la máquina
PT N° de Série Características elétricas Ano de construção Peso da máquina
NL Serienummer Elektrische eigenschappen Bouwjaar Machine gewicht
CS Výrobní č. Elektrické v lastnosti Rok výroby Hmotnost stroje
RU N° Паспорта
Электрические характеристики
Год выпуска Вес машины
PL Nr seryjny Charakterystyka elektryczna Rok produkcji Ciężar maszyny
AR
Copertina GH30-931_6ed_03-2021_11lingue.indd 5Copertina GH30-931_6ed_03-2021_11lingue.indd 5 24/03/2021 12:50:2624/03/2021 12:50:26

www.ghibliwirbel.com
Professional Cleaning Machines Since 1968
6
4
4
25
2
6
7
Copertina GH30-931_6ed_03-2021_11lingue.indd 6Copertina GH30-931_6ed_03-2021_11lingue.indd 6 24/03/2021 12:50:2724/03/2021 12:50:27

www.ghibliwirbel.com
Professional Cleaning Machines Since 1968
7
12
14 18
14
15
16
17
18
8
9
13
14
10
8
8
8
9
9
9
10
11 14
19
13
30
20
15
Fig. 14
11
4
4
25
2
6
7
Copertina GH30-931_6ed_03-2021_11lingue.indd 7Copertina GH30-931_6ed_03-2021_11lingue.indd 7 24/03/2021 12:50:2724/03/2021 12:50:27

www.ghibliwirbel.com
Professional Cleaning Machines Since 1968
8
23
24
26
25
25
25
25
22
22
511
12
4
29
33
3
31
28
30
34
29
28
32
Fig. 16
Fig. 15
Fig. 17
22
22
27
Copertina GH30-931_6ed_03-2021_11lingue.indd 8Copertina GH30-931_6ed_03-2021_11lingue.indd 8 24/03/2021 12:50:3324/03/2021 12:50:33

www.ghibliwirbel.com
Professional Cleaning Machines Since 1968
9
3
37
37
35
3
5
7
4
4
27
31
30
Fig. 18 Fig. 19
Fig. 20 Fig. 21
34
37
36
37
38
2
3
2
34
23
24
26
25
25
25
25
22
22
511
12
4
29
33
3
31
28
30
34
29
28
32
Fig. 16
Fig. 15
Fig. 17
22
22
27
Copertina GH30-931_6ed_03-2021_11lingue.indd 9Copertina GH30-931_6ed_03-2021_11lingue.indd 9 24/03/2021 12:50:4124/03/2021 12:50:41

www.ghibliwirbel.com
Professional Cleaning Machines Since 1968
10
11
11
12
Fig. 22
Fig. 24 Fig. 25
Fig. 26
Fig. 27
Fig. 23
77
27
39
22
9
22
41
40
43
42
34
Copertina GH30-931_6ed_03-2021_11lingue.indd 10Copertina GH30-931_6ed_03-2021_11lingue.indd 10 24/03/2021 12:50:4824/03/2021 12:50:48

www.ghibliwirbel.com
Professional Cleaning Machines Since 1968
11
Fig. 28 Fig. 29
45 9
44
47
47
46
46
EN
English .................................................................................................. ENGLISH - 1
(Translation of original instructions)
Copertina GH30-931_6ed_03-2021_11lingue.indd 11Copertina GH30-931_6ed_03-2021_11lingue.indd 11 24/03/2021 12:50:4824/03/2021 12:50:48

Copertina GH30-931_6ed_03-2021_11lingue.indd 12Copertina GH30-931_6ed_03-2021_11lingue.indd 12 24/03/2021 12:50:4824/03/2021 12:50:48

P
r
o
f
e
s
s
i
o
n
a
l
C
l
e
a
n
i
n
g
M
a
c
h
i
n
e
s
S
i
n
c
e
1
9
6
8
w
w
w
.
g
h
i
b
l
i
w
i
r
b
e
l
.
c
o
m
www.ghibliwirbel.com
Professional Cleaning Machines Since 1968
ENGLISH -
1
Dear Customer,
Thank you for choosing one of our cleaning products.
The floor cleaner you have purchased has been designed to satisfy users in terms of ease
of use and reliability.
We are aware that, in order to remain so over time, a good product requires continu-
ous updates aimed at satisfying the expectations of those who use it daily. To this end,
we hope that you will be not only a satisfied customer but also a partner who does not
hesitate to let us know your views and ideas resulting from personal experience on a
day-to-day basis.
Manuale GH30-931_6ed_03-2021_11lingue.indd 1Manuale GH30-931_6ed_03-2021_11lingue.indd 1 25/02/2021 10:57:4825/02/2021 10:57:48

w
w
w
.
g
h
i
b
l
i
w
i
r
b
e
l
.
c
o
m
P
r
o
f
e
s
s
i
o
n
a
l
C
l
e
a
n
i
n
g
M
a
c
h
i
n
e
s
S
i
n
c
e
1
9
6
8
w
w
w
.
g
h
i
b
l
i
w
i
r
b
e
l
.
c
o
m
www.ghibliwirbel.com
Professional Cleaning Machines Since 1968
ENGLISH -
2
Contents
1.1 TECHNICAL CHARACTERISTICS ............................................................. EN-3
1.2 INTRODUCTION .........................................................................................EN-3
1.3 INTENDED USE OF THE MACHINE ..........................................................EN-3
1.4 NON-INTENDED USE OF THE MACHINE ................................................. EN-3
2.1 UNPACKING ...............................................................................................EN-4
2.2 COMPONENT ASSEMBLY .........................................................................EN-4
2.2.a - Pad assembly ...........................................................................................EN-4
2.2.b - Assembling the tank (optional) ................................................................. EN-4
2.2.c - Electrical spray accessory assembly (Optional) .......................................EN-4
2.2.d - Brush assembly (optional) .......................................................................EN-4
2.2.e - Filling the electrical spray tank (optional) ...............................................EN-4
2.2.f - Electrical connection ...............................................................................EN-5
3.1 KNOWLEDGE OF THE MACHINE .............................................................EN-5
4.1 HANDLE TILT ADJUSTMENT .................................................................... EN-5
5.1 GUIDE HANDLE ..........................................................................................EN-6
6.1 OPERATION ...............................................................................................EN-6
6.1.a - Checks to be performed before use ......................................................... EN-6
6.1.b - Additional weights assembly ....................................................................EN-6
6.1.c - Starting the machine ...............................................................................EN-6
6.1.d - Using the machine ..................................................................................EN-7
6.1.e - Use with overturned handle......................................................................EN-7
6.1.f - End of use and shutdown ........................................................................EN-7
6.1.g - Transport ..................................................................................................EN-7
7.1 MAINTENANCE AND CLEANING ............................................................. EN-7
7.1.a - Cleaning the machine...............................................................................EN-8
7.1.b - Emptying and cleaning the water tank (optional) ....................................EN-8
7.1.c - Cleaning the nozzle of the spray accessory (Optional) ........................... EN-8
7.1.d - Pad replacement ......................................................................................EN-8
7.1.e - Orbiting group disassembly .....................................................................EN-8
TROUBLESHOOTING ........................................................................................ EN-9
WIRING DIAGRAM ........................................................................................... EN-10
Manuale GH30-931_6ed_03-2021_11lingue.indd 2Manuale GH30-931_6ed_03-2021_11lingue.indd 2 25/02/2021 10:57:4925/02/2021 10:57:49

P
r
o
f
e
s
s
i
o
n
a
l
C
l
e
a
n
i
n
g
M
a
c
h
i
n
e
s
S
i
n
c
e
1
9
6
8
w
w
w
.
g
h
i
b
l
i
w
i
r
b
e
l
.
c
o
m
www.ghibliwirbel.com
Professional Cleaning Machines Since 1968
ENGLISH -
3
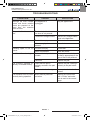
1.1 TECHNICAL CHARACTERISTICS
U10 U10 SPRAY U13
Brush motor power 1000 W 1300 W
Voltage 220 - 240 V~ 110 V~ 220 - 240 V~
Frequency 50 Hz 60 Hz 50 Hz 60 Hz 50 Hz
Oscillations per minute
n.1500 n.1800 n.1500 n.1800 n.1500
Working width - ø brushes mm 430
Brush pressure 44,3 g/cm² 31,5 g/cm² 48,2 g/cm²
Motor passage height 270 mm WITH PAD
H=25 mm 285 mm WITH PAD
H=25 mm
Dry suction socket YES
Noise emission 59.5 dB(A)
Vibration level < 2.5 m/s2
Drive DIRECT
Cable length 12 m
Weight (without accessories) 68 kg 58,5 kg 71,5 kg
Size mm 730X450X1200
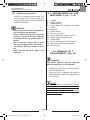
1.2 INTRODUCTION
DANGER:
Before using the appliance, read the accom-
panying “SINGLE DISC SAFETY WARN-
INGS” booklet carefully.
This manual forms an integral part of the ma-
chine itself. It must therefore be kept in a safe
place where it is accessible to all users (opera-
tors and maintenance personnel) throughout
the life of the machine until it is scrapped.
1.3 - INTENDED USE OF
THE MACHINE
WARNING:
This machine is for indoor use only.
DANGER:
Any other use releases the manufacturer
from liability for harm to persons and/or
property and invalidates any warranty
condition.
This machine is intended for commercial use,
for example in hotels, schools, hospitals, fac-
tories, shops, offices and rental businesses.
The machine has been designed and built:
for professional use, for cleaning floors and
carpets, for polishing floors, for sanding
floors (e.g. parquet and uneven surfaces).
1.4 - NON-INTENDED USE
OF THE MACHINE
WARNING:
The machine is not intended for outdoor
use.
DANGER:
-
do not wash floors with water above 50 °C;
- do not use diesel/petrol or corrosive de-
tergents to wash floors;
- do not wash and suck up corrosive, flam-
mable or explosive liquids, even if diluted.
Manuale GH30-931_6ed_03-2021_11lingue.indd 3Manuale GH30-931_6ed_03-2021_11lingue.indd 3 25/02/2021 10:58:0025/02/2021 10:58:00

w
w
w
.
g
h
i
b
l
i
w
i
r
b
e
l
.
c
o
m
P
r
o
f
e
s
s
i
o
n
a
l
C
l
e
a
n
i
n
g
M
a
c
h
i
n
e
s
S
i
n
c
e
1
9
6
8
w
w
w
.
g
h
i
b
l
i
w
i
r
b
e
l
.
c
o
m
www.ghibliwirbel.com
Professional Cleaning Machines Since 1968
ENGLISH -
4
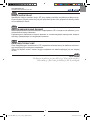
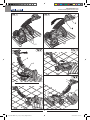
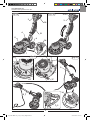
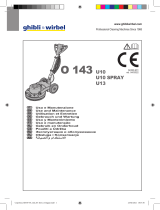
2.1 UNPACKING
(Figs. 1-2-3-4)
- Upon the machine delivery, remove the
external packing and then cut the holders
(1) (Fig.1). Raise the handle (2) by pulling
the unlocking handle (3) (Fig.2);
- Lift the wheels (4) by leveraging the han-
dle (2), rotate the machine and lay the
wheels on the ground (Fig. 3);
- Lift the machine body (5) by leveraging
the handle (2) and move the machine
(Fig. 4).
2.2 COMPONENT
ASSEMBLY
2.2.a - Pad assembly (Figs. 5/7)
- Tilt the head (6) of the machine; with one
hand grip the handle (7) and at the same
time push the machine backward.
- Mount the pad (8) on the pad holder (9)
(Fig. 6).
- Make sure the outer perimeter of the pad
(8) corresponds with the outer perimeter
of the pad holder (9) and then lock it on
the pad holder’s teeth pressing down with
your fingers (Fig. 7).
WARNING:
Use only pads supplied by the manufac-
turer for the specific machine model.
Using other types of pads can compro-
mise the safety of the machine.
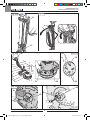
2.1.b - Assembling the tank
(optional) (Figs. 8-14)
- Loosen he knob (10) on the upper sup-
port (11) of the handle (Fig. 8).
- Make sure that the lower support (12)
rests on the base of the handle joint (Fig.
11).
- Screw the chain (13) onto the top of the
tank (14) (Fig. 9).
- Connect the tube (15) into the fitting (16)
at the bottom of the tank (14) (Fig. 10).
- Place the tank (14) on the lower support
(12), by aligning the tank slots (17) with
the specific support guides (18) (Fig. 11).
- Press the tank (14) so that the slots are
against the end stops on the lower sup-
port (12) guides.
- Lower the upper support (11) and attach
its coupling to the coupling tab (19) on top
of the tank (14) (Fig. 12).
- Tighten the knob (10) on the upper sup-
port (11) of the handle (Fig. 12).
- Connect the tube (20) fitting (15) to the
hole on the machine body (Fig. 13).
- Attach the chain (13) to the hook of the
water supply lever (30) (Fig. 14).
2.2.c - Electrical spray accessory
assembly (Optional)
CAUTION:
The optional equipment may exclusively
be assembled by a specialized technician
following the assembly instructions that
accompany the accessory.
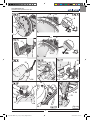
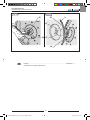
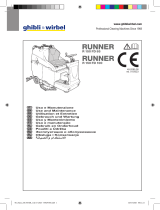
2.2.d - Brush assembly (optional)
(Fig. 15)
- Unscrew the four wing knobs (22) and re-
move the pad driver (23).
- Tighten the desired brush (24) in place of
the driver with the wing knobs (22).
Make sure to firmly tighten the wing
knobs using pliers.
2.2.e - Filling the electrical spray
tank (optional) (Fig. 16)
- Unscrew the tank (25) and remove it.
- Fill it with water and polishing wax.
For dosing, refer to the instructions pro-
vided by the manufacturer of the polish-
ing wax.
- Insert the suction tube (26) into the tank
(25) and fully tighten.
Manuale GH30-931_6ed_03-2021_11lingue.indd 4Manuale GH30-931_6ed_03-2021_11lingue.indd 4 25/02/2021 10:58:0125/02/2021 10:58:01

P
r
o
f
e
s
s
i
o
n
a
l
C
l
e
a
n
i
n
g
M
a
c
h
i
n
e
s
S
i
n
c
e
1
9
6
8
w
w
w
.
g
h
i
b
l
i
w
i
r
b
e
l
.
c
o
m
www.ghibliwirbel.com
Professional Cleaning Machines Since 1968
ENGLISH -
5
2.2.f - Electrical connection
- Connect the machine power cable to a
mains socket whose characteristics cor-
respond to those shown on the machine’s
technical data plate.
WARNING:
- Unwind the power cable completely be-
fore turning on the appliance.
- Use an extension cord only if in perfect
condition and make sure the diameter
is appropriate for the power of the ap-
pliance.
- Never allow the power cable to slide
over sharp edges and do not crush it.
- The socket should be easily accessi-
ble.
- Make sure the electrical cable is not
damaged.
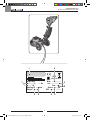
3.1 KNOWLEDGE OF THE
MACHINE (Figs. 17-18)
4) Wheels
3) Handle tilt lever
5) Machine body
7) Head lifting and machine movement
handle
11-12)
Supports
27) Guide handle
28) Electric control box
29) Brush rotation start levers (on-off)
30) Water supply adjustment lever
31) Power cable
32) Brush rotation lever release button
33) Wax spray start button (optional)
34) Pusher tags
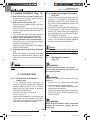
4.1 HANDLE TILT
ADJUSTMENT (Fig. 19)
WARNING:
The handle position must be adjusted
while the appliance is at a standstill.
- Pulling the lever (3) the handle position
can be adjusted (27);
when the lever is released, the handle is
positioned and locked in the closest posi-
tion required.
NOTE:
Adjust the handle to a comfortable position,
depending on your height, in order to easily
push the machine in straight paths.
Never start the machine without having tilted
the handle correctly.
Manuale GH30-931_6ed_03-2021_11lingue.indd 5Manuale GH30-931_6ed_03-2021_11lingue.indd 5 25/02/2021 10:58:0525/02/2021 10:58:05

w
w
w
.
g
h
i
b
l
i
w
i
r
b
e
l
.
c
o
m
P
r
o
f
e
s
s
i
o
n
a
l
C
l
e
a
n
i
n
g
M
a
c
h
i
n
e
s
S
i
n
c
e
1
9
6
8
w
w
w
.
g
h
i
b
l
i
w
i
r
b
e
l
.
c
o
m
www.ghibliwirbel.com
Professional Cleaning Machines Since 1968
ENGLISH -
6
5.1 GUIDE HANDLE (Fig. 17)
1) Pad rotation lever release button (32)
Press the button (32) to release the pad
rotation start levers (29).
2) Pad rotation start levers (29)
Pulling the pad rotation levers (29) ena-
bles pad rotation.
When the levers (29) are released, pad
rotation stops and the machine stops au-
tomatically.
The levers (29) should be kept pulled to
achieve continuous machine operation.
3) Water supply adjustment lever (30)
(in the presence of an optional tank)
Pulling the lever (30) activates the water
supply for washing the floor.
When the lever is released (30) the water
supply is interrupted.
4)
Polishing liquid spray button (optional)
(33)
When the button is pressed and held
down, the polishing liquid spray is acti-
vated; if the button is released, the spray
stops.
NOTE:
The spray works even when the pad is not ro-
tating.
6.1 OPERATION
6.1.a - Checks to be performed
before use
- If the electrical spray accessory is
mounted (optional), check that it contains
enough polishing liquid for the working
phase and that the nozzle is properly
connected and adjusted.
- Check the condition of the pad.
If worn, replace it.
- Check that the appliance, particularly the
mains cable, is not damaged in any way
that might compromise correct machine
operation or the operator’s safety.
6.1.b - Additional weights assembly
(Fig. 20)
- If there’s the need to increase the ground
pressure, it is possible to assemble the
additional weights Kit, which weighs 6,5
kg, or the double additional weights Kit
which weighs 13 kg.
- Position the front weight (35) and the rear
one (36) and fix them with the supplied
knobs (37); short knob for the single ad-
ditional weights kit, long knob for the dou-
ble additional weights kit.
- It is advised to mount the pair of weights
(front + rear) instead of a single weight in
order to avoid abnormal vibrations.
NOTE:
While mounting the rear weight (36), check the
correct position of the water hose passage hole
(38).
6.1.c - Starting the machine
(Fig. 17)
WARNING:
Do not start the machine if it is tilted.
Do not start the machine if the pad is not
correctly mounted.
DANGER:
Ensure your hands are dry before using the
appliance.
- Pull the lever up (3) and lower the handle
until it reaches the height desired.
- Press the button (32) to release the pad
rotation start levers (29).
- Pulling the levers (29) starts the machine.
- When both levers (29) are released, the
machine stops.
WARNING:
Never wrap the network cable around the
operator the operator’s neck or the ma-
chine body.
Manuale GH30-931_6ed_03-2021_11lingue.indd 6Manuale GH30-931_6ed_03-2021_11lingue.indd 6 25/02/2021 10:58:0525/02/2021 10:58:05

P
r
o
f
e
s
s
i
o
n
a
l
C
l
e
a
n
i
n
g
M
a
c
h
i
n
e
s
S
i
n
c
e
1
9
6
8
w
w
w
.
g
h
i
b
l
i
w
i
r
b
e
l
.
c
o
m
www.ghibliwirbel.com
Professional Cleaning Machines Since 1968
ENGLISH -
7
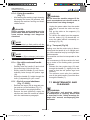
6.1.d - Using the machine
(Fig. 17)
- After starting the machine, begin cleaning
by keeping the levers (29) pressed, thus
keeping the machine running and brush
rotation active.
DANGER:
During operation, avoid passing over the
power cable with the machine: this could
cause serious damage and dangerous
situations!
NOTE:
Using the machine in a xed position with the
pad rotation enabled for a prolonged period of
time can cause damage to the oor.
NOTE:
When the levers (29) are released, pad rotation
stops and the machine turns off
6.1.e - Use with overturned handle
(Fig. 21)
- Partially raise the handle (2) and unlock
the pusher tags (34) with one foot.
- Slowly rotate the handle (2) until it auto-
matically locks through the pusher tags
(34).
- Adjust the handle (2) height through the
lever (3) depending on your needs.
6.1.f – End of use and shutdown
(Fig. 17-22-23).
- Release the levers (29) to stop pad rota-
tion and turn off the machine (Fig. 17).
- Put the handle in an upright position.
- Remove the tank (Optional), empty the
solution and clean the nozzle as indicat-
ed in the maintenance paragraph.
WARNING:
Do not leave the machine stopped if the
pad is mounted and not raised in order to
prevent them from being damaged.
- Unplug the power cable from the socket
and wrap it around the cable reel sup-
ports.
- Roll up the cable on the supports (11)
(12) (Fig. 22).
- To remove the cable from the supports,
turn the hooks (11) (12) inward and re-
move the cable without necessarily un-
winding it (Fig. 23).
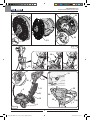
6.1.g - Transport (Fig.24)
Making sure that the mains plug is discon-
nected and the handle is in an upright posi-
tion, lift the machine body by turning the han-
dle downwards.
The machine can then be transported on the
wheels.
If it is necessary to lift the machine for load-
ing on trucks or for climbing stairs, proceed
as follows:
- Release the two pusher tags (34) and,
through the handle (7), slightly move the
head so that the two pusher tags hook
correctly.
- Two persons must raise the machine:
one on the guide handle (2) and the other
through the handle (7).
7.1 MAINTENANCE AND
CLEANING
WARNING:
For information and warnings relating
to maintenance or cleaning, follow what
is described in the “Safety warnings for
single disc” manual, accompanying this
document.
Manuale GH30-931_6ed_03-2021_11lingue.indd 7Manuale GH30-931_6ed_03-2021_11lingue.indd 7 25/02/2021 10:58:0525/02/2021 10:58:05

w
w
w
.
g
h
i
b
l
i
w
i
r
b
e
l
.
c
o
m
P
r
o
f
e
s
s
i
o
n
a
l
C
l
e
a
n
i
n
g
M
a
c
h
i
n
e
s
S
i
n
c
e
1
9
6
8
w
w
w
.
g
h
i
b
l
i
w
i
r
b
e
l
.
c
o
m
www.ghibliwirbel.com
Professional Cleaning Machines Since 1968
ENGLISH -
8
OPERATIONS TO BE
CARRIED OUT
DAILY
7.1.a - Cleaning the machine
Clean the machine with a damp cloth and
then wipe it with a clean, dry cloth to prevent
the formation of scale due to the effect of
chemicals.
WARNING:
Do not use solvents, acids or corrosive
substances for cleaning the machine.
If the pad is dirty, wash it at a maximum
temperature of 60 °.
7.1.b - Emptying and cleaning the
water tank (optional)
WARNING:
Once you have finished washing, you
must drain and clean the water tank to
prevent deposits or scale.
To empty the water tank, release it from its
supports.
7.1.c - Cleaning the nozzle of the
spray accessory (Optional)
(Figs. 16-17).
WARNING:
Once you have finished polishing, you
must drain and clean the water tank to
prevent deposits or scaling and you must
clean the nozzle.
- Remove the tank (25) (Fig. 16), empty
the solution, rinse it and rell it with water.
- Position yourself with the machine near a
discharge drain and press the button (33)
(Fig. 17) until the tank is empty.
OPERATIONS TO BE
CARRIED OUT WHEN
NECESSARY
7.1.d - Pad replacement
The pad must be replaced when it is worn
and its thickness is less than 10 mm;
see the “Pad Assembly” paragraph for re-
placement instructions.
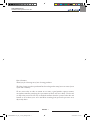
7.1.e - Orbiting group disassembly
(Figs. 25-26-27-28-29)
- Unscrew the four wing knobs (22) and re-
move the disc (39) and the driver disc (9).
- Unscrew the hexagon head screw (40) by
blocking the rotation through a contrast
surface (41)
- Unscrew the two screws (42) and remove
the cover (43).
- Tighten the supplied M12 Allen screw
(44), to extract the orbiting group (45);
block the rotation using a contrast sur-
face if necessary.
NOTE:
Reassemble everything proceeding in reverse
order to the disassembly operations: when re-
assembling the driver disc (9), centre the two
plugs (46) of the orbiting group (45) on the
holes (47) of the driver disc.
Manuale GH30-931_6ed_03-2021_11lingue.indd 8Manuale GH30-931_6ed_03-2021_11lingue.indd 8 25/02/2021 10:58:0525/02/2021 10:58:05
Strona jest ładowana ...
Strona jest ładowana ...
Strona jest ładowana ...
Strona jest ładowana ...
-
 1
1
-
 2
2
-
 3
3
-
 4
4
-
 5
5
-
 6
6
-
 7
7
-
 8
8
-
 9
9
-
 10
10
-
 11
11
-
 12
12
-
 13
13
-
 14
14
-
 15
15
-
 16
16
-
 17
17
-
 18
18
-
 19
19
-
 20
20
-
 21
21
-
 22
22
-
 23
23
-
 24
24


Ghibli & Wirbel O 143 U 10 Use And Maintenance
- Typ
- Use And Maintenance
- Ten podręcznik jest również odpowiedni dla
w innych językach
- English: Ghibli & Wirbel O 143 U 10
Powiązane dokumenty
-
 Ghibli & Wirbel InPump 90.2 SP CF Use And Maintenance
-
 Ghibli & Wirbel S2 80 D 70 BC Use And Maintenance
-
 Ghibli & Wirbel TOOL PRO WDA 40 H AS Use And Maintenance
-
 Ghibli & Wirbel O 143 SPRAY Use And Maintenance
-
 Ghibli & Wirbel RUNNER R 150 FD 85 BC CHEM Use And Maintenance
-
 Ghibli & Wirbel RANGER R 115 FD 75 BC CHEM Use And Maintenance


Inne dokumenty
-
MasterCraft R44-180 Instrukcja obsługi
-
Comet CPS 50 Instrukcja obsługi
-
Efco DR 50 K800H Instrukcja obsługi
-
Viper LS160HD-EU Instrukcja obsługi
-
-
Nibbi NTS 65 Instrukcja obsługi
-
Viper AS5160 Skrócona instrukcja obsługi
-
-
Bissell Lift-Off 30K7 SERIES Instrukcja obsługi