
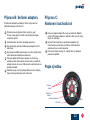
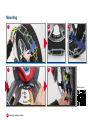
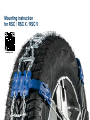
Mounting instruction
servostar / servostar X / servostar suv

2
Preparation tools
1a
17 19
21/22
17 19
21/22
4 5
6
3a 3b 3c
1b
*
**
*
2b
2a

3
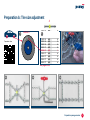
Preparation pewag servostar
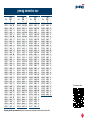
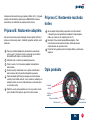
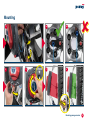
Preparation A: Tire size adjustment
2
2
5
/
4
5
-
1
7
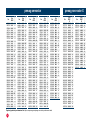
225/45-17
see pages 4 & 5
-1
tyre
dimension chain
size element-
adaption
195/80-13 840 -4
205/75-13 840 -2
175/80-14 840 -2
185/75-14 840 -1
205/70-14 840 -4
215/65-14 840 -2
235/60-14 840 -2
175/75-15 840 -4
185/70-15 840 -3
195/65-15 840 -1
215/60-15 840 -3
235/55-15 840 -3
195/60-16 840 -3
205/55-16 840 0
215/55-16 840 -4
225/50-16 840 0
235/50-16 840 -4
205/50-17 840 -2
225/45-17 840 -1
235/45-17 840 -4
245/40-17 840 -2
255/40-17 840 -2
265/40-17 840 -4
205/45-18 840 -4
215/40-18 840 0
225/40-18 840 -2
255/35-18 840 -2
265/35-18 840 -4
295/30-18 840 -1
215/35-19 840 -1
225/35-19 840 -3
245/30-19 840 0
255/30-19 840 -2
265/30-19 840 -4
tyre
dimension chain
size element-
adaption
225/30-20 840 -4
205/80-13 850 -4
185/80-14 850 -2
195/75-14 850 -1
215/70-14 850 -4
245/60-14 850 -1
185/75-15 850 -4
195/70-15 850 -3
205/65-15 850 -1
225/60-15 850 -2
265/50-15 850 0
275/50-15 850 -3
175/70-16 850 -2
185/65-16 850 0
205/60-16 850 -2
225/55-16 850 -3
245/50-16 850 -2
185/60-17 850 -3
205/55-17 850 -4
215/50-17 850 0
225/50-17 850 -4
245/45-17 850 -2
275/40-17 850 -2
215/45-18 850 -2
235/40-18 850 0
245/40-18 850 -2
275/35-18 850 -1
285/35-18 850 -4
235/35-19 850 0
245/35-19 850 -3
275/30-19 850 -1
285/30-19 850 -3
245/30-20 850 -3
195/80-14 860 -2
tyre
dimension chain
size element-
adaption
205/75-14 860 -1
225/70-14 860 -3
265/60-14 860 -4
175/80-15 860 0
195/75-15 860 -4
205/70-15 860 -2
215/65-15 860 0
225/65-15 860 -4
235/60-15 860 -1
285/50-15 860 -2
175/75-16 860 -3
195/65-16 860 0
205/65-16 860 -4
215/60-16 860 -1
235/55-16 860 -1
255/50-16 860 0
265/50-16 860 -3
185/65-17 860 -4
215/55-17 860 -2
235/50-17 860 -2
255/45-17 860 0
285/40-17 860 0
295/40-17 860 -2
215/50-18 860 -4
225/45-18 860 0
235/45-18 860 -2
255/40-18 860 0
265/40-18 860 -3
295/35-18 860 -1
225/40-19 860 0
235/40-19 860 -3
255/35-19 860 0
265/35-19 860 -2
295/30-19 860 0
3a 3b 3c
1 2 3
Preparation video

4
Dim.
Size
RSC
195/80-13
840
-4
205/75-13
840
-2
175/80-14
840
-2
185/75-14
840
-1
205/70-14
840
-4
215/65-14
840
-2
235/60-14
840
-2
175/75-15
840
-4
185/70-15
840
-3
195/65-15
840
-1
215/60-15
840
-3
235/55-15
840
-3
195/60-16
840
-3
205/55-16
840
OK
215/55-16
840
-4
225/50-16
840
OK
235/50-16
840
-4
255/45-16
840
-2
205/50-17
840
-2
225/45-17
840
-1
235/45-17
840
-4
245/40-17
840
-2
255/40-17
840
-2
265/40-17
840
-4
205/45-18
840
-4
215/40-18
840
OK
225/40-18
840
-2
255/35-18
840
-2
265/35-18
840
-4
295/30-18
840
-1
215/35-19
840
-1
225/35-19
840
-3
245/30-19
840
OK
255/30-19
840
-2
265/30-19
840
-4
225/30-20
840
-4
205/80-13
850
-4
185/80-14
850
-2
195/75-14
850
-1
Dim.
Size
RSC
215/70-14
850
-4
245/60-14
850
-1
185/75-15
850
-4
195/70-15
850
-3
205/65-15
850
-1
225/60-15
850
-2
265/50-15
850
OK
275/50-15
850
-3
175/70-16
850
-2
185/65-16
850
OK
205/60-16
850
-2
225/55-16
850
-3
245/50-16
850
-2
185/60-17
850
-3
195/55-17
850
OK
205/55-17
850
-4
215/50-17
850
OK
225/50-17
850
-4
245/45-17
850
-2
275/40-17
850
-2
215/45-18
850
-2
235/40-18
850
OK
245/40-18
850
-2
275/35-18
850
-1
285/35-18
850
-4
235/35-19
850
OK
245/35-19
850
-3
275/30-19
850
-1
285/30-19
850
-3
235/30-20
850
-1
245/30-20
850
-3
195/80-14
860
-2
205/75-14
860
-1
225/70-14
860
-3
265/60-14
860
-4
175/80-15
860
OK
195/75-15
860
-4
205/70-15
860
-2
215/65-15
860
OK
Dim.
Size
RSC
225/65-15
860
-4
235/60-15
860
-1
285/50-15
860
-2
175/75-16
860
-3
195/65-16
860
OK
205/65-16
860
-4
215/60-16
860
-1
235/55-16
860
-1
255/50-16
860
OK
265/50-16
860
-3
185/65-17
860
-4
215/55-17
860
-2
235/50-17
860
-2
255/45-17
860
OK
265/45-17
860
-3
285/40-17
860
OK
295/40-17
860
-2
215/50-18
860
-4
225/45-18
860
OK
235/45-18
860
-2
255/40-18
860
OK
265/40-18
860
-3
295/35-18
860
-1
225/40-19
860
OK
235/40-19
860
-3
255/35-19
860
OK
265/35-19
860
-2
295/30-19
860
OK
225/35-20
860
-1
235/35-20
860
-4
255/30-20
860
OK
265/30-20
860
-2
275/30-20
860
-4
205/80-14
870
-2
215/75-14
870
-1
235/70-14
870
-3
185/80-15
870
OK
205/75-15
870
-4
215/70-15
870
-2
Dim.
Size
RSC
245/60-15
870
OK
255/60-15
870
-3
275/55-15
870
-2
295/50-15
870
OK
175/80-16
870
-3
185/75-16
870
-2
195/70-16
870
-1
215/65-16
870
-3
225/60-16
870
OK
235/60-16
870
-4
245/55-16
870
OK
255/55-16
870
-3
205/60-17
870
OK
215/60-17
870
-4
225/55-17
870
-1
245/50-17
870
OK
255/50-17
870
-3
275/45-17
870
-1
205/55-18
870
-2
225/50-18
870
-2
245/45-18
870
OK
255/45-18
870
-3
275/40-18
870
OK
285/40-18
870
-3
205/50-19
870
-4
225/45-19
870
-3
245/40-19
870
-1
255/40-19
870
-3
275/35-19
870
OK
285/35-19
870
-2
295/35-19
870
-4
225/40-20
870
-4
245/35-20
870
-1
255/35-20
870
-3
285/30-20
870
-1
295/30-20
870
-3
215/80-14
880
-3
225/75-14
880
OK
195/80-15
880
OK
Dim.
Size
RSC
215/75-15
880
-4
225/70-15
880
-1
195/75-16
880
-2
205/70-16
880
-1
225/65-16
880
-2
245/60-16
880
-3
295/50-16
880
-3
185/70-17
880
OK
205/65-17
880
-1
225/60-17
880
-3
235/55-17
880
OK
245/55-17
880
-3
195/60-18
880
215/55-18
880
-1
225/55-18
880
-4
235/50-18
880
OK
245/50-18
880
-3
265/45-18
880
-1
275/45-18
880
-4
295/40-18
880
-1
215/50-19
880
-2
235/45-19
880
-1
245/45-19
880
-4
265/40-19
880
-1
275/40-19
880
-4
195/50-20
880
215/45-20
880
-3
235/40-20
880
-2
245/40-20
880
-4
265/35-20
880
-1
275/35-20
880
-3
245/35-21
880
-4
265/30-21
880
-1
275/30-21
880
-2
285/30-21
880
-4
Dim.
Size
RSC
X
205/80-15
890 X -1
225/75-15
890 X -4
235/70-15
890 X -1
275/60-15
890 X -1
195/80-16
890 X -4
205/75-16
890 X -2
215/70-16
890 X OK
235/65-16
890 X -2
255/60-16
890 X -2
205/70-17
890 X -4
215/65-17
890 X -1
235/60-17
890 X -2
255/55-17
890 X -2
275/50-17
890 X OK
215/60-18
890 X -2
235/55-18
890 X -3
255/50-18
890 X -2
285/45-18
890 X -2
205/55-19
890 X OK
225/50-19
890 X OK
235/50-19
890 X -3
255/45-19
890 X -2
285/40-19
890 X -1
295/40-19
890 X -4
235/45-20
890 X -4
255/40-20
890 X -2
265/40-20
890 X -4
285/35-20
890 X OK
295/35-20
890 X -2
255/35-21
890 X -2
265/35-21
890 X -4
295/30-21
890 X -1
265/30-22
890 X -4
295/25-22
890 X OK
215/80-15
900 X -1
235/75-15
900 X -4
245/70-15
900 X -1
205/80-16
900 X -4
215/75-16
900 X -2
Dim.
Size
RSC
X
225/70-16
900 X OK
235/70-16
900 X -4
215/70-17
900 X -3
225/65-17
900 X -1
245/60-17
900 X -1
275/55-17
900 X -4
225/60-18
900 X -2
245/55-18
900 X -1
265/50-18
900 X OK
275/50-18
900 X -3
295/45-18
900 X OK
225/55-19
900 X -3
265/45-19
900 X OK
275/45-19
900 X -3
195/55-20
900 X OK
245/45-20
900 X -2
275/40-20
900 X -2
275/35-21
900 X -1
285/35-21
900 X -3
285/30-22
900 X -2
295/30-22
900 X -4
Regularly updated tyre-dimension list: https://www.pewag.com/pewag-servostar-tyre-dimension-table/
pewag servostar pewag servostar X

5
Regularly updated tyre-dimension list: https://www.pewag.com/pewag-servostar-tyre-dimension-table/
Dim.
Size
RSC
V
215/80-15
910 V -1
225/75-15
910 V OK
225/80-15
910 V -5
235/75-15
910 V -3
245/70-15
910 V -1
255/70-15
910 V -4
195/80-16
910 V OK
205/80-16
910 V -3
215/75-16
910 V -2
225/70-16
910 V -1
225/75-16
910 V -5
235/70-16
910 V -4
255/65-16
910 V -4
275/60-16
910 V -4
205/70-17
910 V OK
215/70-17
910 V -3
225/65-17
910 V -1
235/65-17
910 V -4
245/60-17
910 V -2
255/60-17
910 V -4
275/55-17
910 V -3
225/60-18
910 V -2
235/60-18
910 V -4
245/55-18
910 V -2
255/55-18
910 V -4
265/50-18
910 V -1
275/50-18
910 V -3
285/50-18
910 V -5
295/45-18
910 V -1
225/55-19
910 V -2
235/50-19
910 V OK
235/55-19
910 V -5
245/50-19
910 V -2
255/45-19
910 V OK
255/50-19
910 V -4
265/45-19
910 V -1
275/45-19
910 V -2
285/45-19
910 V -4
Dim.
Size
RSC
V
295/40-19
910 V OK
235/45-20
910 V OK
235/50-20
910 V -5
245/45-20
910 V -2
255/40-20
910 V OK
255/45-20
910 V -4
265/40-20
910 V OK
275/40-20
910 V -2
285/40-20
910 V -4
295/40-20
910 V -5
315/35-20
910 V -2
325/35-20
910 V -4
245/40-21
910 V -2
255/40-21
910 V -4
275/35-21
910 V -2
285/35-21
910 V -3
295/35-21
910 V -4
305/30-21
910 V OK
315/30-21
910 V -1
325/30-21
910 V -2
265/30-22
910 V OK
265/35-22
910 V -5
285/30-22
910 V -2
295/30-22
910 V -4
245/75-15
920 V OK
265/70-15
920 V -1
215/80-16
920 V -1
235/75-16
920 V -3
245/70-16
920 V -1
265/65-16
920 V -1
225/70-17
920 V OK
235/70-17
920 V -3
245/65-17
920 V -1
255/65-17
920 V -3
265/60-17
920 V -1
275/60-17
920 V -3
225/65-18
920 V -1
235/65-18
920 V -3
Dim.
Size
RSC
V
245/60-18
920 V -1
255/60-18
920 V -3
265/55-18
920 V OK
245/55-19
920 V -1
255/55-19
920 V -3
265/50-19
920 V OK
275/50-19
920 V -2
295/45-19
920 V OK
245/50-20
920 V -1
255/50-20
920 V -3
265/45-20
920 V OK
275/45-20
920 V -2
305/40-20
920 V -2
335/35-20
920 V OK
245/45-21
920 V -1
265/40-21
920 V OK
275/40-21
920 V -1
285/40-21
920 V -3
305/35-21
920 V OK
315/35-21
920 V -1
255/40-22
920 V -4
275/35-22
920 V -1
285/35-22
920 V -2
305/30-22
920 V OK
315/30-22
920 V OK
255/75-15
930 V OK
225/80-16
930 V OK
225/85-16
930 V -5
235/80-16
930 V -3
245/75-16
930 V -2
255/70-16
930 V OK
255/75-16
930 V -5
265/70-16
930 V -2
275/70-16
930 V -5
285/65-16
930 V -2
225/75-17
930 V -1
235/75-17
930 V -4
245/70-17
930 V -2
Dim.
Size
RSC
V
255/70-17
930 V -5
265/65-17
930 V -2
275/65-17
930 V -5
285/60-17
930 V -2
255/65-18
930 V -5
265/60-18
930 V -2
275/60-18
930 V -4
285/55-18
930 V -1
235/65-19
930 V -5
255/60-19
930 V -5
265/55-19
930 V -2
275/55-19
930 V -4
235/55-20
930 V OK
235/60-20
930 V -5
255/55-20
930 V -5
265/50-20
930 V -2
275/50-20
930 V -4
285/45-20
930 V OK
295/45-20
930 V -2
305/45-20
930 V -4
255/50-21
930 V -5
265/45-21
930 V -1
275/45-21
930 V -3
285/45-21
930 V -5
295/40-21
930 V -1
315/40-21
930 V -4
265/40-22
930 V -1
275/40-22
930 V -3
285/40-22
930 V -4
315/35-22
930 V -3
325/35-22
930 V -4
285/35-23
930 V -4
295/35-23
930 V -5
pewag servostar suv
Tyre dimension table

6Preparation pewag servostar
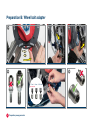
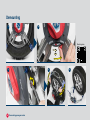
Preparation B: Wheel bolt adapter
û
ü
1
2
3
1a 2a
3a 3b
1b
ü
û
2b
17 mm*
*pre-assembled
19 mm 21/22 mm

7
Preparation pewag servostar
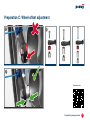
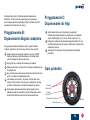
Preparation C: Wheel-offset adjustment
2
1
3ü
û
Preparation video

8DE
Kundeninformation
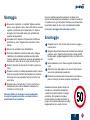
Das Anpassen der Kette vor der Fahrt ist unbedingt notwendig,
da dies die Montage der Kette bei winterlichen Verhältnissen
beträchtlich vereinfacht. Nur wenn die Kette optimal an den Reifen
und die Felge angepasst ist, ist ein reibungsloses und schnelles
Montieren möglich.
Vorbereitung A:
Anpassung an die Reifengröße
Für einige Reifengrößen ist eine Anpassung der
Schneekettengröße notwendig.
1Lesen Sie Ihre Reifendimension ab
2Suchen Sie diese in der angeführten Anpassungstabelle
(S. 4 & 5)
3Entfernen Sie ggf. Verstellelemente (gelb markiert) mit dem
beigefügten Werkzeug wie in den Abbildungen 3a-3c gezeigt.
Erklärung Tabelle (Seite 4 & 5)
OK = keine Anpassung notwendig
-1 = 1 Element entfernen
-2 = 2 Elemente entfernen usw.
Bei Entfernung von 2 Elementen, immer zwei diagonal
voneinander liegende Elemente entfernen.
Bewahren Sie die entfernten Teile auf – die Kette kann für andere
Reifendimensionen wiederverwendet werden.
Hinweis: Angaben sind allgemein gültig und nicht verbindlich.
Diese resultieren aus unseren Tests und Erfahrungen. Daher ist
eine Testmontage vor dem ersten Einsatz dringend zu empfehlen.
Nach ca. 50 m Fahrt den Sitz der Kette prüfen.
Eventuell weitere Anpassungen vornehmen, d.h. weitere
Verstellelemente entfernen, wenn sich die Kette nicht auf den
Reifen zieht.
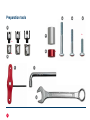
Werkzeuge für die Vorbereitung
1a +1b Adapter für Befestigung an der Radmutter
1a Klemmen mit Schlüsselweite 17, 19 und 21/22 mm
1b Hülsen für Klemmen
2a +2b Abstandhalter
3a Schraube lang
3b Schraube mittel
3c Schraube kurz
4+5Werkzeug für Größenanpassung der Kette
6Schraubenschlüssel

DE 9
Arme der
Kette
Schiebeschalter
Handrad
Ratsche
Laufnetz
Vorbereitung B:
Anpassung Adapter
Um den Adapter anzupassen, entfernen Sie Radkappenabdeckun-
gen und Radmutterkappen. Reinigen Sie ggf. den Radbolzen bzw.
diesen Felgenbereich von Schmutz und Eis bevor Sie den Adapter
montieren.
Vorbereitung C:
Anpassung an die Felge
Produkt-
beschreibung
1a Schieben Sie den Schiebeschalter der Ratsche nach
rechts in die Position „open“. Folgen Sie dabei den auf der
Ratsche beschriebenen Richtungspfeilen in der markierten
Reihenfolge.
1b Ziehen Sie das Seil, an dem der Adapter hängt, so weit als
möglich heraus.
2a Nun überprüfen Sie, ob der auf der Kette vormontierte
Adapter auf die Radmutter passt.
2b Die Klemme muss gerade und vollständig auf den Sechskant
der Radmutter aufgesetzt werden, damit eine sichere
Befestigung erzielt werden kann.
3a Ist er zu klein und passt nicht auf den Radbolzen, nehmen Sie
die nächste Größe der Klemme und Hülse, montieren diese
auf den Adapter und probieren es erneut. Das Abschrauben
und Zusammenschrauben wird per Hand gemacht.
3b Der Sechskant der Klemme muss komplett durch die Öffnung
der Hülse geschoben werden, damit die Klemme korrekt an
der Radmutter befestigt werden kann.
1Berührt der Adapter die Felge, muss der Adapter verlängert
werden. Grundsätzlich gilt: Adapter so nah als möglich an die
Felge schrauben, ohne dass dieser die Felge berührt (wie in
Abb. 3).
2Es gibt drei verschiedene Varianten um den Adapter zu
verlängern. Diese drei Möglichkeiten sind auf dem Bild
ersichtlich. Das Abschrauben und Zusammenschrauben wird
per Hand gemacht.
3Berührt der Griff nicht mehr die Felge ist die Adaptierung
abgeschlossen

10 EN
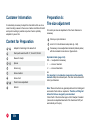
Customer Information
It is absolutely necessary to adjust the chain before first use. As a
result mounting is easier in the course of winter conditions. Smooth
and quick mounting is possible only when chain is optimally
adapted to tyre and rim.
Content for Preparation
1a +1b Adapter for fastening to the wheel bolt
1a Clamp with wrench width 17, 19 and 21/22 mm
1b Sleeve for clamp
2a +2b Spacer
3a Screw long
3b Screw medium
3c Screw short
4+5Tools for size adjustment
6Wrench
Preparation A:
Tire size adjustment
For some tyre sizes an adjustment of the chain dimension is
necessary.
1
Check your tyre dimension
2
Look for it in the dimension setup table (p. 4 & 5)
3
If necessary, remove adjustment elements (marked yellow)
with the enclosed tool as shown in figures 3a-3c.
Explanation table (page 4 & 5)
OK = no adjustment necessary
-1 = remove 1 element
-2 = remove 2 elements
etc.
For removing 2 or 4 elements, always remove the opposite
elements. Keep the removed parts –this chain can be reused for
other tyre dimension.
Note: These instructions are generally valid and non-binding and
are results of tests and our experience. Therefore, a fitting test
before the first use is urgently recommended.
Check the fit of the chain after approx. 50 m. Readjust if needed
(remove more adjustment elements if the chain does NOT pull
automatically on the tyre).

EN 11
Preparation B:
Wheel bolt adapter
To adjust the adapter, remove the wheel cover and wheel bolt
caps. Remove any dirt, snow or ice.
1a Move the slide switch of the ratchet to the “open” position.
Please follow the directional arrows in marked order.
1b Pull out the cable on which the adapter is fixed.
2a Now check whether the pre-assembled adapter fits onto the
wheel bolt.
2b The clamp must be placed straight and completely on the
hexagon of the wheel bolt for secure attachment.
3a If the adapter is too small and is not fitting on the wheel bolt,
please take the next size of the clamp and the sleeve, mount it
on the adapter and try it again. The offscrewing and screwing
together is happening by hand.
3b The hexagon of the clamp has to be pushed completely
through the opening of the sleeve. So the clamp can be
fastened correctly to the wheel bolt.
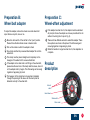
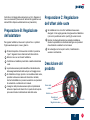
Preparation C:
Wheel-offset adjustment
1If the adapter touches the rim, the adapter must be extended.
As principle: Screw the adapter as close as possible to the rim
without it touching the rim (as in Fig. 3).
2There are three different variants to extend the adapter. These
three options are shown in the picture. The offscrewing and
screwing together is happening by hand.
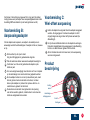
3When the handle no longer touches the rim, the adaptation is
complete.
Product
description
Arms of
chain
Slide switch
Hand wheel
Ratchet
Chain mesh

12 FR
Informations client
Il est impératif de régler la chaîne avant sa première utilisation. Cela
facilite le montage dans des conditions hivernales. Un montage simple
et rapide n’est possible que si la chaîne est parfaitement adaptée au
pneu et à la jante du véhicule.
Contenu pour la préparation
1a +1b
Adaptateur pour fixation à l’écrou de la roue
1a Pince avec ouvertures de clé de 17, 19 et 21/22 mm
1b Manchon pour pince
2a +2b Pièce intercalaire
3a Vis longue
3b Vis moyenne
3c Vis courte
4+5Outils pour ajustement de la taille
6Clé
Préparation A: Ajustement à
dimension de la chaîne
Certaines tailles de pneus exigent un ajustement de la dimension de la
chaîne.
1Vérifiez la dimension de votre pneu.
2Recherchez-la dans le tableau des dimensions
(p. 4 & 5).
3
Enlevez au besoin le nombre d’éléments de réglage
mentionné (en jaune) avec les outils fournis, comme indiqué
dans l’illustration 3a-3c.
Explication du tableau (page 4 & 5)
OK = pas d’ajustement nécessaire,
-1 = enlever 1 élément
-2 = enlever 2 éléments
etc.
Si vous devez enlever 2 éléments, il faut enlever 2 éléments
opposés.
Conservez les pièces enlevées – cette chaîne peut être
réutilisée pour d’autres dimensions de pneus.
Indication : Ces instructions sont à caractère général et non
contractuelles ; elles sont le résultat de tests et de notre expérience. Il
est donc obligatoire d’effectuer un contrôle de l’ajustement avant la
première utilisation.
Vérifiez la tenue de la chaîne au bout de 50 m environ. Réajustez-la en
cas de besoin (enlevez d’autres éléments de réglage si la chaîne ne
s’étire PAS automatiquement sur le pneu).

FR 13
Préparation B: Ajustement de
l’adaptateur
Pour ajuster l’adaptateur, enlevez l’enjoliveur et les caches-écrous de
la roue. Enlevez éventuellement la saleté, la neige ou la glace.
1a Régler la molette en position « open » Suivre les flèches dans
l‘ordre indiqué.
1b Enlevez le câble auquel l’adaptateur est fixé.
2a Vérifiez si l‘assemblage de l‘adaptateur correspond à l‘écrou de
la roue.
2b Pour une fixation sécurisée, la pince doit être placée dans l’axe
et à fond sur la tête hexagonale de l’écrou de la roue.
3a Si l‘adaptateur est trop petit et ne s‘adapte pas au boulon
de roue, veuillez prendre la taille suivante de la pince et de
l‘écrou, montez-le sur l‘adaptateur et réessayez. Le dévissage
et le vissage se font à la main.
3b La tête hexagonale de la pince doit être intégralement
enfoncée dans l’ouverture de manchon. Cela permet de fixer
correctement la pince à l’écrou de la roue.
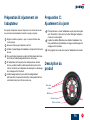
Preparation C:
Ajustement à la jante
1Principe de base : vissez l’adaptateur au plus près de la jante
(voir l’illustration 3) sans qu’il la touche. Rallonger l‘adapteur
si celui-ci touche la jante.
2Il existe trois tailles différentes pour étendre l‘adaptateur. Ces
trois possibilités sont présentées en image. Le dévissage et le
vissage se font à la main.
3Si la poignée ne touche plus la jante, l‘adaptation est réussie.
Description du
produit
Bras de la
chaîne
Bouton rouge
Molette
Cliquet
Filet de la chaîne

14 NL
Klantinformatie
Het is absoluut noodzakelijk dat de ketting vóór het eerste
gebruik wordt aangepast. Op die wijze is de montage in winterse
omstandigheden eenvoudiger. Een vlotte en snelle montage is
uitsluitend mogelijk indien de ketting optimaal is aangepast aan de
band en velg.
Verpakkingsinhoud
1a +1b Adapter voor aanspannen van de slotmoer
1a Klem met moersleutelbreedte 17, 19 en 21/22 mm
1b Huls voor klem
2a +2b Afstandshouder
3a Bout lang
3b Bout medium
3c Bout kort
4+5Gereedschap voor het aanpassen van de ketting
6Steeksleutel voor adapter montage
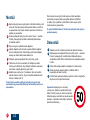
Voorbereiding A: Aanpassing van
de ketting aan de bandenmaat
Voor sommige bandenmaten is een aanpassing van de ketting-
afmeting vereist.
1
Controleer de afmeting van uw banden.
2
Zoek deze op in de afmetingtabel (blz. 4 & 5).
3
Verwijder indien noodzakelijk het opgegeven aantal
aanpassingselementen (geel) met de meegeleverde
gereedschappen, zoals getoond in de afbeelding 3a-3c.
Uitleg tabel (bladzijde 4 & 5)
OK = geen aanpassing vereist
-1 = verwijder 1 element
-2 = verwijder 2 elementen
enz.
Wanneer je twee elementen moet verwijderen, verwijder
dan twee diagonale elementen. Bewaar de verwijderde
onderdelen – de ketting kan opnieuw gebruikt worden voor andere
bandenmaten.
Opmerking: deze instructies zijn algemeen geldig en niet bindend
en zijn het resultaat van testen en onze ervaring. Daarom wordt
dringend aanbevolen, vóór het eerste gebruik een passingstest
uit te voeren.

NL 15
Controleer of de ketting na ongeveer 50 m nog past. Pas indien
nodig opnieuw aan (verwijder meer aanpassingselementen indien
de ketting NIET automatisch op de band getrokken wordt).
Voorbereiding B:
Aanpassingsadapter
Om de adapter aan te passen, verwijdert u de wieldop en evt.
aanwezige kunststof wielboutdoppen. Verwijder al het vuil, sneeuw
en ijs.
1a Zet de schuif op de ‘open’ stand.
Volg de richtingspijlen in gemarkeerde volgorde.
1b Trek de kabel naar buiten waaraan de adapter bevestigd is.
2a Controleer nu of de vooraf gemonteerde adapter op de
slotmoer past.
2b Voor een veilige bevestiging moet de klem recht en com pleet
op de zeshoekige moer van de slotmoer geplaatst worden.
3a Als de adapter te klein is en niet op de wielbout past, neem
dan de grotere maat van de klem en de moer, monteer
deze op de adapter en probeer het opnieuw. Het los- en
vastschroeven gebeurt met de hand.
3b De zeshoek van de klem moet geheel door de opening
van de huls worden gedrukt, zodat de klem correct aan de
slotmoer vastgemaakt kan worden.
Voorbereiding C:
Wiel-offset aanpassing
1Indien de adapter de velg raakt moet de adapter aangepast
worden. Als uitgangspunt: monteer de adapter zo dicht
mogelijk tegen de velg zonder dat hij deze aanraakt (zie
afbeelding 3) .
2Er zijn drie verschillende maten om de adapter te verlengen.
Deze drie mogelijkheden zijn weergegeven in de afbeelding.
Het los- en vastschroeven gebeurt met de hand.
3Als het handvat de rand niet meer raakt, is de aanpassing
succesvol uitgevoerd.
Product
beschrijving
Ketting
armen
Schuif
Handmatige
kettingspanner
Spanner
Kettingnet

16 IT
Informazioni per il cliente
È assolutamente necessario regolare la catena prima del primo
utilizzo. In questo modo, il montaggio in condizioni invernali
risulterà più facile. Un montaggio semplice e veloce è possibile
solo se la catena è stata adattata in modo ottimale al pneumatico e
al cerchio.
Contenuto per la preparazione
1a +1b Adattatore per il fissaggio al dado della ruota
1a Pinza con apertura di chiave di 17, 19 e 21/22 mm
1b Manicotto per pinza
2a +2b Distanziale
3a Vite lunga
3b Vite media
3c Vite corta
4+5Strumenti per la regolazione della misura
6Chiave
Preparazione A: Regolazione
della catena in base alle
dimensioni
P
er alcune misure di pneumatici è necessario regolare le dimensioni
della catena.
1
Controllare le dimensioni dello pneumatico del proprio
veicolo.
2
Cercarle nella tabella di configurazione delle dimensioni
(p. 4 & 5)
3
Se necessario, il numero di elementi (gialli) di regolazione
specificato con gli strumenti in dotazione, come mostrato
nella figuras 3a-3c
Spiegazione della tabella (pagina 4 & 5):
OK = nessuna regolazione necessaria,
-1 = rimuovere 1 elemento,
-2 = rimuovere 2 elementi
ecc.
Per rimuovere 2 o 4 elementi, rimuovere sempre gli elementi
opposti. Conservare i pezzi rimossi: questa catena può essere
riutilizzata per pneumatici di altre dimensioni.
Nota: queste istruzioni hanno validità generale, non sono vincolanti
e sono il frutto di test e della nostra esperienza. Si raccomanda
pertanto di effettuare un montaggio di prova prima di utilizzare
la catena per la prima volta.

IT 17
Controllare il montaggio della catena dopo ca. 50 m. Regolare di
nuovo se necessario (rimuovere altri elementi di regolazione se la
catena NON si dispone automaticamente sul pneumatico).
Preparazione B: Regolazione
dell’adattatore
Per regolare l‘adattatore, rimuovere il copricerchio e i copridadi.
Togliere eventuale sporco, neve o ghiaccio.
1a
Portare il dispositivo di chiusura del cricchetto in posizione
“open”. Seguire le frecce direzionali nell‘ordine indicato.
1b
Estrarre il cavo su cui è fissato l‘adattatore.
2a Controllare se l‘adattatore premontato si adatta al dado della
ruota.
2b La pinza deve essere posizionata dritta e interamente sulla
testa esagonale del dado della ruota per un fissaggio sicuro.
3a Se l’adattatore è troppo piccolo e non si adatta al dado ruota,
prendere la misura successiva del morsetto e del dado,
montarli sull’adattatore e provare nuovamente. Le operazioni
di avvitamento e svitamento sono manuali.
3b L‘esagono della pinza deve essere spinto completamente
attraverso l‘apertura del manicotto. In questo modo la pinza
può essere fissata correttamente al dado della ruota.
Preparazione C: Regolazione
dell‘offset delle ruote
1Se l‘adattatore tocca il cerchio l‘adattatore deve essere
allungato. Come regola generale, bisogna avvitare l‘adattatore
il più vicino possibile al cerchio (vedi fig. 3) senza toccarlo.
2Esistono tre diverse dimensioni per estendere l’adattatore.
Queste tre possibilità sono mostrate nella figura. Le operazioni
di avvitamento e svitamento sono manuali.
3Se la maniglia non tocca più il cerchio, l’adattamento è
avvenuto correttamente.
Descrizione del
prodotto
Bracci della
catena
Dispositivo di
chiusura
Volantino
Cricchetto
Maglia della catena

18 CZ
Informace pro zákazníka
Před prvním použitím je nutné přizpůsobit sněhový řetěz rozměru
pneumatiky. Díky tomu bude montáž v zimních podmínkách
snažší. Snadná a rychlá montáž je možná jen tehdy, když je řetěz
optimálně přizpůsoben pneumatice a ráfku.
Obsah pro přípravu
1a +1b Adaptér pro upevnění matice kola
1a Spona s klíčem 17, 19 a 21/22 mm
1b Objímka spony
2a +2b Rozpěrka
3a Šroub dlouhý
3b Šroub střední
3c Šroub krátký
4+5Nástroje pro nastavení velikosti
6Klíč
Příprava A:
Seřízení řetězu podle rozměru
Pro některé rozměry pneumatik je nutné přizpůsobit rozměr řetězu.
1
Zjistěte rozměr vaší pneumatiky.
2
Vyhledejte ho v tabulce nastavení rozměrů (strana 4 & 5).
3
Podle potřeby pomocí přiložených nástrojů odstraňte sta-
novený počet seřizovacích elementů (žluté) podle obrázky
3a-3c.
Vysvětlující tabulka (strana 4 & 5)
OK = seřízení není nutné
-1 = odstraňte 1 prvek
-2 = odstraňte 2 prvky
atd.
Pokud je třeba odstranit dva elementy, odstraňte dva diagonálně
ležící elementy. Demontované prvky uschovejte, abyste tento řetěz
mohli použít i pro jiný rozměr pneumatiky.
Poznámka: Tyto pokyny mají obecnou platnost, nejsou závazné a
jsou založeny na našich testech a zkušenostech.
Důrazně doporučujeme provést zkušební montáž před prvním
použitím.
Po přibližně 50 metrech jízdy zkontrolujte řetěz, jestli je správně
napnutý. Podle potřeby upravte seřízení. (Odstraňte více
seřizovacích prvků, pokud se řetěz automaticky NENATÁHNE na
pneumatiku.)

CZ 19
Příprava B: Seřízení adaptéru
Při seřizování adaptéru sundejte kryt kola a krytky matic kol.
Odstraňte nečistoty, sníh nebo led.
1a
Přestavte posuvný přepínač ráčny do polohy „open“
Prosím, postupujte při montáži a demontáži podle šipek v
označeném pořadí.
1b Vytáhněte kabel, na kterém je adaptér upevněný.
2a Nyní zkontrolujte, jestli se předmontovaný adaptér hodí na
matici kola.
2b Aby byla spona řádně namontovaná, musí být v přímé poloze
úplně nasazená na šestihranu matice kola.
3a Pokud je adaptér příliš malý a nepasuje na šroub kola,
vezměte prosím další velikost svorky a matice, nasaďte na
adaptér a zkuste to znovu. Odšroubování a sešroubování se
provádí manuálně.
3b Šestihran spony musí být úplně protlačen otvorem objímky.
Sponu tak lze správně upevnit k matici kola.
Příprava C:
Nastavení rozchodu kol
1Pokud se adaptér dotýká ráfku musí se prodloužit. Základní
princip: Přišroubujte adaptér co nejblíže k ráfku (viz obr. 3) tak,
aby se ho nedotýkal.
2Existují tři různé velikosti pro prodloužení adaptéru. Tyto
tři možnosti jsou znázorněny na obrázku. Odšroubování a
sešroubování se provádí manuálně.
3Pokud se již černý plastový díl nedotýk ráfku, je nastavení
provedeno úspěšně.
Popis výrobku
Ramena
řetězu
Posuvný přepínač
Dopínací
systém
Ráčna
Síť řetězu

20 SK
Informácia pre zákazníka
Pred prvým použitím je absolútne nevyhnutné prispôsobiť rozmery
reťaze kolesám. Vďaka tomu bude osadenie reťaze v zimných
mesiacoch jednoduchšie. Jednoduché a rýchle osadenie je
možné len vtedy, keď je reťaz optimálne prispôsobená konkrétnej
pneumatike a ráku.
Obsah balenia
1a +1b Adaptér na upevnenie k matici kolesa
1a Svorka s rozmermi kľúča 17, 19 a 21/22 mm
1b Puzdro na svorku
2a +2b Dištančná vložka
3a Dlhá skrutka
3b Stredne dlhá skrutka
3c Krátka skrutka
4+5Náradie na upravenie rozmeru
6Kľúč
Príprava A: Prispôsobenie
rozmerov reťaze v závislosti od
veľkosti kolies
Pre niektoré veľkosti kolies je potrebné rozmery reťaze najskôr
prispôsobiť.
1Skontrolujte rozmery pneumatík.
2Vyhľadajte tieto rozmery v tabuľke rozmerov (strana 4 & 5).
3
V prípade potreby pomocou priloženého náradia odstráňte
uvedený počet nastavovacích prvkov (žltých), ako to je zná-
zornené na obrázky 3a-3c.
Vysvetľujúca tabuľka (strana 4 & 5)
OK = upravenie nie je potrebné
-1 = odstráňte jeden nastavovací prvok
-2 = odstráňte 2 nastavovacie prvky
atď.
Pri odstraňovaní 2 alebo 4 prvkov vždy odstráňte protiľahlé
prvky. Odstránené nastavovacie prvky si odložte – reťaz budete
môcť neskôr použiť aj na iné kolesá.
Poznámka: Tieto pokyny sú len všeobecné a nie sú záväzné.
Sú výsledkom našich testov a skúseností. Preto dôrazne
odporúčame pred prvým použitím reťaze vykonať test
presnosti osadenia.
Strona jest ładowana ...
Strona jest ładowana ...
Strona jest ładowana ...
Strona jest ładowana ...
Strona jest ładowana ...
Strona jest ładowana ...
Strona jest ładowana ...
Strona jest ładowana ...
Strona jest ładowana ...
Strona jest ładowana ...
Strona jest ładowana ...
Strona jest ładowana ...
Strona jest ładowana ...
Strona jest ładowana ...
Strona jest ładowana ...
Strona jest ładowana ...
-
 1
1
-
 2
2
-
 3
3
-
 4
4
-
 5
5
-
 6
6
-
 7
7
-
 8
8
-
 9
9
-
 10
10
-
 11
11
-
 12
12
-
 13
13
-
 14
14
-
 15
15
-
 16
16
-
 17
17
-
 18
18
-
 19
19
-
 20
20
-
 21
21
-
 22
22
-
 23
23
-
 24
24
-
 25
25
-
 26
26
-
 27
27
-
 28
28
-
 29
29
-
 30
30
-
 31
31
-
 32
32
-
 33
33
-
 34
34
-
 35
35
-
 36
36


w innych językach
- italiano: Pewag ServoStar Manuale utente
- Deutsch: Pewag ServoStar Benutzerhandbuch
- slovenčina: Pewag ServoStar Používateľská príručka
- français: Pewag ServoStar Manuel utilisateur
Inne dokumenty
-
Tesla K-Summit Instrukcja obsługi
-
Silvercrest 326517_1904 Operation and Safety Notes
-
Silvercrest SNAW 1000 B1 Operating Instructions Manual
-
Zelmer ZKS16500 (KS1700) Instrukcja obsługi
-
-
-
König CB-12 Instrukcja obsługi
-
 SUPPORTPLUS RC 8 Instrukcja obsługi
-
Adler AD 3133 Instrukcja obsługi
-
Yamaha MOTIF-RACK ES Karta katalogowa
