Tesla TSL-HC-UFR102 Instrukcja obsługi
- Kategoria
- Zmierzenie
- Typ
- Instrukcja obsługi

1
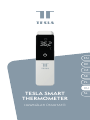
USER MANUAL
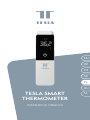
TESLA SMART
THERMOMETER
EN
CZ
SK
PL
HU
SL
DE

2
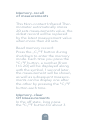
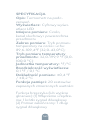
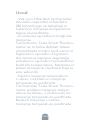
Introduction
- Your new Infrared thermometer
uses advanced infrared (IR) tech-
nology to measure temperature
instantly and accurately on the
body or object.
- Easy to use and less measure-
ment time
Tesla Smart Thermometer does
not need to contact body or
object to ensure the safety and
hygiene. Its ergonomic design
makes this thermometer be simple
and very easy to check the tem-
perature. It only takes 1 second to
take measurement and reading.
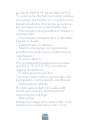
- Body, ear and object tempera-
ture modes
Tesla Smart Thermometer
supports to measure tempera-
ture of body surface, ear canal
and object. Measuring range
of object-temperature mode is
32.0°F-199.9°F (0.0°C -100.0°C).
This means except body surface,
ear canal temperature, it also

3
supports to take the surface tem-
perature of object temperature
as below,
• Surface temperature of milk in
the bottle
• Surface temperature of baby
bath
• Environment temperature
• Object mode is for reference
only
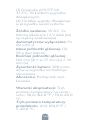
- Alarm sounds
When body temperature is over
99.5°F(37.5°C), an alarm sounds
for 10 times
- Memory function
It stores up to 20 sets recent
measurement data.
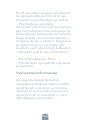
- Auto power off
Automatically power off if left
idle for 60±5seconds.
- Measurement
Measurement time 1 second and
the measurement distance is
within 1 cm.
Please read the manual carefully
before you use the unit and keep
for future reference.

4
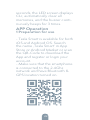
- Intended use
The Infrared Thermometer is
continuous for the continuous
measurement and monitoring
of human body temperature
from body surface, ear canal or
ambient. The device is indicated
for use by people of all ages at
homecare and in hospital.
- Contraindication(s): None.
- The patient is an intended
operator.
Safety information
To assure the correct use of the
product, basic safety measures
should always be followed inclu-
ding the warning and the caution
listed in the instruction manual:
WARNING: This alert identities
hazards that may cause serious
personal injury or death.
CAUTION: This alert identities
hazards that may cause minor
personal injury. product damage,
or property damage.

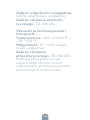
5
- Tesla Smart Thermometer is
not intended to substitute for a
consultation with your physician.
The forehead scan temperature
serves as a reference only. It
cannot be a judgment on fever.
- Basic safety precautions should
always be observed, especially
when the thermometer is used
on or near children and disabled
persons.
- Please place the device unrea-
chable by young.
- Avoid direct sunlight.
- Do not touch the lens.
- No modification of this device
is allowed.
- The swallowing of small parts
like packing bag, battery, battery
cover and so on may cause the
suffocation.
- Please do not use a dilution
agent, alcohol, or petrol to clean
the unit.
- Please treat is gently and pre-
vent the falling from a high place.
- Please do not immersed it in
liquid.

6
- Never leave battery in the
battery compartment for a long
time without use, as they may
leak and cause damage to the
unit.
- Please take off the battery if
you do not intend to use within
3 months. Replace with new
batteries if the unit display a low
battery symbol.
- Do not mix the old and new
batteries together.
- Do not use during the trans-
portation.
WARNING:
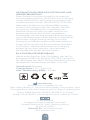
- Do not dispose of electrical
appliances as unsorted municipal
waste, use separate collection fa-
cilities. Contact your local gover-
nment for information regarding
the collection systems available.
If electrical appliances are
disposed of in landfills or dumps,
hazardous substances can leak
into the groundwater and get
into the food chain, damaging
your health and well-being.

7
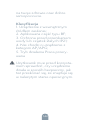
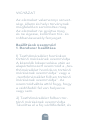
Classification
1. Internally powered equipment;
2. Type BF applied part;
3. Protection against ingress of
water or Particulate matter IP21;
4. Not category AP/APG
equipment;
5. Mode of operation Continuo-
us operation.
- The user must check that the
equipment functions safely and
see that it is in proper working
condition before being used.

8
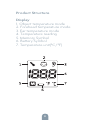
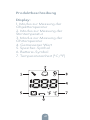
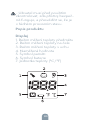
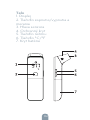
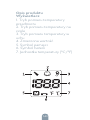
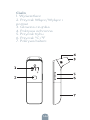
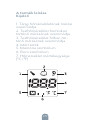
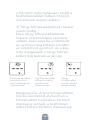
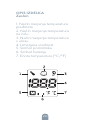
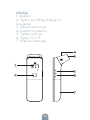
Product Structure
Display
1. Object temperature mode
2. Forehead temperature mode
3. Ear temperature mode
4. Temperature reading
5. Memory Symbol
6. Battery Symbol
7. Temperature unit(°C/°F)

9
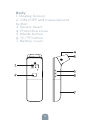
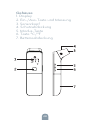
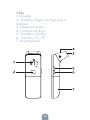
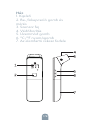
Body
1. Display Screen
2. ON/OFF and measurement
button
3. Sensor head
4. Protective cover
5. Mode button
6. °C/°F button
7. Battery cover

10
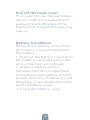
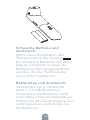
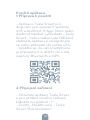
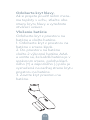
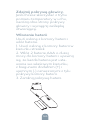
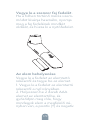
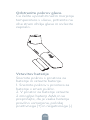
Pull off the head cover
If you want to use the ear tempe-
rature mode for measurement,
please press both sides of the
head cover and pull the opening
cap up.
Battery Installation
Remove the battery cover from
the battery compartment insert
the battery.
1. Remove the battery cover from
the battery compartment as the
arrow direction accordingly.
2. Insert 2 AAA powerful
batteries into the compartment
and ensure each battery is in the
proper direction, Positive (+) and
Negative (-) are displayed on the
back of battery cover.
3. Close the battery cover.

11
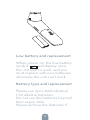
Low battery and replacement
When power on, the low battery
symbol will display once
the unit start to work, and you
must replace with new batteries,
otherwise the unit can‘t work.
Battery type and replacement
Please use 2pcs AAA identical
1.5V alkaline batteries.
Do not use the batteries beyond
their expiry date.
Please remove the batteries if

12
you do not need to use for long
time.
WARNING
Dispose of the battery in
accordance with all federal, state
and local laws. To avoid fire and
explosion hazard, do not burn or
incinerate the battery.
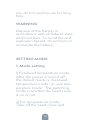
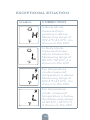
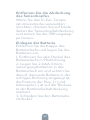
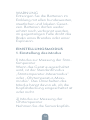
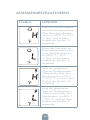
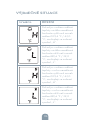
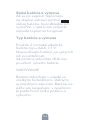
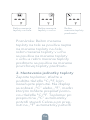
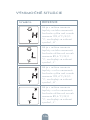
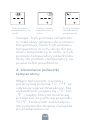
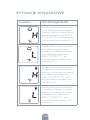
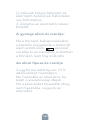
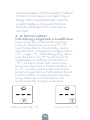
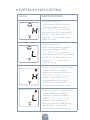
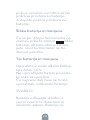
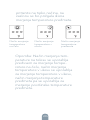
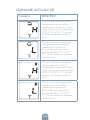
SETTING MODE
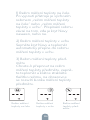
1. Mode setting
1) Forehead temperature mode
After the power is turned off,
the default mode is „forehead
temperature mode“ or „ear tem-
perature mode“. The switching
mode is whether the head cover
is on or not.
2) Ear temperature mode
Take off the head cover and

13
automatically switch to ear
temperature mode.
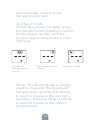
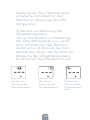
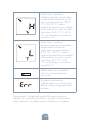
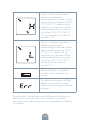
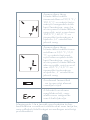
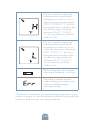
3) Object mode
Under the power on state, press
the Mode button briefly to switch
to the object mode, and the
screen object temperature icon
lights up.
Note: The Body Mode is mainly
used to measure the forehead
temperature, and the Ear Mode
is used to measure the ear tem-
perature, then the Object Mode
is used to measure the object
temperature.
Forehead
temperature
mode
Ear temperature
mode Object mode

14
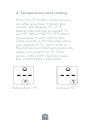
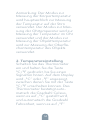
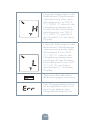
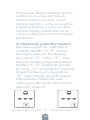
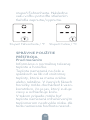
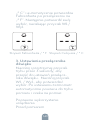
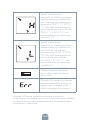
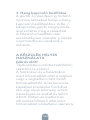
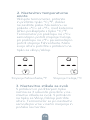
2. Temperature unit setting
Press °C/°F button when power
on after you hear 1 beep, the
screen will display °C or °F,
Mode will change between °C
and °F. When the °C/°F button
is pressed. It will confirm the
Celsius Unit automatically when
you switch to °C, and confirm
the Fahrenheit Unit automatically
when you switch to °F. Then
press „ON/OFF“ button make
the confirmation selection.
Celsius/°CFahrenheit /°F

15
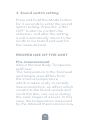
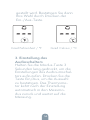
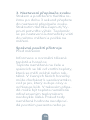
3. Sound switch setting
Press and hold the Mode button
for 3 seconds to enter the sound
switch setting. Press the „ON/
OFF“ button to confirm the
selection, and after the setting,
it will automatically return to the
mode to be tested and wait for
the measurement.
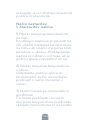
PROPER USE OF THE UNIT
Pre-measurement
About Normal Body Temperatu-
re&Fever
The temperature in the forehead
and temple area differs from
the internal temperature,
which is taken orally or rectally.
Vasoconstriction, an effect which
constricts the blood vessels and
cools the skin, can occur during
the early stages of a fever. In this
case, the temperature measured
by the Infrared thermometer may

16
be unusually low. If the measure-
ment therefore does not match
the patient‘s own perception or
is unusually low, peat the mea-
surement every 15 minutes. As a
reference, you can also measure
the internal body temperature
using a conventional oral or
rectal thermometer.
Body temperature can vary from
one individual person to next.
It also varies by location on the
body and time of day. Below
shows the statistical normal
ranges from different sites.
Please keep in mind that tempe-
ratures measured from different
sites, even at the same time,
should not be directly compared.
Fever indicates that the body
temperature is higher than
normal. This symptom may be
caused by infection, overdressing
or immunization. Some people
may not experience fever even
when they are ill.
These include, but are not limited

17
to, infants younger than 3 months
old, persons with compromi-
sed immune systems, persons
taking antibiotics, steroids, or
antipyretics (aspirin, ibuprofen,
acetaminophen), or persons with
certain chronic illnesses. Please
consult your physician when you
feel ill even if you do not have
fever.
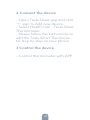
As a Body Thermometer
Press the ON/OFF to start the
machine. The measurement pre-
paration screen will be displayed
after one second. The °F icon will
be on. Align the machine with
the forehead center and let the
distance between the infrared
thermometer protective cover
and the forehead be 1cm. Press
the ON/OFF key to measure,
and the measurement result will
be prompted.

18
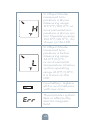
Note:
- if the reading is
< 99.5°F(37.5°C), the display will
show the measurement together
with 1 short beep.
- If the reading is 99.5°F(37.5°C)
and<109.4°F(43°C), the buzzer
10 short beeps.
- As the forehead measurement
temperature is likely to be
affected by sweat, oil and the
surroundings, the reading shall
be taken as a reference only.
- If the probe is placed at an
angle close to the forehead
measurement, the reading will
be affected by surrounding
temperature.
- Babies‘ skin reacts very quickly
in the ambient temperature.
Therefore, do not take their
temperature with the non-con-
tact thermometer during/after
breastfeeding, because the skin
temperature maybe lower than
the internal body temperature.
- The user and the infrared ther-

19
mometer should be quiescence
for at least 30 minutes under
similar indoor conditions.
As an Ear Thermometer
Press the ON/OFF to start the
machine, and the display screen
will display the measurement
preparation screen one second
later. The °F icon will light up, pull
out the protective cover of the
infrared thermometer, pull the
ear back and put the detection
head of the infrared thermome-
ter into the ear canal, press the
„ON/OFF“ to measure, and the
measurement result will be pro-
mpted when the measurement is
completed.
Note:
- If there are 10 short beeps in a
row, the patient‘s temperature
may be equal to or higher than
37.5‘C, and he/she may have a
fever.

20
- The ear measurement mode is
contact measurement. The inter-
val between each measurement
is 3-5 seconds. The buzzer emits
a short beep before measuring
again.
As an Object Thermometer
Press the ON/OFF to start the
machine, and the display screen
will display the measurement
preparation screen one second
later. The °F icon will light up,
press the setting key to switch to
the object mode, let the distance
between the infrared thermome-
ter and the object be 1cm, press
the ON/OFF to measure, and
the measurement result will be
prompted when the measure-
ment is completed.
Strona się ładuje...
Strona się ładuje...
Strona się ładuje...
Strona się ładuje...
Strona się ładuje...
Strona się ładuje...
Strona się ładuje...
Strona się ładuje...
Strona się ładuje...
Strona się ładuje...
Strona się ładuje...
Strona się ładuje...
Strona się ładuje...
Strona się ładuje...
Strona się ładuje...
Strona się ładuje...
Strona się ładuje...
Strona się ładuje...
Strona się ładuje...
Strona się ładuje...
Strona się ładuje...
Strona się ładuje...
Strona się ładuje...
Strona się ładuje...
Strona się ładuje...
Strona się ładuje...
Strona się ładuje...
Strona się ładuje...
Strona się ładuje...
Strona się ładuje...
Strona się ładuje...
Strona się ładuje...
Strona się ładuje...
Strona się ładuje...
Strona się ładuje...
Strona się ładuje...
Strona się ładuje...
Strona się ładuje...
Strona się ładuje...
Strona się ładuje...
Strona się ładuje...
Strona się ładuje...
Strona się ładuje...
Strona się ładuje...
Strona się ładuje...
Strona się ładuje...
Strona się ładuje...
Strona się ładuje...
Strona się ładuje...
Strona się ładuje...
Strona się ładuje...
Strona się ładuje...
Strona się ładuje...
Strona się ładuje...
Strona się ładuje...
Strona się ładuje...
Strona się ładuje...
Strona się ładuje...
Strona się ładuje...
Strona się ładuje...
Strona się ładuje...
Strona się ładuje...
Strona się ładuje...
Strona się ładuje...
Strona się ładuje...
Strona się ładuje...
Strona się ładuje...
Strona się ładuje...
Strona się ładuje...
Strona się ładuje...
Strona się ładuje...
Strona się ładuje...
Strona się ładuje...
Strona się ładuje...
Strona się ładuje...
Strona się ładuje...
Strona się ładuje...
Strona się ładuje...
Strona się ładuje...
Strona się ładuje...
Strona się ładuje...
Strona się ładuje...
Strona się ładuje...
Strona się ładuje...
Strona się ładuje...
Strona się ładuje...
Strona się ładuje...
Strona się ładuje...
Strona się ładuje...
Strona się ładuje...
Strona się ładuje...
Strona się ładuje...
Strona się ładuje...
Strona się ładuje...
Strona się ładuje...
Strona się ładuje...
Strona się ładuje...
Strona się ładuje...
Strona się ładuje...
Strona się ładuje...
Strona się ładuje...
Strona się ładuje...
Strona się ładuje...
Strona się ładuje...
Strona się ładuje...
Strona się ładuje...
Strona się ładuje...
Strona się ładuje...
Strona się ładuje...
Strona się ładuje...
Strona się ładuje...
Strona się ładuje...
Strona się ładuje...
Strona się ładuje...
Strona się ładuje...
Strona się ładuje...
Strona się ładuje...
Strona się ładuje...
Strona się ładuje...
Strona się ładuje...
Strona się ładuje...
Strona się ładuje...
Strona się ładuje...
Strona się ładuje...
Strona się ładuje...
Strona się ładuje...
Strona się ładuje...
Strona się ładuje...
Strona się ładuje...
Strona się ładuje...
Strona się ładuje...
Strona się ładuje...
Strona się ładuje...
Strona się ładuje...
Strona się ładuje...
Strona się ładuje...
Strona się ładuje...
Strona się ładuje...
Strona się ładuje...
Strona się ładuje...
Strona się ładuje...
Strona się ładuje...
Strona się ładuje...
Strona się ładuje...
Strona się ładuje...
Strona się ładuje...
Strona się ładuje...
Strona się ładuje...
Strona się ładuje...
Strona się ładuje...
Strona się ładuje...
Strona się ładuje...
Strona się ładuje...
Strona się ładuje...
Strona się ładuje...
Strona się ładuje...
Strona się ładuje...
Strona się ładuje...
Strona się ładuje...
Strona się ładuje...
Strona się ładuje...
Strona się ładuje...
Strona się ładuje...
Strona się ładuje...
Strona się ładuje...
Strona się ładuje...
Strona się ładuje...
Strona się ładuje...
Strona się ładuje...
Strona się ładuje...
Strona się ładuje...
Strona się ładuje...
Strona się ładuje...
Strona się ładuje...
Strona się ładuje...
Strona się ładuje...
Strona się ładuje...
Strona się ładuje...
Strona się ładuje...
Strona się ładuje...
Strona się ładuje...
Strona się ładuje...
Strona się ładuje...
Strona się ładuje...
Strona się ładuje...
Strona się ładuje...
Strona się ładuje...
Strona się ładuje...
Strona się ładuje...
Strona się ładuje...
Strona się ładuje...
Strona się ładuje...
Strona się ładuje...
Strona się ładuje...
Strona się ładuje...
Strona się ładuje...
Strona się ładuje...
Strona się ładuje...
Strona się ładuje...
Strona się ładuje...
Strona się ładuje...
Strona się ładuje...
Strona się ładuje...
Strona się ładuje...
Strona się ładuje...
Strona się ładuje...
Strona się ładuje...
Strona się ładuje...
Strona się ładuje...
Strona się ładuje...
Strona się ładuje...
Strona się ładuje...
Strona się ładuje...
Strona się ładuje...
-
 1
1
-
 2
2
-
 3
3
-
 4
4
-
 5
5
-
 6
6
-
 7
7
-
 8
8
-
 9
9
-
 10
10
-
 11
11
-
 12
12
-
 13
13
-
 14
14
-
 15
15
-
 16
16
-
 17
17
-
 18
18
-
 19
19
-
 20
20
-
 21
21
-
 22
22
-
 23
23
-
 24
24
-
 25
25
-
 26
26
-
 27
27
-
 28
28
-
 29
29
-
 30
30
-
 31
31
-
 32
32
-
 33
33
-
 34
34
-
 35
35
-
 36
36
-
 37
37
-
 38
38
-
 39
39
-
 40
40
-
 41
41
-
 42
42
-
 43
43
-
 44
44
-
 45
45
-
 46
46
-
 47
47
-
 48
48
-
 49
49
-
 50
50
-
 51
51
-
 52
52
-
 53
53
-
 54
54
-
 55
55
-
 56
56
-
 57
57
-
 58
58
-
 59
59
-
 60
60
-
 61
61
-
 62
62
-
 63
63
-
 64
64
-
 65
65
-
 66
66
-
 67
67
-
 68
68
-
 69
69
-
 70
70
-
 71
71
-
 72
72
-
 73
73
-
 74
74
-
 75
75
-
 76
76
-
 77
77
-
 78
78
-
 79
79
-
 80
80
-
 81
81
-
 82
82
-
 83
83
-
 84
84
-
 85
85
-
 86
86
-
 87
87
-
 88
88
-
 89
89
-
 90
90
-
 91
91
-
 92
92
-
 93
93
-
 94
94
-
 95
95
-
 96
96
-
 97
97
-
 98
98
-
 99
99
-
 100
100
-
 101
101
-
 102
102
-
 103
103
-
 104
104
-
 105
105
-
 106
106
-
 107
107
-
 108
108
-
 109
109
-
 110
110
-
 111
111
-
 112
112
-
 113
113
-
 114
114
-
 115
115
-
 116
116
-
 117
117
-
 118
118
-
 119
119
-
 120
120
-
 121
121
-
 122
122
-
 123
123
-
 124
124
-
 125
125
-
 126
126
-
 127
127
-
 128
128
-
 129
129
-
 130
130
-
 131
131
-
 132
132
-
 133
133
-
 134
134
-
 135
135
-
 136
136
-
 137
137
-
 138
138
-
 139
139
-
 140
140
-
 141
141
-
 142
142
-
 143
143
-
 144
144
-
 145
145
-
 146
146
-
 147
147
-
 148
148
-
 149
149
-
 150
150
-
 151
151
-
 152
152
-
 153
153
-
 154
154
-
 155
155
-
 156
156
-
 157
157
-
 158
158
-
 159
159
-
 160
160
-
 161
161
-
 162
162
-
 163
163
-
 164
164
-
 165
165
-
 166
166
-
 167
167
-
 168
168
-
 169
169
-
 170
170
-
 171
171
-
 172
172
-
 173
173
-
 174
174
-
 175
175
-
 176
176
-
 177
177
-
 178
178
-
 179
179
-
 180
180
-
 181
181
-
 182
182
-
 183
183
-
 184
184
-
 185
185
-
 186
186
-
 187
187
-
 188
188
-
 189
189
-
 190
190
-
 191
191
-
 192
192
-
 193
193
-
 194
194
-
 195
195
-
 196
196
-
 197
197
-
 198
198
-
 199
199
-
 200
200
-
 201
201
-
 202
202
-
 203
203
-
 204
204
-
 205
205
-
 206
206
-
 207
207
-
 208
208
-
 209
209
-
 210
210
-
 211
211
-
 212
212
-
 213
213
-
 214
214
-
 215
215
-
 216
216
-
 217
217
-
 218
218
-
 219
219
-
 220
220
-
 221
221
-
 222
222
-
 223
223
-
 224
224
-
 225
225
-
 226
226
-
 227
227
-
 228
228
-
 229
229
-
 230
230
-
 231
231
-
 232
232
-
 233
233
-
 234
234


Tesla TSL-HC-UFR102 Instrukcja obsługi
- Kategoria
- Zmierzenie
- Typ
- Instrukcja obsługi
w innych językach
- Deutsch: Tesla TSL-HC-UFR102 Benutzerhandbuch
- slovenčina: Tesla TSL-HC-UFR102 Používateľská príručka
Inne dokumenty
-
Truelife Care Q6 Instrukcja obsługi
-
 Miniland thermosense Instrukcja obsługi
-
Beurer FT 100+ Instrukcja obsługi
-
Silvercrest 322247 Instrukcja obsługi
-
Beurer FT 85 Instrukcja obsługi
-
-
Beurer FT 95 Instrukcja obsługi
-
-
Microlife NC 300 Instrukcja obsługi
-
