Electrolux EWC1150 Instrukcja obsługi
- Kategoria
- Pralki
- Typ
- Instrukcja obsługi

WASHING MACHINE
INSTRUCTION BOOKLET
EWC 1150
GB
192 996 930 - 00 - 282008
RU
ñòèðàëüíàÿ ìàøèíà
ÐÓÊÎÂÎÄÑÒÂÎ ÏÎ ÝÊÑÏËÓÀÒÀÖÈÈ
192996940.qxd 07/07/2008 15.16 Page 1

- 2 -
Contents
For the User
Safety information 3
Disposal 4
Your new washing machine 4
Description of the appliance 5-7
- Machine front, Machine rear
- Control panel
General washing information 8-9
Programme chart 10-11
Using the appliance 12-13
- Starting a wash programme
- Changing a wash programme
- Interrupting a programme
- Cancelling a programme
- Opening the door when the programme
has started
- At the end of the programme
Maintenance and cleaning 14
- The cabinet
- The detergent dispenser
- Opening for the detergent dispenser
- Cleaning inside the machine
- Protecting the machine against freezing
If the machine is not working 15
Service 16
- Service and spare parts
For the Installer
Technical specifications 16
Unpacking the machine 17
- Damages
- When lifting the machine
- Transit locking devices
Installation 18-19
- Levelling the machine
- Water inlet
- Water discharge
- Electrical connection
Rukowodstwo po \kspluatacii 20
Guide to use the instruction book
The following symbols will be found in the text to guide you throughout the instructions:
Safety information
Step by step instructions
Hints and tips
Environmental information

- 3 -
822 61 16-27
Before installing and first using the washing machine, read this instruction booklet carefully, including it’s hints
and warnings. To avoid unnecessary mistakes and accidents, it is important to ensure that all people using
the washing machine are thoroughly familiar with it’s operation and safety features. Save these instructions
and make sure they remain with the dishwasher if it is moved or sold, so that everyone using it through it’s
life can be properly informed on appliance use and safety.
Safety information
Installation and service
● All packaging and transit locking devices must be
removed before the machine is first used. If they
are not, the result may be damage to the machine
or other property. See the section ”Transit locking
devices”.
● All installation and service work done on the product
must be carried out by a qualified technician in accor-
dance with these instructions. Work performed by
persons with inadequate knowledge may adversely
affect the satisfactory functioning of the product and
may cause personal injury or damage. Before any
work is carried out on the machine, it must be isolated
from the electrical supply, by unplugging the power
cord or removing the fuse.
● The machine is heavy, so take care when lifting it.
Never lift the machine by gripping it’s control panel,
door, or detergent dispenser.
● Avoid installing the machine in a room where there is
no waste gully (floor drain) set into the floor.
● The power cord must be plugged into an earthed
socket, which need to be easily accessible.
Permanent installation must only be carried out by
an authorized electrician.
● If the power cord is damaged, it must be replaced by
a special cord or assembly available from the manu-
facturer or it’s service agent.
● Make sure that the power cord is not nipped or other-
wise damaged and that the hoses do not get crushed
or kinked when moving the machine in connection
with installation or cleaning etc.
● When the machine location is on carpet floors, attention
must be paid so as to ensure that there is no obstruction
to the bottom vents.
● Servicing and possible repairs must be carried out by
a service company authorised by the supplier. Use
only spare parts supplied by these. Never try to repair
the machine yourself.
Child Safety
● The machine should be used by adults only. Do not
let children play with the controls or other parts of it.
● Remember that the plastic bags included in the
packaging can be fatal playthings for small children.
● Before loading the machine, check that there are no
foreign objects or pets inside the drum.
● When the machine is operating, the door glass will
get hot, so it should not be touched. Keep children
away from the machine when it is operating.
During Use
● This machine is intended only for normal domestic
washing and only in accordance with these instruc-
tions. If it is used for other purposes, there is a risk
that this may cause personal injury or damage to
property.
● Only machine-washable items should be washed in
the machine. If in doubt, contact the manufacturer or
retailer of the item.
● Follow the recommendations of the care label and make
sure that pockets are empty and zips and buttons are
done up before washing.
● Objects such as coins, safety pins, nails, screws and
other hard objects can cause serious damage to the
machine. Make sure that all pockets have been emptied
before putting garments into the machine.
● Remove stains such as rust, dye, ink and grass before
machine-washing.
● Avoid washing clothes which are frayed or exces-
sively worn.
● Wash small items such as thin socks, garment ties/
laces, lace items etc. in a special laundry net to prevent
them from getting between the inner and outer drums.
● Items which have been treated with chemicals such
as stain removal products, liquid domestic cleaning
products and similar must be rinsed thoroughly by
hand before they can be washed in the machine.
● Underwired bras, if washed in the machine at all,
should be washed in a laundry net.
● Only use detergents specially designed for washing
machine.
● Always follow the recommendations of the manu-
facturers of detergent and fabric conditioner con-
cerning the quantities of these products to use. Using
too much can damage your laundry items.
● Do not overload the drum. Overloading impairs the
machine's performance and can damage laundry items.
● Before opening the door always check that the water
has been pumped out of the machine.
● Do not leave the premises while the machine is operating.
● After using the machine, turn off it’s water supply and
disconnect it from the power supply. When removing
the electrical plug, grip the plug, not the lead.
● Leave the door ajar when the machine is not in use,
to prevent any stale odour.
● Make sure that the machine is disconnected from the
power supply during cleaning and maintenance work.

- 4 -
- the packing material:
Never leave packaging material in a place
where children may play with it.
All materials used in packaging this machine are environ-
mentally-friendly. The various plastics used are identified
and can be recycled:
● PE stands for polyethylene, which is used for the
bag around the machine and the bag in which
these instructions were supplied.
● PS stands for polystyrene (in this case moulded
polystyrene), which is used for the sections of
packaging needed to cushion the machine in
transit.
The cardboard components of the packaging are made
from recyclable paper and should be taken to a collection
point for recycling.
- the old appliance:
The symbol on the product or on its packaging indicates
that this product may not be treated as household waste.
Instead it shall be handed over to the applicable collection
point for the recycling of electrical and electronic equipment.
By ensuring this product is disposed of correctly, you will
help prevent potential negative consequences for the
environment and human health, which could otherwise be
caused by inappropriate waste handling of this product.
For more detailed information about recycling of this product,
please contact your local city office, your household waste
disposal service or the shop where you purchased the
product.
- energy saving tips:
To save water, energy and help protect the environment,
we recommend that you follow these hints:
● The washing machine is especially economical when
you fully utilise the stated filling quantities.
● Adjust the quantity of washing detergent according to
the hardness of the water, the amount of laundry and
the degree of soiling.
● A programme without pre-wash is sufficient for normally
soiled laundry.
● For small amounts of washing, use only half to two
thirds the recommended amount of washing detergent.
● Suitable pretreatment enables stains and small amounts
of dirt to be removed. You can then wash at a lower
temperature.
Disposal
Your new washing machine meets all modern require-
ments for effective treatment of laundry with low water,
energy and detergent consumption.
● The programme selector combines the function of
programme and temperature selection, making it
easier to set the programme.
● Programme progress display shows current phase
of the selected programme.
● The automatic cooling of the washing water from
90°C to 60°C before draining will reduce thermal
shock to fabrics, helping to prevent creasing.
● The special wool programme with it’s new delicate
wash system treats your woollens with extreme care.
● The unbalance detection system discover and
prevents vibrations caused by incorrect distribution
of the laundry during the spin cycle.
● The ECO valve makes the full use of detergent
possible and saves energy by lower water consumption.
Your new washing machine

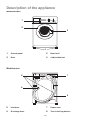
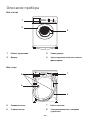
Machine front
Description of the appliance
1 Control panel
2 Door
3 Door latch
4 4 adjustable feet
- 5 -
1
2
4
3
Machine rear
6
8
7
5
5 Inlet hose
6 Discharge hose
7 Power cord
8 Transit locking devices

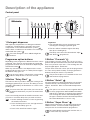
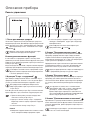
1 Detergent dispenser
With separate compartments for detergent and fabric
conditioner. The detergent is poured in the larger
compartment on the left marked with the symbol
and the fabric conditioner in the smaller one on the right
marked with the symbol .
Pre-wash detergent is to be added straight into
the drum.
Programme option buttons
Depending on the programme, different functions can be
combined. They must be selected after the requested
programme has been choosen and before depressing the
Start/Pause button .
When any of these buttons are depressed, the corres-
ponding indicator lamp comes on. When pressed again,
the indicator lamp goes out.
If an incorrect option is selected, the corresponding
indicator lamp flashes for about 2 seconds.
2 Button ”Delay Start”
This button makes it possible to delay the starting of the
washing programme by 6 or 3 hours. The delay you have
selected is indicated by the illumination on of the corres-
ponding light.
You must select this option after you have set the
programme and before you press the Start/Pause
button.
If you have already pressed the Start/Pause button and
you wish to cancel the delay time, proceed as follows:
1. Set the washing machine to Pause by pressing
the Start/Pause button.
2. Press the Delay button once, the light relevant
to the selected delay goes off.
3. Press in the Start/Pause button again.
Important!
● The selected delay can be changed only after
selecting the washing programme again.
● The door will be locked throughout the delay
time (door locked light lit).
The Delay start cannot be selected with ”Spin”
and ”Drain” programmes.
3 Button ”Pre-wash”
If the laundry is heavily soiled, you can choose a pro-
gramme with pre-wash. Before the main wash the machine
then run a pre-wash up to 30° C. The washing time will
be prolonged approx. 20 minutes.
The pre-wash ends with a short spin in the programmes
for cotton and synthetic laundry. In the programme for
delicate laundry the water is only drained.
The pre-wash option is not available for the wool
and hand wash programmes.
4 Button ”Quick”
Short programme for lightly soiled white-/coloured and
synthetic laundry. The washing time will be reduced
approx. 10 minutes. Max. recommended temperature
60° C.
This options can not be choosen together with the
economy programmes 40E and 60E and neither
with the wool, delicate or hand wash programmes.
The washing time will be reduced depending on
the type of material and the selected temperature.
Recommended load for cotton is 2 kg.
5 Button ”Super Rinse”
When pressing this button, the machine will perform 2
additional rinses. Can be used with all programmes
except for the wool and hand wash programmes.
Recommended for people with sensitive skin, or
in areas with very soft water.
- 6 -
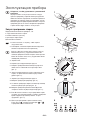
Description of the appliance
Control panel
6h
3h
E
E
1 2 5 6 743 8 9

6 Button ”Start/Pause”
This button has two functions:
Start: Press the button in order to start the required
programme. The corresponding indicator lamp
is lit. The indicator lamp for ”Locked” in the pro-
gramme progress display is lit and the door is
locked.
Pause: To interrupt a programme which is running, press
the button. The corresponding indicator lamp
starts to flash. To continue the programme, press
the button again.
7 Programme progress display
When you select a wash programme, the light corres-
ponding to the various phases of the programme goes on.
When the programme has started, the display will allways
show which section of the choosen programme the
machine is performing, or if is finished.
= pre-wash/main wash
= rinses
= spin
= end
= locked
The light comes on when the machine is performing
the washing phase (main wash). If you have choosen the
”Pre-wash” option by pressing that button, the light
will be on during the pre-wash phase too.
When the ”End” light is lit, the programme is finished.
The door can be opened and the laundry can be removed.
The light ”Locked” indicates if the door can be opened:
- the light is lit: the door can not be opened
- the light is out: the door can be opened
- the light flashes: the door can soon be opened
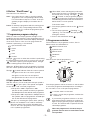
8 Spin speed or function
With this selector you can reduce the final spin speed or
select the ”No spin” option. The speeds are applied
for the ”white-” and ”coloured” programmes.
● The position 1100 is equivalent to 900
rpm/min for the synthetic and wool programmes
and 700 rpm/min for the delicate wash programme.
● The position 500 is equivalent to 500 rpm/min for
the synthetic and wool programmes and 450 rpm/
min for the delicate wash programme.
”No spin”, by selecting this option all the spinning
phases are excluded. To be used for extremely
delicate material. The machine will add 3 extra
rinses to the cotton programmes and 1 extra rinse
to the synthetic programmes.
”Rinse Hold”, when selecting this position the
water of the last rinse is not drained to prevent
the laundry from creasing. The lights ”End”
and ”Locked” on the programme progress
display are lit when the programme is finished
and indicating that the water must be drained
before the door can be opened.
To drain the water:
1. Turn the programme selector to the ”Reset”
position.
2. Choose the programme ”Draining” or
”Spinning”. You can reduce the spin speed by
turning the selector.
3. Press in the Start/Pause-button .
9 Programme selector
The machine has six programme sections, five for
different wash recommendations:
White/coloureds wash
Synthetic wash
Delicate wash
Handwash
Wool
and one for the special programmes:
Mini Rinses Drain Spin
Turn the programme selector clockwise or anticlockwise
to select the programme and temperature according to
the care label, or one of the special programmes.
= cold, the water is not heated
= resets, cancels the programme, switches the
machine off.
If you turn the programme selector to an other
programme when the machine is working, the
lights in the programme progress display starts
to flash. The machine will not perform the new
selected programme.
When the programme is finished, the pro-
gramme selector must be turned back to the
reset position.
- 7 -

- 8 -
Sorting the laundry
● Do not allow moist laundry to lay for any longer period
of time. Moist laundry becommes mouldy and begin
to smell. The mould stains can not be removed.
● It’s not recommended to mix coloured with white
materials.
● New coloured garments often contain surplus dye. It
is best to wash such items separately the first time.
● Linen can be washed as ”cotton” or ”synthetic” but
spin only briefly otherwise the fibres will brake.
● Iron free materials such as polyester/cotton should be
washed as ”synthetic”.
● Fragile materials such as acrylic and most curtains
should be washed as ”delicate”.
● The wool programme is specially designed for garments
made from 100%, new wool with the label ”Machine
washable”. Other types of wool and mixtures can
shrink, or mat if machine washed.
● Treat diffucult stains such as grass, rust, tar, paint
and ink before washing. To remove stains from paint
can solvents like terpentine be used. In this case the
garments must be rinsed thoroughly before they can
be washed in the machine.
The manufacture is not responsible for any damage
caused by the use of any solvents or flammable
substanses.
Temperatures
● We recommend that you wash white cotton at 60°C
instead of 90°C.
● Never wash linen at any temperature higher then
60°C, because the fabric then becommes burled.
● Fast coloured garments normally requires 60°C, but
if the garments are not heavily soilded, they will be
clean at 40°C.
● White and coloured synthetic materials can normally
be washed at 60°C, but often it’s enough with 40°C, if
the garments are not heavily soilded.
● Non-fast coloured garments and fragile materials
should never be washed at any temperature higher
then 40°C.
Allways check the care label, so that the garment
is washed at the right temperature. The garment
can be discoloured if it’s washed at a higher
temperature then what is recommended.
How much laundry per load?
Since it’s difficult to weigh the laundry we suggest that
you appriciate the weight by looking to see how full the
drum is.
Cotton and linen: Full drum, but not too tightly packed.
Not fragile synthetic materials: No more then 2/3 of
the drum.
Fragile materials, delicate wash and wool: No more
then half full drum.
Before loading the laundry into the machine:
● All tears and holes repaired.
● Lose buttons resown.
● Zips are done up.
● Empty and close all pockets. Objects such as coins,
safety pins, nails, screws and other hard objects can
cause serious damage to the machine and the laundry.
These types of damages are not covered by guarantee.
Weight examples of laundry items
(dry items)
To help you load your washing machine correctly, here
are some weight examples of average garments and
items. These are based on cotton goods.
Bathrobe ~1.2 kg
Duvet cover ~0.7 kg
Sheet ~0.5 kg
Blouse ~0.1 kg
Towel (Terry) ~0.2 kg
Shirt ~0.2 kg
Nightdress ~0.2 kg
Pyjamas ~0.2 kg
Underpants ~0.1 kg
Underpants (long) ~0.3 kg
Pillow-case ~0.2 kg
Socks ~0.1 kg
Descaling
If your water supply is harder than 7° dH, you should de-
scale your washing machine at least once every three
months.
1. Use approx. 150 ml of citric acid instead of de-
tergent.
2. Run the wash programme with the highest
temperature without any laundry.
Limescale deposits on components such as the
machine's heating element will reduce their
service life.
Contact your water company to find out the
hardness level of your local water supply.
General washing information

Detergent and fabric conditioner
Good washing result depends on among other things of
the choice of detergent and the correct dosage. Too low
dosage can cause resoiling in the form of grey burls, brown
discolouration from the drum and odour in the machine.
Too much detergent has a negative impact on the envi-
ronment. Even biodegradable detergents contains subs-
tances which can disturb the balance of the environment.
Use only good-quality detergents which are
intended for use in automatic washing
machines.
To determ how much to use, follow the detergent manu-
facturer's recommendations, taking into account the size
of the wash load, the degree of soiling and the hardness
of your water supply. If you live in an area with hard water,
see the section ”Descaling”. If the water hardness level
is unknown, your local water company should be able to
inform you.
Detergent
Pour the detergent into the left-hand compartment of the
detergent dispenser before the programme is started.
Special types of detergents are available for coloureds,
delicates and wool.
Do not put the detergent manufacturer’s
dosing device/ball into the drum. Pour the
detergent into the detergent compartment
instead.
This washing machine has a washing system which uses
a minimum amount of water in order to make the laundry
clean. It is therefore a risk that the detergent will not de-
solve and residues can be found on the garments after
the programme is finished if a dosing device is used.
Pre-wash detergent is to be added straight into
the drum.
Liquid detergent
A suitable liquid detergent can be used instead of powder
detergent for programmes with low or medium wash
temperatures. In these cases you must choose a pro-
gramme without pre-wash. Pour the liquid detergent into
the detergent compartment immediately before you start
the programme.
Fabric conditioner
If you are using fabric conditioner, pour it into the right-
hand compartment of the detergent dispenser. Fabric
conditioner is particularly useful if the load will later be
dried in a tumble dryer, as it counteracts static electricity.
Follow the manufacturer’s dosage instructions.
Never fill the compartment for fabric condi-
tioner higher than the marked maximum level.
- 9 -
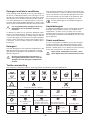
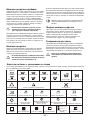
Textile care labelling
These are the commonest symbols used on garments and textiles, plus brief explanations.
dry cleaning in all
solvents
dry cleaning in perchlor-
ethylene, petrol, pure
alcohol, R 111 & R 113
dry cleaning in petrol,
pure alcohol and R 113
DRYING
WASHING
hand wash only do not wash in water
90° wash
BLEACHING
IRONING
DRY-CLEAN
may be bleached in cold water do not bleach
ironing max. 200°
do not dry-clean
ironing max. 150° ironing max. 100° do not iron
dry flat drip dry hang-dry do not tumble-drycan be tumble-dried
60° wash 40° wash 30° wash
normal temp.
low temp.
delicate wash
normal wash

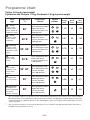
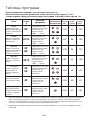
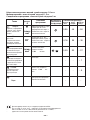
Programme chart
- 10 -
60°E
Cotton 3.0 kg dry load weight
Synthetics and Delicate 1.5 kg, Handwash 1.0 kg dry load weight
Load
type
White
heavily soiled
working clothes,
sheets, tablecloths,
underwear, towels.
White
normally soiled
sheets, towels,
underwear.
Coloured
normally soiled
underwear, terry,
tablecloths, towels,
sheets.
Delicate
for fragile items
e.g. net curtains.
Handwash
for fragile items
which is particularly
sensitive to
machine washing.
90°
30° 60°
40°
30°
1,43
44
~ 126
0,57
39
~ 130
0,78
44
~ 107
0,38
45
~ 61
0,20
42
~ 50
Wash programme 90°C
without pre wash.
3 rinses and spin max.
1100 rpm/min.
Wash programme 30°,
60°C without pre wash.
3 rinses and spin max.
1100 rpm/min
Wash programme 60°C
without pre wash.
3 rinses and spin max.
1100 rpm/min.
Wash programme 40°C
without pre wash.
3 rinses and spin
max. 700 rpm/min.
Wash programme 30°C
without pre wash.
3 rinses and spin
max. 900 rpm/min.
Temperature
°C
Option
buttons
Consumption *
Programme
content
Synthetic
lightly soiled
underwear, anti-
crease shirts,
blouses.
30° 40°
0,26
42 ~ 67
Wash programme 30°,
40°C without pre wash.
3 rinses and spin
max. 900 rpm/min.
Energy
kWh
Time
minutes
Water
litres
* The consumption figures can deviate from the stated figures depending on the water pressure, water hardness,
inlet temperature, room temperature, type and quantity of laundry, the detergent used, fluctuations in the main
voltage and choosen additional functions. The stated figures refers to the highest water temperatures for each
wash programme.
** The consumer information on the energy declaration is in accordance with directive EEC 92/75 and refers to
the 60E wash programme for cotton.
**
40°E
Coloured
lightly soiled
sheets, towels,
blouses.
0,35
44
~ 126
Wash programme 40°C
without pre wash.
3 rinses and spin max.
1100 rpm/min

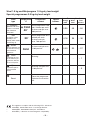
This appliance complies with the following E.E.C. directives:
– 73/23/EEC, dated 19.02.1973 – low-voltage directive.
– 89/336/EEC, dated 03.05.1989 (incl. amendment
– 92/31/EEC) – directive on electromagnetic compatibility.
- 11 -
Wool 1.0 kg and Miniprogram 1,5 kg dry load weight
Special programmes 3.0 kg dry load weight
Load
type
Woollens
garments with wool-
symbol or marked
with ”Machine
washable”.
Rinses
this programme can
be used for rinsing
hand washed
garments.
Cold
40°
Cold
Wash programme Cold,
40°C without pre wash.
3 rinses and spin max.
900 rpm/min.
Spin
separate spin for
hand washed
items.
Reset
Draining and spin max.
1100 rpm/min.
Reset the programme.
Switches the machine
off.
3 rinses and spin max.
1100 rpm/min.
Temperature
°C
Option
buttons
Programme
content
Drain
emptying the last
rinse water in pro-
grammes with the
rinse hold option.
Draining
0,35
45
~ 50
Mini
for lightly soiled
laundry or for
laundry which needs
freshening up.
30°
Wash programme 30°C
without pre wash.
2 rinses and spin
max. 700 rpm/min.
0,18
35
~ 30
0,03
30
~ 27
-
- ~ 1
Consumption *
-
- ~ 5
-
- -
Energy
kWh
Time
minutes
Water
litres

- 12 -
Using the appliance
Have you removed all the transit locking
devices?
The very first time the machine is used, you should
run a wash programme without any load, to clear
any residues which may have been left by the
manufacturing process. Pour approx. 100 ml of de-
tergent straight into the drum and run a programme
at 60°. When the programme is finished, the machine
will be ready for use.
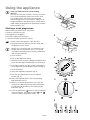
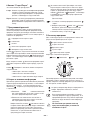
Starting a wash programme
Before starting up the machine, check that:
● the door is properly closed
● the appliance is plugged in
● the water supply tap is turned on
To start the machine, proceed as follows:
1. Pull the door latch gently to open the door.
2. Fill the drum evenly with the laundry. Large and
small items can be mixed.
Always try to wash full loads: for maximum load
weights see the programme charts. You should
only reduce the load weight for heavily soiled items
and sensitive materials.
3. Close the door.
4. Pull out the dispenser drawer.
5. Measure out the amount of detergent required and
pour it into the larger compartment on the left (fig 1).
6. Pour fabric softener into the smaller compartment
on the right without exceeding the max. level (fig. 2).
7. Close the drawer.
8. Select the required programme (fig. 3).
9. Turn the spin speed selector to the required
position (fig. 4).
10. Select the required option. The corresponding
light illuminates (fig. 5).
11. Before you start the programme, if you wish the
starting to be delayed, press the Delay start button
to select the desired delay. The relevant light
illuminates (fig. 5).
12. Press the Start/Pause button to start the required
wash programme. The indicator lights and
comes on and the programme starts.
1
2
3
5
4

- 13 -
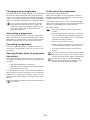
Changing a wash programme
The programme can be changed as long as the Start/Pause
button hasn’t been depressed. If the programme has
started, you can only change it by turning the programme
selector to the ”Reset” position and cancel the programme.
Select a new programme and press the Start/Pause button.
If you turn the programme selector to another
programme when the machine is running, the
lights in the programme progress display start to
flash. The machine will not perform the new
selected programme.
Interrupting a programme
Press the Start/Pause button to interrupt a programme
which is running. The corresponding light starts to flash.
After approx. 1 minute the door can be opened. The pro-
gramme continues when you press the button again.
Cancelling a programme
Turn the programme selector to the ”Reset” position, to
cancel a pre-set programme. Now you can select a new
programme.
Opening the door when the programme
has started
Press the Start/Pause button. The door can be opened
after approx. 1 minute, when the following conditions are
observed:
● The water temperature is below 55°C.
● The water level is below the bottom edge of the door.
● The machine doesn’t spin.
If it’s absolutely necessary to open the door and the con-
ditions above have been observed, you must switch the
machine off by turning the programme selector to the
”Reset” position. After approx. 1 minute the door can be
opened.
Pay attention that there can be remaining water in
the machine.
At the end of the programme
The machine stops automatically.
When the ”End” light is lit, the programme is finished.
The light ”Locked” goes out, the door can be opened
and the laundry can be removed.
If the ”Rinse hold” option has been selected, the lights
”End” and ”Locked” continue to be lit to indicate that the
water must be drained before opening the door.
To drain the water:
1. Turn the programme selector to the ”Reset”
position.
2. Select the programme ”Draining” or ”Spinning”.
You can reduce the spin speed by turning the
selector to avoid synthetic, wool or other fragile
materials becoming creased.
3. Press in the Start/Pause button.
4. When the light ”Locked” goes out, the door can
be opened and the laundry can be removed.
5. Turn the programme selector to the ”Reset”
position.
If you do not intend to carry out any more laundry,
turn off the water supply and for safety reasons,
also disconnect the power supply to the machine.
Leave the door ajar, so that the remaining
moisture inside the drum can evaporate and
prevent any musty smells developing.

- 14 -
The cabinet
Clean the outside surfaces of the appliance using a mild
(non-abrasive) household cleaning product. Finish by re-
moving remaining traces of the product with a damp cloth.
Do not use cleaning products which contain
alcohol (spirits), thinners and similar substances.
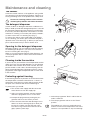
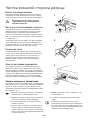
The detergent dispenser
In time, residues of detergent and fabric conditioner are
likely to build up inside the detergent dispenser. It should
be cleaned at regular intervals by flushing it out with water.
If necessary, the whole dispenser can be taken out of the
machine for cleaning. You need to pull it firmly outwards,
so that it comes free of a retaining stop (Fig. 1).
To remove the siphon at the inside edge of the dispen-
ser for cleaning, you need to press it inwards and pull it
upwards at the same time (Fig. 2). When you put it back,
press it downwards until you hear a distinct click.
Opening for the detergent dispenser
Detergent residues can also build up inside the opening
for the detergent dispenser. You can use an old tooth-
brush for cleaning this area (Fig. 3).
When you have finished and put back the dispenser, run
a short programme with no wash load in the machine to
rinse it clean.
Cleaning inside the machine
If you mostly use your machine for low-temperature washes
and/or if you use only very little detergent, you should clean
the inside of the machine about once a month. This will
prevent mould or stale odours from developing. Use the
full recommended quantity of detergent and run a wash
programme at the highest temperature with no wash load
in the machine.
Protecting against freezing
If the washing machine is placed in an environment where
the temperature sometimes falls below 0° C, there is a
risk that the small amount of water which remains inside
the parts of the machine will freeze and damage it.
To prevent this you should:
1. Turn off the water supply and disconnect the
water inlet hose from the supply tap.
2. Select a wash programme, start the machine
and let the programme run for a short time.
3. Interrupt the programme by turning the pro-
gramme selector to the ”Reset” position.
4. Place the end of the inlet and discharge hoses
down low, into the waste gully (floor drain) set
into the floor. Make sure that the end of the
hose does not go below the water level in the
gully's (drain's) water trap.
5. Select the programme ”Drain” and let that run
until it is finished.
6. Turn the programme selector to the ”Reset”
position.
The appliance is only to be used and stored
indoors at normal room temperature. The manu-
facture is not responsible for any frost damage.
Maintenance and cleaning
1
2
3

- 15 -
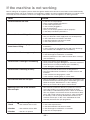
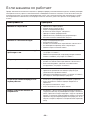
If the machine is not working
The machine will not start.
The machine is not filling with water.
The machine is discharging water at the
same time as filling.
The machine will not empty or spin.
The machine is leaking or overflowing.
The machine is vibrating or noisy.
The machine door will not open.
• Is the door closed properly?
• Have you pressed the Start button?
• Is the water tap turned on?
• Is the machine plugged in?
• Has the fuse blown?
• Have you set the programme selector properly?
• Is the delay start-button pressed in?
• Is the water tap turned on?
• Has your domestic water supply been cut off temporarily?
• Is the water inlet hose kinked or blocked?
• Is the filter inside the inlet hose blocked?
• Is the water pressure too low?
• Did you select a programme without drain and spin?
• Is the discharge hose kinked or constricted?
• Have any extensions to the outlet hose been done correctly?
(See Installation).
• Have you used too much detergent?
• Have you been using the detergent for automatic machines?
• Are both hoses correctly installed? (See Installation)
• Is the detergent compartment blocked?
• Have you removed all three transit locking devices?
• Has the machine been installed on a suitable surface and
levelled?
• Is the machine knocking against a wall?
• Is the machine standing firmly on all four feet?
• Did you wait approx. 1 minute after that the programme had
finished and has the indicator light for locked door gone out?
Read the chapter ”Maintenance” on door opening.
Never try to force the door open. Contact service.
Fault Check
Spinning starts late or the machine
does not spin.
• The electronic unbalance detection system has cut in be-
cause the laundry is not evenly distributed in the drum.
The laundry is redistributed by reverse rotation of the drum.
This may happen several times before the unbalance disap-
pears and normal spinning can resume. If, after 10 minutes,
the laundry is still not evenly distributed in the drum, the
machine will not spin. In this case, redistribute the load
manually and select the spin programme.
The ”End” indicator light flashes:
1 flash
= the machine does not fill
2 flashes = the machine will not drain
4 flashes = the door is opened
• Is the water tap turned on?
• Is the filter inside the inlet hose blocked?
• Is the discharge hose kinked or constricted?
• Is the door closed properly?
Before calling out an engineer, please check through the details below because some faults can be rectified easily
without the need to call out an engineer. If an engineer is called to resolve a problem listed below or to repair a fault
caused by incorrect installation or mis-use a charge will be made, even if the appliance is under guarantee.
• Is the end of the discharge hose too low down? (See
Installation)
• Is there a proper air gap between the end of the discharge
hose and the wall standpipe? (See Installation)

- 16 -
Service
Service and spare parts
Servicing and possible repairs must be carried out by
a service company authorised by the supplier. Use only
spare parts supplied by these.
Before calling service, use the trouble shooting table
”If the machine is not working” to try to attend to the fault
yourself. Note that electrical faults shall always be
rectified by a certified electrician.
Give the appliance’s model designation, product- and
serial numbers according to the data plate.
You can record these details here:
TYPE. ............................................................
MOD. ...........................................................
PROD.NO. ............................................................
SER.NO. ............................................................
Purchase date:
......................................................
Under what circumstances does the fault occur?
Never attempt to repair the washing machine
yourself. Repairs carried out by unauthorised
or inexperienced persons can cause injury or
serious malfunctioning.
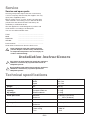
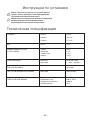
Technical specifications
Dimensions Height 67 cm
Width 49,5 cm
Depth 51,5 cm
Weight Net 53 kg
Recommended Cotton 3.0 kg
capacity Synthetics/Delicate 1.5 kg
dry weight Wool/Handwash 1.0 kg
Water pressures Minimum
Maximum
Drum volume 39 litres
Spin speed Maximum
Maximum
Electrical data Power supply 230V / 50 Hz
Power rating 1600 W
Fuse 10 A
Installation instructioners
Any electrical work required to install this appliance,
should be carried out by a qualified electrician or
competent person.
Any plumbing work required to install this appliance,
should be carried out by a qualified plumber or
competent person.
0,05 MPa (0,5 bares)
1000MPa (10 bares)
1100 rpm/min.
1100

- 17 -
Unpacking
Damages
If the machine has been damaged during transport, you
should immediately notify the company responsible for
delivering it.
Check that the machine is undamaged. If you discover
any damage, faults or that anything is missing, you should
notify the dealer immediately.
Never leave packaging material in a place
where children may play with it.
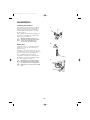
When lifting the machine
Be careful when lifting the machine. Incorrect methods of
lifting can cause physical injuries and also increase the
risk of damage to the machine. Open the door and take
hold of the top inside of the door opening. You can also
lift the machine by gripping the rear overhang of the top.
Never lift the machine by gripping it’s control
panel, door, or detergent dispenser. (Fig. 1).
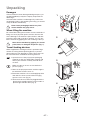
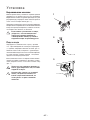
Transit locking devices
When supplied the washing machine is packed using a
number of locking devices/packing pieces to prevent
drum and motor from damage in transit. These must all
be removed before installed the washing machine.
1. Spread some of the polystyrene packaging
materials on the floor behind the machine and
then lay the machine carefully rearside down
on them.
Make sure that no hoses are crushed in the
process (Fig. 2).
2. Remove the polystyrene base and the support
bar which the machine rests on.
3. Return the machine to it’s normal upright position
and undo the three screws with belonging
spacers on it’s rear (Fig. 3).
4. The three holes must then be plugged with the
plastic plugs supplied, which can be found in a
plastic bag inside the drum (Fig. 4).
B
1
2
3
4

- 18 -
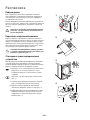
Installation
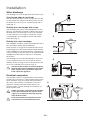
Levelling the machine
The machine must be installed on a sound and
firm surface and must not be touching walls or
furniture. Adjust the two front feet to level the
machine. Make sure the machine is resting on
all four feet (Fig. 1).
Some vibration is normal and unavoidable when
the machine is spinning the load, particularly if
the floor is not a concrete one.
When the appliance location is on
carpet floors, attention must be paid
so as to ensure that there is no
obstruction to the bottom vents.
Water inlet
Connect the inlet hose to a tap with a 3/4" pipe
thread. If necessary, use the restrictor (1/2”)
supplied. (Fig. 2).
The inlet hose must not be joined onto any form
of extension hose. If it is too short, the entire hose
must be replaced with a longer high-pressure
hose, specially designed for the purpose.
The machine end of this hose can be turned in
any direction. Loosen the retaining nut, turn the
hose, then retighten the nut (Fig. 3).
Check that the nut is tightend before
the machine is moved into position.
Use only the inlet hose supplied with
the machine, do not reuse the old inlet
hose.
3
2
1
192996970_GB.qxd 07/07/2008 16.45 Page 18

- 19 -
Installation
Water discharge
The discharge hose can be placed in these three ways:
Over the top edge of a washtub:
Use this option only if you can be sure that the hose will
not move when the machine is draining. The hose can
be fixed to the wall on a hook or tied to the tap with a
string (Fig. 1).
Directly into a waste pipe with a trap:
The discharge pipe can be connected directly into the
pipe (e.g. one beneath a washtub or kitchen sink), above
the water trap. The discharge hose must be arranged
so that some part of it’s length is routed up to a level
corresponding to the top edge of the tub and fixed in
place there (Fig. 2).
Directly into a wall standpipe:
This standpipe should be vertical. The height above the
floor should be between 650 and 800 mm.
There must be an air gap around and below the end of
the discharge hose. This means that the internal diameter
of the standpipe must be greater than the outer diameter
of the hose (Fig. 3). The hose must not be sticked into the
standpipe more than 50 mm and it has to be fixed in
this position.
The discharge hose can be extended up to total 3,5 m.
For the extension piece use a hose with an internal
diameter at least as large as that of the machine's own
hose. Use a suitable hose connector (Fig. 4).
In order for the machine to function properly,
the drain hose must be hooked on the factory
fitted support piece situated on top of the
back side of the appliance.
Electrical connection
The washing machine is supplied with a lead and elect-
rical plug for connection to a 230 V earthed wall socket,
which should be easily accessible and protected by a
10 A fuse. If the machine is installed in a "wet area"
(bathroom, laundry) but without fixed wiring to the
electrical supply, an earth leakage circuit breaker (or
RCD) must be used.
Before any work is carried out on the machine,
it must be isolated from the electric mains
supply, for example by removing the plug
from the wall socket.
Permanent electrical installation must be
carried out by an authorized electrician.
2
3
1
4

Sodervanie
Dlq polxzowatelq
Informaciq po tehnike
bezopasnosti
21
Utilizaciq 22
Wa[a nowaq stiralxnaq ma[ina 22
Opisanie pribora 23-25
- Wid szadi, Wid speredi
- Panelx uprawleniq
Ob]aq informaciq o stirke 26-27
Tablicy programm 28-29
|kspluataciq pribora 30-31
- Zapusk programmy stirki
- Izmenenie programmy stirki
- Prerywanie programmy stirki
- Otmena programmy stirki
- Otkrytie dwercy posle zapuska programmy
- Posle zawer[eniq programmy
~istka wne[nej storony dwercy 32
- Korpus stiralxnoj ma[iny
- Lotok dlq zagruzki mo@]ego sredstwa
- Gnezdo dlq lotka
- O^istka wnutrennih powerhnostej
- Za]ita ma[iny ot zamerzaniq
Esli ma[ina ne rabotaet 33-34
Serwis 34
- Serwisnoe obsluviwanie i zapasnye ^asti
Dlq ustanow]ika
Tehni^eskaq specifikaciq 35
Raspakowka 36
- Powrevdeniq
- Perenoska stiralxnoj ma[iny
- Stopornye transportirowo^nye ustrojstwa
USTANOWKA 37-38
- Wyrawniwanie ma[iny
- Poda^a wody
- Sliw wody
- Poda^a \lektro\nergii
Uslownye obozna^eniq, ispolxzuemye w rukowodstwe po \kspluatacii
Wy wstretite w tekste sledu@]ie obozna^eniq, kotorye budut westi was po instrukcii:
Informaciq po bezopasnosti
Posledowatelxnostx wypolneniq instrukcij
Poleznye sowety
Informaciq po za]ite okruva@]ej sredy
- 20 -
Strona się ładuje...
Strona się ładuje...
Strona się ładuje...
Strona się ładuje...
Strona się ładuje...
Strona się ładuje...
Strona się ładuje...
Strona się ładuje...
Strona się ładuje...
Strona się ładuje...
Strona się ładuje...
Strona się ładuje...
Strona się ładuje...
Strona się ładuje...
Strona się ładuje...
Strona się ładuje...
Strona się ładuje...
Strona się ładuje...
Strona się ładuje...
Strona się ładuje...
-
 1
1
-
 2
2
-
 3
3
-
 4
4
-
 5
5
-
 6
6
-
 7
7
-
 8
8
-
 9
9
-
 10
10
-
 11
11
-
 12
12
-
 13
13
-
 14
14
-
 15
15
-
 16
16
-
 17
17
-
 18
18
-
 19
19
-
 20
20
-
 21
21
-
 22
22
-
 23
23
-
 24
24
-
 25
25
-
 26
26
-
 27
27
-
 28
28
-
 29
29
-
 30
30
-
 31
31
-
 32
32
-
 33
33
-
 34
34
-
 35
35
-
 36
36
-
 37
37
-
 38
38
-
 39
39
-
 40
40


Electrolux EWC1150 Instrukcja obsługi
- Kategoria
- Pralki
- Typ
- Instrukcja obsługi
w innych językach
- English: Electrolux EWC1150 User manual
Powiązane artykuły
-
Electrolux EWC1050 Instrukcja obsługi
-
Electrolux EWF 1000 Instrukcja obsługi
-
Electrolux EWF1645 Instrukcja obsługi
-
-
-
Electrolux EDC3150 Instrukcja obsługi
-
-
Inne dokumenty
-
Zanussi FCS920C Instrukcja obsługi
-
-
-
-
Hoover NEXTRA Instrukcja obsługi
-
Otsein-Hoover DYN 9124D3P-30 Instrukcja obsługi
-
-
Candy GC4 2D Karta katalogowa
-
Candy GO 5100 D Instrukcja obsługi
-