
LED SOLAR LANTERN
LED SOLAR LANTERN
Assembly, operating and safety instructions
LED-SOLCELLSLAMPA
Monterings-, bruks- och säkerhetsanvisningar
LAMPA SOLARNA LED
Wskazówki montażu, obsługi i bezpieczeństwa
LED-SOLARLEUCHTE
Montage-, Bedienungs- und Sicherheitshinweise
LED-AURINK OKENNOV ALAISIN
Asennus-, käyttö- ja turvallisuusohjeet
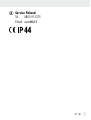
IAN 386580_2107

GB Assembly, operating and safety instructions Page 5
FI Asennus-, käyttö- ja turvallisuusohjeet Sivu 25
SE Monterings-, bruks- och säkerhetsanvisningar Sidan 43
PL Wskazówki montażu, obsługi i bezpieczeństwa Strona 62
DE/AT/CH Montage-, Bedienungs- und Sicherheitshinweise Seite 82

A1
1
HG07137B HG07137CHG07137A
HG07137B HG07137CHG07137A
2
3
6
4
5
1
2
3
4
5
3
4
5
2
6
6

B
HG07137B
HG07137C
HG07137A
8
10
6
9
8
10
9
77
8
10
9
7

5 GB
List of pictograms used .......................................................Page 6
Introduction ................................................................................Page 7
Proper use ......................................................................................Page 7
Description of parts and features .................................................Page 8
Scope of delivery ...........................................................................Page 8
Technical data ...............................................................................Page 8
Safety instructions .................................................................. Page 9
Product-specific safety instructions ................................................ Page 10
Safety instructions for batteries / rechargeable batteries ............ Page 11
Functioning .................................................................................. Page 13
Preparing for use .................................................................... Page 14
Assembling of the product ............................................................Page 14
Setting up the product ...................................................................Page 15
Replacing the rechargeable battery .............................................Page 15
Charging the rechargeable battery..............................................Page 18
Maintenance and care ......................................................... Page 18
Troubleshooting ....................................................................... Page 19
Disposal ......................................................................................... Page 20
Warranty ...................................................................................... Page 22
Warranty claim procedure ...........................................................Page 23
Service ............................................................................................ Page 24

6 GB
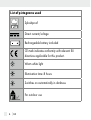
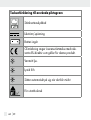
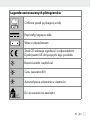
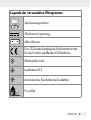
List of pictograms used
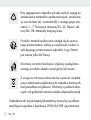
Splashproof
Direct current/voltage
Rechargeable battery included
CE mark indicates conformity with relevant EU
directives applicable for this product.
Warm white light
Illumination time: 8 hours
Switches on automatically in darkness
For outdoor use

7 GB
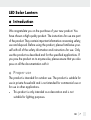
LED Solar Lantern
Introduction
We congratulate you on the purchase of your new product. You
have chosen a high quality product. The instructions for use are part
of the product. They contain important information concerning safety,
use and disposal. Before using the product, please familiarise your-
self with all of the safety information and instructions for use. Only
use the product as described and for the specified applications. If
you pass the product on to anyone else, please ensure that you also
pass on all the documentation with it.
Proper use
The product is intended for outdoor use. The product is suitable for
use in private household and is not intended for commercial use or
for use in other applications.
This product is only intended as a decoration and is not
suitable for lighting purposes.

8 GB
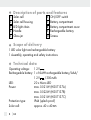
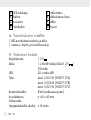
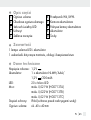
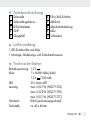
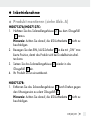
Description of parts and features
1 Solar cell
2 Solar cell housing
3 LED light chain
4 Handle
5 Glass jar
6 ON/OFF switch
7 Battery compartment
8 Battery compartment cover
9 Rechargeable battery
10 Screws
Scope of delivery
1 LED solar light and rechargeable battery
1 Assembly, operating and safety instructions
Technical data
Operating voltage: 1.2 V
Rechargeable battery: 1 x Ni-MH rechargeable battery/AAA/
1.2 V / 300 mAh
LED: 20 x Micro LED
Power: max. 0.021 W (HG07137A)
max. 0.022 W (HG07137B)
max. 0.021 W (HG07137C)
Protection type: IP44 (splash proof)
Solar cell: approx. 40 x 40 mm

9 GB
Lighting time
(with full charge): approx. 8 hours
Safety instructions
PLEASE READ THE INSTRUCTIONS FOR USE PRIOR TO USE!
PLEASE KEEP THE INSTRUCTIONS IN A SAFE PLACE! IF PASS-
ING THIS PRODUCT ON TO A THIRD PARTY ALSO INCLUDE
ALL DOCUMENTS.
This product can be used by children aged from 8 years and
above and persons with reduced physical, sensory or mental
capabilities or lack of experience and knowledge if they have
been given supervision or instruction concerning use of the
product in a safe way and understand the hazards involved.
Children shall not play with the product. Cleaning and user
maintenance shall not be made by children without supervision.
Do not use the product if you detect any kind of damage.
Always switch off the product, when storing it in dark environ-
ment, in order not to discharge the rechargeable battery.

10 GB
The LEDs are not replaceable.
If the LEDs fail at the end of their lives, the entire product must
be replaced.
The product does not contain any parts that can be serviced
by the user.
Never plug in the LED light chain 3 directly into a 230 V∼
(alternating current) directly.
The product is not a toy and should not be player by children.
Children are not able to understand the danges that can
occur when handling the product.
The product can never be used as a container.
Product-specific safety instructions
Make sure that the solar cell is free of dirt and free of snow
and ice in winter. Otherwise the performance of the solar cell
will diminish.

11 GB
Safety instructions for batteries/
rechargeable batteries
DANGER TO LIFE! Keep batteries/rechargeable batteries
out of reach of children. If accidentally swallowed seek imme-
diate medical attention.
Swallowing may lead to burns, perforation of soft tissue, and
death. Severe burns can occur within 2 hours of ingestion.
DANGER OF EXPLOSION! Never recharge
non-rechargeable batteries. Do not short-circuit bat-
teries/rechargeable batteries and/or open them.
Overheating, fire or bursting can be the result.
Never throw batteries/rechargeable batteries into fire or water.
Do not exert mechanical loads to batteries/rechargeable
batteries.
Risk of battery leakage
Avoid extreme environmental conditions and temperatures,
which could affect batteries/rechargeable batteries, e.g.
radiators/direct sunlight.

12 GB
If batteries/rechargeable batteries have leaked, avoid contact
with skin, eyes and mucous membranes with the chemicals!
Flush immediately the affected areas with fresh water and seek
medical attention!
WEAR PROTECTIVE GLOVES! Leaked or dam-
aged batteries/rechargeable batteries can cause
burns on contact with the skin. Wear suitable protec-
tive gloves at all times if such an event occurs.
In the event of a battery leak, immediately remove it from the
product to prevent damage.
Only use the same type of batteries/rechargeable batteries.
Do not mix used and new batteries/rechargeable batteries.
Remove the batteries/rechargeable batteries if the product
will not be used for a longer period.
Risk of damage of the product
Only use the specified type of battery/rechargeable battery!
Insert batteries/rechargeable batteries according to polarity
marks (+) and (-) on the battery/rechargeable battery and the
product.

13 GB
Use a dry lint-free cloth or cotton swab to clean the contacts
on the battery/rechargeable battery and in the battery com-
partment before inserting!
Remove exhausted batteries/rechargeable batteries from the
product immediately.
Functioning
The solar cell installed in the product converts sunlight into electrical
energy and stores it in 1 Ni-MH rechargeable battery. Switch on the
product with the ON/OFF switch 6. The product will automati-
cally light on as it begins to get dark. The LEDs are a very long-life
and energy-saving light source. The light duration depends on the
amount of sunlight, the angle of light on the solar cell and the tem-
perature (the battery capacity is temperature-dependent). A vertical
angle of light at temperatures above the freezing point is ideal. The
rechargeable battery does not achieve maximum capacity until after
several charge and discharge cycles.
In summer a completely drained rechargeable battery takes about
2 to 4 days to fully recharge in constant sunlight.

14 GB
Preparing for use
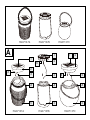
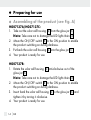
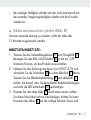
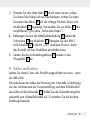
Assembling of the product (see Fig. A)
HG07137A/HG07137C:
1. Take out the solar cell housing 2 from the glass jar 5.
Note: Take care not to damage the LED light chain 3.
2. Move the ON/OFF switch 6 to the ON position to enable
the product switching on during darkness.
3. Put back the solar cell housing 2 into the glass jar 5.
4. Your product is ready for use.
HG07137B:
1. Rotate the solar cell housing 2 anti-clockwise out of the
glass jar 5.
Note: Take care not to damage the LED light chain 3.
2. Move the ON/OFF switch 6 to the ON position to enable
the product switching on during darkness.
3. Insert back the solar cell housing 2 to the glass jar 5 and
tighten it by turning it clockwise.
4. Your product is ready for use.

15 GB
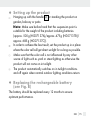
Setting up the product
Hanging up with the handle 4 or standing the product on
garden, balcony or patio.
Note: Make sure before hand that the suspension point is
suitable for the weight of the product including batteries
(approx. 500 g (HG07137A)/approx. 475 g (HG07137B) /
approx. 685 g (HG07137C)).
In order to achieve the best result, set the product up in a place
where the solar cell will get direct sunlight for as long as possib
le.
Make sure that the solar cell is not influenced by any other
source of light such as yard or street lighting as otherwise the
product will not come on in twilight.
The product automatically switches on in twilight conditions
and off again when normal outdoor lighting conditions return.
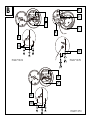
Replacing the rechargeable battery
(see Fig. B)
The battery should be replaced every 12 months to ensure
optimum performance.

16 GB
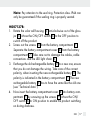
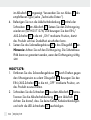
HG07137A/ HG07137C:
1.
Separate the solar cell housing
2
from the glass jar
5
.
Move
the ON/OFF switch 6 to the OFF position to switch off the
product.
2. Take out the seal ring (HG07137A only) and screw out the
screws 10 from the battery compartment 7. Separate the battery
compartment cover 8 from the battery compartment 7. Take
care not to
damage the cables, cable connections and the LED
light chain
3
.
3. Exchange the old rechargeable battery 9 to a new one, en-
sure that you do not damage the wiring. Take care of the correct
polarity, when inserting the new rechargeable battery 9. The
polarity is indicated in the battery compartment 7. The new
rechargeable battery 9 has to have the same like the old one
(see “Technical data“).
4. Now insert the battery compartment cover 8 into battery com-
partment 7 by screwing up the screws 10 . Insert back the
seal ring (HG07137A only) and move the ON/OFF switch
6 to ON position to enable the product switching on during
darkness.
5. Insert the solar cell housing 2 into the glass jar 5.

17 GB
Note: Pay attention to the seal ring. Protection class IP44 can
only be guaranteed if the sealing ring is properly seated.
HG07137B:
1. Rotate the solar cell housing 2 anti-clockwise out of the glass
jar 5. Move the ON/OFF switch 6 to the OFF position to
switch off the product.
2. Screw out the screws 10 from the battery compartment 7.
Separate the battery compartment cover 8 from the battery
compartment 7. Take care not to damage the cables, cable
connections and the LED light chain 3.
3. Exchange the old rechargeable battery 9 to a new one, ensure
that you do not damage the wiring. Take care of the correct
polarity, when inserting the new rechargeable battery 9. The
polarity is indicated in the battery compartment 7. The new
rechargeable battery 9 has to have the same like the old one
(see “Technical data“).
4. Now insert the battery compartment cover 8 into battery com-
partment 7 by screwing up the screws 10 . Move the ON/
OFF switch 6 to ON position to enable the product switching
on during darkness.

18 GB
5. Put back the solar cell housing 2 to the glass jar 5.
Charging the rechargeable battery
Note that the product must be switched on when the battery is
charging.
The charging time of the battery when the solar cell is used depends
on the intensity of the sunlight and the angle of incidence of the light
on the solar cell 1. Place the solar cell as perpendicular as possible
to the angle of incidence of the light. In this way you will receive the
highest light levels.
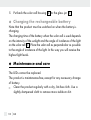
Maintenance and care
The LEDs cannot be replaced.
The product is maintenance-free, except for any necessary change
of battery.
Clean the product regularly with a dry, lint-free cloth. Use a
slightly dampened cloth to remove more stubborn dirt.

19 GB
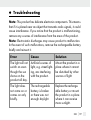
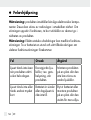
Troubleshooting
Note: This product has delicate electronic components. This means
that if it is placed near an object that transmits radio signals, it could
cause interference. If you notice that the product is malfunctioning,
remove any sources of interference from the area of the product.
Note: Electrostatic discharges may cause product to malfunction.
In the event of such malfunctions, remove the rechargeable battery
briefly and reinsert it.
Error Cause Solution
The light will not
switch on even
though the sun
shone on the
product all day.
Artificial sources of
light, e.g. street light-
ing, are interfering
with the product.
Mount the product in a
place where it cannot
be disturbed by other
sources of light.
The light does
not come on or
comes on only
briefly.
The rechargeable
battery is broken
or there was not
enough daylight.
Replace the recharge-
able battery or mount
the product in a place
where it can receive
more sunlight.

20 GB
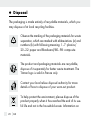
Disposal
The packaging is made entirely of recyclable materials, which you
may dispose of at local recycling facilities.
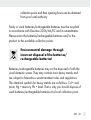
b
a
Observe the marking of the packaging materials for
waste
separation, which are marked with abbreviations (a) and
numbers (b) with following meaning: 1–7: plastics/
20–22: paper and fibreboard/80–98: composite
materials.
The product and packaging materials are recyclable,
dispose of it separately for better waste treatment. The
Triman logo is valid in France only.
Contact your local refuse disposal authority for more
details of how to dispose of your worn-out product.
To help protect the environment, please dispose of the
product properly when it has reached the end of its use-
ful life and not in the household waste. Information on
Strona się ładuje...
Strona się ładuje...
Strona się ładuje...
Strona się ładuje...
Strona się ładuje...
Strona się ładuje...
Strona się ładuje...
Strona się ładuje...
Strona się ładuje...
Strona się ładuje...
Strona się ładuje...
Strona się ładuje...
Strona się ładuje...
Strona się ładuje...
Strona się ładuje...
Strona się ładuje...
Strona się ładuje...
Strona się ładuje...
Strona się ładuje...
Strona się ładuje...
Strona się ładuje...
Strona się ładuje...
Strona się ładuje...
Strona się ładuje...
Strona się ładuje...
Strona się ładuje...
Strona się ładuje...
Strona się ładuje...
Strona się ładuje...
Strona się ładuje...
Strona się ładuje...
Strona się ładuje...
Strona się ładuje...
Strona się ładuje...
Strona się ładuje...
Strona się ładuje...
Strona się ładuje...
Strona się ładuje...
Strona się ładuje...
Strona się ładuje...
Strona się ładuje...
Strona się ładuje...
Strona się ładuje...
Strona się ładuje...
Strona się ładuje...
Strona się ładuje...
Strona się ładuje...
Strona się ładuje...
Strona się ładuje...
Strona się ładuje...
Strona się ładuje...
Strona się ładuje...
Strona się ładuje...
Strona się ładuje...
Strona się ładuje...
Strona się ładuje...
Strona się ładuje...
Strona się ładuje...
Strona się ładuje...
Strona się ładuje...
Strona się ładuje...
Strona się ładuje...
Strona się ładuje...
Strona się ładuje...
Strona się ładuje...
Strona się ładuje...
Strona się ładuje...
Strona się ładuje...
Strona się ładuje...
Strona się ładuje...
Strona się ładuje...
Strona się ładuje...
Strona się ładuje...
Strona się ładuje...
Strona się ładuje...
Strona się ładuje...
Strona się ładuje...
Strona się ładuje...
Strona się ładuje...
Strona się ładuje...
Strona się ładuje...
Strona się ładuje...
Strona się ładuje...
-
 1
1
-
 2
2
-
 3
3
-
 4
4
-
 5
5
-
 6
6
-
 7
7
-
 8
8
-
 9
9
-
 10
10
-
 11
11
-
 12
12
-
 13
13
-
 14
14
-
 15
15
-
 16
16
-
 17
17
-
 18
18
-
 19
19
-
 20
20
-
 21
21
-
 22
22
-
 23
23
-
 24
24
-
 25
25
-
 26
26
-
 27
27
-
 28
28
-
 29
29
-
 30
30
-
 31
31
-
 32
32
-
 33
33
-
 34
34
-
 35
35
-
 36
36
-
 37
37
-
 38
38
-
 39
39
-
 40
40
-
 41
41
-
 42
42
-
 43
43
-
 44
44
-
 45
45
-
 46
46
-
 47
47
-
 48
48
-
 49
49
-
 50
50
-
 51
51
-
 52
52
-
 53
53
-
 54
54
-
 55
55
-
 56
56
-
 57
57
-
 58
58
-
 59
59
-
 60
60
-
 61
61
-
 62
62
-
 63
63
-
 64
64
-
 65
65
-
 66
66
-
 67
67
-
 68
68
-
 69
69
-
 70
70
-
 71
71
-
 72
72
-
 73
73
-
 74
74
-
 75
75
-
 76
76
-
 77
77
-
 78
78
-
 79
79
-
 80
80
-
 81
81
-
 82
82
-
 83
83
-
 84
84
-
 85
85
-
 86
86
-
 87
87
-
 88
88
-
 89
89
-
 90
90
-
 91
91
-
 92
92
-
 93
93
-
 94
94
-
 95
95
-
 96
96
-
 97
97
-
 98
98
-
 99
99
-
 100
100
-
 101
101
-
 102
102
-
 103
103


w innych językach
- Deutsch: LIVARNO 386580 Bedienungsanleitung
- eesti: LIVARNO 386580 Omaniku manuaal
- svenska: LIVARNO 386580 Bruksanvisning
- English: LIVARNO 386580 Owner's manual
Powiązane artykuły
-
LIVARNO 385508 Instrukcja obsługi
-
-
-
-
-
-
-
-
-
Inne dokumenty
-
 LIVARNO LUX HG00776C Assembly, Operating And Safety Instructions
-
Silvercrest HG05395C Operation and Safety Notes
-
Silvercrest 312091 Operation and Safety Notes
-
Parkside PLEM 20 A1 Operation and Safety Notes
-
-
Auriol 291528 Operation and Safety Notes
-
Silvercrest 273028 Operation Manual
