
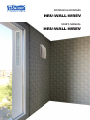
HRU-WALL-WREV
INSTRUKCJA MONTAŻU
USER’S MANUAL
HRU-WALL-WREV

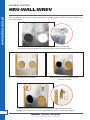
1. Zamontuj stelaż dopasowując otwór w ścianie za pomocą wkrętów Ø6.
Przy górnych otworach zastosowano poszerzenie które ułatwia montaż wkrętów.
2. Podłóż pod stelaż izolację. 3. Wytnij otwór w izolacji tak aby pokrył się
z otworem w ścianie.
4. Ręcznie lub za pomocą kombinerek wygnij odpowiednie mocowania puszek.
Zarówno mocowanie prawe jak i lewe uwzględniony ma spadek na ewentualne skropliny.
W przypadku montażu samego urządzenia HRU-WALL proszę postępować zgodnie z instrukcją dostępną na:
www.alnor.com.pl
ALNOR
®
systemy wentylacji
jest prawnie chronionym znakiem i technicznym patentem. Prawo do zmian zastrzeżone.
2
www.alnor.com.pl
Instrukcja montażu
HRU-WALL-WREV

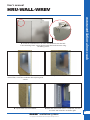
5. Zamontuj puszkę rozprężną czerpni tak aby otwór Ø150 trafił w otwór stelażu.
Przykręć puszkę do wygiętych mocowań za pomocą wkrętów samogwintujących.
6. Położ pierwszą warstwę izolacji. Na czas budowy
otwór puszki wentylacyjnej zabezpiecz zaślepką.
7. Położ drugą warstwę izolacji.
8. Położ trzecią warstwę izolacji. 9. Po skończonej budowie odkręć zaślepkę
i przykręć kratkę wentylacyjną.
3
ALNOR
®
systemy wentylacji
jest prawnie chronionym znakiem i technicznym patentem. Prawo do zmian zastrzeżone.
www.alnor.com.pl
Instrukcja montażu
HRU-WALL-WREV

1. Install the mounting frame by fitting & fastening the hole in the wall using Ø6 screws.
In the top holes of the mounting frame, we designed special widening, which facilitates the screw fastening.
2. Put the layer of insulation
under the mounting frame.
3. Cut the hole in the insulation so it fits the hole in
the wall.
4. Manually or with pliers, bend the correct fasteners. Both the right and left fastenings
are designed in the manner that includes the slop for possible condensation.
When installing the ventilation unit HRU-WALL itself, follow the manual www.ventilation-alnor.co.uk
ALNOR
®
ventilation systems
is a legally protected trademark and technical patent. All rights reserved.
4
www.ventilation-alnor.co.uk
User’s manual
HRU-WALL-WREV

5. Install the ventilation duct to match the Ø150 hole with the hole
in the mounting frame. Fasten the duct with the bend fasteners using
self-drilling screws.
6. Lay the first layer of insulation. For the time of
construction, secure the ventilation duct opening with
a cover.
7. Lay the second layer of insulation.
8. Lay the third layer of insulation. 9. After the construction work is completed, unscrew
the cover and install the ventilation grille.
5
ALNOR
®
ventilation systems
is a legally protected trademark and technical patent. All rights reserved.
www.ventilation-alnor.co.uk
User’s manual
HRU-WALL-WREV
-
 1
1
-
 2
2
-
 3
3
-
 4
4
-
 5
5


w innych językach
- English: Alnor HRU-WALL-WREV User manual
Inne dokumenty
-
Komfovent LDS Instrukcja instalacji
-
Nalnor DV-PP-L-150 Instrukcja obsługi
-
Crivit DS-1435 User Instructions
-
Overmax OV-85IN1 Instrukcja obsługi
-
-
 Seenergy HIT PLUS Instrukcja obsługi
-
Vents MAO1, MAO2, M1OK2 Instrukcja obsługi
-
Electrolux EXC650EIWA24 Instrukcja instalacji
-
Dell XPS 15 L501X Skrócona instrukcja obsługi
