
You should read this user manual carefully before
using the appliance.
Bevor Sie das Gerät in Betrieb nehmen, sollten
Sie diese Gebrauchsanweisung aufmerksam lesen.
Alvorens de apparatuur in gebruik te nemen dient
u deze gebruiksaanwijzing aandachtig te lezen.
Przed uruchomieniem urządzenia należy koniecznie
dokładnie przeczytać niniejszą instrukcję obsługi.
Lisez attentivement ce mode d’emploi avant d’utiliser
l’appareil .
Prima di utilizzare l’apparecchio in funzione leggere
attentamente le istruzioni per l’uso.
Citiţi cu atenţie prezentul manual de utilizare înainte de
folosirea aparatului.
Внимательно прочитайте руководство пользователя
перед использованием прибора.
Πρέπει να διαβάσετε αυτές τις οδηγίες χρήσης
προσεκτικά πριν χρησιμοποιήσετε τη συσκευή.
SLICER PROFI LINE
210000, 210017, 210031, 210048, 210086, 970294

2
Keep these instructions with the appliance.
Diese Gebrauchsanweisung bitte beim Gerät aufbewahren.
Bewaar deze handleiding bij het apparaat.
Zachowaj instrukcję urządzenia
Gardez ces instructions avec cet appareil.
Conservate le istruzioni insieme all’apparecchio.
Păstraţi maualul de utilizare alături de aparat.
Хранить руководство вместе с устройством.
Φυλάξτε αυτές τις οδηγίες μαζί με τη συσκευή.
For indoor use only.
Nur zur Verwendung im Innenbereich.
Alleen voor gebruik binnenshuis.
Do użytku wewnątrz pomieszczeń.
Pour l’usage à l’intérieur seulement.
Destinato solo all’uso domestico.
Doar pentru uz la interior.
Использовать только в помещениях.
Για χρήση μόνο σε εσωτερικό χώρο.
For item 210017 only.
Nur für Artikel 210017.
Alleen voor artikel 210017.
Dla pozycji numer 210017 tylko.
Pour l’article 210017 seulement.
Solo per articolo 210017.
Numai pentru articolul 210017.
Только для элемента 210017.
Για το στοιχείο 210017 μόνο.

Dear Customer,
Thank you for purchasing this Hendi appliance. Read this manual carefully, paying particular attention to
the safety regulations outlined below, before installing and using this appliance for the first time.
Safety regulations
• This appliance is intended for commercial use only.
• Only use the appliance for the intended purpose it was designed for as described in this
manual.
• The manufacturer is not liable for any damage caused by incorrect operation and
improper use.
• Keep the appliance and electrical plug away from water and other liquids. In the event
the appliance falls into water, immediately remove the power plug from the socket. Do
not use the appliance until it has been checked by a certified technician. Failure to follow
these instructions will cause life threatening risks.
• Never attempt to open the housing of the appliance by yourself.
• Do not insert objects into the housing of the appliance.
• Do not touch the plug with wet or damp hands.
•
Danger of electric shock! Do not attempt to repair the appliance by yourself, repairs
are only to be conducted by qualified personnel.
• Never use a damaged appliance! When it’s damaged, disconnect the appliance from the
socket and contact the retailer.
• Warning! Do not immerse the electrical parts of the appliance in water or other liquids.
• Never hold the appliance under running water.
• Regularly check the power plug and cord for any damage. When damaged it must be
replaced by a service agent or similarly qualified person in order to avoid danger or injury.
• Make sure the cord does not come in contact with sharp or hot objects and keep it away
from open fire. Never pull the power cord to unplug it from the socket, always pull the
plug instead.
• Make sure that the power cord and/or extension cord do not cause a trip hazard.
• Never leave the appliance unattended during use.
• Warning!
As long as the plug is in the socket the appliance is connected to the power
source.
• Turn off the appliance before unplugging it from the socket.
• Connect the power plug to an easily accessible electrical socket so that in case of emergency
the appliance can be unplugged immediately.
• Never carry the appliance by the cord.
• Do not use any extra devices that are not supplied together with the appliance.
• Only connect the appliance to an electrical outlet with the voltage and frequency mentioned
on the appliance label.
• Never use accessories other than those recommended by the manufacturer. Failure to do
so could pose a safety risk to the user and could damage the appliance. Only use original
parts and accessories.
3
NLEN

4
EN
• This appliance should not be operated by persons with reduced physical, sensory or mental
capabilities, or persons that have a lack of experience and knowledge.
• This appliance should, under any circumstances, not be used by children.
• Keep the appliance and its power cord out of reach of children.
• WARNING: ALWAYS switch off the appliance and unplug from power socket before
cleaning, maintenance or storage.
Special Safety Regulations
• CAUTION! Unplug before cleaning, maintenance or repair!
•
CAUTION! Two-person handling required!
•
CAUTION! Read instruction manual before operation, cleaning or maintenance!
• The food to be sliced must be thawed, unpacked and free from bones before it can be
sliced with the appliance. Do not use the appliance for slicing frozen food, vegetables or
for any other purpose.
• Use the appliance only as described in the manual.
• Any other use might lead to damage to the appliance or personal injury.
• This appliance should be operated by trained personnel.
• Do not place the appliance on a heating object (gasoline, electric, charcoal cooker, etc.)
Keep the appliance away from any hot surfaces and open flames. Always operate the
appliance on a level, stable, clean, heat-resistant and dry surface.
• Danger of injury! Care is needed when handling the blade, especially when removing the
blade for cleaning. Wear protective gloves (not supplied) if necessary.
• Caution! Securely route the power cord if necessary in order to prevent unintentional
tripping over and falling.
• Do not use the appliance before it is properly assembled with the blade, blade guard and
the food holder.
• Do not use the appliance near explosive or flammable materials, credit cards, magnetic
discs or radios.
• Never bypass any safety interlocks on the appliance.
• WARNING: Keep all ventilation openings in the appliance clear of obstruction.
• WARNING: ALWAYS switch OFF the appliance and unplug from electrical power supply
before cleaning, maintenance or storage.
• WARNING: ALWAYS keep hands, long hair and clothing away from the moving parts.
• Allow at least 20 cm spacing around the appliance for ventilation purpose during use.
• WARNING! Take great care when handling the cutting discs. Wear protective gloves (not
supplied) if necessary.

5
EN
Intended use
• This appliance is intended for professional use.
•
The appliance is designed only for slicing foodstuff,
e. g. meats, cheese, breads, etc. Any other use may
lead to damage to the appliance or personal injury.
• Operating the appliance for any other purpose
shall be deemed a misuse of the device. The user
shall be solely liable for improper use of the de-
vice.
Grounding installation
This appliance is classified as protection class
I and must be connected to a protective ground.
Grounding reduces the risk of electric shock by
providing an escape wire for the electric current.
This appliance is fitted with a power cord that has a
grounding wire and grounded plug. The plug must
be plugged into an outlet that is properly installed
and grounded.
Information on the slicer
General precautions
• The slicer must be operated only by highly qual-
ified people who are fully aware of the safety
measures described in this manual.
•
In case of personnel rotation, training is to be pro-
vided in advance
.
•
Although the slicer is equipped with safety devices
in the dangerous points, it is recommended not to
touch
the blade and the moving components.
•
Before starting cleaning and maintenance opera-
tions, disconnect the slicer plug from the supply
.
•
Assess the residual risks carefully when protec-
tion devices are removed to carry out cleaning and
maintenance
.
• Cleaning and maintenance require great concen-
tration.
•
A regular control of the electric supply cord is abso-
lutely necessary; a worn-out or damaged cord can
expose users to great electric shock hazard
.
•
If the slicer shows malfunctions, it is recommended
not to use or attempt to repair the device; please
call the “SERVICE CENTRE”
.
•
Do not use the slicer for frozen products, meat
and fish with bones and any products other than
foodstuffs.
•
Do not use the slicer without the meat pusher
when the meat is nearly finished.
•
Do not place yourself in a dangerous position, the
blade may cause injuries.
The manufacturer and/or the seller is not liable in
the following cases:
- if the slicer has been tampered by non-author-
ized personnel;
- if some parts have been substituted by non-orig-
inal spare parts;
- if the instructions included in this manual are not
followed accurately;
- if the slicer is not cleaned and oiled with the right
products.
Safety systems installed in the slicer
The slicer is equipped with:
•
a micro-switch which stops the slicer in case the
tie rod for blade guard is removed; the micro-switch
prevents from restarting the slicer if the guard has
not been set in the switch-off position
.
•
a relay in the control box which requires the restart
of the slicer when a power cut occurs
.
Even though slicers are provided with electrical and
mechanical protections (when the slicer is operat-
ing and for maintenance and cleaning operations),
there are still RESIDUAL RISKS that cannot be
eliminated completely; these risks are specified in
this manual under WARNING. The blade and other
parts of the machine can cause cuts and injuries.

6
EN
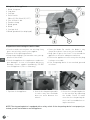
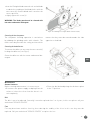
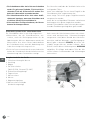
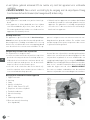
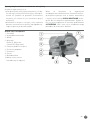
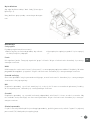
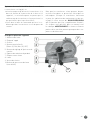
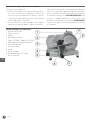
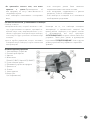
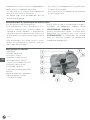
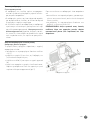
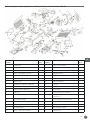
Main parts of the appliance
1 Blade sharpener
2 Stop plate
3 Carriage
4 On/off switch
[White (I): ON; Black (O): OFF]
5 Slice thickness dial
6 Product clamp
7 Blade guard
8 Blade
9 Carriage lock
10 Blade guard bolt (not displayed)
9
Preparations before using for the first time
• Check to make sure no parts are missing. If any
parts are missing, contact your supplier.
• Remove all the packing material.
• Keep the packaging if you intend to store your ap-
pliance in the future.
• Check the appliance for completeness and trans-
port damages. In case of incomplete delivery or
damage, contact supplier immediately. DO NOT
use the appliance. (See ==> Warranty).
• Clean the blade. Be careful: the blade is very
sharp. (Use gloves if necessary, not included)
• Keep open a space of at least 10 cm around the
appliance to allow for adequate ventilation.
• Position the appliance in such a way that the plug
is always accessible.
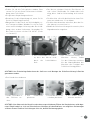
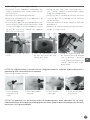
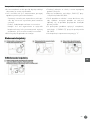
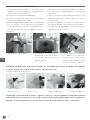
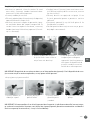
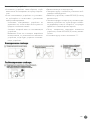
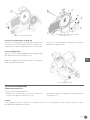
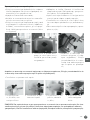
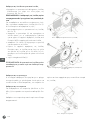
• If the sharpening device is not attached, proceed
as follows:
1. Top view of the appliance 2. Attach the sharpening module
in such a way that the blade
does not move between the
wheels.
3. Secure the sharpening device
to the machine by tightening
the holder. Check to make
sure that the sharpening de-
vice is well secured before us-
ing the machine.
NOTE! The sharpening device is equipped with a safety switch. If the sharpening device is not properly at-
tached, you will not be able to use the appliance.

7
EN
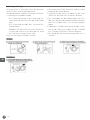
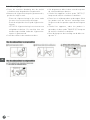
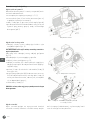
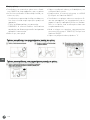
• Attach the hand guard.
1. Place both screws in
the carriage.
2. Attach the hand
guard.
3. Place the two wash-
ers over the white
bolts.
4. Screw on the two
dome nuts.
NOTE! You are advised not to use the appliance if the hand guard is not attached as instructed! These are
safety features that will prevent possible injury. If you do not attach these features, there will be a risk of
injury.
Instructions for use
• Position the appliance so that the on/off switch is
facing the user.
• If the blade sharpener has not been installed,
proceed as follows:
- Position the blade sharpener in its support so
that the blade does not extend between the
gears.
- Tighten the safety screw on the blade sharpen-
er.
- Note! The appliance is equipped with a safe-
ty switch and will turn off automatically if the
sharpening device is removed)
• Push the plug in the wall socket.
• Turn the dial with the graduated scale to the de-
sired slice thickness.
• Switch ON the appliance by pressing the “WHITE
(I)” button of the ON/OFF switch.
• Put the food product on the carriage and adjust
the clamp to hold the product firmly in place.
Make sure the product is positioned against the
stop plate.
• Once the product has been sliced, switch OFF the
appliance by pressing the “BLACK (O)” button of
the ON/OFF switch.
• Turn the thickness dial back to “0”.

8
EN
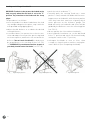
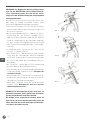
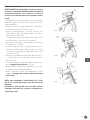
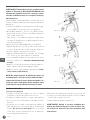
Loading and slicing of foodstuffs
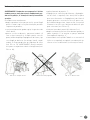
WARNING: Products to be cut must be loaded on the
food tray only when the dial knob is set to the “0”
position. Pay attention to the blade and the sharp
edges.
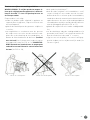
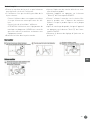
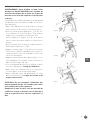
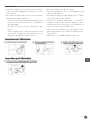
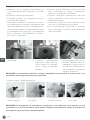
The procedure is as follows:
•
once the product has been loaded onto the food
tray and placed against the plate, stop it with the
arm provided with gripping points;
•
adjust the dial knob so as to obtain the desired
cutting thickness;
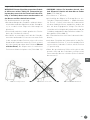
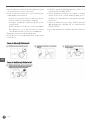
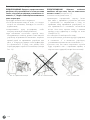
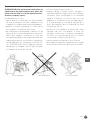
•
to avoid accidents, the operator has to face the ma-
chine and adopt a correct position: put the ring hand
on the meat pusher, and then the left one beside the
deflector (do not touch the blade);the body must
be perpendicular to the working surface (see FIG.
1a). WARNING: Pay maximum attention: no part of
your body should contact the blade (see FIG. 1b)
;
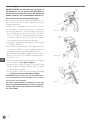
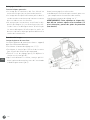
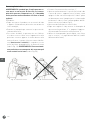
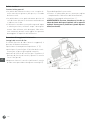
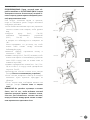
•
push the switch-on button “I”;
•
smoothly push the carriage (food tray + meat
pusher + stem) towards the blade without exert-
ing pressure on foodstuffs with the meat pusher
since they have their own force of gravity which
exerts pressure on the thickness gauge. The
blade will easily cut foodstuffs and slicers will be
guided by the deflector onto the collecting plate
(see FIG. 2);
•
do not operate the slicer without foodstuffs;
•
once foodstuffs have been cut, set the dial knob
in the “0” position and switch off the machine by
setting the switch to the “0” position;
•
resharpen the blade as soon as slices show
a rough or frayed surface and the cutting be-
comes difficult (see Sharpening the blade).
Fig. 1a. Right position Fig. 1b. Bad position
Fig. 2. Cutting meat

9
EN
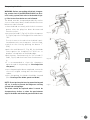
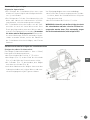
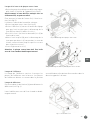
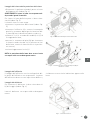
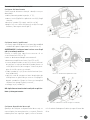
Sharpening the blade
WARNING: Before proceeding with blade sharpen-
ing, remain alert to the RESIDUAL RISKS (see Elec-
trical safety system) that refer to the hazard of inju-
ry if the instructions below are not followed.
The blade must be sharpened periodically and as
soon as it becomes blunt; the detailed instructions
below are to be followed:
•
clean the blade accurately with alcohol to remove
grease after the plug has been disconnected
from the socket;
•
unscrew the knob (1, Fig.3a), lift (a) the sharpener
(2, Fig.3a) up to the locking position and rotate it
180°.
Then let it move to the end so that the blade is posi-
tioned between the two sharpeners. Lock the knob
;
•
switch-on the slicer by pushing the button “I”
(ON);
•
push the small button (3, Fig. 3b), let the blade
rotate against the sharpener for 30/40 sec. to
produce a sharp burr on the blade edge;
•
push buttons simultaneously for 3/4 seconds (1
and 2, Fig 3c) and then leave them simultaneous-
ly;
•
it is recommended to clean the sharpeners
upon the end of sharpening (see Cleaning of the
sharpener);
•
once sharpening has been completed, return the
slice to its original setting with the reverse pro-
cedure.
•
after sharpening, the blade should be cleaned
(See Cleaning of the blade guard and blade)
NOTE: Do not prolong the burring operation beyond
3/4 sec. in order to prevent the dangerous twisting
of the blade cutting edge.
The blade should be replaced when it cannot be
sharpened any further or when the gap between
edge of the blade and the blade guard exceeds 6 mm.
Fig. 3a
Fig. 3b
Fig. 3c

10
EN
Ordinary cleaning
General features
•
The slicer cleaning must be carried out at least
once a day or more frequently, if necessary.
•
Cleaning must be extremely accurate for those
parts of the slicer which are directly or indirectly
in contact with foodstuffs.
•
The slicer must not be cleaned with water-cleaner
and high pressure water jets; use water and neutral
detergent instead. Do not use other detergents.
Tools, brushes and other devices likely to damage
the slicer’s surface must not be used
.
Before carrying our any cleaning operation it is
necessary to:
•
disconnect the power supply plug from the socket
to isolate the slicer from the rest of the electric
circuit completely;
•
set the dial knob adjusting the plate to the “0”
position.
WARNING: Pay attention to residual risks due to
cutting and/or sharp edges. Wear protective gloves
(not supplied) if necessary.
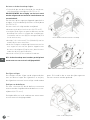
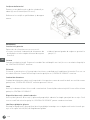
Slicer cleaning procedure
Cleaning of the food tray
The carriage (food tray + arm + stem) is easily re-
movable:
•
set the dial knob in the “0” position (1)
;
•
set the carriage (2) at the end of its run (a) near the
controls
;
•
unscrew the screw
(3), slide the carriage upwards
(b);
•
after having removed the carriage, it is possible
to clean accurately the food tray with hot water
and neutral detergent (pH 7).
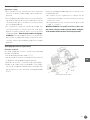
Carriage removal
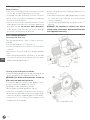
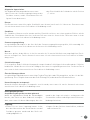
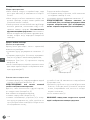
Cleaning of the blade guard and blade
•
Remove the blade guard cover by unscrewing the
pin at the back of the appliance (see Fig. 4).
WARNING: The blade cleaning must be carried out
with a wet cloth with metal gloves on.
To clean the opposite surface of the blade it is nec-
essary to remove the blade (see Fig. 5).
The blade is to be removed as follows:
•
disassemble the blade guard
(see Fig. 5);
•
remove the sharpener (a) and turn the thickness
blade with the dial knob to make the Plexiglas blade
removal tool (b) (not supplied) adhere to the blade
;
•
loosen the 3 or 4 screws (f) (according to the
model) that fix the blade;
Fig. 4 – Blade guard removal

11
EN
•
lean the Plexiglas blade removal tool on the blade
to obtain the coupling of the blade holes with the
two screws (e), turn the blade until it reaches the
correct position;
•
slightly tighten the screw (e).
WARNING: The blade guard must be cleaned with
hot water and neutral detergent.
Fig. 5 – Assembling the Plexiglas blade removal tool (b)
Cleaning of the sharpener
The sharpener cleaning operation is carried out
by rubbing the grinding moles with a brush. The
moles must be placed in the safety position which
means that they must be turned towards the side
opposite to the blade.
Cleaning of the deflector
To remove the deflector unscrew the two screws (a)
locking the deflector (see Fig. 6).
Clean the deflector with hot water and neutral de-
tergent.
Fig. 6 - View of the deflector
Maintenance
General features
Before starting maintenance it is necessary to:
•
Disconnect the power supply cord plug from the
socket to isolate the slicer from the electric cir-
cuit completely.
•
Place the dial knob adjusting the thickness plate
in the “0”position.
Belt
The belt is not to be adjusted. Generally, it must be replaced after 3 or 4 years; in this case please call your
authorized “SERVICE CENTER”.
Feet
Feet may deteriorate and lose elasticity, thus reducing the stability of the slicer. In this case they must be
replaced. Call your authorized “SERVICE CENTER” to replace the feet.

12
EN
Power supply cord
Periodically check the power supply cord for any symptoms of worn-out and, if this is the case, please call the
“SERVICE CENTER” to have it replaced.
Blade
Check that the blade does not lose more than 10mm of its original diameter. To have it replaced call the
“SERVICE CENTER”.
Sharpener - grinding moles
Check that the grinding moles retain their abrasive property during sharpening operations. Call the “SERVICE
CENTRE” if it is necessary to replace the grinding moles to prevent the blade damage.
Lubrication of sliding guides
From time to time pou some oil drops onto the round sliding guide along which the carriage moves back and
forth. This operation can be performed through the opening (OIL) next to the dial knob.
Label of the push-button panel
If the labels of the push-button panel have been damaged, call the “SERVICE CENTER” for replacement.
Machine disposal
Putting the machine out of service
If for some reason there is a necessity to put the
machine out of service, make sure nobody can use
it: disconnect it from the mains and eliminate any
the electrical connections.
Storage
• Before storage, always make sure the appliance
has already been disconnected from the electri-
cal outlet and cooled down completely.
• Store the appliance in a cool, clean and dry place.
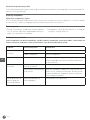
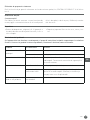
Troubleshooting
If the appliance does not function properly, please check the below table for the solution. If you are still
unable to solve the problem, please contact the supplier/service provider.
Problem Possible cause Solution
Appliance does not
slice evenly
Blunt blade Sharpen blade
Dirty appliance Clean the appliance
Appliance stops
slicing
Overheated motor Let the machine cool off for an extended period. The
motor’s safety thermostat will reset itself automatically.
Carriage does not
slide
Dirty slide bar Clean the slide bar and lubricate with Vaseline
Some food stick to the
blade.
Switch off the appliance & unplug it. Let it come to a
complete stop. Remove any blockage. Wipe the blade
with a damp cloth.
Blade stops when
product is being cut
v-belt worn out or dirty Contact the supplier.
When in doubt, always contact your supplier!

13
EN
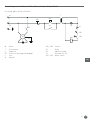
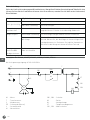
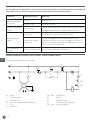
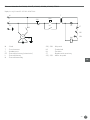
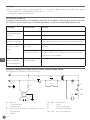
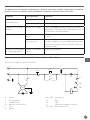
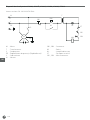
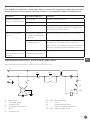
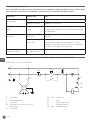
Circuit diagram for 210000, 210017, 210031, 210048, 210086, 970294
AC voltage input: AC220-240V 50Hz
N
L
PE
KC
KC HL
KM
ST
SQ1
SQ2
T
SB1
SB2
PE
C
M
M : Motor
T : Transformer
C : Capacitor
PE : Protective earthing (Grounding)
L : Live
N : Neutral
SB1, SB2 : Switch
KC : Relay
HL : Indicator lamp
ST : Thermal cut-out
SQ1, SQ2 : Micro switch

14
EN
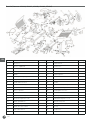
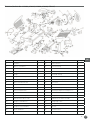
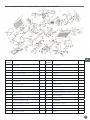
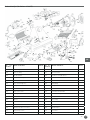
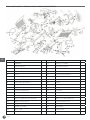
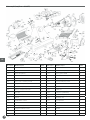
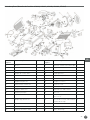
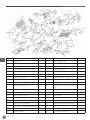
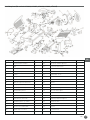
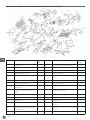
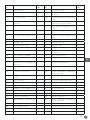
Part list (Item no: 210000, 210031, 210048, 210086, 970294)
Part no. Part name Quantity Part no. Part name Quantity
1 Encloser 1 20 Slide mulch 1
2 Active clapboard 1 21 Power line 1
3 Food salver 1 22 Slide axle 1
4 Blade guard disc 1 23 Knob with scale 1
5 Blade 1 24 Spring gasket 1
6 Blade guarding ring 1 25 Cam 1
7 Tray bracket 1 26 Cam osculant staff 1
8 Food and fixed-arm 1 27 Slider 1
9 Fixed-arm bushing 1 28 Slide axle briquetting 2
10 Fixed-arm handle 1 29 Spring of towing bracket axle 2
11 Plastic granule 1 30 Towing bracket axle 1
12 Motor 1 31 Quadrate axis 1
13 Motor briquetting 1 32 Towing bracket 1
14 Fixed-arm pin Ø12×185 1 33 M8×35Hexagonal screw 1
15 Blade guard bolts 1 34 Ball bearing 607 1
16 Ball bearing 6202 2 35 Towing bracket cover knob 1
17 Blade belt wheel Ø66 1 36 Relay 1
18 Pin of belt wheel 1 37 Capacitor 1
19 BeltSV.330 2 38 Capacitor retainer 1

15
EN
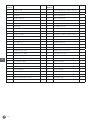
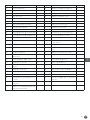
Part no. Part name Quantity Part no. Part name Quantity
39 Button mulch 1 65 Fixed-arm handle bolt 1
40 Button switch 1 66 Finger baffle bolt 2
41 Motherboard 1 67 Finger baffle nut 2
42 Meatscraper 1 68 Bracket knob bolt 1
43 Sharpener mulch 1 69 Undee spring gascket 1
44 Sharpener base of subassembly 1 70 Motor impacted bolt 1
45 Sharpener base of assembled 1 71 Meat scraping shim 2
46 Button of sharpener 2 72 Meat scraper bolt 2
47 Fine grinding wheel Ø45 1 73 Capacitor fixation clamp bolt 1
48 Crude grinding wheel Ø45 1 74 Tray bearing cover A 1
49 Pin of rubbing stone 2 75 Meat board bracket 1
50 Spring 2 76 Tray bearing cover B 1
51 Pin of sharpener bracket 1 77 Cross recessed countersunk head
M6×12
2
52 Sharpener tighten knob 1 78 Slide axle briquetting bolt 4
53 Active clapboard mandril 1 79 Quadrate axis locking screw 2
54 Rubber foot 4 80 Slider adjust bolt 1
55 Pin of blade guarding ring 2 81 Magnet 1
56 Meat blocking board 1 82 Magnet switch 1
57 Slide axle bracket 2 83 Aluminium block 1
58 Small belt wheel of motor 1 84 Microswitch 1
59 Slide driver 1 85 Stainless steel lock 1
60 Belt wheel setting 1 86 Limited block 1
61 Sharpener setting 1 87 Stainless steel bar 1
62 Ø15 Spring gasket for bearing 1 88 Set screw for tray bracket 1
63 Ø15 Spring gasket for bearing 1 89 Oil seal 1
64 Blade guard disc square-head nut 1

16
EN
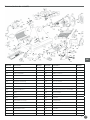
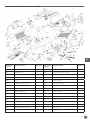
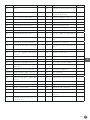
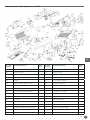
Part list (Item no: 210017)
Part no. Part name Quantity Part no. Part name Quantity
101 Encloser 1 119 Belt SV.400 2
102 Active clapboard 1 120 Supportng base 1
103 Food salver 1 121 Cable jacket 1
104 Guarding blade disc 1 122 Mearscraper 1
105 blade 1 123 Button mulch 1
106 Blade guarding ring 1 124 Button switch 1
107 Tray bracket 1 125 Capacitor 1
108 Food fixed-arm 1 126 Capacitor retainer 1
109 Fixed-arm bushing 1 127 Screw of oriented staff 1
110 Handle 1 128 Knob with scale 1
111 Plastic granule 1 129 Spring gasket 1
112 Motor 1 130 Cam 300 1
113 Motor briquetting 1 131 Motherboard 1
114 Power line 1 132 Cam osculant pin 1
115 Blade guard bolts 1 133 Sliding axle 1
116 Ball bearing6204 2 134 Slider 1
117 Belt wheel 1 135 Rubber foot 4
118 Pin of belt wheel 1 136 Sliding axle briquetting 2

17
EN
Part no. Part name Quantity Part no. Part name Quantity
137 Relay 1 165 Ø 47 Spring gasket for hole 1
138 Spring of sliding axle 2 166 Blade guard disc square-head nut 1
139 Towing bracket sliding axle 1 167 Fixed-arm handle bolt 1
140 Quadrate axis 1 168 Finger baffle bolt 2
141 Towing bracket 1 169 Finger baffle nut 2
142 Button of towing bracket 1 170 Bracket knob bolt 1
143 Sharpener mulch 1 171 Bracket knob nut 1
144 Button 2 172 Bracket bottom bolt 1
145 Fine grinding wheel Ø 45 1 173 Quadrate axis locking screw 2
146 Pin of burr cleaning wheel 2 174 Slide axle briquetting bolt 4
147 Spring of burr cleaning wheel 2 175 Slide axle bolt 1
148 Crude grinding wheel Ø 45 2 176 Ø 12 Under spring gasket 1
149 Sharpener tighten knob 1 177 Meat scraping shim 2
150 Supporting base of outer ring 1 178 Meat scraper bolt 1
151 Ø 4.751 Wheel 1 179 Fulcrum bearing shim 2
152 Pin of rubbing stone 1 180 Fulcrum bearing bolt 2
153 Sharpener base of subassembly 1 181 Stainless steel lock 1
154 pin of blade guading ring 2 182 Magnet 1
155 Pin of food tray 1 183 Magnet switch 1
156/156A Meat blocking board 1 184 Limited block 1
157 Bracket of sliding axle 1 185 Microswitch 1
158 Small belt wheel of motor 1 186 Tray bearing cover A 1
159 Slide transmitting wheel 1 187 Tray bearing cover B 1
160 Towing bracket handle 1 188 Fulcrum bearing shim 1
161 Sliding axle608 1 189 Oil seal 1
162 Belt wheel setting 1 190 Stainless steel bar 1
163 Sharpener setting 1 191 Set screw for tray bracket 1
164 Ø 20 Spring gasket for bearing 1

18
EN
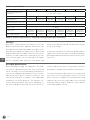
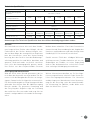
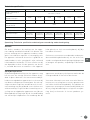
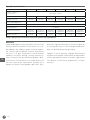
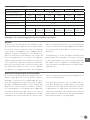
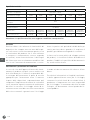
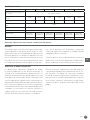
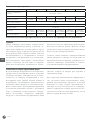
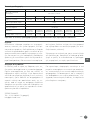
Technical specifications
Item no. 210031 210048 210000 210017 210086 970294
Operating voltage and
frequency
220-240V~ / 50 Hz
Rated input power 200W 280W 320W 420W 320W 280W
Blade diameter 195 mm 220 mm 250 mm 300 mm 250 mm 220 mm
Waterproof protection class IP33
Protecion class Class I
Noise level < 70 dB (A)
Dimension 400x400x
(H)330 mm
440x420x
(H)350 mm
485x420x
(H)395 mm
600x480x
(H)450 mm
485x420x
(H)395 mm
440x420x
(H)350 mm
Net weight (approx) 13.5 kg 14 kg 16 kg 26 kg 16 kg 14 kg
Remark: Technical specification is subjected to change without prior notification.
Warranty
Any defect affecting the functionality of the ap-
pliance which becomes apparent within one year
after purchase will be repaired by free repair or re-
placement provided the appliance has been used
and maintained in accordance with the instructions
and has not been abused or misused in any way.
Your statutory rights are not affected. If the appli-
ance is claimed under warranty, state where and
when it was purchased and include proof of pur-
chase (e.g. receipt).
In line with our policy of continuous product devel-
opment we reserve the right to change the product,
packaging and documentation specifications with-
out notice.
Discarding & Environment
When decommissioning the appliance, the prod-
uct must not be disposed of with other household
waste. Instead, it is your responsibility to dispose to
your waste equipment by handing it over to a des-
ignated collection point. Failure to follow this rule
may be penalized in accordance with applicable
regulations on waste disposal. The separate col-
lection and recycling of your waste equipment at
the time of disposal will help conserve natural re-
sources and ensure that it is recycled in a manner
that protects human health and the environment.
For more information about where you can drop off
your waste for recycling, please contact your local
waste collection company. The manufacturers and
importers do not take responsibility for recycling,
treatment and ecological disposal, either directly
or through a public system.

19
DE
Sehr geehrter Kunde,
Vielen Dank für den Kauf dieses Hendi Gerät. Lesen Sie dieses Handbuch sorgfältig und achten Sie
besonders auf die unten aufgeführten Sicherheitsvorschriften, bevor Sie dieses Gerät zum ersten Mal
installieren und verwenden.
Sicherheitsvorschriften
• Dieses Gerät ist nur für den gewerblichen Gebrauch bestim.
• Verwenden Sie das Gerät nur für den vorgesehenen Zweck, für den es entworfen wurde,
wie in diesem Handbuch beschrieben.
• Der Hersteller haftet nicht für Schäden, die durch fehlerhafte Bedienung und
unsachgemäße Verwendung verursacht werden.
• Halten Sie das Gerät und den elektrischen Stecker von Wasser und anderen Flüssigkeiten
fern. Falls das Gerät in Wasser fällt, entfernen Sie sofort den Netzstecker von der
Steckdose. Verwenden Sie das Gerät erst, wenn es von einem zertifizierten Techniker
überprüft wurde. Die Nichtbefolgung dieser Anweisungen führt zu lebensbedrohlichen
Risiken.
• Versuchen Sie niemals, das Gehäuse des Geräts selbst zu öffnen.
• Legen Sie keine Objekte in das Gehäuse der Appliance ein.
• Berühren Sie den Stecker nicht mit nassen oder feuchten Händen.
•
Gefahr eines elektrischen Schlags! Versuchen Sie nicht, das Gerät selbst zu
reparieren, Reparaturen sind nur von qualifiziertem Personal durchzuführen.
• Verwenden Sie niemals ein beschädigtes Gerät! Wenn es beschädigt ist, trennen Sie das
Gerät von der Steckdose und wenden Sie sich an den Händler.
• Warnung! Tauchen Sie die elektrischen Teile des Geräts nicht in Wasser oder andere
Flüssigkeiten ein.
• Halten Sie das Gerät niemals unter fließendem Wasser.
• Überprüfen Sie regelmäßig den Netzstecker und das Kabel auf Beschädigungen. Bei
Beschädigung muss es durch einen Dienstleister oder eine ähnlich qualifizierte Person
ersetzt werden, um Gefahren oder Verletzungen zu vermeiden.
• Stellen Sie sicher, dass das Kabel nicht mit scharfen oder heißen Gegenständen in
Berührung kommt und halten Sie es von offenem Feuer fern. Ziehen Sie niemals das
Netzkabel, um es von der Steckdose zu trennen, ziehen Sie stattdessen immer den
Stecker.
• Stellen Sie sicher, dass das Netzkabel und/oder das Verlängerungskabel keine
Auslösegefahr verursachen.
• Lassen Sie die Appliance während des Gebrauchs niemals unbeaufsichtigt.
• Warnung!
Solange sich der Stecker in der Steckdose befindet, wird das Gerät an die
Stromquelle angeschlossen.
• Schalten Sie die Appliance aus, bevor Sie sie vom Sockel trennen.
• Schließen Sie den Netzstecker an eine leicht zugängliche Steckdose an, so dass das Gerät
im Notfall sofort abgenommen werden kann.

20
DE
• Tragen Sie das Gerät niemals an der Schnur.
• Verwenden Sie keine zusätzlichen Geräte, die nicht zusammen mit der Appliance geliefert
werden.
• Schließen Sie das Gerät nur an eine Steckdose mit der Spannung und Frequenz an, die auf
dem Etikett des Gerätes angegeben ist.
• Verwenden Sie niemals anderes Zubehör als das vom Hersteller empfohlene Zubehör.
Andernfalls könnte ein Sicherheitsrisiko für den Benutzer darstellen und das Gerät
beschädigen. Verwenden Sie nur Originalteile und Zubehör.
• Dieses Gerät sollte nicht von Personen mit eingeschränkter körperlicher, sensorischer
oder geistiger Leistungsfähigkeit oder von Personen mit mangelnder Erfahrung und
Kenntnisnahme betrieben werden.
• Dieses Gerät sollte unter keinen Umständen von Kindern verwendet werden.
• Bewahren Sie das Gerät und das Netzkabel außerhalb der Reichweite von Kindern auf.
• ACHTUNG: Schalten Sie das Gerät immer aus und ziehen Sie es vor der Reinigung,
Wartung oder Lagerung von der Steckdose ab.
Besondere Sicherheitsvorschriften
• HINWEIS! Vor Reinigung, Wartung und Reparatur den Netzstecker ziehen!
•
HINWEIS! Handhabung durch zwei Personen erforderlich!!
•
HINWEIS! Bedienungsanleitung vor Betrieb, Reinigung und Wartung lesen!
• Die zu schneidenden Produkte müssen aufgetaut, ausgepackt und frei von Knochen
sein. Verwenden Sie das Gerät nicht zum Schneiden von Tiefkühlkost, Gemüse oder zu
anderen Zwecken.
• Verwenden Sie das Gerät ausschließlich gemäß dieser Anleitung.
• Die Verwendung des Geräts für andere Zwecke kann zu seiner Beschädigung oder zu
Körperverletzungen führen.
• Dieses Gerät darf nur von geschultem Personal bedient werden.
• Stellen Sie das Gerät nicht auf einen wärmemittierenden Gegenstand (Gasherd,
Elektroherd, usw.). Das Gerät ist weit entfernt von heißen Oberflächen und offenem
Feuer zu lagern. Stellen Sie das Gerät auf eine ebene, stabile, horizontale, saubere und
trockene Fläche auf, die auch gegen die Einwirkung hoher Temperaturen beständig ist.
• Achtung! Es besteht die Verletzungsgefahr! Bei der Handhabung des Messers muss man
sehr vorsichtig sein, insbesondere beim Ausbau der Klinge. Falls notwendig, tragen Sie
die Schutzhandschuhe (nicht mitgeliefert).
• Achtung! Das Stromkabel muss so gesichert werden, dass man nicht darüber stolpern
oder stürzen kann.
• Benutzen Sie das Gerät nicht, bevor das Messer, der Messerschutz und der Ablageteller
nicht ordnungsgemäß zusammengebaut werden.
Strona się ładuje...
Strona się ładuje...
Strona się ładuje...
Strona się ładuje...
Strona się ładuje...
Strona się ładuje...
Strona się ładuje...
Strona się ładuje...
Strona się ładuje...
Strona się ładuje...
Strona się ładuje...
Strona się ładuje...
Strona się ładuje...
Strona się ładuje...
Strona się ładuje...
Strona się ładuje...
Strona się ładuje...
Strona się ładuje...
Strona się ładuje...
Strona się ładuje...
Strona się ładuje...
Strona się ładuje...
Strona się ładuje...
Strona się ładuje...
Strona się ładuje...
Strona się ładuje...
Strona się ładuje...
Strona się ładuje...
Strona się ładuje...
Strona się ładuje...
Strona się ładuje...
Strona się ładuje...
Strona się ładuje...
Strona się ładuje...
Strona się ładuje...
Strona się ładuje...
Strona się ładuje...
Strona się ładuje...
Strona się ładuje...
Strona się ładuje...
Strona się ładuje...
Strona się ładuje...
Strona się ładuje...
Strona się ładuje...
Strona się ładuje...
Strona się ładuje...
Strona się ładuje...
Strona się ładuje...
Strona się ładuje...
Strona się ładuje...
Strona się ładuje...
Strona się ładuje...
Strona się ładuje...
Strona się ładuje...
Strona się ładuje...
Strona się ładuje...
Strona się ładuje...
Strona się ładuje...
Strona się ładuje...
Strona się ładuje...
Strona się ładuje...
Strona się ładuje...
Strona się ładuje...
Strona się ładuje...
Strona się ładuje...
Strona się ładuje...
Strona się ładuje...
Strona się ładuje...
Strona się ładuje...
Strona się ładuje...
Strona się ładuje...
Strona się ładuje...
Strona się ładuje...
Strona się ładuje...
Strona się ładuje...
Strona się ładuje...
Strona się ładuje...
Strona się ładuje...
Strona się ładuje...
Strona się ładuje...
Strona się ładuje...
Strona się ładuje...
Strona się ładuje...
Strona się ładuje...
Strona się ładuje...
Strona się ładuje...
Strona się ładuje...
Strona się ładuje...
Strona się ładuje...
Strona się ładuje...
Strona się ładuje...
Strona się ładuje...
Strona się ładuje...
Strona się ładuje...
Strona się ładuje...
Strona się ładuje...
Strona się ładuje...
Strona się ładuje...
Strona się ładuje...
Strona się ładuje...
Strona się ładuje...
Strona się ładuje...
Strona się ładuje...
Strona się ładuje...
Strona się ładuje...
Strona się ładuje...
Strona się ładuje...
Strona się ładuje...
Strona się ładuje...
Strona się ładuje...
Strona się ładuje...
Strona się ładuje...
Strona się ładuje...
Strona się ładuje...
Strona się ładuje...
Strona się ładuje...
Strona się ładuje...
Strona się ładuje...
Strona się ładuje...
Strona się ładuje...
Strona się ładuje...
Strona się ładuje...
Strona się ładuje...
Strona się ładuje...
Strona się ładuje...
Strona się ładuje...
Strona się ładuje...
Strona się ładuje...
Strona się ładuje...
Strona się ładuje...
Strona się ładuje...
Strona się ładuje...
Strona się ładuje...
Strona się ładuje...
Strona się ładuje...
Strona się ładuje...
-
 1
1
-
 2
2
-
 3
3
-
 4
4
-
 5
5
-
 6
6
-
 7
7
-
 8
8
-
 9
9
-
 10
10
-
 11
11
-
 12
12
-
 13
13
-
 14
14
-
 15
15
-
 16
16
-
 17
17
-
 18
18
-
 19
19
-
 20
20
-
 21
21
-
 22
22
-
 23
23
-
 24
24
-
 25
25
-
 26
26
-
 27
27
-
 28
28
-
 29
29
-
 30
30
-
 31
31
-
 32
32
-
 33
33
-
 34
34
-
 35
35
-
 36
36
-
 37
37
-
 38
38
-
 39
39
-
 40
40
-
 41
41
-
 42
42
-
 43
43
-
 44
44
-
 45
45
-
 46
46
-
 47
47
-
 48
48
-
 49
49
-
 50
50
-
 51
51
-
 52
52
-
 53
53
-
 54
54
-
 55
55
-
 56
56
-
 57
57
-
 58
58
-
 59
59
-
 60
60
-
 61
61
-
 62
62
-
 63
63
-
 64
64
-
 65
65
-
 66
66
-
 67
67
-
 68
68
-
 69
69
-
 70
70
-
 71
71
-
 72
72
-
 73
73
-
 74
74
-
 75
75
-
 76
76
-
 77
77
-
 78
78
-
 79
79
-
 80
80
-
 81
81
-
 82
82
-
 83
83
-
 84
84
-
 85
85
-
 86
86
-
 87
87
-
 88
88
-
 89
89
-
 90
90
-
 91
91
-
 92
92
-
 93
93
-
 94
94
-
 95
95
-
 96
96
-
 97
97
-
 98
98
-
 99
99
-
 100
100
-
 101
101
-
 102
102
-
 103
103
-
 104
104
-
 105
105
-
 106
106
-
 107
107
-
 108
108
-
 109
109
-
 110
110
-
 111
111
-
 112
112
-
 113
113
-
 114
114
-
 115
115
-
 116
116
-
 117
117
-
 118
118
-
 119
119
-
 120
120
-
 121
121
-
 122
122
-
 123
123
-
 124
124
-
 125
125
-
 126
126
-
 127
127
-
 128
128
-
 129
129
-
 130
130
-
 131
131
-
 132
132
-
 133
133
-
 134
134
-
 135
135
-
 136
136
-
 137
137
-
 138
138
-
 139
139
-
 140
140
-
 141
141
-
 142
142
-
 143
143
-
 144
144
-
 145
145
-
 146
146
-
 147
147
-
 148
148
-
 149
149
-
 150
150
-
 151
151
-
 152
152
-
 153
153
-
 154
154
-
 155
155
-
 156
156


Hendi 297728 Instrukcja obsługi
- Kategoria
- Krajalnice
- Typ
- Instrukcja obsługi
w innych językach
- italiano: Hendi 297728 Manuale utente
- Deutsch: Hendi 297728 Benutzerhandbuch
- français: Hendi 297728 Manuel utilisateur
- română: Hendi 297728 Manual de utilizare
Powiązane artykuły
-
Hendi 975749 Instrukcja obsługi
-
Hendi 970294 Instrukcja obsługi
-
Hendi 298077 Instrukcja obsługi
-
-
Hendi 570159 Instrukcja obsługi
-
-
-
Hendi 224403 Instrukcja obsługi
-
Hendi 222805 Instrukcja obsługi
-
Hendi 820612 Knife Sharpener Instrukcja obsługi
Inne dokumenty
-
MSW MSW-MBS680H Instrukcja obsługi
-
Tristar EM-2103 Instrukcja obsługi
-
Parkside PSS 65 A1 Original Instructions Manual
-
Tristar EM-2099 Instrukcja obsługi
-
-
Kenwood SL250 Instrukcja obsługi
-
Melissa 646-040 Instrukcja obsługi
-
Bifinett Food Slicer KH 150 Instrukcja obsługi
-
KALORIK TKG AS 1003 Instrukcja obsługi
-
Parkside 316707 1904 Translation Of The Original Instructions