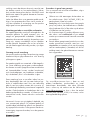
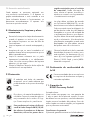
Silvercrest Tower Fan Heater STHL 2000 A1 Instrukcja obsługi
- Typ
- Instrukcja obsługi

TOWER FAN HEATER STHL 2000 A1
TURM-HEIZLÜFTER STHL 2000 A1
RADIATEUR SOUFFLANT TOUR STHL 2000 A1
IAN 367685_2101
IEGB NI CY MT
TOWER FAN HEATER
Operating and Safety Instructions
This product is only suitable for well
insulated spaces or occasional use.
ATDE CH
TURM-HEIZLÜFTER
Bedienungs- und Sicherheitshinweise
Dieses Produkt ist nur für gut isolierte Räume oder
für den gelegentlichen Gebrauch geeignet.
DK
VARME-VENTILATORTÅRN
Betjenings- og sikkerhedsinstruktioner
Dette produkt er kun egnet til godt isolerede
rum eller lejlighedsvis brug.
ES
CALEFACTOR DE TORRE
Instrucciones de utilización y de seguridad
Este producto está indicado únicamente en
lugares abrigados o para una utilización puntual.
SK
VEŽOVÝ TEPLOVZDUŠNÝ VENTILÁTOR
Návod na obsluhu a bezpečnostné pokyny
Tento výrobok je určený iba do dobre izolovaných
priestorov alebo na príležitostné použitie.
PL
TERMOWENTYLATOR WIEŻA
Wskazówki użytkowania i bezpieczeństwa
Ten produkt jest odpowiedni tylko do
sporadycznego użytku lub do stosowania w
dobrze izolowanych pomieszczeniach.
CZ
VĚŽOVÝ OHŘÍVAČ S VENTILÁTOREM
Pokyny pro obsluhu a bezpečnostní pokyny
Tento výrobek je vhodný pouze pro dobře
izolované prostory nebo občasné používání.
BENL
TOREN-VENTILATORKACHEL
Bedienings- en veiligheidsinstructies
Dit product is uitsluitend geschikt voor goed
geïsoleerde plaatsen of voor incidenteel gebruik.
BEFR CH
RADIATEUR SOUFFLANT TOUR
Instructions d‘utilisation et consignes de sécurité
Ce produit ne peut être utilisé que dans des locaux
bien isolés ou de manière occasionnelle.
OS

TOWER FAN HEATER STHL 2000 A1
TURM-HEIZLÜFTER STHL 2000 A1
RADIATEUR SOUFFLANT TOUR STHL 2000 A1
GB/IE/NI/CY/MT Operation and Safety Instructions Page 5
DE/AT/CH Bedienungs- und Sicherheitshinweise Seite 21
FR/BE/CH Instructions d‘utilisation et consignes de sécurité Page 37
NL/BE Bedienings- en veiligheidsinstructies Pagina 53
CZ Pokyny pro obsluhu a bezpečnostní pokyny Strana 69
PL Wskazówki użytkowania i bezpieczeństwa Strona 85
SK Návod na obsluhu a bezpečnostné pokyny Strana 101
ES Instrucciones de utilización y de seguridad Página 117
DK Betjenings- og sikkerhedsinstruktioner Side 133
GB IE CYNI MT
Before reading, fold out the page with the images and familiarise yourself with all the features of the
device.
DE AT CH
Klappen Sie vor dem Lesen die Seite mit den Abbildungen aus und machen Sie sich anschließend mit
allen Funktionen des Gerätes vertraut.
FR BE CH
Avant de lire le mode d‘emploi, ouvrez la page contenant les illustrations et familiarisez-vous ensuite
avec toutes les fonctions de l‘appareil.
NL BE
Vouw vóór het lezen de pagina met de afbeeldingen open en maak u vertrouwd met alle functies van
het apparaat.
CZ
Před čtením si otevřete stranu s obrázky a potom se seznamte se všemi funkcemi přístroje.
PL
Przed rozpoczęciem czytania rozłóż stronę zawierającą rysunki, a następnie zapoznaj się ze wszyst-
kimi funkcjami urządzenia.
SK
Prv než začnete čítať tento návod, rozložte si stránku s obrázkami a oboznámte sa so všetkými funk-
ciami zariadenia.
ES
Antes de empezar a leer abra la página que contiene las imágenes y, en seguida, familiarícese con
todas las funciones del dispositivo.
DK
Før du læser, skal du folde siden ud med illustrationer og derefter gøre dig bekendt med alle enhedens
funktioner.

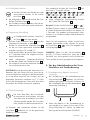
7
9
10
14
11
12
13
8
15
16
1
5
2
4
3
6


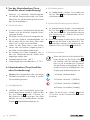
GB/IE/NI/MT/CY 5
1. Introduction ........................................................................................................................ Page 7
1.1 Intended use ........................................................................................................................ Page 7
1.2 Scope of delivery ................................................................................................................ Page 7
1.3 Features ................................................................................................................................ Page 7
1.4 Technical data ..................................................................................................................... Page 7
2. Safety indications ........................................................................................................... Page 9
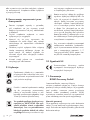
2.1 General safety indications
Safety of electrical appliances for home use .................................................................... Page 9
2.2 Specific safety indications
Special requirements for room heating appliances .......................................................... Page 10
2.3 Additional safety indications .............................................................................................. Page 11
2.4 Information about batteries ................................................................................................ Page 12
3.
Before commissioning (
Tower fan heater
without remote control)
..... Page 14
3.1 Setting up the appliance ..................................................................................................... Page 14
4. Commissioning (Tower fan heater without remote control) ................ Page 14
4.1 Standby mode ..................................................................................................................... Page 14
4.2 Fan mode ............................................................................................................................. Page 14
4.3 Heating level setting (heating mode) ................................................................................ Page 14
4.4 Switching the appliance off ................................................................................................ Page 14
4.5 Oscillation function ............................................................................................................. Page 15
4.6 Temperature setting ............................................................................................................. Page 15
4.7 Timer setting ........................................................................................................................ Page 15
5.
Before commissioning the
tower fan heater
with remote control .......
Page 15
5.1 Remote control: Inserting/changing the battery ............................................................... Page 15

GB/IE/NI/MT/CY6
6. Commissioning (Tower fan heater with remote control) ....................... Page 16
6.1 Standby mode ..................................................................................................................... Page 16
6.2 Fan mode ............................................................................................................................. Page 16
6.3 Heating level setting (heating mode) ................................................................................ Page 16
6.4 Switching the appliance off ................................................................................................ Page 16
6.5 Oscillation function ............................................................................................................. Page 16
6.6 Temperature setting ............................................................................................................. Page 17
6.7 Timer setting ........................................................................................................................ Page 17
7. Protective devices for the appliance ................................................................... Page 17
7.1 Overheating protection ....................................................................................................... Page 17
7.2 Tip-over protection ............................................................................................................... Page 17
8. Maintenance, cleaning and storage ................................................................... Page 18
9. Disposal ................................................................................................................................ Page 18
10. EU conformity .................................................................................................................... Page 18
11. Guarantee from ROWI Germany GmbH ........................................................ Page 18
12. Service ................................................................................................................................... Page 20

GB/IE/NI/MT/CY 7
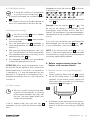
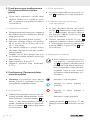
1. Introduction
Congratulations on purchasing your new appliance.
You have decided in favour of a high-quality prod-
uct. The operating instructions are part of this prod-
uct. They contain important information regarding
the safety, use and disposal. Familiarise yourself
with all the operating and safety indications prior
to using the product. Only use the product as de-
scribed and for the specified areas of use. If you
pass the product on to third parties, hand out all the
documents too.
1.1 Intended use
This product is only suitable for well-insulated rooms
or occasional use. The appliance is not intended for
use in rooms in which special conditions prevail, e.g.
a corrosive or explosive atmosphere (dust or gas).
Do not use this appliance outdoors. Every further
use or change to the appliance is viewed as not
in accordance with its intended use and involves
considerable accident risks. We assume no liability
for damages arising from improper use. The heater
blower is only determined for use as supplementary
heating and exclusively for private use.
1.2 Scope of delivery
1 Tower fan heater STHL 2000 A1
1 Remote control (including coin cell)
1 Set of operating instructions
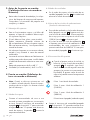
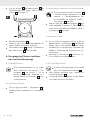
TOWER FAN HEATER STHL 2000 A1
1.3 Features
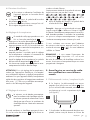
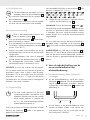
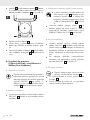
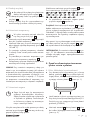
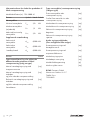
Tower fan heater
1 Display
2 Temperature key
3 Timer key
4 Oscillation key
5 On/off key
6 On and off switch
Remote control
7 On/off key
8 Temperature key
9 Plus key
10 Minus key
11 Timer key
12 Oscillation key
13 Heating level key
14 Battery compartment
15 Lock
16 Coin cell (battery)
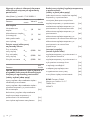
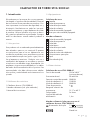
1.4 Technical data
Tower fan heater STHL 2000 A1
Input voltage: 220-240 V~
(alternating current)
Mains frequency: 50-60 Hz
Rated power: 2000 W
Heating level 1: 1200 W
Heating level 2: 2000 W
Protection rating: II
Temperature selection range: 15 ºC - 40 ºC
Timer: 24 hours
Mains cable length: 1.8 m
Remote control (only for use with Tower fan
heater STHL 2000 A1)
Battery supply: 3 V (direct current)
CR2025
: Lithium battery

GB/IE/NI/MT/CY8
Information requirements for electric local
space heaters
Model identifier(s): STHL 2000 A1
Item Symbol Value Unit
Heat output
Nominal heat output Pnom 2.0 kW
Minimum heat
output (indicative) Pmin 1.2 kW
Maximum continuous
heat output Pmax,c 2.0 kW
Auxiliary electricity consumption
At nominal heat output elmax 0.000 kW
At minimum heat output elmin 0.000 kW
In standby mode elSB 0.000 kW
Item Unit
Type of heat input, for electric storage local
space heaters only (select one)
manual heat charge control, with
integrated thermostat [no]
manual heat charge control with room and/
or outdoor temperature feedback [no]
electronic heat charge control with room
and/ or outdoor temperature feedback [no]
fan assisted heat output [no]
Type of heat output/room temperature
control (select one)
single stage heat output and no room
temperature control [no]
Two or more manual stages, no room
temperature control [no]
with mechanic thermostat room
temperature control [no]
with electronic room temperature control [yes]
electronic room temperature control
plus day timer [no]
electronic room temperature control
plus week timer [no]
Other control options
(multiple selections possible)
room temperature control,
with presence detection [no]
room temperature control,
with open window detection [no]
with distance control option [no]
with adaptive start control [no]
with working time limitation [yes]
with black bulb sensor [no]
ROWI Germany GmbH
Werner-von-Siemens-Str. 27
76694 Forst
GERMANY

GB/IE/NI/MT/CY 9
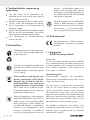
2. Safety indications
Read all the safety indications and instructions.
Failure to adhere to the safety indications and instructions may
cause serious injuries and/or property damages.
Please keep all the safety indications and instructions for fu-
ture use.
2.1 General safety indications
Safety of electrical appliances for home use
This appliance can be used by children of 8 years and more as
well as by persons with reduced physical, sensory or mental abil-
ities or lacking experience and knowledge, if they are supervised
or are instructed in the safe use of the appliance and understand
the ensuing dangers. Children may not play with the appliance.
The cleaning and maintenance of the appliance by the user
may
not be carried out by children not under supervision.
No measures need be taken by the user to set the product to 50 or
60 Hz or 220 or 240 V. The product adjusts automatically to the
correct frequency or voltage.
If the supply cable for this appliance is damaged, it must be re-
placed by the manufacturer or his customer service or a similarly
qualified person in order to avoid any dangers.

GB/IE/NI/MT/CY10
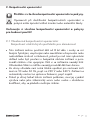
2.2 Specific safety indications
Special requirements for room heating appliances
WARNING! Do not cover!
To avoid the heater overheating, it must not be covered.
The heater may not be placed directly beneath a wall mains socket.
Do not use this heater in the direct vicinity of a bathtub, a shower
or a swimming pool.
Do not commission an appliance which has been dropped.
Do not use if visible signs of damages can be seen on the heater.
The heater must be placed on a firm, flat and level base.
WARNING! The heater may not be used in small rooms where
people live who are not able to leave the room independently
unless constant monitoring is guaranteed.
WARNING! Fire danger! To reduce the danger of fire, keep tex-
tiles, curtains and other combustible materials at least 1 m away
from the air outlet.
Children of less than 3 must be kept away unless they are constantly
monitored.
Children between 3 and 8 may only switch the appliance on and
off if they are under supervision or have been instructed in the safe
use of the appliance and have understood the resulting dangers,
with the prerequisite that the appliance is placed or installed in
its normal operating position. Children between 3 and 8 may not
plug the plug into the mains socket, control the appliance, clean it
and/or not carry out user maintenance.

GB/IE/NI/MT/CY 11
Warning against hot surfaces!
ATTENTION: Some parts of the product may become extremely
hot and cause burns. Special care is required if children and vul-
nerable persons are present.
2.3 Additional safety indications
The appliance is only suitable for indoor operation.
Danger to life due to electrical current!
Danger to life in case of contact with live cables or components!
Before connecting the appliance, compare the connection data on
the name plate (voltage and frequency) with the data from your
electricity grid. Ensure that the data tallies so that no damages to
the appliance are incurred.
Never open the appliance’s casing. If live connections are touched
and/or the electrical and mechanical setup changed, the risk of
electric shock exists!
Ensure that the supply cable is not laid over hot surfaces and/or
sharp edges.
Pay attention that the supply cable is neither bent nor jammed.
Only have the appliance repaired by authorised specialist com-
panies or customer service. Inappropriate repairs may result in
considerable danger for the user. Moreover, the guarantee rights
become null and void.
Protect the appliance against damp and the penetration of liquids.
The appliance must not be sprayed.
Only remove the supply cable from the mains socket from the mains plug.
Do not operate the appliance in the vicinity of open flames.
Only operate the appliance with a fully unrolled supply cable.

GB/IE/NI/MT/CY12
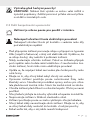
Never wind the supply cable around the appliance. Ensure that the
supply cable does not come into contact with hot surfaces.
Lay the supply cable so that it is not possible to stumble over it.
2.4 Information about batteries
Keep out of the reach of children.
If swallowed, they may cause injuries and lead to the perforation
of soft tissue and ensuing death. Severe burns may be incurred
within 2 hours of intake. Consult a physician immediately.
Incorrect handling of batteries may cause fire, explosions, the leak-
age of hazardous substances or further hazardous situations!
Do not fling the batteries into a fire and do not subject them to high
temperatures.
Neither open, deform nor short-circuit batteries as this may cause
the chemicals they contain to escape.
Do not try to recharge batteries. Only batteries marked as
“rechargeable” may be recharged. There is danger of explosion!
Always remove rechargeable batteries from the appliance for
recharging.
Test the batteries regularly. Chemicals which leak may cause
long-term damages to the appliance. Be particularly careful when
handling damaged or leaking batteries.
Danger of chemical burn! Wear protective gloves.
Chemicals which leak from a battery may cause skin irritations.
In case of skin contact, rinse with ample water. If the chemicals
have come into contact with the eyes, always rinse them with
water, do not rub them and consult a physician immediately.
Neither use different battery nor rechargeable battery types nor
mix old and new batteries.
Always insert batteries with the correct polarity, because otherwise
the danger of bursting exists.

GB/IE/NI/MT/CY 13
Remove the batteries from the appliance if you do not wish to use
it for a longer period or wish to store it.
Insert the batteries using the correct polarity.
Do not allow children to replace the batteries without adult super-
vision.
Always select the correct size and battery type for the intended
use. The information provided with the appliance for supporting the
correct battery selection should be kept as a reference.
Clean the battery contacts and also the equipment’s contacts
before installing the battery.
Remove used batteries without delay and dispose of them in an
environmentally responsible manner.
Do not dismantle batteries.
If the battery compartment cover doesn’t close properly, do not
use the remote control any longer and keep it out of the reach of
children.
Avoid extreme conditions and temperatures which can influence
batteries / rechargeable batteries, e.g. placing them on radiators /
direct insolation.

GB/IE/NI/MT/CY14
3. Before commissioning (Tower fan
heater without remote control)
Remove all packaging material and transport
safety devices from the appliance. Check
whether the packing contents are complete and
undamaged.
3.1 Setting up the appliance
For safe, fault-free operation of the appliance,
its location must meet the following prerequi-
sites:
The base must be firm, flat and level.
Minimum clearance from the casing of 90 cm
at the side, 90 cm at the top, 90 cm at the back
and 1 m at the front must be adhered to.
Do not place the appliance in a hot, wet or very
wet surroundings or in the vicinity of combus-
tible material.
The mains socket must be easily accessible,
enabling easy removal of the supply cable if
necessary.
Temperature range: 0 to +40 ºC
Humidity (no condensation): 5–75 %
4. Commissioning (Tower fan heater
without remote control)
Note: For initial use or if not used for a longer
period, slight odours may arise in the short-term.
4.1 Standby mode
Connect the Tower heater blower to an earthed,
secured wall mains socket. To supply the appli-
ance with electricity, put the on/off switch 6
to position "I". The appliance is then in standby
mode and the display 1 shows the room tem-
perature.
4.2 Fan mode
Press the on/off key 5 once in standby mode.
The appliance is then in fan mode.
4.3 Heating level setting (heating mode)
Press the on/off key 5 once in fan mode. The
appliance is then in heating level 1. The tower
heater blower has a heat output of 1200 W.
The on/off key 5 is lit in blue.
Press the on/off key 5 again to change the
appliance to heating level 2. The tower heater
blower has a heat output of 2000 W. The on/
off key 5 is lit in red.
4.4 Switching the appliance off
If the appliance is in heating level 2, press
the on/off key
5
. The fan runs for a fur-
ther 60 seconds before going off (a count-
down is shown on the display). The appli-
ance returns to standby mode. The display
shows the room temperature.
Press 1x: Fan mode
Press 2x: Heating level 1 (1200 W)
Press 3x: Heating level 2 (2000 W)
Press 4x: Switch off (standby)
To disconnect the tower heater blower from the
electricity, put the on/off switch 6 to position
"O".

GB/IE/NI/MT/CY 15
4.5 Oscillation function
To switch the oscillation of the appliance
on or off, press the oscillation key 4 .
If successfully activated, the oscillation key icon
4 is lit.
The oscillation function has the effect that the air
blown off is distributed from the left to the right.
4.6 Temperature setting
Press the on/off key 5 once in standby
mode twice or three times.
Press the temperature key 2 to enter tempera-
ture setting mode.
Press the temperature key 2 repeatedly to
reach the temperature you desire (between 15
and 40 ºC).
After setting the desired temperature, wait 3 sec-
onds. The specification is assumed automatically.
If the temperature has been successfully set, the
temperature key icon 2 is lit .
The integrated thermostat now automatically
switches the heating function on/off.
ATTENTION! When setting the temperature, it must
be observed that the appliance does not heat if the
desired temperature is lower than room temperature
or equivalent to it. To heat, the temperature set must
be at least 1
ºC
higher than room temperature. This is
displayed automatically when you switch the remote
controller on.
4.7 Timer setting
The timer is used to switch the tower heat-
er blower off automatically. A switching
off time can be selected in hour steps with
the timer. The tower heater blower then
switches off automatically.
In fan or heating mode, press the timer key 3
repeatedly until you reach the desired number of
hours.
Repeated pressing of the timer key 3 sets the timer
to an hourly step:
If timer setting has been successful, the timer key
icon 3 is lit .
Example: Press the timer key 3 until “ ” can
be seen on the display, if the appliance should
automatically switch off after 4 hours. Wait for 3
seconds. The specification is assumed automatically.
The appliance will be switched off automatically in
4 hours.
If you wish to ensure that the timer specification has
been accepted, press the timer key 3 once. ” ”
or your specification is shown on the display.
NOTE: If you set the on/off switch 6 to “O” po-
sition or if the tower heater blower is disconnected
from the electricity supply, the timer and temperature
you have programmed are deleted.
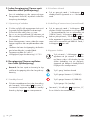
5. Before commissioning tower fan
heater with remote control
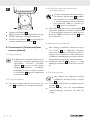
5.1 Remote control: Inserting/changing the
battery
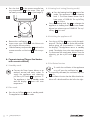
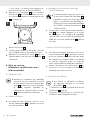
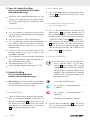
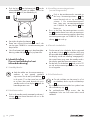
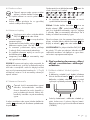
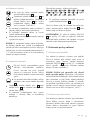
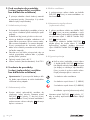
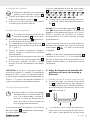
When supplied, a lithium coin cell 16 is includ-
ed with the remote control. In order to enable
operation of the remote control, remove the
plastic tape which protrudes out of the battery
compartment 14 (see Image 1).
If the battery in the remote control has to be re-
placed, insert a new 3 volt lithium coin cell. Pay
attention to the lithium coin cell type (CR2025)
here.
1

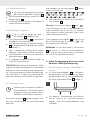
GB/IE/NI/MT/CY16
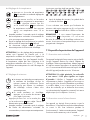
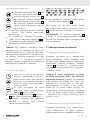
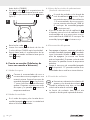
Press the lock 15 on the remote controller bat-
tery compartment 14 to the centre. Then, pull
the battery compartment 14 out (see Image 2).
Remove the used battery 16 .
Insert a new type CR2025 3 volt lithium coin
cell using the correct polarity.
Slide the battery compartment 14 back into the
remote controller until the lock 15 clicks into po-
sition.
6. Commissioning (Tower fan heater
with remote control)
6.1 Standby mode
Connect the Tower heater blower to an
earthed, secured wall mains socket. To
supply the appliance with electricity,
put the on/off switch 6 to position "I".
The appliance is then in standby mode
and the display 1 shows the room
temperature.
6.2 Fan mode
Press the on/off key 7 once in standby mode.
The appliance is then in fan mode.
6.3 Heating level setting (heating mode)
Press the heating level key 13 once in fan
mode. The appliance is then in heating
level 1. The tower heater blower has a
heat output of 1200 W. The on/off key
5 is lit in blue.
Press the heating level key 13 to change the
appliance to heating level 2. The tower heater
blower has a heat output of 2000 W. The on/
off key 5 is lit in red.
6.4 Switching the appliance off
Press the on/off key 7 once to switch the appli-
ance off. The fan runs for a further 60 seconds
before going off (a countdown is shown on
the display). The appliance returns to standby
mode. The display shows the room temperature.
To disconnect the towerheater blower from the
electricity, put the on/off switch 6 to position
"O".
6.5 Oscillation function
To switch the oscillation of the appliance
on or off, press the oscillation key 12 .
If successfully activated, the oscillation key icon
4 is lit.
The oscillation function has the effect that the air
blown off is distributed from the left to the right.
2

GB/IE/NI/MT/CY 17
6.6 Temperature setting
Press the temperature key 8 to enter
temperature setting mode.
Press the plus key 9 repeatedly to
increase the temperature you desire.
Press the minus key 10 repeatedly to
reduce the temperature you desire. You
can select a temperature between 15
and 40 ºC.
After setting the desired temperature, wait
3 seconds. The specification is assumed
automatically.
If the temperature has been successfully set, the
temperature key icon 2 is lit.
The integrated thermostat now automatically
switches the heating function on/off.
ATTENTION! When setting the temperature, it must
be observed that the appliance does not heat if the
desired temperature is lower than room temperature
or equivalent to it. To heat, the temperature set must
be at least 1 ºC higher than room temperature. This
is displayed automatically when you switch the
remote controller on.
6.7 Timer setting
The timer is used to switch the tower heater
blower off automatically. A switching off
time can be selected in hour steps with
the timer. The tower heater blower then
switches off automatically.
In fan or heating mode, press the timer
key 11 to set the timer.
Press the plus key 9 repeatedly or the minus
key 10 to set the switching off time you desire
After setting the switching off time, wait
3 seconds. The specification is assumed
automatically.
The timer can be set to an hourly step:
If timer setting has been successful, the timer key
icon 3 is lit.
If you wish to ensure that the timer specification has
been accepted, press the timer key
11
once. Your
specification is shown on the display.
NOTE: If you set the on/off switch 6 to “O”
position or if the tower heater blower is disconnected
from the electricity supply, the timer and temperature
you have programmed are deleted.
7. Protective devices for the appliance
7.1 Overheating protection
This appliance is equipped with overheating protection.
If the appliance becomes too hot, the heating element
is automatically switched off. To switch the appliance
off, set the on/off switch
6
to “
O
” and unplug the
mains plug from the mains socket. Let the appliance
cool down for at least 10 minutes.
ATTENTION! There’s normally a reason
for overheating! It can mean fire danger!
Check whether the appliance can give off its heat
sufficiently: Is the appliance covered or is it too close
to an obstacle? If possible, rectify the problem. Even
if you cannot find a cause, but overheating protection
is triggered again, you must switch the appliance
off and revert to the service hotline (see chapter
“Service”).
7.2 Tip-over protection
This appliance is equipped with overturning
protection. If the appliance is accidentally knocked
over or subjected to significant inclination during
operation, it is automatically switched off. The
appliance works exclusively in an upright position.

GB/IE/NI/MT/CY18
8. Maintenance, cleaning and storage
Always unplug the mains cable when the
appliance is not in use, prior to each cleaning
or in case of operational faults!
Only clean the appliance when switched off
and cold.
Ensure when cleaning that no moisture ingresses
into the appliance in order to avoid irreparable
damages to the appliance.
Clean the casing with a slightly damp cloth
and a mild flushing fluid. Do not use aggressive
and/or abrasive cleaning agents under any
circumstances whatsoever.
Remove dust deposits on the protective mesh and
on the ventilation louvres with a vacuum cleaner.
9. Disposal
The packaging consists of environmental-
ly friendly materials which you can dis-
pose of via local recycling points.
The product and packaging materials
are recyclable, dispose of it separately
for better waste treatment. The Triman
logo is valid in France only.
This product is subject to the European
Directive 2012/19/EU. Do not dis-
pose of the product with domestic
waste, but via local collecting points
for material recycling! You can ask your
municipal administration or city administra-
tion regarding the options for disposing of
the used appliance.
Batteries must be recycled in accordance
with Directive 2006/66/EC and may
not be disposed of with domestic waste.
Each consumer is legally obliged to re-
turn all batteries/rechargeable batteries
to a collection point in his municipality/
district or to the trade. This duty serves to
ensure that batteries/rechargeable bat-
teries can be directed to environmentally
friendly disposal. Only return batteries/
rechargeable batteries which are not
charged Batteries must be removed from
the
appliance prior to disposal.
Observe the markings on the packaging
materials when separating the waste,
they are marked with abbreviations (a)
and numbers (b) with the following
meanings: 1–7: Plastics/ 20–22: Paper
and cardboard/80–98: Composite ma-
terials.
10. EU conformity
The tower heater blower meets the re-
quirements of the valid European and
national regulations.
11. Guarantee from
ROWI Germany GmbH
Dear customer,
we grant you 3 years’ guarantee from the date of
purchase for this appliance. In case of any faults
with this product, you are entitled to make use of
your legal rights vis-à-vis the seller of the product.
These legislative rights are not restricted by our guar-
antee defined below.
Guarantee conditions
The period of guarantee begins with the date of
purchase. Please keep the original receipt in a safe
place. It is required as proof of purchase.
If a material or manufacturing fault occurs within
three years of the purchase date of this product, we
will - at our discretion - either repair it free of charge,
replace it or reimburse you the purchase price. This
guarantee assumes that the faulty appliance and
the proof of purchase (receipt) are presented within
the three-year-period and a brief written description
is provided as to the fault which exists and when it
occurs.

GB/IE/NI/MT/CY 19
If the fault is covered by our guarantee, you will re-
ceive the repaired product or a new product back.
No new guarantee period begins with the repair or
replacement of the product.
Guarantee period and statutory claims for
defects
The guarantee period is not extended by the war-
ranty. This also applies to replaced and repaired
parts. Any damages and faults which exist when
purchased must be notified without delay after un-
packing. Repairs required after the period of guar-
antee are subject to payment.
Scope of the guarantee
The appliance was produced with due care in ac-
cordance with strict quality guidelines and diligently
examined prior to delivery.
The guarantee service is applicable for material or
manufacturing errors. This guarantee neither extends
to product parts subject to normal wear and tear
which can therefore be viewed as wear and tear
parts nor to damages to fragile parts, e.g. switches,
rechargeable batteries or parts consisting of glass.
This guarantee becomes null and void if the product
has been damaged, not used or serviced correctly.
For correct use of the product, all the instructions list-
ed in the operating instructions must be adhered to
precisely. Designated use and actions against which
the operating instructions warn or against which
warnings are given must absolutely be avoided.
The product is only intended for private and not for
commercial use. In case of abusive and incorrect
treatment, use of force and in case of intervention
which has not been made by our authorised service
subsidiary, the guarantee becomes null and void.
Processing in guarantee cases
In order to ensure fast processing of your concern,
please observe the following information:
Please keep the receipt and article number
(IAN 367685_2101) on hand as a proof of
purchase for all inquiries.
You can find the article number on the name
plate on the product, the front page of your
instructions (on the bottom left-hand side) or
on the sticker on the reverse or underneath the
product.
Should you incur functional or other faults,
please first contact the service department
named below by phone or via E-mail.
You can then send a product recorded as being
faulty together with the proof of purchase (re-
ceipt) and the information as to what fault exists
post-paid to the service address we provide you
with.
You can download this and several further manu-
als, product videos and installation software from
www.lidl-service.com You can access the Lidl ser-
vice page (www.lidl-service.com) directly with this
QR code and open your operating instructions by
entering the article number (IAN 367685_2101).

GB/IE/NI/MT/CY20
12. Service
Should you incur any problems when operating your
ROWI Germany product, please do the following:
Making contact
You can reach the ROWI Germany service team
under:
ROWI Germany GmbH
Werner-von-Siemens-Str. 27
D-76694 Forst
GERMANY
lidl-services@rowi-group.com
Service hotline: +49 800 7694 7694
(free from landlines)
IAN 367685_2101
Most problems can already be resolved by compe-
tent, technical advice from our service team.
Strona się ładuje...
Strona się ładuje...
Strona się ładuje...
Strona się ładuje...
Strona się ładuje...
Strona się ładuje...
Strona się ładuje...
Strona się ładuje...
Strona się ładuje...
Strona się ładuje...
Strona się ładuje...
Strona się ładuje...
Strona się ładuje...
Strona się ładuje...
Strona się ładuje...
Strona się ładuje...
Strona się ładuje...
Strona się ładuje...
Strona się ładuje...
Strona się ładuje...
Strona się ładuje...
Strona się ładuje...
Strona się ładuje...
Strona się ładuje...
Strona się ładuje...
Strona się ładuje...
Strona się ładuje...
Strona się ładuje...
Strona się ładuje...
Strona się ładuje...
Strona się ładuje...
Strona się ładuje...
Strona się ładuje...
Strona się ładuje...
Strona się ładuje...
Strona się ładuje...
Strona się ładuje...
Strona się ładuje...
Strona się ładuje...
Strona się ładuje...
Strona się ładuje...
Strona się ładuje...
Strona się ładuje...
Strona się ładuje...
Strona się ładuje...
Strona się ładuje...
Strona się ładuje...
Strona się ładuje...
Strona się ładuje...
Strona się ładuje...
Strona się ładuje...
Strona się ładuje...
Strona się ładuje...
Strona się ładuje...
Strona się ładuje...
Strona się ładuje...
Strona się ładuje...
Strona się ładuje...
Strona się ładuje...
Strona się ładuje...
Strona się ładuje...
Strona się ładuje...
Strona się ładuje...
Strona się ładuje...
Strona się ładuje...
Strona się ładuje...
Strona się ładuje...
Strona się ładuje...
Strona się ładuje...
Strona się ładuje...
Strona się ładuje...
Strona się ładuje...
Strona się ładuje...
Strona się ładuje...
Strona się ładuje...
Strona się ładuje...
Strona się ładuje...
Strona się ładuje...
Strona się ładuje...
Strona się ładuje...
Strona się ładuje...
Strona się ładuje...
Strona się ładuje...
Strona się ładuje...
Strona się ładuje...
Strona się ładuje...
Strona się ładuje...
Strona się ładuje...
Strona się ładuje...
Strona się ładuje...
Strona się ładuje...
Strona się ładuje...
Strona się ładuje...
Strona się ładuje...
Strona się ładuje...
Strona się ładuje...
Strona się ładuje...
Strona się ładuje...
Strona się ładuje...
Strona się ładuje...
Strona się ładuje...
Strona się ładuje...
Strona się ładuje...
Strona się ładuje...
Strona się ładuje...
Strona się ładuje...
Strona się ładuje...
Strona się ładuje...
Strona się ładuje...
Strona się ładuje...
Strona się ładuje...
Strona się ładuje...
Strona się ładuje...
Strona się ładuje...
Strona się ładuje...
Strona się ładuje...
Strona się ładuje...
Strona się ładuje...
Strona się ładuje...
Strona się ładuje...
Strona się ładuje...
Strona się ładuje...
Strona się ładuje...
Strona się ładuje...
Strona się ładuje...
Strona się ładuje...
Strona się ładuje...
Strona się ładuje...
Strona się ładuje...
Strona się ładuje...
-
 1
1
-
 2
2
-
 3
3
-
 4
4
-
 5
5
-
 6
6
-
 7
7
-
 8
8
-
 9
9
-
 10
10
-
 11
11
-
 12
12
-
 13
13
-
 14
14
-
 15
15
-
 16
16
-
 17
17
-
 18
18
-
 19
19
-
 20
20
-
 21
21
-
 22
22
-
 23
23
-
 24
24
-
 25
25
-
 26
26
-
 27
27
-
 28
28
-
 29
29
-
 30
30
-
 31
31
-
 32
32
-
 33
33
-
 34
34
-
 35
35
-
 36
36
-
 37
37
-
 38
38
-
 39
39
-
 40
40
-
 41
41
-
 42
42
-
 43
43
-
 44
44
-
 45
45
-
 46
46
-
 47
47
-
 48
48
-
 49
49
-
 50
50
-
 51
51
-
 52
52
-
 53
53
-
 54
54
-
 55
55
-
 56
56
-
 57
57
-
 58
58
-
 59
59
-
 60
60
-
 61
61
-
 62
62
-
 63
63
-
 64
64
-
 65
65
-
 66
66
-
 67
67
-
 68
68
-
 69
69
-
 70
70
-
 71
71
-
 72
72
-
 73
73
-
 74
74
-
 75
75
-
 76
76
-
 77
77
-
 78
78
-
 79
79
-
 80
80
-
 81
81
-
 82
82
-
 83
83
-
 84
84
-
 85
85
-
 86
86
-
 87
87
-
 88
88
-
 89
89
-
 90
90
-
 91
91
-
 92
92
-
 93
93
-
 94
94
-
 95
95
-
 96
96
-
 97
97
-
 98
98
-
 99
99
-
 100
100
-
 101
101
-
 102
102
-
 103
103
-
 104
104
-
 105
105
-
 106
106
-
 107
107
-
 108
108
-
 109
109
-
 110
110
-
 111
111
-
 112
112
-
 113
113
-
 114
114
-
 115
115
-
 116
116
-
 117
117
-
 118
118
-
 119
119
-
 120
120
-
 121
121
-
 122
122
-
 123
123
-
 124
124
-
 125
125
-
 126
126
-
 127
127
-
 128
128
-
 129
129
-
 130
130
-
 131
131
-
 132
132
-
 133
133
-
 134
134
-
 135
135
-
 136
136
-
 137
137
-
 138
138
-
 139
139
-
 140
140
-
 141
141
-
 142
142
-
 143
143
-
 144
144
-
 145
145
-
 146
146
-
 147
147
-
 148
148
-
 149
149
-
 150
150


Silvercrest Tower Fan Heater STHL 2000 A1 Instrukcja obsługi
- Typ
- Instrukcja obsługi
w innych językach
- español: Silvercrest Tower Fan Heater STHL 2000 A1 Instrucciones de operación
- Deutsch: Silvercrest Tower Fan Heater STHL 2000 A1 Bedienungsanleitung
- slovenčina: Silvercrest Tower Fan Heater STHL 2000 A1 Návod na používanie
- français: Silvercrest Tower Fan Heater STHL 2000 A1 Mode d'emploi
- dansk: Silvercrest Tower Fan Heater STHL 2000 A1 Betjeningsvejledning
- Nederlands: Silvercrest Tower Fan Heater STHL 2000 A1 Handleiding
Powiązane artykuły
Inne dokumenty
-
Blaupunkt FHM601 Instrukcja obsługi
-
Clatronic HL 3763 Instrukcja obsługi
-
Lechpol TSA5040 Instrukcja obsługi
-
Princess 01.347000.01.001 Instrukcja obsługi
-
BOMANN EK 6023 CB Instrukcja obsługi
-
Teesa TSA8052 Instrukcja obsługi
-
Perel PTC0003 Instrukcja obsługi
-
BOMANN EK 6022 Instrukcja obsługi
-
EWT M2GTS Instrukcja obsługi
-
Parkside PKH 2000 A1 Operation And Safety Instructions