
Operating Instructions
Bedienungsanleitung
Instructions d’utilisation
Istruzioni per l’uso
Gebruiksaanwijzing
Manual de instrucciones
Brugsvejledning
Driftsföreskrifter
Bruksanvisning
Käyttöohjeet
Çalıştırma Talimatları
Instrukcja obsługi
Provozní pokyny
Használati utasítás
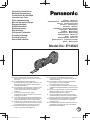
Cordless Multi-Tool
Akkubetriebener Multifunktionswerkzeug
Sans fil Outil multi-fonction
Senza fili Multi-utensile
Snoerloze Multitool
Inalámbrica Herramienta múltiple
Ledningsfri Multiværktøj
Sladdlös Multiverktyg
Batteridrevet Multiverktøy
Akkukäyttöinen Multi-Tool
Akülü Çoklu Alet
Akumulatorowy Multi-Tool
Akumulátorový Víceúčelové nářadí
Akkus Multi-eszköz
Model No: EY46A5
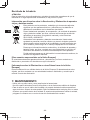
EN: Before operating this unit, please read these
instructions completely and save this manual for
future use.
DE: Vor Inbetriebnahme des Gerätes die
Betriebsanleitung bitte gründlich durchlesen und
diese Broschüre zum späteren Nachschlagen
sorgfältig aufbewahren.
FR: Lire entièrement les instructions suivantes avant
de faire fonctionner l’appareil et conserver ce
mode d’emploi à des fins de consultation
ultérieure.
IT: Prima di usare questa unità, leggere
completamente queste istruzioni e conservare il
manuale per usi futuri.
NL: Lees deze gebruiksaanwijzing aandachtig door
voor u het apparaat in gebruik neemt en bewaar
de gebruiksaanwijzing voor eventuele naslag.
ES: Antes de usar este aparato por primera vez, lea
todas las instrucciones de este manual y guarde
el manual para poderlo consultar en el futuro.
DA: Gennemlæs denne betjeningsvejledning før
brugen og gem den til fremtidig brug.
SV: Läs igenom hela bruksanvisningen innan
verktyget tas i bruk. Spara bruksanvisningen för
senare användning.
NO: Før enheten tas i bruk, vennligst les disse alle
anvisningene og oppbevar deretter
bruksanvisningen for senere bruk.
FI: Lue ohjeet huolella ennen laitteen käyttöönottoa
ja säilytä tämä käyttöohje tallessa tulevaa tarvetta
varten.
TR: Bu cihazı çalıştırmadan önce lütfen bu talimatları
dikkatli bir şekilde okuyun ve bu kılavuzu
gelecekte kullanmak üzere saklayın.
PL: Przed przystąpieniem do obsługi omawianego
urządzenia należy przeczytać w całości niniejszą
instrukcję i zachować ją do wglądu na przyszłość.
CS: Před zahájením práce s jednotkou si přečtěte v
úplnosti tyto pokyny a příručku uchovejte pro
pozdější použití.
HU: A készülék használata előtt olvassa el ezeket az
utasításokat, és őrizze meg a jelen útmutatót a
későbbi használat céljából.

- 2 -
Index/Index/Index/Indice/Index/Indice/Indeks/Index/Indeks/Hakemisto/
Dizin/Indeks/Index/Tárgymutató
English: Page 8 Dansk: Side 69 Česky: Strana 130
Deutsch: Seite 19 Svenska: Sid 79 Magyar: Oldal 140
Français: Page 29 Norsk: Side 89
Italiano: Pagina 39 Suomi: Sivu 99
Nederlands: Bladzijde 49 Türkçe: Sayfa 109
Español: Página 59 Polski: Strona 120
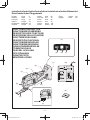
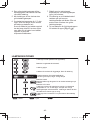
FUNCTIONAL DESCRIPTION
FUNKTIONSBESCHREIBUNG
DESCRIPTION DES FONCTIONS
DESCRIZIONE DELLE FUNZIONI
FUNCTIEBESCHRIJVING
DESCRIPCIÓN FUNCIONAL
FUNKTIONSBESKRIVELSE
FUNKTIONSBESKRIVNING
FUNKSJONSBESKRIVELSE
TOIMINTAKUVAUS
İŞLEVSEL AÇIKLAMA
OPIS DZIAŁANIA
FUNKČNÍ POPIS
MŰKÖDÉSI LEÍRÁS
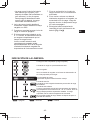
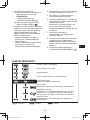
9ņV
(A)
(B)
(C)
(D)
(E)
(F)
(J)
(K)
(M)
(N)
(L)
(G) (H) (I)

- 3 -
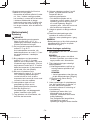
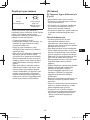
(A)
Blade
Blatt
Lame de scie
Lama
Zaagblad
Cuchilla
Blad
Klinga
Blad
Terä
Bıçak
Ostrze
Čepel
Penge
(B)
LED light
LED-Leuchte
Lumière DEL
Luce LED
LED-lampje
Luz indicadora
LED-lys
LED-ljus
LED-lys
LED-valo
LED ışığı
Lampka LED
LED osvětlení
LED-lámpa
(C)
Blade release lever
Blattlösehebel
Levier de dégagement de la lame de scie
Leva di rilascio della lama
Zaagbladvegrendeling
Palanca de liberación de la cuchilla
Bladets udløserhåndtag
Klingans frigöringsspak
Bladets utløserarm
Terän vapautusvipu
Bıçak çıkartma kolu
Dźwignia zwalniająca ostrze
Uvolňovací páčka čepele
Pengekioldó kar
(D)
Power switch
Netzschalter
Interrupteur d’alimentation
Interruttore di accensione
Hoofdschakelaar
Interruptor de alimentación
Afbryder
Strömbrytare
Strømbryter
Käyttökytkin
Açma/Kapama düğmesi
Przycisk zasilania
Spínač napájení
Hálózati kapcsoló
(E)
Frequency adjustment dial
Frequenzeinstellrad
Molette de réglage de fréquence
Manopola di regolazione frequenza
Draaiknop voor de frequentie
Dial de ajuste de la frecuencia
Frekvensjusteringshjul
Frekvensjusteringsratt
Frekvensjusteringsskive
Kierrostaajuuden säätövalitsin
Frekans ayarlama kadranı
Pokrętło regulacji częstotliwości
Volicí kotouč frekvence
Frekvencia beállító tárcsa
(F)
Display panel
Anzeigefeld
Ecran d’affichage
Display
Displaypaneel
Panel de exhibición
Displaypanel
Display
Displaypanel
Näyttöpaneeli
Gösterge paneli
Panel wyświetlacza
Panel displeje
Kijelzőpanel
(G)
Low battery warning lamp
Akku-Schwach-Warnlampe
Témoin d’avertissement de batterie faible
Spia di avvertimento batteria scarica
Waarschuwingslampje laag accuvermogen
Lámpara de advertencia de batería baja
Advarselslampe for lavt batteriniveau
Varningslampa för lågt batteri
Varsellampe for lavt batteri
Akun alhaisen varaustilan varoitusvalo
Düşük pil uyarı lambası
Lampka ostrzegawcza niskiego poziomu
naładowania akumulatora
Kontrolka vybití akumulátoru
Üzemi töltöttség figyelmeztető lámpa
(H)
On lock warning lamp
Einschaltsicherungsleuchte
Témoin d’avertissement à verrou activé
Spia avvertenza blocco utensile
Waarschuwingslampje inschakelvergrendeling
Luz de advertencia de bloqueo
Låseadvarselslampe
Varningslampa för påslagningssäkring
Varsellampe for innkoblingssikring
Turvalukituksen merkkivalo
Kilit uyarı lambası
Lampka ostrzegawcza blokady
Kontrolka blokování
Be zár figyelmeztető lámpa

- 4 -
(I)
Overheat warning lamp (battery)
Überhitzungs-Warnlampe (Akku)
Témoin d’avertissement de surchauffe (batterie)
Spia avvertenza surriscaldamento (batteria)
Oververhitting-waarschuwingslampje (accu)
Luz de advertencia de sobrecalentamiento (batería)
Advarselslamp til overophedning (batteri)
Varningslampa för överhettning (batteri)
Varsellampe for overoppheting (batteri)
Ylikuumenemisen varoituslamppu (akku)
Aşırı ısınma uyarı lambası (batarya)
Lampka ostrzegawcza przegrzania (akumulator)
Kontrolka přehřátí (akumulátoru)
Túlmelegedés fi gyelmeztető lámpa (akkumulátor)
(J)
Alignment mark
Ausrichtmarkierung
Marque d’alignement
Marcatura di allineamento
Uitlijntekens
Marca de alineación
Flugtemærke
Anpassningsmärken
Innrettingsmerke
Sovitusmerkki
Hizalama işareti
Znacznik
Rovnací značky
Pozíciójelölések
(K)
Vent hole
Entlüftungsöffnung
Trou d’aération
Foro di sfiato
Ventilatiegat
Orificio de ventilación
Ventilationshul
Ventilhål
Ventilasjonsåpning
Tuuletusaukko
Havalandırma deliği
Otwór wentylacyjny
Větrací otvor
Szellőzőfurat
(L)
Fixing bolt
Befestigungsschraube
Boulon de fixation
Bullone di fissaggio
Bevestigingsbout
Perno de fijación
Fastgørelsesbolt
Fixeringsbult
Festebolt
Kiinnityspultti
Sabitleme cıvatası
Śruba mocująca
Upevňovací šroub
Rögzítő csavar
(M)
Battery charger
Ladegerät
Chargeur de batterie
Caricabatterie
Acculader
Cargador de batería
Batterioplader
Batteriladdare
Batterilader
Akkulaturi
Pil şarj cihazı
Ładowarka
Nabíječky akumulátorů
Akkumulátortöltő
(N)
Battery pack cover
Akkuabdeckung
Couvercle de la batterie autonome
Coperchio batterie
Accudeksel
Cubierta de la batería
Akkuafdækning
Batterilock
Batteripakkedeksel
Akun liitinsuoja
Pil takımı kapağı
Pokrywa akumulatora
Kryt akumulátoru
Akkumulátoregység fedele

- 5 -
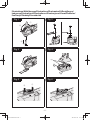
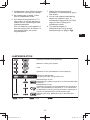
Fig. 1 Fig. 2
Fig. 3 Fig. 4
Fig. 5 Fig. 6
Illustrations/Abbildungen/Illustrations/Illustrazioni/Afbeeldingen/
Imágenes/Illustrationer/Illustrationer/Illustrasjoner/Kuvat/Resimler/
Ilustracje/Obrázky/Illusztrációk
(J)

- 6 -
Fig. 7 Fig. 8
Fig. 9 Fig. 10

- 7 -
Fig. 10
(N)
Terminals
Anschlüsse
Bornes
Terminali
Aansluitpunten
Terminales
Terminaler
Poler
Ender
Liittimet
Terminaller
Styki
Konektory
Érintkezők
Label (red or yellow)
Etikett (rot oder gelb)
Etiquette (rouge ou jaune)
Etichetta (rossa o gialla)
Label (rood of geel)
Etiqueta (roja o amarilla)
Label (rødt eller gult)
Etikett (röd eller gul)
Etikett (rød eller gul)
Tarra (punainen tai keltainen)
Etiket (kırmızı veya sarı)
Etykieta (czerwona lub żółta)
Etiketa (červená nebo žlutá)
Címke (piros vagy sárga)
Fig. 11
Alignment marks
Ausrichtmarkierungen
Marques d’alignement
Marcature allineamento
Uitlijntekens
Marcas de alineación
Flugtemærker
Anpassningsmärken
Opprettingsmerke
Sovitusmerkit
Hizalama işaretleri
Znaczniki
Rovnací značky
Pozíciójelölések
Battery pack release button
Akku-Entriegelungsknopf
Bouton de libération de batterie autonome
Tasto di rilascio pacco batteria
Accu-ontgrendeltoets
Botón de liberación de batería
Udløserknap til batteripakning
Frigöringsknapp för batteri
Utløserknapp for batteripakke
Akkupaketin irrotuspainike
Pil takımı serbest bırakma düğmesi
Przycisk zwolnienia blokady akumulatora
Tlačítko uvolnění bloku baterie
Akkumulátoregység kioldógombja
rie autonome
Attaching
Anbringen
Connexion
Collegamento
Bevestigen
Acoplamiento
Påsætning
Montering
Montering
Kiinnittäminen
Takma
Mocowanie
Nasazení
Csatlakoztatás
Removing
Entfernen
Retrait
Rimozione
Verwijderen
Desacoplamiento
Aftagning
Lossdragning
Demontering
Irrottaminen
Çıkarma
Wyciąganie
Sejmutí
Eltávolítás

- 8 -
EN
DE
FR
IT
NL
ES
DA
SV
NO
FI
TR
PL
CS
HU
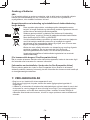
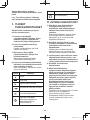
Original instructions: English
Translation of the original instructions:
Other languages
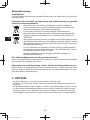
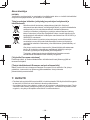
Read the “Safety Instructions” booklet
and the following before using.
I.
GENERAL SAFETY
WARNINGS
Save all warnings and instructions for
future reference.
1) Do not operate this unit in explosive
atmospheres, such as in the
presence of fl ammable liquids,
gases or dust.
2) Do not expose this unit to rain or wet
conditions.
Water entering this unit will increase
the risk of electric shock.
3) Do not overreach. Keep proper
footing and balance at all times.
This enables better control of this unit
in unexpected situations.
4) Have your unit serviced by a
qualifi ed repair person using only
identical replacement parts.
This will ensure that the safety of this
unit is maintained.
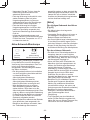
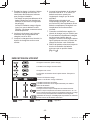
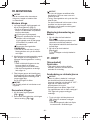
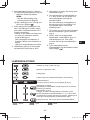
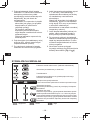
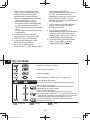
Symbol Meaning
Volts
Direct current
No load speed
Revolutions or reciprocations
per minutes
Electrical capacity of battery
pack
To reduce the risk of injury,
user must read and understand
instruction manual.
For indoor use only.
II
.
ADDITIONAL SAFETY
WARNINGS
1) Hold the power tool by insulated
gripping surfaces only, when
performing an operation where the
cutting tool may contact hidden
wiring.
Contact with a “live” wire will also make
exposed metal parts of the power tool
“live” and could give the operator an
electric shock.
2) Do not use accessories which are
not specifi cally designed and
recommended by the tool
manufacturer.
Just because the accessory can be
attached to your power tool, it does not
assure safe operation.
3) Accessories that do not match the
mounting hardware of the power tool
will run out of balance, vibrate
excessively and may cause loss of
control.
4) Do not use a damaged accessory.
5) Wear personal protective equipment.
Depending on application, use face
shield, safety goggles or safety
glasses. As appropriate, wear dust
mask, hearing protectors, gloves
and workshop apron capable of
stopping small abrasive or
workpiece fragments. The eye
protection must be capable of
stopping fl ying debris generated by
various operations.
The dust mask or respirator must be
capable of fi ltrating particles generated
by your operation. Prolonged exposure
to high intensity noise may cause
hearing loss.
6) Keep bystanders a safe distance
away from work area. Anyone
entering the work area must wear
personal protective equipment.
Fragments of workpiece or of a broken
accessory may fl y away and cause
injury beyond immediate area of
operation.

- 9 -
EN
DE
FR
IT
NL
ES
DA
SV
NO
FI
TR
PL
CS
HU
7) Do not run the power tool while
carrying it at your side.
Accidental contact with the spinning
accessory could snag your clothing,
pulling the accessory into your body.
8) Do not operate the power tool near
fl ammable materials.
Sparks could ignite these materials.
9) Do not use accessories that require
liquid coolants.
Using water or other liquid coolants
may result in electrocution or shock.
WARNING for charger and battery
pack
• Do not use other than the Panasonic
battery packs that are designed for
use with this unit.
• Panasonic is not responsible for any
damage or accident caused by the
use of the recycled battery pack and
the counterfeit battery pack.
• Do not dispose of the battery pack in
a fi re, or expose it to excessive heat.
• Do not drive the likes of nails into the
battery pack, subject it to shocks,
dismantle it, or attempt to modify it.
• Do not allow metal objects to touch
the battery pack terminals.
• Do not carry or store the battery pack
in the same container as nails or
similar metal objects.
• Do not charge the battery pack in a
high-temperature location, such as
next to a fi re or in direct sunlight.
Otherwise, the battery may overheat,
catch fi re, or explode.
• Never use other than the dedicated
charger to charge the battery pack.
Otherwise, the battery may leak,
overheat, or explode.
• After removing the battery pack from
this product or the charger, always
reattach the pack cover. Otherwise,
the battery contacts could be shorted,
leading to a risk of fi re.
• When the battery pack has
deteriorated, replace it with a new
one.
Continued use of a damaged battery
pack may result in heat generation,
ignition or battery rupture.
• If you detect any abnormalities,
discontinue use immediately and
contact the retailer from which you
purchased this product.
• Do not use the Li-ion battery pack
with its temperature below
0 °C or
above 40 °C.
It may lead to the cause of
malfunction of main unit. Leave the
battery pack at room temperature for
more than one hour for adjusting its
temperature.
• Do not store the tool and battery pack
in locations where the temperature
may reach or exceed
50 °C (such as
a metal tool shed, or a car in the
summer), which can lead to
deterioration of the storage battery.

- 10 -
EN
DE
FR
IT
NL
ES
DA
SV
NO
FI
TR
PL
CS
HU
III.
ASSEMBLY
CAUTION
• When attaching or removing blades,
disconnect battery pack from main unit.
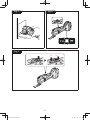
Attaching Blade
1. Raise the blade release lever and pull
out the fi xing bolt.
[Fig.1]
• Make sure that the blade release
lever is in front of the main unit and
parallel to the main unit.
Raise the blade release lever.
Since the operation becomes heavy
from here, fi rmly hold down the
blade release lever unit it is parallel
to the main unit.
Remove the fi xing bolt.
NOTE:
• If it is diffi cult to pull out, grasp the
fi xing bolt and rattle left and right.
2. With the blade mounting section facing
up, insert the blade and fi xing bolt into
the blade mounting section in order.
[Fig.2]
• Align the hole of the blade with the
convex part of the blade mounting
part and attach it.
• Insert the fi xing bolt fi rmly all the way
in.
3. Fix the blade by tilting the blade
release lever to the switch side. [Fig.3]
Firmly return the lever to its original
position.
Make sure the blade is secure.
CAUTION
• Be careful not to get your fi ngers caught.
Removing Blade
1. Raise the blade release lever.
[Fig.1
]
2. Remove the fi xing bolt and blade in this
order. [Fig.1
]
CAUTION
• Do not touch the blade immediately after
operation. It may be hot and could burn
your skin.
• Grab the fi xing bolt and rattle it from side
to side.
If it still does not come out, insert a
fl athead screwdriver between the fi xing
bolt and blade mounting part and pry it
out.
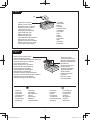
Attaching or Removing
Battery pack
1. To attach the battery pack:
[Fig.4
]
Align the highlighted marker points and
attach battery pack.
Slide the battery pack until it locks into
position.
2. To remove the battery pack:
[Fig.4
]
Push the button and slide the battery
pack forward.
IV.
OPERATION
[Main unit]
NOTE:
• Be aware that this tool is always in an
operating condition, since it does not
have to be plugged into an electrical
outlet.
Power switch operation
CAUTION
• Before inserting the battery pack into the
tool, always make sure that the power
switch operates properly and returns to
the “OFF” position when the rear of the
power switch is depressed.
• Power switch can be locked in “ON”
position. Stay alert when locking tool in
“ON” position and grasp the tool fi rmly.
1. To start operation, press and slide the
power switch toward the “ON” position.
[Fig.5
]
• Lightly attach the blade to the target
and move the main unit in the cutting
direction.
• To stop the tool, press the rear of the
power switch, then it returns to the
“OFF” position.
[Fig.6]

- 11 -
EN
DE
FR
IT
NL
ES
DA
SV
NO
FI
TR
PL
CS
HU
2. For continuous operation, press the
front of the power switch to lock it.
[Fig.5
]
• To stop the tool, press the rear of the
power switch, then it returns to the
“OFF” position. [Fig.6]
LED light
Illuminates while depressing the power
switch.
CAUTION
• Do not use it as a substitute for a regular
fl ashlight, since it does not have enough
brightness.
CAUTION: DO NOT STARE INTO
BEAM.
Use of controls or adjustments or
performance of procedures other than
those specifi ed herein may result in
hazardous radiation exposure.
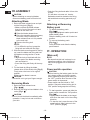
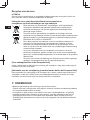
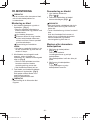
Frequency adjustment
• By turning the frequency adjustment dial
(E), the frequency can be switched freely
between 6000 min
-1
and 20000 min
-1
.
• There are 1 to 6 dials, and the frequency
increases as the number increases.
• Set the frequency by turning the dial
according to the work purpose.
• Turn the frequency adjustment dial to
adjust the frequency according to the
work application.
Also, be sure to check that the frequency
can be adjusted by turning the frequency
adjustment dial with the switch on before
starting work.
Indicator lamp for On lock
start prevention function
This unit will not start when the battery
pack is inserted with the switch at the
“ON” position (switch lever at “ON”).
The warning lamp will fl ash at this time to
indicate that the “On lock start prevention
function” has operated.
[Fig.9]
• Press the switch to the “OFF” position
(switch lever at “OFF”) and then press it
back to the “ON” position (switch lever at
“ON”) to start this unit.
[Fig.9]
NOTE:
• If the battery level is extremely low, the
warning lamp may not blink.
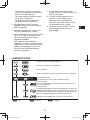
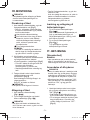
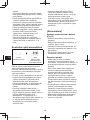
Overheat warning lamp
Off
(normal
operation)
Flashing: Overheat
Indicates operation has
been halted due to
battery overheating.
To protect the battery, be sure to note the
following when carrying out this operation.
• If the battery becomes hot, the protection
function will be activated and the motor
or battery will stop operating. The
overheat warning lamp on the control
panel illuminates or fl ashes when this
feature is active.
• If the overheating protection feature
activates, allow the tool to cool
thoroughly (at least 30 minutes). The tool
is ready for use when the overheat
warning lamp goes out.
• Avoid using the tool in a way that causes
the overheating protection feature to
activate repeatedly.
• If the tool is operated continuously under
high-load conditions or if it is used in
hot-temperature conditions (such as
during summer), the overheating
protection feature may activate
frequently.
• If the tool is used in cold-temperature
conditions (such as during winter) or if it
is frequently stopped during use, the
overheating protection feature may not
activate.
• The performance of the EY9L42
deteriorates signifi cantly at and below
10 °C due to work conditions and other
factors.

- 12 -
EN
DE
FR
IT
NL
ES
DA
SV
NO
FI
TR
PL
CS
HU
Low battery warning lamp
Off
(normal
operation)
Flashing
(No charge)
Battery protection
feature active
Excessive (complete) discharging of
lithium ion batteries shortens their service
life dramatically. The tool includes a
battery protection feature designed to
prevent excessive discharging of the
battery pack.
• The battery protection feature activates
immediately before the battery loses its
charge, causing the low battery warning
lamp to fl ash.
• If you notice the low battery warning
lamp fl ashing, charge the battery pack
immediately.
• If it is started with too little battery power
remaining, the tool may stop operating
without the low battery warning lamp
fl ashing fi rst. This indicates that there is
too little battery power remaining to use
the tool, and the battery pack should be
charged before further use.
• If the tool is subject to a sudden load
during use that causes the motor to lock
up, the overdischarge prevention sensor
may be triggered, and the low battery
warning lamp may fl ash. The lamp will
stop fl ashing once you address the
cause of the motor’s locking up and cycle
the trigger.
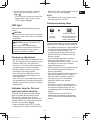
[Battery Pack]
For Appropriate Use of Battery
Pack [Fig.10]
• The rechargeable batteries have a
limited life.
• Do not use the battery pack soaked in
conductors like water.
• For optimum battery life, store the Li-ion
battery pack following use without
charging it.
• When operating the battery pack, make
sure the work place is well ventilated.
For safe use
• The battery pack is designed to be
installed by proceeding two steps for
safety. Make sure the battery pack is
installed properly to the main unit before
use.
• If the battery pack is not connected fi rmly
when the switch is switched on, the
overheat warning lamp and the battery
low warning lamp will fl ash to indicate
that safe operation is not possible, and
the main unit will not rotate normally.
Connect the battery pack into the unit of
the tool until the red or yellow label
disappears.
• Only use rechargeable battery packs for
Panasonic rechargeable tools. Do not
use modifi ed battery packs (including
battery packs which have been
disassembled and parts replaced).
• Do not use deteriorated battery packs.
There is a risk of the generation of heat,
ignition and explosion.
• If a battery pack leaks fl uid, cease use,
keep away from open fl ames, and return
it to the store immediately.
• Attach the battery pack by sliding until
the yellow and red labels are no longer
visible, and check that it does not fall out
of place.
- Failure to do so may result in scalding.

- 13 -
EN
DE
FR
IT
NL
ES
DA
SV
NO
FI
TR
PL
CS
HU
• The usage temperature range for lithium
ion battery packs is 0 to 40 degrees.
- Use of battery packs cooled to below
zero, such as in colder northern areas,
may result in abnormal operation of the
device. In such cases, leave the battery
pack in a location of 10 degrees or
more for one hour or more before use,
and only use the device after the
battery pack has warmed up.
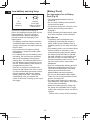
[Battery Charger]
Charging
CAUTION
1) If the temperature of the battery pack
falls approximately below
−10 °C,
charging will automatically stop to
prevent degradation of the battery.
2) The ambient temperature range is
between 0 °C and 40 °C.
If the battery pack is used when the
battery temperature is below
0 °C, the
tool may fail to function properly.
3) Use the charger at temperatures
between
0 °C and 40 °C, and charge
the battery at a temperature similar to
that of the battery itself. (There should
be no more than a
15 °C difference
between the temperatures of the
battery and the charging location.)
4) When charging a cool battery pack
(below
0 °C) in a warm place, leave the
battery pack at the place and wait for
more than one hour to warm up the
battery to the level of the ambient
temperature.
5) Cool down the charger when charging
more than two battery packs
consecutively.
6) Do not insert your fi ngers into contact
hole, when holding charger or any
other occasions.
7) Unplug the charger when not in use.
8) Store the charger between 0 and 40
degrees, and charge the battery pack
at a temperature close to the storage
temperature.
• If the battery pack is charged while at
a temperature below 0 degrees, a full
charge will give only around 50% of a
normal charge. Commence charging
after 1 hour or more at the prescribed
temperature.
9) Do not charge in a poorly ventilated
place.
10)
Do not cover the battery pack or
charger with a cloth or the like while
charging is in progress.
NOTE:
• Your battery pack is not fully charged at
the time of purchase. Be sure to charge
the battery before use.
How to charge
1. Plug the charger into the AC outlet.
NOTE:
• Sparks may be produced when the
plug is inserted into the AC power
supply, but this is not a problem in
terms of safety.
2. Connect the battery pack fi rmly into the
charger.
(1) Line up the alignment marks and
place the battery onto the dock on
the charger.
NOTE:
• Not all battery packs display the
alignment marks. [Fig.11]
(2) Slide forward in the direction of the
arrow. [Fig.11
]
3. During charging, the charging lamp will
be lit. When charging is completed, an
internal electronic switch will
automatically be triggered to prevent
overcharging.
• Charging will not start if the battery
pack is hot (for example, immediately
after heavy-duty operation).
The orange standby lamp will be
fl ashing until the battery cools down.
Charging will then begin
automatically.

- 14 -
EN
DE
FR
IT
NL
ES
DA
SV
NO
FI
TR
PL
CS
HU
4. The charge lamp (green) will fl ash
slowly once the battery is
approximately 80% charged.
5. When charging is completed, the
charging lamp in green color will turn
off.
6. If the temperature of the battery pack is
0 °C or less, charging takes longer to
fully charge the battery pack than the
standard charging time.
Even when the battery is fully charged,
it will have approximately 50% of the
power of a fully charged battery at
normal operating temperature.
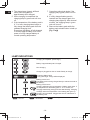
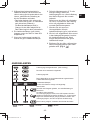
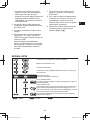
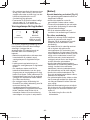
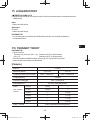
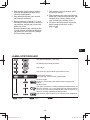
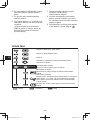
LAMP INDICATIONS
Charging is completed. (Full charge.)
Battery is approximately 80% charged.
Now charging.
Turn off Illuminated
Flashing
Charger is plugged into the AC outlet. Ready to charge.
Charging Status Lamp.
Left: green Right: orange will be displayed.
Battery pack is cool.
The battery pack is being charged slowly to reduce the load on
the battery.
Battery pack is warm.
Charging will begin when temperature of battery pack drops. If
the temperature of the battery pack is -10 °C or less, the
charging status lamp (orange) will also start fl ashing. Charging
will begin when the temperature of the battery pack goes up.
Charging is not possible. Clogged with dust or malfunction of
the battery pack.
(Green) (Orange)
7. Consult an authorized dealer if the
charging lamp (green) does not turn
off.
8. If a fully charged battery pack is
inserted into the charger again, the
charging lamp lights up. After several
minutes, the charging lamp in green
color will turn off.
9. Remove the battery pack while the
battery pack release button is held up.
[Fig.11
]

- 15 -
EN
DE
FR
IT
NL
ES
DA
SV
NO
FI
TR
PL
CS
HU
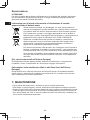
Battery Recycling
ATTENTION:
For environmental protection and recycling of materials, be sure that it is disposed of at an
offi cially assigned location, if there is one in your country.
Information for Users on Collection and Disposal of Old Equipment and
used Batteries
These symbols on the products, packaging, and/or accompanying
documents mean that used electrical and electronic products and batteries
should not be mixed with general household waste.
For proper treatment, recovery and recycling of old products and used
batteries, please take them to applicable collection points, in accordance
with your national legislation and the
Directives 2012/19/EU and 2006/66/
EC.
By disposing of these products and batteries correctly, you will help to
save valuable resources and prevent any potential negative effects on
human health and the environment which could otherwise arise from
inappropriate waste handling.
For more information about collection and recycling of old products and
batteries, please contact your local municipality, your waste disposal
service or the point of sale where you purchased the items.
Penalties may be applicable for incorrect disposal of this waste, in
accordance with national legislation.
[For business users in the European Union]
If you wish to discard electrical and electronic equipment, please contact your dealer or
supplier for further information.
[Information on Disposal in other Countries outside the European Union]
These symbols are only valid in the European Union. If you wish to discard these items,
please contact your local authorities or dealer and ask for the correct method of disposal.
V.
MAINTENANCE
• Use only a dry, soft cloth for wiping the unit.
Do not use a damp cloth, thinner, benzine, or other volatile solvents for cleaning.
• In the event that the inside of the tool or battery pack is exposed to water, drain and allow
to dry as soon as possible. Carefully remove any dust or iron fi lings that collect inside the
tool. If you experience any problems operating the tool, consult with a repair shop.

- 16 -
EN
DE
FR
IT
NL
ES
DA
SV
NO
FI
TR
PL
CS
HU
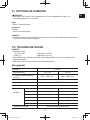
VI.
OPTIONAL ACCESSORIES
CAUTION
• To prevent the risk of injury, only use accessory or attachment for its stated purpose.
Battery Pack
• See the Specifi cation.
Battery Charger
EY0L82
• See the Specifi cation.
NOTE:
• If you need any assistance for more details regarding these accessories, ask your local
service centre.
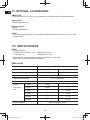
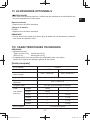
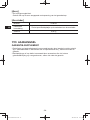
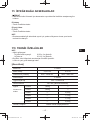
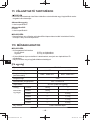
VII.
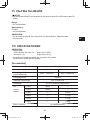
SPECIFICATIONS
NOTE:
• Weight indication
Greater than or equal to 1 kg: indicated by 0.05 kg.
Less than 1 kg: indicated by 0.01 kg.
• This chart may include models that are not available in your area.
Please refer to the latest general catalogue.
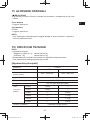
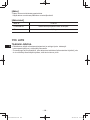
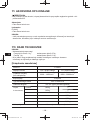
[Main unit]
Model No. EY46A5
Motor voltage 14.4 V DC 18 V DC
Oscillation speed (No load) 6000 – 18000 min
-1
6000 – 20000 min
-1
Oscillation angle 3 degrees
Applicable Blade type
OIS STARLOCK
Overall length 261 mm (Main unit only)
Weight
With battery
pack:
EY9L45
1.85 kg —
EY9L47
1.65 kg —
EY9L51
— 2.00 kg
EY9L52
— 1.75 kg
EY9L53
— 1.75 kg
EY9L54
— 2.00 kg
Noise, Vibration See the included sheet

- 17 -
EN
DE
FR
IT
NL
ES
DA
SV
NO
FI
TR
PL
CS
HU
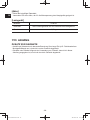
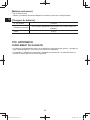
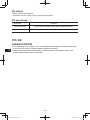
[Battery Pack]
• See the included sheet.
Use a battery pack adapted motor voltage of main unit.
[Battery Charger]
Model No. EY0L82
Electrical rating See the rating plate on the bottom of the charger
Weight 0.93 kg
VIII.
APPENDIX
WARRANTY SUPPLEMENT
• The breakdown and damage caused by usage consistent for a long time (e.g.: factory
work on the assembly line, etc.) is out of warranty.
• Damage or failure caused by use of accessories that are not specifi ed in this manual will
not be covered by warranty.

- 18 -
EN
DE
FR
IT
NL
ES
DA
SV
NO
FI
TR
PL
CS
HU
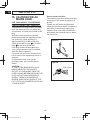
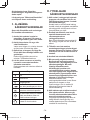
IX.
CAUTION FOR AC
MAINS LEAD
FOR YOUR SAFETY, PLEASE READ
THE FOLLOWING TEXT CAREFULLY
This appliance is supplied with a moulded
three pin mains plug for your safety and
convenience. A 5 amp fuse is fi tted in this
plug.
Should the fuse need to be replaced
please ensure that the replacement fuse
has a rating of 5 amp and that it is
approved by ASTA or BSI to BS1362.
Check for the ASTA mark
or the BSI
mark
on the body of the fuse.
If the plug contains a removable fuse
cover you must ensure that it is refi tted
when the fuse is replaced.
If you lose the fuse cover the plug must
not be used until a replacement cover is
obtained.
A replacement fuse cover can be
purchased from your local Panasonic
Dealer.
CAUTION:
IF THE FITTED MOULDED PLUG IS
UNSUITABLE FOR THE SOCKET
OUTLET IN YOUR HOME THEN THE
FUSE SHOULD BE REMOVED AND THE
PLUG CUT OFF AND DISPOSED OF
SAFELY. THERE IS A DANGER OF
SEVERE ELECTRICAL SHOCK IF THE
CUT OFF PLUG IS INSERTED INTO ANY
13 AMP SOCKET.
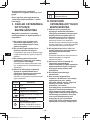
ONLY FOR U. K.
Figure B
Figure A
Fuse Cover
How to replace the fuse
The location of the fuse differs according
to the type of AC mains plug (fi gures A
and B).
Confi rm the AC mains plug fi tted and
follow the instructions below. Illustrations
may differ from actual AC mains plug.
Open the fuse cover with a screwdriver
and replace the fuse and close or attach
the fuse cover.

- 19 -
EN
DE
FR
IT
NL
ES
DA
SV
NO
FI
TR
PL
CS
HU
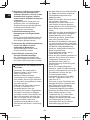
Original-Anleitung: Englisch
Übersetzung der Original-Anleitung:
Andere Sprachen
Lesen Sie die Broschüre
„Sicherheitshinweise“ und die folgenden
Hinweise, bevor Sie das Produkt
verwenden.
I.
ALLGEMEINE
SICHERHEITSHINWEISE
Bewahren Sie alle Warnungen und
Anweisungen für spätere Bezugnahme
auf.
1) Verwenden Sie dieses Gerät nicht in
explosionsgefährdeten Bereichen,
wie zum Beispiel bei Anwesenheit
brennbarer Flüssigkeiten, Gase oder
brennbaren Staubs.
2) Setzen Sie dieses Gerät weder
Regen noch Nässe aus.
Wenn Wasser in dieses Gerät eindringt,
steigt die Gefahr eines Stromschlags.
3) Übernehmen Sie sich nicht. Achten
Sie zu jeder Zeit auf sicheren Stand
und das Gleichgewicht.
Dies ermöglicht eine bessere
Handhabung dieses Geräts in
unvorhergesehenen Situationen.
4) Lassen Sie Ihr Gerät nur von einem
qualifi zierten Wartungstechniker
warten und es dürfen nur identische
Ersatzteile verwendet werden.
Dadurch wird sichergestellt, dass die
Sicherheit dieses Geräts erhalten bleibt.
Symbol Bedeutung
Volt
Gleichstrom
Leerlaufdrehzahl
Drehzahl oder Hubzahl pro
Minute
Akkukapazitat in Ampere
Stunden
Zur Verminderung der
Verletzungsgefahr muss die
Bedienungsanleitung gründlich
gelesen werden.
Symbol Bedeutung
Nur für Inneneinsatz.
II
.
ZUSÄTZLICHE
SICHERHEITSWARNUNGEN
1) Halten Sie das Elektrowerkzeug nur
an den Oberfl ächen der Isoliergriffe
fest, wenn Sie Arbeiten ausführen,
bei denen das Schneidwerkzeug auf
verborgene Kabel treffen kann.
Durch die Berührung eines unter
Spannung stehenden Kabels können
die Metallteile des Elektrowerkzeugs
unter Strom gesetzt werden und der
Bediener kann einen elektrischen
Schlag erleiden.
2) Nur speziell gefertigtes und vom
Werkzeughersteller empfohlenes
Zubehör verwenden.
Wenn sich ein Zubehör am
Elektrowerkzeug anbringen lässt, ist damit
noch kein sicherer Betrieb garantiert.
3) Zubehör, das nicht den
Befestigungsmaßen des
Elektrowerkzeugs entspricht, gerät
aus dem Gleichgewicht, vibriert
übermäßig und Sie können die
Kontrolle darüber verlieren.
4) Verwenden Sie kein beschädigtes
Zubehör.
5) Schutzvorrichtungen verwenden. Je
nach Anwendung muss ein
Gesichtsschutzschild oder eine
Schutzbrille getragen werden.
Außerdem nach Bedarf eine
Staubschutzmaske, einen
Gehörschutz, Handschuhe oder eine
Schürze tragen, die kleine Fragmente
des Werkstücks aufzufangen
vermögen. Der Augenschutz muss in
der Lage sein, weg geschleuderte
Fragmente von verschiedenen
Anwendungen aufzufangen.
Die Staubmaske bzw. das Atemgerät
muss die entstehenden Staubpartikel
wirksam herausfi ltern können. Eine
langzeitige Einwirkung lauter Geräusche
kann zu Gehörschäden führen.

- 20 -
EN
DE
FR
IT
NL
ES
DA
SV
NO
FI
TR
PL
CS
HU
6) Zuschauer sollten sich in sicherer
Entfernung vom Arbeitsbereich
aufhalten. Personen, die sich in den
Arbeitsbereich begeben, müssen
entsprechende Schutzvorrichtungen
verwenden.
Weggeschleuderte Fragmente vom
Werkstück oder von beschädigtem
Zugehör können auch außerhalb des
unmittelbaren Arbeitsbereichs
Verletzungen verursachen.
7) Das Elektrowerkzeug beim
Herumtragen nicht eingeschaltet
lassen.
Durch eine unfreiwillige Berührung mit
der Bekleidung kann das Zubehör an
Ihren Körper gezogen werden.
8) Verwenden Sie das Elektrowerkzeug
nicht in der Nähe von leicht
entzündbaren Materialien.
Solche Materialien können durch
Funken entzündet werden.
9) Kein Zubehör verwenden, das
fl üssige Kühlmittel benötigt.
Bei Verwendung von Wasser oder
anderen fl üssigen Kühlmitteln besteht
die Gefahr eines elektrischen Schlags.
WARNUNG für das Ladegerät und
den Akku
• Verwenden Sie ausschließlich
Panasonic-Akkus, die für dieses
Gerät vorgesehen sind.
• Panasonic übernimmt keine
Verantwortung für etwaige Schäden
oder Unfälle, die durch den Gebrauch
von recycelten und gefälschten Akkus
verursacht werden.
• Entsorgen Sie diesen Akku niemals
im Feuer und setzen Sie ihn
keinesfalls starker Hitze aus.
• Versuchen Sie niemals, Gegenstände
wie Nägel in den Akku zu schlagen,
und setzen Sie ihn keinen Stößen aus.
Sehen Sie außerdem davon ab, den
Akku zu zerlegen oder zu verändern.
• Achten Sie darauf, dass keine
metallischen Gegenstände mit den
Anschlüssen des Akkus in Verbindung
kommen.
• Der Akku darf nicht im selben Behälter
wie Nägel oder ähnliche metallische
Gegenstände transportiert oder
gelagert werden.
• Laden Sie den Akku niemals an einem
Ort mit hoher Temperatur,
beispielsweise neben einem Feuer
oder direkter Sonnenein-strahlung.
Andernfalls kann dies zu Überhitzung,
einem Brand oder einer Explosion
führen.
• Laden Sie den Akku ausschließlich mit
dem dafür vorgesehenen Ladegerät.
Andernfalls kann dies zu einem
Auslaufen des Akkus, einem Brand
oder einer Explosion führen.
• Nachdem Sie das Batterie-/Akkupack
von dem Produkt oder dem Ladegerät
abgenommen haben, bringen Sie stets
die Batterie-/Akkupackabdeckung
wieder an. Anderenfalls könnten die
Batterie-/Akkukontakte
kurzgeschlossen werden, was zu
einem Brand führen kann.
• Wenn der Akku schwach geworden ist,
ersetzen Sie ihn durch einen neuen.
Fortgesetzter Gebrauch eines
beschädigten Akkus kann zu
Wärmeerzeugung, Entzündung oder
Bruch führen.
• Wenn Sie Unregelmäßigkeiten
bemerken, stellen Sie die Benutzung
sofort ein und wenden Sie sich an den
Einzelhändler, bei dem Sie das
Produkt erworben haben.
• Verwenden Sie den Li-Ionen-Akku
nicht bei Temperaturen unter 0 °C
oder über 40 °C.
Dies kann zu einer Fehlfunktion des
Hauptgeräts führen. Lassen Sie den
Akku länger als eine Stunde bei
Raumtemperatur liegen, um den
Temperaturausgleich herzustellen.
• Werkzeug und Akku dürfen nicht an
Orten gelagert werden, wo die
Temperatur auf 50 °C oder höher
steigen kann (z.B.Werkzeugs
chuppen aus Metall oder das Innere
von Fahrzeugen im Sommer).
Andernfalls droht eine Leistungs-
beeinträchtigung des Akkus.
Strona się ładuje...
Strona się ładuje...
Strona się ładuje...
Strona się ładuje...
Strona się ładuje...
Strona się ładuje...
Strona się ładuje...
Strona się ładuje...
Strona się ładuje...
Strona się ładuje...
Strona się ładuje...
Strona się ładuje...
Strona się ładuje...
Strona się ładuje...
Strona się ładuje...
Strona się ładuje...
Strona się ładuje...
Strona się ładuje...
Strona się ładuje...
Strona się ładuje...
Strona się ładuje...
Strona się ładuje...
Strona się ładuje...
Strona się ładuje...
Strona się ładuje...
Strona się ładuje...
Strona się ładuje...
Strona się ładuje...
Strona się ładuje...
Strona się ładuje...
Strona się ładuje...
Strona się ładuje...
Strona się ładuje...
Strona się ładuje...
Strona się ładuje...
Strona się ładuje...
Strona się ładuje...
Strona się ładuje...
Strona się ładuje...
Strona się ładuje...
Strona się ładuje...
Strona się ładuje...
Strona się ładuje...
Strona się ładuje...
Strona się ładuje...
Strona się ładuje...
Strona się ładuje...
Strona się ładuje...
Strona się ładuje...
Strona się ładuje...
Strona się ładuje...
Strona się ładuje...
Strona się ładuje...
Strona się ładuje...
Strona się ładuje...
Strona się ładuje...
Strona się ładuje...
Strona się ładuje...
Strona się ładuje...
Strona się ładuje...
Strona się ładuje...
Strona się ładuje...
Strona się ładuje...
Strona się ładuje...
Strona się ładuje...
Strona się ładuje...
Strona się ładuje...
Strona się ładuje...
Strona się ładuje...
Strona się ładuje...
Strona się ładuje...
Strona się ładuje...
Strona się ładuje...
Strona się ładuje...
Strona się ładuje...
Strona się ładuje...
Strona się ładuje...
Strona się ładuje...
Strona się ładuje...
Strona się ładuje...
Strona się ładuje...
Strona się ładuje...
Strona się ładuje...
Strona się ładuje...
Strona się ładuje...
Strona się ładuje...
Strona się ładuje...
Strona się ładuje...
Strona się ładuje...
Strona się ładuje...
Strona się ładuje...
Strona się ładuje...
Strona się ładuje...
Strona się ładuje...
Strona się ładuje...
Strona się ładuje...
Strona się ładuje...
Strona się ładuje...
Strona się ładuje...
Strona się ładuje...
Strona się ładuje...
Strona się ładuje...
Strona się ładuje...
Strona się ładuje...
Strona się ładuje...
Strona się ładuje...
Strona się ładuje...
Strona się ładuje...
Strona się ładuje...
Strona się ładuje...
Strona się ładuje...
Strona się ładuje...
Strona się ładuje...
Strona się ładuje...
Strona się ładuje...
Strona się ładuje...
Strona się ładuje...
Strona się ładuje...
Strona się ładuje...
Strona się ładuje...
Strona się ładuje...
Strona się ładuje...
Strona się ładuje...
Strona się ładuje...
Strona się ładuje...
Strona się ładuje...
Strona się ładuje...
Strona się ładuje...
Strona się ładuje...
Strona się ładuje...
Strona się ładuje...
Strona się ładuje...
-
 1
1
-
 2
2
-
 3
3
-
 4
4
-
 5
5
-
 6
6
-
 7
7
-
 8
8
-
 9
9
-
 10
10
-
 11
11
-
 12
12
-
 13
13
-
 14
14
-
 15
15
-
 16
16
-
 17
17
-
 18
18
-
 19
19
-
 20
20
-
 21
21
-
 22
22
-
 23
23
-
 24
24
-
 25
25
-
 26
26
-
 27
27
-
 28
28
-
 29
29
-
 30
30
-
 31
31
-
 32
32
-
 33
33
-
 34
34
-
 35
35
-
 36
36
-
 37
37
-
 38
38
-
 39
39
-
 40
40
-
 41
41
-
 42
42
-
 43
43
-
 44
44
-
 45
45
-
 46
46
-
 47
47
-
 48
48
-
 49
49
-
 50
50
-
 51
51
-
 52
52
-
 53
53
-
 54
54
-
 55
55
-
 56
56
-
 57
57
-
 58
58
-
 59
59
-
 60
60
-
 61
61
-
 62
62
-
 63
63
-
 64
64
-
 65
65
-
 66
66
-
 67
67
-
 68
68
-
 69
69
-
 70
70
-
 71
71
-
 72
72
-
 73
73
-
 74
74
-
 75
75
-
 76
76
-
 77
77
-
 78
78
-
 79
79
-
 80
80
-
 81
81
-
 82
82
-
 83
83
-
 84
84
-
 85
85
-
 86
86
-
 87
87
-
 88
88
-
 89
89
-
 90
90
-
 91
91
-
 92
92
-
 93
93
-
 94
94
-
 95
95
-
 96
96
-
 97
97
-
 98
98
-
 99
99
-
 100
100
-
 101
101
-
 102
102
-
 103
103
-
 104
104
-
 105
105
-
 106
106
-
 107
107
-
 108
108
-
 109
109
-
 110
110
-
 111
111
-
 112
112
-
 113
113
-
 114
114
-
 115
115
-
 116
116
-
 117
117
-
 118
118
-
 119
119
-
 120
120
-
 121
121
-
 122
122
-
 123
123
-
 124
124
-
 125
125
-
 126
126
-
 127
127
-
 128
128
-
 129
129
-
 130
130
-
 131
131
-
 132
132
-
 133
133
-
 134
134
-
 135
135
-
 136
136
-
 137
137
-
 138
138
-
 139
139
-
 140
140
-
 141
141
-
 142
142
-
 143
143
-
 144
144
-
 145
145
-
 146
146
-
 147
147
-
 148
148
-
 149
149
-
 150
150
-
 151
151
-
 152
152


w innych językach
- čeština: Panasonic EY46A5 Operativní instrukce
- español: Panasonic EY46A5 Instrucciones de operación
- italiano: Panasonic EY46A5 Istruzioni per l'uso
- Deutsch: Panasonic EY46A5 Bedienungsanleitung
- svenska: Panasonic EY46A5 Bruksanvisningar
- français: Panasonic EY46A5 Mode d'emploi
- Türkçe: Panasonic EY46A5 Kullanma talimatları
- English: Panasonic EY46A5 Operating instructions
- dansk: Panasonic EY46A5 Betjeningsvejledning
- suomi: Panasonic EY46A5 Käyttö ohjeet
- Nederlands: Panasonic EY46A5 Handleiding
Powiązane artykuły
-
Panasonic EY37C3 Instrukcja obsługi
-
-
-
-
Panasonic EY75A7 Instrukcja obsługi
-
-
-
-
-