
CW W2G R K Y
4
2
HVAC
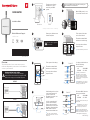
BEFORE
Thermostat
1
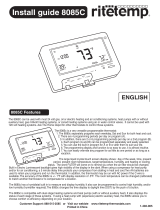
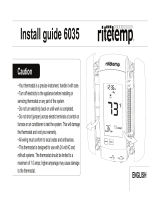
Installation Guide
resideo.com
C WIRE ADAPTER
Online Guides and Support
OFF
Turn the power off at the
breaker box or control
switch for your HVAC*
system.
Remove your old thermostat
from the wall plate.
*Heating, ventilation, and air conditioning
Overview
This product provides a C wire (common wire) to power a
thermostat. Only install if you do not have a C wire available to
connect to your thermostat.
5
Open HVAC system’s cover
to reveal the control board.
6
Take a picture of the wires
on the control board.
Ensure the terminal labels
and wires are in the image.
You may need to reference
the picture later.
*
O or B terminal may also be used.
CONTINUE
7
Use the provided stickers to
label the following
connected wires:
8
Disconnect ONLY the wires
that you just labelled:
AFTER
HVAC
C Wire
Adapter
Thermostat
C
OFF
ON
Breaker box Switch
Do not remove any wires
at this time!
ZONING CONTROL PANEL CHECK
For zoned systems, install the C Wire Adapter
between the thermostat and the zoning panel, NOT
between the zoning panel and HVAC equipment.
3
Take a picture of the wiring.
Ensure the terminal labels
and wires are in the image.
You may need to reference
the picture later.
Confirm that you do not have
a wire in the C terminal. If
you have a wire in the
C terminal, then you do not
need this product.
Look for an unused wire. If
you have an unused wire,
then you do not need this
product. Connect one end of
that wire to C terminal at the
HVAC and the other to C
terminal at new thermostat.
*
The C wire (common) might be
labeled as B rather than C on certain
thermostats.
Go to your HVAC system. It may be located in your
attic, crawl space or basement.
C terminal
*
EXAMPLE
*
R
C
W or W1
Y or Y1
R or Rc
G
G
Y
W
W2
**
CW W2G R K Y
Terminal Labels
Wires
G
C
R
W
W2
Y
G
R or Rc
•
•
*
**
EXAMPLE
*
C
Y or Y1
R or Rc
G
W2
R
G
W
Y
W or W1
W or W1
Y or Y1
•
•
*
Not all systems will have a
W or W1-wire. On a heat pump
application, the wire coming from
O/B on the old thermostat would
match to either O or B at equipment
rather than W.
**
If multiple wires are connected
to a terminal, only label the the wire
running to your thermostat.
G
R or Rc
•
•
W or W1
Y or Y1
•
•
*
Do NOT disconnect wires that you
did not label.
**
If multiple wires are connected
to a terminal, only remove the the
wire running to your thermostat.
***
On a heat pump application,
the wire coming from O/B on the old
thermostat would match to either O
or B at equipment rather than W.
***
33-00342-08

15
16
13
14
Before mounting, check to
make sure surface is clean
enough to ensure good
adhesion.
Mount C Wire Adapter
inside the furnace using
included mount and
adhesive pad.
11
Connect the wires from
the “Equipment”
labelled side of the C
Wire Adapter to the
matching terminals on
the control board.
*
If there are separate wires to
W and O, leave the W and O wires
attached at HVAC and do not
connect them to the C Wire
Adapter.
Label your now converted
wires as shown.
Close the HVAC system’s cover.
Leave the power off.
12
CHECKPOINT
Your C Wire Adapater should now be installed between
your thermostat wiring and the control board.
HVAC
Control Board
Thermostat
C Wire
Adapter
Adhesive pad
Mount
G Y
K
C
G
Y
Wires
C
K
Labels
Label ALL of the remaining
wires according to their
terminals.
*
O/B terminal may also be used.
G W R Y
K
C
EXAMPLE
R
W
17
Confirm you have labelled
ALL of your wiring.
Disconnect the wires from
the old wall plate.
*
O/B terminal may also be used.
18
9
Insert the wires you just
disconnected into the
C Wire Adapter terminals.
W C K R
THERMOSTAT
EQUIPMENT
R
Y
G
W or O/B
G
Y
R
Wires
W or O/B
C
K
R
Terminals
This will convert the G and
Y-wires into C and K-wires.
10
Take a picture of the wires
you inserted into the C Wire
Adapter.
Ensure the terminal labels
and wires are in the image.
You may need to reference
the picture later.
W C K R
THERMOSTAT
EQUIPMENT
W
R
Y
G
W C K R
THERMOSTAT
EQUIPMENT
R
Y
G
K
C
EXAMPLE
R
W
Refer to your new thermostat’s
installation guide for detailed
instructions to complete the
following tasks below.
The wires you label C and K are
the wires you inserted into the
C and K-terminals in step .
9
NEXT STEPS
C
W, W1, O, or B
*
Y or Y1
R
G
W2
W
R
Y
G
C
EXAMPLE
Go back to your thermostat.
A
Remove the old wall plate and mount the new one.
C
Complete your new thermostat’s installation by
attaching the thermostat to the wall plate,
restoring the power, and configuring the
thermostat.
B
Wire the new thermostat.
EXAMPLE
C
R
C W
K
R
K
W
Refer to the labels you
applied when inserting
the wires.
When done wiring, you should
have wires in the C and
K-terminals.
You should not have wires in
the Y or G-terminals.
*
*
Resideo Technologies, Inc.
1985 Douglas Drive North, Golden Valley, MN 55422
1-800-468-1502
33-00342—08 M.S. Rev. 05-20 | Printed in United States
© 2020 Resideo Technologies, Inc. All rights reserved.
The Honeywell Home trademark is used under license from Honeywell International, Inc.
This product is manufactured by Resideo Technologies, Inc. and its affiliates.
www.resideo.com
-
 1
1
-
 2
2


Honeywell Home Smart Thermosta Instrukcja obsługi
- Typ
- Instrukcja obsługi
- Niniejsza instrukcja jest również odpowiednia dla
w innych językach
Inne dokumenty
-
Sharper Image Honeywell® Lyric T5+ Wi-Fi Smart Thermostat Instrukcja obsługi
-
Alarm.Com PanelKit Instrukcja obsługi
-
Filtrete 3M-50 Instrukcja instalacji
-
3M 3M-30 Install Manual
-
 RiteTemp 6010 Instrukcja instalacji
-
 RiteTemp 8025 Instrukcja instalacji
-
 RiteTemp 8085C Instrukcja instalacji
-
 RiteTemp 8029B Install Manual
-
Intermatic CA8900 Instrukcja obsługi
-
 RiteTemp 6035 Instrukcja instalacji


