
©Copyright2008Smart-AVI,AllRightsReserved
Notice
The informationcontained in thisdocument is
subject to change without notice. Smart-AVI makes
no warranty of any kind with regard to this material,
including but not limited to, impliedwarranties of
merchantabilityandfitnessforanyparticular
purpose.
Smart-AVIwillnotbeliableforerrorscontainedherein
or for incidental or consequentialdamages in
connection with the furnishing, performance or use
of this material.
No partofthisdocument may be photocopied,
reproduced or translated into anotherlanguagewith
out prior written consent from Smart-AVI.
For the complete manual, visit www.smartavi.com.
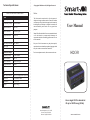
Useasingle CAT5 to broadcast
IR up to 1000ft away(333m)
HDC-IR
www.smartavi.com
User Manual
11651 Vanowen St.
North Hollywood, CA 91605
Phone:(818)503-6200
Facsimile: (818) 503-6208
Technical Specifications
METI
IR Eye input
IR Frequency Range 30 KHz to 80KHz
Capture Distance Up to 25ft
Cable Connector
IR Signal Indicator Green LED
Power Requirements 5VDC 30mA
epyT langiS
TTL
IR Emitter output
IR Frequency Range
30KHz to 80KHz
Emitter Distance
Up to 10’
Cable Connector 3.5mm mono jack
IR Signal Indicator
Box
Power Requirments 12VDC 2A single power up to 250’
Cable Link CAT5 568A or 568B
Dimension
Weight
.25lb (0.9 Kg.)
HDC-IR SPECIFICATIONS
3.5mm stero jack
Red LED
2.5”x2.5”x1.0”

Introduction
The HDC-IR range of products allow the extension
of Infra Red control signals using single CAT5 UTP
(category 5, unshielded twisted pair) cable. The
HDC-IR is the first product for this application.
Features
Uses easy to install, inexpensive CAT5.
Output reaches up to 1000 feet (300 m).
Sends IR and Power signals over CAT5
.RI lanoitcerid-iB
High ground loop immunity.
Built-in lightning, power surge and transient
protection.
Remote Units come with Buffered Outputs.
Compact Enclosure.
Optional power supply for remote unit.
Fully compliant with standard modulated IR
and the latest IRDA.
Fully transparent path for all protocols and
data transfers.
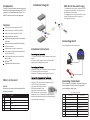
What’s in the box?
RI-CDH
Please check the contents of the package before
beginning installation.
Installation Diagram
ytQ metI noitpircseD
1
1
1
1
DEL-MS
EYE-MS
2
Installation Instructions
Operating Instructions
Once installation is completed, verify that the power is
present at all devices in the system. The peripheral
devices should be ready for use.
sdradnatSgniriW5TAC
#n Ai 8P 65AIT/A BI 8E 65AIT/AIE
ep1 irtsnee
rghtiweti eh pW irtsegnarohtiwetihW
ne2 ergdilosroepirtsetihwhtiwneerG egna
rodilosroepirtsetihwhtiwegnarO
3epirtsegnarohtiwetihW epirtsneerghtiwetihW
eu4 lb
dilosroepirtsetihwhtiweulB eulbdilosroepirtsetihwhtiweulB
ep5 irtseulbhtiweti eh pW irtseulbhtiwetihW
6 egnarodilosroepirtsetihwhtiwegnarO dilosroepirtsetihwhtiwneerG
nw7 orbdilosroepirtsnworbhtiwetihW nworbdilosropirtsnworbhtiwetihW
nw8 orbdilosroepirtsetihwhtiwnworB nworbdilosroepirtsetihwhtiwnworB
Connecting the IR
Use the Diagram for the IR connection.
Connecting the Transmitter
1. Connect the IR LED to the IR window on the source
device.
2. Connect power supply to the unit. Observe LED
lighting up indicating power present.
Connecting the Receiver
Connect IR LED to the IR window on the souce device.
2. Connect the IR Eye to the Receiver.
3. Observe LED lighting indicating power present.
Connect the Transmitter to the Receiver
Connect the transmitter to the receiver using
Category 5 UTP cable (Purchased separately). The
CAT 5 UTP cable, if purchased in
bulk, will be wired using 568A or
568B wiring standard. Once
connected, check that the power
LEDs on both the receiver and the
transmitter are on, IR status LED is on and RX LED is
flashing when Remote control is used indicating that
communication is in progress.
HDC-IR-TX
HDC-IR-RX
PS12VDC2A
IR Transmitter
IR Receiver
IR Emitter
IR Eye “Optional”
Power supply12VDC2A
Supports any IR Remote Control.
HDC-IR can be used 2 ways,
1. enabling the remote side to control the DVD,
or any other source device. (the IR eye would
be connected at the remote).
2. enabling the source side to turn off or on the
remote TV/Monitor (the IR eye would be
connected at the source.
-
 1
1
-
 2
2


Smart-AVI HDC-IR Skrócona instrukcja obsługi
- Typ
- Skrócona instrukcja obsługi
- Niniejsza instrukcja jest również odpowiednia dla
w innych językach
- English: Smart-AVI HDC-IR Quick start guide