
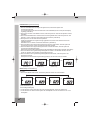
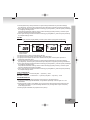
Design Stereo Music- Center
mit CD/ MP3- Player
Stereo hudební systém s
CD/ MP3-přehrávačem
Sistema de Som Estéreo Design
com Leitor de CD/ MP3
CD/ MP3 çalarlı Design Stereo
Music- Center
Design Stereo Music-Center
met CD/ MP3-speler
Stereofoniczny zestaw muzyczny
Design z odtwarzaczem CD/MP3
Equipo de música estéreo de diseño
con reproductor de CD y MP3
Stereo Music- Center con
lettore CD/ MP3
Formatervezett sztereó mini torony,
CD/MP3-lejátszóval
Chaîne hi-fi stéréo design avec
lecteur CD/MP3
Design stereo music center
with CD/MP3 Player
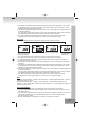
2308

2.
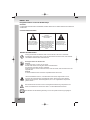
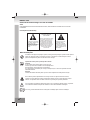
Der Blitz im gleichseitigen
Dreieck weist auf gefährliche
Hochspannung im Gerät hin,
die zu Stromschlag führen
kann.
Das Ausrufungszeichen im
gleichseitigen Dreieck weist
auf wichtige Bedienungs -
und Wartungsanleitungen hin.
WARNUNG
UM STROMSCHLAGGEFAHR ZU VERMEIDEN, DIESES GERÄT NICHT REGEN ODER FEUCHTIGKEITEN
AUSSETZEN.
SICHERHEITSBESTIMMUNGEN
VORSICHT
STROMSCHLAGGEFAHR
NICHT ÖFFNEN
VORSICHT: ZUR VERMEIDUNG VON
STROMSCHLAG GERÄTEGEHÄUSE
NICHT ÖFFNEN. ES BEFINDEN SICH
KEINE VOM VERBRAUCHER
WARTBAREN TEILE IM INNERN DES
GERÄTS. REPARATUR UND
WARTUNG NUR DURCH FACHPER-
SONAL.
MODELL: 2308
Design Stereo Music- Center mit CD/ MP3- Player
Achtung bei Kleinteilen und Batterien, bitte nicht Verschlucken, dies kann zu ernsthaften
Schädigungen oder Erticken führen. Achten Sie inbesondere bei Kindern darauf, dass Kleinteile
und Batterien ausserhalb deren Reichweite sind.
Wichtige Hinweise zum Gehörschutz
Vorsicht:
Ihr Gehör liegt Ihnen und auch uns am Herzen.
Deshalb seien Sie bitte vorsichtig beim Gebrauch dieses Gerätes.
Wir empfehlen: Vermeiden Sie hohe Lautstärken.
Sollte das Gerät von Kindern verwendet werden, achten Sie darauf, dass das Gerät nicht zu laut
eingestellt wird.
Achtung!
Zu hohe Lautstärken können bei Kindern irreparable Schäden hervorrufen.
Lassen Sie NIEMALS Personen, und insbesondere keine Kinder, Gegenstände in Löcher,
Schächte oder andere Öffnungen des Gehäuses stecken; dies könnte zu einem tödlichen
elektrischen Schlag führen. Das Gerätegehäuse, darf nur von ausgebildetem Fachpersonal
geöffnet werden.
Bitte verwenden Sie das Gerät nur seiner vorhergesehenen Bestimmung entsprechend. Das
Gerät ist ausschließlich für den Einsatz in Wohn- und Geschäftsbereichen bestimmt.
Bitte bewahren Sie die Bedienungsanleitung auch für eine spätere Verwendung sorgfältig auf.
WEITERE INFORMATIONEN

3.
Hinweise zum Umweltschutz
Dieses Produkt darf am Ende seiner Lebensdauer nicht über den normalen Haushaltsabfall entsorgt
werden, sondern muss an einem Sammelpunkt für das Recycling von elektrischen und
elektronischen Geräten abgegeben werden. Das Symbol auf dem Produkt, der Gebrauchsanleitung
oder der Verpackung weist darauf hin.
Die Werkstoffe sind gemäß ihrer Kennzeichnung wiederverwertbar. Mit der Wiederverwendung, der
stofflichen Verwertung oder anderen Formen der Verwertung von Altgeräten leisten Sie einen
wichtigen Beitrag zum Schutze unserer Umwelt.
Bitte erfragen Sie bei der Gemeindeverwaltung die zuständige Entsorgungsstelle.
Behindern Sie nicht die Belüftung des Gerätes, wie etwa mit Vorhängen, Zeitungen, Decken oder
mit Möbelstücken, die Belüftungsschlitze müsssen immer frei sein. Überhitzung kann Schäden
verursachen und die Lebensdauer des Gerätes verkürzen.
Hitze und Wärme
Setzen Sie das Gerät nicht direkter Sonnenstrahlung aus. Achten Sie darauf, das das Gerät keinen
direkten Wärmequellen wie Heizung oder offenem Feuer ausgesetzt ist. Achten Sie darauf, das die
Lüftungsschlitze des Gerätes nicht verdeckt sind.
Feuchtigkeit und Reinigung
Dieses Produkt ist nicht wasserfest! Tauchen Sie den Player nicht in Wasser ein und lassen ihn
auch nicht mit Wasser in Berührung kommen. In den Player eindringendes Wasser kann ernsthafte
Schäden verursachen.
Verwenden Sie keine Reinigungsmittel, die Alkohol, Ammoniak, Benzen oder Schleifmittel
enthalten, da diese den Player beschädigen können. Verwenden Sie zum Reinigen ein weiches,
feuchtes Tuch.
Batterien fachgerecht entsorgen
Batterien gehören nicht in den Hausmüll. Die Batterien müssen bei einer Sammelstelle für
Altbatterien abgegeben werden. Werfen Sie Batterien niemals in Feuer.
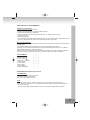
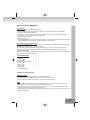
VORBEREITUNG
INSTALLATION
• Packen Sie alle Teile aus, und entfernen Sie die Schutzmaterialien.
• Legen Sie die Batterien in die Fernbedienung ein.
• Verbinden Sie das Gerät nicht mit der Stromversorgung ehe Sie die Kabel und Verbindungen überprüft
haben.
• Blockieren Sie nicht die Ventilierungsöffnungen. Stellen Sie sicher, dass einige Zentimeter um die Öffnungen
herum Platz ist.
ANSCHLÜSSE
1) Verbinden Sie den rechten und linken Lautsprecher mit der rechten und linken Lautsprecherbuchse.
2) Stellen Sie vor der ersten Nutzung sicher, dass die AC Spannung des Geräts (auf die Rückseite gedruckt)
die gleiche Spannung wie die Steckdose, an die Sie das Gerät anschließen wollen, hat.
NUTZUNG / COMPACT DISC
Beachten Sie die folgenden Hinweise, da Dreck, Kratzer oder Verzerrung der CD zu fehlerhafter Wiedergabe
der CD führen kann.

4.
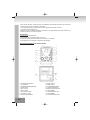
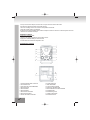
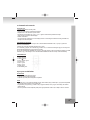
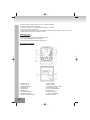
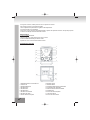
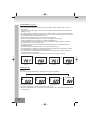
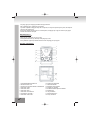
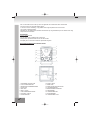
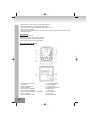
BEDIENUNGSELEMENTE UND EIGENSCHAFTEN
1. CD OPEN/CLOSE FACH
2. LCD-DISPLAY
3. FERNBEDIENUNGSSENSOR
4. STOP TASTE
5. SKIP- TASTE
6. SKIP+ TASTE
7. PLAY/PAUSE TASTE
8. VOLUME+ - TASTE
9. FUNKTIONSAUSWAHL
10. PROG. TASTE
11. MODE TASTE
12. KOPFHÖRERBUCHSE
13. TUNING KONTROLLE
14. BAND WÄHLSCHALTER
15. FM ANTENNE
16. LAUTSPRECHER links
17. STROMKABEL
18. LAUTSPRECHER rechts
• Wenn Sie die CD halten, achten Sie darauf, die Oberfläche der beschriebenen Seite nicht zu berühren.
• Lassen Sie die CD nicht an folgenden Orten liegen:
In der Nähe einer Heizung, oder an Orten wo hohe Temperaturen entstehen können.
An feuchten oder staubigen Orten.
• Entfernen Sie vor dem Abspielen jegliche Unreinheiten (z.B. Fingerabdrücke) mit einem weichen Tuch.
Wischen Sie immer von innen nach außen.
CD EINLEGEN
• Drücken Sie auf OPEN/CLOSE
• Legen Sie die CD ein (bedruckte Seite nach oben)
• Drücken Sie erneut auf OPEN/CLOSE um das CD Fach zu schließen.
• Das Display wird nun die Anzahl vorhandener Titel anzeigen.
1
2
3
4
5
6
7
8
9
10
11
12
13
14
18
15
16
17

5.
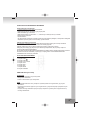
FERNBEDIENUNGS FUNKTIONEN
Vorbereitung
• Legen Sie die Batterien in die Fernbedienung ein.
• Öffnen Sie das Batteriefach indem Sie die Abdeckung auf der Rückseite der Fernbedienung entfernen.
• Legen Sie zwei “UM4/AAA” Batterien ein.
• Achten Sie dabei auf die Polarisierung der Batterien. Die Ausrichtung der Batterien sollte mit den + und –
Markierungen in dem Batteriefach übereinstimmen.
• Legen Sie die Abdeckung wieder ein.
• Batterien austauschen:
Sobald die Fernbedienung nicht mehr richtig zu funktionieren scheint, oder Sie näher an das Gerät
herangehen müssen um die Fernbedienung zu benutzen, sollten Sie die Batterien austauschen.
Die Fernbedienung benutzen
Wenn Sie die Fernbedienung benutzen, richten Sie diese in etwa in die Richtung des
FERNBEDIENUNGSSENSORS aus, und drücken Sie sanft aber fest auf die Tasten.
Die Nutzung der Fernbedienung ist bis zu ca. 6m Entfernung zu dem Gerät möglich.
Wenn Sie sich jedoch nicht direkt vor dem FERNBEDIENUNGSSENSOR befinden, wird die maximal
mögliche Entfernung geringer.
Stellen Sie sicher, dass keine Objekte den Sensor blockieren und, dass der Sensor keinem direkten
Sonnenlicht ausgesetzt ist.
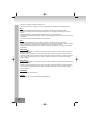
FERNBEDIENUNG
1. Ordnertaste
2. Ordnertaste
3. PLAY/PAUSE Taste
4. STOP Taste
5. SKIP + Taste
6. SKIP – Taste
7. MODE Taste
8. PROGRAM Taste
Tastenfunktionen BENUTZUNG
PLAY/PAUSE
• Startet die Wiedergabe, wenn das Gerät sich im Stoppmodus befindet.
• Pausiert die Wiedergabe, wenn das sich im Wiedergabemodus befindet.
• Startet die Wiedergabe erneut, wenn sich das Gerät im Pausemodus befindet.
STOP
• Im Wiedergabe- oder Pausemodus: Wechselt zu Stoppmodus oder Programmierungseingabemodus, wenn
im Programmierungswiedergabemodus.
• Im Programmierungseingabemodus: Schließt den Programmierungseingabemodus, löscht
Programmspeicher, und wechselt zum Stoppmodus.
• Wenn das Gerät sich in der zufälligen Wiedergabe befindet: Wechselt zum Stoppmodus und stoppt den
Zufallsmodus auf.

6.
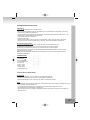
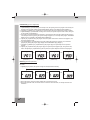
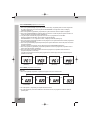
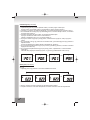
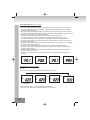
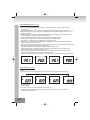
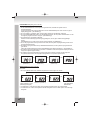
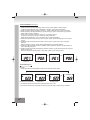
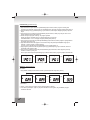
PROGRAM Taste [Funktionserklärung]
1. Wenn die PROGRAM Taste im Stoppmodus gedrückt wird, wechselt das System zum
Programmierungsmodus.
Im Programmierungsmodus wird die Titelnummer sowie PROGRAM (im 500 ms takt) auf dem Display
angezeigt. (siehe Bild 1)
2. Wenn Sie auf FF/SKIP+ oder FB/SKIP- drücken, wird das System den Titel, den Sie speichern möchten,
auswählen.
3. Wenn Sie PROGRAM drücken nachdem Sie einen Titel ausgewählt haben, wird das System den Titel
speichern, und zum nächsten Programmierungsmodus wechseln. (siehe Bild 2)
4. Das System kann im CD Modus 20 Tracks speichern.
Sobald die Höchstzahl der Programmierungen gespeichert ist, können keine weiteren Tracks mehr
gespeichert werden.
PROGRAM und P 01 werden im 500ms takt aufleuchten. (siehe Bild 3)
5. Wenn Sie während dem Programmierungsmodus auf die STOP Taste drücken, wird das System die
Programmierung löschen und den Programmierungsmodus schließen.
6. Wenn Sie während dem Programmierungsmodus auf PLAY/PAUSE drücken, wird das System die
Programmierungswiedergabe starten.
Während der Programmierungswiedergabe wird das PROGRAM auf dem Display angezeigt. (siehe Bild 4)
7. Wenn Sie während der Programmierungswiedergabe auf FF/SKIP+ oder FB/SKIP- drücken, wird das
System zur nächsten oder vorherigen Programmierung springen.
8. Wenn Sie während der Programmierungswiedergabe auf STOP drücken, wird das System in den
Stoppmodus wechseln.
Das System wird den Inhalt der Programmierung speichern, bis Sie erneut auf STOP drücken.
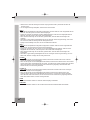
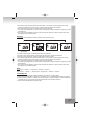
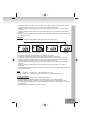
MODE Taste [Funktionserklärung]
CD Modus:
1. Wenn Sie die MODE Taste drücken, ändert das System den Modus nach Ihrem belieben:
2. In dem REPEAT-1 Modus wird das System den derzeit abgespielten Titel der CD wiederholen.
3. In dem REPEAT-ALL Modus wird das System alle Titel abspielen und dann die Titel erneut von vorne
wiedergeben.
PROGRAM
P0 1
PROGRAM
P0 1
PROGRAM
P03
PROGRAM
P03
→
→
→
(DISPLAY 1)
(DISPLAY 2) (DISPLAY 3)
(DISPLAY 4)
023
►
→
→
→
023
►
023
►
023
►
REP.
REP.
ALL
RANDOM
↓
NO REPEAT & RANDOM
(Keine Wiederholung, und
keine zufällige Wiedergabe)
REPEAT-1
REPEAT ALL
RANDOM

7.
4. Wenn alle Titel im RANDOM Modus (Zufallsmodus) abgespielt wurden oder Sie während dem
Zufallsmodus auf die STOP Taste drücken, wird das System in den Stoppmodus wechseln und den
Zufallsmodus ebenfalls stoppen.
5. Wenn Sie während dem Zufallsmodus auf FF/SKIP+ drücken, wird das System einen zufälligen Titel zur
Wiedergabe aussuchen.
Wenn Sie auf FF/SKIP+ während der letzte noch zu abzuspielende Titel abgespielt wird, wird das System
einen zufälligen Titel auswählen, und alle Titel erneut zufällig wiedergeben.
6. Wenn Sie während dem Zufallsmodus auf FB/SKIP- drücken, wird das System den derzeit abgespielten
Titel von vorne abspielen, und nicht zu einem vorherigen Titel wechseln.
MP3 Modus
1. Wenn Sie die MODE Taste drücken, ändert das System den Modus nach Ihrem belieben:
2. In dem REPEAT-1 Modus wird das System den derzeit abgespielten MP3 Titel wiederholen.
3. In dem REPEAT-FOLDER Modus wird das System alle Titel in dem MP3 Ordner abspielen und dann die
Titel erneut von vorne wiedergeben
4. In dem REPEAT-ALL Modus wird das System alle Titel abspielen und dann die Titel erneut von vorne
wiedergeben
5. Wenn alle Titel im RANDOM Modus (Zufallsmodus) abgespielt wurden oder Sie während dem
Zufallsmodus auf die STOP Taste drücken, wird das System in den Stoppmodus wechseln und den
Zufallsmodus ebenfalls stoppen.
6. Wenn Sie während dem Zufallsmodus auf FF/SKIP+ drücken, wird das System einen zufälligen Titel zur
Wiedergabe aussuchen.
Wenn Sie auf FF/SKIP+ während der letzte noch zu abzuspielende Titel abgespielt wird, wird das System
einen zufälligen Titel auswählen, und alle Titel erneut zufällig wiedergeben.
7. Wenn Sie während dem Zufallsmodus auf FB/SKIP- drücken, wird das System den derzeit abgespielten
Titel von vorne abspielen, und nicht zu einem vorherigen Titel wechseln.
MODI
CD: None (normale Wiedergabe) → Repeat 1 (einen Titel wiederholen) → Repeat all (alle Titel wiederholen)
→ Random (zufällige Wiedergabe) → None
MP3: None (normale Wiedergabe) → Repeat 1 (einen Titel wiederholen) → Repeat folder (alle Titel in dem
Ordner wiederholen) → Random all (alle Titel zufällig abspielen) Random (zufällige Wiedergabe der Titel in
dem Ordner) → None.
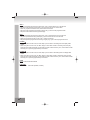
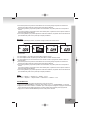
MP3 PROGRAMMIERUNG
Mit dem MP3 Player können Sie 99 Titel in einer beliebigen Reihenfolge programmieren und abspielen.
1. Drücken Sie auf die PROGRAM Taste während das Gerät sich im Stoppmodus befindet. Das Display wir
P01 und PROGRAM anzeigen.
2. Wenn Sie auf FF/SKIP+ oder FB/SKIP- drücken, wird das System den Titel, den Sie speichern möchten,
auswählen. Sie können auch auf FOLDER DN oder FOLDER UP auf der Fernbedienung drücken um in
anderen Ordnern nach zu programmierenden Titeln zu suchen.
3. Drücken Sie auf PROGRAM um zu bestätigen und den Titel in die Programmierung zu speichern.
023
►
→
→
→
023
►
023
►
023
►
REP.
REP.
ALL
RANDOM
↓
NO REPEAT & RANDOM
(Keine Wiederholung, und
keine zufällige Wiedergabe)
REPEAT-1
REPEAT FOLDER
RANDOM
MP3 MP3
MP3
MP3
AL BUM

8.
4. Machen Sie so weiter bis Sie alle gewünschten Titel programmiert haben. (wiederholen Sie dazu die
Schritte 2 und 3)
5. Um die Programmierung abzuspielen, drücken Sie auf PLAY/PAUSE.
SKIP +
• Wechselt den abzuspielenden Anfangstitel im Stoppmodus vorwärts. Sollte der vorher ausgewählte Titel der
letzte sein, wird das System zum ersten Titel zurückspringen.
• Springt zum nächsten Titel während normalem Wiedergabemodus. Sollte der vorher abgespielte Titel der
letzte sein, wird das System zu dem ersten Titel zurückspringen.
• Wenn Sie diese Taste länger als 0.5 Sekunden gedrückt halten, wird das Gerät den derzeitigen Titel
vorspulen.
• Wechselt im Programmierungswiedergabemodus zu dem nächsten Titel der Programmierung, oder zurück
zum ersten Titel, sollte der vorherige Titel der letzte gewesen sein.
• Springt zu einem zufälligen Titel, wenn Sie sich im Zufallsmodus befinden.
SKIP –
• Wechselt den abzuspielenden Anfangstitel im Stoppmodus rückwärts. Sollte der vorher ausgewählte Titel
der erste sein, wird das System zum letzten Titel zurückspringen.
• Springt zum vorherigen Titel, wenn Sie sich in normalem Wiedergabemodus befinden. Sollte der vorher
abgespielte Titel der erste sein, wird das System zu dem letzten Titel zurückspringen.
• Wenn Sie diese Taste länger als 0.5 Sekunden gedrückt halten, wird das Gerät den derzeitigen Titel
zurückspulen.
• Wechselt im Programmierungswiedergabemodus zu dem vorherigen Titel der Programmierung, oder zum
letzten Titel, sollte der vorherige Titel der erste gewesen sein.
FOLDER
• Wenn sich das System im MP3 Stoppmodus befindet, wechseln Sie mit dieser Taste zu dem nächsten
Ordner. Die Ordnernummer wird angezeigt.
• Wenn sich das System im MP3 Wiedergabemodus befindet, wechseln Sie mit dieser Taste zu dem nächsten
Ordner, dessen erster Titel abgespielt wird. Die Ordner- und Titelnummer werden angezeigt. Wenn Sie diese
Taste einmal drücken, wird nur die Ordnernummer 3 Sekunden lang angezeigt. Wenn Sie diese Taste
zweimal drücken, wird der Ordner gewechselt.
FOLDER
• Wenn sich das System im MP3 Stoppmodus befindet, wechseln Sie mit dieser Taste zu dem vorherigen
Ordner. Die Ordnernummer wird angezeigt.
• Wenn sich das System im MP3 Wiedergabemodus befindet, wechseln Sie mit dieser Taste zu dem
vorherigen Ordner, dessen erster Titel abgespielt wird. Die Ordner- und Titelnummer werden angezeigt.
Wenn Sie diese Taste einmal drücken, wird nur die Ordnernummer 3 Sekunden lang angezeigt. Wenn Sie
diese Taste zweimal drücken, wird der Ordner gewechselt.
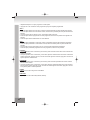
BAND
Verschieben Sie diesen Schalter um zwischen AM/FM Empfang auszuwählen.
FUNCTION
Verschieben Sie diesen Schalter um den Funktionsmodus zwischen CD/MP3/TUNER auszuwählen.

9.
RADIOBETRIEB
TUNING
• Schieben Sie den FUNCTION Schalter auf RADIO um zum Radiobetrieb zu wechseln.
• Die Radiobetriebleuchte wird aufleuchten.
• Wählen Sie zwischen AM/FM mit dem BAND Schalter.
• Drehen Sie die TUNING KONTROLLE um den gewünschten Sender auszuwählen.
HINWEIS:
Wenn Sie einen UKW-Sender hören, dann sollten Sie die UKW-Antenne auf der Rückseite voll abwickeln.
Wenn Sie einen MW-Sender hören, dann sollten Sie das Gerät für besten Empfang ausrichten.
TECHNISCHE DATEN
ALLGEMEIN
Stromversorgung : AC 230V ~ 50Hz
Stromverbrauch: 15 W
Lautsprecherimpedanz: 8 Ohm
Radio Frequenzbereich: MW 525 – 1615KHz
UKW 87,5 – 108MHz
CD Bereich
Übertragungsbereich (-3dB): 60 – 16,000 Hz
Rauschabstand: 60 dB
Harmonische Verzerrung: 0.4%
Kompatibel mit: CD-DA, CD-R, CD-RW, MP3
(Die technischen Daten können sich ohne Ankündigung ändern.)

10.
WARNING:
TO MINIMISE THE RISK OF ELECTRICAL SHOCK, DO NOT EXPOSE THE UNIT TO RAIN OR MOISTURE.
SAFETY PRECAUTION
MODEL: 2308
Design stereo music center with CD/MP3 Player
Beware of small pieces and batteries, do not swallow them. It may be hazardous to your health
and lead into
suffocation. Please, Make sure to keep small devices and batteries out of the reach of children.
Important advice regarding hearing protection
Caution:
You care for your hearing, and so do we.
Therefore, use caution while using this appliance.
Our recommendation: Avoid high volumes.
Children should be supervised while using headphones; make sure that the appliance is not set to
high volume.
Caution!
High volumes may cause irreparable damage to children’s ears.
NEVER let allow anyone, especially children, to put objects into the holes, slots or openings on
this devise. This
may lead into death due to electric shock. The device must only be opened by a qualified
assistant.
Only use the appliance for its intended purpose.
This device may only be used in housings and business premises.
Please keep this instruction manual for further reference.
FURTHER INFORMATION
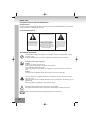
A triangle with a lightning symbol
draws the user's attention to
"dangerous voltage" without
insulation in the cabinet which may
be high enough to entail a risk of
electric shock.
WARNING
RISK OF ELECTRIC SHOCK
DO NOT OPEN
CAUTION: TO REDUCE
THE RISK OF ELECTRIC SHOCK,
DO NOT REMOVE COVER (OR BACK).
THERE ARE NO USER SERVICEABLE
PART INSIDE.
REFER SERVICING TO QUALIFIED
SERVICE PERSONNEL.
A triangle with an exclamation mark
draws the user's attention to
important instructions for use and
maintenance in the accompanying
manual, which should be studied.

11.
Instructions on environment protection
Do not dispose of this product in the usual household garbage at the end of its life cycle; hand it
over at a collection point for the recycling of electrical and electronic appliances. The symbol on the
product, the instructions for use or the packing will inform about the methods for disposal.
The materials are recyclable as mentioned in its marking. By recycling, material recycling or other
forms of reutilization of old appliances, you are making an important contribution to protect our
environment.
Please inquire at the community administration for the authorized disposal location.
Do not obstruct the ventilation of the device. Make sure, that no curtains, newspapers, furniture or
any other type of object are blocking the ventilation system of the apparatus. The ventilation system
must be clear of objects at all times! Overheating may lead into serious damage of the device and
reduce its performance and lifespan.
Heat and warmth
Do not expose the appliance to direct sunlight. Make sure that the appliance is not subject to direct
heat sources such as heaters or open fire. Make sure that the ventilation slots of the appliance are
not covered.
Moisture and cleaning
This appliance is not waterproof! Do not immerse player in water. Do not allow player to come in
contact with water.
If water gets inside the player it may cause serious damage. Do not use cleaning agents that
contain alcohol, ammoniac, benzene or abrasives as these could damage the player. For cleaning,
use a soft, moistened cloth.
Professional recycling
Batteries and packaging should not be disposed of in the trash. Batteries must be handed over to a
collection centre for used batteries. Separating disposable packaging materials is ecologically
friendly.
PREPARATION FOR USE
INSTALLATION
• Unpack all parts and remove protective material.
• Insert the batteries into the remote control transmitter.
• Do not connect the unit to the mains before checking the mains voltage and before all other connections
have been made.
• Do not cover any vents and make sure that there is a space of several centimeters around the unit for
ventilation.
CONNECTIONS
1) Connect left and right speaker to left and right speaker jacks.
2) Before connecting the unit to the mains, make sure that the AC voltage printed on the back plate is the
same as the AC voltage from your wall outlet.
OPERATION / COMPACT DISC
Bear in mind the following points since any dirt; scratches or warping of the disc can cause broken or
intermittent sound and also noise.

12.
CONTROLS AND FEATURES
1. CD OPEN/CLOSE DOOR
2. LCD DISPLAY
3. REMOTE SENSOR
4. STOP BUTTON
5. SKIP - BUTTON
6. SKIP+ BUTTON
7. PLAY/PAUSE BUTTON
8. VOLUME + - BUTTON
9. FUNCTION SELECTOR
10. PROG. BUTTON
11. MODE BUTTON
12. PHONES JACK
13. TUNING CONTROL
14. BAND SELECTOR
15. FM ANTENNA
16. SPEAKERS Left
17. POWER cord
18. SPEAKERS Right
• When holding the discs, take care not to touch the playing surface.
• Do not place discs in the following locations:
Near a heating device or place where the temperature is high;
In damp or dusty areas.
• Wipe away any fingerprints or dust on the playing surface of a disc using a soft cloth. Always wipe from the
inside toward the outside of the disc.
LOADING THE DISC
• Press OPEN/CLOSE
• Insert a CD (printed side up) in the tray.
• Press OPEN/CLOSE to close the tray.
• The display shows the CD’s total number of tracks.
1
2
3
4
5
6
7
8
9
10
11
12
13
14
18
15
16
17

13.
REMOTE CONTROL FUNCTIONS
Preparation before use
• Installing batteries in the remote control unit
• Remove the battery cover from the back of the remote control unit.
• Insert two “UM4/AAA” size batteries.
• Insert the batteries with the and terminals matching the indication inside the battery compartment.
• Replace the cover.
• Battery replacement
• When the remote control operation becomes unstable or the distance from which remote control is possible
becomes shorter, replace the batteries with new ones.
Using the remote control unit
To use the remote unit, point at the REMOTE SENSOR and press the buttons gently and firmly. Remote
control operation is possible within approximate 18ft(6m). However, since the remote control range is less
when the unit is used at an angle, use directly in front of the REMOTE SENSOR, for maximum distance.
Do not expose the REMOTE SENSOR to strong light (direct sunlight or artificial lighting) and make sure that
there are no obstacles between the REMOTE SENSOR and the remote control unit.
REMOTE CONTROL
1. Folder button
2. Folder button
3. PLAY / PAUSE button
4. STOP button
5. SKIP + button
6. SKIP - button
7. MODE button
8. PROGRAM button
Key Function OPERATION
PLAY/PAUSE
• Start playing from stop mode.
• Start pause during play.
• Return to play mode from a pause.
STOP
• In Play mode or Pause mode: Changing to Stop mode or Program Entry mode during program play.
• In Program Entry mode: Exit the Program Entry mode, clear program memory and change to Stop mode.
• In Random Play (Mode Button): Changing to Stop mode and release Random function.

14.
PROGRAM key [Function Explanation]
1. If [PROGRAM] key is pressed during the CD stop mode, the system goes to the program mode. During the
program mode, the track number and PROGRAM display will flash in the 500[ms] interval (Display 1).
2. If [FF/SKIP+] / [FB/SKIP-] key is pressed, the system chooses the track number which it wants to register.
3. If [PROGRAM] key is pressed after choosing a track number, the system keeps the track number, and goes
to next program mode (Display 2).
4. The system can hold 20 programs for CD Mode / 10 programs for MP3. After the system held 20 programs,
it can’t keep another song. During the system holding 20 programs, it can't keep other program. PROGRAM
display and “P 01“ will flash in the 500[ms] interval (Display 3).
5. If [STOP] key is pressed during the program mode, the system removes the contents of the program, and
cancels the program mode.
6. If [PLAY/PAUSE] key is pressed during the system holding the program of more than one, it starts the
program play. During the program play, Display shows PROGRAM is play (display 4).
7. If [FF/SKIP+] / [FB/SKIP-] key is pressed during the program play, the system skips to next / previous
program.
8. If [STOP] key is pressed during the program play, the system stops the program play, and goes the stop
mode. Until [STOP] key is pressed during the stop mode, the system keeps the contents of the program.
MODE key [Function Explanation]
CD Mode:
1. If [MODE] key is pressed, the system changes the mode(as follows intention).
2. During the repeat-1 mode, the system repeats the current track of the CD.
3. During the repeat-all mode, if it reaches the end of the tune of the final track, it is usually returned to the
head track.
PROGRAM
P0 1
PROGRAM
P0 1
PROGRAM
P03
PROGRAM
P03
→
→
→
(DISPLAY 1)
(DISPLAY 2) (DISPLAY 3)
(DISPLAY 4)
023
►
→
→
→
023
►
023
►
023
►
REP.
REP.
ALL
RANDOM
↓
NO REPEA & RANDOM
REPEAT-1
REPEAT ALL
RANDOM

15.
4. If whole track was finished during the random play mode or if [STOP] key is pressed during the random play
mode, the system goes to the stop mode and cancels the random play mode.
5. If [FF/SKIP+] key is pressed during the random play mode, the system skips next at random. If [FF/SKIP+]
key is pressed on the tune of the final track, the system searches next lap at random.
6. If [FB/SKIP-] key is pressed during the random play mode, the system searches the beginning of the current
track, but doesn’t skip track down.
MP3 Modus
1. If [MODE] key is pressed, the system changes the mode(as follows intention).
2. During the repeat-1 mode, the system repeats the current track of the MP3
3. During the repeat-folder mode, the system repeats the current folder track of the MP3
4. During the repeat-all mode, if it reaches the end of the tune of the final track, it is usually returned to the
head track.
5. If whole track was finished during the random play mode or if [STOP] key is pressed during the random play
mode, the system goes to the stop mode & cancels the random play mode.
6. If [FF/SKIP+] key is pressed during the random play mode, the system skips next at random. If [FF/SKIP+]
key is pressed on the tune of the final track, the system searches next lap at random.
7. If [FB/SKIP-] key is pressed during the random play mode, the system searches the beginning of the current
track, but doesn’t skip track down.
MODE
CD: None → Repeat 1 → Repeat all → Random → None.
MP3: None → Repeat 1 → Repeat folder → Random all → Random → None…
PROGRAMMING MP3
The MP3 player enable program 10 tracks in a sequence of your choice.
1. Press PROGRAM button in stop mode the display will show “P01” and “PROGRAM” will be blinking.
2. Press FF/SKIP+ and FB/SKIP- button to select the desired track to be programmed. or Press FOLDER DN
and FOLDER UP button on the remote control to select the desired next folder’s track to be programmed.
3. Press PROGRAM button to entry memory.
4. Continue to program, repeat steps 2 and 3.
5. Press PLAY / PAUSE button on program mode to play the programmed tracks.
023
►
→
→
→
023
►
023
►
023
►
REP.
REP.
ALL
RANDOM
↓
NO REPEA & RANDOM
REPEAT-1
REPEAT FOLDER
RANDOM
MP3 MP3
MP3
MP3
AL BUM

16.
SKIP +
• Change the starting play track during stop mode, cyclic to the first track if it is in the last track.
• Skip to the next track during Normal Play, cyclic to the first track if it is in the last track.
• When Key is pushed more than 0.5sec, Fast-Forward is executed.
• Skip to the next programmed track during Program play, cyclic to the first programmed track.
• Skip to the next random track during Random play.
SKIP -
• Change the starting play track during stop mode, cyclic to the last track if it is in the first track.
• Skip to the previous track during Normal play, cyclic to the last track if it in the first track.
• When key is pushed more than 0.5 sec, Fast – reverse is executed.
• Skip to the previous programmed track during Program play, cyclic to the first programmed track.
FOLDER
• When the system is STOP mode, For MP3, Skip up to next folder in increasing order and display folder
number.
• When the system is PLAY mode, For MP3, Skip up to next folder number in increasing order, start play
head track of the folder and display current folder and track number Press key once, current folder number
is flashing for 3s, press key again folder up is executed.
FOLDER
• When the system is STOP mode, For MP3, Skip up to next folder in decreasing order and display folder
number.
• When the system is PLAY mode, For MP3, Skip up to next folder number in decreasing order, start play
head track of the folder and display current folder and track number Press key once, current folder number
is flashing for 3s, press key again folder up is executed.
BAND
Move to select Radio Band AM/FM
FUNCTION
Move to select FUNCTION (CD/MP3, TUNER).

17.
RADIO OPERATION
TUNING
• Push function button “RADIO” to set unit to Radio mode.
• Radio Function Indicator will light up
• Select the tuning range with the BAND button.
• Rotate TUNING CONTROL to select the desired station.
NOTE:
When listening to FM broadcasts it is advisable to extend fully the wire FM antenna on the rear cover.
When listening to AM broadcasts it is advisable to adjust the position of the helmet for optimum reception.
SPECIFICATIONS
GENERAL
Power supply: AC 230V ~ 50Hz
Power Consumption: 15 watts
Speaker impedance: 8 Ohm
Radio Section: AM 525 – 1615KHz
FM 87.5 – 108MHz
Compact Disc Section
Frequency Response (-3dB): 60 – 16,000 Hz
Signal-to-noise Ratio: 60 dB
Harmonic Distortion: 0.4%
Compatible with: CD-DA, CD-R, CD-RW, MP3
(Specification subjects to be changed without notice.)

18.
Un triangle avec symbole
d’éclairattire l’attention de
l’utilisateur sur la présence de
"voltage dangereux" non isolé
dans le coffrage, pouvant être
assez puissant pour provoquer
une électrocution.
Un triangle avec point
d’exclamation attire l’attention
de l’utilisateur sur la présence
dans le manuel d’instructions
importantes concernant
l’utilisation et la maintenance,
et devant être consultées.
AVERTISSEMENT:
L’APPAREIL A LA PLUIE OU A L’HUMIDITE. AFIN DE LIMITER LES RISQUES D’ELECTROCUTION, NE
PAS EXPOSER
PRECAUTION DE SECURITE
AVERTISSEMENT RISQUE
D’ELECTROCUTION NE
PAS OUVRIR
ATENTION: AFIN DE REDUIRE LES
RISQUES D’ELECTROCUTION, NE
PAS RETIRER LE COFFRAGE (AVANT
OU ARRIERE). NE CONTIENT AUCUNE
PIECE REMPLACABLE. CONFIER
TOUTE REPARATION A DU
PERSONNEL QUALIFIE.
MODELE: 2308
Chaîne hi-fi stéréo design avec lecteur CD/MP3
Prenez garde aux petites pièces et piles, ne les avalez pas. Cela pourrait être dangereux pour
votre santé et mener à l'étouffement. Prêtez l'attention la plus élevée pour garder les petits
appareils et piles hors de la portée des enfants.
Conseil important pour la protection de l’ouïe
Attention:
Nous tenons à votre ouïe autant que vous.
Par conséquent, prenez vos précautions lors de l’usage de cet appareil.
Notre recommandations: Evitez les volumes forts.
Dans le cas où des enfants utilisent l’appareil, assurez-vous que le volume n’est pas sur la
position élevée.
Attention!
Les volumes élevés peuvent irrémédiablement endommager l’ouïe des enfants.
NE JAMAIS laisser une personne ou surtout un enfant mettre des objets dans les trous, fentes ou
autres ouvertures de l’appareil. Cela pourrait entraîner la mort par décharge électrique. L’appareil
doit être ouvert uniquement par un assistant qualifié.
Veuillez utiliser l'appareil uniquement aux fins pour lesquelles il a été créé.
Cet appareil est exclusivement destiné à l'usage dans des locaux privés ou à usage commercial.
Veuillez conserver ce mode d`emploi pour utilisation ultérieure.
PLUS D’INFORMATIONS

19.
Indications relatives à la protection de l’environnement
Au terme de sa durée de vie, ce produit ne doit pas être éliminé avec les ordures ménagères mais
doit être remis à un point de collecte destiné au recyclage des appareils électriques et
électroniques. Le symbole figurant sur le produit, la notice d’utilisation ou l’emballage vous indique
cela.
Les matériaux sont recyclables conformément à leur marquage. Vous apportez une large
contribution à la protection de l’environnement par le biais du recyclage, de la réutilisation matérielle
ou par les autres formes de réutilisation des appareils usagés.
Veuillez vous adresser à la municipalité pour connaître la déchetterie compétente.
Ne gênez pas la ventilation du dispositif. Assurez-vous que rideaux, journaux, couvertures ou
meubles ne bloquent en aucun cas les fentes de ventilation de l’appareil. La ventilation doit être
assurée à tout moment! La surchauffe peut causer à l’appareil des dommages sérieux et réduire sa
performance et sa durée de vie.
La chaleur et sources de chaleur
Veuillez ne pas exposer l’appareil à la lumière directe (du soleil). Assurez-vous que l’appareil n’est
pas en contact direct avec des sources de chaleur telles qu’un chauffage ou un feu. Assurez-vous
que les fentes d’aération de l’appareil ne sont pas fermées.
Humidité et nettoyage
L’appareil n’est pas étanche! Ne plongez pas l’appareil dans l’eau. Evitez son contact avec l’eau.
De l’eau dans l’appareil pourrait sérieusement l’endommager.
N’employez pas de détergents contenant de l’alcool, de l’ammoniaque, du benzène ou des abrasifs.
Ces produits pourraient endommager votre appareil. Pour nettoyer l’appareil, utilisez un chiffon
doux et humide.
Recyclage professionnel
Les piles et l’emballage n’appartiennent pas à la catégorie des ordures ménagères. Les piles
doivent être dirigées vers un centre collectant les piles usagées. Les matériaux de l’emballage sont
écologiques.
PRÉPARATION POUR L’UTILISATION
INSTALLATION
• Déballez les et retirez toutes les protections.
• Insérez les piles dans la télécommande.
• Ne branchez pas l’appareil à une prise avant d’avoir vérifié le voltage et d’avoir effectué toutes les autres
connections.
• Ne couvrez aucune des sorties d’aération et laissez plusieurs centimètres autour de l’appareil pour une
bonne ventilation.
BRANCHEMENTS
1) Branchez les enceintes droite et gauche à leur prises Jack respectives.
2) Avant de brancher l’appareil à une prise de courrant, assurez-vous que le voltage inscrit sur la façade
arrière est le même que celui de votre alimentation.
UTILISATION / DISQUE COMPACTE
Gardez à l’esprit les points suivants car toute poussière, égratignure ou rayure sur le disque peuvent
provoquer des interférences sonores et des bruits.

20.
CONTROLES ET FONCTIONS
1. PORTE OPEN/CLOSE POUR CD
2. AFFICHAGE LCD
3. CAPTEUR DE TELECOMMANDE
4. BOUTON STOP
5. BOUTON SKIP-
6. BOUTON SKIP+
7. BOUTON PLAY/PAUSE
8. BOUTON VOLUME +-
9. SELECTEUR DE FONCTION
10. PROG. BOUTON
11. BOUTON MODE
12. FICHE À ÉCOUTEURS
13. MOLETTE DE RÉGLAGE
14. BOUTON SÉLECTEUR DE BANDE
15. ANTENNE FM
16. ENCEINTE gauche
17. Câble d’alimentation
18. ENCEINTE droite
• Lorsque vous tenez le disque, assurez-vous de ne pas touchez la surface de lecture.
• Ne placez pas les disques dans les endroits suivants :
Près d’un chauffage ou dans un endroit où la température est élevée.
Dans des endroits sales ou poussiéreux.
• Enlevez toute empreinte digitale de la surface du disque à l’aide d’un tissu doux. Passez toujours le tissu de
l’intérieur vers l’extérieur du disque.
CHARGER LE DISQUE
• Appuyez sur OPEN/CLOSE
• Insérez un CD (face imprimée vers le haut) dans le tiroir.
• Appuyez sur OPEN/CLOSE pour fermer le tiroir.
• L’écran affiche le nombre total de pistes du CD.
1
2
3
4
5
6
7
8
9
10
11
12
13
14
18
15
16
17
Strona się ładuje...
Strona się ładuje...
Strona się ładuje...
Strona się ładuje...
Strona się ładuje...
Strona się ładuje...
Strona się ładuje...
Strona się ładuje...
Strona się ładuje...
Strona się ładuje...
Strona się ładuje...
Strona się ładuje...
Strona się ładuje...
Strona się ładuje...
Strona się ładuje...
Strona się ładuje...
Strona się ładuje...
Strona się ładuje...
Strona się ładuje...
Strona się ładuje...
Strona się ładuje...
Strona się ładuje...
Strona się ładuje...
Strona się ładuje...
Strona się ładuje...
Strona się ładuje...
Strona się ładuje...
Strona się ładuje...
Strona się ładuje...
Strona się ładuje...
Strona się ładuje...
Strona się ładuje...
Strona się ładuje...
Strona się ładuje...
Strona się ładuje...
Strona się ładuje...
Strona się ładuje...
Strona się ładuje...
Strona się ładuje...
Strona się ładuje...
Strona się ładuje...
Strona się ładuje...
Strona się ładuje...
Strona się ładuje...
Strona się ładuje...
Strona się ładuje...
Strona się ładuje...
Strona się ładuje...
Strona się ładuje...
Strona się ładuje...
Strona się ładuje...
Strona się ładuje...
Strona się ładuje...
Strona się ładuje...
Strona się ładuje...
Strona się ładuje...
Strona się ładuje...
Strona się ładuje...
Strona się ładuje...
Strona się ładuje...
Strona się ładuje...
Strona się ładuje...
Strona się ładuje...
Strona się ładuje...
Strona się ładuje...
Strona się ładuje...
Strona się ładuje...
Strona się ładuje...
Strona się ładuje...
Strona się ładuje...
-
 1
1
-
 2
2
-
 3
3
-
 4
4
-
 5
5
-
 6
6
-
 7
7
-
 8
8
-
 9
9
-
 10
10
-
 11
11
-
 12
12
-
 13
13
-
 14
14
-
 15
15
-
 16
16
-
 17
17
-
 18
18
-
 19
19
-
 20
20
-
 21
21
-
 22
22
-
 23
23
-
 24
24
-
 25
25
-
 26
26
-
 27
27
-
 28
28
-
 29
29
-
 30
30
-
 31
31
-
 32
32
-
 33
33
-
 34
34
-
 35
35
-
 36
36
-
 37
37
-
 38
38
-
 39
39
-
 40
40
-
 41
41
-
 42
42
-
 43
43
-
 44
44
-
 45
45
-
 46
46
-
 47
47
-
 48
48
-
 49
49
-
 50
50
-
 51
51
-
 52
52
-
 53
53
-
 54
54
-
 55
55
-
 56
56
-
 57
57
-
 58
58
-
 59
59
-
 60
60
-
 61
61
-
 62
62
-
 63
63
-
 64
64
-
 65
65
-
 66
66
-
 67
67
-
 68
68
-
 69
69
-
 70
70
-
 71
71
-
 72
72
-
 73
73
-
 74
74
-
 75
75
-
 76
76
-
 77
77
-
 78
78
-
 79
79
-
 80
80
-
 81
81
-
 82
82
-
 83
83
-
 84
84
-
 85
85
-
 86
86
-
 87
87
-
 88
88
-
 89
89
-
 90
90


w innych językach
- čeština: Elta 2308 Uživatelský manuál
- español: Elta 2308 Manual de usuario
- italiano: Elta 2308 Manuale utente
- Deutsch: Elta 2308 Benutzerhandbuch
- português: Elta 2308 Manual do usuário
- français: Elta 2308 Manuel utilisateur
- Türkçe: Elta 2308 Kullanım kılavuzu
- English: Elta 2308 User manual
- Nederlands: Elta 2308 Handleiding