Sony KLV-20 SR3/S Instrukcja obsługi

Kategoria
Telewizory LCD
Typ
Instrukcja obsługi

Ten podręcznik jest również odpowiedni dla

Operating Instructions
GB
Before operating the TV, please read the “Safety Information”
section of this manual. Retain this manual for future reference.
R
LCD Colour TV
©2004 by Sony Corporation
Инструкция по эксплуатации
RU
Перед тем как включить телевизор, просим Вас ознакомиться
с разделом "Общие правила техники безопасности"
настоящей инструкции. Сохраняйте настоящую инструкцию
на будущее.
Instrukcja obsługi
PL
Przed przystąpieniem do eksploatacji telewizora należy
zapoznać się z rozdziałem "Informacje dotyczące
bezpieczeństwa" w niniejszej instrukcji. Prosimy o zachowanie
niniejszej instrukcji do wglądu w przyszłości.
Manual de Instruções
PT
Antes de utilizar o televisor, por favor leia a secção “Informação
sobre segurança” deste manual. Guarde este manual para
futuras consultas.
KLV-20SR3
2-067-275-12 (1)
3
GB
Introduction
Thank you for choosing this Sony product.
Before operating the TV, please read this manual thoroughly and retain it for future reference.
Symbols used in the manual:
Table of Contents
Introduction .......................................................................................................................................................... 3
Quick Start Guide................................................................................................................................................. 4
Safety Information.............................................................................................................................................. 10
Precautions .........................................................................................................................................................13
Overview & Installation
Checking the Accessories Supplied.................................................................................................................... 14
Overview of Remote Control Buttons................................................................................................................ 15
Overview of the TV Buttons and side Connectors.............................................................................................17
Overview of the TV Indicators...........................................................................................................................18
Inserting Batteries into the Remote Control.......................................................................................................18
Removing the Rear Cover ..................................................................................................................................19
Connecting the Aerial and VCR......................................................................................................................... 20
Adjusting the viewing angle of the TV .............................................................................................................. 21
First Time Operation
Switching on the TV and Automatically Tuning ............................................................................................... 22
TV Functions
Introducing and Using the Menu System .......................................................................................................... 24
The Picture Adjustment menu ..................................................................................................................... 25
The Sound Adjustment menu.......................................................................................................................27
The Features menu........................................................................................................................................ 28
The Set Up menu.......................................................................................................................................... 30
The Manual Programme Preset menu.......................................................................................................... 32
Other Functions
Sleep Timer ........................................................................................................................................................34
Picture Freeze.....................................................................................................................................................34
Teletext..................................................................................................................................................................35
Additional Information
Connecting Equipment to the TV........................................................................................................................36
Viewing pictures from equipment connected to the TV......................................................................................38
Technical Specifications......................................................................................................................................39
Troubleshooting...................................................................................................................................................40
Buttons shaded white on the remote control show you the
buttons you have to press to follow the sequence of the
instructions.
Informs you of the result of the instructions.
Important information.
Information on a feature.
1,2... Sequence of instructions.
Table of Contents
4
Quick Start Guide
This section will help you to:
-Insert batteries into the remote control,
-Remove the rear cover,
-Connect an aerial and VCR,
-Automatically tune the TV,
1 Mains Lead (Type C-6):
2 Batteries (AA size):
1 Remote
control
(RM-Y1108):
Quick Start Guide
Checking the Accessories supplied
1
5
GB
Inserting batteries into the remote control
2
SONY CORPORATION JAPAN/4
S
ON
Y CO
R
PO
R
A
T
IO
N
JA
PA
N
/4
Make sure you insert the supplied batteries using the correct polarities.
Always remember to dispose of used batteries in an environmental friendly way.
Quick Start Guide
6
Removing the rear cover
3
When you connect the cables, remove the rear cover of the TV set. Be sure to attach the rear cover back on the TV
set after you finish connecting the cables.
Removing the rear cover
Hold the rear cover as illustrated below and pull off one side of the lower part of the cover towards you first. Then,
detach the upper part of the cover from the TV set.
Attaching the rear cover
Hold the rear cover as illustrated below, fitting the four detents on the rear cover into the corresponding holes on the
TV set, then push the rear cover back on to the TV set.
It is not necessary to attach the rear cover if you install a wall-mount bracket SU-W210 (optional
accessory).
Quick Start Guide
7
GB
or
VCR
Connecting the aerial and VCR
4
Make sure to connect the aerial before the Scart.
For more details regarding VCR connection, refer to “Connecting Equipment to the TV” on page 36.
Quick Start Guide
8
The first time you switch on your TV, a sequence of menu screens appear on the TV enabling you to: 1) choose
the language of the menu screen 2) choose the country in which you are going to operate the TV, 3) search and
store all available channels (TV Broadcast) and 4) change the order in which the channels (TV Broadcast)
appear on the screen.
However, if you need to change any of these settings at a later date, you can do that by selecting the appropriate
option in the (Set Up menu) or by pressing and holding the Auto Start Up button on the top of TV set
for more than three seconds, see page 17.
Switching on the TV and automatically tuning
5
1 Connect the TV plug to the mains socket (220-240V
AC, 50Hz).
2 The first time that the TV set is connected, it is usually
turned on. If the TV is off, press the on/off button to
turn on the TV.
The first time you switch on the TV, a Language menu
appears automatically on the TV screen.
3 Press the V, v, B or b buttons on the remote control to select your
language, then press the
OK button to confirm your selection. From
now on all the menus will appear in your chosen language.
4 The Country menu appears automatically. Press the v or V button
to select the country in which you are using the TV. Press the
OK
button to confirm your selection.
• If the country in which you want to use the TV set does not
appear in the list, select “-” instead of a country.
• To avoid wrong teletext characters for cyrillic languages we
recommend selecting Russia if your own country does not
appear in the list.
Country
Select country
United Kingdom
Ireland
Nederland
België/Belgique
Luxembourg
France
Italia
Schweiz/Suisse/Svizzera
Deutschland
Österreich
Quick Start Guide
9
GB
5 The Auto Tuning menu appears on the screen. Press the OK
button to select Yes.
6 The TV starts to automatically search and store all
available broadcast channels for you.
This procedure could take some minutes. Please be patient
and do not press any buttons, otherwise automatic tuning
will not be completed.
If no channels were found during the auto tune process, a
message appears automatically on the screen asking you to
connect the aerial. Check the aerial connection (refer to
page 20). Press the
OK button to restart the auto tuning
process.
7 After all available channels are captured and stored,
the Programme Sorting menu automatically appears
on the screen enabling you to change the order in
which the channels are stored.
a) If you wish to keep the broadcast channels in the tuned order,
go to step 8.
b) If you wish to store the channels in a different order:
1 Press the v or V button to select the programme
number with the channel (TV Broadcast) you wish
to move. Press the
b button.
2 Press the v or V button to select the new
programme number position for your selected channel
(TV Broadcast). Press the
OK button to store
The selected channel now moves to its new
programme position and the other channels move
accordingly.
3 Repeat steps b)1 and b)2 if you wish to change
the order of the other channels.
8 Press the MENU button to remove the menu from the screen
Your TV set is now ready for use
Auto tuning
Programmes found:
No channel found.
Please connect aerial
Confirm
Programme Sorting
Exit:
MENU
01
02
03
04
05
06
07
08
09
10
11
TVE
TVE2
TV3
C33
C27
C58
S02
S06
C44
C47
C48
Programme Sorting
Exit:
MENU
01
02
03
04
05
06
07
08
09
10
11
TVE
TVE2
TV3
C33
C27
C58
S02
S06
C44
C47
C48
01 TVE
Do you want to start
automatic tuning?
Ye s No
Quick Start Guide
10
Safety Information
Mains lead
Unplug the mains lead when
moving the TV. Do not move
the set with the mains lead
plugged in. It may damage the
mains lead and result in fire or
electric shock. If the set has been dropped or
damaged, have it checked immediately by qualified
service personal.
Medical institution
Do not place this TV set in a
place where medical
equipment is in use. It may
cause malfunction of medical
instruments.
Damage requiring service
If the surface of the display cracks, do not touch it until
you have unplugged the mains lead. Otherwise electric
shock may result.
Ventilation
Leave space around the TV set. Otherwise, adequate air-
circulation may be blocked causing overheating which
may cause fire or damage the TV set.
LCD screen
• Although the LCD screen is made with high-precision
technology and 99.99% or more of the pixels are
effective, black dots may appear or bright points of
light (red, blue or green) may appear constantly on the
LCD screen. This is a structural property of the LCD
panel and is not a malfunction.
• Do not expose the LCD screen surface to the sun.
Doing so may damage the screen surface.
• Do not push or scratch the front filter, or place objects
on top of the TV set .The image may be uneven or the
LCD panel may be damaged.
• If the TV set is used in a cold place, a smear may occur
in the picture or the picture may become dark. This
does not indicate a failure. These phenomena disappear
as the temperature rises.
• Ghosting may occur when still pictures are displayed
continuously. It may disappear after a few moments.
• The screen and cabinet get warm when the TV set is in
use. This is not a malfunction
Carrying
Before carrying the TV set, disconnect all the cables
from the TV set.
Fluorescent lamp
This TV set uses a special fluorescent lamp as its
light source. If the screen image becomes dark,
flickers or does not appear, the fluorescent lamp has
run down and should be replaced. For replacement,
consult qualified service personnel.
Adjusting the viewing angle of the TV set
When adjusting the angle, hold the stand with your
hand so that it does not come loose or fall off.
Be careful not to catch your fingers between the TV
set and the stand.
10 cm
Leave at least this
much space.
30 cm
10 cm
Never install the unit as follows:
Air circulation
is blocked
Wall
Safety Information
11
GB
Power Sources
Overloading
This TV set is designed to operate
on a 220-240V AC supply only.
Take care not to connect too
many appliances to the same
mains socket as this could result
in fire or electric shock.
Mains lead protection
Pull out the mains lead by the
plug. Do not pull on the mains
lead itself.
Wiring
Unplug the mains lead when wiring cables. Be sure to
unplug the mains lead for your safety, when hooking up.
Cleaning
Clean the mains plug regularly. If the
plug is covered with dust and it picks up
moisture, its insulation may deteriorate
and result in fire. Unplug the mains plug
and clean it regularly.
When not in use
For environmental and safety
reasons, it is recommended that
the TV set is switched off when
not in use - not left in standby
mode. Disconnect from the
mains.
Mains
Do not use a poor fitting mains socket. Insert
the plug fully into the mains. If it is loose, it
may cause arcing and result in fire. Contact
your electrician to have the mains socket
changed.
Moisture
Do not touch the mains lead with a wet
hand. If you plug/unplug the mains lead
with a wet hand, it may cause electric
shock.
Lightning storms
For your own safety, do not touch
any part of the TV set, mains lead
or aerial lead during lightning
storms.
Mains lead
If you damage the mains lead, it
may result in fire or electric
shock.
Do not pinch, bend, or twist the
cable excessively. The core
lines may be bared or cut,
causing a short - circuit which
may in fire or electric shock.
Do not convert or damage the
mains lead.
Do not put anything heavy on the mains lead. Do not
pull the mains lead.
Keep the mains lead away from heat sources.
Be sure to grasp the plug when disconnecting the
mains lead.
• If the mains lead is damaged, stop using it and ask your
dealer or Sony service centre to exchange it.
Electric shock
Do not touch the TV set with wet hands. Doing so may
cause electric shock or damage the TV set.
Corrosion
If you use this set near the seashore, salt may corrode
metal parts of the TV set and cause internal damage or
fire. It may also shorten the life of the TV set. Steps
should be taken to reduce the humidity and temperature
of the area where the set is located.
Cable wiring
Take care not to catch your feet on the cables. It may
damage the TV set.
Installation
Do not install optional components too close to the TV
set. Keep optional components at least 30 cm away from
the TV set. If a VCR is installed in front or at the right
side of the TV set, the picture may distort.
Heat
Do not touch the surface of the TV. It remains hot, even
after the TV has been turned off for some time.
Oils
Do not install TV set in restaurants that use oil. Dust
absorbing oil may enter into the TV set and damage TV
set.
Water and moisture
Do not use the TV set near water – for example, near a
bathtub or shower room. Also, do not expose to rain,
moisture or smoke. This might result in fire or electric
shock. Do not use the TV set where insects may enter.
Disposal of the TV set
• Do not dispose of the TV set with general household
waste.
• The LCD contains a small amount of liquid crystal and
mercury. The fluorescent tube used in the TV set also
contains mercury. Follow your local ordinances and
regulations for disposal
continued...
Safety Information
12
Installation and moving
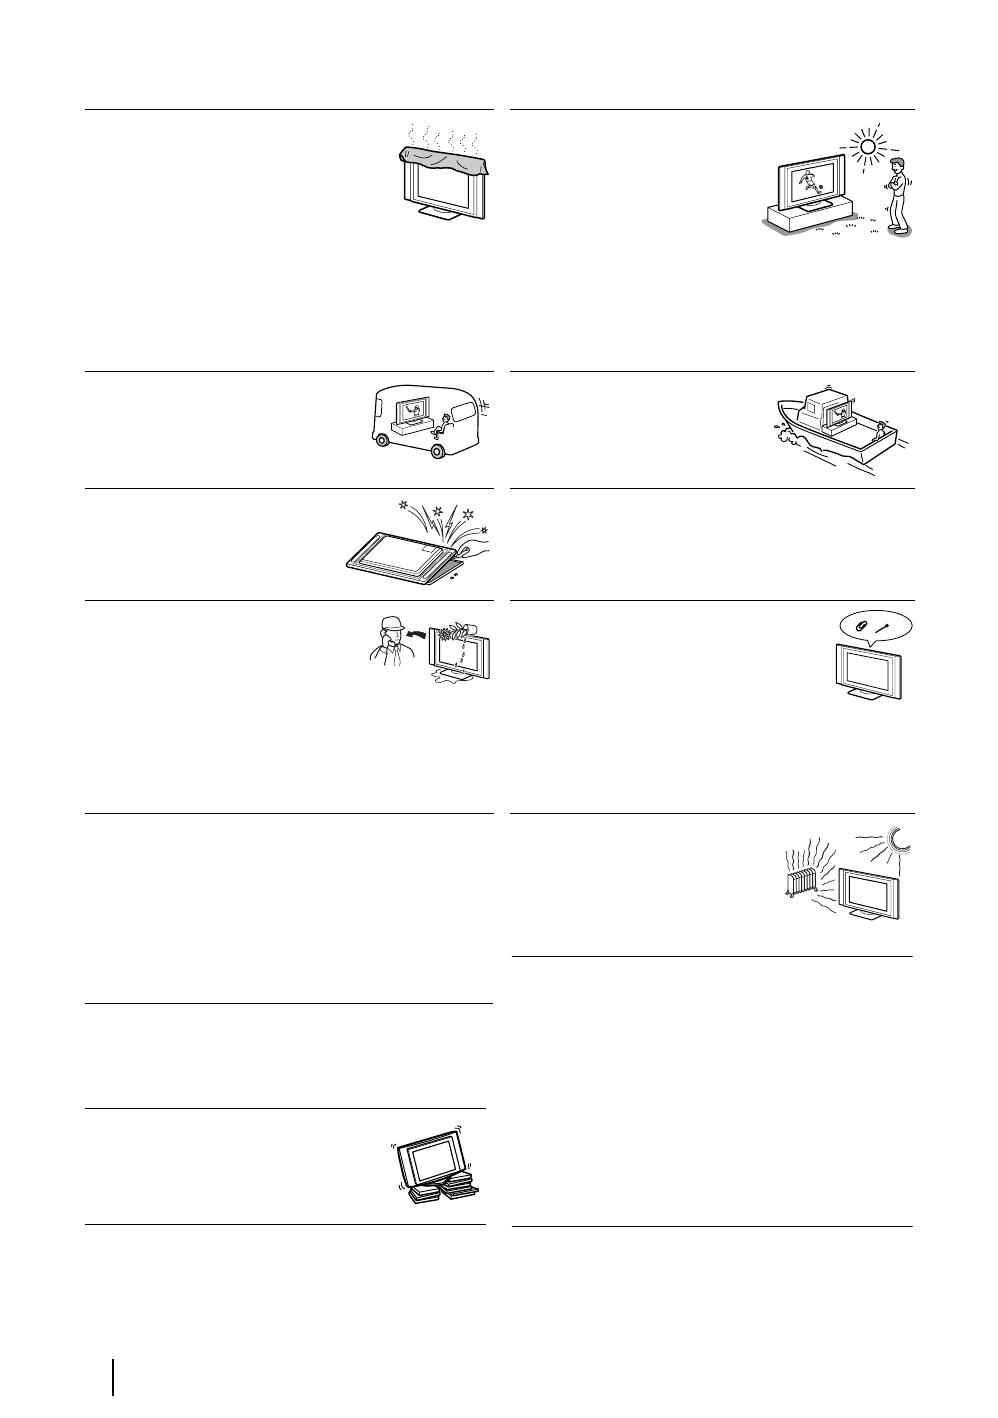
Ventilation
Never cover the ventilation holes in the
cabinet. It may cause overheating and
result in fire. Unless proper ventilation is
provided, the TV set may gather dust and
get dirty. For proper ventilation, observe
the following:
Do not install the TV set turned backward or sideways.
Do not install the TV set turned over or upside down.
Do not install the TV set on a shelf or in a closet.
Do not place the TV set on a rug or bed.
Do not cover the TV set with cloth, such as curtains, or
items such as news papers, etc.
Outdoor use
Do not install this TV set
outdoors. If the TV set is exposed
to rain, it may result in fire or
electric shock. If the TV set is
exposed to direct sunlight, the TV
set may heat up and it may
damage the TV set.
Vehicle or ceiling
Do not install this TV set in a vehicle.
Bumping of the vehicle may cause the
set to fall down and cause injury. Do
not hang this TV set from the ceiling.
Ships and other vessels
Do not install this TV set in a ship
or vessel. If the TV set is exposed
to seawater, it may cause fire or
damage the TV set.
Servicing
Do not open the cabinet. Entrust
the TV set to qualified service
personnel only.
To prevent the TV set from falling
Place the TV set on a secure, stable stand. Do not hang
anything on the TV set.
Moisture and flammable objects
Do not let this TV set get wet.
Never spill liquid of any kind on
the TV set. If any liquid or solid
object does fall through, do not
operate the TV set. It may result in electric shock or
damage to the TV set. Have it checked immediately by
qualified personnel.
To prevent fire, keep flammable objects or naked
lights (e.g. candles) away from the TV set.
Ventilation holes
Do not insert anything in the ventilation
holes. If metal or something flammable
enters, it may result in fire or electric shock.
Protruding location
Do not install the TV set in protruding locations. If you
install the TV set in the following locations, it may result
in injury.
Do not install the TV set in a location where the TV set
protrudes, such as on or behind pillar.
Do not install the TV set in a location where you might
bump your head on it.
Placement
Never place the TV set in hot,
humid or excessively dusty places.
Do not install the TV set where it
may be exposed to mechanical
vibrations.
Cleaning the Screen Surface
The screen surface is finished with a special coating to
prevent strong light reflections. Be sure to observe the
following precautions to avoid the damaging the finish.
• To remove dust from the screen surface, wipe gently with
a soft cloth. If dust is persistent, wipe with a soft cloth
slightly moistened with a diluted mild detergent
solution. You can wash and repeatedly use the soft cloth.
• Never use any type of abrasive path, alkaline/acid
cleaner, scouring powder, or strong solvent such as
alcohol, benzine or thinner.
Cleaning
Unplug the mains lead when cleaning this TV set. If not,
it may result in electric shock.
Recommended place for the TV set
Place the TV Set on a stable, level
surface. Otherwise, the TV set may fall
and cause injury.
Safety Information
13
GB
Precautions
On viewing the TV comfortably
To view the TV comfortably, the recommended viewing position is from four to seven times of the screen’s
vertical length away from the TV set.
View the TV in a moderate light room, as viewing the TV in poor light taxes your eyes. Watching the screen
continuously for long periods of time can also tax your eyes.
On installing the TV set
Do not install the TV in places subject to extreme temperature, for example in direct sunlight, or near a radiator,
or heating vent. If the TV set is exposed to extreme temperature, the TV set may heat up and it may cause
deformations of the casing or cause the TV set to malfunction.
To obtain a clear picture, do not expose the screen to direct illumination or direct sunlight. If possible, use spot
lighting directed down from the ceiling.
The TV set is not disconnected from the mains when the switch is in Off position. To disconnect the set
completely, pull the plug from the mains.
On volume adjustment
Adjust the volume so as not to trouble neighbours. Sound carries very easily at night time. Therefore, closing the
windows or using headphones is suggested.
When using headphones, adjust the volume so as to avoid excessive levels, as hearing damage may result.
On handling the remote control
Handle the remote control with care. Do not drop or step on it, or spill liquid of any kind onto it.
Do not place the remote control in a location near a heat source, or in a place subject to direct sunlight, or in a
damp room.
On cleaning the cabinet
Be sure to unplug the mains lead before cleaning.
Clean the cabinet with a soft cloth lightly dampened. Do not use any type of abrasive pad, alkaline cleaner,
scouring powder or solvent, such as alcohol or benzine, or antistatic spray.
Note that material deterioration or screen coating degradation may occur if the TV is exposed to a volatile solvent,
such as alcohol, thinner, benzine or insecticide, or if prolonged contact is maintained with rubber or vinyl
materials.
The ventilation holes can accumulate dust over a period of time and the accumulated dust may make the cooling
function less effective. To prevent this, we recommend removing the dust periodically (once a month) using a
vacuum cleaner.
On handling and cleaning the screen surface
To avoid screen degradation, follow the points mentioned below. Do not push on or scratch with hard objects, or
throw anything at the screen. The screen may be damaged.
Be sure to unplug the mains lead before cleaning.
Do not touch the TV after operating continuously for along period as the display panel becomes hot.
We recommend that the screen surface is touched as little as possible.
Clean the screen with a soft cloth lightly moistened. Cleaning with dirty cleaning cloth may result in damage to
the TV set. Never use any type of abrasive pad, scouring powder, or solvent, such as alcohol or benzine. This type
of contact may result in damage to the screen surface.
Safety Information
14
Overview & Installation
Checking the Accessories supplied
1 Mains Lead (Type C-6):
2 Batteries (AA size):
1 Remote
control
(RM-Y1108):
Overview & Installation
15
GB
Overview of Remote Control Buttons
1 Muting the Sound: Press this button to mute the sound from the TV. Press it
again to cancel.
2 TV I/ -
Switching the TV to the standby mode:
Press this button to temporarily turn off the TV and switch it to standby mode (the
(Standby/Sleep) indicator on the TV lights up in red). Press again to switch on
the TV from standby mode.
To save energy, we recommend switching the TV off completely when
the TV is not in use.
If no signal is received or no operation is performed in the TV mode for
15 minutes, the TV automatically switches to standby mode.
3
Picture Freeze: Press this button to freeze the picture. For more details refer to
"Picture Freeze" on page 34
4
Turning on the Sleep Timer Function: Press this button to set the TV to
automatically switch to standby mode after a specified time period. For more
details, refer to "Sleep Timer Function" on page 34.
5
Selecting the input source: Press this buttons repeatedly until the input
symbol of the desired source appears on the screen.
6 0 - 9
Selecting Channels: Press these buttons to select channels. For
double-digit channel numbers, enter the second digit within 2.5 seconds.
7
Displaying on-screen information: Press this button to display all on-screen
indicators. Press it again to cancel.
8
Watching Last Channel Selected: Press this button to watch the last channel
selected (the last channel watched for at least five seconds).
9
Fastext: In Teletext mode, these buttons can be used as Fastext buttons. For
more details see page 35
q; Selecting a sound effect: Press this button repeatedly to change the sound
effect. For details on different sound effects refer to page 27
qa Selecting the Picture Mode / Adjusting the Brightness Of Teletext
Pages.
a)
In normal TV mode: Press this button repeatedly to change the picture
mode. For more details, refer to "Picture Adjustment" on page 25.
b) In Teletext mode: Press this button repeatedly to change the brightness of
Teletext pages.
Overview & Installation
1
3
2
4
5
7
8
9
q;
6
qa
qs
qd
qf
qg
qh
qk
qj
continued...
16
The buttons with green symbols (except for (Power/Standby)) are also used for Teletext operations. For
more details refer to "Teletext" on page 35.
qs V / v / B / b / OK Buttons:
a)
When the menu is displayed: use these buttons to operate the menu
system. For more details, refer to "Introducing and Using the Menu
System" on page 24.
b) When the menu is turned off: press OK to show an overview of all TV
Channels. Then press
V or v to select the channel and press OK to watch
the selected channel.
qd Selecting the TV mode: Press this button to switch off Teletext or video
input.
qf Selecting Teletext: Press this button to switch on Teletext. For more
details, refer to "Teletext" on page 35.
qg MENU - Displaying the menu system: Press this button to display the
menu on the screen. Press it again to remove the menu from the screen.
qh 2
+/- Adjusting the TV volume: Press these buttons to adjust the
volume of the TV.
qj
PROG +/- Selecting Channels: Press these buttons to select the next or
previous channel.
qk
Selecting screen format: Press this button to view programmes in 16:9
mode. Press again to return to 4:3 mode.
Overview & Installation
1
3
2
4
5
7
8
9
q;
6
qa
qs
qd
qf
qg
qh
qk
qj
17
GB
Overview of the TV Buttons and side Connectors
3
3
o3
Power On / OffVolume control
(+/-)
Programme Up or
Down (selects TV
channels)
Picture Freeze press this button to
freeze the picture. For more details
refer to “Picture Freeze” on page 34.
Auto Start Up press and hold this
button for three seconds to start the
Auto Start Up sequence. For more
details refer to “Switching On the
TV and Automatically Tuning” on
page 22.
Selecting Input Source
for more details refer to
“Viewing pictures from
equipment connected to
the TV” on page 38.
Overview of the TV Buttons
Overview of the side Connectors
S Video Input
jack
Audio Input
jacks
Video Input
jack
Headphones
jack
Overview & Installation
18
Overview & Installation
Overview of the TV indicators
Inserting Batteries into the Remote Control
Make sure you insert the supplied batteries using the correct polarities.
Always remember to dispose of used batteries in an environmental friendly way.
To operate the remote
control, point it towards
this receiver.
Lights up in green when the
TV is switched on.
Lights up in red when
the TV is in standby
mode.
Flashes red when a
button is pressed on the
remote control.
Lights up in red when
the sleep timer is set.
For more details, refer
to “Sleep Timer” on
page 34.
SONY CORPORATION JAPAN/4
S
O
N
Y
C
O
R
PO
R
A
TIO
N
JA
P
AN
/4
19
GB
Overview & Installation
Removing the Rear Cover
When you connect the cables, remove the rear cover of the TV set. Be sure to attach the rear cover back on the TV
set after you finish connecting the cables.
Removing the rear cover
Hold the rear cover as illustrated below and pull off one side of the lower part of the cover towards you first. Then,
detach the upper part of the cover from the TV set.
Attaching the rear cover
Hold the rear cover as illustrated below, fitting the four detents on the rear cover into the corresponding holes on the
TV set, then push the rear cover back on to the TV set.
It is not necessary to attach the rear cover if you install a wall-mount bracket SU-W210 (optional
accessory).
20
Connecting the Aerial and VCR
or
VCR
Overview & Installation
Make sure to connect the aerial before the Scart.
For more details regarding VCR connection, refer to “Connecting Equipment to the TV” on page 36.
21
GB
Adjusting the viewing angle of the TV
You can adjust the angle to avoid the reflection of light and get a better view of the TV set.
When adjust the angle, hold the stand with your hand so that it does not come loose or fall off.
Be careful not to catch your fingers between the TV and the stand.
Backward direction
Horizontal direction
10º
75º 75º
Overview & Installation
  • Page 1 1
  • Page 2 2
  • Page 3 3
  • Page 4 4
  • Page 5 5
  • Page 6 6
  • Page 7 7
  • Page 8 8
  • Page 9 9
  • Page 10 10
  • Page 11 11
  • Page 12 12
  • Page 13 13
  • Page 14 14
  • Page 15 15
  • Page 16 16
  • Page 17 17
  • Page 18 18
  • Page 19 19
  • Page 20 20
  • Page 21 21
  • Page 22 22
  • Page 23 23
  • Page 24 24
  • Page 25 25
  • Page 26 26
  • Page 27 27
  • Page 28 28
  • Page 29 29
  • Page 30 30
  • Page 31 31
  • Page 32 32
  • Page 33 33
  • Page 34 34
  • Page 35 35
  • Page 36 36
  • Page 37 37
  • Page 38 38
  • Page 39 39
  • Page 40 40
  • Page 41 41
  • Page 42 42
  • Page 43 43
  • Page 44 44
  • Page 45 45
  • Page 46 46
  • Page 47 47
  • Page 48 48
  • Page 49 49
  • Page 50 50
  • Page 51 51
  • Page 52 52
  • Page 53 53
  • Page 54 54
  • Page 55 55
  • Page 56 56
  • Page 57 57
  • Page 58 58
  • Page 59 59
  • Page 60 60
  • Page 61 61
  • Page 62 62
  • Page 63 63
  • Page 64 64
  • Page 65 65
  • Page 66 66
  • Page 67 67
  • Page 68 68
  • Page 69 69
  • Page 70 70
  • Page 71 71
  • Page 72 72
  • Page 73 73
  • Page 74 74
  • Page 75 75
  • Page 76 76
  • Page 77 77
  • Page 78 78
  • Page 79 79
  • Page 80 80
  • Page 81 81
  • Page 82 82
  • Page 83 83
  • Page 84 84
  • Page 85 85
  • Page 86 86
  • Page 87 87
  • Page 88 88
  • Page 89 89
  • Page 90 90
  • Page 91 91
  • Page 92 92
  • Page 93 93
  • Page 94 94
  • Page 95 95
  • Page 96 96
  • Page 97 97
  • Page 98 98
  • Page 99 99
  • Page 100 100
  • Page 101 101
  • Page 102 102
  • Page 103 103
  • Page 104 104
  • Page 105 105
  • Page 106 106
  • Page 107 107
  • Page 108 108
  • Page 109 109
  • Page 110 110
  • Page 111 111
  • Page 112 112
  • Page 113 113
  • Page 114 114
  • Page 115 115
  • Page 116 116
  • Page 117 117
  • Page 118 118
  • Page 119 119
  • Page 120 120
  • Page 121 121
  • Page 122 122
  • Page 123 123
  • Page 124 124
  • Page 125 125
  • Page 126 126
  • Page 127 127
  • Page 128 128
  • Page 129 129
  • Page 130 130
  • Page 131 131
  • Page 132 132
  • Page 133 133
  • Page 134 134
  • Page 135 135
  • Page 136 136
  • Page 137 137
  • Page 138 138
  • Page 139 139
  • Page 140 140
  • Page 141 141
  • Page 142 142
  • Page 143 143
  • Page 144 144
  • Page 145 145
  • Page 146 146
  • Page 147 147
  • Page 148 148
  • Page 149 149
  • Page 150 150
  • Page 151 151
  • Page 152 152
  • Page 153 153
  • Page 154 154
  • Page 155 155
  • Page 156 156
  • Page 157 157
  • Page 158 158
  • Page 159 159
  • Page 160 160
  • Page 161 161
  • Page 162 162

Sony KLV-20 SR3/S Instrukcja obsługi

Kategoria
Telewizory LCD
Typ
Instrukcja obsługi
Ten podręcznik jest również odpowiedni dla

w innych językach