
Size - A5
DE
Gebrauchsanweisung
EN
User manual
ES
Manual de instrucciones
FR
Mode d'emploi
GR
Οδηγίες χρήσης
HU
Használati leírás
IT
Manuale dell'utente
NL
Gebruiksaanwijzing
PL
Instrukcja obsługi
PT
Manual de utilização
SE
Användarhandbok
TR
Kullanım Kılavuzu
Deutsch 3 - 8
English 9 - 14
Español 15 - 20
Français 21 - 26
Ελληνικά 27 - 32
Magyar 33 - 38
Italiano 39 - 44
Nederlands 45 - 50
Polski 51 - 56
Português 57 - 62
Svenska 63 - 68
Türkçe 69 - 74
Ice Cream Maker
KIM 20821 M
Imtron GmbH
Wankelstraße 5
85046 Ingolstadt
Germany
www.imtron.eu
www.koenic-online.com
IM_KIM 20821 M_201204_V05
IM_KIM20821M_201204_V05_HR.indb 1IM_KIM20821M_201204_V05_HR.indb 1 4/12/2020 3:58 PM4/12/2020 3:58 PM

Size - A5
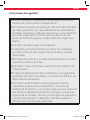
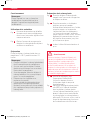
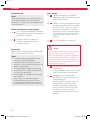
32
5
C
D
A
B
I
J
K
H
E
F
G
6
8
1
1
2
4
1
2
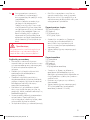
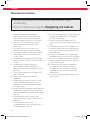
1397
max.max.
800 ml800 ml
IM_KIM20821M_201204_V05_HR.indb 2IM_KIM20821M_201204_V05_HR.indb 2 4/12/2020 3:58 PM4/12/2020 3:58 PM

Deutsch
3
Sicherheitshinweise
• Das Produkt darf nicht mit einer externen Zeitschaltuhr oder
mit einem separaten Fernwirksystem betrieben werden.
• Dieses Produkt kann von Kindern ab 8 Jahren sowie von
Personen mit reduzierten physischen, sensorischen oder
mentalen Fähigkeiten oder Mangel an Erfahrung und/oder
Wissen benutzt werden, wenn sie beaufsichtigt werden
oder bezüglich des sicheren Gebrauchs des Produktes
unterwiesen wurden und die daraus resultierenden
Gefahren verstanden haben.
• Kinder dürfen nicht mit dem Produkt spielen.
• Reinigung und Benutzerwartung dürfen nicht durch Kinder
durchgeführt werden, es sei denn, sie sind älter als 8 Jahre
und beaufsichtigt.
• Kinder jünger als 8 Jahre sind vom Produkt und dem
Netzkabel fernzuhalten.
• Die Netzanschlussleitung muss regelmäßig auf Zeichen
von Beschädigungen untersucht werden, und falls diese
beschädigt ist, darf das Produkt nicht mehr benutzt werden.
• Das Produkt muss an eine Steckdose mit Schutzleiter
angeschlossen werden.
• Dieses Produkt ist für die Verarbeitung haushaltsüblicher
Mengen im Haushalt oder in haushaltsähnlichen, nicht-
gewerblichen Anwendungen bestimmt. Haushaltsähnliche
Anwendungen umfassen z.B. die Verwendung in Mitarbeiter-
küchen von Läden, Büros sowie die Nutzung durch Gäste von
Pensionen, kleinen Hotels und ähnlichen Wohneinrichtungen.
• Um Gefährdungen zu vermeiden, darf ein beschädigtes
Netzkabel nur vom Hersteller, einer von ihm beauftragten
Werkstatt oder einer ähnlich qualifizierten Person ersetzt
werden.
IM_KIM20821M_201204_V05_HR.indb 3IM_KIM20821M_201204_V05_HR.indb 3 4/12/2020 3:58 PM4/12/2020 3:58 PM

Deutsch
4
Size - A5
Sicherheitshinweise
• Reinigen Sie das Produkt und die übrigen Zubehörteile nach
jedem Gebrauch.
• Beachten Sie das Kapitel Reinigung und Pflege.
1. Lesen Sie diese Bedienungsanleitung vor
dem ersten Gebrauch gründlich durch. Sie
enthält wichtige Informationen für Ihre
Sicherheit sowie zum Gebrauch und zur
Pflege des Produktes.
2. Heben Sie die Bedienungsanleitung zum
späteren Nachschlagen auf und geben Sie
sie mit dem Produkt weiter.
3. Beachten Sie alle Warnungen auf dem
Produkt und in dieser Bedienungsanleitung.
4. Benutzen Sie das Produkt nur für den
vorgesehenen Zweck. Unsachgemäßer
Gebrauch könnte zu Gefährdungen führen.
5. Wenn Sie das Produkt nicht
bestimmungsgemäß verwenden
oder falsch bedienen, kann für daraus
resultierende Schäden keine Haftung
übernommen werden.
6. Die Verwendung von Zubehör und
Produktteilen, die vom Hersteller nicht
ausdrücklich empfohlen werden, kann
Verletzungen oder Schäden verursachen
und führt zum Verlust der Garantie.
7. Lassen Sie das Produkt nie unbeaufsichtigt,
solange es eingeschaltet ist.
8. Stellen Sie keine Gegenstände auf das
Produkt.
9. Tauchen Sie elektrische Teile des Produktes
während des Reinigens oder des Betriebs
nie in Wasser oder andere Flüssigkeiten.
Halten Sie das Produkt nie unter fließendes
Wasser.
10. Versuchen Sie niemals das Produkt selbst
zu reparieren. Geben Sie das Produkt
zur Wartung und Reparatur an einen
Fachhändler oder einen qualifizierten
Kundendienst.
11. Die Netzspannung muss mit den Angaben
auf dem Typenschild des Produktes
übereinstimmen.
12. Der Netzstecker dient als Trennvorrichtung.
Achten Sie darauf, dass der Netzstecker
immer gut zugänglich und erreichbar ist.
13. Nur der Netzstecker kann das Produkt
vollständig vom Stromnetz trennen.
14. Vermeiden Sie die Beschädigung des
Netzkabels durch Knicken oder Kontakt mit
scharfen Kanten.
15. Halten Sie das Produkt, einschließlich
Netzkabel und Netzstecker, von
Hitzequellen, wie z. B. Heizkörpern, Öfen und
anderen Hitze erzeugenden Produkten, fern.
16. Ziehen Sie den Netzstecker nur am
Netzstecker selbst aus der Steckdose.
Ziehen Sie nicht am Netzkabel.
17. Ziehen Sie den Netzstecker aus der
Steckdose, ...
- wenn das Produkt nicht benutzt wird,
- wenn Funktionsstörungen auftreten,
- bevor Sie Zubehör anbringen /
- entfernen und
- bevor Sie das Produkt reinigen.
18. Wenn das Netzkabel oder das Gehäuse des
Produktes beschädigt oder das Produkt
heruntergefallen ist, darf das Produkt
nicht benutzt werden, bis es von einem
Fachmann überprüft worden ist.
19. Verwenden Sie das Produkt nur in
trockenen Innenräumen, niemals im Freien.
IM_KIM20821M_201204_V05_HR.indb 4IM_KIM20821M_201204_V05_HR.indb 4 4/12/2020 3:58 PM4/12/2020 3:58 PM

5
Deutsch
Lieferumfang
1 x Eisbereiter
1 x Bedienungsanleitung
1 x Garantiekarte
Technische Daten
Nennspannung : 220 - 240 V~
Nenneingangsleistung : 12 W
Nennfrequenz : 50 Hz
Schutzklasse : II
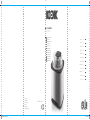
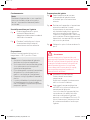
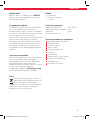
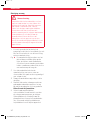
Bedienelemente und Komponenten
A
Bedienfeld mit Display
B
Taste zurück
C
Ein-/Aus-Schalter
D
Taste vor
E
Doppelwandiger Eisbehälter
F
Griring
G
Außenbehälter
H
Rühreinsatz mit Anschluss
I
Deckel mit Einfüllönung
J
Motorgehäuse
K
Netzkabel mit Netzstecker
Herzlichen Glückwunsch!
Vielen Dank, dass Sie sich für ein KOENIC
Produkt entschieden haben. Bitte lesen Sie die
Gebrauchsanweisung aufmerksam durch und
bewahren Sie sie für späteres Nachschlagen
auf.
Bestimmungsgemäßer Gebrauch
Das Gerät ist ausschließlich für die Zubereitung
von Speiseeis geeignet. Jeglicher anderer
Gerbrauch kann zu Schäden am Gerät oder
Verletzungen führen.
Die Imtron GmbH übernimmt keine Haftung
für Schäden am Produkt, Sachschaden, oder
für Personenverletzungen aufgrund von
unachtsamer, unsachgemäßer, falscher oder
nicht dem vom Hersteller angegebenen Zweck
entsprechender Verwendung des Produkts.
Vor dem ersten Gebrauch
Entfernen Sie das Produkt und das Zubehör
vorsichtig aus der Originalverpackung. Es
empfiehlt sich die Originalverpackung für
späteres Verstauen aufzubewahren. Möchten
Sie die Originalverpackung entsorgen, so tun
Sie dies nach den geltenden gesetzlichen
Bestimmungen.
Überprüfen Sie den Verpackungsinhalt auf
Vollständigkeit und Beschädigungen. Sollte
der Verpackungsinhalt unvollständig oder
Beschädigungen feststellbar sein, kontaktieren
Sie umgehend Ihre Verkaufstelle.
Reinigen Sie das Produkt nach dem Auspacken;
siehe Kapitel Reinigung und Pflege.
Entsorgung
Dieses Produkt nicht im unsortierten
Hausmüll, sondern an einer
ausgewiesenen Sammelstelle für
Elektro- und Elektronik-Altgeräte entsorgen.
Dadurch tragen Sie zum Schutz der Ressourcen
und der Umwelt bei. Für weitere Information
wenden Sie sich bitte an Ihren Händler oder die
örtlichen Behörden.
IM_KIM20821M_201204_V05_HR.indb 5IM_KIM20821M_201204_V05_HR.indb 5 4/12/2020 3:58 PM4/12/2020 3:58 PM

6
Deutsch
Size - A5
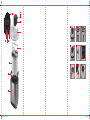
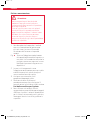
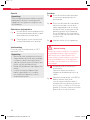
Eis herstellen
Abb.
3
Setzen Sie den tiefgefrorenen
Eisbehälter zusammen mit dem
Griring in den Außenbehälter.
Abb.
4
Setzen Sie den Deckel so auf den
Außenbehälter, dass das Netzkabel
nach hinten weggeführt wird und die
Nasen am Deckel in die Aussparungen
am Griring fassen. Die Einfüllönung
zeigt nach vorne. Verdrehen Sie den
Deckel leicht im Uhrzeigersinn bis er
einrastet.
Abb.
5
Stecken Sie den Netzstecker in die
Steckdose.
Achtung
Starten Sie immer erst das Gerät und füllen
Sie dann die Zutaten ein und stoppen Sie das
Gerät nie während der Speiseeiszubereitung!
Die Eismasse gefriert sofort an den Wänden
des Eisbehälters und der Rühreinsatz
blockiert beim (erneuten) Einschalten, was
zu Beschädigungen an Motor und Getriebe
führen kann!
Abb.
6
Schalten Sie das Rührwerk mit dem
Ein-/Ausschalter ein.
Mit den Tasten vor oder zurück, können
Sie die Operationszeit einstellen.
Abb.
7
Geben Sie die Eismischung, max.
800ml, durch den Einfülltrichter in den
Eisbehälter.
Lassen Sie das Gerät solange
laufen, bis Sie mit der Konsistenz
des Speiseeises zufrieden sind.
Nach spätestens 25 Minuten ist
das Eis fertig. 45 Minuten ist auch
die maximale Operationszeit des
Speiseeisbereiters.
Bedienung
Hinweis:
Stellen Sie das Gerät auf eine ebene und
rutschfeste Fläche, in der Nähe einer
geeigneten Steckdose. Das Gerät ist mit
rutschfesten Standfüßen ausgestattet.
Gebrauch des Eisbereiters
Abb.
1
Drehen Sie den Deckel mit
Motorgehäuse leicht gegen den
Uhrzeigersinn, sodass er sich löst und
nehmen Sie ihn ab.
Abb.
2
Nehmen Sie den Griring zusammen
mit dem Eisbehälter aus dem
Außenbehälter.
Vorbereitung
Legen Sie den Eisbehälter ca. 24 Stunden bei
mindestens -18 °C in ein Gefrierfach.
Hinweis:
• Bewahren Sie den Eisbehälter aufrecht im
Gefrierfach auf.
• Stellen Sie sicher, dass der Eisbehälter
absolut trocken ist, bevor Sie ihn ins
Gefrierfach stellen.
• Legen Sie den Eisbehälter vor dem
Einfrieren in eine Folientüte, z.B. einen
Gefrierbeutel.
• Bereiten Sie all Zutaten laut Rezept zu.
• Lassen Sie die Zutaten für das Eis
im Kühlschrank für ca. 4 Stunden
abkühlen, sodass Sie bei der eigentlichen
Eiszubereitung schneller heruntergekühlt
werden kann.
IM_KIM20821M_201204_V05_HR.indb 6IM_KIM20821M_201204_V05_HR.indb 6 4/12/2020 3:58 PM4/12/2020 3:58 PM

7
Deutsch
Joghurt – Zitronen Eis
300 g Naturjoghurt
400 g Sahne
150 g Puderzucker
50 ml Zitronensaft
•
Das Joghurt mit dem Puderzucker und
dem Zitronensaft vermengen und
im Anschluss die geschlagene Sahne
unterheben. Die fertig vorbereitete Masse
vor der Zubereitung in der Eismaschine im
Kühlschrank herunterkühlen.
•
Gefrierzeit in der Eismaschine: 30 min.
Schokoladen Eis mit Schokostücken
150 g Schokolade
570 ml Milch
400 g Sahne
100 g Zucker
50 g Schokostücken
• Milch, Zucker und Schokolade in einem Topf
erhitzen bis sich Schokolade und Zucker
vollständig gelöst haben. Anschließend die
Sahne zugeben und für 2 Minuten erhitzen.
• Die fertig vorbereitete Masse vor der
Weiterarbeitung vollständig abkühlen lassen.
• Gefrierzeit in der Eismaschine: 30 min. (Nach
15 min .die Schokostücken zugeben).
Abb.
8
Schalten Sie das Gerät mit dem Ein-/
Ausschalter aus und ziehen Sie den
Netzstecker.
Verdrehen Sie leicht den Deckel bis
Sie ihn abnehmen können. Ziehen
Sie den Rühreinsatz aus dem Eis.
Schaben Sie evtl. festhängendes Eis
mit einem Plastiklöel oder Ähnlichem
vom Rühreinsatz ab. Nehmen Sie
den Griring zusammen mit dem
Eisbehälter aus dem Außenbehälter
und entnehmen Sie das Eis. Benutzen
Sie dafür ausschließlich Plastik- oder
Holzbesteck.
Achtung
Benutzen Sie kein Metallbesteck um das Eis
aus dem Eisbehälter zu entnehmen, da dieser
dadurch zerkratzt werden könnte!
Tipps und Tricks
•
Die Eismasse immer vorab vorbereiten und
danach im Kühlschrank abkühlen lassen, so
gefriert sie schneller.
• Alle Zutaten nach Möglichkeit pürieren
oder zerkleinern, damit sich diese besser
vermengen.
• Gröbere Zutaten, bspw. Schokoladen- /
Obststücken, erst zugeben, wenn sich die
Masse bereits etwas gefestigt hat, da sie
sich sonst nicht gleichmäßig vermengen.
•
Bei Rezepten mit Alkohol, diesen
sparsam dosieren und erst am Ende der
Zubereitungszeit hinzugeben, da dieser die
Gefrierzeit verlängert.
• Verwenden Sie Sahne für cremigeres Eis.
Je höher der Fettanteil der Sahne, desto
cremiger das Eis.
•
Speiseeis hat generell eine etwas weichere
Konsistenz. Für eine festere Konsistenz,
die Masse nach der Zubereitung in einem
separaten, verschließbaren, Behältnis im
Gefrierschrank einfrieren.
• Lagern Sie das zubereitete Eis nicht in
oenen Behältern im Gefrierschrank, da sich
sonst Eiskristalle bilden könnten.
IM_KIM20821M_201204_V05_HR.indb 7IM_KIM20821M_201204_V05_HR.indb 7 4/12/2020 3:58 PM4/12/2020 3:58 PM

8
Deutsch
Size - A5
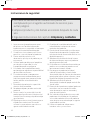
Reinigung und Pflege
Vorsicht
Tauchen Sie elektrische Teile des Gerätes
während des Reinigens nie in Wasser oder
andere Flüssigkeiten. Halten Sie das Gerät
nie unter fließendes Wasser. Verwenden
Sie zur Reinigung keinesfalls Lösungs- und
Scheuermittel, harte Bürsten, metallische
oder scharfe Gegenstände. Lösungsmittel
sind gesundheitsschädlich und greifen die
Plastikteile an; scheuernde Reiniger und
Hilfsmittel zerkratzen die Oberfläche.
1. Vorausgesetzt Deckel, Griring und
Eisbehälter wurden schon entnommen,
ziehen Sie den Rühreinsatz vom Anschluss
am Motorgehäuse ab.
Abb.
9
Lösen Sie das Motorgehäuse vom
Deckel indem Sie die Laschen auf
beiden Seiten drücken, sodass sich
beide Teile trennen lassen. Bei
Schwierigkeiten drücken Sie die
Laschen nacheinander.
2. Waschen Sie alle Komponenten außer
dem Motorgehäuse mit warmem Wasser
und Geschirrspülmittel und spülen Sie sie
danach mit klarem Wasser gründlich ab.
3. Trocknen Sie alle Komponenten nach jeder
Reinigung sorgfältig ab.
4. Setzen Sie alle zuvor gereinigten und
abgetrockneten Teile wieder zusammen.
Beachten Sie dazu die entsprechenden
Punkte im Abschnitt Gebrauch des
Eisbereiters.
5. Verwenden Sie zur Reinigung keinesfalls
Lösungs- und Scheuermittel, harte Bürsten,
metallische oder scharfe Gegenstände.
Lösungsmittel sind gesundheitsschädlich
und greifen die Plastikteile an; scheuernde
Reiniger und Hilfsmittel zerkratzen die
Oberfläche.
IM_KIM20821M_201204_V05_HR.indb 8IM_KIM20821M_201204_V05_HR.indb 8 4/12/2020 3:58 PM4/12/2020 3:58 PM

English
9
Safety Instructions
• Do not operate the product by means of an external timer
or separate remote control system.
• This product can be used by children aged from 8 years
and above and persons with reduced physical, sensory or
mental capabilities or lack of experience and knowledge if
they are being supervised or have been given instructions
concerning the use of the product in a safe way and
understand the hazards involved.
• Children shall not play with the product.
• Cleaning and user maintenance shall not be carried out by
children unless they are older than 8 years and supervised.
• Keep this product and its power cord out of reach of
children under the age of 8 years.
• The product is to be connected to a socket-outlet having an
earthing contact.
• The supply cord should be regularly examined for signs of
damage, and if the cord is damaged, the product must not
be used.
• The product is designed for the preparation of normal
household quantities in the home, or in household-like, non-
commercial environments. Household-like environments
include sta kitchens in shops, oces, agricultural and
other small businesses or for use by guests at bed
and breakfast establishments, small hotels and similar
residential facilities.
IM_KIM20821M_201204_V05_HR.indb 9IM_KIM20821M_201204_V05_HR.indb 9 4/12/2020 3:58 PM4/12/2020 3:58 PM

English
10
Size - A5
Safety Instructions
• A damaged power cord may only be replaced by the
authorised service agent in order to avoid hazards.
• Clean the product and all other accessories after each use.
• Follow the instructions in the chapter Cleaning and care.
1. Read this manual thoroughly before first
use. It contains important information
for your safety as well as for the use and
maintenance of the equipment.
2. Keep this manual for future reference and
pass it on with the product.
3. Pay particular attention to the warnings on
the product and in this manual.
4. Use the product only for its intended
purpose. Improper use may lead to hazards.
5. In the event of improper use or wrong
operation, we do not accept any liability for
resulting damages.
6. The use of accessories and components
not expressly recommended by the
manufacturer may result in injuries or
damages and voids the warranty.
7. Never leave the product unsupervised
while it is switched on.
8. Do not place any objects on top of the
product.
9. Never immerse electrical parts of the
product in water or any other fluid during
cleaning or operation. Never hold the
product under running water.
10. Do not under any circumstances attempt
to repair the product yourself. For servicing
and repairs, please consult an authorised
service agent.
11. The mains voltage must match the
information on the rating label of the
product.
12. The power plug is used as the disconnect
device. Please be sure that the power plug
is in operable condition.
13. Only unplugging from the power socket can
separate the product completely from the
mains.
14. Avoid damages to the power cord that may
be caused by kinks or contact with sharp
corners.
15. Keep this product including its power cord
and power plug away from all heat sources
such as ovens, hot plates and other heat-
producing devices/objects.
16. Only unplug from the power socket by the
plug itself. Do not pull on the cord.
17. Unplug the product ...
- when the product is not being used,
- in case of malfunctions,
- before attaching / detaching,
- accessories and
- before cleaning the product.
18. If the power cord or the casing of the
product have been damaged or if the
product has been dropped, the product may
not be used before it has been examined by
an authorised service agent.
19. Use this product in dry indoor areas only
and never outdoors.
IM_KIM20821M_201204_V05_HR.indb 10IM_KIM20821M_201204_V05_HR.indb 10 4/12/2020 3:58 PM4/12/2020 3:58 PM

11
English
Content
1 x Ice cream maker
1 x Instruction manual
1 x warranty card
Technical data
Rated voltage : 220 - 240 V~
Rated input power : 12 W
Rated frequency : 50 Hz
Protection class : II
Controls and components
A
Control panel with display
B
Back button
C
On / o switch
D
Forward button
E
Double-walled ice container
F
Grip ring
G
Outer container
H
Mixer insert with adapter
I
Lid with filling opening
J
Motor housing
K
Power cord with plug
Congratulations!
Thank you for your purchase of a KOENIC
product. Please read this manual carefully and
keep it for future reference.
Intended use
This product is suitable for preparing ice cream
only. Any other use can lead to damage to the
device or injuries.
The Imtron GmbH assumes no liability for
damage to the product, for property damage or
for personal injury due to careless or improper
usage of the product, or usage of the product
which does not meet the manufacturer’s
specified purpose.
Before first use
Carefully take the product and its accessories
out of the original packaging. Retain the
original packaging in case you would like to
store the product away or transport it at a
later date. If you choose to dispose of the
original packaging, then do so according to the
applicable legal regulations.
Check the packaging contents for
completeness and damages. Should the
contents in the packaging not be complete or
damaged, do not use the product. Return it to
your retail outlet immediately.
After unpacking, please refer to chapter
Cleaning and care.
Disposal
Do not dispose of this appliance as
unsorted municipal waste. Return it to a
designated collection point for the
recycling of WEEE. By doing so, you will help to
conserve resources and protect the
environment. Contact your retailer or local
authorities for more information.
IM_KIM20821M_201204_V05_HR.indb 11IM_KIM20821M_201204_V05_HR.indb 11 4/12/2020 3:58 PM4/12/2020 3:58 PM

12
English
Size - A5
Making ice cream
Fig.
3
Place the frozen ice cream container
together with the grip ring in the outer
container.
Fig.
4
Place the lid on the outer container
so that the power cord is led away to
the rear and the lugs on the lid engage
in the recesses on the grip ring. The
filling opening is at the front. Twist the
cover slightly clockwise until it clicks
into place.
Fig.
5
Insert the power plug into the socket.
Warning
Always start the appliance first and then add
the ingredients and never stop the appliance
while the ice cream is being prepared! The
ice cream immediately freezes on the walls
of the ice container and the mixer is blocked
when you switch it on (again), which can
damage the motor and gearbox!
Fig.
6
Switch on the mixer with the on / o
switch.
Use the forward and backward buttons
to set the operation time.
Fig.
7
Add the ice cream mixture, max.
800ml, through the funnel into the ice
container.
Let the appliance run until you are
satisfied with the consistency of the
ice cream. The ice cream is ready after
25 minutes at the latest. 45 minutes is
also the maximum operating time for
the ice cream maker.
Operation
Note:
Place the device on a flat and non-slip
surface, near a suitable socket. The device is
equipped with non-slip feet.
Using the ice cream maker
Fig.
1
Turn the cover with the motor housing
slightly counter-clockwise so that it
loosens and remove it.
Fig.
2
Take the grip ring together with the ice
container from the outer container and
lift it up.
Preparation
Place the ice container in a freezer at -18 °C for
about 24 hours.
Note:
• Store the ice cream container upright in
the freezer compartment.
• Make sure the ice cream container is
absolutely dry before you put it in the
freezer.
• Before freezing, put the ice cream
container in a plastic bag, e.g. a freezer
bag.
• Prepare all ingredients according to the
recipe.
• Let the ice cream mixture cool in the
refrigerator for approx. 4 hours so that
it can cool down more quickly when you
actually prepare the ice cream.
IM_KIM20821M_201204_V05_HR.indb 12IM_KIM20821M_201204_V05_HR.indb 12 4/12/2020 3:58 PM4/12/2020 3:58 PM

13
English
Yoghurt – lemon ice cream
300 g pure yoghurt
400 g whipped cream
150 g powdered sugar
50 ml lemon juice
• Blend the yoghurt, sugar and lemon and
fold in the whipped cream afterwards.
Refrigerate the mixture before further
preparation in the ice machine.
• Freezing time in the machine: 30 min.
Chocolate ice cream
150 g chocolate
570 ml milk
400 g whipped cream
100 g sugar
50 g chocolate bits
• Heat up the sugar, milk and chocolate in
a pot until all ingredients have properly
dissolved and mixed. Add the whipped cream
and heat up for two minutes.
• Cool down the mixture before further
preparation.
• Freezing time in the machine: 30 min. (add
chocolate bits after 15 min.)
Fig.
8
Switch o the device with the on / o
switch and pull out the mains plug.
Twist the lid slightly until you can
remove it. Pull the mixer out of the
ice. Scrape o any stuck ice from the
mixer insert with a plastic spoon or
something similar. Take the grip ring
together with the ice container from
the outer container and remove the
ice. Use only plastic or wooden cutlery
for this.
Warning
Do not use metal cutlery to remove the ice
from the ice cream container, as this could
lead to scratches!
Tips and recommendations
• Always prepare the ice cream mixture in
advance and refrigerate it, before further
preparation in the ice cream maker. It will
freeze faster this way.
• Blend or chop all ingredients evenly, to
ensure even blending.
• Add bigger ingredients, e.g. pieces of
chocolate or fruits, only after the ice cream
mixture is slightly frozen, as otherwise they
might not be blended in evenly.
• When adding alcohol, do so sparsely and
towards the end of the freezing, as alcohol
delays the freezing process.
• Use cream or whipped cream for creamier
ice cream. The higher the fat content of the
cream, the creamier the ice cream.
• Ice cream is usually of softer consistency.
If you wish to further freeze the ice cream,
place it in a separate, sealable, box.
• Do not store ice cream in open containers,
as ice crystals might form.
IM_KIM20821M_201204_V05_HR.indb 13IM_KIM20821M_201204_V05_HR.indb 13 4/12/2020 3:58 PM4/12/2020 3:58 PM

14
English
Size - A5
Cleaning and care
Caution
Never immerse electrical parts of the device
in water or any other fluids during cleaning
or operation. Never hold the device under
running water. Never use solvents and
abrasives, hard brushes, metallic or sharp
objects for cleaning. Solvents are harmful
to your health and attack the plastic parts.
Abrasive cleaners and tools do scratch the
surface.
1. Assuming the lid, grip ring and ice cream
container have already been removed, pull
the mixer insert o the connection on the
motor housing.
Fig.
9
Detach the motor housing from
the cover by pressing the tabs on
both sides so that both parts can be
separated. If you have diculties,
press the tabs one after the other.
2. Wash all components except the motor
housing with warm water and washing-up
liquid, and then rinse them thoroughly with
clean water.
3. Carefully dry all components after each
cleaning.
4. Put all the previously cleaned and dried
parts back together. Please note the
relevant points in the Using the ice
cream maker section.
5. Never use solvents, abrasives, hard brushes,
metallic or sharp objects for cleaning.
Solvents are harmful to health and attack
plastic parts; Abrasive cleaners and
auxiliaries scratch the surface.
IM_KIM20821M_201204_V05_HR.indb 14IM_KIM20821M_201204_V05_HR.indb 14 4/12/2020 3:58 PM4/12/2020 3:58 PM

Español
15
Instrucciones de seguridad
• No use el producto mediante un temporizador externo o
sistema de control remoto independiente.
• Este producto puede ser usado por niños de más de 8 años
de edad y personas con capacidades físicas, sensoriales o
mentales reducidas, o falta de experiencia y conocimientos,
si reciben supervisión o instrucciones sobre el uso del
producto de forma segura y comprenden los riesgos que
implica.
• Los niños no deben jugar con el aparato.
• La limpieza y el mantenimiento no deben ser realizados
por niños a menos que tengan más de 8 años y reciban
supervisión.
• Mantenga el producto y su cable fuera del alcance de niños
menores de 8 años de edad.
• El producto debe enchufarse a una toma de corriente con
toma de tierra.
• El cable de alimentación debe examinarse con regularidad
para detectar indicios de daños; si el cable está dañado, no
debe utilizarse el aparato.
• El producto está diseñado para la preparación de las
cantidades propias del uso doméstico, o de entornos
similares al doméstico, y no es adecuado para uso comercial.
Los entornos similares al doméstico incluyen cocinas para
el personal en tiendas, oficinas y otros negocios pequeños,
o para los huéspedes en albergues, hoteles pequeños e
instalaciones residenciales parecidas.
IM_KIM20821M_201204_V05_HR.indb 15IM_KIM20821M_201204_V05_HR.indb 15 4/12/2020 3:58 PM4/12/2020 3:58 PM

Español
16
Size - A5
Instrucciones de seguridad
• Un cable de alimentación dañado sólo puede ser
reemplazado por el agente autorizado de servicio para
evitar peligros.
• Limpie el producto y los demás accesorios después de cada
uso.
• Siga las instrucciones del capítulo Limpieza y cuidados.
1. Lea este manual completamente antes
del primer uso. Contiene información
importante para su seguridad así como para
el uso y el mantenimiento del equipo.
2. Guarde estas instrucciones para futuras
consultas y transmítalo con el producto.
3. Preste atención particular a las
advertencias que hay en el producto y en
este manual.
4. Utilice el producto sólo para el propósito
para el que está pensado. Un uso
inapropiado puede ser peligroso.
5. En caso de uso inapropiado o manejo
equivocado, no aceptamos responsabilidad
por los daños resultantes.
6. El uso de accesorios y componentes
no expresamente recomendados por el
fabricante puede tener como resultado
heridas o daños e invalidación de la
garantía.
7. Nunca deje el producto sin supervisión
mientras esté encendido.
8. No coloque objetos pesados encima del
producto.
9. Nunca sumerja las partes eléctricas del
producto en agua durante la limpieza ni el
manejo. Nunca mantenga el producto bajo
agua corriente.
10. Bajo ninguna circunstancia intente reparar
el producto usted mismo. Para recibir
asistencia y reparaciones, consulte a un
agente autorizado de servicio.
11. El voltaje de la red debe coincidir con la
información de la etiqueta de valores
nominales del producto.
12. El enchufe de alimentación se utiliza como
dispositivo de desconexión. Asegúrese de
que el enchufe de alimentación está en una
condición operativa.
13. Sólo desenchufe del enchufe de la toma
de alimentación para separar el producto
completamente de la red.
14. Evite daños en el cable de alimentación que
podrían ser causados por torceduras o el
contacto con rincones afilados.
15. Mantenga este producto incluido el
cable de alimentación y el enchufe de
alimentación lejos de fuentes de calor como
por ejemplo, hornos, platos calientes y otros
dispositivos/objetos que produzcan calor.
16. Sólo desenchufe de la toma de
alimentación tirando del propio enchufe. No
tire del cable.
17. Desenchufe el producto cuando el producto
no esté en uso, en caso de disfunción,
antes de conectar o quitar accesorios y
antes de cada limpieza.
18. Si el cable de alimentación o la carcasa del
producto están dañados o si el producto
se ha caído, no debe utilizarse el producto
antes de que sea examinado por un agente
autorizado de servicio.
19. Utilice este producto sólo en zonas
interiores secas y nunca fuera.
IM_KIM20821M_201204_V05_HR.indb 16IM_KIM20821M_201204_V05_HR.indb 16 4/12/2020 3:58 PM4/12/2020 3:58 PM

17
Español
Contenidos
1 x Máquina de helado
1 x Manual del usuario
1 x Garantía
Datos técnicos
Tensión nominal : 220 - 240 V~
Potencia de entrada nominal : 12 W
Frecuencia : 50 Hz
Clase de protección : II
Control y componentes
A
Panel de control con pantalla
B
Botón de retroceso
C
Interruptor de encendido / apagado
D
Botón de avance
E
Recipiente de hielo de doble pared
F
Asa de agarre
G
Recipiente externo
H
Accesorio de mezcla con adaptador
I
Tapa con apertura de llenado
J
Chasis del motor
K
Cable de alimentación con enchufe
Felicidades!
Gracias por adquirir un producto KOENIC. Lea
atentamente este manual y consérvelo como
referencia en el futuro.
Finalidad de uso
Este producto solamente es adecuado para
preparar helado. El accesorio para bollos
solamente está diseñado para tostar levemente
bollos o cruasanes. Cualquier otro uso puede
provocar daños en el aparato o heridas.
Imtron GmbH no asume ninguna
responsabilidad por daños producidos al
producto, a la propiedad o por lesiones
personales debidas al uso inadecuado del
producto o por su utilización para una finalidad
distinta a la especificada por el fabricante.
Antes del primer uso
Saque el producto y sus accesorios
cuidadosamente del embalaje original. Se
recomienda conservar el embalaje original
para guardarlo. Si quiere desechar el embalaje
original, tenga en cuenta las normas legales
aplicables. Si tiene dudas sobre una eliminación
adecuada, contacte con su centro de gestión
de residuos local.
Compruebe que el contenido entregado esté
completo y sin daños. Si el contenido está
incompleto o dañado, contacte de inmediato
con su lugar de adquisición.
Tras desembalarlo, consulte el capítulo
Limpieza y cuidados.
Eliminación
No deseche este aparato en la basura
doméstica. Llévelo a un punto de
recogida selectiva para el reciclaje de los
componentes eléctricos y electrónicos.
Póngase en contacto con su vendedor o
autoridades locales para obtener más
información al respecto.
IM_KIM20821M_201204_V05_HR.indb 17IM_KIM20821M_201204_V05_HR.indb 17 4/12/2020 3:58 PM4/12/2020 3:58 PM

18
Español
Size - A5
Preparar helado
Fig.
3
Ponga el recipiente de helado junto con
el asa en el recipiente exterior.
Fig.
4
Ponga la tapa en el recipiente exterior
de forma que el cable de alimentación
quede apartado hacia la parte posterior
y que las varillas de la tapa encajen
en los recesos del asa. La apertura de
llenado está en la parte anterior. Gire
ligeramente la tapa en sentido horario
hasta que encaje en posición.
Fig.
5
Introduzca el enchufe en la toma.
Advertencia
¡Encienda primero el aparato, añada a
continuación los ingredientes y no detenga
el aparato mientras se esté preparando el
helado! ¡El helado se congelará de inmediato
en las paredes del recipiente de hielo y se
bloqueará la batidora cuando la encienda
(de nuevo), lo que puede dañar el motor y el
engranaje!
Fig.
6
Encienda la batidora con el interruptor
de encendido / apagado.
Use los botones de avance y
retroceso para establecer el tiempo de
funcionamiento.
Fig.
7
Añada la mezcla de helado máx.
800ml, por el embudo en el recipiente
para hielo.
Deje funcionar el aparato hasta que
esté satisfecho con la consistencia
del helado. El helado estará preparado
pasados como máximo 25 minutos.
45 minutos es también el tiempo de
funcionamiento máximo de la máquina
de helado.
Funcionamiento
Nota:
Ponga el dispositivo sobre una superficie
plana y antideslizante, cerca de una toma
adecuada. El dispositivo está equipado con
patas antideslizantes.
Uso de la máquina de helado
Fig.
1
Gire ligeramente la cubierta con el motor
de chasis en dirección contraria a las
agujas del reloj y retírela.
Fig.
2
Agarre el asa junto con el recipiente
de hielo y levántelos del recipiente
exterior.
Preparación
Ponga el recipiente de hielo en un congelador a
-18 °C durante aproximadamente 24 horas.
Nota:
• Guarde el recipiente de helado derecho en
el compartimiento del congelador.
• Asegúrese de que el recipiente de helado
esté totalmente seco antes de ponerlo en
el congelador.
• Antes de congelar, ponga el recipiente de
helado en una bolsa de plástico, como una
bolsa para congelador.
• Prepare todos los ingredientes según la
receta.
• Deje que la mezcla de helado se enfríe en
el frigorífico durante aproximadamente 4
horas, de forma que pueda enfriarse más
rápidamente cuando prepare el helado.
IM_KIM20821M_201204_V05_HR.indb 18IM_KIM20821M_201204_V05_HR.indb 18 4/12/2020 3:58 PM4/12/2020 3:58 PM

19
Español
Helado de yogur - limón
300 g de yogur puro
400 g de nata montada
150 g de azúcar en polvo
50 ml de zumo de limón
• Bata el yogur, azúcar y limón y añada la nata
montada a continuación. Refrigere la mezcla
antes de seguir preparándola en la máquina
de helado.
• Tiempo de congelación en la máquina:
30min.
Helado de chocolate
150 g de chocolate
570 ml de leche
400 g de nata montada
100 g de azúcar
50 g de virutas de chocolate
• Caliente el azúcar, la leche y el chocolate en
un cazo hasta que todos los ingredientes se
hayan disuelto y mezclado correctamente.
Añada la nata montada y caliente durante
dos minutos.
• Enfríe la mezcla antes de seguir
preparándola.
• Tiempo de congelación en la máquina:
30min. (añadir virutas de chocolate pasados
15 min.)
Fig.
8
Apague el dispositivo con el interruptor
de encendido / apagado y desconecte
el enchufe.
Gire ligeramente la tapa hasta que
pueda retirarla. Saque la batidora
del hielo. Raspe el hielo adherido del
accesorio de batidora con una cuchara
de plástico o utensilio similar. Tome el
asa junto con el recipiente de hielo del
recipiente externo y retire el hielo. Use
exclusivamente utensilios de plástico o
madera para hacerlo.
Advertencia
¡No use utensilios metálicos para retirar el
hielo del recipiente de helado, podría causar
rayadas!
Recomendaciones y consejos
• Prepare siempre antes la mezcla de helado
y refrigérela antes de seguir preparándola
en la máquina de helado. Se congelará más
rápidamente de este modo.
• Bata o pique todos los ingredientes de
forma homogénea para garantizar una
mezcla uniforme.
• Añada ingredientes más grandes, como
trozos de chocolate o fruta, solamente
cuando la mezcla de helado esté
ligeramente congelada, dado que en caso
contrario podría no mezclarse de forma
homogénea.
• Cuando añada alcohol, hágalo ligeramente y
hacia el final de la congelación, dado que el
alcohol retrasa el proceso de congelación.
• Use nata o nata montada para un helado
más cremoso. Cuanto mayor sea el
contenido graso de la nata, más cremoso
será el helado.
• El helado normalmente tiene una
consistencia más blanda.
• Si desea congelar más el helado, póngalo en
un recipiente separado cerrable. No guarde
el helado en recipientes abiertos, se podrían
crear cristales de hielo.
IM_KIM20821M_201204_V05_HR.indb 19IM_KIM20821M_201204_V05_HR.indb 19 4/12/2020 3:58 PM4/12/2020 3:58 PM

20
Español
Size - A5
Limpieza y mantenimiento
Precaución
No sumerja nunca las piezas eléctricas del
producto en agua durante la limpieza o el
uso. No aguante nunca el producto bajo agua
corriente. Al limpiar, no use nunca disolventes
ni materiales abrasivos, cepillos rígidos,
objetos metálicos o afilados. Los disolventes
son dañinos para la salud humana y pueden
afectar a las piezas de plástico, mientras que
los mecanismos y herramientas de limpieza
abrasivos pueden rayar las superficies.
1. Siempre que ya se hayan retirado la tapa,
el asa y el recipiente de helado, saque el
accesorio de batidora de la conexión del
chasis del motor.
Fig.
9
Desmonte el chasis del motor de la
cubierta presionando las pestañas
a ambos lados de forma que ambas
piezas puedan separarse. Si tiene
dificultades, presione las pestañas una
tras otra.
2. Lave todos los componentes, excepto
el chasis del motor, con agua caliente y
lavavajillas, y enjuáguelos por completo con
agua limpia.
3. Seque cuidadosamente todos los
componentes cada vez que los limpie.
4. Vuelva a montar las piezas previamente
limpias y secas. Observe los aspectos
correspondientes en la sección Usar la
máquina de helado.
5. No use nunca disolventes, abrasivos,
cepillos rígidos, ni objetos metálicos ni
afilados para la limpieza. Los disolventes
son perjudiciales para la salud y dañan las
piezas de plástico. Los limpiadores abrasivos
y los accesorios rayan la superficie.
IM_KIM20821M_201204_V05_HR.indb 20IM_KIM20821M_201204_V05_HR.indb 20 4/12/2020 3:58 PM4/12/2020 3:58 PM
Strona się ładuje...
Strona się ładuje...
Strona się ładuje...
Strona się ładuje...
Strona się ładuje...
Strona się ładuje...
Strona się ładuje...
Strona się ładuje...
Strona się ładuje...
Strona się ładuje...
Strona się ładuje...
Strona się ładuje...
Strona się ładuje...
Strona się ładuje...
Strona się ładuje...
Strona się ładuje...
Strona się ładuje...
Strona się ładuje...
Strona się ładuje...
Strona się ładuje...
Strona się ładuje...
Strona się ładuje...
Strona się ładuje...
Strona się ładuje...
Strona się ładuje...
Strona się ładuje...
Strona się ładuje...
Strona się ładuje...
Strona się ładuje...
Strona się ładuje...
Strona się ładuje...
Strona się ładuje...
Strona się ładuje...
Strona się ładuje...
Strona się ładuje...
Strona się ładuje...
Strona się ładuje...
Strona się ładuje...
Strona się ładuje...
Strona się ładuje...
Strona się ładuje...
Strona się ładuje...
Strona się ładuje...
Strona się ładuje...
Strona się ładuje...
Strona się ładuje...
Strona się ładuje...
Strona się ładuje...
Strona się ładuje...
Strona się ładuje...
Strona się ładuje...
Strona się ładuje...
Strona się ładuje...
Strona się ładuje...
-
 1
1
-
 2
2
-
 3
3
-
 4
4
-
 5
5
-
 6
6
-
 7
7
-
 8
8
-
 9
9
-
 10
10
-
 11
11
-
 12
12
-
 13
13
-
 14
14
-
 15
15
-
 16
16
-
 17
17
-
 18
18
-
 19
19
-
 20
20
-
 21
21
-
 22
22
-
 23
23
-
 24
24
-
 25
25
-
 26
26
-
 27
27
-
 28
28
-
 29
29
-
 30
30
-
 31
31
-
 32
32
-
 33
33
-
 34
34
-
 35
35
-
 36
36
-
 37
37
-
 38
38
-
 39
39
-
 40
40
-
 41
41
-
 42
42
-
 43
43
-
 44
44
-
 45
45
-
 46
46
-
 47
47
-
 48
48
-
 49
49
-
 50
50
-
 51
51
-
 52
52
-
 53
53
-
 54
54
-
 55
55
-
 56
56
-
 57
57
-
 58
58
-
 59
59
-
 60
60
-
 61
61
-
 62
62
-
 63
63
-
 64
64
-
 65
65
-
 66
66
-
 67
67
-
 68
68
-
 69
69
-
 70
70
-
 71
71
-
 72
72
-
 73
73
-
 74
74


w innych językach
- español: Koenic KIM 20821 M El manual del propietario
- italiano: Koenic KIM 20821 M Manuale del proprietario
- Deutsch: Koenic KIM 20821 M Bedienungsanleitung
- svenska: Koenic KIM 20821 M Bruksanvisning
- português: Koenic KIM 20821 M Manual do proprietário
- français: Koenic KIM 20821 M Le manuel du propriétaire
- Türkçe: Koenic KIM 20821 M El kitabı
- English: Koenic KIM 20821 M Owner's manual
- Nederlands: Koenic KIM 20821 M de handleiding
Inne dokumenty
-
Unold 48865 Instrukcja obsługi
-
Unold 48818 Instrukcja obsługi
-
Unold 48845 Instrukcja obsługi
-
Unold 48806 Instrukcja obsługi
-
-
-
-
Silvercrest SECM 12 A1 Operating Instructions Manual
-
-