HP LaserJet 9040 Printer series Skrócona instrukcja obsługi
- Kategoria
- Wydrukować
- Typ
- Skrócona instrukcja obsługi
Niniejsza instrukcja jest również odpowiednia dla

HP LaserJet 9040/9050
Getting Started Guide
Začínáme
Alapvet tudnivalók kézikönyve
Wprowadzenie


English
HP LaserJet 9040/9050 printer
Getting Started Guide

© 2005 Copyright Hewlett-Packard
Development Company, L.P.
Reproduction, adaptation, or translation
without prior written permission is prohibited,
except as allowed under the copyright laws.
The information contained herein is subject
to change without notice.
Publication number
Q3721-90938
Edition 1, 02/2005
The only warranties for HP products and
services are set forth in the express warranty
statements accompanying such products and
services. Nothing herein should be construed
as constituting an additional warranty.
HP shall not be liable for technical or editorial
errors or omissions contained herein.
Trademark Credits
Microsoft
, Windows
, and Windows NT
are U.S. registered trademarks of Microsoft
Corporation.
UNIX
is a registered trademark of
The Open Group.
All other products mentioned herein may be
trademarks of their respective companies.

ENWW Contents 3
English
Printer Setup
Contents
Introduction. . . . . . . . . . . . . . . . . . . . . . . . . . . . . . . . . . . . . . . . . . . . . . . . . . . . . . . . . . . . . . . . .4
Installation checklist . . . . . . . . . . . . . . . . . . . . . . . . . . . . . . . . . . . . . . . . . . . . . . . . . . . . . . . . . . 4
Prepare printer location . . . . . . . . . . . . . . . . . . . . . . . . . . . . . . . . . . . . . . . . . . . . . . . . . . . . . . . 5
Check package contents. . . . . . . . . . . . . . . . . . . . . . . . . . . . . . . . . . . . . . . . . . . . . . . . . . . . . . . 9
Locate printer parts. . . . . . . . . . . . . . . . . . . . . . . . . . . . . . . . . . . . . . . . . . . . . . . . . . . . . . . . . . 10
Remove internal packaging . . . . . . . . . . . . . . . . . . . . . . . . . . . . . . . . . . . . . . . . . . . . . . . . . . . 11
Install accessories . . . . . . . . . . . . . . . . . . . . . . . . . . . . . . . . . . . . . . . . . . . . . . . . . . . . . . . . . . 12
Install print cartridge . . . . . . . . . . . . . . . . . . . . . . . . . . . . . . . . . . . . . . . . . . . . . . . . . . . . . . . . . 14
Connect printer cables . . . . . . . . . . . . . . . . . . . . . . . . . . . . . . . . . . . . . . . . . . . . . . . . . . . . . . . 15
Connecting a parallel cable. . . . . . . . . . . . . . . . . . . . . . . . . . . . . . . . . . . . . . . . . . . . . . . 16
Connecting to Ethernet 10/100TX network (for the HP LaserJet 9040n/9050n and the
HP LaserJet 9040dn/9050dn). . . . . . . . . . . . . . . . . . . . . . . . . . . . . . . . . . . . . . . . . . . . . 17
Change the control panel overlay . . . . . . . . . . . . . . . . . . . . . . . . . . . . . . . . . . . . . . . . . . . . . . . 18
Connect power cord . . . . . . . . . . . . . . . . . . . . . . . . . . . . . . . . . . . . . . . . . . . . . . . . . . . . . . . . . 19
Configure the control panel display language. . . . . . . . . . . . . . . . . . . . . . . . . . . . . . . . . . . . . . 20
Load Tray 1 . . . . . . . . . . . . . . . . . . . . . . . . . . . . . . . . . . . . . . . . . . . . . . . . . . . . . . . . . . . . . . . .21
Load Trays 2 and 3 . . . . . . . . . . . . . . . . . . . . . . . . . . . . . . . . . . . . . . . . . . . . . . . . . . . . . . . . . . 22
Print a configuration page. . . . . . . . . . . . . . . . . . . . . . . . . . . . . . . . . . . . . . . . . . . . . . . . . . . . . 23
Install printing software. . . . . . . . . . . . . . . . . . . . . . . . . . . . . . . . . . . . . . . . . . . . . . . . . . . . . . . 24
Installing Windows printing software. . . . . . . . . . . . . . . . . . . . . . . . . . . . . . . . . . . . . . . .24
Installing Macintosh printing software . . . . . . . . . . . . . . . . . . . . . . . . . . . . . . . . . . . . . . .24
Verify printer setup . . . . . . . . . . . . . . . . . . . . . . . . . . . . . . . . . . . . . . . . . . . . . . . . . . . . . . . . . . 26
Customer support. . . . . . . . . . . . . . . . . . . . . . . . . . . . . . . . . . . . . . . . . . . . . . . . . . . . . . . . . . . 26
Warranty and regulatory information. . . . . . . . . . . . . . . . . . . . . . . . . . . . . . . . . . . . . . . . . . . . . 27
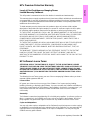
Hewlett-Packard limited warranty statement. . . . . . . . . . . . . . . . . . . . . . . . . . . . . . . . . . 27
HP’s Premium Protection Warranty. . . . . . . . . . . . . . . . . . . . . . . . . . . . . . . . . . . . . . . . . 29
HP Software License Terms . . . . . . . . . . . . . . . . . . . . . . . . . . . . . . . . . . . . . . . . . . . . . . 29
FCC regulations . . . . . . . . . . . . . . . . . . . . . . . . . . . . . . . . . . . . . . . . . . . . . . . . . . . . . . . 31
Safety Information. . . . . . . . . . . . . . . . . . . . . . . . . . . . . . . . . . . . . . . . . . . . . . . . . . . . . .32
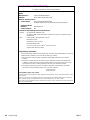
Declaration of Conformity . . . . . . . . . . . . . . . . . . . . . . . . . . . . . . . . . . . . . . . . . . . . . . . . . . . . . 34

4 Printer Setup ENWW
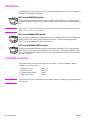
Introduction
Congratulations on your purchase of the HP LaserJet 9040/9050 printer. This series of printers is
available in the following configurations.
HP LaserJet 9040/9050 printer
The HP LaserJet 9040/9050 printer (product number Q7697A/Q3721A) comes standard with
64 megabytes (MB) of random-access memory (RAM), wide-format printing, and two 500-sheet
trays.
Note Only the HP LaserJet 9040/9050 printer requires an optional enhanced input/output
(EIO) card to connect to a network.
HP LaserJet 9040n/9050n printer
The HP LaserJet 9040n/9050n printer (product number Q7698A/Q3722A) comes standard with
128 MB of RAM, wide-format printing, two 500-sheet trays, a 100-sheet multipurpose tray
(Tray 1), and an embedded HP Jetdirect print server.
HP LaserJet 9040dn/9050dn printer
The HP LaserJet 9040dn/9050dn printer (product number Q7699A/Q3723A) comes standard
with 128 MB of RAM, wide-format printing, two 500-sheet trays, a 100-sheet multipurpose tray
(Tray 1), an embedded HP Jetdirect print server, and a duplex printing accessory (for printing on
both sides of paper).
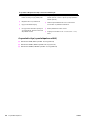
Installation checklist
This guide will help you set up and install your new printer. For correct installation, please
complete each section in order:
WARNING! The printer is heavy. HP recommends that four people move it to avoid injury to you and damage
to the printer.
● Unpack the printer steps 1-4
● Install the printer steps 5-13
● Install printing software step 14
● Verify printer setup step 15

ENWW Prepare printer location 5
English
Step 1. Prepare printer location
Shipping box space requirements
Make sure that your building has a door or receiving area large enough for delivery of the
shipping box. The approximate dimensions of the shipping box are as follows:
911 x 790 mm deep x 1036 mm high (36 x 31 inches deep x 41 inches high).
Unpacking space requirements
Before removing the plastic wrapping from the shipping box, make sure that you have enough
space to remove the contents from the shipping box, and then lift the product off its shipping
pallet. HP recommends at least 3.1 meters (10 feet) of space around the shipping box to remove
all of the shipping materials.
Removing the printer from the shipping box
See the graphics on the shipping box for information about how to remove the printer from the
shipping box.
WARNING! The printer is heavy. HP recommends that four people move it to avoid injury to you and damage
to the printer.

6 Printer Setup ENWW
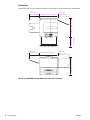
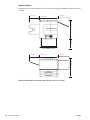
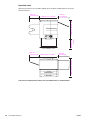
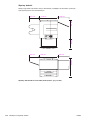
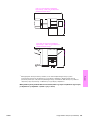
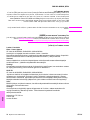
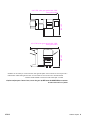
Printer size
Prepare a location for the printer that allows for these physical and environmental requirements:
HP LaserJet 9040/9050 printer dimensions (top and side views)
633 mm (24.9 inches)
353 mm
(13.9 inches)
638 mm (25.1 inches)
600 mm (23.6 inches)
368 mm
(17.8 inches)
353 mm
(13.9 inches)
638 mm (25.1 inches)
406 mm
(16 inches)
406 mm
(16 inches)

ENWW Prepare printer location 7
English
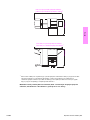
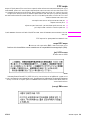
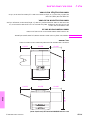
1
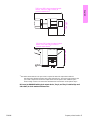
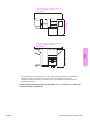
The smaller measurement is the space that is required to extend the output device with the
attachment bar still attached to the latch under optional Tray 4. The larger measurement is the
space that is required to remove the output device from the product. The additional space
allows enough clearance to remove the attachment bar from the latch under optional Tray 4.
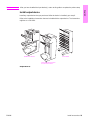
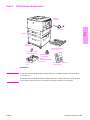
HP LaserJet 9040/9050 with typical output device, Tray 4, and Tray 1 installed (top and
side views) to show maximum dimensions
1001 mm
(39.4 inches)
1036 mm (40.8 in)
2591 mm (102 inches) to extend output
device; 2705 mm (106.5 inches) to
remove output device
1
2591 mm (102 inches) to extend output
device; 2705 mm (106.5 inches) to
remove output device
1

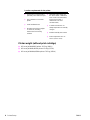
8 Printer Setup ENWW
Printer weight (without print cartridge)
● HP LaserJet 9040/9050 printer: 63.5 kg (140 lb)
● HP LaserJet 9040n/9050n printer: 69.4 kg (153 lb)
● HP LaserJet 9040dn/9050dn printer: 76.2 kg (168 lb)
Location requirements for the printer
● A level area on a hard surface,
preferably a floor without carpet
● Space allowance around the
printer
● A well-ventilated room
● No exposure to direct sunlight
or chemicals, including
ammonia-based cleaning
solutions
● Adequate power supply (For
the 110 V model, a dedicated
15 A circuit is recommended;
for the 220 V model, a
dedicated 8 A circuit is
recommended)
● A stable environment—no
abrupt temperature or humidity
changes
● Relative humidity 20% to 80%
● Room temperature 10°C to
32.5°C (50°F to 91°F)

ENWW Check package contents 9
English
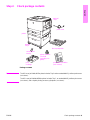
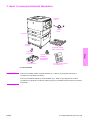
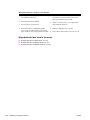
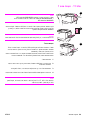
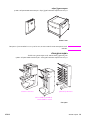
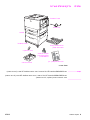
Step 2. Check package contents
Package contents
Note The HP LaserJet 9040n/9050n printer includes Tray 1 and an embedded HP Jetdirect print server
(not shown).
The HP LaserJet 9040dn/9050dn printer includes Tray 1, an embedded HP Jetdirect print server
(not shown), and a duplex printing accessory (duplexer; not shown).
power cord
printer
control panel
overlay
print
cartridge
printer software
CD-ROM
(including use
guide)
printer documentation
(this manual)
face-up output bin
optional
Tray 4
optional
Tray 1

10 Printer Setup ENWW
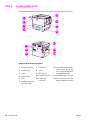
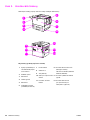
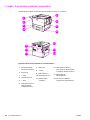
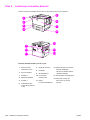
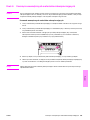
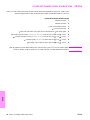
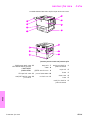
Step 3. Locate printer parts
The following illustrations give the location and names of the important printer parts.
Printer parts (front and rear views)
1 Face-up output bin
2 Control panel
3 Tray 2
4 Power switch
5 Tray 1
6 Standard output bin
(face-down bin)
7 Front door
8 Tray 3
9 EIO slots (2)
10 Security lock port
11 Power cord
connector
12 Local area network (LAN)
connector (RJ-45) (for the
HP LaserJet 9040n/9050n
and 9040dn/9050dn)
13 Parallel B cable connector
14 HP Jet-Link connector (for
paper-handling accessory)
1
2
6
8
3
4
7
10
11
12
13
9
5
14

ENWW Remove internal packaging 11
English
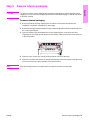
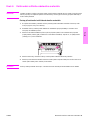
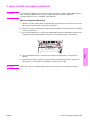
Step 4. Remove internal packaging
CAUTION The printer contains orange shipping tape and internal packaging to prevent damage during
shipping. You must remove all shipping materials and internal packaging in order for the printer
to function correctly.
To remove internal packaging
1 Remove all orange packing material from the exterior of the printer and remove any
cardboard or styrofoam material that is not orange.
2 Remove all orange packing material from the standard output bin and the protective film from
the control panel display.
3 Open the left door and pull straight back on the shipping tape to remove the two fuser
shipping locks (as shown by the diagram on the printer). Make sure that the fuser levers are
in the lock position.
4 Open the trays, remove any orange packing material, and close the trays.
5 Open the front door and remove the orange packing tape at the front transfer roller area and
on the lock lever for the print cartridge. Close the front door.
Note Save all packing material. You might need it to repack the printer at a later date.

12 Printer Setup ENWW
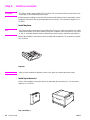
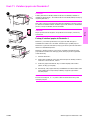
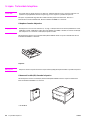
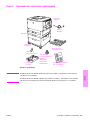
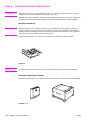
Step 5. Install accessories
WARNING! This printer weighs approximately 63.5 kg (140 lb). HP recommends that four people move it to
avoid injury to you and damage to the printer.
Install any paper-handling accessories that you purchased with the printer or separately. Use the
installation instructions that are packaged with the accessories. The instructions might be on a
CD-ROM.
Install duplexer
Note If you purchased an output device (the multifunction finisher, the 3,000-sheet stacker, the 3,000-
sheet stacker/stapler, or the 8-bin mailbox) along with a duplexer and an input device (Tray 4 and/
or Tray 1), install the duplexer and the input device(s) before trying to install the output device.
Refer to the installation instructions that are included with the duplexer. The instructions might be
on a CD-ROM.
Duplexer
Note After you have installed the duplexer, return to this guide to complete the printer setup.
Install input device(s)
Refer to the installation instructions that are included with the input device(s). The instructions
might be on a CD-ROM.
Tray 1 and Tray 4

ENWW Install accessories 13
English
Note After you have installed the input device(s), return to this guide to complete the printer setup.
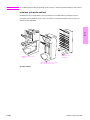
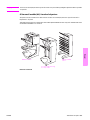
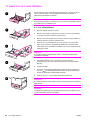
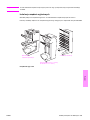
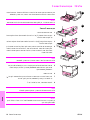
Install output device
Install any output device that you purchased. After the device is installed, go to step 6.
Refer to the installation instructions that are included with the output device. The instructions
might be on a CD-ROM.
.
Output devices
8-bin mailbox
Multifunction finisher
3,000-sheet stacker/stapler
or 3,000-sheet stacker

14 Printer Setup ENWW
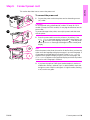
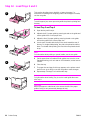
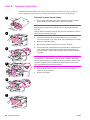
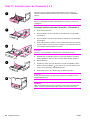
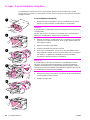
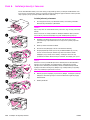
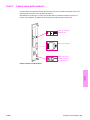
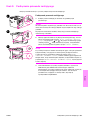
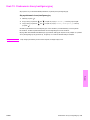
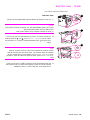
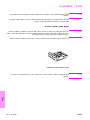
Step 6. Install print cartridge
Use this procedure to install the print cartridge. If toner gets on your clothing, wipe it off with a dry
cloth and wash the clothing in cold water. Hot water sets toner into fabric.
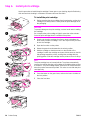
To install the print cartridge
1 Before removing the print cartridge from its packaging, set the print
cartridge on a sturdy surface. Gently slide the print cartridge out of
the packaging.
CAUTION
To prevent damage to the print cartridge, use two hands when handling
the cartridge.
Do not expose the print cartridge to light for more than a few minutes.
Cover the print cartridge when it is outside of the printer.
2 Gently rock the print cartridge from front to back to distribute the
toner evenly inside the cartridge. This is the only time that you need
to rock the cartridge.
3 Open the front door on the printer.
4 Rotate the green lever downward to the unlock position.
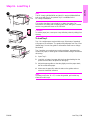
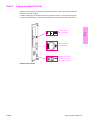
5 Hold the cartridge so that the arrow is on the left side of the
cartridge. Position the cartridge as shown, with the arrow on the left
side pointing toward the printer, and align the cartridge with the
printing guides. Slide the cartridge into the printer as far as it will go.
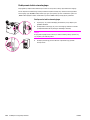
Note
The print cartridge has an internal pull tab. The printer automatically
removes the pull tab after the print cartridge is installed and the product
is turned on. The print cartridge makes a loud noise for several seconds
when the product removes the pull tab. This noise occurs with new print
cartridges only.
6 Press the button on the green lever, and turn the lever clockwise to
the lock position.
7 Close the front door.
1
5
3
4
6
7

ENWW Connect printer cables 15
English
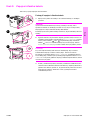
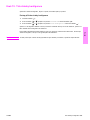
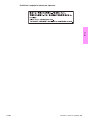
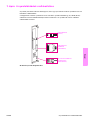
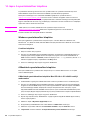
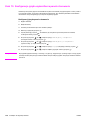
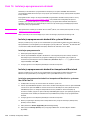
Step 7. Connect printer cables
The printer can connect to a computer using a parallel cable, or to the network using an optional
HP Jetdirect print server.
For printers equipped with the embedded HP Jetdirect print server, a network cable connection
is provided through a 10/100TX (RJ-45) connector. The printer also has a connector for an
HP Jet-Link Connector.
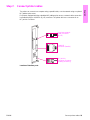
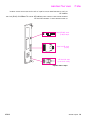
Location of interface ports
Parallel B
connector (Parallel)
Local area network
(LAN) connector
(RJ-45)
HP Jet-Link
connector (for paper-
handling accessory)

16 Printer Setup ENWW
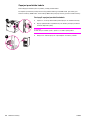
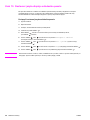
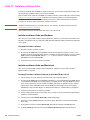
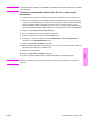
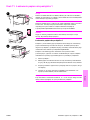
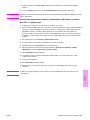
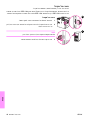
Connecting a parallel cable
Use a parallel cable if you want to connect the printer directly to a computer.
To ensure reliability, use an IEEE-1284 bidirectional B-type parallel cable. These cables are
clearly marked with “IEEE-1284.” Only IEEE-1284 cables support all of the advanced printer
features.
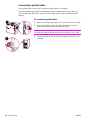
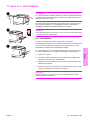
To connect a parallel cable
1 Make sure that the printer power cord is not connected to an outlet.
2 Connect the parallel cable to the printer parallel port. Press the
locking release levers while connecting the cable.
Note
If installing the cable is difficult, make sure you have the correct cable.
3 Connect the other end of the cable to the proper connector on the
computer.
2
3

ENWW Connect printer cables 17
English
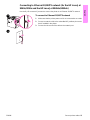
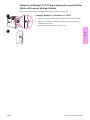
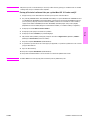
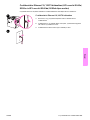
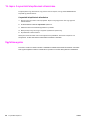
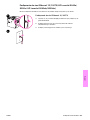
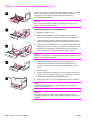
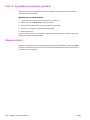
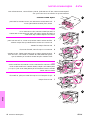
Connecting to Ethernet 10/100TX network (for the HP LaserJet
9040n/9050n and the HP LaserJet 9040dn/9050dn)
Use the RJ-45 connector if you want to connect the printer to an Ethernet 10/100TX network.
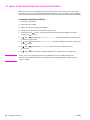
To connect to Ethernet 10/100TX network
1 Make sure that the printer power cord is not connected to an outlet.
2 Connect a network cable to the embedded HP Jetdirect print server
that is installed in the printer.
3 Connect the other end of the cable to the network port.
2
3

18 Printer Setup ENWW
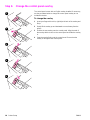
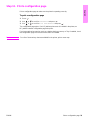
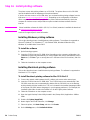
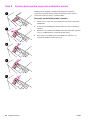
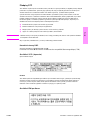
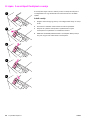
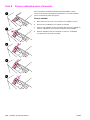
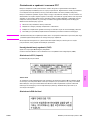
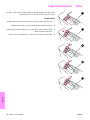
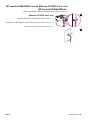
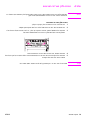
Step 8. Change the control panel overlay
The control panel comes with an English overlay installed. If necessary,
use the procedure below to change the control panel overlay to one
included in the box.
To change the overlay
1 Insert your fingernail or a thin, rigid object in back of the overlay and
lift up.
2 Gently lift the overlay up and backward to move it away from the
printer.
3 Position the new overlay over the control panel. Align the ends of
the overlay with the holes on the control panel and slide the overlay
in.
4 Snap the overlay firmly onto the control panel. Ensure that the
overlay is flat against the control panel.
1
2
3
4
5
Strona się ładuje...
Strona się ładuje...
Strona się ładuje...
Strona się ładuje...
Strona się ładuje...
Strona się ładuje...
Strona się ładuje...
Strona się ładuje...
Strona się ładuje...
Strona się ładuje...
Strona się ładuje...
Strona się ładuje...
Strona się ładuje...
Strona się ładuje...
Strona się ładuje...
Strona się ładuje...
Strona się ładuje...
Strona się ładuje...
Strona się ładuje...
Strona się ładuje...
Strona się ładuje...
Strona się ładuje...
Strona się ładuje...
Strona się ładuje...
Strona się ładuje...
Strona się ładuje...
Strona się ładuje...
Strona się ładuje...
Strona się ładuje...
Strona się ładuje...
Strona się ładuje...
Strona się ładuje...
Strona się ładuje...
Strona się ładuje...
Strona się ładuje...
Strona się ładuje...
Strona się ładuje...
Strona się ładuje...
Strona się ładuje...
Strona się ładuje...
Strona się ładuje...
Strona się ładuje...
Strona się ładuje...
Strona się ładuje...
Strona się ładuje...
Strona się ładuje...
Strona się ładuje...
Strona się ładuje...
Strona się ładuje...
Strona się ładuje...
Strona się ładuje...
Strona się ładuje...
Strona się ładuje...
Strona się ładuje...
Strona się ładuje...
Strona się ładuje...
Strona się ładuje...
Strona się ładuje...
Strona się ładuje...
Strona się ładuje...
Strona się ładuje...
Strona się ładuje...
Strona się ładuje...
Strona się ładuje...
Strona się ładuje...
Strona się ładuje...
Strona się ładuje...
Strona się ładuje...
Strona się ładuje...
Strona się ładuje...
Strona się ładuje...
Strona się ładuje...
Strona się ładuje...
Strona się ładuje...
Strona się ładuje...
Strona się ładuje...
Strona się ładuje...
Strona się ładuje...
Strona się ładuje...
Strona się ładuje...
Strona się ładuje...
Strona się ładuje...
Strona się ładuje...
Strona się ładuje...
Strona się ładuje...
Strona się ładuje...
Strona się ładuje...
Strona się ładuje...
Strona się ładuje...
Strona się ładuje...
Strona się ładuje...
Strona się ładuje...
Strona się ładuje...
Strona się ładuje...
Strona się ładuje...
Strona się ładuje...
Strona się ładuje...
Strona się ładuje...
Strona się ładuje...
Strona się ładuje...
Strona się ładuje...
Strona się ładuje...
Strona się ładuje...
Strona się ładuje...
Strona się ładuje...
Strona się ładuje...
Strona się ładuje...
Strona się ładuje...
Strona się ładuje...
Strona się ładuje...
Strona się ładuje...
Strona się ładuje...
Strona się ładuje...
Strona się ładuje...
Strona się ładuje...
Strona się ładuje...
Strona się ładuje...
Strona się ładuje...
Strona się ładuje...
Strona się ładuje...
Strona się ładuje...
Strona się ładuje...
Strona się ładuje...
Strona się ładuje...
Strona się ładuje...
Strona się ładuje...
Strona się ładuje...
Strona się ładuje...
Strona się ładuje...
Strona się ładuje...
Strona się ładuje...
Strona się ładuje...
Strona się ładuje...
Strona się ładuje...
Strona się ładuje...
Strona się ładuje...
Strona się ładuje...
Strona się ładuje...
Strona się ładuje...
Strona się ładuje...
Strona się ładuje...
Strona się ładuje...
Strona się ładuje...
Strona się ładuje...
Strona się ładuje...
Strona się ładuje...
Strona się ładuje...
Strona się ładuje...
Strona się ładuje...
Strona się ładuje...
Strona się ładuje...
Strona się ładuje...
Strona się ładuje...
Strona się ładuje...
Strona się ładuje...
Strona się ładuje...
Strona się ładuje...
Strona się ładuje...
Strona się ładuje...
Strona się ładuje...
Strona się ładuje...
Strona się ładuje...
-
 1
1
-
 2
2
-
 3
3
-
 4
4
-
 5
5
-
 6
6
-
 7
7
-
 8
8
-
 9
9
-
 10
10
-
 11
11
-
 12
12
-
 13
13
-
 14
14
-
 15
15
-
 16
16
-
 17
17
-
 18
18
-
 19
19
-
 20
20
-
 21
21
-
 22
22
-
 23
23
-
 24
24
-
 25
25
-
 26
26
-
 27
27
-
 28
28
-
 29
29
-
 30
30
-
 31
31
-
 32
32
-
 33
33
-
 34
34
-
 35
35
-
 36
36
-
 37
37
-
 38
38
-
 39
39
-
 40
40
-
 41
41
-
 42
42
-
 43
43
-
 44
44
-
 45
45
-
 46
46
-
 47
47
-
 48
48
-
 49
49
-
 50
50
-
 51
51
-
 52
52
-
 53
53
-
 54
54
-
 55
55
-
 56
56
-
 57
57
-
 58
58
-
 59
59
-
 60
60
-
 61
61
-
 62
62
-
 63
63
-
 64
64
-
 65
65
-
 66
66
-
 67
67
-
 68
68
-
 69
69
-
 70
70
-
 71
71
-
 72
72
-
 73
73
-
 74
74
-
 75
75
-
 76
76
-
 77
77
-
 78
78
-
 79
79
-
 80
80
-
 81
81
-
 82
82
-
 83
83
-
 84
84
-
 85
85
-
 86
86
-
 87
87
-
 88
88
-
 89
89
-
 90
90
-
 91
91
-
 92
92
-
 93
93
-
 94
94
-
 95
95
-
 96
96
-
 97
97
-
 98
98
-
 99
99
-
 100
100
-
 101
101
-
 102
102
-
 103
103
-
 104
104
-
 105
105
-
 106
106
-
 107
107
-
 108
108
-
 109
109
-
 110
110
-
 111
111
-
 112
112
-
 113
113
-
 114
114
-
 115
115
-
 116
116
-
 117
117
-
 118
118
-
 119
119
-
 120
120
-
 121
121
-
 122
122
-
 123
123
-
 124
124
-
 125
125
-
 126
126
-
 127
127
-
 128
128
-
 129
129
-
 130
130
-
 131
131
-
 132
132
-
 133
133
-
 134
134
-
 135
135
-
 136
136
-
 137
137
-
 138
138
-
 139
139
-
 140
140
-
 141
141
-
 142
142
-
 143
143
-
 144
144
-
 145
145
-
 146
146
-
 147
147
-
 148
148
-
 149
149
-
 150
150
-
 151
151
-
 152
152
-
 153
153
-
 154
154
-
 155
155
-
 156
156
-
 157
157
-
 158
158
-
 159
159
-
 160
160
-
 161
161
-
 162
162
-
 163
163
-
 164
164
-
 165
165
-
 166
166
-
 167
167
-
 168
168
-
 169
169
-
 170
170
-
 171
171
-
 172
172
-
 173
173
-
 174
174
-
 175
175
-
 176
176
-
 177
177
-
 178
178
-
 179
179
-
 180
180
-
 181
181
-
 182
182


HP LaserJet 9040 Printer series Skrócona instrukcja obsługi
- Kategoria
- Wydrukować
- Typ
- Skrócona instrukcja obsługi
- Niniejsza instrukcja jest również odpowiednia dla
w innych językach
Powiązane artykuły
-
HP (Hewlett-Packard) LaserJet 9040/9050 Multifunction Printer series Instrukcja obsługi
-
HP LaserJet 9050 Printer series Instrukcja obsługi
-
HP LaserJet 5100 Printer series instrukcja
-
-
HP LaserJet 4200 Printer series instrukcja
-
HP LaserJet 8150 Multifunction Printer series Skrócona instrukcja obsługi
-
-
HP LaserJet M5035 Multifunction Printer series Skrócona instrukcja obsługi
-
-