Lionelo Astrid Baby carrier Instrukcja obsługi
- Kategoria
- Siedzenia samochodowe
- Typ
- Instrukcja obsługi

‑ 1 ‑
www.lionelo.com
Manual de usuario
Handleiding
Naudojimo instrukcija
Návod k obsluze
Használa utasítás
Manual u lizare
User manual
Instrukcja obsługi
Bedienungsanleitung
Инструкция по эксплуатации
Manuale d’uso
Manuel de l’U lisateur
Astrid
Baby carrier
Nosidełko
Babytrage
Детские перевозчика
Culla portatile
Coque-bébé
Portador de bebé
Kinderwagen
Automobilinė kėdutė
Dětské nosítko
Gyermekhordozó
Scoică auto

‑ 2 ‑
3
4
5A
B
C
D
E
F
G
H
I
J
K
L
1 2

‑ 3 ‑
6
MN
O
7 8
910

‑ 4 ‑
11
13
12
A
16
14
15
17

‑ 5 ‑
18
A
B
20 21
22 23
19

‑ 6 ‑
24 25
27
2928
26

‑ 7 ‑
30 31
B
33
34
32
35

‑ 8 ‑
38
41
36
40
39
A
37

‑ 9 ‑ EN
Informaon
The child restraint system belongs to the „universal” category. It holds the cercate
of approval pursuant to the UN regulaons no. 44, series of amendments 04, for
general use in vehicles, and is suitable for installaon on most car seats.
A proper installaon is possible if the vehicle manufacturer has specied in the
vehicle manual that the vehicle supports the assembly of the „universal” child
restraint system for this age group.
This child restraint system has been classied as „universal” in more demanding condions
than those applicable in previous designs which have not been provided with this informaon.
The product is t for installaon only when the cered vehicles are equipped with
three-point safety belts with a roller which have been cered in accordance with the
UN/EEC regulaons no. 16 or other equivalent standards.
Should you have any doubts, please contact the manufacturer or retailer.
The product is intended for children from weight group 0+ (0 – 13 kg).
Dear customer!
Should you have any remarks or quesons concerning the product, please do
not hesitate to contact us: [email protected]
The product is admied to ECE R44 amendments series 04 as a child restraint
system for weight group 0+ (0-13 kg). This carrier will provide best protecon
to your child only when assembled in accordance with the manual. A failure to
follow the manual may lead to accidents. To protect your child properly, LO –
Astrid must always be used and installed in accordance with the manual. (g. 1)
1. How to use
IMPORTANT: Please read the ps below carefully and store this manual (e.g. in
the car in which the carrier is xed) so that it is always easily accessible. If you
hand this carrier over to a third party, please aach the manual.
A wrong assembly may pose a threat to child’s health and life. The manufacturer
EN

‑ 10 ‑EN
shall not be held responsible for potenal hazards arising from wrong assembly.
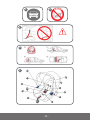
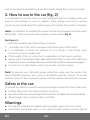
2. How to use in the car (g. 2)
It is forbidden to use the carrier on seats equipped with front airbags (does not
apply to side airbags). In case of collision, acve airbags may lead to serious
injuries or even death. Read the vehicle manual to idenfy the locaon of airbags!
Note! It is forbidden to assemble the product on the seat equipped with two-point
safety belts. This may lead to serious injuries or even death. (g. 3)
See gure 4:
? - assembly possible only if the airbag is inacve
?? - assembly only if the seat is equipped with three-point safety belts
• It is forbidden to install the product on rear-facing or side-facing seats
(common in vans or minibuses).
• If the height of the car safety belt is adjustable, set the lowest posion.
• Always secure the restraint system with safety belts in the car, even if the child is not
transported. In case of collision, the unsecured restraint system may injure passengers.
• Do not use car safety belts used to secure the restraint system.
Note! To provide your child with proper protecon, make sure the product has
been assembled properly and is used in accordance with the manual. To use the
restraint system in the car properly, please read the vehicle manufacturer’s manual.
Safety in the car:
To provide top safety to yourself and your passengers during the travel, make sure:
• Folding elbow rests are folded (vercal posion).
• Any items which may cause damage in the car in case of collision are secured properly.
• All passengers have fastened their seat belts.
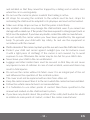
Warnings
• LO-Astrid is intended for children whose weight ranges from 0 to 13 kg.
• Hard items and plasc parts of the child restraint system must be placed

‑ 11 ‑ EN
and installed so that they cannot be trapped by a sliding seat or vehicle door
when the car is used regularly.
• Do not use the carrier in places in which front airbag is acve.
• All straps for securing the restraint to the vehicle must be taut, straps for
restraining the child must be adapted to its physique and must not be twisted.
• Make sure all lap straps run low so that the pelvis is held rmly.
• Any accident or collision may damage the child restraint, even if you cannot see
damage with a naked eye. If the product has been exposed to strong impact (such as
hit), it must be replaced. If you have any doubts, contact the seller or manufacturer.
• Do not modify the carrier unless you have been permied by the approval
body. To provide your child with top safety, x and use the equipment in
accordance with the manual.
• Plasc elements of this carrier may heat up in the sun and cause the child’s skin to burn.
• Protect your child and carrier against sunlight (you can for instance cover
it with a light piece of clothing). If the carrier is not covered, try to avoid
exposure to sun. Otherwise the carrier may be too hot for your child’s skin.
• Never leave your child in the car unaended.
• Luggage and other similar items must be secured so that they do not cause
any injuries in case of collision. In case of road accident, unsecured items may
result in fatal injuries.
• Do not use the carrier without its fabric cover. It is an integral part of the set
and inuences the operaon of the restraint system.
• The cover must not be replaced with an item from other set.
• Keep the carrier manual. Store it in the car in which the carrier has been installed.
• Follow the vehicle manufacturer’s recommendaons.
• It is forbidden to use other points of contact than those specied in the
manual and marked on the child restraint system.
• If you have any doubts about the posion of the safety belt buckle for adults
in relaon to main points of contact, contact the carrier manufacturer.

‑ 12 ‑EN
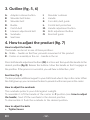
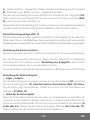
3. Outline (g. 5, 6)
A. Adapters release buon
B. Shoulder belt holes
C. Shoulder belt
D. Buckle
E. Crotch belt
F. Harness adjustment belt
G. Sunshade
H. Seat liner
I. Shoulder cushions
J. Handle
K. Car safety belt guide
L. Crotch belt protecon
M. Handle adjustment buon
N. Belts adjustment buon
O. Rear belt guide
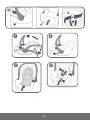
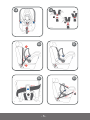
4. How to adjust the product (g. 7)
How to adjust the handle
The handle can be set in one of three posions:
A – Stable – handle on the oor, prevents movement of the product
B – Carrier or assembly in the car – handle in the air
Press both handle adjustment buons (M) at a me and then push the handle to the
desired posion (g. 8). Release the buons. Move the handle so that it engages in
the posion. If the process is successful, you will hear a disncve „click”.
Seat liner (g. 9)
The liner provides addional support to your child’s head when it stays in the carrier. When
the child grows up, you can remove the liner to provide it with more space in the carrier.
How to adjust the sunshade
The sunshade protects your child against sunlight.
To assemble it: Li the handle of the carrier to C posion (see: How to adjust
the handle). Next li the sunshade to the desired posion.
To disassemble it: Push the sunshade to the desired posion.
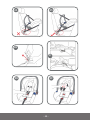
How to adjust the belts
• Tighter/looser

‑ 13 ‑ EN
To loosen the belts, press the adjustment belt (N) and pull the shoulder belts
(C). Do not pull the belt protecve cushion (g. 10)
To ghten the belts, pull the harness adjustment belt (F) (g. 11).
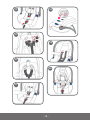
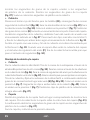
• Belts height
When your child grows up, you can change the height of shoulder belts so that
they are best adapted to the size of your child. To do so, detach the belts from the
metal buckle at the back of the carrier (G in the g. 13). Pull the belts through the
hole above (H in the g. 13). Next fasten them again in the buckle. The shoulder
belt should be posioned at the height of child’s arms or just below it (g. 13).
• Assembly / disassembly
To disassemble the belts, undo them and extend as much as possible (g. 14). Next
detach the belts from the metal buckle at the back of the carrier (shoulder belts, g.
13) and from the boom (crotch belt). Pull the belts through holes and take them out.
To assemble the belts, pull them through holes and take them out at the back
and boom of the carrier. Put the belts on the buckle (g. 15).The ready belts
must not be twisted or tangled.
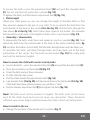
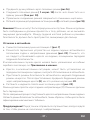
How to secure the child with carrier’s safety belts
• Loosen the belts – press the adjustment buon (N) and pull the shoulder belts (C).
• Press the red buon on the buckle (D) (g. 17).
• Undo the belts and put them sideways.
• Put the child into the carrier.
• Pull the child’s hands through shoulder belts (g. 16).
• Join shoulder belts (1 in g. 18) and then insert them in the belt buckle (2 in g. 18).
If the belts have been joined properly, you will hear a “click”.
• Pull the harness adjustment belt (F) and ghten the belts (g. 18).
Note! The belts must not be twisted or tangled. The belts must not be loose,
must t the child’s body but must not cause any discomfort. There should be
sucient space (two ngers wide) between the child’s chest and safety belts.
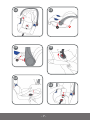
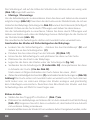
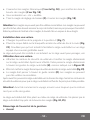
How to install in the car
• Change the posion of the handle into C posion (g. 7).

‑ 14 ‑EN
• Place the carrier on the vehicle’s rear seat in a rear-facing posion (g. 21).
Remember that it is forbidden to install the carrier on the seat equipped
with a front airbag.
In special cases it is allowed to install the carrier on the passenger’s front seat, see:
How to use in the car.
• Fasten the car safety seat and put the lap belt on the carrier. Aer fastening,
pull the lap belt through the carrier guide (K), as presented in the g. 20.
• Extend and pull the car shoulder belt around the carrier (g. 23).
• The belt must go through the rear guide (O). Belts must not be twisted.
After you have finished the procedure, push the carrier towards the seat
backrest. Tighten the car safety belts so that the carrier is stable.
Note! Before you hit the road, always make sure the belt goes through the guides.
The child restraint system must be placed on the central part of the seat. Do not
posion the carrier too close to the belt buckle (g. 24, 25).
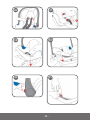
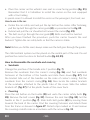
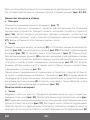
How to disassemble the sunshade and covering
• Sunshade
Change the posion of the handle into C posion (g. 7).
Remove the sunshade from the carrier’s casing (g. 26), next nd sunshade
fasteners at the boom of the handle and slide them down (g. 27). Pull
the bracket tabs out of the handles on the sides of carrier’s casing. Pull the
sunshade from the carrier’s casing (Fig. 26), then locate the rubber brackets
of the sunshade, aached to the plasc tabs of the cover. Slide the rubber
brackets o. (g. 27). Put the plasc hooks of the cover back.
• Covering
Press the red buon on the buckle (D) and undo the carrier safety belts (g.
28). Remove the belt covers (g. 29). Remove the seat liner (g. 30). Set the
handle in the C posion (g. 7). Slide both belt guides (K) by moving them
towards the back of the carrier. Find the covering fasteners and detach them
from the frame as showed in gure 27. Detach clips marked as O and remove
the covering on both sides in accordance with the arrow in g. 31.

‑ 15 ‑ EN
Hold the carrier with one hand and pull the covering with the other in the direcon
showed by the arrow in the g. 33.
When you can see free space between the carrier covering and harness adjustment
belt (F), pull the covering upwards so that it goes through the adjustment belt (g. 34).
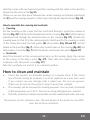
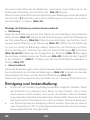
How to assemble the covering and sunshade
• Covering
Put the covering on the carrier. Pull the crotch belt through a protecve cushion of
this belt (g. 35). Pull the belts through holes in the covering (g. 36). Pull the harness
adjustment belt through the dedicated hole on the covering (g. 37). Smooth the
covering away so that it ts the carrier properly. Stretch and x the covering on ends
of the carrier then slide the belt guides (K) into posion (Fig. 38 and 39). Set the
handle in the A posion (g. 7). Fasten clips on both sides of the covering (g. 40). Set
the handle in C posion (g. 7). Slide the plasc cover hooks into place (gure 27).
• Sunshade
Insert the brackets in the corresponding place on the casing. Apply the canopy
to the casing of the baby carrier (g. 41). Then slide the rubber hooks of the
sunshade onto the plasc cover (g. 27).
Take the sunshade out and set it in a desired posion.
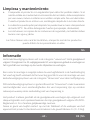
How to clean and maintain
• Check the product for potenal damage on a regular basis. If the carrier
was aected during an accident, it must be replaced by a new item, even
if you cannot see any damage with a naked eye. Do not use greases.
When you do not use the product, keep it away from sunlight.
• The covering can be removed for cleaning purposes. You can wash it manually
at the temperature up to 30˚C. Do not use strong detergents (e.e. solvents).
• The belts, protecve cushions and buckles must be washed with water and soap.
The pictures are for reference only. The real design of the products may dier
from the pictures presented.

‑ 16 ‑PL
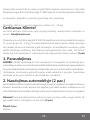
Informacja
Urządzenie przytrzymujące dla dzieci należy do kategorii „uniwersalne”. Uzyskało homologację
zgodnie z regulaminem ONZ nr 44, seria poprawek 04, do ogólnego zastosowania w
pojazdach i nadaje się do instalacji na większości miejsc siedzących w samochodzie.
Prawidłowa instalacja jest możliwa jeśli producent pojazdu oświadczył w instrukcji
obsługi pojazdu, że pojazd nadaje się do instalacji urządzenia przytrzymującego
dla dzieci kategorii „uniwersalne” dla tej grupy wiekowej.
To urządzenie przytrzymujące dla dzieci zostało zaklasykowane do kategorii
„uniwersalne” w bardziej wymagających warunkach w odniesieniu do warunków
stosujących się do wcześniejszych projektów, które nie są opatrzone tą informacją.
Produkt nadaje się do instalacji jedynie wówczas, gdy homologowane pojazdy wyposażone
są w trzypunktowe wyposażone w zwijacz pasy bezpieczeństwa, które uzyskały
homologację zgodnie z regulaminem ONZ/EKG nr 16 lub innymi równoważnymi normami.
W przypadku wątpliwości należy skontaktować się z producentem lub sprzedawcą
detalicznym urządzenia.
Produkt przeznaczony dla dzieci z grupy wagowej 0+ (0 – 13 kg).
Drogi Kliencie!
Jeśli masz jakiekolwiek uwagi lub pytania do zakupionego produktu, skontaktuj
się z nami: [email protected]
Produkt jest dopuszczony do ECE R44 seria poprawek 04 jako urządzenie
przytrzymujące dla grupy wagowej 0+ (0 - 13 kg). To nosidełko będzie
maksymalnie chronić twoje dziecko tylko wtedy, gdy będzie zamontowane zgodnie
z instrukcją. Niestosowanie się do instrukcji może prowadzić do nieszczęśliwego
wypadku. Aby chronić swoje dziecko prawidłowo, LO-Astrid musi zawsze
być używany i zainstalowany w sposób opisany w niniejszej instrukcji. (rys. 1)
PL

‑ 17 ‑ PL
1. Zastosowanie
WAŻNE: Należy dokładnie zapoznać się z poniższymi wskazówkami i przechowywać niniejszą
instrukcję (np. w aucie w którym montowane jest nosidełko) aby była zawsze łatwo dostępna.
W przypadku przekazania nosidełka osobie trzeciej należy dołączyć do niego instrukcję.
Nieprawidłowy montaż może stanowić zagrożenie dla zdrowia i życia dziecka. Producent nie
ponosi odpowiedzialności za ewentualne zagrożenia spowodowane niewłaściwym montażem.
2. Zastosowanie w aucie (rys. 2)
Nie wolno używać nosidełka na miejscach zaopatrzonych w przednie poduszki powietrzne
(nie dotyczy to bocznych poduszek powietrznych). Aktywne poduszki powietrzne
w sytuacji kolizji mogą spowodować poważne obrażenia lub nawet śmierć. Sprawdź
instrukcję obsługi pojazdu w celu ustalenia gdzie znajdują się poduszki powietrzne!
Uwaga! Nie wolno montować produktu na miejscu z dwupunktowym pasem
bezpieczeństwa. Mogłoby to spowodować poważne obrażenia lub nawet śmierć. (rys. 3)
Zobacz rys. 4:
Na miejscu:
? - montaż możliwy tylko jeśli poduszka powietrzna jest dezaktywowana
?? - montaż wyłącznie, jeśli siedzzenie wyposażone jest w trzypunktowe pasy
bezpieczeństwa
•
Nie wolno montować produktu na miejscach pojazdu, skierowanych tyłem lub
bokiem do kierunku jazdy (spotyka się je np. w vanach lub minibusach).
• Jeśli wysokość samochodowego pasa bezpieczeństwa regulowana, ustaw ją
na najniższej możliwej pozycji.
• Zawsze zabezpieczaj fotelik pasami bezpieczeństwa w samochodzie, nawet jeśli akurat
nie jest przewożone w nim dziecko. Niezabezpieczony fotelik w sytuacji kolizji może
zranić pasażerów samochodu.
•
Nie używaj pasów bezpieczeństwa samochodu, którymi przypięty jest fotelik.
Uwaga! Aby Twoje dziecko było odpowiednio chronione, upewnij się, że produkt zamocowany został
prawidłowo i użytkowany jest zgodnie z poleceniami zamieszczonymi w instrukcji. Aby w odpowiednio
korzystać z fotelika w samochodzie należy zapoznać się z instrukcją obsługi producenta pojazdu.

‑ 18 ‑PL
Bezpieczeństwo w pojeździe:
Aby zapewnić jak największe bezpieczeństwo sobie i pasażerom w trakcie jazdy, upewnij się, że:
• Składane oparcia pod łokcie są złożone (pozycja pionowa).
•
Wszelkie obiekty, które mogłyby spowodować uszkodzenia w samochodzie
w sytuacji kolizji są odpowiednio zabezpieczone.
• Wszyscy pasażerowie mają zapięte pasy bezpieczeństwa.
Ostrzeżenia
• Fotelik LO-Astrid przeznaczony jest dla dzieci od urodzenia do wagi 13 kg.
•
Twarde elementy oraz plaskowe części urządzenia przytrzymującego dla dzieci
należy umieścić i zainstalować w taki sposób, by w normalnych warunkach eksploatacji
pojazdu nie mogły zostać uwięzione przez przesuwane siedzenie lub drzwi pojazdu.
•
Nie używaj fotelika w miejscach, gdzie aktywna jest przednia poduszka powietrzna.
•
Wszelkie taśmy mocujące urządzenie przytrzymujące do pojazdu muszą być
napięte, taśmy przytrzymujące dziecko muszą być dopasowane do jego budowy
ciała i nie mogą być poskręcane.
• Upewnij się, że wszystkie taśmy biodrowe przebiegają nisko tak, aby miednica
była mocno przytrzymywana.
• Każdy wypadek lub stłuczka może zniszczyć fotelik, nawet jeśli uszkodzeń nie
widać gołym okiem.
•
Jeśli produkt został wystawiony na działanie silnych czynników (takich jak uderzenie) należy
go wymienić. Jeśli masz jakieś wątpliwości, skontaktuj się ze sprzedawcą lub producentem.
•
Nie należy dokonywać żadnych przeróbek ani instalacji dodatkowych elementów
bez akceptacji organu udzielającego homologacji. Aby zapewnić dziecku maksymalne
bezpieczeństwo, sprzęt należy zamocować i użytkować zgodnie z zaleceniami w instrukcji.
• Plaskowe elementy tego fotelika mogą nagrzewać się w słońcu i powodować
oparzenia na skórze dziecka.
•
Chroń swoje dziecko i fotelik przed słońcem (na przykład przykrywając je jasnym
elementem odzieży). Jeśli fotelik nie jest przykryty, staraj się nie wystawiać go na słońce.
•
W przeciwnym przypadku fotelik może być zbyt gorący dla skóry Twojego dziecka.
•
Nigdy nie zostawiaj swojego dziecka bez opieki w urządzeniu przytrzymującym.
•
Bagaże i inne, podobne elementy powinny być zabezpieczone, aby w sytuacji kolizji nie
spowodowały żadnych obrażeń. W sytuacji wypadku drogowego niezabezpieczone

‑ 19 ‑ PL
mogą powodować śmiertelne obrażenia.
• Nie powinno się używać fotelika bez tapicerki. Stanowi ono integralny element
zestawu i ma wpływ na działanie urządzenia przytrzymującego.
•
Tapicerka nie może być zastąpiona elementem pochodzącym z innego zestawu.
•
Zachowaj instrukcję obsługi fotelika. Trzymaj ją w aucie, w którym zainstalowany jest fotelik.
• Należy stosować się do zaleceń producenta pojazdu.
•
Nie wolno używać innych nośnych punktów styczności niż te, opisane w instrukcji
i oznaczone na urządzeniu przytrzymującym dla dzieci.
•
Jeśli masz wątpliwości co do pozycji klamry pasów bezpieczeństwa dla dorosłych
względem głównych nośnych punktów styczności, skontaktuj się z producentem fotelika.
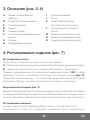
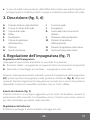
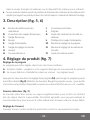
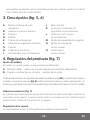
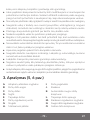
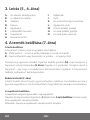
3. Opis (rys. 5, 6)
A. Przycisk zwalniający adaptery
B. Otwory pasów naramiennych
C. Pas naramienny
D. Klamra
E. Pas krokowy
F. Pas regulacji uprzęży
G. Daszek
H. Wkładka redukcyjna
I. Poduszki naramienne
J. Uchwyt
K. Prowadnica pasa bezpieczeństwa
samochodu
L. Ochronka pasa krokowego
M. Przycisk regulacji uchwytu
N. Przycisk regulacji pasów
O. Tylna prowadnica pasów
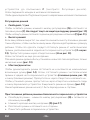
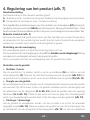
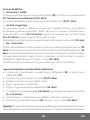
4. Regulacja produktu (rys. 7)
Regulacja uchwytu
Rączkę można ustawić na jednej z trzech pozycji:
A – Pozycja stabilna – uchwyt na podłożu, blokuje ruch produktu
B – Nosidełko lub montaż w samochodzie – rączka w górze
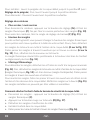
Wciśnij jednocześnie oba przyciski regulacji uchwytu (M), a następnie przesuń uchwyt
do pożądanej pozycji (rys. 8). Puść przyciski. Poruszaj nieco rączką - tak, aby zakotwiczyła
się na dostępnej pozycji. Proces powinien zakończyć się słyszalnym „kliknięciem”.
Wkładka redukcyjna (rys. 9)
Wkładka zapewnia dodatkowe wsparcie dla głowy dziecka podczas pobytu

‑ 20 ‑PL
w nosidełku. Jeśli dziecko podrośnie, wkładkę można usunąć aby zapewnić dziecku
więcej przestrzeni w nosidełku.
Regulacja daszka
Daszek zapewnia Twojemu dziecku ochronę przed promieniami słonecznymi.
Aby zamontować: Podnieś uchwyt nosidełka do pozycji C (patrz: Regulacja
uchwytu). Następnie, podnieś daszek do pożądanej pozycji.
Aby zdemontować: Pchnij daszek w kierunku pożądanej pozycji.
Regulacja pasów
• Ciaśniej / luźniej
Aby poluźnić pasy, wciśnij przycisk regulacji (N) i pociągnij za pasy naramienne
(C). Nie należy pociągać za poduszkę ochronną pasów (rys. 10)
Aby ścieśnić pasy, pociągnij za pas regulacji uprzęży (F) (rys. 11).
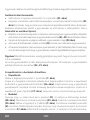
• Wysokość pasów
Jeśli Twoje dziecko urośnie, możesz zmienić wysokość pasów naramiennych tak, aby
były lepiej dopasowane ro rozmiaru dziecka. Aby to zrobić, odepnij pasy z metalowej
klamry z tyłu nosidełka (G na rys. 13). Przełóż pasy przez otwór wyżej (H na rys. 13).
Następnie zapnij je raz jeszcze na klamrze.
Pas naramienny powinien być ustawiony na wysokości ramion dziecka lub tylko nieco niżej (rys. 13).
• Montaż / demontaż
Aby zdemontować pasy rozepnij je i wyciągnij na maksymalną możliwą długość (rys.
14). Następnie, odepnij pasy z metalowej klamry z tyłu nosidełka (pasy naramienne,
rys. 13) a oraz od spodu (pas krokowy). Przełóż pasy przez otwory i wyciągnij je.
Aby zamontować pasy, przełóż je przez otwory i wyciągnij z tyłu i od spodu
nosidełka. Załóż pasy na klamrę (rys. 15).
Montowane pasy nie mogą być przekręcone ani splątane.
Zapinanie dziecka pasami bezpieczeństwa nosidełka
• Poluźnij pasy - wciśnij przycisk regulacji (N) i pociągnij za pasy naramienne (C).
• Wciśnij czerwony przycisk na klamrze (D) (rys. 17).
• Rozepnij pasy i odłóż je na boki.
• Włóż dziecko do nosidełka.
Strona się ładuje...
Strona się ładuje...
Strona się ładuje...
Strona się ładuje...
Strona się ładuje...
Strona się ładuje...
Strona się ładuje...
Strona się ładuje...
Strona się ładuje...
Strona się ładuje...
Strona się ładuje...
Strona się ładuje...
Strona się ładuje...
Strona się ładuje...
Strona się ładuje...
Strona się ładuje...
Strona się ładuje...
Strona się ładuje...
Strona się ładuje...
Strona się ładuje...
Strona się ładuje...
Strona się ładuje...
Strona się ładuje...
Strona się ładuje...
Strona się ładuje...
Strona się ładuje...
Strona się ładuje...
Strona się ładuje...
Strona się ładuje...
Strona się ładuje...
Strona się ładuje...
Strona się ładuje...
Strona się ładuje...
Strona się ładuje...
Strona się ładuje...
Strona się ładuje...
Strona się ładuje...
Strona się ładuje...
Strona się ładuje...
Strona się ładuje...
Strona się ładuje...
Strona się ładuje...
Strona się ładuje...
Strona się ładuje...
Strona się ładuje...
Strona się ładuje...
Strona się ładuje...
Strona się ładuje...
Strona się ładuje...
Strona się ładuje...
Strona się ładuje...
Strona się ładuje...
Strona się ładuje...
Strona się ładuje...
Strona się ładuje...
Strona się ładuje...
Strona się ładuje...
Strona się ładuje...
Strona się ładuje...
Strona się ładuje...
Strona się ładuje...
Strona się ładuje...
Strona się ładuje...
Strona się ładuje...
Strona się ładuje...
Strona się ładuje...
Strona się ładuje...
Strona się ładuje...
Strona się ładuje...
Strona się ładuje...
Strona się ładuje...
Strona się ładuje...
Strona się ładuje...
Strona się ładuje...
Strona się ładuje...
Strona się ładuje...
Strona się ładuje...
Strona się ładuje...
Strona się ładuje...
Strona się ładuje...
-
 1
1
-
 2
2
-
 3
3
-
 4
4
-
 5
5
-
 6
6
-
 7
7
-
 8
8
-
 9
9
-
 10
10
-
 11
11
-
 12
12
-
 13
13
-
 14
14
-
 15
15
-
 16
16
-
 17
17
-
 18
18
-
 19
19
-
 20
20
-
 21
21
-
 22
22
-
 23
23
-
 24
24
-
 25
25
-
 26
26
-
 27
27
-
 28
28
-
 29
29
-
 30
30
-
 31
31
-
 32
32
-
 33
33
-
 34
34
-
 35
35
-
 36
36
-
 37
37
-
 38
38
-
 39
39
-
 40
40
-
 41
41
-
 42
42
-
 43
43
-
 44
44
-
 45
45
-
 46
46
-
 47
47
-
 48
48
-
 49
49
-
 50
50
-
 51
51
-
 52
52
-
 53
53
-
 54
54
-
 55
55
-
 56
56
-
 57
57
-
 58
58
-
 59
59
-
 60
60
-
 61
61
-
 62
62
-
 63
63
-
 64
64
-
 65
65
-
 66
66
-
 67
67
-
 68
68
-
 69
69
-
 70
70
-
 71
71
-
 72
72
-
 73
73
-
 74
74
-
 75
75
-
 76
76
-
 77
77
-
 78
78
-
 79
79
-
 80
80
-
 81
81
-
 82
82
-
 83
83
-
 84
84
-
 85
85
-
 86
86
-
 87
87
-
 88
88
-
 89
89
-
 90
90
-
 91
91
-
 92
92
-
 93
93
-
 94
94
-
 95
95
-
 96
96
-
 97
97
-
 98
98
-
 99
99
-
 100
100


Lionelo Astrid Baby carrier Instrukcja obsługi
- Kategoria
- Siedzenia samochodowe
- Typ
- Instrukcja obsługi
w innych językach
- español: Lionelo Astrid Baby carrier Manual de usuario
- italiano: Lionelo Astrid Baby carrier Manuale utente
- Deutsch: Lionelo Astrid Baby carrier Benutzerhandbuch
- slovenčina: Lionelo Astrid Baby carrier Používateľská príručka
- français: Lionelo Astrid Baby carrier Manuel utilisateur
- Nederlands: Lionelo Astrid Baby carrier Handleiding
- română: Lionelo Astrid Baby carrier Manual de utilizare
Powiązane artykuły
Inne dokumenty
-
kiddy GUARDIANFIX Instrukcja obsługi
-
kiddy EVOLUTION PRO 2 Instrukcja obsługi
-
-
kiddy EVOLUNA 2 Instrukcja obsługi
-
-
-
-
RECARO Young Profi plus Instrukcja instalacji
-
-
 Jole litetrax™ 4 Instrukcja obsługi
