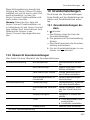
Siemens TQ703R07/02 Instrukcja obsługi
- Kategoria
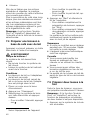
- Ekspresy do kawy
- Typ
- Instrukcja obsługi
Niniejsza instrukcja jest również odpowiednia dla

EQ.700 integral TQ7.....
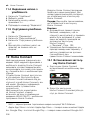
Fully automatic
espresso machine
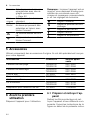
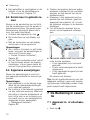
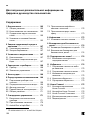
EN Information for Use ................. 6
FR Manuel d'utilisation ............... 36
NL Gebruikershandleiding ........... 68
PL Instrukcja obsługi .................. 98
CS Návod kobsluze .................. 131
RU Руководство пользователя 160
UK Керівництво з експлуатації 193
DE Gebrauchsanleitung ............ 226
Siemens Home Appliances
Register your appliance on My Siemens and
discover exclusive services and offers.

A B C D E F G
HIJ
K
1
1
2
3
4
5
8
10
11
14
15
9
13
16
6 7
12
2

34
5 6
7 8
9 10

11 12
13 14
15 16
17 18

19 20
21 22
23 24
25 26

en
6
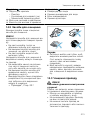
Further information and explanations are
available online:
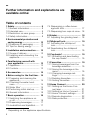
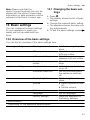
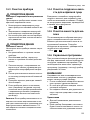
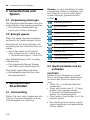
Table of contents
1 Safety...........................................8
1.1 General information................... 8
1.2 Intended use.............................. 8
1.3 Restriction on user group.......... 8
1.4 Safety information...................... 8
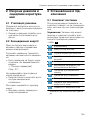
2 Environmental protection and
saving energy............................12
2.1 Disposing of packaging .......... 12
2.2 Tips for saving energy............. 12
3 Installation and connection......12
3.1 Scope of delivery..................... 12
3.2 Installing and connecting the
appliance................................. 12
4 Familiarising yourself with
your appliance...........................13
4.1 Appliance ................................ 13
4.2 Controls ................................... 13
5 Accessories...............................14
6 Before using for the first time ..14
6.1 Preparing and cleaning the
appliance................................. 14
6.2 Checking the water hard-
ness......................................... 14
6.3 Water filter1.............................. 15
6.4 Performing initial start-up ........ 16
6.5 General information................. 16
7 Basic operation .........................16
7.1 Switching the appliance on
or off........................................16
7.2 Dispensing beverages ............ 17
7.3 doubleShot and tripleShot....... 17
7.4 Dispensing a coffee bever-
age with milk ........................... 17
7.5 Dispensing two cups at once.. 18
8 Grinder.......................................18
8.1 Adjusting the grinding level..... 18
9 Childproof lock..........................19
9.1 Activating the child-proof
lock..........................................19
9.2 Deactivating the childproof
lock..........................................19
10 Cup heater1..............................19
10.1 Activating and deactivating
the cup heater1......................19
11 Favourites................................19
11.1 Saving beverages from the
beverage selection................ 19
11.2 Saving the beverage in the
menu......................................19
11.3 Changing beverage set-
tings....................................... 20
11.4 Deleting favourites................. 20
11.5 Sorting favourites .................. 20
12 HomeConnect ........................20
12.1 Setting up the HomeCon-
nect app ................................ 21
12.2 Setting up HomeConnect..... 21
12.3 HomeConnect settings......... 21
12.4 Remote diagnostics .............. 22
12.5 Data protection...................... 22
1Depending on the appliance specifications

en
7
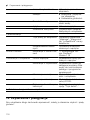
13 Basic settings..........................23
13.1 Changing the basic set-
tings....................................... 23
13.2 Overview of the basic set-
tings....................................... 23
14 Cleaning and servicing...........24
14.1 Dishwasher-safe compon-
ents........................................24
14.2 Cleaning agent ...................... 25
14.3 Cleaning the appliance ......... 25
14.4 Cleaning the drip tray and
coffee dregs container .......... 26
14.5 Cleaning the milk container .. 26
14.6 Service programmes............. 26
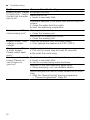
15 Troubleshooting......................28
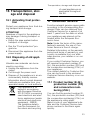
16 Transportation, storage and
disposal ...................................33
16.1 Activating frost protection ..... 33
16.2 Disposing of old appliance ... 33
17 Customer Service....................33
17.1 Product number (E-Nr.),
production number (FD)
and consecutive numbering
(Z-Nr.) .................................... 33
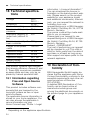
18 Technical specifications.........34
18.1 Information regarding Free
and Open Source Software... 34
19 Declaration of Conformity ......34

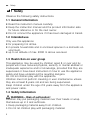
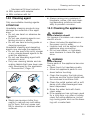
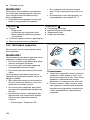
en Safety
8
1 Safety
Observe the following safety instructions.
1.1 General information
¡Read this instruction manual carefully.
¡Keep the instruction manual and the product information safe
for future reference or for the next owner.
¡Do not connect the appliance if it has been damaged in transit.
1.2 Intended use
Only use this appliance:
¡for preparing hot drinks.
¡in private households and in enclosed spaces in a domestic en-
vironment.
¡up to an altitude of max. 2000m above sea level.
1.3 Restriction on user group
This appliance may be used by children aged 8 or over and by
people who have reduced physical, sensory or mental abilities or
inadequate experience and/or knowledge, provided that they are
supervised or have been instructed on how to use the appliance
safely and have understood the resulting dangers.
Do not let children play with the appliance.
Children must not perform cleaning or user maintenance unless
they are at least 8 years old and are being supervised.
Keep children under the age of 8 years away from the appliance
and power cable.
1.4 Safety information
WARNING‒Risk of suffocation!
Children may put packaging material over their heads or wrap
themselves up in it and suffocate.
▶Keep packaging material away from children.
▶Do not let children play with packaging material.

Safety en
9
Children may breathe in or swallow small parts, causing them to
suffocate.
▶Keep small parts away from children.
▶Do not let children play with small parts.
WARNING‒Risk of electric shock!
Incorrect installation is dangerous.
▶Connect and operate the appliance only in accordance with the
specifications on the rating plate.
▶Connect the appliance to a power supply with alternating cur-
rent only via a properly installed socket with earthing.
▶The protective conductor system of the domestic electrical in-
stallation must be properly installed.
If the appliance or the power cord is damaged, this is dangerous.
▶Never operate a damaged appliance.
▶Never operate an appliance with a cracked or fractured surface.
▶Never pull on the power cord to unplug the appliance. Always
unplug the appliance at the mains.
▶If the appliance or the power cord is damaged, immediately un-
plug the power cord or switch off the fuse in the fuse box.
▶Call customer services. →Page33
Improper repairs are dangerous.
▶Repairs to the appliance should only be carried out by trained
specialist staff.
▶Only use genuine spare parts when repairing the appliance.
▶If the power cord of this appliance is damaged, it must be re-
placed by the manufacturer, the manufacturer's Customer Ser-
vice or a similarly qualified person in order to prevent any risk.
An ingress of moisture can cause an electric shock.
▶Never immerse the appliance or the power cord in water.
▶Liquids must not be spilled on the appliance plug connection.
▶Only use the appliance in enclosed spaces.
▶Never expose the appliance to intense heat or humidity.
▶Do not use steam- or high-pressure cleaners to clean the appli-
ance.

en Safety
10
WARNING‒Risk of fire!
The appliance will become hot.
▶Ventilate the appliance adequately.
▶Never operate the appliance in a cupboard.
It is dangerous to use an extended power cord and non-approved
adapters.
▶Do not use extension cables or multiple socket strips.
▶Only use adapters and power cords approved by the manufac-
turer.
▶If the power cord is too short and a longer one is not available,
please contact an electrician to have the domestic installation
adapted.
WARNING‒Risk of burns!
Some parts of the appliance become very hot.
▶Never touch hot appliance parts.
▶Allow hot appliance parts to cool down before touching.
WARNING‒Risk of scalding!
Freshly prepared drinks are very hot.
▶Leave drinks to cool down if necessary.
▶Do not let escaping liquids or steam come into contact with
your skin.
A remote start via the Home Connect app while the appliance is
unattended may cause scalding to third parties.
▶Do not reach under the coffee outlet during the dispensing of
drinks.
▶Keep other persons, in particular children, away from the appli-
ance.
WARNING‒Risk of injury!
Improper use of the appliance may endanger the user.
▶To avoid injuries, only use the appliance for its intended pur-
pose.
Trapped fingers when closing the appliance door.
▶Be careful of your fingers when closing the appliance door.

Safety en
11
The grinder rotates.
▶Never reach into the grinder.
WARNING‒Danger: Magnetism!
The appliance contains permanent magnets. These may affect
electronic implants, e.g. pacemakers or insulin pumps.
▶People with electronic implants must stand at least 10 cm away
from the appliance.
▶This minimum distance of 10 cm must also be observed for the
water tank when removed.
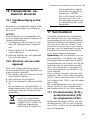
WARNING‒Risk of harm to health!
Soiling on the appliance may be harmful to health.
▶To ensure hygiene, follow the cleaning instructions for the appli-
ance.

en Environmental protection and saving energy
12
2 Environmental protec-
tion and saving energy
2.1 Disposing of packaging
The packaging materials are environ-
mentally compatible and can be re-
cycled.
▶Sort the individual components by
type and dispose of them separ-
ately.
2.2 Tips for saving energy
If you follow these instructions, your
appliance will use less power.
Set the interval for automatic switch-
off to the smallest value.
aIf the appliance is not being used,
it will switch itself off earlier.
→"Basic settings", Page23
Do not interrupt the dispensing pro-
cess prematurely.
aThe amount of water or milk that is
heated is used optimally.
Descale the appliance regularly.
aLimescale deposits increase the
appliance's energy consumption.
3 Installation and con-
nection
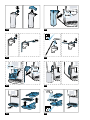
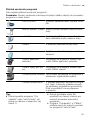
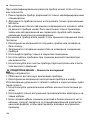
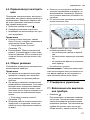
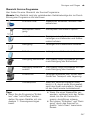
3.1 Scope of delivery
After unpacking all parts, check for
any damage in transit and complete-
ness of the delivery.
Note:Different accessories are en-
closed depending on the appliance
model. This accessory is shown in a
frame with a dashed line.
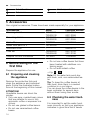
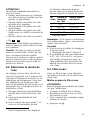
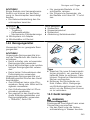
→Fig. 1
A
Fully automatic coffee ma-
chine
B
Milk container
C
Milk tube
D
Adapter for milk containers 1
E
User manual
F
Insertion aid for water filter
G
Descaling tablet 1
H
Cleaning tablet 1
I
Water filter 1
J
Water hardness testing strip
K
Microfibre cloth
1Depending on the appliance spe-
cifications
3.2 Installing and connecting
the appliance
ATTENTION!
Risk of damage to the appliance. If
the appliance is not started up cor-
rectly, it may be damaged.
▶Use the appliance in frost-free
rooms only.
▶If the appliance has been transpor-
ted or stored below 0°C, wait
3hours at room temperature be-
fore starting it up.
▶After plugging in, always wait ap-
prox.5seconds.
1. Place the appliance on a level, wa-
ter-resistant surface that is capable
of bearing its weight.

Familiarising yourself with your appliance en
13
2. Using the mains plug, connect the
appliance to an earthed socket
that has been correctly installed.
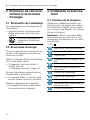
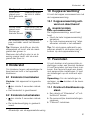
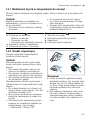
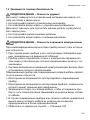
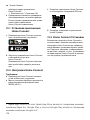
4 Familiarising yourself
with your appliance
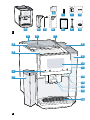
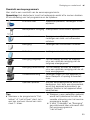
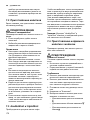
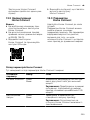
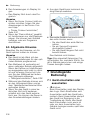
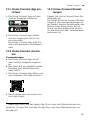
4.1 Appliance
You can find an overview of the parts
of your appliance here.
Note:Individual details and colours
may differ, depending on the appli-
ance model.
→Fig. 2
1
Milk container
2
Touch fields
3
Cup heater1
4
Aroma lid
5
Bean container
6
Rotary selector for grinder
setting
7
Tablet compartment
8
Cover for water tank
9
Water tank
10
Touch display
11
Brewing chamber door
12
Cup lighting
13
Rating plate
14
Milk system
15
Beverage outlet cover
1Depending on the appliance spe-
cifications
16
Drip tray
1Depending on the appliance spe-
cifications
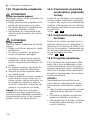
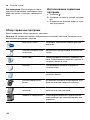
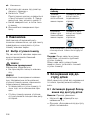
4.2 Controls
You can find an overview of the con-
trols for your appliance here.
Touch fields
Here you can find an overview of the
symbols that are always visible.
Switch the appliance on or
off.
Dispense two cups.
Open or close the service
programmes.
Open or exit the settings.
Touch display
The touch display functions both as a
display and a control.
Favour-
ites Select saved beverages
with personal settings.
→Page19
Classic Select standard bever-
ages.
coffee-
World Select basic beverages
which can be extended in
conjunction with
Home Connect.
Cup warmer is switched
on.
Appliance is connected to
HomeConnect.
Note:When the appliance is
switched on, you have additional op-
erating options with relevant displays
and messages, e.g. beverage set-
tings.
Set strength.
Set per-cup quantity.

en Accessories
14
Set milk ratio.
Set aroma.
Set temperature.
5 Accessories
Use original accessories. These have been made especially for your appliance.
Accessories Retail Customer service
Cleaning tablets TZ80001A
TZ80001B 00312097
00312098
Descaling tablets TZ80002A
TZ80002B 00312094
00312095
Water filter TZ70003 00575491
Water filter pack of 3 TZ70033A
Microfibre cloth - 00460770
Care set TZ80004A
TZ80004B 00312105
00312106
Adapter for milk containers TZ70001 17006005
first time
6 Before using for the
first time
first time
Prepare the appliance for use.
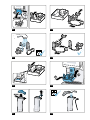
6.1 Preparing and cleaning
the appliance
Remove the protective foils and
clean the appliance and individual
parts. Follow the illustrated instruc-
tions at the beginning of this manual.
ATTENTION!
Unsuitable beans can block the
grinder.
▶Only use pure, roasted bean mixes
that are suitable for use in fully
automatic coffee or espresso ma-
chines.
▶Do not use glazed coffee beans.
▶Do not use caramelised coffee
beans.
▶Do not use coffee beans that have
been treated with additives con-
taining sugar.
▶Do not add instant coffee.
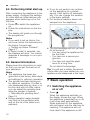
→Fig. 3- 24
Note:Fill the water tank each day
with fresh, cold, non-carbonated wa-
ter.
Tip:To keep the coffee beans at
their best, store them in a sealed
container in a cool place.
You can keep the coffee beans in the
bean container for several days
without them losing their aroma.
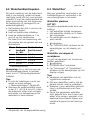
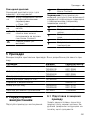
6.2 Checking the water hard-
ness
It is important to set the water hard-
ness correctly so that your appliance
indicates in good time that it needs

first time en
15
descaling. You can use the enclosed
test strip to check the water hardness
or ask your local water company.
1. Briefly dip the test strip in fresh tap
water.
2. Allow the water to drain off the test
strip.
3. Read the water hardness off the
test strip after 1minute.
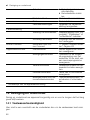
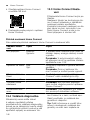
The table shows allocation of the
levels to the different degrees of
water hardness:
Level German
degrees in
°dH
Total hard-
ness in mmol/
l
1 1-7 < 1.3
2 8-14 1.3-2.5
3 15-21 2.5-3.8
4122-30 > 3.8
1Factory setting
Note:If a water softening system is
installed in your house, you can se-
lect "Water softening system".
Tips
¡You can change the settings at
any time.
→"Basic settings", Page23
¡If the water hardness exceeds
21°dH (3.8mmol/l), you can fill
the water tank with prefiltered wa-
ter to reduce limescale deposits.
6.3 Water filter1
You can use a water filter to minimise
limescale deposits and reduce impur-
ities in the water.
Inserting the water filter
ATTENTION!
Possible damage to the appliance
due to limescale build-up.
▶Change the water filter in good
time.
▶Change the water filter after
2months at the latest.
▶Observe the display messages.
1. Press .
2. Press "INTENZA filter" and follow
the instructions on the display.
Changing or removing the water
filter
You can also operate your appliance
without a water filter.
1. Press .
2. Press "INTENZA filter".
3. Press "Replace" or "Remove" and
follow the instructions on the dis-
play.
Tips
¡You should also change your wa-
ter filter for reasons of hygiene.
¡With a water filter you need to de-
scale your appliance less fre-
quently.
¡If you use a water filter, your coffee
will be more flavoursome.
¡If your appliance has not been
used for a long time, for example if
you were on holiday, you should
rinse the water filter before use by
dispensing a cup of hot water.
¡The water filter can be purchased
from retailers or customer service.
→"Accessories", Page14
1Depending on the appliance specifications

en operation
16
6.4 Performing initial start-up
After connecting the appliance to the
power supply, configure the settings
for initial start-up. Initial start-up only
appears when switching on for the
first time.
1. Press to switch the appliance
on.
2. Follow the instructions on the dis-
play.
aThe display will guide you through
the programme.
Notes
¡If you want to set up HomeCon-
nect now, follow the instructions in
the HomeConnect app.
→"Setting up HomeConnect",
Page21
¡If "Demo mode" is selected, only
the displays will work. You cannot
dispense a beverage or run a pro-
gramme.
6.5 General information
Please bear this information in mind
so that you can get the best out of
your appliance.
Notes
¡The appliance has been pro-
grammed at the factory with stand-
ard settings for optimum operation.
¡The grinder has been factory-set
for optimum operation. If coffee is
only dispensed drop by drop or is
too thin and with too little crema,
you can adjust the grinding level
when the grinder is running.
→"Adjusting the grinding level",
Page18
¡During operation water droplets
may form at the ventilation slits
and on the lid of the tablet com-
partment.
¡If you do not perform any actions
on the appliance for a certain
period, it will switch off automatic-
ally. You can change the duration
in the basic settings.
¡For technical reasons steam can
escape from the appliance.
¡The first beverage will not yet have
its full aroma if:
–You are using the appliance for
the first time.
–You have run a service pro-
gramme.
–You have not used the appli-
ance for a long time.
Do not drink the beverage.
Tip:You will get a stable, fine-pored
crema after you have started up your
appliance and dispensed a few cups.
operation
7 Basic operation
operation
7.1 Switching the appliance
on or off
▶Press .
When the appliance switches on,
the display shows the logo. When
the appliance is switched on or off,
it will rinse itself automatically.
When switched off, the appliance
will emit steam into the drip tray for
cleaning. The appliance will not
rinse itself if the appliance is still

operation en
17
warm when switched on or if no
beverage was dispensed before it
was switched off.
7.2 Dispensing beverages
Find out how to prepare a drink of
your choice.
WARNING
Risk of scalding!
Freshly prepared drinks are very hot.
▶Leave drinks to cool down if ne-
cessary.
▶Do not let escaping liquids or
steam come into contact with your
skin.
Notes
¡With a number of settings your cof-
fee is prepared in several steps.
Wait until the process is fully com-
pleted.
¡If you are dispensing a beverage
with milk, always connect the milk
container filled with milk or the
milk adapter to a milk carton.
¡You can only connect the milk con-
tainer or milk adapter if the milk
system is fitted with the adapter
and the hose in the beverage out-
let cover.
¡The milk container is specially de-
signed for this appliance. Only use
the milk container for storing milk
in the refrigerator and in the
house.
¡If the milk system has not been
cleaned, small amounts of milk
may escape when hot water is dis-
pensed.
7.3 doubleShot and tripleShot
Your appliance grinds the coffee two
or three times.
To ensure that only pleasant-tasting
and easily digestible aromatic sub-
stances are released, coffee beans
are freshly ground and brewed again
by the appliance.
The longer coffee brews, the more
bitter substances and undesirable
aromas are released. These bitter
substances and undesirable aromas
affect the taste and digestibility of
coffee.
Note:The functions "doubleShot" and
"tripleShot" depend on the beverage
strength and beverage size selected.
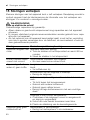
7.4 Dispensing a coffee
beverage with milk
An example explains how to make a
latte macchiato.
WARNING
Risk of burns!
The milk system can become ex-
tremely hot.
▶Never touch the milk system when
it is hot.
▶Allow the hot milk system to cool
down before touching it.
Requirements
¡The milk container or milk adapter
is connected.
¡The milk container is filled with
milk or the milk adapter hose is
immersed in milk.
1. Place a glass underneath the
beverage outlet.
2. Press "Classic".
3. Select and press the beverage
symbol for latte macchiato.
‒To change the strength, press .
‒To change the per-cup quantity,
press .
‒To change the milk ratio, press
.

en Grinder
18
4. Press "Start" and wait until the pro-
cess is complete.
‒To completely stop dispensing
the beverage, press "Stop".
‒To only stop the current dis-
pensing step, press "Skip".
After preparing the beverage, the
milk system will automatically
clean itself with a short jet of
steam.
Notes
¡If you do not change any settings
for approx. 30seconds, the appli-
ance will exit settings mode.
¡The appliance saves the settings
automatically.
Tips
¡You can also pre-heat cups before
dispensing using hot water or the
cup heater1.
¡You can also use plant-based al-
ternatives to milk, e.g. soya milk.
¡The quality of the milk froth de-
pends on the type of milk or plant-
based alternative used.
7.5 Dispensing two cups at
once
Depending on your beverage, you
can make 2 cups at the same time.
Note:If the "doubleShot" or
"tripleShot" function is active, the
function for dispensing two cups at
once is not possible.
1. Press the symbol for your desired
drink.
2. Press .
aThe display shows the setting .
3. Place two cups on the left and
right underneath the beverage out-
let.
4. Press "Start".
The beverage is prepared in 2
steps. The beans are ground in 2
grinding operations.
aThe beverage is brewed and then
runs into the cups.
5. Wait until the process is complete.
8 Grinder
Your appliance has an adjustable
grinder, which you can use to cus-
tomise the grinding level of your cof-
fee beans.
8.1 Adjusting the grinding
level
Set the desired grinding level while
the coffee beans are being ground.
WARNING
Risk of injury!
The grinder rotates.
▶Never reach into the grinder.
ATTENTION!
Risk of damage to the grinder. The
grinder may be damaged if the grind-
ing level is not set properly.
▶Only set the grinding level when
the grinder is running.
▶Select the grinding level using the
rotary selector step by step.
Grinding level Setting
Fine grinding
level for lightly
roasted beans
Turn rotary se-
lector anticlock-
wise.
1Depending on the appliance specifications

Childproof lock en
19
Grinding level Setting
Coarse grind-
ing level for
dark-roasted
beans
Turn rotary se-
lector clockwise.
The grinding level setting only
takes effect after the second cup.
Tip:If the coffee is only dispensed
drop by drop, set a coarser grinding
level.
If the coffee is too thin with too little
crema, set a finer grinding level.
9 Childproof lock
You can lock the appliance, to pro-
tect children against scalding and
burns.
9.1 Activating the child-proof
lock
Requirement:The appliance is
switched on.
▶Press and hold for at least
3seconds.
aThe childproof lock is activated.
9.2 Deactivating the child-
proof lock
▶Press and hold for at least
3seconds.
aThe childproof lock is deactivated.
10 Cup heater1
You can use the cup heater to pre-
heat your cups.
10.1 Activating and deactivat-
ing the cup heater1
WARNING
Risk of burns!
The cup heater1 can become very
hot.
▶Never touch the cup heater1 while
hot.
▶Allow the hot cup heater1 to cool
down before touching it.
Tip:Place the cups with their base
on the cup heater to warm them to
optimum effect1.
11 Favourites
Save beverages with your personal
settings as a favourite.
You can mark your favourites with a
colour. A favourite is a beverage with
personal settings. You can change
the settings at any time.
Note:To exit the settings, press
or start dispensing the beverage.
11.1 Saving beverages from
the beverage selection
1. Select a beverage from "Classic"
or "coffeeWorld".
2. Select the personal beverage set-
tings.
3. Press "Favourite".
4. Select the required colour for the
beverage.
5. Press "Save".
11.2 Saving the beverage in
the menu
1. Press "Favourites".
1Depending on the appliance specifications

en HomeConnect
20
2. Press .
aThe display shows all available
beverages.
3. Select the required beverage.
4. Select the personal beverage set-
tings.
5. Press "Next".
6. Select the required colour for the
beverage.
7. Press "Save".
11.3 Changing beverage set-
tings
1. Press "Favourites".
2. Select the beverage and press
briefly.
3. Change the beverage settings.
4. Press "Apply".
aThe new settings are saved.
11.4 Deleting favourites
1. Press "Favourites".
2. Select the beverage.
3. Press the beverage for at least
3seconds.
4. Confirm "Delete".
11.5 Sorting favourites
1. Press "Settings".
2. Press "Personalisation".
3. Press "Sort favourites".
4. Sort favourites, e.g. by name or
colour.
HomeConnect
12 HomeConnect
HomeConnect
This appliance is network-capable.
Connecting your appliance to a mo-
bile device lets you control its func-
tions via the HomeConnect app, ad-
just its basic settings and monitor its
operating status.
The HomeConnect services are not
available in every country. The avail-
ability of the HomeConnect function
depends on the availability of
HomeConnect services in your coun-
try. You can find information about
this at: www.home-connect.com.
To be able to use HomeConnect,
you must first set up the connection
to the WLAN home network (Wi-Fi1)
and to the HomeConnect app.
The HomeConnect app guides you
through the entire login process. Fol-
low the instructions in the HomeCon-
nect app to configure the settings.
Tip:Please also follow the instruc-
tions in the HomeConnect app.
Notes
¡Please note the safety precautions
in this instruction manual and
make sure that they are also ob-
served when operating the appli-
ance via the HomeConnect app.
→"Safety", Page8
¡Operating the appliance on the ap-
pliance itself always takes priority.
During this time it is not possible
to operate the appliance using the
HomeConnect app.
1Wi-Fi is a registered trademark of the Wi-Fi Alliance.
Strona się ładuje...
Strona się ładuje...
Strona się ładuje...
Strona się ładuje...
Strona się ładuje...
Strona się ładuje...
Strona się ładuje...
Strona się ładuje...
Strona się ładuje...
Strona się ładuje...
Strona się ładuje...
Strona się ładuje...
Strona się ładuje...
Strona się ładuje...
Strona się ładuje...
Strona się ładuje...
Strona się ładuje...
Strona się ładuje...
Strona się ładuje...
Strona się ładuje...
Strona się ładuje...
Strona się ładuje...
Strona się ładuje...
Strona się ładuje...
Strona się ładuje...
Strona się ładuje...
Strona się ładuje...
Strona się ładuje...
Strona się ładuje...
Strona się ładuje...
Strona się ładuje...
Strona się ładuje...
Strona się ładuje...
Strona się ładuje...
Strona się ładuje...
Strona się ładuje...
Strona się ładuje...
Strona się ładuje...
Strona się ładuje...
Strona się ładuje...
Strona się ładuje...
Strona się ładuje...
Strona się ładuje...
Strona się ładuje...
Strona się ładuje...
Strona się ładuje...
Strona się ładuje...
Strona się ładuje...
Strona się ładuje...
Strona się ładuje...
Strona się ładuje...
Strona się ładuje...
Strona się ładuje...
Strona się ładuje...
Strona się ładuje...
Strona się ładuje...
Strona się ładuje...
Strona się ładuje...
Strona się ładuje...
Strona się ładuje...
Strona się ładuje...
Strona się ładuje...
Strona się ładuje...
Strona się ładuje...
Strona się ładuje...
Strona się ładuje...
Strona się ładuje...
Strona się ładuje...
Strona się ładuje...
Strona się ładuje...
Strona się ładuje...
Strona się ładuje...
Strona się ładuje...
Strona się ładuje...
Strona się ładuje...
Strona się ładuje...
Strona się ładuje...
Strona się ładuje...
Strona się ładuje...
Strona się ładuje...
Strona się ładuje...
Strona się ładuje...
Strona się ładuje...
Strona się ładuje...
Strona się ładuje...
Strona się ładuje...
Strona się ładuje...
Strona się ładuje...
Strona się ładuje...
Strona się ładuje...
Strona się ładuje...
Strona się ładuje...
Strona się ładuje...
Strona się ładuje...
Strona się ładuje...
Strona się ładuje...
Strona się ładuje...
Strona się ładuje...
Strona się ładuje...
Strona się ładuje...
Strona się ładuje...
Strona się ładuje...
Strona się ładuje...
Strona się ładuje...
Strona się ładuje...
Strona się ładuje...
Strona się ładuje...
Strona się ładuje...
Strona się ładuje...
Strona się ładuje...
Strona się ładuje...
Strona się ładuje...
Strona się ładuje...
Strona się ładuje...
Strona się ładuje...
Strona się ładuje...
Strona się ładuje...
Strona się ładuje...
Strona się ładuje...
Strona się ładuje...
Strona się ładuje...
Strona się ładuje...
Strona się ładuje...
Strona się ładuje...
Strona się ładuje...
Strona się ładuje...
Strona się ładuje...
Strona się ładuje...
Strona się ładuje...
Strona się ładuje...
Strona się ładuje...
Strona się ładuje...
Strona się ładuje...
Strona się ładuje...
Strona się ładuje...
Strona się ładuje...
Strona się ładuje...
Strona się ładuje...
Strona się ładuje...
Strona się ładuje...
Strona się ładuje...
Strona się ładuje...
Strona się ładuje...
Strona się ładuje...
Strona się ładuje...
Strona się ładuje...
Strona się ładuje...
Strona się ładuje...
Strona się ładuje...
Strona się ładuje...
Strona się ładuje...
Strona się ładuje...
Strona się ładuje...
Strona się ładuje...
Strona się ładuje...
Strona się ładuje...
Strona się ładuje...
Strona się ładuje...
Strona się ładuje...
Strona się ładuje...
Strona się ładuje...
Strona się ładuje...
Strona się ładuje...
Strona się ładuje...
Strona się ładuje...
Strona się ładuje...
Strona się ładuje...
Strona się ładuje...
Strona się ładuje...
Strona się ładuje...
Strona się ładuje...
Strona się ładuje...
Strona się ładuje...
Strona się ładuje...
Strona się ładuje...
Strona się ładuje...
Strona się ładuje...
Strona się ładuje...
Strona się ładuje...
Strona się ładuje...
Strona się ładuje...
Strona się ładuje...
Strona się ładuje...
Strona się ładuje...
Strona się ładuje...
Strona się ładuje...
Strona się ładuje...
Strona się ładuje...
Strona się ładuje...
Strona się ładuje...
Strona się ładuje...
Strona się ładuje...
Strona się ładuje...
Strona się ładuje...
Strona się ładuje...
Strona się ładuje...
Strona się ładuje...
Strona się ładuje...
Strona się ładuje...
Strona się ładuje...
Strona się ładuje...
Strona się ładuje...
Strona się ładuje...
Strona się ładuje...
Strona się ładuje...
Strona się ładuje...
Strona się ładuje...
Strona się ładuje...
Strona się ładuje...
Strona się ładuje...
Strona się ładuje...
Strona się ładuje...
Strona się ładuje...
Strona się ładuje...
Strona się ładuje...
Strona się ładuje...
Strona się ładuje...
Strona się ładuje...
Strona się ładuje...
Strona się ładuje...
Strona się ładuje...
Strona się ładuje...
Strona się ładuje...
Strona się ładuje...
Strona się ładuje...
Strona się ładuje...
Strona się ładuje...
Strona się ładuje...
Strona się ładuje...
Strona się ładuje...
Strona się ładuje...
Strona się ładuje...
Strona się ładuje...
Strona się ładuje...
Strona się ładuje...
Strona się ładuje...
-
 1
1
-
 2
2
-
 3
3
-
 4
4
-
 5
5
-
 6
6
-
 7
7
-
 8
8
-
 9
9
-
 10
10
-
 11
11
-
 12
12
-
 13
13
-
 14
14
-
 15
15
-
 16
16
-
 17
17
-
 18
18
-
 19
19
-
 20
20
-
 21
21
-
 22
22
-
 23
23
-
 24
24
-
 25
25
-
 26
26
-
 27
27
-
 28
28
-
 29
29
-
 30
30
-
 31
31
-
 32
32
-
 33
33
-
 34
34
-
 35
35
-
 36
36
-
 37
37
-
 38
38
-
 39
39
-
 40
40
-
 41
41
-
 42
42
-
 43
43
-
 44
44
-
 45
45
-
 46
46
-
 47
47
-
 48
48
-
 49
49
-
 50
50
-
 51
51
-
 52
52
-
 53
53
-
 54
54
-
 55
55
-
 56
56
-
 57
57
-
 58
58
-
 59
59
-
 60
60
-
 61
61
-
 62
62
-
 63
63
-
 64
64
-
 65
65
-
 66
66
-
 67
67
-
 68
68
-
 69
69
-
 70
70
-
 71
71
-
 72
72
-
 73
73
-
 74
74
-
 75
75
-
 76
76
-
 77
77
-
 78
78
-
 79
79
-
 80
80
-
 81
81
-
 82
82
-
 83
83
-
 84
84
-
 85
85
-
 86
86
-
 87
87
-
 88
88
-
 89
89
-
 90
90
-
 91
91
-
 92
92
-
 93
93
-
 94
94
-
 95
95
-
 96
96
-
 97
97
-
 98
98
-
 99
99
-
 100
100
-
 101
101
-
 102
102
-
 103
103
-
 104
104
-
 105
105
-
 106
106
-
 107
107
-
 108
108
-
 109
109
-
 110
110
-
 111
111
-
 112
112
-
 113
113
-
 114
114
-
 115
115
-
 116
116
-
 117
117
-
 118
118
-
 119
119
-
 120
120
-
 121
121
-
 122
122
-
 123
123
-
 124
124
-
 125
125
-
 126
126
-
 127
127
-
 128
128
-
 129
129
-
 130
130
-
 131
131
-
 132
132
-
 133
133
-
 134
134
-
 135
135
-
 136
136
-
 137
137
-
 138
138
-
 139
139
-
 140
140
-
 141
141
-
 142
142
-
 143
143
-
 144
144
-
 145
145
-
 146
146
-
 147
147
-
 148
148
-
 149
149
-
 150
150
-
 151
151
-
 152
152
-
 153
153
-
 154
154
-
 155
155
-
 156
156
-
 157
157
-
 158
158
-
 159
159
-
 160
160
-
 161
161
-
 162
162
-
 163
163
-
 164
164
-
 165
165
-
 166
166
-
 167
167
-
 168
168
-
 169
169
-
 170
170
-
 171
171
-
 172
172
-
 173
173
-
 174
174
-
 175
175
-
 176
176
-
 177
177
-
 178
178
-
 179
179
-
 180
180
-
 181
181
-
 182
182
-
 183
183
-
 184
184
-
 185
185
-
 186
186
-
 187
187
-
 188
188
-
 189
189
-
 190
190
-
 191
191
-
 192
192
-
 193
193
-
 194
194
-
 195
195
-
 196
196
-
 197
197
-
 198
198
-
 199
199
-
 200
200
-
 201
201
-
 202
202
-
 203
203
-
 204
204
-
 205
205
-
 206
206
-
 207
207
-
 208
208
-
 209
209
-
 210
210
-
 211
211
-
 212
212
-
 213
213
-
 214
214
-
 215
215
-
 216
216
-
 217
217
-
 218
218
-
 219
219
-
 220
220
-
 221
221
-
 222
222
-
 223
223
-
 224
224
-
 225
225
-
 226
226
-
 227
227
-
 228
228
-
 229
229
-
 230
230
-
 231
231
-
 232
232
-
 233
233
-
 234
234
-
 235
235
-
 236
236
-
 237
237
-
 238
238
-
 239
239
-
 240
240
-
 241
241
-
 242
242
-
 243
243
-
 244
244
-
 245
245
-
 246
246
-
 247
247
-
 248
248
-
 249
249
-
 250
250
-
 251
251
-
 252
252
-
 253
253
-
 254
254
-
 255
255
-
 256
256


Siemens TQ703R07/02 Instrukcja obsługi
- Kategoria
- Ekspresy do kawy
- Typ
- Instrukcja obsługi
- Niniejsza instrukcja jest również odpowiednia dla
w innych językach
- Deutsch: Siemens TQ703R07/02 Benutzerhandbuch
- slovenčina: Siemens TQ703R07/02 Používateľská príručka
- français: Siemens TQ703R07/02 Manuel utilisateur
Powiązane artykuły
-
Siemens EQ.9 plus connect s500(TI9553X1RW) Instrukcja obsługi
-
Siemens TI9573X9RW Instrukcja obsługi
-
-
-
-
-
Siemens TI955209RW/10 Instrukcja obsługi