
COLOR LASERJET ENTERPRISE CP4020/CP4520
EN
Installation Guide . . . 1
2
FR
Guide d'installation . . . 7
DE
Installationshandbuch . . . 13
IT
Guida di installazione . . . 21
ES
Guía de instalación . . . 27
CA
Guia d'instal·lació . . . 33
HR
Vodič kroz instalaciju . . . 39
CS
Průvodce instalací . . . 45
DA
Installationsvejledning . . . 51
NL
Installatiehandleiding . . . 57
FI
Asennusopas . . . 63
EL
Οδηγός εγκατάστασης . . . 69
HU
Telepítési útmutató . . . 75
NO
Installeringsveiledning . . . 81
PL
Podręcznik instalacji . . . 87
PT
Guia de instalação . . . 95
RO
Ghid de instalare . . . 101
RU
Руководство по установке . . . 107
SK
Inštalačná príručka . . . 115
SL
Priročnik za namestitev . . . 121
SV
Installationshandbok . . . 127
TR
Kurulum Kılavuzu . . . 133
SERIES PRINTER / SERIE D'IMPRIMANTES
HP LaserJet Information Engineering

HP LaserJet Information Engineering

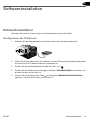
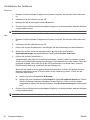
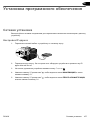
Software installation
Network installation
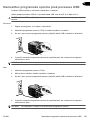
Use a network connection to connect multiple computers to the product.
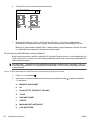
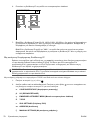
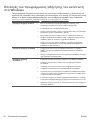
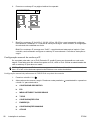
Configure the IP address
1. Connect the network cable to the product and the network port.
2. Wait for 60 seconds before continuing. During this time, the network recognizes the product
and assigns an IP address or hostname for the product.
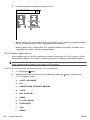
3. At the product control panel, press the Home button
.
4. Press the down arrow
to highlight the INFORMATION menu, and then press the OK button.
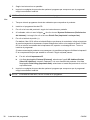
5. Press the down arrow
to highlight the PRINT CONFIGURATION menu, and then press the
OK button.
ENWW Network installation 1
EN
1
HP LaserJet Information Engineering

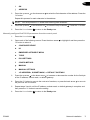
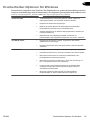
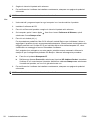
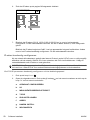
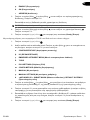
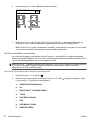
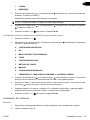
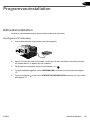
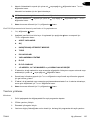
6. Find the IP address on the Embedded Jetdirect page.
HP Color LaserJet CP4525 Printers
Embedded Jetdirect Page
7. IPv4: If the IP address is 0.0.0.0, or 192.0.0.192, or 169.254.x.x, you must manually configure
the IP address. See the instructions that follow. Otherwise, the network configuration was
successful.
IPv6: If the IP address begins with "fe80:", the product should be able to print. If not, you must
manually configure the IP address. See the instuctions that follow.
Manual IP address configuration
If your network supports it, use Internet Protocol version 6 (IPv6) for the most secure network printing.
For networks that do not support IPv6, use IPv4. Ask your network administrator for the IP address
that you should use.
NOTE: In general, use IPv6 for Windows Vista, Macintosh, Unix, and Linux operating systems.
Use IPv4 for other Windows operating systems and for home networks.
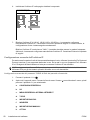
Manually configure IPv6 TCP/IP parameters from the control panel
1. Press the Home button
.
2. Open each of the following menus. Press the down arrow
to highlight it and then press the
OK button to select it.
a. CONFIGURE DEVICE
b. I/O
c. EMBEDDED JETDIRECT MENU
d. TCP/IP
e. IPV6 SETTINGS
f. ADDRESS
g. MANUAL SETTINGS
h. ENABLE
2 Software installation ENWW
2
HP LaserJet Information Engineering

i. ON
j. ADDRESS
3. Press the up arrow
or the down arrow to select the first character of the address. Press the
OK button.
Repeat this process for each character in the address.
NOTE: You must press the OK button after entering each character.
4. Press the up arrow or the down arrow to select the stop character . Press the OK button.
5. Press the Home button
to return to the Ready state.
Manually configure IPv4 TCP/IP parameters from the control panel
1. Press the Home button
.
2. Open each of the following menus. Press the down arrow
to highlight it and then press the
OK button to select it.
a. CONFIGURE DEVICE
b. I/O
c. EMBEDDED JETDIRECT MENU
d. TCP/IP
e. IPV4 SETTINGS
f. CONFIG METHOD
g. MANUAL
h. MANUAL SETTINGS
i. <IP ADDRESS>, SUBNET MASK, or DEFAULT GATEWAY
3. Press the up arrow
or the down arrow to increase or decrease the number for the first byte
of the IP address, subnet mask, or default gateway.
4. Press the OK button to move to the next set of numbers, or press the back arrow
to move to
the previous set of numbers.
5. Repeat steps 3 and 4 until the IP address, subnet mask, or default gateway is complete, and
then press the OK button to save the setting.
6. Press the Home button
to return to the Ready state.
ENWW Network installation 3
EN
3
HP LaserJet Information Engineering

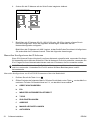
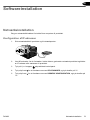
Install the software
Windows
1. Quit all open programs on each computer that will share the product.
2. Install the software from the CD.
3. Follow the onscreen instructions.
4. Print a page from any program to make sure that the software is correctly installed.
NOTE: If the installation failed, reinstall the software.
Mac
1. Quit all open programs on each computer that will share the product.
2. Install the software from the CD.
3. Click the product icon, and follow the onscreen instructions.
4. At the computer, open the Apple menu
, click the System Preferences menu, and then click
the Print & Fax icon.
5. Click the plus symbol (+).
By default, Mac OS X uses the Bonjour method to find the driver and add the product to the
printer pop-up menu. This method is best in most situations. If Mac OS X cannot find the HP
printer driver, an error message displays. Reinstall the software.
If you are connecting the product to a large network, you might need to use IP printing to connect
rather than Bonjour. Follow these steps:
a. Click the IP Printer button.
b. From the Protocol drop-down list, select the HP Jetdirect-Socket option. Enter the IP
address or host name for the product. From the Print Using drop-down list, select the
product model if one is not already selected.
6. Print a page from any program to make sure that the software is correctly installed.
NOTE: If the installation failed, reinstall the software.
4 Software installation ENWW
4
HP LaserJet Information Engineering

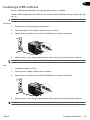
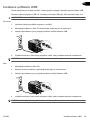
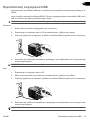
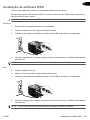
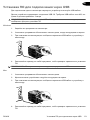
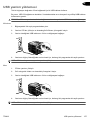
USB software installation
Use a USB cable to connect a single computer directly to the product.
This product supports a USB 2.0 connection. You must use an A-to-B type USB cable that is no
longer than 2 m (6.5 ft).
CAUTION: Do not connect the USB cable until the installation software prompts you to connect it.
Windows
1. Quit all open programs on the computer.
2. Install the software from the CD, and follow the onscreen instructions.
3. When the software prompts you, connect the USB cable to the product and the computer.
4. Print a page from any program to make sure that the software is correctly installed.
NOTE: If the installation failed, reinstall the software.
Mac
1. Install the software from the CD.
2. Click the product icon, and follow the onscreen instructions.
3. When the software prompts you, connect the USB cable to the product and the computer.
4. Print a page from any program to make sure that the software is correctly installed.
NOTE: If the installation failed, reinstall the software.
ENWW USB software installation 5
EN
5
HP LaserJet Information Engineering

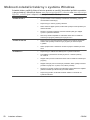
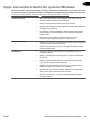
Printer-driver options for Windows
Printer drivers provide access to the product features and allow the computer to communicate with
the product (using a printer language). The following printer drivers are available at
www.hp.com/
go/cljcp4025_software or www.hp.com/go/cljcp4525_software.
HP PCL 6 driver
●
Provided as the default driver. This driver is automatically installed unless
you select a different one.
●
Recommended for all Windows environments
●
Provides the overall best speed, print quality, and product-feature support
for most users
●
Developed to align with the Windows Graphic Device Interface (GDI) for the
best speed in Windows environments
●
Might not be fully compatible with third-party and custom software programs
that are based on PCL 5
HP UPD PS driver
●
Recommended for printing with Adobe
®
software programs or with other
highly graphics-intensive software programs
●
Provides support for printing from postscript emulation needs, or for
postscript flash font support
HP UPD PCL 5
●
Recommended for general office printing in Windows environments
●
Compatible with previous PCL versions and older HP LaserJet products
●
The best choice for printing from third-party or custom software programs
●
The best choice when operating with mixed environments, which require the
product to be set to PCL 5 (UNIX, Linux, mainframe)
●
Designed for use in corporate Windows environments to provide a single
driver for use with multiple printer models
●
Preferred when printing to multiple printer models from a mobile Windows
computer
6 Software installation ENWW
6
HP LaserJet Information Engineering

Installation du logiciel
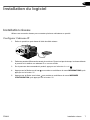
Installation réseau
Utilisez une connexion réseau pour connecter plusieurs ordinateurs au produit.
Configurer l'adresse IP
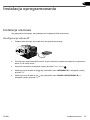
1. Reliez le produit au port réseau à l'aide du câble réseau.
2. Patientez pendant 60 secondes avant de continuer. Durant ce laps de temps, le réseau détecte
le produit et lui attribue une adresse IP ou un nom d'hôte.
3. Sur le panneau de commande du produit, appuyez sur le bouton Accueil
.
4. Appuyez sur la flèche vers le bas
pour mettre en surbrillance le menu INFORMATIONS, puis
appuyez sur le bouton OK.
5. Appuyez sur la flèche vers le bas
pour mettre en surbrillance le menu IMPRIMER
CONFIGURATION, puis appuyez sur le bouton OK.
FRWW Installation réseau 1
FR
7
HP LaserJet Information Engineering

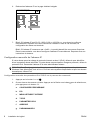
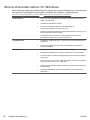
6. Recherchez l'adresse IP sur la page Jetdirect intégrée.
HP Color LaserJet CP4525 Printers
Embedded Jetdirect Page
7. IPv4 : Si l'adresse IP est 0.0.0.0, 192.0.0.192 ou 169.254.x.x, vous devez la configurer
manuellement. Reportez-vous aux instructions ci-dessous. Dans le cas contraire, la
configuration du réseau est terminée.
IPv6 : Si l'adresse IP commence par « fe80: », le produit devrait être en mesure d'imprimer.
Dans le cas contraire, vous devez configurer l'adresse IP manuellement. Reportez-vous aux
instructions ci-dessous.
Configuration manuelle de l'adresse IP
Si votre réseau prend en charge le protocole Internet version 6 (IPv6), utilisez-le pour bénéficier
d'une impression réseau sécurisée. Si votre réseau ne prend pas en charge ce protocole, utilisez le
protocole IPv4. Demandez l'adresse IP à votre administrateur réseau.
REMARQUE : En règle générale, utilisez le protocole IPv6 pour les systèmes d'exploitation
Windows Vista, Macintosh, Unix et Linux. Pour tout autre système d'exploitation et pour les réseaux
domestiques, utilisez IPv4.
Configuration manuelle des paramètres IPv6 TCP/IP via le panneau de commande
1. Appuyez sur le bouton Accueil
.
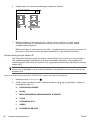
2. Ouvrez chacun des menus suivants. Appuyez sur la flèche vers le bas
pour le sélectionner,
puis appuyez sur le bouton OK.
a. CONFIGURER PERIPHERIQUE
b. E/S
c. MENU JETDIRECT INTEGRE
d. TCP/IP
e. PARAMETRES IPV6
f. ADRESSE
g. PARAM MANUELS
2 Installation du logiciel FRWW
8
HP LaserJet Information Engineering

h. ACTIVER
i. ACTIVE
j. ADRESSE
3. Appuyez sur la flèche vers le haut
ou vers le bas pour sélectionner le premier caractère
de l'adresse. Appuyez sur le bouton OK.
Répétez l'opération pour chaque caractère de l'adresse.
REMARQUE : Vous devez appuyer sur le bouton OK après avoir entré chaque caractère.
4. Appuyez sur la flèche vers le haut ou la flèche vers le bas pour sélectionner le caractère
d'arrêt
. Appuyez sur le bouton OK.
5. Appuyez sur le bouton Accueil
pour revenir à l'état Prêt.
Configuration manuelle des paramètres IPv4 TCP/IP via le panneau de commande
1. Appuyez sur le bouton Accueil
.
2. Ouvrez chacun des menus suivants. Appuyez sur la flèche vers le bas
pour le sélectionner,
puis appuyez sur le bouton OK.
a. CONFIGURER PERIPHERIQUE
b. E/S
c. MENU JETDIRECT INTEGRE
d. TCP/IP
e. PARAMETRES IPV4
f. METHODE CONFIG.
g. MANUEL
h. PARAM MANUELS
i. <ADRESSE IP>, MASQUE SOUS-RESEAU, ou PASSERELLE PAR DEFAUT
3. Appuyez sur la flèche vers le haut
ou la flèche vers le bas pour augmenter ou diminuer le
nombre du premier octet de l'adresse IP, du masque de sous-réseau ou de la passerelle par
défaut.
4. Appuyez sur le bouton OK pour passer au groupe de chiffres suivant ou appuyez sur la flèche
vers la gauche
pour passer au groupe précédent.
5. Répétez les étapes 3 et 4 jusqu'à ce que l'adresse IP, le masque de sous-réseau ou la
passerelle par défaut soit complet, puis appuyez sur le bouton OK pour enregistrer le paramètre.
6. Appuyez sur le bouton Accueil
pour revenir à l'état Prêt.
FRWW Installation réseau 3
FR
9
HP LaserJet Information Engineering

Installation du logiciel
Windows
1. Fermez tous les programmes ouverts sur tous les ordinateurs qui partageront le produit.
2. Installez le logiciel depuis le CD.
3. Suivez les instructions à l'écran.
4. Imprimez une page de votre choix pour vous assurer que le logiciel est installé correctement.
REMARQUE : En cas d'échec de l'installation, réinstallez le logiciel.
Mac
1. Fermez tous les programmes ouverts sur tous les ordinateurs qui partageront le produit.
2. Installez le logiciel depuis le CD.
3. Cliquez sur l'icône du produit et suivez les instructions à l'écran.
4. Sur l'ordinateur, ouvrez le menu Pomme
, cliquez sur le menu Préférences système, puis
sur l'icône Imprimer & Télécopier.
5. Cliquez sur le signe plus (+).
Par défaut, Mac OS X utilise le logiciel Bonjour pour localiser le pilote et ajouter le produit dans
le menu contextuel des imprimantes. Dans la plupart des cas, cette solution est celle qui
fonctionne le mieux. Si Mac OS X ne trouve pas le pilote d'imprimante HP, un message d'erreur
s'affiche. Réinstallez le logiciel.
Si vous souhaitez connecter votre produit sur un réseau étendu, vous devrez peut-être utiliser
l'option Impression IP plutôt que le logiciel Bonjour pour effectuer la connexion. Suivez les
étapes ci-dessous :
a. Cliquez sur le bouton Imprimante IP.
b. Dans la liste déroulante Protocole, sélectionnez l'option HP Jetdirect-Socket. Saisissez
l'adresse IP ou le nom d'hôte du produit. Dans la liste déroulante Imprimer via,
sélectionnez le modèle du produit si ce n'est pas encore fait.
6. Imprimez une page de votre choix pour vous assurer que le logiciel est installé correctement.
REMARQUE : En cas d'échec de l'installation, réinstallez le logiciel.
4 Installation du logiciel FRWW
10
HP LaserJet Information Engineering

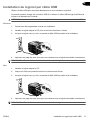
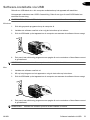
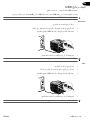
Installation du logiciel par câble USB
Utilisez un câble USB pour connecter directement un seul ordinateur au produit.
Ce produit prend en charge une connexion USB 2.0. Utilisez un câble USB de type A-à-B dont la
longueur ne dépasse pas 2 mètres.
ATTENTION : Attendez les instructions du logiciel d'installation pour connecter le câble USB.
Windows
1. Fermez tous les programmes ouverts sur l'ordinateur.
2. Installez le logiciel depuis le CD, puis suivez les instructions à l'écran.
3. Lorsque le logiciel vous y invite, connectez le câble USB au produit et à l'ordinateur.
4. Imprimez une page de votre choix pour vous assurer que le logiciel est installé correctement.
REMARQUE : En cas d'échec de l'installation, réinstallez le logiciel.
Mac
1. Installez le logiciel depuis le CD.
2. Cliquez sur l'icône du produit et suivez les instructions à l'écran.
3. Lorsque le logiciel vous y invite, connectez le câble USB au produit et à l'ordinateur.
4. Imprimez une page de votre choix pour vous assurer que le logiciel est installé correctement.
REMARQUE : En cas d'échec de l'installation, réinstallez le logiciel.
FRWW Installation du logiciel par câble USB 5
FR
11
HP LaserJet Information Engineering

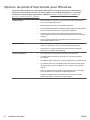
Options du pilote d'imprimante pour Windows
Les pilotes d'imprimante vous permettent d'accéder aux fonctions du produit et permettent à
l'ordinateur de communiquer avec ce dernier (grâce à un langage d'impression). Les pilotes
d'impression suivants sont disponibles à l'adresse
www.hp.com/go/cljcp4025_software ou
www.hp.com/go/cljcp4525_software.
Pilote HP PCL 6
●
Pilote d'impression par défaut. Ce pilote est installé automatiquement si
vous n'en avez pas choisi d'autre.
●
Recommandé pour tous les environnements Windows
●
Offre la vitesse la plus rapide, la meilleure qualité d'impression et la meilleure
prise en charge de fonctions pour la plupart des utilisateurs
●
Conçu pour être conforme avec l'interface Windows Graphic Device
Interface (GDI) afin d'offrir la vitesse la plus rapide sur les environnements
Windows
●
Peut ne pas être entièrement compatible avec les logiciels tiers ou
personnalisés basés sur PCL 5
Pilote HP UPD PS
●
Recommandé pour les impressions avec les logiciels Adobe
®
et autres
logiciels qui présentent un très grand nombre d'objets graphiques
●
Offre la prise en charge de l'impression liée aux besoins d'émulation
postscript ou de la police flash postscript.
Pilote HP UPD PCL 5
●
Recommandé pour les impressions de bureau sous Windows
●
Compatible avec les anciennes versions PCL et les anciens produits
HP LaserJet
●
La meilleure option d'impression à partir de logiciels tiers ou personnalisés
●
La meilleure option pour une utilisation dans des environnements mixtes,
qui exigent que le produit soit défini sur PCL 5 (UNIX, Linux, ordinateur
central)
●
Conçu pour être utilisé sous Windows en entreprise. Inclut un seul pilote
pour une utilisation avec plusieurs modèles d'imprimante.
●
A utiliser de préférence pour des impressions sur plusieurs modèles
d'imprimante depuis un ordinateur portable Windows
6 Installation du logiciel FRWW
12
HP LaserJet Information Engineering

Softwareinstallation
Netzwerkinstallation
Verbinden Sie mehrere Computer über eine Netzwerkverbindung mit dem Gerät.
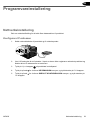
Konfigurieren der IP-Adresse
1. Schließen Sie das Netzwerkkabel an das Gerät und an den Netzwerkanschluss an.
2. Warten Sie 60 Sekunden, bevor Sie fortfahren. In dieser Zeit erkennt das Netzwerk das Gerät
und weist ihm eine IP-Adresse oder einen Hostnamen zu.
3. Drücken Sie auf dem Bedienfeld des Geräts die Taste Home
.
4. Drücken Sie auf die Nach-unten-Taste
, um das Menü INFORMATIONEN zu markieren, und
drücken Sie dann auf die Taste OK.
5. Drücken Sie auf die Nach-unten-Taste
, um das Menü KONFIGURATION DRUCKEN zu
markieren, und drücken Sie dann auf die Taste OK.
DEWW Netzwerkinstallation 1
DE
13
HP LaserJet Information Engineering

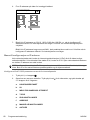
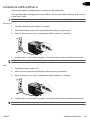
6. Suchen Sie die IP-Adresse auf der Seite für das integrierte Jetdirect.
HP Color LaserJet CP4525 Printers
Embedded Jetdirect Page
7. IPv4: Wenn die IP-Adresse 0.0.0.0, 192.0.0.192 oder 169.254.x.x lautet, müssen Sie sie
manuell konfigurieren. Siehe die folgenden Anweisungen. Andernfalls war die
Netzwerkkonfiguration erfolgreich.
IPv6: Wenn die IP-Adresse mit „fe80:“ beginnt, ist das Gerät für den Druck bereit. Konfigurieren
Sie andernfalls die IP-Adresse manuell. Siehe die folgenden Anweisungen.
Manuelles Konfigurieren der IP-Adresse
Wenn IPv6 (Internet Protocol Version 6) von Ihrem Netzwerk unterstützt wird, verwenden Sie dieses
für Netzwerkdruck mit höchster Sicherheit. Falls Ihr Netzwerk IPv6 nicht unterstützt, verwenden Sie
IPv4. Fragen Sie Ihren Netzwerkadministrator nach der IP-Adresse, die Sie verwenden sollten.
HINWEIS: Grundsätzlich sollten Sie IPv6 für die Betriebssysteme Windows Vista, Macintosh, Unix
und Linux verwenden. Verwenden Sie IPv4 für andere Windows-Betriebssysteme und für
Heimnetzwerke.
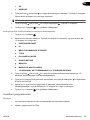
Manuelles Konfigurieren von IPv6-TCP/IP-Parametern über das Bedienfeld
1. Drücken Sie auf die Taste Home
.
2. Öffnen Sie jedes der folgenden Menüs. Drücken Sie die Nach-unten-Taste
, um das Menü zu
markieren. Drücken Sie anschließend auf OK, um das Menü auszuwählen.
a. GERÄT KONFIGURIEREN
b. E/A
c. MENÜ FÜR INTEGRIERTEN JETDIRECT
d. TCP/IP
e. IPV6-EINSTELLUNGEN
f. ADRESSE
g. MANUELLE EINSTELLUNGEN
h. AKTIVIEREN
2 Softwareinstallation DEWW
14
HP LaserJet Information Engineering

i. EIN
j. ADRESSE
3. Drücken Sie auf die Nach-oben-Taste
oder die Nach-unten-Taste , um das erste Zeichen
der Adresse auszuwählen. Drücken Sie auf die Taste OK.
Wiederholen Sie diesen Vorgang für jedes Zeichen der Adresse.
HINWEIS: Sie müssen nach jeder Zeicheneingabe auf die Taste OK drücken.
4. Drücken Sie auf die Nach-oben-Taste oder auf die Nach-unten-Taste , um das
Stoppzeichen
auszuwählen. Drücken Sie auf die Taste OK.
5. Drücken Sie auf die Taste Home
, um zum Zustand Bereit zurückzukehren.
Manuelles Konfigurieren von IPv4-TCP/IP-Parametern über das Bedienfeld
1. Drücken Sie auf die Taste Home
.
2. Öffnen Sie jedes der folgenden Menüs. Drücken Sie die Nach-unten-Taste
, um das Menü zu
markieren. Drücken Sie anschließend auf OK, um das Menü auszuwählen.
a. GERÄT KONFIGURIEREN
b. E/A
c. MENÜ FÜR INTEGRIERTEN JETDIRECT
d. TCP/IP
e. IPV4-EINSTELLUNGEN
f. KONFIG.METHODE
g. MANUELL
h. MANUELLE EINSTELLUNGEN
i. <IP-ADRESSE>, TEILNETZMASKE oder STANDARD-GATEWAY
3. Drücken Sie auf die Nach-oben-Taste
oder auf die Nach-unten-Taste , um die Zahl für das
erste Byte der IP-Adresse, Subnetzmaske oder des Standardgateways zu erhöhen oder zu
verringern.
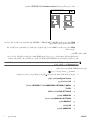
4. Drücken Sie auf OK, um zur nächsten Zahlengruppe zu springen. Drücken Sie die Zurück-
taste (
), um zur vorherigen Zahlengruppe zu springen.
5. Wiederholen Sie die Schritte 3 und 4, bis die IP-Adresse, Subnetzmaske oder das Standard-
gateway vollständig sind, und drücken Sie dann auf die Taste OK, um die Einstellung zu
speichern.
6. Drücken Sie auf die Taste Home
, um zum Zustand Bereit zurückzukehren.
DEWW Netzwerkinstallation 3
DE
15
HP LaserJet Information Engineering

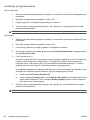
Installieren der Software
Windows
1. Beenden Sie alle laufenden Programme auf jedem Computer, der mit dem Gerät verbunden
ist.
2. Installieren Sie die Software von der CD.
3. Befolgen Sie die Anweisungen auf dem Bildschirm.
4. Drucken Sie eine Seite aus einem beliebigen Programm, um sicherzustellen, dass die Software
richtig installiert wurde.
HINWEIS: Wenn die Installation fehlgeschlagen ist, müssen Sie die Software neu installieren.
Mac
1. Beenden Sie alle laufenden Programme auf jedem Computer, der mit dem Gerät verbunden
ist.
2. Installieren Sie die Software von der CD.
3. Klicken Sie auf das Gerätesymbol, und befolgen Sie die Anweisungen auf dem Bildschirm.
4. Öffnen Sie auf dem Computer das Apple-Menü
, klicken Sie auf das Menü
Systemeinstellungen und anschließend auf das Symbol Drucken und Faxen.
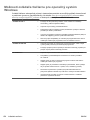
5. Klicken Sie auf das Pluszeichen (+).
Standardmäßig nutzt Mac OS X die Bonjour-Methode, um den Treiber zu ermitteln und das
Gerät zum Drucker-Einblendmenü hinzuzufügen. Diese Methode ist in den meisten Fällen die
geeignete Auswahl. Wenn Mac OS X den HP Druckertreiber nicht finden kann, wird eine
Fehlermeldung angezeigt. Installieren Sie die Software neu.
Wenn Sie das Gerät in einem großen Netzwerk anschließen, müssen Sie statt der Bonjour-
Methode möglicherweise die IP-Druck-Option für die Verbindung nutzen. Führen Sie die
folgenden Schritte aus:
a. Klicken Sie auf die Schaltfläche IP-Drucker.
b. Wählen Sie in der Dropdown-Liste Protokoll die Option HP Jetdirect-Socket aus. Geben
Sie die IP-Adresse oder den Hostnamen für das Gerät ein. Wenn noch kein Modell
ausgewählt ist, wählen Sie aus der Dropdown-Liste Druckverwendung das Gerätemodell
aus.
6. Drucken Sie eine Seite aus einem beliebigen Programm, um sicherzustellen, dass die Software
richtig installiert wurde.
HINWEIS: Wenn die Installation fehlgeschlagen ist, müssen Sie die Software neu installieren.
4 Softwareinstallation DEWW
16
HP LaserJet Information Engineering

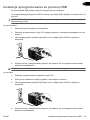
USB-Softwareinstallation
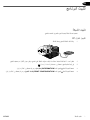
Verbinden Sie einen einzelnen Computer über ein USB-Kabel mit dem Gerät.
Dieses Produkt unterstützt eine USB 2.0-Verbindung. Sie benötigen für den Anschluss ein USB-
Kabel mit einem Typ-A- und einem Typ-B-Stecker (Höchstlänge 2 m).
ACHTUNG: Schließen Sie das USB-Kabel erst an, wenn Sie während der Installation dazu
aufgefordert werden.
Windows
1. Beenden Sie alle laufenden Programme auf dem Computer.
2. Installieren Sie die Software von der CD, und befolgen Sie die Anweisungen auf dem
Bildschirm.
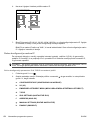
3. Wenn Sie von der Software dazu aufgefordert werden, schließen Sie das USB-Kabel an das
Gerät und an den Computer an.
4. Drucken Sie eine Seite aus einem beliebigen Programm, um sicherzustellen, dass die Software
richtig installiert wurde.
HINWEIS: Wenn die Installation fehlgeschlagen ist, müssen Sie die Software neu installieren.
Mac
1. Installieren Sie die Software von der CD.
2. Klicken Sie auf das Gerätesymbol, und befolgen Sie die Anweisungen auf dem Bildschirm.
3. Wenn Sie von der Software dazu aufgefordert werden, schließen Sie das USB-Kabel an das
Gerät und an den Computer an.
4. Drucken Sie eine Seite aus einem beliebigen Programm, um sicherzustellen, dass die Software
richtig installiert wurde.
DEWW USB-Softwareinstallation 5
DE
17
HP LaserJet Information Engineering

HINWEIS: Wenn die Installation fehlgeschlagen ist, müssen Sie die Software neu installieren.
6 Softwareinstallation DEWW
18
HP LaserJet Information Engineering
Strona jest ładowana ...
Strona jest ładowana ...
Strona jest ładowana ...
Strona jest ładowana ...
Strona jest ładowana ...
Strona jest ładowana ...
Strona jest ładowana ...
Strona jest ładowana ...
Strona jest ładowana ...
Strona jest ładowana ...
Strona jest ładowana ...
Strona jest ładowana ...
Strona jest ładowana ...
Strona jest ładowana ...
Strona jest ładowana ...
Strona jest ładowana ...
Strona jest ładowana ...
Strona jest ładowana ...
Strona jest ładowana ...
Strona jest ładowana ...
Strona jest ładowana ...
Strona jest ładowana ...
Strona jest ładowana ...
Strona jest ładowana ...
Strona jest ładowana ...
Strona jest ładowana ...
Strona jest ładowana ...
Strona jest ładowana ...
Strona jest ładowana ...
Strona jest ładowana ...
Strona jest ładowana ...
Strona jest ładowana ...
Strona jest ładowana ...
Strona jest ładowana ...
Strona jest ładowana ...
Strona jest ładowana ...
Strona jest ładowana ...
Strona jest ładowana ...
Strona jest ładowana ...
Strona jest ładowana ...
Strona jest ładowana ...
Strona jest ładowana ...
Strona jest ładowana ...
Strona jest ładowana ...
Strona jest ładowana ...
Strona jest ładowana ...
Strona jest ładowana ...
Strona jest ładowana ...
Strona jest ładowana ...
Strona jest ładowana ...
Strona jest ładowana ...
Strona jest ładowana ...
Strona jest ładowana ...
Strona jest ładowana ...
Strona jest ładowana ...
Strona jest ładowana ...
Strona jest ładowana ...
Strona jest ładowana ...
Strona jest ładowana ...
Strona jest ładowana ...
Strona jest ładowana ...
Strona jest ładowana ...
Strona jest ładowana ...
Strona jest ładowana ...
Strona jest ładowana ...
Strona jest ładowana ...
Strona jest ładowana ...
Strona jest ładowana ...
Strona jest ładowana ...
Strona jest ładowana ...
Strona jest ładowana ...
Strona jest ładowana ...
Strona jest ładowana ...
Strona jest ładowana ...
Strona jest ładowana ...
Strona jest ładowana ...
Strona jest ładowana ...
Strona jest ładowana ...
Strona jest ładowana ...
Strona jest ładowana ...
Strona jest ładowana ...
Strona jest ładowana ...
Strona jest ładowana ...
Strona jest ładowana ...
Strona jest ładowana ...
Strona jest ładowana ...
Strona jest ładowana ...
Strona jest ładowana ...
Strona jest ładowana ...
Strona jest ładowana ...
Strona jest ładowana ...
Strona jest ładowana ...
Strona jest ładowana ...
Strona jest ładowana ...
Strona jest ładowana ...
Strona jest ładowana ...
Strona jest ładowana ...
Strona jest ładowana ...
Strona jest ładowana ...
Strona jest ładowana ...
Strona jest ładowana ...
Strona jest ładowana ...
Strona jest ładowana ...
Strona jest ładowana ...
Strona jest ładowana ...
Strona jest ładowana ...
Strona jest ładowana ...
Strona jest ładowana ...
Strona jest ładowana ...
Strona jest ładowana ...
Strona jest ładowana ...
Strona jest ładowana ...
Strona jest ładowana ...
Strona jest ładowana ...
Strona jest ładowana ...
Strona jest ładowana ...
Strona jest ładowana ...
Strona jest ładowana ...
Strona jest ładowana ...
Strona jest ładowana ...
Strona jest ładowana ...
Strona jest ładowana ...
Strona jest ładowana ...
Strona jest ładowana ...
Strona jest ładowana ...
Strona jest ładowana ...
Strona jest ładowana ...
Strona jest ładowana ...
Strona jest ładowana ...
Strona jest ładowana ...
Strona jest ładowana ...
Strona jest ładowana ...
-
 1
1
-
 2
2
-
 3
3
-
 4
4
-
 5
5
-
 6
6
-
 7
7
-
 8
8
-
 9
9
-
 10
10
-
 11
11
-
 12
12
-
 13
13
-
 14
14
-
 15
15
-
 16
16
-
 17
17
-
 18
18
-
 19
19
-
 20
20
-
 21
21
-
 22
22
-
 23
23
-
 24
24
-
 25
25
-
 26
26
-
 27
27
-
 28
28
-
 29
29
-
 30
30
-
 31
31
-
 32
32
-
 33
33
-
 34
34
-
 35
35
-
 36
36
-
 37
37
-
 38
38
-
 39
39
-
 40
40
-
 41
41
-
 42
42
-
 43
43
-
 44
44
-
 45
45
-
 46
46
-
 47
47
-
 48
48
-
 49
49
-
 50
50
-
 51
51
-
 52
52
-
 53
53
-
 54
54
-
 55
55
-
 56
56
-
 57
57
-
 58
58
-
 59
59
-
 60
60
-
 61
61
-
 62
62
-
 63
63
-
 64
64
-
 65
65
-
 66
66
-
 67
67
-
 68
68
-
 69
69
-
 70
70
-
 71
71
-
 72
72
-
 73
73
-
 74
74
-
 75
75
-
 76
76
-
 77
77
-
 78
78
-
 79
79
-
 80
80
-
 81
81
-
 82
82
-
 83
83
-
 84
84
-
 85
85
-
 86
86
-
 87
87
-
 88
88
-
 89
89
-
 90
90
-
 91
91
-
 92
92
-
 93
93
-
 94
94
-
 95
95
-
 96
96
-
 97
97
-
 98
98
-
 99
99
-
 100
100
-
 101
101
-
 102
102
-
 103
103
-
 104
104
-
 105
105
-
 106
106
-
 107
107
-
 108
108
-
 109
109
-
 110
110
-
 111
111
-
 112
112
-
 113
113
-
 114
114
-
 115
115
-
 116
116
-
 117
117
-
 118
118
-
 119
119
-
 120
120
-
 121
121
-
 122
122
-
 123
123
-
 124
124
-
 125
125
-
 126
126
-
 127
127
-
 128
128
-
 129
129
-
 130
130
-
 131
131
-
 132
132
-
 133
133
-
 134
134
-
 135
135
-
 136
136
-
 137
137
-
 138
138
-
 139
139
-
 140
140
-
 141
141
-
 142
142
-
 143
143
-
 144
144
-
 145
145
-
 146
146
-
 147
147
-
 148
148
-
 149
149
-
 150
150
-
 151
151
-
 152
152


HP Color LaserJet Enterprise CP4025 Printer series Instrukcja instalacji
- Typ
- Instrukcja instalacji
- Ten podręcznik jest również odpowiedni dla
w innych językach
- čeština: HP Color LaserJet Enterprise CP4025 Printer series instalační příručka
- español: HP Color LaserJet Enterprise CP4025 Printer series Guía de instalación
- italiano: HP Color LaserJet Enterprise CP4025 Printer series Guida d'installazione
- Deutsch: HP Color LaserJet Enterprise CP4025 Printer series Installationsanleitung
- slovenčina: HP Color LaserJet Enterprise CP4025 Printer series Návod na inštaláciu
- svenska: HP Color LaserJet Enterprise CP4025 Printer series Installationsguide
- português: HP Color LaserJet Enterprise CP4025 Printer series Guia de instalação
- français: HP Color LaserJet Enterprise CP4025 Printer series Guide d'installation
- Türkçe: HP Color LaserJet Enterprise CP4025 Printer series Yükleme Rehberi
- English: HP Color LaserJet Enterprise CP4025 Printer series Installation guide
- dansk: HP Color LaserJet Enterprise CP4025 Printer series Installationsvejledning
- русский: HP Color LaserJet Enterprise CP4025 Printer series Инструкция по установке
- suomi: HP Color LaserJet Enterprise CP4025 Printer series Asennusohje
- Nederlands: HP Color LaserJet Enterprise CP4025 Printer series Installatie gids
- română: HP Color LaserJet Enterprise CP4025 Printer series Ghid de instalare
Powiązane dokumenty
-
HP LaserJet Enterprise P3015 Printer series Instrukcja obsługi
-
HP Color LaserJet CP3520 Printer Series Instrukcja obsługi
-
HP LaserJet Enterprise 700 Printer M712 series Instrukcja instalacji
-
HP DesignJet T1300 PostScript Printer instrukcja
-
HP Color LaserJet Managed MFP E67650 series Instrukcja instalacji
-
-
-
-
HP LaserJet Enterprise M606 series Instrukcja instalacji
-
