Dell PowerEdge T105 Skrócona instrukcja obsługi
- Typ
- Skrócona instrukcja obsługi

FILE LOCATION: H:\Enterprise\Pandora\DL1358 - Pandora Getting Started Guide A01\EMEA - JN548
A01\EN\fc.fm
DELL CONFIDENTIAL – PRELIMINARY 5/5/08 – FOR PROOF ONLY
Current template as of 4/26/2007
Model EMT
Dell™ PowerEdge™
T105 Systems
Getting Started
With Your System
Začínáme se systémem
Guide de mise en route
Erste Schritte mit dem System
Τα πρώτα βήµατα µε το σύστηµά σας
Rozpoczęcie pracy z systemem
Начало работы с системой
Procedimientos iniciales con el sistema
תכרעמה םע הדובעה תליחת


Model EMT
Dell™ PowerEdge™
T105 Systems
Getting Started
With Your System

Notes, Notices, and Cautions
NOTE: A NOTE indicates important information that helps you make better use
of your computer.
NOTICE: A NOTICE indicates either potential damage to hardware or loss of data
and tells you how to avoid the problem.
CAUTION: A CAUTION indicates a potential for property damage, personal injury,
or death.
____________________
Information in this document is subject to change without notice.
© 2008 Dell Inc. All rights reserved.
Reproduction in any manner whatsoever without the written permission of Dell Inc. is strictly
forbidden.
Trademarks used in this text: Dell, the Dell logo, and PowerEdge are trademarks of Dell Inc.; AMD,
AMD Opteron, and AMD Sempron are trademarks of Advanced Micro Devices Inc.; Intel is a registered
trademark of Intel corporation in the U.S. and other countries. Microsoft, Windows, and Windows
Server are either trademarks or registered trademarks of Microsoft Corporation in the United States
and/or other countries; Red Hat and Red Hat Enterprise Linux are registered trademarks of Red Hat, Inc.;
SUSE is a registered trademark of Novell Inc.
Other trademarks and trade names may be used in this document to refer to either the entities claiming
the marks and names or their products. Dell Inc. disclaims any proprietary interest in trademarks and
trade names other than its own.
Model EMT
April 2008 P/N JN548 Rev. A01

Contents 3
Contents
System Features . . . . . . . . . . . . . . . . . . . . . . 5
Supported Operating Systems
. . . . . . . . . . . . . . . 6
Other Information You May Need
. . . . . . . . . . . . . 7
Obtaining Technical Assistance . . . . . . . . . . . . . 7
Installation and Configuration
. . . . . . . . . . . . . . . 8
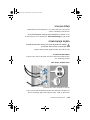
Unpack the System
. . . . . . . . . . . . . . . . . . 8
Connect the Keyboard, Mouse, and Monitor
. . . . . 8
Connect the System to Power
. . . . . . . . . . . . 9
Turn on the System and Monitor
. . . . . . . . . . . 9
Complete the 0perating System Setup
. . . . . . . . . . 10
Technical Specifications
. . . . . . . . . . . . . . . . 10

4 Contents

Getting Started With Your System 5
System Features
This section describes the major hardware and software features of your
system. It also provides information about other documents you may need
when setting up your system and how to obtain technical assistance.
• One dual-core or quad-core AMD™ Opteron™ 1000 processor or AMD
Sempron™ with ECC processor (when available).
NOTE: Use the System Setup program to view processor information.
See the Hardware Owner’s Manual.
• A minimum of 512 MB of 667- or 800-MHz DDR II SDRAM memory,
upgradable to a maximum of 8 GB DDR II SDRAM memory by installing
512-MB, 1-GB, or 2-GB unbuffered ECC memory modules in the four
memory module sockets on the system board, single- or dual-rank.
• Support for the following internal hard-drive (non–hot-plug)
configurations:
– Up to two internal 3.5-inch SATA hard drives with an integrated SATA
controller
or
– Up to two internal 3.5-inch Serial-Attached SCSI (SAS) hard drives
with a SAS controller card
• One 3.5-inch peripheral drive bay for the optional diskette drive, and
two 5.25-inch bays for the following supported drives: DVD-ROM,
combination CD-RW/DVD, DVD-RW, or tape backup device.
NOTE: DVD devices are data only.
• Support for the following RAID volumes with an optional SAS RAID
controller card: simple, spanned, striped (RAID 0), and mirrored (RAID 1).
• Support for USB 2.0.
• A chassis intrusion alert.

6 Getting Started With Your System
The system board includes the following integrated features:
• Dual-channel SATA controller that supports up to two supported devices
including, DVD-ROM, CDRW/DVD combination drive, DVD-RW, and
a SATA tape backup device.
NOTE: DVD devices are data-only.
• SATA controller that supports up to two cabled SATA hard drives.
• One 32-bit, 33-MHz PCI expansion card slot, one PCI Express x1
expansion slot, and two PCI Express x8 expansion slots.
• An integrated ATI ES1000 2D graphics controller with 32 MB of graphics
memory. Maximum resolution is 1600x1200 with 65,536 colors; true-color
graphics are supported in the following resolutions: 640 x 480, 800 x 600,
1024 x 768, and 1280 x 1024.
• An integrated Gigabit NIC, capable of supporting 1000-Mbps, 100-Mbps,
or 10-Mbps data rates, with support for PXE and Wake-on-LAN.
• Eight USB 2.0-compliant connectors (two on the front, one internal for
a bootable memory key, and five on the back) capable of supporting a
diskette drive, a CD-ROM drive, a keyboard, a mouse, or a USB flash drive.
• Back-panel connectors include serial, video, five USB connectors,
and one NIC connector.
• Front-panel connectors include two USB connectors.
• Four front-panel system diagnostic LEDs for failure messaging and
notification during startup.
For more information about specific features, see "Technical Specifications"
on page 10.
Supported Operating Systems
Your system supports the following operating systems:
• Microsoft
®
Windows Server
®
2008, Standard Edition (32-bit x86)
• Microsoft Windows Server 2008, Standard Edition (64-bit x86)
• Microsoft Windows Server 2003, Standard Edition x86 and EMT64T

Getting Started With Your System 7
• Microsoft Windows Server 2003, R2 Standard and Enterprise Editions
with SP2 x86 and EM64T
• Microsoft Windows
®
Small Business Server 2003 R2 Standard
and Premium Editions x86 and EM64T
•Red Hat
®
Enterprise Linux
®
(version 5) x86_64
•SUSE
®
LINUX Enterprise Server 10 x86_64
Other Information You May Need
CAUTION: The Product Information Guide provides important safety and
regulatory information. Warranty information may be included within this
document or as a separate document.
• The
Hardware Owner’s Manual
provides information about system
features and describes how to troubleshoot the system and install or
replace system components. This document can be found on the CDs
that came with your system or on
support.dell.com
.
• CDs included with your system provide documentation and tools
for configuring and managing your system.
• Updates are sometimes included with the system to describe changes
to the system, software, and/or documentation.
NOTE: Always check for updates on support.dell.com and read the updates
first because they often supersede information in other documents.
• Release notes or readme files may be included to provide last-minute
updates to the system or documentation or advanced technical reference
material intended for experienced users or technicians.
• Operating system documentation describes how to install (if necessary),
configure, and use the operating system software.
• Documentation for any components you purchased separately provides
information to configure and install these options.
Obtaining Technical Assistance
If you do not understand a procedure in this guide or if the system does
not perform as expected, see your Hardware Owner’s Manual.
Dell Enterprise Training and Certification is available; see dell.com/training
for more information. This service may not be offered in all locations.

8 Getting Started With Your System
Installation and Configuration
CAUTION: Before performing the following procedure, read and follow the safety
instructions and important regulatory information in your Product Information
Guide.
This section describes the steps to set up your system for the first time.
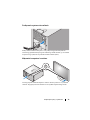
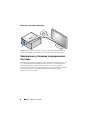
Unpack the System
Unpack your system and identify each item. Keep all shipping materials
in case you need them later.
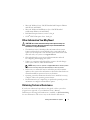
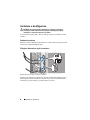
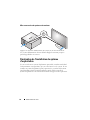
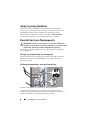
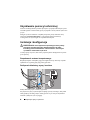
Connect the Keyboard, Mouse, and Monitor
Connect the keyboard, mouse, and monitor (optional).
The connectors on the back of your system have icons indicating which
cable to plug into each connector. Be sure to tighten the screws (if any)
on the monitor's cable connector.

Getting Started With Your System 9
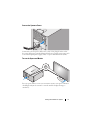
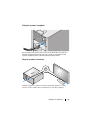
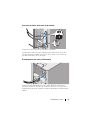
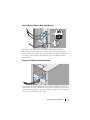
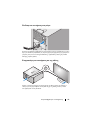
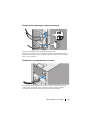
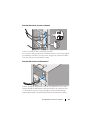
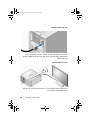
Connect the System to Power
Connect the system’s power cable to the system. Next, plug the other end of
the power cable into a grounded electrical outlet or a separate power source such
as an uninterrupted power supply (UPS) or a power distribution unit (PDU).
Turn on the System and Monitor
Press the power button on the system and the monitor. The power indicators
should light. Adjust the monitor's controls until the displayed image is
satisfactory.

10 Getting Started With Your System
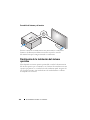
Complete the 0perating System Setup
If you purchased a preinstalled operating system, see the operating system
documentation that ships with your system. To install an operating system
for the first time, see the Quick Installation Guide. Be sure the operating system
is installed before installing hardware or software not purchased with the
system.
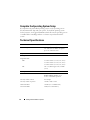
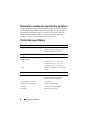
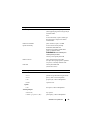
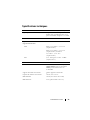
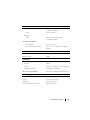
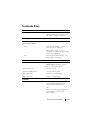
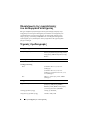
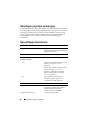
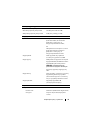
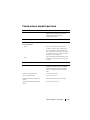
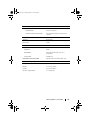
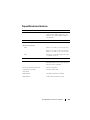
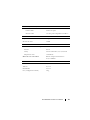
Technical Specifications
Processor
Processor type One AMD
™
Opteron
™
dual- or quad-
core 1000 series or AMD
™
Sempron
™
processor, with ECC series.
Expansion Bus
Bus type PCI and PCIe
Expansion slots
PCIe
2.5-Gb/sec PCIe x1, 3.3-V, 12-V (slot 4)
2.5-Gb/sec PCIe x8, 3.3-V, 12-V (slot 1)
2.5-Gb/sec PCIe x8, 3.3-V, 12-V (slot 2)
PCI One 3.3-V, half-length, 32-bit, 33-MHz
(slot 3)
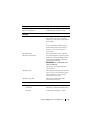
Memory
Architecture
72-bit, ECC, PC-6400, Unbuffered,
DDR II SDRAM, DIMMs, rated
for
667- or 800-MHz operation
Memory module sockets four 240-pin
Memory module capacities
512 MB, 1 GB, or 2 GB
Minimum RAM
512 MB (one 512-MB module)
Maximum RAM 8 GB (four 2-GB modules)

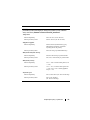
Getting Started With Your System 11
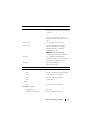
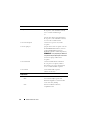
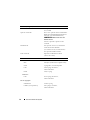
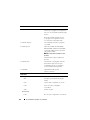
Drives
Hard Drives
Up to two non–hot-plug, 3.5-inch, internal
SATA hard drives with the integrated SATA
controller
or
Up to two non–hot-plug, 3.5-inch,
internal SAS drives with a SAS controller
card
Diskette drive one optional 2.5-inch, 1.44-MB
Optical drives up to two optional internal SATA
Interface DVD-ROM, combination
CD-RW/DVD drives, DVD-RW
(SATA interface only)
NOTE: DVD devices are data only.
external optional USB optical disk drive
Tape drive one optional internal half-height,
5.25-inch SCSI (for use in 5.25-inch bay
only) with optional SCSI controller
Flash drive optional USB flash drive
(internal or external)
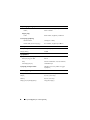
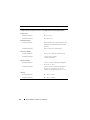
Connectors
Back
NIC
one RJ-45 (for Broadcom Gigabit LOM)
Serial
9-pin, DTE, 16550-compatible
USB
five 4-pin, USB 2.0-compliant
Video
15-pin VGA
Front
USB
two 4-pin, USB 2.0-compliant
Internally accessible
SATA channels
four 7-pin
USB key (for memory key)
one 4-pin, USB 2.0-compliant

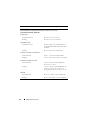
12 Getting Started With Your System
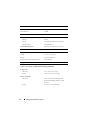
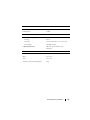
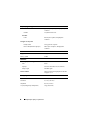
Video
Video type Integrated
Video memory 32 MB
Power
AC power supply (per power supply)
Wa tt ag e
305 W
Voltage 100-120V/200-240V, 9/4.5A, 50/60 Hz,
Heat dissipation
1040 BTU/Hour
CMOS Backup Battery CR 2032 3.0-V lithium ion coin cell
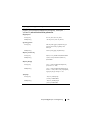
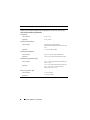
Physical
Height 41.3 cm (16.25 inches)
Width 18.7 cm (7.36 inches)
Depth 45.8 cm (18 inches)
Weight (maximum configuration) 13 kg (28.6 lb)
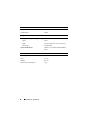
Environmental
NOTE: For additional information about environmental measurements for specific
system configurations, see dell.com/environmental_datasheets.
Temperature
Operating
10° to 35°C (50° to 95°F)
Storage
–40° to 65°C (–40° to 149°F)
Relative humidity
Operating
20% to 80% (noncondensing) with a
maximum humidity gradient of 10%
per hour
Storage
5% to 95% (noncondensing)

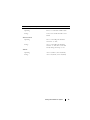
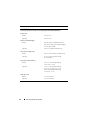
Getting Started With Your System 13
Maximum vibration
Operating
0.26 G, 5 to 350 Hz at 0.0002 G2/Hz
Storage
1.54 G, 10 to 250 Hz at 0.003 to 0.01
G2/Hz
Maximum shock
Operating
31 G +/- 10% with pulse duration
of 2.6 msec +/- 10%,
Storage
71 G +/- 10% with pulse duration
of 2 msec +/- 10%, 32G +/-5% with
velocity change of 270 ips +/- 5%
Altitude
Operating
–15.2 to 3,048 m (–50 to 10,000 ft)
Storage
–15.2 to 10,600 m (–50 to 35,000 ft)
Environmental (continued)

14 Getting Started With Your System

Model EMT
Dell™ PowerEdge™
Systémy T105
Začínáme
se systémem

Poznámky, a upozornění
POZNÁMKA: POZNÁMKA označuje důležitou informaci, s jejíž pomocí
lépe využijete svůj počítač.
UPOZORNĚNÍ: UPOZORNĚNÍ poukazuje na možnost poškození
hardwaru nebo ztráty dat a poskytuje návod, jak se danému problému
vyhnout.
POZOR: VAROVÁNÍ označuje hrozící nebezpečí poškození majetku,
poranění nebo usmrcení osob.
____________________
Informace obsažené v tomto dokumentu podléhají změnám bez předchozího upozornění.
© 2008 Dell Inc. Všechna práva vyhrazena.
Jakákoli reprodukce tohoto dokumentu je bez písemného souhlasu společnosti Dell Inc.
přísně zakázána.
Obchodní známky použité v tomto textu: Dell, logo Dell a PowerEdge jsou obchodní známky
společnosti Dell Inc.; AMD, AMD Opteron, a AMD Sempron jsou obchodní známky společnosti
Advanced Micro Devices Inc.; Intel je registrovaná obchodní známka společnosti Intel v USA a dalších
zemích. Microsoft, Windows, a Windows Server jsou obchodní známky nebo registrované obchodní
známky společnosti Microsoft Corporation v USA a/nebo dalších zemích; Red Hat a Red Hat Enterprise
Linux jsou registrované obchodní známky společnosti Red Hat, Inc.; SUSE je registrovaná obchodní
známka společnosti Novell Inc.
V tomto dokumentu mohou být použity další obchodní známky a názvy odkazující na subjekty,
kterým tyto známky či názvy patří, nebo na jejich výrobky. Společnost Dell Inc. se zříká jakýchkoli
vlastnických zájmů o jiné než vlastní ochranné známky a obchodní názvy.
Model EMT
Duben 2008 Č. dílu JN548 Rev. A01

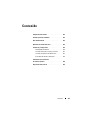
Obsah 17
Obsah
Systémové funkce . . . . . . . . . . . . . . . . . . 19
Podporované operační systémy
. . . . . . . . . 20
Další užitečné informace
. . . . . . . . . . . . . . 21
Odborná pomoc
. . . . . . . . . . . . . . . . . . . 21
Instalace a konfigurace . . . . . . . . . . . . . . . 22
Rozbalení systému . . . . . . . . . . . . . . . . 22
Připojení klávesnice, myši a monitoru
. . . . . 22
Připojení systému k napájení
. . . . . . . . . . 23
Zapnutí systému a monitoru
. . . . . . . . . . . 23
Dokončení nastavení operačního
systému
. . . . . . . . . . . . . . . . . . . . . . . . 24
Technická specifikace
. . . . . . . . . . . . . . . 24

18 Obsah
Strona się ładuje...
Strona się ładuje...
Strona się ładuje...
Strona się ładuje...
Strona się ładuje...
Strona się ładuje...
Strona się ładuje...
Strona się ładuje...
Strona się ładuje...
Strona się ładuje...
Strona się ładuje...
Strona się ładuje...
Strona się ładuje...
Strona się ładuje...
Strona się ładuje...
Strona się ładuje...
Strona się ładuje...
Strona się ładuje...
Strona się ładuje...
Strona się ładuje...
Strona się ładuje...
Strona się ładuje...
Strona się ładuje...
Strona się ładuje...
Strona się ładuje...
Strona się ładuje...
Strona się ładuje...
Strona się ładuje...
Strona się ładuje...
Strona się ładuje...
Strona się ładuje...
Strona się ładuje...
Strona się ładuje...
Strona się ładuje...
Strona się ładuje...
Strona się ładuje...
Strona się ładuje...
Strona się ładuje...
Strona się ładuje...
Strona się ładuje...
Strona się ładuje...
Strona się ładuje...
Strona się ładuje...
Strona się ładuje...
Strona się ładuje...
Strona się ładuje...
Strona się ładuje...
Strona się ładuje...
Strona się ładuje...
Strona się ładuje...
Strona się ładuje...
Strona się ładuje...
Strona się ładuje...
Strona się ładuje...
Strona się ładuje...
Strona się ładuje...
Strona się ładuje...
Strona się ładuje...
Strona się ładuje...
Strona się ładuje...
Strona się ładuje...
Strona się ładuje...
Strona się ładuje...
Strona się ładuje...
Strona się ładuje...
Strona się ładuje...
Strona się ładuje...
Strona się ładuje...
Strona się ładuje...
Strona się ładuje...
Strona się ładuje...
Strona się ładuje...
Strona się ładuje...
Strona się ładuje...
Strona się ładuje...
Strona się ładuje...
Strona się ładuje...
Strona się ładuje...
Strona się ładuje...
Strona się ładuje...
Strona się ładuje...
Strona się ładuje...
Strona się ładuje...
Strona się ładuje...
Strona się ładuje...
Strona się ładuje...
Strona się ładuje...
Strona się ładuje...
Strona się ładuje...
Strona się ładuje...
Strona się ładuje...
Strona się ładuje...
Strona się ładuje...
Strona się ładuje...
Strona się ładuje...
Strona się ładuje...
Strona się ładuje...
Strona się ładuje...
Strona się ładuje...
Strona się ładuje...
Strona się ładuje...
Strona się ładuje...
Strona się ładuje...
Strona się ładuje...
Strona się ładuje...
Strona się ładuje...
Strona się ładuje...
Strona się ładuje...
-
 1
1
-
 2
2
-
 3
3
-
 4
4
-
 5
5
-
 6
6
-
 7
7
-
 8
8
-
 9
9
-
 10
10
-
 11
11
-
 12
12
-
 13
13
-
 14
14
-
 15
15
-
 16
16
-
 17
17
-
 18
18
-
 19
19
-
 20
20
-
 21
21
-
 22
22
-
 23
23
-
 24
24
-
 25
25
-
 26
26
-
 27
27
-
 28
28
-
 29
29
-
 30
30
-
 31
31
-
 32
32
-
 33
33
-
 34
34
-
 35
35
-
 36
36
-
 37
37
-
 38
38
-
 39
39
-
 40
40
-
 41
41
-
 42
42
-
 43
43
-
 44
44
-
 45
45
-
 46
46
-
 47
47
-
 48
48
-
 49
49
-
 50
50
-
 51
51
-
 52
52
-
 53
53
-
 54
54
-
 55
55
-
 56
56
-
 57
57
-
 58
58
-
 59
59
-
 60
60
-
 61
61
-
 62
62
-
 63
63
-
 64
64
-
 65
65
-
 66
66
-
 67
67
-
 68
68
-
 69
69
-
 70
70
-
 71
71
-
 72
72
-
 73
73
-
 74
74
-
 75
75
-
 76
76
-
 77
77
-
 78
78
-
 79
79
-
 80
80
-
 81
81
-
 82
82
-
 83
83
-
 84
84
-
 85
85
-
 86
86
-
 87
87
-
 88
88
-
 89
89
-
 90
90
-
 91
91
-
 92
92
-
 93
93
-
 94
94
-
 95
95
-
 96
96
-
 97
97
-
 98
98
-
 99
99
-
 100
100
-
 101
101
-
 102
102
-
 103
103
-
 104
104
-
 105
105
-
 106
106
-
 107
107
-
 108
108
-
 109
109
-
 110
110
-
 111
111
-
 112
112
-
 113
113
-
 114
114
-
 115
115
-
 116
116
-
 117
117
-
 118
118
-
 119
119
-
 120
120
-
 121
121
-
 122
122
-
 123
123
-
 124
124
-
 125
125
-
 126
126
-
 127
127
-
 128
128


