Indesit sixl 149 s Instrukcja obsługi
- Kategoria
- Pralki
- Typ
- Instrukcja obsługi
Niniejsza instrukcja jest również odpowiednia dla

GB
GB
1
English, 1
Contents
Installation, 2-3
Unpacking and levelling
Connecting the electricity and water supplies
Technical details
Description of the machine, 4-5
Self-cleaning detergent dispenser drawer
Control panel
Load balancing system
Running a wash cycle, 6
Wash programmes, 7
Detergents and laundry, 8
Preparing the laundry
Washing recommendations
Precautions and advice, 9
General safety
Disposal
Saving energy and respecting the environment
Drip-tray system
Care and maintenance, 10
Cutting off the water or electricity supply
Cleaning the machine
Cleaning the detergent dispenser drawer
Caring for the door and drum of your appliance
Cleaning the pump
Checking the water inlet hose
Troubleshooting, 11
Service, 12
WASHING MACHINE
SIXL 149 S
Instructions for use
GB
Polski,13
PL

2
GB
A
Installation
This instruction manual should be kept in a safe
place for future reference. If the appliance is sold,
transferred or moved, make sure that the instruction
manual remains with the machine so that the new
owner is able to familiarise himself/herself with its
operation and features.
Read these instructions carefully: they contain vital
information relating to the safe installation and
operation of the appliance.
Unpacking and levelling
Unpacking
1. Unpack the washing machine.
2. Make sure that the machine has not been
damaged during the transportation process. If it has
been damaged, contact the retailer and do not
proceed any further with the installation process.
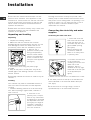
3. Remove the 4
protective screws (used
during transportation)
and the rubber washer
with the corresponding
spacer, located on the
rear part of the appliance
(see figure).
4. Close off the holes using the plastic plugs
provided.
5. Keep all the parts in a safe place: they will be
needed again if the washing machine is moved to
another location.
Packaging materials should not be used as toys for
children.
Levelling
Your machine may make a considerable amount of
noise if the two front feet have not been adjusted
correctly.
1. Install the washing machine on a flat and sturdy
floor, without placing it against walls, cabinets or
other furniture.
2. If the floor is not
perfectly level, compen-
sate for any unevenness
by tightening or loosening
the adjustable front feet
(see figure); the angle of
inclination, measured in
relation to the worktop,
must not exceed 2°.
Levelling the machine correctly will provide it with
stability, help to avoid vibrations and excessive noise
and prevent it from shifting while it is operating. If it is
placed on carpet or a rug, adjust the feet in such a
way as to allow a sufficient ventilation space
underneath the machine.
Connecting the electricity and water
supplies
Connecting the water inlet hose
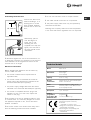
1. Insert seal A into the
end of the inlet hose and
screw the latter onto a
cold water tap with a 3/4
gas threaded opening
(see figure).
Before performing the
connection, allow the
water to run freely until it
is perfectly clear.
2. Connect the inlet hose
to the machine by
screwing it onto the cold
water inlet of the
appliance, which is
situated on the top right-
hand side of the rear part
of the appliance(see
figure).
3. Make sure that the hose is not folded over or bent.
The water pressure at the tap must fall within the
values indicated in the Technical details table (see
next page).
If the inlet hose is not long enough, contact a
specialised shop or an authorised technician.

GB
GB
3
Technical details
Model
SIXL 149 S
Dimensions
59.5 cm wide
85 cm high
53.5 cm deep
Capacity
from 1 to 6 kg
Electric
connections
please refer to the technical data plate
fixed to the machine
Water
connections
maximum pressure 1 MPa (10 bar)
minimum pressure 0.05 MPa (0.5 bar)
drum capacity 52 litres
Spin speed
up to 1400 rpm
Control
programmes
according to EN
60456 directive
programme ;
run with a load of 6 kg.
This appliance is compliant with the
following European Community
Directives:
- 73/23/CEE of 19/02/73 (Low
Voltage) and subsequent amendments
- 89/336/CEE of 03/05/89
(Electromagnetic Compatibility) and
subsequent amendments
- 2002/96/CE
65 - 100 cm
Connecting the drain hose
Connect the drain hose,
without bending it, to a
draining duct or a wall
drain situated between
65 and 100 cm from the
floor;
alternatively, place it
over the edge of a
basin, sink or tub,
fastening the duct
supplied to the tap (see
figure). The free end of
the hose should not be
underwater.
We advise against the use of hose extensions; if it
is absolutely necessary, the extension must have the
same diameter as the original hose and must not
exceed 150 cm in length.
Electrical connections
Before plugging the appliance into the electricity
socket, make sure that:
the socket is earthed and complies with all
applicable laws;
the socket is able to withstand the maximum
power load of the appliance as indicated in the
Technical data table (see opposite);
the power supply voltage falls within the values
indicated in the Technical data table(see opposite);
the socket is compatible with the plug of the
appliance. If this is not the case, replace the
socket or the plug.
The machine must not be installed outdoors, even
in covered areas. It is extremely dangerous to leave
the appliance exposed to rain, storms and other
weather conditions.
The mains socket must remain within easy reach
after the washing machine has been installed.
Do not use extension cords or multiple sockets.
The cable should not be bent or compressed.
The power supply cable must only be replaced by
authorised technicians.
Warning! The company shall not be held responsible
in the event that these regulations are not respected.

4
GB
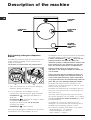
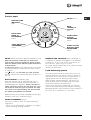
Description of the machine
CONTROL
PANEL
PORTHOLE
DOOR
PORTHOLE
DOOR
HANDLE
ACCESS
PANEL FOR
THE DRAIN
PUMP
Self-cleaning detergent dispenser
drawer
This washing machine is fitted with an innovative self-
cleaning detergent drawer which enhances the
quality of each wash.
The drawer is located inside the porthole door.
1. Open the porthole door to access the detergent
dispenser drawer (see figure A).
2. Pour the detergent or the additive into the
compartments, over the protective grilles, as follows:
Compartment
: detergent and additives in
liquid form.
Compartment
: detergent in powder or tablet
form and powder addititves.
To place the tablets inside, lift up the grille
protecting the drawer.
Compartment
: fabric softener.
Pouring liquid detergent or additives into the central
compartment may cause leakages to occur.
The detergent level can be seen through the corresponding
transparent windows provided on the compartment.
Inside compartments and , there are also
floating indicators (see figure B) . When the
maximum quantity of detergent/fabric softener has
been measured out, the indicators rise until they
touch the grilles protecting the compartments.
We recommend that the maximum levels
indicated on the detergent dispenser drawer are
not exceeded.
We recommend that the dosage instructions on
the detergent packaging are followed carefully. If
using certain particularly thick types of detergent,
we suggest that these are placed directly inside the
drum and not in the detergent dispenser drawer.
Exceeding the maximum levels indicated on the
machine may cause the detergent to leak out of the
bottom part of the drawer.
Exceeding the stated amount of detergent does not
result in a more effective was; it simply pollutes the
environment more.
The water used during the wash cycle will remove
any excess detergent from the drawer. It is, however,
possible to remove the drawer manually (see Care
and Maintenance).
To facilitate the process of measuring out the
detergents, we recommend that the dosing device
supplied with the washing machine is used.
The maximum capacity of the drawer is as follows:
- liquid detergents: 1 1/2 measures
- powder detergents: 2 measures
- fabric softener: 1 measure
M
A
X
M
A
X
STOP
STOP
AB
ADJUSTABLE FEET

GB
GB
5
ON/OFF button
DOOR
LOCKED red
indicator
light
WASHING TIME
INDICATOR
lights
START DAILY
WASH 30
PROGRAMME
button
START DELICATES
PROGRAMME
button
START WHITE
COTTON
PROGRAMME
button
START COLOUR
MIX EASY-IRON
PROGRAMME
button
Control panel
ON/OFF button: press this to switch the machine on or off.
When the machine is switched on, the buttons
used to start various programmes begin to flash,
while the washing time indicator lights illuminate in
a fixed manner.
To cancel the cycle, press and hold the on/off button
for approximately 2 seconds while the wash cycle is
in progress.
The
indicator light will flash for a few seconds
and the machine will automatically drain the water in
the tub.
DOOR LOCKED red indicator light:
when the indicator light is illuminated the door is
locked to prevent it being opened accidentally; to
avoid damaging the appliance, wait for the light to
switch off before opening the door after the cycle
has ended or when the cycle is paused. The light
will remain lit for approximately two minutes after
the washing programme has finished.
Rapid flashing of the DOOR LOCKED indicator light
indicates a fault (see Troubleshooting).
START PROGRAMME buttons:
press one of these to start the selected washing
programme.
- button lit in a fixed manner: programme in progress.
- buttons flashing: awaiting selection.
WASHING TIME INDICATOR lights: these light up
in sequence to indicate the progress of the washing
programme. At the end of the programme all
the indicator lights begin to flash.
For further details, please refer to the chapter entitled
Running a wash cycle.
Load balancing system
To avoid excessive vibrations before every spin, the
machine distributes the load in a uniform manner by
rotating the drum continuously at a speed which is
slightly greater than the washing rotation speed.
When, despite repeated attempts, the load is not
perfectly distributed, the machine spins at a lower
speed than stated for the wash cycle.
If the load is excessively unbalanced, the machine
performs the distribution process instead of spinning.
Balancing attempts may increase the total duration of
the cycle, up to a maximum of 10 minutes.

6
GB
Running a wash cycle
Note: Once the appliance has been installed, and
before you use it for the first time, run a wash cycle
with detergent and no laundry, using the
programme.
1. SWITCH ON THE MACHINE by pressing the ON/
OFF
button. The icons for the START
PROGRAMME buttons begin to flash and the
WASHING TIME INDICATOR lights light up in a
fixed manner, to indicate that the washing machine
is ready to receive instructions.
2. LOAD THE LAUNDRY. Open the door using the
handle. Load the laundry, making sure you do not
exceed the maximum load value indicated in the
table of programmes on the following page.
3. MEASURE OUT THE DETERGENT AND
ADDITIVES.
Pour the detergents into the drawer located inside
the porthole door, taking care not to exceed the
maximum levels indicated on the surface of the
drawer and by the floating indicators. For further
details, please refer to the chapter entitled
Description of the machine.
4. CLOSE THE DOOR.
5. START THE
WASHING
PROGRAMME by
pressing the
corresponding START
PROGRAMME
BUTTON. The icon
corresponding to the
selected programme
illuminates in a fixed
manner, and all the wash time indicator lights
switch off. The DOOR LOCKED indicator light
illuminates in a fixed manner, to signal the
activation of the door safety device.
For a description of the wash programmes
available, please refer to the chapter entitled
Wash programmes.
The procedure used to start the DELICATES
programme is different; see paragraph "Delicates
30°" on the following page.
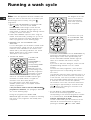
During the programme the WASH TIME
INDICATOR lights illuminate in sequence, indicating
how much of the programme has already been
completed.
The diagram at the side
refers to a situation in
which approximately
50% of the cycle has
been completed.
At the end of the cycle,
all the WASHING TIME
INDICATOR lights begin
to flash.
6. The WASH PROGRAMME can be SUSPENDED by
pressing the illuminated start programme button
which begins to flash. After approximately two
minutes the DOOR LOCKED indicator light will
switch off to indicate that the door may be
opened.
If you wish to add more detergent, make sure that
the MAX floating indicator is not in a raised
position.
To restart the wash programme, close the door
again and press the corresponding start button
once more.
To guarantee maximum safety, whenever there is a
quantity of water in the drum which could leak out
of the machine, it will not be possible to open the
door (the DOOR LOCKED indicator light will remain
lit even after the two minutes have passed).
The machine, in this case, should be switched off
by pressing for approximately 2 seconds the ON/
OFF
button, then waiting for the water to be
drained automatically.
7. AT THE END OF THE PROGRAMME
At the end of the wash programme, the icon
corresponding to the selected programme remains
lit in a fixed manner, while all the washing time
indicator lights begin to flash.
To start a new wash cycle the machine must be
switched off and switched back on again, by
pressing the ON/OFF
button TWO TIMES.

GB
GB
7
Wash programmes
*Note: for information relating to excluding the spin cycle in the delicates programme, please refer to the
Delicates 30° paragraph further down the page.
**Note: for information relating to rinsing hand-washed clothes in cold water, please refer to the
Daily wash 30 / Cold water rinse paragraph further down the page.
WHITE COTTON 60°
Designed for the washing of all durable white cotton
garments. Higher washing temperatures offer improved
washing results in Class A appliances.
COLOUR MIX 40° / EASY-IRON
This programme can be used to wash all your coloured
garments, whether cotton or synthetic fabric. The spin
cycle is carefully controlled during the entire wash cycle,
so as to reduce the formation of creases in the fabric
and make it easier to iron.
Cotton and synthetic garments can be washed at the
same time.
DELICATES 30°
A cycle designed for the washing of all woollen, silk and
delicate garments. As these garments have different
features, this programme requires an activation
process which is different from the others:
+ DELICATES CYCLE WITH FINAL SPIN (for
woollen garments): press the START DELICATES
PROGRAMME
button. After approximately 3
seconds, the START DELICATES PROGRAMME
and START DAILY WASH PROGRAMME buttons
begin to flash. Press the START DELICATES
PROGRAMME
button to perform the wash, which
ends with a delicate spin cycle. This programme
includes drum movements which have been carefully
researched to remove excess water from the fabric,
thereby reducing friction and helping to protect your
woollen garments.
+ DELICATES CYCLE WITH SPIN PHASE
EXCLUDED (for silk and viscose garments and for
curtains; not to be used for washing wool):
press the START DELICATES PROGRAMME
button. After approximately 3 seconds, the START
DELICATES PROGRAMME
and START DAILY
WASH PROGRAMME
buttons begin to flash. Press
the START DAILY WASH PROGRAMME
button to
perform the wash without the final spin cycle. At the
end of the cycle, the machine will automatically drain
the water contained in the drum. We recommend that
the garments are removed from the washing machine
straight away, in order to limit the formation of creases.
DAILY WASH 30 / COLD WATER RINSE
This programme can be used to wash lightly soiled
cotton or synthetic fabrics, or garments with the "wash
at 30°"
instruction on the label, in just 30 minutes. It
is also possibile to rinse cotton or synthetic garments
which have been washed by hand (this does not include
wool or silk).
Thanks to its special sensors, the washing machine
is able to recognise when the garments placed in the
drum have detergent on them.
- if no detergent is detected on the clothes, the DAILY
WASH 30' cycle will be performed;
- if detergent is detected (cloths which have been
washed by hand), the COLD WATER RINSE cycle will
be performed automatically.
AUTOMATIC RINSE MANAGEMENT
The rinse function is monitored and controlled in every
programme by special sensors. If the garments are
very soapy at the end of the wash, the rinse cycle
will be extended automatically until the detergent is
removed completely. In this case the wash
programme duration may be slightly increased in relation
to the information given in the table of programmes.
The duration of the programmes indicated in the table are for guidance purposes only, and are calculated based on an average load quantity.
Button Fabrics
Max.
load
(kg)
Te m pe ratu r e
Spin
speed
(rpm)
Cycle
duration
(minutes)
Wash cycle description
WHITE COTTON
Durable white cotton
6 60°C 1400 135
Wash cycle, rinse cycles, intermediate
and final spin cycles
COLOR MIX 40° / EASY IRON
Coloured cotton
and synthetics
4,5 40°C 1000 105
Wash cycle, rinse cycles and delicate
spin cycle
DELICATES
Wool (final delicate spin
cycle)
1,5 30°C 600 50
Wash cycle, rinse cycles and delicate
spin cycle
Silk and curtains (without
final spin cycle)
1,5 30°C no* 50
Wash cycle, rinse cycles and drainage
DAILY
WASH /
COLD WATER RINSE
Cotton and synthetics
3
30°/cold
water**
800 30
Wash cycle (only if the "
Rapid
wash"
programme activated), rinse cycles,
delicate spin cycle
+
+

8
GB
Washing recommendations
Bed and bathroom laundry (sheets, towels,
bathrobes, etc.): use the WHITE COTTON
programme which guarantees the most efficient
wash in Class A appliances. The intensive spin
cycle eliminates all excess water efficiently.
White cotton garments (shirts, T-shirts,
tablecloths, etc.): use the WHITE COTTON 60°
programme. If there are any stubborn stains, they
should be pre-treated with solid soap before the
wash cycle is started.
Coloured cotton garments (shirts, T-shirts,
underwear, etc.): use the COLOUR MIX 40°
programme, which maximises the performance of
the wash without damaging the colours. The spin
cycle phase, thanks to the incorporated EASY
IRON function, reduces the formation of creases
at the end of the wash, making the fabric easier
to iron. We recommend the use of liquid
detergent.
White or coloured synthetic garments (shirts,
T-shirts, underwear, etc.): use the COLOUR MIX
40°
programme. We recommend that white
and coloured garments are not washed in the
same wash cycle, to prevent any colour leakage
from seeping into the white clothing. We
recommend the use of liquid detergent.
Coloured synthetic and cotton garments, with
wash at 30°
instruction on the care label: use
the DAILY WASH 30
programme. The low
washing temperature protects the coloured fabrics.
We recommend the use of liquid detergent.
Woollen garments (jumpers, scarves, etc.): use
the DELICATES 30° programme with final spin
+ . The movement of the drum during the
wash and the delicate spin cycle reduces fabric
matting. We recommend the use of detergents
specifically designed for woollen garments. We
recommend that the maximum load level is not
exceeded.
Silk garments (shirts, underwear, etc.): use the
DELICATES 30° programme with the spin excluded
+ . Try not to leave the laundry in the drum for
too long after the wash cycle has finished, to
prevent excessive creasing.
Curtains: use the DELICATES 30° programme
with the spin excluded
+ . We recommend
they are folded and placed inside a pillowcase or a
mesh bag. Wash them separately, making sure
the maximum load level is not exceeded.
How much does your laundry weigh?
1 sheet 400-500 g
1 pillow case 150-200 g
1 tablecloth 400-500 g
1 bathrobe 900-1.200 g
1 towel 150-250 g
1 pair of jeans 400-500 g
1 shirt 150-200 g
Detergents and laundry
Preparing the laundry
Divide the laundry according to:
- the type of fabric/the symbol on the label;
- the colours: separate coloured garments from
whites.
Empty all garment pockets and check the
buttons.
Do not exceed the load values indicated for the
Wash programmes.

GB
GB
9
Precautions and advice
This machine was designed and constructed in
accordance with international safety regulations. The
following information is provided for safety reasons
and must therefore be read carefully.
General safety
This appliance was designed for domestic use only.
The machine must only be used by adults, in
accordance with the instructions given in this manual.
Do not touch the machine when barefoot or with
wet or damp hands or feet.
Do not pull on the power supply cable when
unplugging the appliance from the electricity
socket. Hold the plug and pull.
Do not touch the drained water as it may reach
extremely high temperatures.
Never force the porthole door. this could damage
the safety lock mechanism designed to prevent
accidental opening.
If the appliance breaks down, do not under any
circumstances access the internal mechanisms in
an attempt to repair it yourself.
Always keep children well away from the appliance
while it is operating.
The door can become quite hot during the wash cycle.
If the appliance has to be moved, work in a group
of two or three people and handle it with the
utmost care. Never try to do this alone, because
the appliance is very heavy.
Before loading laundry into the washing machine,
make sure the drum is empty.
Disposal
Disposing of the packaging materials: observe local
regulations so that the packaging may be re-used.
The European Directive 2002/96/EC on Waste
Electrical and Electronic Equipment, requires that
old household electrical appliances must not be
disposed of in the normal unsorted municipal
waste stream. Old appliances must be collected
separately in order to optimise the recovery and
recycling of the materials they contain and reduce
the impact on human health and the
environment. The crossed out "wheeled bin"
symbol on the product reminds you of your
obligation, that when you dispose of the appliance
it must be separately collected.
Consumers should contact their local authority or
retailer for information concerning the correct
disposal of their old appliance.
Saving energy and respecting the
environment
Saving detergents, water, energy and time
To avoid wasting resources, the washing machine
should be used with a full load. One full load instead of
two half loads saves up to 50% of the energy used.
Treating stains with a stain remover, or leaving
them to soak before they are washed, reduces the
need to wash the garments at high temperatures.
Use the correct quantity of detergent, in
accordance with the water hardness, how soiled
the garments are and the amount of laundry you
have, in order to avoid wastage and to protect the
environment: although they are biodegradable,
detergents still contain ingredients which alter the
balance of nature. Avoid using fabric softener
wherever possible.
If you use your washing machine between late
afternoon and the early hours of the morning, you will
help to reduce the peak load of the electricity board.
Drip-tray system
The machine is fitted with a drip-tray system on the
inside of the door, which catches any residual drips of
water at the end of the cycle.
We recommend that the dampness level of the
sponge inside the drip-tray compartment is checked
regularly. If necessary, it may be cleaned or replaced
as follows:
1. Remove the
compartment by applying
a light pressure to the
lower part.
2. Remove the sponge
inside it, rinse it under
running water and wring it
out thoroughly. It may
also be replaced with one
of the spare sponges
provided.
3. Place the sponge back inside the compartment.
4. Replace the compartment in the door, making
sure the springs on the door are correctly
inserted into the corresponding slots on the
compartment.
5. Make sure that the compartment is slotted back
into position correctly.
2
1

10
GB
Care and maintenance
Cutting off the water and electricity
supply
Turn off the water tap after every wash. This will
limit wear on the hydraulic system in the machine
and help to prevent leaks.
Unplug the appliance when cleaning it and during
all maintenance work.
Cleaning the machine
The outer parts and rubber components of the
appliance can be cleaned using a soft cloth soaked in
lukewarm soapy water. Do not use solvents or
abrasives.
Cleaning the detergent dispenser
drawer
We recommend you check that there is no
detergent or water inside the detergent drawer
before removing it. If these substances are present,
proceed with care as they may leak out of the
drawer while it is being removed.
The detergent dispenser drawer in this machine is
cleaned automatically during the wash cycles.
However, residues may form very occasionally after
certain detergents have been used. To clean the
drawer, proceed as follows:
1. Open the door to
access the drawer.
2. Remove the drawer by
pulling upwards, holding it
by the central
compartment as
indicated in the figure. Do
not grip the drawer by
the grille as this may
damage it.
3. Unhook the drawer
cover to access the
compartment, as
indicated in the figure.
4. Clean the drawer
under running water.
5. Re-hook the cover
and replace the drawer,
pushing until it clicks into
place.
Caring for the door and drum of your
appliance
Always leave the porthole door ajar in order to
prevent unpleasant odours from forming.
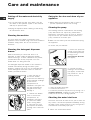
Cleaning the pump
The washing machine is fitted with a self-cleaning
pump which does not require any maintenance.
Sometimes, small items (such as coins or buttons)
may fall into the pre-chamber which protects the
pump, situated in its bottom part.
Make sure the wash cycle has finished and unplug
the appliance.
To access the pre-chamber:
1. remove the protective
casing on the lower part
of the washing machine,
turning it in an
anticlockwise direction
(see figure);
2. unscrew the lid by
rotating it anti-clockwise
(see figure): a little water
may trickle out. This is
perfectly normal;
3. clean the inside thoroughly;
4. screw the lid back on;
5. screw the protective cap back on by turning it in a
clockwise direction, making sure the arrow on the
inside part of the cap is facing upwards.
Checking the water inlet hose
Check the inlet hose at least once a year. If there are
any cracks, it should be replaced immediately: during
the wash cycles, water pressure is very strong and a
cracked hose could easily split open.
Never use second-hand hoses.

GB
GB
11
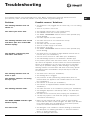
Troubleshooting
Problem:
The washing machine does not
switch on.
The wash cycle wont start.
The washing machine does not fill
with water (the door locked LED
flashes rapidly).
The machine continuously fills
with water and drains.
The washing machine does not
drain or spin.
The machine vibrates a lot during
the spin cycle.
The washing machine leaks.
The DOOR LOCKED indicator light
flashes rapidly.
Too much foam.
Your washing machine could occasionally fail to work. Before contacting the Technical Assistance Centre
(see Service), make sure that the problem is not easily solved using the following list.
Possible causes / Solutions:
The appliance is not plugged into the socket fully, or is not making
contact.
There is no power in the house.
The washing machine door is not closed properly.
The ON/OFF button has not been pressed.
The START PROGRAMME buttons have not been pressed (they
are still flashing).
The water tap has not been opened.
The water inlet hose is not connected to the tap.
The hose is bent.
The water tap has not been opened.
There is no water supply in the house.
The pressure is too low.
The START PROGRAMME buttons have not been pressed (they
are still flashing).
The drain hose is not fitted at a height between 65 and 100 cm
from the floor ( see Installation).
The free end of the hose is under water (see Installation).
The wall drainage system is not fitted with a breather pipe.
If the problem persists even after these checks, shut off the water
tap, switch the appliance off and contact the Technical Assistance
Service. If the dwelling is on one of the upper floors of a building,
there may be problems relating to water drainage, causing the
washing machine to fill with water and drain continuously. Special
anti-draining valves are available in shops and help to avoid this
inconvenience.
The drain hose is bent (see Installation).
The drainage duct is clogged.
The protective screws (used during transportation) were not
removed when the appliance was installed. Remove the screws
(see Installation).
The machine is not level (see Installation).
The machine is trapped between cabinets and walls (see
Installation).
The water inlet hose is not screwed on properly (see Installation).
The detergent dispenser is blocked (to clean it, see Care and
maintenance).
The drain hose is not fixed in place properly (see Installation).
The drip-tray system is full. Clean the sponge or replace it (see
"Precautions and advice").
Switch off the machine and unplug it, wait for approximately 1
minute and then switch it back on again. The wash cycle will have
to be started again from the beginning. If the problem persists,
contact the Technical Assistance Service.
The detergent is not suitable for machine washing (it should bear
the description for washing machines or hand and machine
wash, or similar instructions).
Too much detergent was used.

12
GB
Service
Before calling for Assistance:
Check whether you can solve the problem alone (see Troubleshooting);
Restart the programme to check whether the problem has been solved;
If it has not, contact the Authorised Technical Assistance Service.
If the machine has been installed or used incorrectly, you may be charged for the maintenance callout
service.
Always request the assistance of authorised technicians.
Have the following information to hand:
the type of problem;
the appliance model (Mod.);
the serial number (S/N).
The above information can be found on the data plate located on the appliance itself.

PL
13
Polski
Spis treci
Instalacja, 14-15
Rozpakowanie i wypoziomowanie
Pod³¹czenie do sieci wodnej i elektrycznej
Dane techniczne
Opis maszyny, 16-17
Samooczyszczaj¹ca siê szufladka na rodki pior¹ce
Panel sterowania
System równowa¿enia za³adunku
W jaki sposób wykonaæ cykl prania, 18
Programy prania, 19
rodki pior¹ce i bielizna, 20
Przygotowanie bielizny
Zalecenia dotycz¹ce prania
Zalecenia i rodki ostro¿noci, 21
Ogólne zasady bezpieczeñstwa
Utylizacja
Oszczêdnoæ i ochrona rodowiska
System zbierania kropel
Utrzymanie i konserwacja, 22
Od³¹czenie wody i pr¹du elektrycznego
Czyszczenie maszyny
Czyszczenie szufladki na rodki pior¹ce
Dbanie o okr¹g³e drzwiczki oraz bêben
Czyszczenie pompy
Kontrola przewodu doprowadzaj¹cego wodê
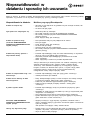
Nieprawid³owoci w dzia³aniu i sposoby
ich usuwania, 23
Serwis Techniczny, 24
PL
PRALKA
SIXL 149 S
Instrukcja obs³ugi

14
PL
A
Instalacja
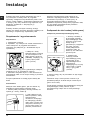
Nale¿y zachowaæ niniejsz¹ ksi¹¿eczkê aby móc z
niej skorzystaæ w ka¿dej chwili. W przypadku
sprzeda¿y, odst¹pienia lub przeniesienia pralki w inne
miejsce, nale¿y zadbaæ o przekazanie ksi¹¿eczki wraz
z maszyn¹, aby nowy w³aciciel móg³ zapoznaæ siê z
dzia³aniem urz¹dzenia i z dotycz¹cymi go
ostrze¿eniami.
Nale¿y uwa¿nie przeczytaæ instrukcjê obs³ugi:
zawiera ona wa¿ne informacje dotycz¹ce instalacji oraz
w³aciwego i bezpiecznego u¿ytkowania pralki.
Rozpakowanie i wypoziomowanie
Rozpakowanie
1. Rozpakowaæ maszynê.
2. Sprawdziæ, czy maszyna nie zosta³a uszkodzona w
czasie transportu. W przypadku stwierdzenia
uszkodzeñ nie pod³¹czaæ jej i skontaktowaæ siê ze
sprzedawc¹.
3. Odkrêciæ 4 ruby
zabezpieczaj¹ce maszynê
na czas transportu oraz
zdj¹æ gumowy element z
podk³adk¹, znajduj¹cy siê
w tylnej czêci pralki
(patrz rysunek).
4. Zatkaæ otwory przy pomocy plastikowych zalepek,
znajduj¹cych siê w wyposa¿eniu maszyny.
5. Zachowaæ wszystkie czêci: w razie koniecznoci
przewiezienia pralki w inne miejsce nale¿y je ponownie
zamontowaæ.
Czêci opakowania nie nadaj¹ siê do zabawy dla
dzieci.
Poziomowanie
Maszyna mo¿e dzia³aæ g³ono, jeli nie dokona siê
prawid³owej regulacji dwóch przednich nó¿ek.
1. Ustawiæ pralkê na p³askiej i twardej pod³odze, nie
opieraæ jej o ciany, meble itp.
2. Jeli pod³oga nie jest
idealnie pozioma, nale¿y
skompensowaæ
nierównoci, dokrêcaj¹c
lub odkrêcaj¹c przednie
nó¿ki (patrz rysunek); k¹t
nachylenia, zmierzony na
górnym blacie pralki, nie
powinien przekraczaæ 2°.
Staranne wypoziomowanie pralki zapewnia jej
stabilnoæ i zapobiega wibracjom, ha³asowi oraz
przesuwaniu siê maszyny w czasie pracy. W
przypadku ustawienia pralki na dywanie lub
wyk³adzinie dywanowej nale¿y tak wyregulowaæ nó¿ki,
aby pod pralk¹ pozostawa³a wolna przestrzeñ
niezbêdna dla wentylacji.
Pod³¹czenie do sieci wodnej i elektrycznej
Pod³¹czenie przewodu doprowadzaj¹cego wodê
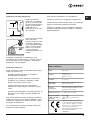
1. Wsun¹æ uszczelkê A
do koñcówki przewodu
doprowadzaj¹cego wodê i
przykrêciæ go do kurka
zimnej wody z
gwintowanym przy³¹czem
3/4 (patrz rysunek).
Przed pod³¹czeniem
spuszczaæ wodê, a¿
stanie siê ona ca³kowicie
przezroczysta.
2. Pod³¹czyæ do
maszyny przewód
doprowadzaj¹cy wodê,
przykrêcaj¹c go do
odpowiedniego otworu
dop³ywowego,
znajduj¹cego siê w tylnej
czêci pralki, z prawej
strony u góry (patrz
rysunek).
3. Zwróciæ uwagê, aby na przewodzie nie by³o zagiêæ
ani zwê¿eñ.
Cinienie wody w kurku powinno mieciæ siê w
przedziale podanym w tabeli Danych technicznych
(patrz strona obok).
Jeli d³ugoæ przewodu doprowadzaj¹cego wodê jest
niewystarczaj¹ca, nale¿y zwróciæ siê do
specjalistycznego sklepu lub do autoryzowanego
technika.

PL
15
65 - 100 cm
Pod³¹czenie przewodu odp³ywowego
Pod³¹czyæ przewód
odp³ywowy, nie zginaj¹c
go, do rury ciekowej lub
do otworu odp³ywowego w
cianie, które powinny
znajdowaæ siê na
wysokoci od 65 do 100
cm od pod³ogi;
albo oprzeæ go na brzegu
zlewu lub wanny,
przymocowuj¹c do kranu
prowadnik, znajduj¹cy
siê w wyposa¿eniu pralki
(patrz rysunek). Wolny
kraniec rury usuwania
wody nie powinien
pozostawaæ zanurzony w
wodzie.
Odradza siê u¿ywanie rur-przed³u¿aczy; jeli
przed³u¿acz jest jednak konieczny, powinien mieæ on
ten sam przekrój, co rura oryginalna, i nie powinien
przekraczaæ 150 cm d³ugoci.
Pod³¹czenie elektryczne
Przed w³o¿eniem wtyczki do gniazdka elektrycznego
nale¿y siê upewniæ czy:
gniazdko posiada uziemienie i jest zgodne z
obowi¹zuj¹cymi przepisami;
gniazdko jest w stanie wytrzymaæ maksymalne
obci¹¿enie mocy maszyny, wskazane w tabeli
Danych technicznych (patrz obok);
napiêcie zasilania mieci siê w wartociach
wskazanych w tabeli Danych technicznych (patrz
obok);
gniazdko jest kompatybilne z wtyczk¹ maszyny. W
przeciwnym razie nale¿y wymieniæ gniazdko lub
wtyczkê.
Nie nale¿y instalowaæ pralki na otwartym powietrzu,
nawet jeli miejsce to jest chronione daszkiem, gdy¿
wystawienie urz¹dzenia na dzia³anie deszczu i burz,
jest bardzo niebezpieczne.
Po zainstalowaniu maszyny gniazdko elektryczne
powinno byæ ³atwo dostêpne.
Nie u¿ywaæ przed³u¿aczy ani rozga³êziaczy.
Kabel nie powinien byæ pogiêty ani przygnieciony.
Kabel zasilania elektrycznego mo¿e byæ wymieniany
wy³¹cznie przez autoryzowanych techników.
Uwaga! W przypadku nie przestrzegania powy¿szych
warunków producent zwolniony zostanie z wszelkiej
odpowiedzialnoci.
Dane techniczne
Model
SIXL 149 S
Wymiary
szerokoæ cm 59,5
wysokoæ cm 85
g³êbokoæ cm 53,5
Pojemnoæ
od 1 do 6 kg
Dane pr¹du
elektrycznego
dane techniczne umieszczone s¹ na
tabliczce na maszynie
Dane sieci
wodoci¹gowej
Maksymalne cinienie 1 MPa (10 barów)
cinienie minimalne 0,05 MPa (0,5 barów)
pojemnoæ bêbna 52 litrów
Szybkoæ wirowania
do 1400 obrotów na minutê
Programy kontrolne
zgodnie z przepisami
EN 60456
program ;
wykonane przy 6 kg za³adowanej
bielizny.
Urz¹dzenie to zosta³o wyprodukowane
zgodnie z nastêpuj¹cymi przepisami EWG:
- 73/23/CEE z dn. 19/02/73 (o Niskim
Napiêciu) wraz z kolejnymi zmianami
- 89/336/CEE z dn. 03/05/89
(o Kompatybilnoci Elektromagnetycznej)
wraz z kolejnymi zmianami
- 2002/96/CE

16
PL
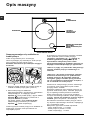
PANEL
STEROWANIA
DRZWICZKI
REGULOWANE NÓ¯KI
UCHWYT
OKR¥G£YCH
DRZWICZEK
Samooczyszczaj¹ca siê szufladka na
rodki pior¹ce
Pralka ta wyposa¿ona jest w innowacyjn¹
samooczyszczaj¹c¹ siê szufladkê na rodki pior¹ce,
która umo¿liwia poprawê jakoci prania.
Szufladka umieszczona jest wewn¹trz okr¹g³ych
drzwiczek.
1. Otworzyæ okr¹g³e drzwiczki, aby uzyskaæ dostêp do
szufladki na rodki pior¹ce (patrz rysunek A).
2. Wlaæ rodek pior¹cy lub dodatek do
w³aciwychpojemników, umieszczonych nad kratkami
zabezpieczaj¹cymi, w nastêpuj¹cy sposób:
Pojemnik
: p³ynny rodek pior¹cy i p³ynne dodatki.
Pojemnik
: rodek pior¹cy w proszku lub w
pastylkach i dodatki w proszku.
Aby w³o¿yæ pastylki, nale¿y podnieæ kratkê
zabezpieczaj¹c¹ umieszczon¹ na szufladce.
Pojemnik : rodek zmiêkczaj¹cy.
Wlanie p³ynnych rodków pior¹cych lub dodatków do
rodkowego pojemnika mo¿e spowodowaæ ich
niepo¿¹dany wyciek.
M
A
X
M
A
X
DRZWICZKI DOSTÊPU
DO POMPY
ODPROWADZAJ¥CEJ
WODÊ
STOP
STOP
W specjalnych przezroczystych okienkach szufladki
mo¿na sprawdziæ poziom rodka pior¹cego.
Ponadto w pojemnikach
i znajduj¹ siê
wskaniki p³ywakowe (patrz rysunek B). Po
wprowadzeniu maksymalnej iloci rodka
pior¹cego/zmiêkczaj¹cego wskaniki podnosz¹ siê,
dotykaj¹c kratek zabezpieczaj¹cych pojemników.
Zaleca siê nigdy nie przekraczaæ maksymalnego
poziomu rodków pior¹cych wskazanego na
szufladce.
Zaleca siê, aby zawsze przestrzegaæ instrukcji
dozowania umieszczonych na opakowaniach
rodków pior¹cych. W przypadku niektórych
szczególnie gêstych rodków pior¹cych zaleca
siê ich wprowadzenie bezporednio do bêbna, a
nie do szufladki na rodki pior¹ce.
Przekroczenie maksymalnego poziomu wskazanego
na maszynie mo¿e spowodowaæ wyciek rodka
pior¹cego do³em szufladki.
Stosowanie nadmiernej iloci rodków pior¹cych nie
poprawia skutecznoci prania, natomiast przyczynia
siê do wiêkszego zanieczyszczenia rodowiska.
Woda wykorzystywana w cyklu prania umo¿liwia
usuniêcie ewentualnego nadmiaru rodka pior¹cego z
szufladki. Istnieje te¿ mo¿liwoæ rêcznego wyjêcia
szufladki (patrz Utrzymanie i konserwacja).
Dla u³atwienia dozowania rodków pior¹cych zaleca
siê u¿ywanie odpowiedniego dozownika, znajduj¹cego
siê w wyposa¿eniu pralki.
Maksymalna pojemnoæ szufladki odpowiada:
- p³ynne rodki pior¹ce: 1 1/2 miarki
- rodki pior¹ce w proszku: 2 miarki
- rodek zmiêkczaj¹cy: 1 miarka
AB
Opis maszyny

PL
17
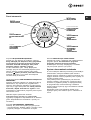
Przycisk
W£¥CZANIA/
WY£¥CZANIA
Czerwona kontrolka
ZABLOKOWANIA
OKR¥G£YCH
DRZWICZEK
Przycisk W£¥CZANIA/WY£¥CZANIA:
wcisn¹æ go, aby w³¹czyæ lub wy³¹czyæ maszynê.
Kiedy maszyna jest w³¹czona, ikony przycisków
uruchomienia programu zaczynaj¹ pulsowaæ,
natomiast kontrolki wskazuj¹ce czas prania
zaczynaj¹ wieciæ wiat³em ci¹g³ym.
W celu anulowania cyklu nale¿y przytrzymaæ
wciniêty przycisk uruchamiania/wy³¹czania przez
oko³o 2 sekundy w trakcie trwania cyklu prania.
Kontrolka
bêdzie pulsowaæ przez kilka sekund,
maszyna wykonuje w tym czasie automatyczne
usuwanie wody ze zbiornika.
Czerwona kontrolka ZABLOKOWANIA OKR¥G£YCH
DRZWICZEK:
w³¹czona kontrolka wskazuje, ¿e drzwiczki pralki s¹
zablokowane, aby zapobiec ich przypadkowemu
otwarciu; dla unikniêcia uszkodzeñ po zakoñczeniu
cyklu lub po jego wstrzymaniu nie nale¿y otwieraæ
drzwiczek, dopóki kontrolka nie zganie. Czas
oczekiwania po zakoñczeniu programu prania wynosi
oko³o dwóch minut.
Bardzo szybkie pulsowanie kontrolki
ZABLOKOWANIA OKR¥G£YCH DRZWICZEK
sygnalizuje wyst¹pienie nieprawid³owoci w dzia³aniu
(patrz Nieprawid³owoci w dzia³aniu i sposoby ich
usuwania).
Przyciski URUCHOMIENIA PROGRAMU:
nacisn¹æ, aby uruchomiæ wybrany program prania.
- przycisk wiec¹cy wiat³em sta³ym: program w toku.
- przyciski pulsuj¹ce: w oczekiwaniu na wybór.
Kontrolki
WSKAZUJ¥CE
CZAS PRANIA
Przycisk
URUCHOMIENIA
SZYBKI PROGRAMU
30
Przycisk
URUCHOMIENIA
PROGRAMU
DELIKATNE
Przycisk
URUCHOMIENIA
PROGRAMU
BIA£E
BAWE£NIANE
Przycisk
URUCHOMIENIA
PROGRAMU
KOLOR MIX
£ATWE
PRASOWANIE
Kontrolki WSKAZUJ¥CE CZAS PRANIA:
w³¹czaj¹ siê kolejno, wskazuj¹c stan zaawansowania
programu prania. Po zakoñczeniu programu
wszystkie kontrolki zaczynaj¹ pulsowaæ.
Dok³adniejsze informacje znajduj¹ siê w rozdziale
W jaki sposób wykonaæ cykl prania.
System równowa¿enia za³adunku
W celu unikniêcia nadmiernych wibracji przed ka¿dym
odwirowaniem maszyna rozk³ada ciê¿ar wsadu w
jednolity sposób, nastêpuje to poprzez wykonanie serii
ci¹g³ych obrotów kosza z prêdkoci¹ nieco wy¿sz¹ od
obrotów podczas prania.
Jeli jednak pomimo powtarzanych prób wsad nie
zostanie roz³o¿ony równomiernie, maszyna wykona
wirowanie z prêdkoci¹ ni¿sz¹ od zaprogramowanej.
W przypadku zbyt nierównomiernego roz³o¿enia
wsadu maszyna wykonuje jego równowa¿enie zamiast
odwirowywania.
Ewentualne próby zrównowa¿enia wsadu mog¹
wyd³u¿yæ ³¹czny czas trwania cyklu o maksimum 10
minut.
Panel sterowania

18
PL
Uwaga: Po zainstalowaniu pralki, przed
przyst¹pieniem do jej u¿ytkowania, nale¿y wykonaæ
jeden cykl prania ze rodkiem pior¹cym, lecz bez
wsadu, nastawiaj¹c program
.
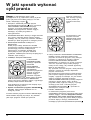
1. W£¥CZYÆ MASZYNÊ naciskaj¹c przycisk
W£¥CZANIA/WY£¥CZANIA
. Ikony przycisków
URUCHOMIENIA PROGRAMU zaczynaj¹
pulsowaæ, a kontrolki WSKAZUJ¥CE CZAS
PRANIA zaczynaj¹ wieciæ wiat³em ci¹g³ym,
wskazuj¹c, ¿e pralka jest gotowa do
zaprogramowania.
2. ZA£ADUNEK BIELIZNY. Otworzyæ okr¹g³e drzwiczki
przy pomocy w³aciwej klamki. W³o¿yæ bieliznê
uwa¿aj¹c, aby nie przekroczyæ wielkoci za³adunku
wskazanej w tabeli programów na nastêpnej stronie.
3. DOZOWANIE RODKÓW PIOR¥CYCH I
DODATKÓW
rodki pior¹ce nale¿y dozowaæ do szufladki
umieszczonej wewn¹trz okr¹g³ych drzwiczek, nie
przekraczaj¹c poziomów maksymalnych
zaznaczonych na zewn¹trz szufladki oraz
wskazywanych przez specjalne wskaniki
p³ywakowe. Dok³adniejsze informacje znajduj¹ siê w
rozdziale Opis maszyny.
4. ZAMKN¥Æ OKR¥G£E DRZWICZKI.
5. URUCHOMIÆ
PROGRAM PRANIA,
wciskaj¹c odpowiedni
PRZYCISK
URUCHOMIENIA
PROGRAMU. Ikona
odpowiadaj¹ca
wybranemu programowi
zaczyna siê wieciæ
wiat³em ci¹g³ym,
natomiast wszystkie
kontrolki wskazuj¹ce czas prania gasn¹. Kontrolka
ZABLOKOWANIA OKR¥G£YCH DRZWICZEK
zaczyna siê wieciæ wiat³em ci¹g³ym, sygnalizuj¹c
blokadê bezpieczeñstwa drzwiczek.
Opis dostêpnych programów prania znajduje siê w
rozdziale Programy prania.
Sposób uruchamiania programu DELIKATNE
jest inny, patrz paragraf Delikatne 30° na
nastêpnej stronie.
W trakcie trwania programu kontrolki WSKAZUJ¥CE
CZAS PRANIA w³¹czaj¹ siê kolejno, aby wskazaæ
jaka czêæ programu zosta³a ju¿ wykonana.
Rysunek umieszczony
obok obrazuje sytuacjê,
w której zosta³o ju¿
wykonane oko³o 50%
cyklu.
Po zakoñczeniu cyklu
wszystkie kontrolki
WSKAZUJ¥CE CZAS
PRANIA s¹ w³¹czone i
pulsuj¹.
6. Istnieje mo¿liwoæ WSTRZYMANIA PROGRAMU
PRANIA poprzez naciniêcie zawieconego
przycisku uruchomienia programu, który zaczyna
pulsowaæ. Po zakoñczeniu programu zganie
kontrolka ZABLOKOWANIA OKR¥G£YCH
DRZWICZEK, co wskazuje, ¿e mo¿na je otworzyæ.
Jeli chce siê dodaæ wiêcej rodka pior¹cego,
nale¿y zwróciæ uwagê, aby wskanik p³ywakowy
MAX nie by³ podniesiony.
Aby ponownie uruchomiæ program, nale¿y zamkn¹æ
drzwiczki i jeszcze raz nacisn¹æ odpowiedni
przycisk uruchomienia.
Dla zapewnienia maksymalnego bezpieczeñstwa,
jeli w bêbnie znajduje siê taka iloæ wody, która
mog³aby wyp³yn¹æ na zewn¹trz, nie jest mo¿liwe
otwarcie okr¹g³ych drzwiczek (kontrolka
ZABLOKOWANE DRZWICZKI pozostaje w³¹czona
równie¿ po up³ywie dwóch minut). W takim
przypadku nale¿y wy³¹czyæ maszynê, trzymaj¹c
wciniêty przez oko³o 2 sekundy przycisk
W£¥CZANIA/WY£¥CZANIA
, i poczekaæ na
automatyczne usuniêcie wody.
7. KONIEC PROGRAMU
Po zakoñczeniu programu prania ikona
odpowiadaj¹ca wybranemu programowi dalej wieci
wiat³em ci¹g³ym, natomiast wszystkie kontrolki
wskazuj¹ce czas prania zaczynaj¹ pulsowaæ.
Aby uruchomiæ nowy cykl prania, nale¿y wy³¹czyæ i
ponownie w³¹czyæ maszynê, DWUKROTNIE
naciskaj¹c przycisk W£¥CZANIA/WY£¥CZANIA
.
W jaki sposób wykonaæ
cykl prania

PL
19
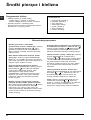
BAWE£NIANE BIA£E 60°
Przeznaczony do prania najbardziej wytrzyma³ych,
bia³ych bawe³nianych tkanin. Wy¿sza temperatura
umo¿liwia uzyskanie najlepszych rezultatów prania w
klasie A.
KOLOR MIX 40° / £ATWE PRASOWANIE
W tym programie mo¿na praæ dowolne kolorowe
tkaniny, zarówno bawe³niane, jak i syntetyczne.
Odwirowywanie jest dok³adnie kontrolowane w ca³ym
cyklu prania, aby ograniczyæ gniecenie siê tkanin, a
tym samym u³atwiæ ich prasowanie.
Mo¿na praæ równoczenie tkaniny bawe³niane i
syntetyczne.
DELIKATNE 30°
Cykl przeznaczony do prania tkanin z we³ny, jedwabiu
oraz z najbardziej delikatnych. Z uwagi na odmienne
w³aciwoci tego rodzaju tkanin, uruchomienie
omawianego programu jest inne ni¿ pozosta³ych:
+ CYKL DELIKATNE Z ODWIROWANIEM
KOÑCOWYM (do tkanin we³nianych): nacinij przycisk
URUCHOMIENIE PROGRAMU DELIKATNE
. Po
oko³o 3 sekundach przyciski URUCHOMIENIA
PROGRAMU DELIKATNE
i URUCHOMIENIA
PROGRAMU SZYBKIEGO zaczynaj¹ pulsowaæ.
Nacinij ponownie przycisk URUCHOMIENIA
PROGRAMU DELIKATNE
, aby wykonaæ cykl
prania, który koñczy siê delikatnym odwirowaniem.
Program ten przewiduje obroty bêbna opracowane
specjalnie w celu umo¿liwienia usuwania nadmiaru
wody z materia³ów, aby ograniczyæ przecieranie siê
w³ókien i w ten sposób chroniæ tkaniny z we³ny.
+ CYKL DELIKATNE BEZ ODWIROWANIA (do
tkanin z jedwabiu i wiskozy oraz do prania zas³on; nie
nale¿y go u¿ywaæ do prania we³ny): nacinij przycisk
URUCHOMIENIE PROGRAMU DELIKATNE
.
Po oko³o 3 sekundach przyciski URUCHOMIENIA
PROGRAMU DELIKATNE
i URUCHOMIENIA
PROGRAMU SZYBKIEGO
zaczynaj¹ pulsowaæ.
Nacinij przycisk URUCHOMIENIA PROGRAMU
SZYBKIEGO
, aby wykonaæ cykl prania bez
odwirowania koñcowego. Po zakoñczeniu cyklu
maszyna automatycznie odprowadzi wodê z bêbna.
Zaleca siê wyj¹æ pranie z pralki zaraz po zakoñczeniu
cyklu, aby unikn¹æ powstania nadmiernych zagnieceñ.
SZYBKI 30 / TYLKO P£UKANIE
Przy zastosowaniu tego programu mo¿na wypraæ w
ci¹gu 30 minut ma³o zabrudzone tkaniny bawe³niane,
syntetyczne lub ze wskazówk¹ na etykiecie pranie w
30° . Mo¿na ponadto wykonaæ szybkie p³ukanie
tkanin bawe³nianych lub syntetycznych wczeniej
wypranych rêcznie (z wyj¹tkiem we³ny i jedwabiu).
Dziêki odpowiednim czujnikom pralka jest w
stanie wykryæ obecnoæ rodka pior¹cego w
tkaninach znajduj¹cych siê w bêbnie:
- jeli na tkaninach nie ma rodka pior¹cego,
wykonany zostanie cykl SZYBKI 30';
- jeli jest rodek pior¹cy (tkaniny wczeniej wyprane
rêcznie), automatycznie wykonany zostanie cykl
TYLKO P£UKANIE.
AUTOMATYCZNE STEROWANIE P£UKANIAMI
W ka¿dym programie funkcja p³ukania jest
kontrolowana przez odpowiednie czujniki. Jeli tkaniny
pod koniec cyklu prania bêd¹ nadmiernie namydlone,
faza p³ukania zostanie automatycznie przed³u¿ona a¿
do ca³kowitego usuniêcia rodka pior¹cego. W takim
przypadku czas trwania programu prania mo¿e byæ
nieco d³u¿szy w stosunku do czasu wskazanego w
tabeli programów.
*Uwaga: informacje dotycz¹ce wy³¹czenia odwirowywania w programie delikatne znajduj¹ siê w paragrafie
Delikatne 30° na dole strony.
**Uwaga: informacje dotycz¹ce wykonania samego p³ukania w zimnej wodzie ubrañ wczeniej wypranych rêcznie
znajduj¹ siê w paragrafie Szybki 30'/Tylko p³ukanie na dole tej strony.
Czasy trwania programów wskazane w tabeli maj¹ charakter czysto orientacyjny i zosta³y obliczone dla redniej iloci ³adunku.
Programy prania
Tasta
Rodzaj tkaniny oraz
stopieñ zabrudzenia
£adune
k maks.
(kg)
Temperatury
Odwirowy
wanie
(obroty na
minutê)
Czas
trwania
cyklu
(minuty)
Opis cyklu prania
BIA£E BAWE£NA
Bawe³niane bia³e
wytrzyma³e
6 60°C 1400 135
Pranie, p³ukania, odwirowania
porednie i koñcowe
KOLOR MIX 40° / £ATWE PRASOW ANIE
Bawe³niane i
syntetyczne kolorowe
4,5 40°C 1000 105
Pranie, p³ukania, delikatne
odwirowanie
DELIKATNE
We³na (delikatne
odwirowanie koñcowe)
1,5 30°C 600 50
Pranie, p³ukania, delikatne
odwirowanie
Jedwab i zas³ony
(bez odwirowania
koñcowego)
1,5 30°C
bez
wirowania*
50 Pranie, p³ukania, opró¿nienie z wody
SZYBKI 30 / TYLKO P£UKANIE
Bawe³niane i
syntetyczne
3
30°/zimna
woda**
800 30
Pranie (tylko w przypadku
w³¹czenia programu "Szybkiego),
p³ukania, delikatne odwirowanie
+
+

20
PL
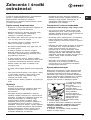
Zalecenia dotycz¹ce prania
Bielizna pocielowa i ³azienkowa
(przecierad³a, rêczniki, szlafroki itp.): zastosuj
program BAWE£NIANE BIA£E 60°
, który
gwarantuje najlepsze wyniki prania w klasie A.
Silne wirowanie umo¿liwia skuteczn¹ eliminacjê
nadmiaru wody.
Bia³a bielizna bawe³niana (koszule, bluzki,
obrusy itp.): zastosuj program BAWE£NIANE
BIA£E 60°. W przypadku obecnoci uporczywych
plam przed wykonaniem cyklu prania zaleca siê je
wstêpnie zapraæ myd³em w kostce.
Kolorowa bielizna bawe³niana (koszule,
bluzki, bielizna osobista itp.): zastosuj program
KOLOR MIX 40°
, który zapewnia najlepsze
wyniki prania, nie niszcz¹c kolorów. Faza
odwirowywania, dziêki funkcji £ATWE
PRASOWANIE, umo¿liwia zmniejszenie iloci
zagnieceñ pod koniec cyklu prania, u³atwiaj¹c
prasowanie. Zaleca siê stosowanie p³ynnego
rodka pior¹cego.
Bielizna z tkanin syntetycznych, bia³a lub
kolorowa (koszule, bluzki, bielizna osobista
itp.): zastosuj program KOLOR MIX 40°
. Zaleca
siê nie praæ równoczenie tkanin bia³ych i
kolorowych w tym samym cyklu prania, aby
unikn¹æ ewentualnego zafarbowania bia³ych tkanin
przez kolorowe. Zaleca siê stosowanie p³ynnego
rodka pior¹cego.
Kolorowe tkaniny bawe³niane lub syntetyczne
ze wskazówk¹ na etykiecie pranie w 30°
:
zastosuj program SZYBKI 30
. Niska temperatu-
ra prania zapewnia najwy¿sz¹ ochronê kolorów.
Zalecamy stosowanie p³ynnego rodka pior¹cego.
Tkaniny we³niane (swetry, szaliki itp.): zastosuj
program DELIKATNE 30° z odwirowaniem
koñcowym
+ . Obroty bêbna podczas prania
i w fazie delikatnego odwirowywania zmniejszaj¹
filcowanie siê tkanin. Zaleca siê stosowanie
specjalnych rodków pior¹cych do we³ny. Zaleca
siê nie przekraczanie maksymalnego poziomu
za³adunku.
Tkaniny jedwabne (koszule, bielizna itp.):
zastosuj program DELIKATNE 30° bez odwirowania
koñcowego
+ . Po zakoñczeniu cyklu nie
pozostawiaj zbyt d³ugo prania w bêbnie, aby
unikn¹æ powstania nadmiernych zagnieceñ.
Firany: zastosuj program DELIKATNE 30° bez
odwirowania koñcowego
+ . Zaleca siê
z³o¿yæ je i umieciæ w poszewce lub w siatkowym
worku. Praæ je osobno uwa¿aj¹c, aby nie
przekroczyæ maksymalnego poziomu za³adunku.
Ile wa¿y bielizna?
1 przecierad³o 400-500 gr.
1 poszewka 150-200 gr.
1 obrus 400-500 gr.
1 szlafrok 900-1.200 gr.
1 rêcznik 150-250 gr.
1 d¿insy 400-500 gr.
1 koszula 150-200 gr.
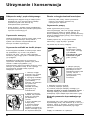
rodki pior¹ce i bielizna
Przygotowanie bielizny
Podzieliæ bieliznê do prania wed³ug:
- rodzaju tkaniny / symbolu na etykietce.
- kolorów: oddzieliæ tkaniny kolorowe od bia³ych.
Opró¿niæ kieszenie i sprawdziæ guziki.
Nie przekraczaæ wartoci maksymalnego ³adunku
wskazanych w Programy prania.
Strona się ładuje...
Strona się ładuje...
Strona się ładuje...
Strona się ładuje...
-
 1
1
-
 2
2
-
 3
3
-
 4
4
-
 5
5
-
 6
6
-
 7
7
-
 8
8
-
 9
9
-
 10
10
-
 11
11
-
 12
12
-
 13
13
-
 14
14
-
 15
15
-
 16
16
-
 17
17
-
 18
18
-
 19
19
-
 20
20
-
 21
21
-
 22
22
-
 23
23
-
 24
24


Indesit sixl 149 s Instrukcja obsługi
- Kategoria
- Pralki
- Typ
- Instrukcja obsługi
- Niniejsza instrukcja jest również odpowiednia dla
w innych językach
- English: Indesit sixl 149 s Owner's manual
Powiązane artykuły
Inne dokumenty
-
Whirlpool SISL 129 S (EU) instrukcja
-
Whirlpool SIXL 129 (EU) instrukcja
-
-
Hotpoint ARSL 85 (EU) instrukcja
-
-
-
HOTPOINT/ARISTON RSG 703 PL instrukcja
-
-
-
Haier HW70-B14266 Instrukcja obsługi