
操作说明
译自 «Original-betriebsanleitung»
CN
Instrukcja obsługi
Tłumaczenie «Original-betriebsanleitung»
PL
Návod k používání
P�eklad «Original-betriebsanleitung»
CZ
Käyttöohje
Käännös «original-betriebsanleitung»
FI
AnvändeArhAndbok
Översättning Av den «originAl-betriebsAnleitung»
SE
Bedieningshandleiding
Vertaling Van de «Original-BetrieBsanleitung»
NL
Manual de Instruções
tradução do «orIgInal-BetrIeBsanleItung»
PT
Documentación técnica
traDucción Del «original-BetrieBsanleitung»
ES
Manuale tecnico
traduzione delle «original-BetrieBsanleitung»
IT
Technical DocumenT
TranslaTions of The «original-BeTrieBsanleiTung»
EN
Dossier technique
traDuction Du «original-BetrieBsanleitung»
FR
Original-BetrieBsanleitung
DE
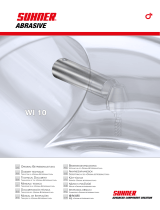
WI 10-FWI 10-F

2

3

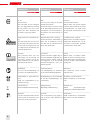
SymbolS
EngliSh
Attention!
Make sure to read!
This information is very important
for ensuring correct operation of
the product. Failure to observe this
information can result in a defect.
Note on safety / Warning
This information serves to achieve
safe operation. Failure to observe
this information may compromise
the operator‘s safety.
Information
This information serves for a good
understanding of the operation of
the product, thereby permitting full
exploitation of the operational po-
tential of the product.
Technical Document
Read the technical document prior
to commissioning.
Safety glasses and ear protection
Wear safety glasses and ear pro-
tection.
Disposal
Friendly-to-the-environment dis-
posal.
Power connector
Before any work is carried out on
the machine, disconnect the pow-
er connector.
Français
symboles
Attention !
A lire impérativement!
Cette information est très impor-
tante pour la garantie de fonc-
tionnement du produit. La non
observation peut entraîner une
défectuosité.
Indication relative à la sécurité /
Avertissement
Cette information sert à permettre
une utilisation sûre. En cas de non
observation, la sécurité de l’utilisa-
teur n’est pas garantie.
Information
Cette information sert à la com-
préhension du fonctionnement du
produit. Par cela, la pleine capa-
cité de fonctionnement du produit
pourra être exploitée.
Dossier technique
Lire le dossier technique avant la
mise en service.
Lunettes de protection et protec-
tion de l’ouïle
Porter des lunettes de protection et
une protection de l’ouïe.
Elimination
Elimination favorable à l’environne-
ment.
Fiche du secteur
Avant tout travail sur la machine,
retirer la fiche du secteur.
Deutsch
symbole
Achtung!
Unbedingt lesen!
Diese Information ist sehr wichtig
für die Funktionsgewährleistung
des Produktes. Bei Nichtbeachten
kann ein Defekt die Folge sein.
Sicherheitshinweis / Warnung
Diese Information dient zum Erlan-
gen eines sicheren Betriebes. Bei
Nichtbeachten ist die Sicherheit für
den Bediener nicht gewährleistet.
Information
Diese Information dient zum gu-
ten Verständnis der Funktion des
Produktes. Dadurch lässt sich die
volle Leistungsfähigkeit des Pro-
duktes ausschöpfen.
Betriebsanleitung
Vor Inbetriebnahme des Produktes
Betriebsanleitung lesen.
Schutzbrille und Gehörschutz
Schutzbrille und Gehörschutz tra-
gen.
Entsorgung
Umweltfreundliche Entsorgung.
Netzstecker
Vor jedem Arbeiten an der Maschi-
ne Netzstecker ziehen.
4

Portugúes
símbolos
Atenção!
A ler impreterivelmente!
Esta informação é extremamente impor-
tante para a garantia de funcionamento
do produto. A sua não observância pode
ocasionar uma avaria.
Indicações relativas à Segurança / Aviso
Esta informação serve para alcançar
uma operação segura. A sua não obser-
vância pode comprometer a segurança
do operador.
Informação
Esta informação permite a boa com-
preensão do funcionamento do produto
de modo a que se possa explorar à sua
plena capacidade de funcionamento.
Manual de Instruções
Ler o manual de Instruções antes de pro-
ceder ao arranque inicial.
Protecção visual e acústica
Usar óculos e dispositivos de protecção
acústica.
Eliminação
Eliminação respeitadora do meio ambi-
ente.
Ficha de conexão à rede
Antes de qualquer trabalho na máquina,
retirar a ficha da tomada.
SímboloS
ESpañol
¡Atención!
¡Léase imprescindiblemente!
Esta información es muy importante para
garantizar el funcionamiento del produc-
to. Si no se tiene en cuenta se pueden
producir defectos o averías.
Indicación relativa a la seguridad / Ad-
vertenica
Esta información es muy importante
para garantizar un uso seguro del pro-
ducto. Si se ignora, no está garantizada
la seguridad del usuario.
Información
Esta información sirve para comprender
el funcionamiento del producto. Ello per-
mite aprovechar al máximo sus presta-
ciones.
Documentación técnica
Leer la documentación técnica antes de
poner en servicio el producto.
Protección visual y acústica
Usar gafas y protección acústica.
Gestión de residuos
Eliminar los residuos sin contaminar el
medio ambiente.
Enchufe de red
Desconectar el enchufe de la red eléc-
trica.
Simboli
italiano
Attenzione!
Da leggere assolutamente!
Questa informazione è molto importante
per il mantenimento della funzionalità del
prodotto. In caso di non osservanza pos-
sono prodursi dei difetti.
Indicazione relativa alla sicurezza / Av-
vertimento
Questa informazione serve al raggi-
ungimento di un esercizio sicuro. In
caso di inosservanza, la sicurezza
dell‘utilizzatore non è garantita.
Informazione
Questa informazione serve ad una cor-
retta comprensione delle funzioni del
prodotto. In questo modo è possibile
sfruttare pienamente le potenzialità del
prodotto.
Manuale tecnico
Prima della messa in funzione del pro-
dotto, leggere il manuale tecnico.
Occhiali di protezione e protezione
dell‘udito
Portare gli occhiali di protezione e la pro-
tezione dell‘udito.
Smaltimento
Smaltimento rispettoso
dell‘ambiente.
Presa di rete
Prima di ogni lavoro sulla macchina to-
gliere la presa di rete.
55

Symbolit
Suomi
Huomio!
Luettava ehdottomasti!
Nämä tiedot ovat erittäin tärkeitä
tuotteen asianmukaisen toiminnan
varmistamiseksi. Jos näitä tietoja
ei huomioida, seurauksena voi olla
vikoja.
Turvallisuusohje / varoitus
Nämä tiedot on laadittu käyttötur-
vallisuuden takaamiseksi. Jos nä-
itä tietoja ei huomioida, käyttäjän
turvallisuutta ei voida taata.
Tiedot
Nämä tiedot on laadittu edistä-
mään tuotteen toimintaan perehty-
mistä. Näin tuotteen kaikkia ominai-
suuksia voidaan täysimääräisesti
hyödyntää.
Käyttöohje
Lue käyttöohje ennen tuotteen
käyttöönottoa.
Suojalasit ja kuulosuojaimet
Käytä suojalaseja ja kuulosuojai-
mia.
Hävittäminen
Hävitä ympäristönsuojelu-
määräysten edellyttämällä tavalla.
Virtapistoke
Vedä virtapistoke irti pistorasiasta
aina ennen kuin alat käsitellä ko-
netta.
SvenSka
Symboler
Obs!
Det är mycket viktigt att du läser
följande information!
Denna information är mycket viktig
för att säkerställa produktens funk-
tionsgaranti. Om du inte iakttar in-
formationen kan detta leda till en
defekt.
Säkerhetsinformation / Varning
Denna information säkerställer en
säker drift av produkten. Om du
inte följer den är operatörens sä-
kerhet inte garanterad.
Information
Denna information hjälper dig att
få en bra förståelse angående pro-
duktens funktion. På det sättet får
du möjligheten att ta vara på alla
prestationsmöjligheter som pro-
dukten erbjuder.
Användarhandbok
Före idrifttagningen av produkten
bör du läsa användarhandboken.
Skyddsglasögon och hörselskydd
Ta på dig skyddsglasögon och
hörselskydd.
Avfallshantering
Miljövänlig avfallshantering.
Elkontakt
Dra ut elkontakten varje gång in-
nan du börjar utföra arbeten på
maskinen.
NederlaNds
symboleN
Let op!
Absoluut lezen!
Deze informatie is zeer belangrijk
voor een gegarandeerde werking
van het product. Het niet in acht
nemen van deze informatie kan
een defect tot gevolg hebben.
Veiligheidsinstructie/waarschuw-
ing
Deze informatie dient voor een vei-
lige werking. Indien deze informa-
tie niet in acht wordt genomen, kan
de veiligheid van de bediener niet
worden gegarandeerd.
Informatie
Deze informatie dient voor een
goed begrip van de werking van
het product. Hierdoor kan de vol-
ledige capaciteit van het product
optimaal worden benut.
Handleiding
Lees voor de inbedrijfstelling van
het product de handleiding door.
Veiligheidsbril en gehoorbescher-
ming
Draag een veiligheidsbril en ge-
hoorbescherming.
Afvalverwerking
Milieuvriendelijke afvalverwerking.
Netstekker
Voor alle werkzaamheden aan de
machine moet de netstekker uit het
stopcontact worden getrokken.
6

中国
符号
注意!
请务必阅读!
本信息对于保证产品功能正常十分重要。
若 不 遵 守 ,可 导 致 失 灵 。
安全提示 / 警告
本 信 息 用 于 确 保 安 全 运 行 。若 不 遵 守 ,恐
无法保证使用者安全。
信息
本 信 息 有 助 于 透 彻 理 解 产 品 功 能 。由 此 可
充分发挥产品的性能。
操作说明
试运行产品前,请阅读操作说明书。
护目镜及听力防护装置
请佩戴护目镜及听力防护装置
报废处理
采取环保的方式报废处理。
电源插头
每次在机器上进行作业时,请拔出电源插
头。
Polski
symbole
Uwaga!
bezpiecznego sposobu pracy. W ra-
-
torowi.
Informacja
Wtyczka sieciowa
Česky
symboly
Pozor!
-
du.
Informace
-
-
7

English
ContEnts
Page
1.1 General notes on safety .......16
1.2 Use of the machine for
pUrposes for which it is
intended ..................................16
1.3 incorrect Use .........................16
2.1 assembly instrUctions ............16
2.2 ratinG data ..............................17
2.3 operatinG conditions .............17
3.1 workinG instrUctions .............17
3.2 switchinG on/off .................17
4.1 preventive maintenance ..........17
4.2 repair ......................................17
4.3 warranty ................................17
4.4 storaGe ..................................17
4.5 disposal / environmental com-
patibility ..................................17
Table des maTières
Français
Page
1.1 instrUctions Générales de
sécUrité...................................14
1.2 Utilisation conforme à la desti-
nation ......................................14
1.3 Utilisation contraire à la desti-
nation ......................................14
1.4 déclaration d‘incorporation ..14
2.1 instrUctions de montaGe ........14
2.2 performances .........................15
2.3 conditions d’exploitation .......15
3.1 indications de travail ..............15
3.2 mise en marche/en coUpUre ....15
4.1 maintenance préventive..........15
4.2 réparation ..............................15
4.3 prestation de Garantie ...........15
4.4 entreposaGe ...........................15
4.5 elimination / compatibilité
environnementale ...................15
Deutsch
InhaltsverzeIchnIs
Seite
1.1 allGemeiner sicherheitstech-
nischer hinweis .......................12
1.2 bestimmUnGsGemässe
verwendUnG ............................12
1.3 nicht bestimmUnGsGemässe
verwendUnG ............................12
1.4 einbaUerklärUnG (oriGinal) ...12
2.1 montaGeanleitUnG ..................12
2.2 leistUnGsdaten .......................13
2.3 betriebsbedinGUnGen ..............13
3.1 arbeitshinweise .......................13
3.2 ein-/aUsschalten ....................13
4.1 vorbeUGende instandhaltUnG .13
4.2 reparatUr ...............................13
4.3 GarantieleistUnG ....................13
4.4 laGerUnG ................................13
4.5 entsorGUnG / UmweltverträG-
lichkeit ....................................13
8

Índice
Portugúes
Página
1.1 indicações Gerais sobre a
técnica de seGUrança .............22
1.2 Utilização correcta para os fins
previstos .................................22
1.3 Utilização incorrecta .............22
1.4 declaração de montaGem .......22
2.1 instrUções de montaGem ........22
2.2 características técnicas ........23
2.3 condições de operação ..........23
3.1 indicações para o trabalho ....23
3.2 liGar/desliGar .........................23
4.1 manUtenção preventiva ..........23
4.2 reparação ...............................23
4.3 condições de Garantia ...........23
4.4 armazenaGem .........................23
4.5 eliminação / compatibilidade
ambiental .................................23
Índice
español
Página
1.1 indicación General relativa a
seGUridad ................................20
1.2 Uso conforme al pre-visto .....20
1.3 Uso no conforme al previsto .20
1.4 declaración de incorporación
................................................20
2.1 instrUcciones de montaje .......20
2.2 datos de rendimiento ..............21
2.3 condiciones de Uso ................21
3.1 instrUcciones de trabajo .......21
3.2 conexión/desconexión ...........21
4.1 maintenance préventive..........21
4.2 reparación ..............................21
4.3 Garantía .................................21
4.4 alimacenamiento .....................21
4.5 eliminación / compatibilidad con
el medio ambiente ....................21
IndIce
ItalIano
Pagina
1.1 informazioni Generali sUlla
sicUrezza.................................18
1.2 impieGo conforme della
macchina .................................18
1.3 impieGo non conforme ...........18
1.4 dichiarazione di montaGGio ....18
2.1 instrUzioni per il montaGGio ...18
2.2 dati sUlle prestazioni .............19
2.3 condizioni di impieGo ...............19
3.1 modalità di lavor ....................19
3.2 inserimento/disinserimento .....19
4.1 manUtenzione preventiva ........19
4.2 riparazione .............................19
4.3 Garanzia .................................19
4.4 immaGazzinamento ...................19
4.5 smaltimento / compatibilità
ambientale ...............................19
9

Sivu
Suomi
SiSällySluettelo
1.1 yleinen tUrvaterkninen ohje ..28
1.2 määräystenmUkainen käyttö ..28
1.3 määräystenvastainen käyttö ..28
1.4 liittämisvakUUtUs ....................28
2.1 asennUsohje ...........................28
2.2 sUoritUskykytiedot ................29
2.3 käyttöolosUhteet ..................29
3.1 työskentelyohjeet ..................29
3.2 päälle/pois kytkeminen ..........29
4.1 ennaltaehkäisevä kUnnossapito
................................................29
4.2 korjaaminen ............................29
4.3 takUU .......................................29
4.4 varastointi ..............................29
4.5 hävittäminen / ympäristövaatimU-
stenmkaisUUs ..........................29
Sida
SvenSka
InnehållSförtecknIng
1.1 allmän säkerhetsinformation 26
1.2 ändamålsenliG användninG .....26
1.3 ike ändamålsenliG användninG 26
1.4 inmonterinGsförklarinG .........26
2.1 monterinGsanvisninG ..............26
2.2 prestandadata .........................27
2.3 driftsvillkor ..........................27
3.1 arbetsanvisninGar ..................27
3.2 slå på/stänGa av ......................27
4.1 förebyGGande Underhåll .......27
4.2 reparation ..............................27
4.3 Garantiservice ........................27
4.4 laGrinG ...................................27
4.5 avfallshanterinG / miljövänli-
Ghet ........................................27
Page
NederlaNds
INhoudsopgave
1.1 alGemene veiliGheidstechnische
nstrUcties ...............................24
1.2 voorGeschreven GebrUik ........24
1.3 niet-voorGeschreven GebrUik 24
1.4 inboUwverklarinG ...................24
2.1 montaGehandleidinG ...............24
2.2 capaciteitGeGevens .................25
2.3 bedrijfsvoorwaarden .............25
3.1 werkinstrUcties .....................25
3.2 in-/Uitschakelen ......................25
4.1 preventief onderhoUd ............25
4.2 reparatie .................................25
4.3 Garantievoorwaarden ............25
4.4 opslaG ....................................25
4.5 afvoeren/milieUvriendelijkheid
................................................25
10

目录
中国
页
1.1 一般安全技术提示 ���������������������������34
1.2 合规用途 ���������������������������������������������34
1.3 非合规用途 �����������������������������������������34
1.4 制造商声明(原文) ������������������������34
2.1 安装说明 ���������������������������������������������34
22.2 性能数据 ���������������������������������������������34
2.3 运行条件 ���������������������������������������������35
3.1 工作提示 ���������������������������������������������35
3.2 开/关机 ���������������������������������������������35
4.1 预防性维护 ����������������������������������������35
4.2 维修 ������������������������������������������������������35
4.3 保修 ������������������������������������������������������35
4.4 存放 ������������������������������������������������������35
4.5 报废/环境相容性 ���������������������������35
Spis treści
Polski
Strona
.
-
......................................
........................
............................
...............
..............
...............
............
..
....................................
................................
......................
...............
Obsah
Česky
Strana
...................................................
...
...
........
.......................
...............
..................
.......................
.....................
..................
.......................................
.......................................
................................
................
11

CN PL CZ FI SE NL PT ES IT EN FR DE
1.1 Allgemeiner sicherheitstechnischer hin-
weis
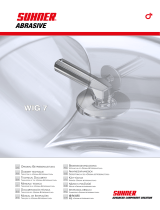
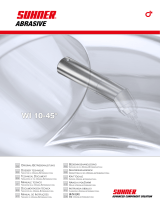
Diese Betriebsanleitung gilt für das Handstück WI 10-F.
Nur qualifiziertes Personal darf das Handstück
handhaben.
Die dem Antrieb separat beigelegten Sicherheits-
hinweise sind zwingend zu beachten.
1.2 Bestimmungsgemässe Verwendung
Die Handstücke sind bestimmt für die Trockenbearbei-
tung von Metalloberflächen. Für das Einspannen von
Schleifwerkzeugen mit zylindrischem Schaft zum Fräsen,
Schleifen, Polieren und Entgraten. Werkzeug-Durchmes-
ser max. 55 mm.
1.3 nicht Bestimmungsgemässe Verwendung
Alle andern als unter Pkt. 1.2 beschriebenen Ver-
wendungen gelten als nicht bestimmungsgemäs-
se Verwendung und sind deshalb nicht zulässig.
1.4 einBAuerklärung (OriginAl)
Hiermit erklärt der Hersteller Suhner Schweiz AG, Indus-
triestrasse 10, CH-5242 Lupfig, der unvollständigen Ma-
schine (Typ und Serien-Nr. siehe Rückseite) dass folgende
grundlegenden Anforderungen der Richtlinie 2006/42/EG
nach Anhang I zur Anwendung kommen und eingehalten
werden: 1.1.2, 1.1.3, 1.1.5, 1.2.1, 1.2.2, 1.3.7, 1.3.8.1, 1.5.1,
1.5.4 und 1.6.1. Für die unvollständige Maschine wurde
eine technische Dokumentation nach Anhang VII der
Maschinenrichtlinie erstellt. Dokumentbevollmächtigter:
T. Fischer. Autorisierten Stellen wird auf begründetem Ver-
langen die technischen Dokumentationen in Papier- oder
elektronischer Form zur Verfügung gestellt. Diese unvoll-
ständige Maschine darf nur dann in Betrieb genommen
werden, wenn festgestellt wurde, dass die Maschine, in
welche die unvollständige Maschine eingebaut werden
soll, den Bestimmungen der Maschinenrichtlinie ent-
spricht. CH-Lupfig, 04/2020.
T. Fischer/Divisionsleiter
2. INbETRIEbNahmE
2.1 mOntAgeAnleitung
Die Kapitel 2 und 3 sind
zwingend vor der Inbe-
triebnahme des Hand-
stücks zu lesen.
Nur Handstücke, Wellen und Schleifwerkzeuge in ein-
wandfreiem Zustand verwenden.
Handstück nur bei ausgeschaltetem und stillstehendem
1. SIChERhEITShINwEIS
Antrieb auf die Welle montieren.
Schleifwerkzeug nur bei ausgeschaltetem und stillstehen-
dem Antrieb montieren.
Die für das Handstück bestimmten Schutzvorrichtungen
unbedingt verwenden.
Länderspezifische Vorgaben beachten.
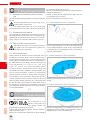
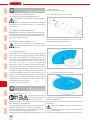
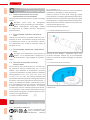
2.1.1 mOntAge/demOntAge des hAndstücks
Arretierknopf drücken und Schlauchkupplung in die
Handstückbohrung einführen. Sicherstellen dass der Ar-
retierknopf eingerastet ist. Demontage des Handstücks in
umgekehrter Reihenfolge.
2.1.2 mOntAge/demOntAge der schutzhAuBe
Die Schutzhaube mit vier Schrauben an das Gehäuse
montieren.
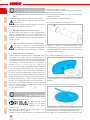
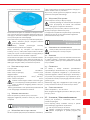
2.1.3 mOntAge/demOntAge des schleifwerkzeugs
Schleifwerkzeug montieren. Das Schleifwerkzeug muss
in den tiefliegenden Zentrierbund der Spindel eingreifen.
Schleifwerkzeug mit Sechskantschlüssel festziehen.
Demontage des Schleifwerkzeugs in umgekehrter Rei-
DE
12

CN CZPL FI SE NL PT ES IT EN FR DE
henfolge.
Nur von SUHNER empfohlene Werkzeuge ver-
wenden.
Die Sicherheitshinweise des Werkzeug-Herstel-
lers sind ebenfalls zu beachten.
Es ist zu prüfen, dass der Durchmesser des Werkzeugs
zulässig ist und die zulässige maximale Drehzahl höher
ist als die Leerlaufdrehzahl oder die eingestellte Drehzahl
der Maschine.
Das montierte Werkzeug muss frei drehen können. An-
schliessend ist ein Probelauf ohne Belastung von min. 30
Sekunden durchzuführen. Vibrierendes Werkzeug umge-
hend ersetzen.
2.2 leistungsdAten
Wellenanschluss G28
Max. Drehzahl 10‘000min-1
Spannzange max. Ø 12mm / 3/8“
Gewicht 1.230kg
Vibrationen EN 60745 3.1m/s2, K=1.5m/s2
Max. Werkzeug-Ø 55mm
Der angegebene Schwingungswert ist nach
einem genormten Prüfverfahren gemessen wor-
den und kann sich vom Wert bei einer tatsäch-
lichen Benutzung unterscheiden. Er kann zum Pro-
duktvergleich oder zu einer einleitenden Einschätzung
der Aussetzung verwendet werden.
2.3 BetrieBsBedingungen
Temperaturbereich Betrieb: 0 bis +50°C
Relative Luftfeuchtigkeit: 95% bei +10°C nicht kondensie-
rend.
3. haNDhabuNg / bETRIEb
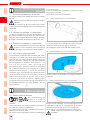
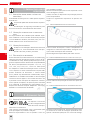
3.1 ArBeitshinweise
Um ein optimales Schleifergebnis zu erreichen, Schleif-
werkzeug mit leichtem Druck gleichmässig hin und her
bewegen.
Zu starker Druck verringert die Leistungsfähigkeit des
Handstücks und die Lebensdauer des Schleifwerkzeugs.
3.2 ein-/AusschAlten
Handstück gut festhalten. Antrieb einschalten.
Probelauf mind. 30 Sek. ohne Belastung durch-
führen. Vibrierende Schleifwerkzeuge nicht ver-
wenden.
Im Betrieb muss das Handstück immer in der Hand ge-
halten werden.
Antrieb bei beendeter Arbeit ausschalten.
Werkzeug läuft noch aus nachdem die Maschine ausge-
schaltet wird.
Handstück so ablegen, dass dadurch keine Gefahr ent-
stehen kann.
Handstück von der Welle demontieren.
4. INSTaNDhaLTuNg / waRTuNg
4.1 VOrBeugende instAndhAltung
Handstück stets sauber halten und trocken aufbe-
wahren.
4.2 repArAtur
Sollte das Handstück, trotz sorgfältiger Herstellungs- und
Prüfverfahren, einmal ausfallen, ist die Reparatur von ei-
ner autorisierten SUHNER Kundendienststelle ausführen
zu lassen.
4.3 gArAntieleistung
Für Schäden/Folgeschäden wegen unsachgemässer
Behandlung, nicht bestimmungsgemässer Verwendung,
nicht Einhalten der Instandhaltungs- und Wartungsvor-
schriften sowie Handhabung durch nicht autorisierte Per-
sonen besteht kein Anspruch auf Garantieleistung.
Beanstandungen können nur anerkannt werden, wenn
das Handstück unzerlegt zurückgesandt wird.
4.4 lAgerung
Temperaturbereich: -15°C bis +50°C
Max. relative Luftfeuchtigkeit: 90 % bei +30°C, 65 % bei
+50°C
4.5 entsOrgung / umweltVerträglichkeit
Das Handstück besteht aus Materialien, die einem Re-
cylingprozess zugeführt werden können.
Handstück vor der Entsorgung unbrauchbar machen.
Handstück nicht in den Müll werfen.
Gemäss nationalen Vorschriften muss dieses
Handstück einer umweltgerechten Wiederverwer-
tung zugeführt werden.
DE
13

CN PL CZ FI SE NL PT ES IT EN FR
1. INDICaTIoN RELaTIvE à
SéCuRITé
1.1 instructiOns générAles de sécurité
Ce dossier technique est valable pour la pièce manuelle
WI 10 -F.
Seul le personnel qualifié peut opérer sur la pièce
manuelle.
Les consignes de sécurité fournies avec l’entraî-
nement en fascicule séparé doivent être impérativement
respectées.
1.2 utilisAtiOn cOnfOrme à lA destinAtiOn
Les pièces manuelles sont destinées au traitement à sec
de surfaces métalliques. Pour serrer des outils de polis-
sage avec tige cylindrique destinés au fraisage, ponçage,
polissage et ébarbage. Diamètre de l‘outil 55 mm max.
1.3 utilisAtiOn cOntrAire à lA destinAtiOn
Toutes les applications autres que celles décrites
au point 1.2 sont à considérer comme contraires à
la destination et ne sont donc pas admissibles.
1.4 déclArAtiOn d‘incOrpOrAtiOn
Par la présente, le fabricant Suhner Schweiz AG, Indus-
triestrasse 10, CH-5242 Lupfig, de la quasi-machine (voir
au dos le type et le numéro de série) déclare que les exi-
gences essentielles suivantes de la directive 2006/42/
CE sont appliquées et respectées selon l‘annexe I : 1.1.2,
1.1.3, 1.1.5, 1.2.1, 1.2.2, 1.3.7, 1.3.8.1, 1.5.1, 1.5.4 et 1.6.1.
Une documentation technique conforme à l‘annexe VII
de la directive Machines a été conçue pour la quasi-
machine. Fondé de pouvoir : T. Fischer. Les documents
techniques seront communiqués aux organismes autori-
sés sur demande motivée sous forme papier ou électro-
nique. Cette quasi-machine ne peut être mise en service
que s‘il est constaté que la machine à laquelle la qua-
si-machine doit être incorporée répond aux dispositions
de la directive Machines. CH-Lupfig, 04/2020. T. Fischer/
Chef de division
2. mISE EN SERvICE
2.1 instructiOns de mOntAge
Il est impératif de lire les
sections 2 et 3 avant la
mise en service de la pièce
manuelle.
Utiliser uniquement des pièces manuelles, des arbres et
des outils de polissage en parfait état.
Ne monter la pièce manuelle sur l’arbre que lorsque l’en-
traînement est coupé et arrêté.
Ne monter l’outil de polissage que lorsque l’entraînement
est coupé et arrêté.
Utiliser impérativement le dispositif de protection prévu
pour la pièce manuelle.
Respecter les prescriptions nationales.
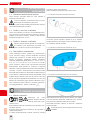
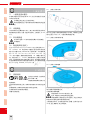
2.1.1 mOntAge/démOntAge de lA pièce mAnuelle
Presser le bouton de blocage et insérer l’accouplement
pour tuyau flexible dans l’alésage de la pièce manuelle.
Vérifier que le bouton de blocage est encliqueté.
Démontage de la pièce manuelle dans l’ordre inverse.
2.1.2 mOntAge/démOntAge du cApOt de prOtectiOn
Monter le capot de protection sur le boîtier à l’aide de
quatre vis.
2.1.3 mOntAge/démOntAge de l’Outil de pOlissAge
Monter l’outil de polissage. L’outil de polissage doit s’en-
gager dans la collerette de centrage basse de la broche.
Serrer l’outil de polissage avec une clé hexagonale.
Démontage de l’outil de polissage dans l’ordre inverse.
Utiliser uniquement les outils recommandés par
SUHNER.
DE
FR
14

CN CZPL FI SE NL PT ES IT EN FR
Les consignes de sécurité du fabricant de l’outil doivent
également être respectées.
Vérifier que le diamètre de l’outil est approprié et que la
vitesse de rotation maximale admissible est supérieure
au régime à vide ou au régime réglé sur l’appareil.
L’outil monté doit pouvoir tourner librement. Une marche
d’essai doit être effectuée ensuite sans contrainte pen-
dant au moins 30 secondes. Remplacer immédiatement
un outil produisant des vibrations.
2.2 perfOrmAnces
Raccord G28
Vitesse de rotation maxi. 10‘000min-1
Pince de serrage maxi. Ø 12mm / 3/8“
Poids 1.230kg
Vibrationen EN 60745 3.1m/s2, K=1.5m/s2
Outil-Ø max. 55mm
La valeur de vibration indiquée a été mesurée se-
lon un processus de contrôle normé et peut diver-
ger de la valeur en utilisation réelle. Elle peut servir
à la comparaison de différents produits ou à l‘estimation
préliminaire des temps d‘arrêt.
2.3 cOnditiOns d’explOitAtiOn
Plage de températres en exploitation: 0 à +50°C
Humidité de l‘air relative: 95% à +10°C sans condensation
3. uTILISaTIoN / ExPLoITaTIoN
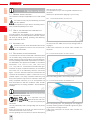
3.1 indicAtiOns de trAVAil
Afin d’obtenir un polissage optimal, mouvoir l’outil de po-
lissage en mouvement de va et vient en maintenant une
légère pression d’appui.
Une pression d’appui trop élevée diminue la capacité de
performance de la pièce manuelle et la durée de vie de
l’outil de polissage.
3.2 mise en mArche/en cOupure
Maintenir fermement la pièce manuelle. Mettre l’entraîne-
ment en marche.
Effectuer une marche d’essai pendant au moins
30 secondes sans contrainte. Ne pas utiliser d‘ou-
tils de polissage produisant des vibrations.
En fonctionnement, la pièce manuelle doit toujours être
tenue en main.
Mettre l’entraînement en coupure une fois le travail ter-
miné.
L’outil continue à tourner après que la machine a été mise
en coupure.
Poser la pièce manuelle de manière à n’engendrer aucun
risque.
Détacher la pièce manuelle de l’arbre.
4.1 mAintenAnce préVentiVe
Maintenir la pièce manuelle en état propre et la
stocker à sec.
4.2 répArAtiOn
Si la pièce manuelle devait présenter un défaut malgré
des processus de fabrication et de contrôles rigoureux, il
y a lieu de faire exécuter la remise en état par un atelier de
service à la clientèle agrée par SUHNER.
4.3 prestAtiOn de gArAntie
Pour des dégâts et dégâts consécutifs résultants d’un
traitement inadéquat, d’une utilisation non conforme à la
destination, du non respect des prescriptions de mainte-
nance et d’entretien, ainsi que de la manutention par du
personnel non autorisé, il n’existe aucune prétention de
garantie.
Des réclamations ne peuvent être reconnues que si la
pièce manuelle est retournée non démontée.
4.4 entrepOsAge
Plage de températures en exploitation: 0 à +50°C
Humidité de l’air relative: 95 % à +10°C sans condensa-
tion.
4.5 eliminAtiOn / cOmpAtiBilité enVirOnnemen-
tAle
Cette pièce manuelle est composée de matériaux pou-
vant être soumis à un processus de recyclage.
Rendre la pièce manuelle inutilisable avant la remise à
une collecte de déchets.
Ne pas mettre la pièce manuelle aux ordures.
Selon les prescriptions nationales, cette pièce ma-
nuelle doit être soumise à un recyclage respectant
l’environnement.
4. maINTENaNCE / ENTRETIEN
DEFR
15

CN PL CZ FI SE NL PT ES IT EN
1.1 generAl nOtes On sAfety
This operation manual is applicable for the hand tool WI
10 - F.
The hand tool may only be handled by personnel
who are qualified.
It is imperative that you observe the safety instruc-
tions provided separately for the drive.
1.2 use Of the mAchine fOr purpOses fOr
which it is intended
The hand pieces are designed for dry applications on
metal surfaces. For receiving abrasive tools with cylindri-
cal shafts for milling, grinding, polishing, and deburring.
Max tool diameter 55 mm.
1.3 incOrrect use
All uses other than those described under section
1.2 are regarded as incorrect use and are there-
fore not admissible.
1.4 declArAtiOn Of incOrpOrAtiOn
The manufacturer Suhner Schweiz AG of Industriestrasse
10, CH-5242 Lupfig, hereby declares for the partly com-
pleted machinery (see reverse side for type and serial no.)
that the following fundamental requirements of the Direc-
tive 2006/42/EC are applied and fulfilled in accordance
with Annex I: 1.1.2, 1.1.3, 1.1.5, 1.2.1, 1.2.2, 1.3.7, 1.3.8.1,
1.5.1, 1.5.4, and 1.6.1. Technical documentation was gen-
erated for the partly completed machinery in accordance
with Annex VII of the Machinery Directive. Document
Agent: T. Fischer. Authorised sites are provided with this
technical documentation in paper or electronic form on
justified request. This partly completed machinery may
be put into operation only when the machine in which the
partly completed machinery is to be incorporated has
been ascertained to fulfil the conditions under the Ma-
chinery Directive. CH-Lupfig, 04/2020. T. Fischer/Division
manager
2.1 AssemBly instructiOns
It is imperative that you
read Sections 2 and 3 be-
fore you start operating the
hand tools.
Use only hand tools, shafts, and grinding tools in perfect
condition.
Attach the hand tool to the shaft only when the drive is
switched off and has come to a stop.
Connect grinding tools only when the drive is switched off
1. NoTES oN SaFETy
2. CommISSIoNINg
and has come to a stop.
It is imperative that you use the guards intended for the
hand tool.
Observe the specifications applying to your country.
2.1.1 AttAching/detAching the hAnd tOOl
Press the locking button and insert the hose coupling into
the hand tool hole. Make sure that the locking button is
engaged.
Follow these instructions in reverse order to detach the
hand tool.
2.1.2 AttAching/detAching the sAfety guArd
Mount the safety guard to the housing using four screws.
2.1.3 AttAching/detAching the grinding tOOl
Mount the grinding tool. The grinding tool must engage in
the deep centering collar of the spindle. Tighten the grind-
ing tool with the hexagon wrench.
Follow these instructions in reverse order to detach the
grinding tool.
FR DE
EN
16

CN CZPL FI SE NL PT ES IT EN
Use only those tools recommended by SUHNER.
You must also observe the safety instructions is-
sued by the manufacturer of the tool.
You must check that the tool’s diameter is within the limits
and the max speed is higher than the tool’s idle or set
speed.
The installed tool must be able to rotate freely. Afterwards
a test run must be conducted without load for at least thir-
ty seconds. Vibrating tools must be replaced immediately.
2.2 rAting dAtA
Connection G28
Maximum speed 10‘000min-1
Maximum collet chuck Ø 12mm / 3/8“
Weight 1.230kg
Vibration EN 60745 3.1m/s2, K=1.5m/s2
Max. wheel diameter 55mm
The specified vibration value was measured with a
standardised test method and may differ from the
actual operating value. The specified value can be
used for product comparisons or for an introductory as-
sessment of work breaks.
2.3 OperAting cOnditiOns
Temperature range during operation: 0 to +50°C
Relative air humidity: 95% at +10°C not condensed
3. haNDLINg / oPERaTIoN
3.1 wOrking instructiOns
To achieve an optimum grinding result, move grinding
tool uniformly back and forth with light pressure.
Excessive pressure lessens the working capability of the
hand tool, as well as the life of the grinding tool.
3.2 switching On/Off
Hold the hand tool firmly. Switch on the drive.
Conduct the test run without load for at least thirty
seconds. Do not use vibrating grinding tools.
You must always hold the hand tool when it is op-
erating.
Switch off the drive when you stop working.
The tool still needs time to stop after the tool has been
switched off.
Put down the hand tool so that there can be no danger.
Remove the hand tool from the shaft.
4.1 preVentiVe mAintenAnce
Always keep the hand tool clean and in a dry
place.
4.2 repAir
If despite strict observance of the manufacturing and test-
ing method the hand tool should happen to fail, it must be
repaired by an authorized SUHNER agency.
4.3 wArrAnty
In the event of the tool being improperly handled, used
for purposes for which it is not intended and/or of the ser-
vice and maintenance instructions not being observed by
non-authorized persons, no warranty shall be in effect for
damages/consequential damages.
Complaints can only be honored if the hand tool is re-
turned in the undisassembled condition.
4.4 stOrAge
Temperature range during operation: -15°C to +50°C
Max. relative air humidity: 90% at +30°C, 65% at +50°C.
4.5 dispOsAl / enVirOnmentAl cOmpAtiBility
This hand tool consists of materials which can be dis-
posed of in a recycling process.
Before disposal, render the hand tool unusable.
Do not throw the hand tool into the garbage collec-
tion.
According to national regulations this hand tool
must be disposed of in an environmentally-compatible
recycling process.
4. SERvICE / maINTENaNCE
FR DEEN
17

CN PL CZ FI SE NL PT ES IT
1.1 infOrmAziOni generAli sullA sicurezzA
Questo manuale tecnico si riferisce alla utensile a mano
WI 10 -F.
È autorizzato a manipolare l‘utensile a mano
esclusivamente personale qualificato.
Attenersi strettamente alle raccomandazioni di si-
curezza allegate separatamente all’azionamento.
1.2 impiegO cOnfOrme dellA mAcchinA
Gli utensili sono adatte per la lavorazione a secco di su-
perfici metalliche. Per il bloccaggio degli utensili abrasivi
con gambo cilindrico per la fresatura, la levigatura, la lu-
cidatura e la sbavatura. Diametro max. dell’utensile: 55
mm.
1.3 impiegO nOn cOnfOrme
Tutti gli ulteriori impieghi, non indicati al prece-
dente punto 1.2 sono da considerare come non
conformi alle prescrizioni e sono pertanto vietati.
1.4 dichiArAziOne di mOntAggiO
Con la presente il costruttore Suhner Schweiz AG, Indus-
triestrasse 10, CH-5242 Lupfig, della macchina incomple-
ta (tipo e n. di serie vedi retro), dichiara che sono state
applicate e rispettate le seguenti specifiche di base della
direttiva 2006/42/CE secondo l’Appendice I: 1.1.2, 1.1.3,
1.1.5, 1.2.1, 1.2.2, 1.3.7, 1.3.8.1, 1.5.1, 1.5.4 e 1.6.1. Per la
macchina incompleta è stata prodotta la necessaria do-
cumentazione tecnica secondo l’Appendice VII della di-
rettiva macchine. Responsabile della documentazione: T.
Fischer. In caso di richiesta motivata la documentazione
tecnica viene fornita in formato cartaceo o elettronico ai
centri autorizzati. Questa macchina incompleta può es-
sere messa in funzione solo dopo aver opportunamente
verificato che la macchina nella quale la macchina incom-
pleta deve essere installata è conforme alle specifiche
della direttiva macchine. CH-Lupfig, 04/2020. T. Fischer/
Presidente di divisione
2. mESSa IN SERvIZIo
2.1 instruziOni per il mOntAggiO
Occorre leggere assoluta-
mente i capitoli 2 e 3 prima
della messa in funzione
dell’utensile a mano.
Utilizzare solo utensili a mano, alberi e utensili abrasivi in
condizioni perfette.
Montare l’utensile a mano sull’albero solo con
l’azionamento disinserito e fermo.
1. PRESCRIZIoNI DI SICuREZZa
Montare l’utensile abrasivo solo con l’azionamento disin-
serito e fermo.
Utilizzare solo i dispositivi di sicurezza idonei per l’utensile
a mano.
Attenersi alle disposizioni vigenti nel paese.
2.1.1 mOntAggiO/smOntAggiO dell’utensile A mAnO
Premere il pulsante di arresto e inserire il giunto flessibile
nel foro per l’utensile a mano. Assicurarsi che il pulsante
di arresto scatti nella posizione.
Smontaggio dell’utensile a mano seguendo la sequenza
al contrario.
2.1.2 mOntAggiO/smOntAggiO lA scOccA di prOteziOne
Montare la scocca di protezione sull‘alloggiamento con
quattro viti.
2.1.3 mOntAggiO/smOntAggiO dell’utensile ABrAsiVO
Montare l‘utensile abrasivo. L‘utensile abrasivo deve ag-
ganciarsi al collare di centraggio profondo del mandrino.
Serrare l‘utensile abrasivo con una chiave esagonale.
Smontaggio dell’utensile abrasivo seguendo la sequenza
EN FR DE
IT
18

CN CZPL FI SE NL PT ES IT
al contrario.
Utilizzare unicamente gli utensili raccomandati
da.
Attenersi anche alle raccomandazioni di sicurez-
za del produttore dell’utensile.
Occorre verificare che il diametro dell’utensile sia con-
sentito e che la velocità massima consentita sia superiore
al numero di giri a vuoto o alla velocità impostata della
macchina.
L’utensile montato deve poter ruotare liberamente. Infine
occorre effettuare una prova senza carico di min. 30 se-
condi. Sostituire immediatamente l’utensile se vibra.
2.2 dAti sulle prestAziOni
Raccordo G28
Melocità massima di rotazione 10‘000min-1
Pinza massima di serraggio Ø 12mm / 3/8“
Peso 1.230kg
Vibrazioni EN 60745 3.1m/s2, K=1.5m/s2
Ø massimo utensile 40mm
Il valore delle vibrazioni indicato è stato misurato
secondo un procedimento di controllo normaliz-
zato e può essere diverso da quello rilevato in
caso di un utilizzo effettivo. Può essere impiegato per il
confronto tra prodotti o per una valutazione introduttiva
dell’interruzione.
2.3 cOndiziOni di impiegO
Temperatura d‘esercizio: 0 a +50 ° C
Umidità relativa: 95% a + 10 ° C senza condensa
3. maNIPoLaZIoNE / ImPIEgo
3.1 mOdAlità di lAVOr
Al fine di ottenere un risultato di lavoro ottimale, muovere
il utensili abrasivi con una leggera pressione in avanti e
indietro.
Una pressione eccessiva diminuisce l‘efficienza della
utensile a mano e la durata di vita del utensili abrasivi.
3.2 inserimentO/disinserimentO
Fissare bene l’utensile a mano. Inserire l’azionamento.
Effettuare una prova senza carico per min. 30 se-
condi. Non utilizzare utensili abrasivi che vibrano.
Durante il funzionamento l’utensile a mano deve
sempre essere tenuta in mano.
Disinserire l’azionamento al termine dei lavori.
L’utensile continua a funzionare fino a fermarsi dopo che
viene disinserito.
Riporre l’utensile a mano in modo da non provocare dan-
ni.
Smontare l’utensile a mano dall’albero.
4.1 mAnutenziOne preVentiVA
Tenere sempre pulita l‘utensile a mano e conser-
varla in un luogo asciutto.
4.2 ripArAziOne
Se l‘utensile a mano guastarsi, nonostante l‘accurata fa-
bbricazione e collaudo, la riparazione deve essere affida-
ta ad un servizio clienti autorizzato SUHNER.
4.3 gArAnziA
Non sussiste diritto alla garanzia in caso di danni o dan-
ni conseguenti dovuti alla manipolazione inadeguata,
all‘uso non conforme alle prescrizioni, al mancato rispetto
delle prescrizioni relative alla messa a punto ed alla ma-
nutenzione, così come all‘impiego da parte di personale
non autorizzato.
Reclamazioni possono essere considerate solo se la
utensile a mano viene ritornata non smontata.
4.4 immAgAzzinAmentO
Temperatura d‘esercizio: 0 to +50°C
Umidità relativa: 95% at +10°C not condensed
4.5 smAltimentO / cOmpAtiBilità AmBientAle
L‘utensile a mano è composta di materiali che possono
essere convogliati in processi di ricliclo.
Rendere inutilizzabile l‘utensile a mano prima dello smal-
timento.
Non gettare l‘utensile a mano nella spazzatura.
In applicazione delle prescrizioni nazionali, questa
utensile a mano deve essere smaltita in modo ris-
pettoso dell‘ambiente.
4. SERvIZIo / maNuTENZIoNE
EN FR DEIT
19

CN PL CZ FI SE NL PT ES
1.1 indicAción generAl relAtiVA A seguridAd
La presente documentación técnica es válida para la por-
taútil WI 10-F.
La portaútil debe ser manejada únicamente por
personal cualificado.
Es obligatorio el cumplimiento de las indicaciones
de seguridad que se adjuntan por separado.
1.2 usO cOnfOrme Al pre-VistO
Los portaútiles se han concebido para mecanizar en
seco superficies metálicas. Se pueden fijar en ellos útiles
para lijar con vástago cilíndrico para fresar, lijar, pulir y
desbarbar. Diámetro máximo del útil: 55 mm.
1.3 usO nO cOnfOrme Al preVistO
Todo uso distinto a lo descrito en el punto 1.2 se
considera no conforme al previsto, por lo que no
está permitido.
1.4 declArAción de incOrpOrAción
El fabricante Suhner Schweiz AG, Industriestrasse 10,
CH-5242 Lupfig, declara que la cuasi máquina (véase el
tipo y nº de serie en la parte posterior) respecta y cumple
los siguientes requisitos básicos establecidos en la Di-
rectiva de Máquinas 2006/42/CE según el Anexo I: 1.1.2,
1.1.3, 1.1.5, 1.2.1, 1.2.2, 1.3.7, 1.3.8.1, 1.5.1, 1.5.4 y 1.6.1.
Para la cuasi máquina se ha preparado una documen-
tación técnica acorde al Anexo VII de la Directiva de Má-
quinas. Representante autorizado: T. Fischer. Si los or-
ganismos autorizados lo solicitasen de forma justificada,
se pondrá a su disposición la documentación técnica en
formato electrónico o papel. Esta máquina incompleta
sólo se puede poner en funcionamiento si se constata
previamente que la máquina completa en la que se debe
realizar su montaje cumple con las disposiciones de la
Directiva de Máquinas. CH-Lupfig, 04/2020. T. Fischer/
Director da División
2. PuESTa EN SERvICIo
2.1 instrucciOnes de mOntAje
Es obligatorio leer los capí-
tulos 2 y 3 antes de la pue-
sta en funcionamiento del
portaútil.
Sólo se deben utilizar portaútiles, ejes y útiles para lijar en
perfecto estado.
El montaje del portaútiles en el eje se debe realizar sólo
con el accionamiento parado y desconectado.
El montaje de l‘útil para lijar se debe realizar sólo con el
1. INDICaCIoNES RELaTIvaS a
SEguRIDaD
accionamiento parado y desconectado.
Es imprescindible utilizar los dispositivos de protección
determinados para el portaútil.
Se deben observar las especificaciones para cada país.
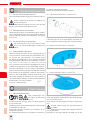
2.1.1 mOntAje/desmOntAje del pOrtAútil
Presionar el botón de bloqueo e introducir el acoplamien-
to de la manguera en el orificio del portaútil. Asegúrese
de que el botón de bloqueo esté encastrado.
Desmontaje del portaútil en el orden inverso.
2.1.2 mOntAje/desmOntAje de lA cuBiertA prOtectOrA
Coloque la cubierta protectora en la carcasa con cuatro
tornillos.
2.1.3 mOntAje/desmOntAje de l‘útile pArA lijAr
Montar l‘útile para lijar. L‘útile para lijar debe encajar en
el collarín de centrado profundo del husillo. Apriete l‘útile
para lijar con una llave hexagonal.
Desmontaje de l‘útile para lijar en el orden inverso.
Utilizar sólo las útiles recomendadas por SUH-
NER.
IT EN FR DE
ES
20
Strona się ładuje...
Strona się ładuje...
Strona się ładuje...
Strona się ładuje...
Strona się ładuje...
Strona się ładuje...
Strona się ładuje...
Strona się ładuje...
Strona się ładuje...
Strona się ładuje...
Strona się ładuje...
Strona się ładuje...
Strona się ładuje...
Strona się ładuje...
Strona się ładuje...
Strona się ładuje...
-
 1
1
-
 2
2
-
 3
3
-
 4
4
-
 5
5
-
 6
6
-
 7
7
-
 8
8
-
 9
9
-
 10
10
-
 11
11
-
 12
12
-
 13
13
-
 14
14
-
 15
15
-
 16
16
-
 17
17
-
 18
18
-
 19
19
-
 20
20
-
 21
21
-
 22
22
-
 23
23
-
 24
24
-
 25
25
-
 26
26
-
 27
27
-
 28
28
-
 29
29
-
 30
30
-
 31
31
-
 32
32
-
 33
33
-
 34
34
-
 35
35
-
 36
36


w innych językach
- español: SUHNER ABRASIVE BA WI 10-F Guía del usuario
- italiano: SUHNER ABRASIVE BA WI 10-F Guida utente
- Deutsch: SUHNER ABRASIVE BA WI 10-F Benutzerhandbuch
- eesti: SUHNER ABRASIVE BA WI 10-F Kasutusjuhend
- svenska: SUHNER ABRASIVE BA WI 10-F Användarguide
- português: SUHNER ABRASIVE BA WI 10-F Guia de usuario
- français: SUHNER ABRASIVE BA WI 10-F Mode d'emploi
- Nederlands: SUHNER ABRASIVE BA WI 10-F Gebruikershandleiding
Powiązane artykuły
-
 SUHNER ABRASIVE WIG 7 instrukcja
-
 SUHNER ABRASIVE WI 10-45° instrukcja
-
 SUHNER ABRASIVE WI 10 instrukcja
-
 SUHNER ABRASIVE WI 4 instrukcja
-
 SUHNER ABRASIVE BA FH 10-L instrukcja
-
 SUHNER ABRASIVE FH 9-INOX instrukcja
-
 SUHNER ABRASIVE FH 15 instrukcja
-
 SUHNER ABRASIVE FH 7-INOX instrukcja
-
 SUHNER ABRASIVE WI 7-45° instrukcja
-
 SUHNER ABRASIVE FH 4-INOX instrukcja


Inne dokumenty
-
Festool PF 1200 E-Plus Alucobond Instrukcja obsługi
-
Kerbl ConstantaRodeo 18950 Instrukcja obsługi
-
-
-
Festool Domino DF 500 Q Instrukcja obsługi
-
-
AL-KO SOLO FC 13-90.5 HD 2WD Operation Manual