
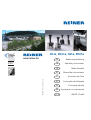
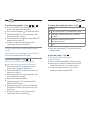
www.reiner.de
Award for
Operational
Excellence
Bedienungsanleitung
Operating instructions
Mode d’emploi
Manual de instrucciones
Istruzioni per l’uso
Instruções de utilização
Instrukcja obsługi
Руководство по эксплуатации
DE
GB
FR
ES
IT
PT
PL
RU
N53a, DN53a, N65a, DN65a
ZN 84087-000 I 15-0047 I 06.2015

Vielen Dank, dass Sie sich für ein Original
REINER Produkt entschieden haben.
Thanks a lot for making your mind for an
original REINER product.
Merci infiniment d’avoir choisi un produit
Original REINER.
Muchas gracias por haberse decidido por
un producto original de REINER.
Vi ringraziamo per aver optato per un
prodotto originale REINER.
Muito obrigado por ter optado por um
produto REINER original.
Dziękujemy Państwu za to, że zdecydowali
się Państwo na zakupienie oryginalnego
produktu REINER.
Благодарим за выбор оригинальной
продукции REINER.
Ernst Reiner GmbH & Co. KG
REINER

1
2
3
4
5
2

DE DE
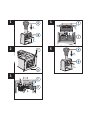
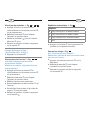
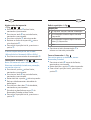
Stempelräder einstellen Abb.
1
+
2
+
3
Gri
bis zum Anschlag durchdrücken
und gedrückt halten.
Überstand
an Frontplatte drücken und
gedrückt halten.
Gri
nach oben führen, bis der Gri
in einer tiefen Position einrastet.
Stempelräder
mit Einstellstift
einstellen.
Um in die Ausgangsposition
zurückzukehren, Gri
drücken.
Sie können auf einfache Weise das Datum
einen Tag weiterstellen!
(Gilt nicht für Stempel N53a und N65a.)
Schalttaste
einmal drücken.
Farbkissen einsetzen Abb.
1
+
4
Hinweis: Bitte nur ölhaltige Stempelfarbe
verwenden.
Vorsichtig handhaben, um Verschmutzung
durch Tinte zu vermeiden!
Gri
bis zum Anschlag durchdrücken
und gedrückt halten.
Überstand
an Frontplatte drücken und
gedrückt halten.
Gri
nach oben führen, bis der Gri
in einer tiefen Position einrastet.
Farbkissen vorsichtig auspacken.
Rastgrie
des Farbkissens
zusammendrücken und gedrückt halten.
Farbkissen in den Schacht
des Stempels
bis zum Anschlag einführen.
Um in die Ausgangsposition
zurückzukehren, Gri
drücken.
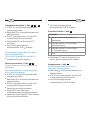
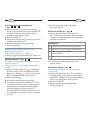
Intervall einstellen Abb.
3
Intervalle
0 Immer die gleiche Nummer wird
gestempelt.
1 Nummer erhöht sich nach jedem
Stempelvorgang.
2 Nummer erhöht sich nach jedem
2. Stempelvorgang.
usw.
Schalthebel
nach oben drücken und
auf das gewünschte Intervall schieben.
Stempel parken Abb.
5
Um Eindrücke auf dem Farbkissen zu
vermeiden, Stempel parken!
Überstand
an Frontplatte drücken und
gedrückt halten.
Gri
nach unten drücken, bis der Gri
in einer hohen Position einrastet.
Um in die Ausgangsposition
zurückzukehren, Gri
drücken.

GB GB
To set the stamp wheels Fig.
1
+
2
+
3
Press the handle
to the bottom of its
travel, then while still holding it.
Press and hold button
on the front plate.
Allow the handle
to move upwards until
the handle locks in place.
You will be able to move the stamp wheels
freely with the stylus
.
In order to return to the print position,
simply push down on handle
.
You can easily place the date one day further
ahead!
(Not valid for the stamp Models N53a and N65a.)
Press the switch button
once.
To insert the inkpad Fig.
1
+
4
Note: Use only oil-containing stamp ink.
Handle with caution to avoid dirt from ink!
Press the handle
to the bottom of its
travel, then, while still holding it.
Press the button
on the front plate and
continue to hold it.
Allow the handle
to move upwards until
the handle locks in place.
Unpack the inkpad carefully.
Squeeze the grips
on the back of the
inkpad and hold them.
Resting the back of the ink pad inside the
pad cradle slide the pad into the slot
of
the stamp.
In order to return to the print position,
simply push down on handle
.
To change the numbering actions Fig.
3
Actions
0 The same number is stamped every time.
1 Number increases after each stamping
process.
2 Number increases after every 2
nd
stamping process.
etc.
Press the switch lever
and slide it to the
desired action.
To park the stamp Fig.
5
To prolong the life of the inkpad,
park the stamp!
Press and hold button
on the front plate.
Gently push handle
downwards until the
stamp clicks & locks in a raised position.
In order to return to the print position,
simply push down on handle
.

FR FR
Mise à jour des molettes Fig.
1
+
2
+
3
Appuyez à fond sur le manche
et
simultanément sur le bouton poussoir
sur la plaque avant.
Relâchez le manche
pour bloquer
l’appareil en position basse.
Mettez les molettes
à jour à l’aide du
bâtonnet
joint.
Revenez en position initiale en appuyant
sur le manche
.
Changez facilement de date !
(Sauf modèles N53a et N65a.)
Appuyez sur la touche
.
Mise en place de l’encreur Fig.
1
+
4
prière de n’employer que des encres
d’empreintes oléiques.
Attention aux taches, manipulez l’encreur
avec précaution !
Appuyez à fond sur le manche
et
simultanément sur le bouton poussoir
sur la face avant.
Relâchez le manche
pour bloquer
l’appareil en position basse.
Déballez l’encreur avec précaution.
Pincez légèrement les deux oreilles
de
l’encrier.
Introduisez l’encrier dans la glissière du
support
jusqu’en butée.
Revenez en position initiale en appuyant
sur le manche
.
Répétition automatique Fig.
3
Répétant
0 Imprime toujours le même numéro.
1 Imprime une fois le même numéro.
2 Imprime deux fois le même numéro.
etc.
Appuyez sur le levier
pour positionner le
système sur le répétant souhaité.
Pour un bon usage Fig.
5
Vous n’utilisez pas votre appareil ?
Mettez le en position de repos pour éviter toute
pression sur l’encrier.
Appuyez sur le bouton poussoir
sur la
face avant.
Relâchez le manche
pour bloquer
l’appareil en position haute.
Revenez en position initiale en appuyant
sur le manche
.

ESES
Ajuste de las ruedas de números
Fig.
1
+
2
+
3
Presionar el mango
hasta el fondo como si
fuera a marcar y mantenerlo así.
Presionar el botón de bloqueo
.
Liberar el mango
que retrocederá quedando
el aparato bloqueado en la segunda posición
de bloqueo.
Ajustar las ruedas de números
usando el
punzón
.
Para desactivar el bloqueo o volver a la
posición inicial, presione el mango
.
Para ajustar las ruedas de la fecha, sólo tiene
que pulsar una vez la tecla de cambio
.
(No es aplicable a los modelos sólo numerador
N53a y N65a.)
Cambio de la almohadilla de tinta
Fig.
1
+
4
Nota: Por favor, utilice sólo tinta de impresión con
base de aceite.
¡Manipular con cuidado para evitar ensuciarse con
la tinta!
Presionar el mango
hasta el fondo como si
fuera a marcar y mantenerlo así.
Presionar el botón de bloqueo
.
Liberar el mango
que retrocederá quedando
el aparato bloqueado en la segunda posición
de bloqueo.
El porta-almohadillas ha quedado abierto listo
para retirar la almohadilla gastada e introducir
la nueva.
Desembalar cuidadosamente la almohadilla de
tinta.
Presionar las patillas de encaje
de la
almohadilla y retirarla.
Insertar la almohadilla de tinta nueva en la
guía
del porta-almohadillas hasta el tope.
Para desactivar el bloqueo o volver a la
posición inicial, presione el mango
.
Ajustar el número de repeticiones Fig.
3
Repeticiones
0 Marca siempre el mismo número.
1 Para marcar números consecutivos.
2 Marca dos veces el mismo número y luego
cambia.
etc.
Presionar la palanca de repeticiones
y
colocarla sobre la repetición deseada.
Posición de reposo Fig.
5
¡La posición de reposo evita que la almohadilla de
tinta se deforme por contacto constante con el
texto!
Presionar el botón de bloqueo
.
Al mismo tiempo que se presiona el mango
hasta que quede bloqueado en la primera
posición de bloqueo que evita que la
almohadilla de tinta esté en contacto con
el texto.
Para desactivar el bloqueo o volver a la
posición inicial, presione el mango
.

IT IT
Impostazione delle ruote del timbro
Fig.
1
+
2
+
3
Premere l’impugnatura
fino all’arresto
e mantenere la pressione.
Premere e mantenere la pressione sulla
sporgenza
sulla placca frontale del timbro.
Portare l’impugnatura
verso l’alto finché
scatta nella posizione intermedia bassa.
Impostare le ruote del timbro
con
l’apposita matita
.
Per ritornare nella posizione iniziale,
premere l’impugnatura
.
E’ possibile spostare facilmente in avanti di un
giorno la data!
(Non vale per i timbri N53a e N65a.)
Premere una volta la leva di
commutazione
.
Inserimento del cuscinetto inchiostrato
Fig.
1
+
4
Nota: utilizzare solo colori da timbro oleosi.
Maneggiare con cura per evitare
di sporcarsi con l’inchiostro!
Premere l’impugnatura
fino all’arresto
e mantenere la pressione.
Premere e mantenere la pressione sul tasto
sulla placca frontale del timbro.
Portare l’impugnatura
verso l’alto finché
scatta nella posizione intermedia bassa.
Disimballare con precauzione il cuscinetto
inchiostrato.
Premere e mantenere la pressione sulle
alette
del cuscinetto inchiostrato.
Introdurre fino all’arresto il cuscinetto
inchiostrato nell’apposito vano
del timbro.
Per ritornare nella posizione iniziale,
premere l’impugnatura
.
Impostazione dell’intervallo Fig.
3
Intervalli
0 Viene timbrato sempre lo stesso numero.
1 Il numero aumenta dopo ogni
timbratura.
2 Il numero aumenta ogni 2 timbrature.
ecc.
Sollevare la leva di commutazione
e
posizionarla sull’intervallo desiderato.
Parcheggiare il timbro Fig.
5
Per evitare impronte sul cuscinetto
inchiostrato, parcheggiare il timbro!
Premere e mantenere la pressione sulla
sporgenza
sulla placca frontale del
timbro.
Portare l’impugnatura
verso il basso
finché scatta nella posizione intermedia alta.
Per ritornare nella posizione iniziale,
premere l’impugnatura
.

PT PT
Ajustar rodas de impressão
Fig.
1
+
2
+
3
Pressionar o punho
até ao limite,
mantendo-o pressionado.
Pressionar a tecla
na parte da frente,
mantendo-a pressionada.
Pressione o punho
até este prender.
Deslocar as rodas de impressão
com o
pino de ajuste
.
Para voltar à posição inicial, pressionar o
punho
.
É muito simples avançar um dia na data!
(Não aplicável ao Numerador N53a e N65a.)
Pressionar uma vez a tecla de comutação
.
Colocação da almofada Fig.
1
+
4
Nota: utilizzare solo colori da timbro oleosi.
Manusear a almofada tintada com precaução,
para evitar sujar-se!
Pressionar o punho
até ao limite,
mantendo-o pressionado.
Pressionar a tecla
na parte da frente,
mantendo-a pressionada.
Deixar deslizar o punho
até este prender.
Retirar cuidadosamente a almofada da
embalagem.
Pressionar as duas abas
da almofada,
mantendo-as pressionadas.
Introduzir a almofada no corpo
do
Numerador/Datador, até ao limite.
Para voltar à posição inicial, pressionar o
punho
.
Definir repetições Fig.
3
Repetições
0 É impressa sempre a mesma numeração.
1 A numeração aumenta depois de cada
impressão.
2 A numeração aumenta depois de cada
duas (2) impressões.
etc.
Pressionar a tecla de comutação
e
colocar no intervalo pretendido.
Travar o Numerador Fig.
5
Para evitar marcas na almofada, trave o
Numerador/Datador!
Pressionar a tecla
na parte da frente,
mantendo-a pressionada.
Deixar deslizar o punho
até este prender.
Para voltar à posição inicial, pressionar o
punho
.

PL PL
Ustawienie pierścieni stemplujących
Rys.
1
+
2
+
3
Naciśnij uchwyt
i przytrzymaj w pozycji
dolnej, która umożliwia wciśnięcie blokady
.
(Uchwyt
naciśnij maksymalnie w dół, a
następnie lekko cofnij w górę.)
Wciśnij blokadę
.
Pierścienie stemplujące
ustaw przy pomocy
patyczka regulacyjnego
.
W celu powrotu do pozycji wyjściowej
naciśnij uchwyt
.
W prosty sposób można przestawić datę
o jeden dzień do przodu!
(Nie dotyczy stempli N53a i N65a.)
Naciśnij przycisk przełączeniowy
jeden raz.
Wkładka tuszująca Rys.
1
+
4
Wskazówka: Proszę używać wyłącznie oleistego
tuszu do stempli.
Postępuj ostrożnie, aby zapobiec zabrudzeniu
tuszem!
Naciśnij uchwyt numeratora
i przytrzymaj
w dolnej pozycji, która umożliwia wciśnięcie
blokady
. (Uchwyt
naciśnij maksymalnie
w dół, a następnie lekko cofnij w górę.)
Naciśnij blokadę
.
Ostrożnie rozpakuj wkładkę tuszującą.
Przytrzymując wkładkę za uchwyty
, wsuń
ją ruchem pionowym w górę - w kieszonkę
.
(Wkładkę można wsunąć w kieszonkę tylko,
gdy uchwyty wystarczająco odstają od
obudowy wkładki. Podczas wsuwania naciśnij
je i utrzymując nacisk wsuń ruchem pionowym
w górę.)
W celu powrotu do pozycji wyjściowej
naciśnij uchwyt
.
Ustawienie powtórzeń Rys.
3
Naciśnij uchwyt suwaka
delikatnie w
dół i przytrzymując naciśnięty przesuń wzdłuż
“okienka” na właściwy numer określający ilość
powtórzeń numeratora.
Powtórzenia
0 Stemplowany jest zawsze ten sam numer.
1 Numer narasta po każdym stemplowaniu.
2 Numer narasta po co drugim
stemplowaniu.
itd.
Po ustawieniu na właściwej pozycji puść
uchwyt suwaka.
Parkowanie stempla Rys.
5
Aby zapobiec zabrudzeniom, stempel należy
“zaparkować”.
Naciśnij uchwyt numeratora
i przytrzymaj
w pozycji dolnej, która umożliwia wciśnięcie
blokady
. (Uchwyt
naciśnij maksymalnie
w dół, a następnie lekko cofnij w górę.)
Wciśnij blokadę
.
W celu powrotu do pozycji wyjściowej
naciśnij uchwyt
.

RU RU
Установка колес нумератора Pис.
1
+
2
+
3
Нажмите ручку
до упора и удерживайте ее в
нажатом положении.
Нажмите кнопку фиксации
на передней панели
штампа и удерживайте ее в нажатом положении.
При нажатой кнопке
, слегка отпустите ручку
до
щелчка и зафиксируйте штамп
.
Установите на колесах
начальные значения для
даты/нумератора при помощи стила
.
Нажмите ручку
для того, чтобы вернуть штамп в
рабочее положение.
При помощи специального рычага
Вы легко и быстро
сможете ежедневно выставлять дату!
(Не подходит для моделей N53a и N65a.)
Однократно нажмите на рычаг
.
Установка штемпельной подушки Pис.
1
+
4
Примечание: используйте только штемпельную краску на
масляной основе.
Обращайтесь со сменными подушками очень осторожно,
т.к. чернила могут испачкать одежду или руки!
Нажмите ручку
до упора и удерживайте ее в
нажатом положении.
Нажмите кнопку фиксации
на передней панели
штампа и удерживайте ее в нажатом положении.
При нажатой кнопке
, слегка отпустите ручку
до
щелчка и зафиксируйте штамп
.
Аккуратно распакуйте сменную штемпельную подушку.
Сожмите фиксаторы
на сменной штемпельной
подушке и удерживайте их в сжатом положении.
Вставьте сменную штемпельную подушку в
специальный держатель
до упора, как показано на
рис. 4.
Нажмите ручку
для того, чтобы вернуть штамп в
рабочее положение.
Установка периодичности нумератора
Pис.
3
Интервалы
0 при каждом нажатии на штамп заданное
цифровое значение нумератора повторяется.
1 при каждом нажатии на штамп заданное
цифровое значение нумератора увеличивается
на единицу, начиная с последней цифры.
2 при 1-м и 2-м нажатии на штамп заданное
цифровое значение повторяется – при 3-м
нажатии на штамп цифровое значение
увеличивается на единицу, начиная с последней
цифры.
и т. д.
Слегка отведите кнопку фиксации периодичности
вверх и задайте желаемую периодичность.
Хранение штампа Pис.
5
После окончания использования штампа, производитель
рекомендует отводить цифровые ленты от
соприкосновения со штемпельной подушкой во избежание
продавливания оттиска на ее поверхности.
Нажмите кнопку фиксации
на передней панели
штампа и удерживайте ее в нажатом положении.
При нажатой кнопке
, нажмите на ручку
,
опускайте ее вниз до щелчка, фиксирующего штамп в
верхнем положении.
Нажмите ручку
для того, чтобы вернуть штамп в
рабочее положение.

.
3
0
1
2
5
.
.
3
+
2
+
1
.
.
.
(.N65aN53a
4
+
1
.

Ihr Ansprechpartner:
mail@gewi-tec.de oder www.gewi-tec.de
Die Münchner Profis - mit Herz
GeWi.Tec GmbH
Robert-Koch-Str. 1
82152 Planegg b.Mchn
Telef on : 089-235089 0
Telef ax: 089-235089 53
-
 1
1
-
 2
2
-
 3
3
-
 4
4
-
 5
5
-
 6
6
-
 7
7
-
 8
8
-
 9
9
-
 10
10
-
 11
11
-
 12
12
-
 13
13


Reiner DN65a Instrukcja obsługi
- Typ
- Instrukcja obsługi
w innych językach
- español: Reiner DN65a Manual de usuario
- português: Reiner DN65a Manual do usuário
Powiązane artykuły
Inne dokumenty
-
mothercare Chicco OhLaLa Twin_0720870 instrukcja
-
BOMANN DR 906 CB Instrukcja obsługi
-
BOMANN TA 246 CB Instrukcja obsługi
-
BOMANN TA 1577 CB Instrukcja obsługi
-
ProfiCare PC-BS 3035 Instrukcja obsługi
-
Baratza Sette 270W Skrócona instrukcja obsługi
-
Baratza Sette 270W Skrócona instrukcja obsługi
-