Philips SPD2512BM Instrukcja obsługi
- Kategoria
- Napędy dysków optycznych
- Typ
- Instrukcja obsługi

How to... for Internal S-ATA ReWriters
using Nero 7
Install Guide
Installationsanleitung
Guide d'installation
Guida d'installazione
Installatiegids
Guía de instalación
Guia de Instalação
Kurulum Kılavuzu
Instrukcja montażu
Installationsguide
UK
D
F
I
NL
E
PT
TR
PL
SV

2
Contents
How to install? 5
Up to date? 13
How to make a video disc? 17
How to make a data or audio disc? 25
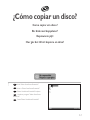
How to copy a disc? 29
More info or help needed 32
Inhalt
Einbau des Laufwerks 5
Sind Sie auf dem neuesten Stand? 13
Erstellen einer Video-Disc 17
Erstellen einer Audio- oder Daten-Disc 25
Kopieren einer Disc 29
Weitere Informationen oder Hilfe erforderlich 33
Table des matières
Comment installer? 5
Vos logiciels sont-ils à jour ? 13
Comment créer un disque vidéo ? 17
Comment créer un disque audio ou de données ? 25
Comment copier un disque ? 29
Vous avez besoin d'aide ou de plus d'informations ? 34
Indice
Come installare 5
Aggiornamento 13
Guida alla creazione di un video disc 17
Guida alla creazione di un disco audio o di un disco dati 25
Guida alla copia di un disco 29
Per ulteriori informazioni o assistenza 35
Inhoud
Hoe installeren? 5
Up to date? 13
Hoe maak ik een video-cd? 17
Hoe maak ik een audio- of data-cd? 25
Hoe kopieer ik een cd? 29
Meer informatie of hulp nodig 36
UK
D
F
I
NL

3
Índice
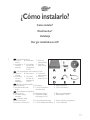
¿Cómo instalarlo? 37
¿Actualizar? 45
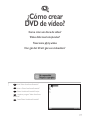
¿Cómo crear DVD de vídeo? 49
¿Cómo crear un disco de datos o audio? 57
¿Cómo copiar un disco? 61
Si necesita más información o ayuda 64
Índice
Como instalar? 37
Atualizado? 45
Como criar um disco de vídeo? 49
Como criar um disco de áudio ou dados? 57
Como copiar um disco? 61
São necessárias mais informações ou ajuda 65
İçindekiler
Nasıl kurulur? 37
Güncel mi? 45
Video diski nasıl oluşturulur? 49
Bzir ses veya veri diski nasıl oluşturulur? 57
Bir disk nasıl kopyalanır? 61
Daha fazla bilgi veya yardım gereklidir 66
Spis treści
Instalacja 37
Aktualizacja 45
Tworzenie płyty wideo 49
Nagrywanie płyt audio lub danych 57
Kopiowanie płyt 61
Potrzebna pomoc lub dodatkowe informacje 67
Innehåll
Hur går installationen till? 37
Uppdaterad? 45
Hur går det till att göra en videoskiva? 49
Hur går det till att göra en ljud- eller dataskiva? 57
Hur går det till att kopiera en skiva? 61
Mer information eller hjälp behövs 68
E
PT
TR
PL
SV


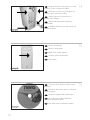
This can be found in the box:
A: Your new B: This manual C: The Nero
drive software disc
D: 4 screws in E: S-ATA F: S-ATA
a small bag Power Cable data cable
converter
Verpackungsinhalt:
A: Ein neues B: Dieses C: Die Nero
Laufwerk Handbuch Software-CD
D: 4 Schrauben E: S-ATA- F: S-ATA-
in einem Stromkabel- Datenkabel
kleinen Beutel adapter
Le coffret d'emballage contient les éléments
suivants :
A : Votre nouveau lecteur B : Ce mode d'emploi C : Le disque du logiciel Nero
D : 4 vis dans un petit sachet E : Adaptateur pour câble F : Câble de données S-ATA
d’alimentation S-ATA
Contenuto della confezione:
A: La nuova unità B: Questo manuale C: Il disco del software Nero
D: 4 viti in un sacchetto piccolo E: Convertitore per cavo F: Cavo dati S-ATA
di alimentazione S-ATA
Dit zit er in de doos:
A: Uw nieuwe station B: Deze handleiding C: De software-disk van Nero
D: 4 schroeven in een zakje E: S-ATA-stroomkabel- F: S-ATA-gegevenskabel
converter
5
1
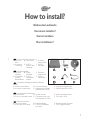
How to install?
Einbau des Laufwerks
Comment installer?
Come installare
Hoe installeren?
UK
D
F
I
NL

6
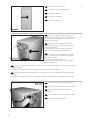
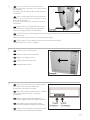
Switch your computer off.
Schalten Sie Ihren Computer aus.
Éteignez l’ordinateur.
Spegnere il computer.
Zet de computer uit.
Disconnect the power cable from the PC.
Ziehen Sie das Netzkabel vom Computer ab.
Débranchez le câble d’alimentation de
l’ordinateur.
Disconnettere il cavo di alimentazione dal PC.
Trek de netstekker uit de PC.
Touch an unpainted metal part (eg. your
heating or an unpainted part of your computer case).
This will avoid any damage to your computer by
electrostatic discharge.
Berühren Sie ein unlackiertes Metallteil
(z.B. Ihre Heizung oder ein unlackiertes Teil Ihres
Computergehäuses).
Das verhindert Schäden an Ihrem Computer
aufgrund von elektrostatischer Entladung.
Touchez une partie métallique non peinte
(p. ex. un radiateur ou une partie non peinte du
boîte de l'ordinateur).
Ce contact permettra d'éviter tout
endommagement de l'ordinateur par décharge
d'électricité statique.
Toccare un elemento di metallo non verniciato (p.es. l’elemento riscaldante o uno non verniciato del
case del computer).
In questo modo si eviteranno danni al computer dovuti a scariche elettrostatiche.
Raak een ongelakt metalen object aan (b.v. de verwarming of een ongelakt deel van de computer-
behuizing).
Op deze manier voorkomt u dat de computer beschadigd raakt als gevolg van elektrostatische ontlading.
4
3
2
UK
D
F
I
NL
UK
D
F
I
NL
UK
D
I
NL
F

7
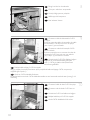
Open your computer. You may have to unleash
screws which are mostly located at the back of your
computer. See your computer manual for more details.
Öffnen Sie Ihren Computer. Eventuell müssen Sie
hierzu Schrauben herausdrehen, die sich meistens an der
Rückseite Ihres Computers befinden.
Weitere Informationen hierzu finden Sie in Ihrem
Computerhandbuch.
Ouvrez l’ordinateur. Pour cela, il peut être nécessaire
de desserrer une ou plusieurs vis à l’arrière de l’ordinateur.
Pour plus de détail, reportez-vous au mode d’emploi de
l’ordinateur.
Aprire il computer. È possibile che si dovranno svitare delle viti che in genere si trovano sul pannello posteriore del
computer. Per ulteriori informazioni fare riferimento al manuale del computer.
Maak uw computer open. Meestal moet u de schroeven aan de achterkant van uw computer losschroeven.
Raadpleeg de handleiding van uw PC voor details over het openen van de PC.
5
6
7
UK
D
F
I
NL
Take off the cover of the computer.
Nehmen Sie die Abdeckung des Computers ab.
Retirez le capot de l’ordinateur.
Togliere il coperchio del computer.
Verwijder de kast van de computer.
UK
D
F
I
NL
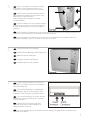
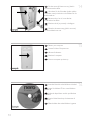
These are the connections (on the back of
your drive) you will have to use for connecting the
drive to the computer.
Das sind die Anschlüsse (an der Rückseite
Ihres Laufwerks), die Sie für den Anschluss Ihres
Laufwerks an den Computer verwenden müssen.
Ce sont les connecteurs (à l’arrière de votre
appareil) que vous devrez utiliser pour raccorder
l’unité à l’ordinateur.
Queste sono le connessioni (sul retro
dell'unità) che dovranno essere utilizzate per
collegare l'unità al computer.
Dit zijn de aansluitingen (op de achterkant van het station) die u gebruikt om het station op de
computer aan te sluiten.
UK
D
I
NL
F

8
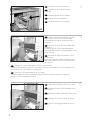
Put the drive into your computer.
Schieben Sie das Laufwerk in Ihren
Computer.
Montez l’appareil dans l’ordinateur.
Mettere l'unità nel computer.
Schuif het station in uw computer.
Attach the S-ATA data cable to your drive.
Schließen Sie das S-ATA-Datenkabel an Ihr
Laufwerk an.
Branchez le câble de données S-ATA à votre
lecteur.
Collegare un cavo dati S-ATA alla propria
unità.
Sluit de S-ATA-gegevenskabel aan op uw
station.
Attach a S-ATA Power Cable to your drive.
You may have to use the S-ATA power cable
converter that came with your drive (see step 1)
to connect.
Schließen Sie ein S-ATA-Stromkabel an Ihr
Laufwerk an.
Sie müssen ggf. den S-ATA-Stomkabeladapter
verwenden, der mit Ihrem Laufwerk geliefert wurde
(siehe Schritt 1).
Branchez un câble d’alimentation S-ATA
à votre lecteur.
Il peut être nécessaire d’utiliser l’adaptateur pour
câble d’alimentation S-ATA fourni avec le lecteur
(voir étape 1).
Collegare un cavo di alimentazione S-ATA alla propria unità.
È possibile risulti necessario utilizzare il convertitore per cavo di alimentazione S-ATA in dotazione con
l’unità (vedi punto 1) per effettuare il collegamento.
Sluit een S-ATA-stroomkabel aan op uw station.
U moet mogelijk de S-ATA-stroomkabelconverter gebruiken die bij uw station is meegeleverd
(zie stap 1) om een verbinding te maken.
10
9
8
UK
UK
D
F
I
NL
UK
D
I
NL
F
D
I
NL
F

9
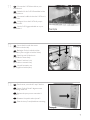
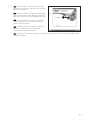
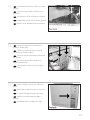
Connect the S-ATA data cable to your
motherboard.
Schließen Sie das S-ATA-Datenkabel an Ihre
Hauptplatine an.
Connectez le câble de données S-ATA sur la
carte mère.
Collegare il cavo dati S-ATA alla propria
scheda madre.
Sluit de S-ATA-gegevenskabel aan op uw
moederbord.
11
12
13
UK
D
F
I
NL
Secure the drive with the screws
(if possible on both sides).
Befestigen Sie das Laufwerk mit den
Schrauben (wenn möglich an beiden Seiten).
Fixez l’appareil à l’aide des vis
(si possible des deux côtés).
Fissare l'unità con le viti
(se possibile su entrambi i lati).
Schroef het station vast
(zo mogelijk aan beide zijden).
UK
D
F
I
NL
Put the cover you took off in step 5 back on.
Setzen Sie die in Schritt 5 abgenommene
Abdeckung wieder auf.
Replacez le capot que vous avez retiré à
l’étape 5.
Rimettere il coperchio tolto al punto 5.
Plaats de in stap 5 verwijderde kast weer terug.
UK
D
I
NL
F

10
Put the screws (if there were any) back in
and reconnect the cables.
Schrauben Sie die Schrauben (sofern welche
vorhanden waren) wieder ein und schließen Sie die
Kabel wieder an.
Resserrez la ou les vis, le cas échéant,
et rebranchez les câbles.
Riavvitare le viti (se presenti) e ricollegare
i cavi.
Plaats de schroeven terug (als die er waren)
en sluit de kabels weer aan.
Insert the Nero disc when Windows is loaded.
Legen Sie die Nero CD ein, wenn Windows
geladen ist.
Insérez le disque Nero une fois que Windows
a démarré.
Inserire il disco Nero dopo il caricamento di
Windows.
Plaats de Nero-disc nadat Windows is gestart.
Restart your computer.
Starten Sie Ihren Computer neu.
Allumez l’ordinateur.
Riavviare il computer.
Start uw computer opnieuw op.
16
15
14
UK
D
F
I
NL
UK
D
F
I
NL
UK
D
I
NL
F

11
Choose "Nero 7 Essentials" and follow the
instructions on the screen. When finished, continue
with the next chapter.
Wählen Sie "Nero 7 Essentials" und befolgen
Sie die Anweisungen auf dem Bildschirm. Wenn Sie
fertig sind, fahren Sie mit dem nächstem Kapitel fort.
Choisissez "Nero 7 Essentials" et suivez les
instructions à l'écran. Lorque vous avez terminé,
passez au chapitre suivant.
Selezionare "Nero 7 Essentials" e seguire le
istruzioni a schermo. Quando si è terminato,
continuare con il capitolo successivo.
Kies "Nero 7 Essentials" en volg de aanwijzingen op het scherm. Ga, als u klaar bent, verder met het
volgende hoofdstuk.
17
UK
D
F
I
NL

12

13
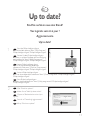
Up to date?
Sind Sie auf dem neuesten Stand?
Vos logiciels sont-ils à jour ?
Aggiornamento
Up to date?
2
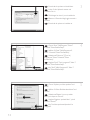
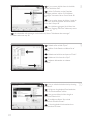
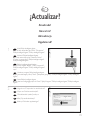
Click "Check for updates".
Klicken Sie auf "Nach Updates suchen".
Cliquez sur "Recherchez les mises-à-jour
logiciels".
Fare clic su "Controlla gli aggiornamenti".
Klik op "Zoek naar updates".
UK
D
F
I
NL
1
Start the Philips Intelligent Agent.
➤ If not available, choose "Start", "(All) Programs",
"Philips Intelligent Agent", "Philips Intelligent Agent".
Starten Sie den Philips Intelligent Agent.
➤ Wenn er auf dem Desktop nicht zur Verfügung
steht, wählen Sie
"Start", "(Alle) Programme",
"Philips Intelligent Agent", "Philips Intelligent Agent".
Lancez Philips Intelligent Agent.
➤ S'il n'est pas directement disponible,
sélectionnez
"Démarrer", "(Tous les) Programmes",
"Philips Intelligent Agent", "Philips Intelligent Agent".
Avviare Philips Intelligent Agent.
➤ Se non fosse disponibile, selezionare "Start", "(Tutti i) Programmi", "Philips Intelligent Agent",
"Philips Intelligent Agent".
Start Philips Intelligent Agent.
➤ Indien niet beschikbaar, kies "Start", "(Alle) programma’s", "Philips Intelligent Agent",
"Philips Intelligent Agent".
UK
D
F
I
NL

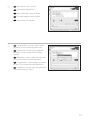
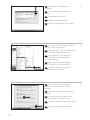
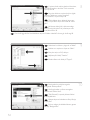
Choose "Update your Nero products" and
"Next".
Wählen Sie "Nero Produkte aktualisieren" und
"Weiter".
Sélectionnez "Mettre à jour vos produits
Nero" puis cliquez sur "Suivant".
Scegliere "Aggiorna i prodotti Nero", quindi
fare clic su "Avanti".
Kies "Uw Nero-producten bijwerken" en
"Volgende".
Choose "Start", "(All) Programs", "Nero 7
Essentials", "Nero ProductSetup".
Wählen Sie "Start", "(Alle) Programme",
"Nero 7 Essentials", "Nero ProductSetup".
Sélectionnez "Démarrer", "(Tous les)
Programmes", "Nero 7 Essentials", "Nero
ProductSetup".
Scegliere "Start", "Tutti i programmi", "Nero 7
Essentials", "Nero ProductSetup".
Kies "Start", "(Alle) Programma’s", "Nero 7
Essentials", "Nero ProductSetup".
Download the updates and install them.
Laden Sie die Updates herunter und
installieren Sie sie.
Téléchargez les mises à jour et installez-les.
Effettuare il Download degli aggiornamenti e
installarli.
Download de updates en installeer ze.
14
5
4
3
F
I
NL
UK
D
F
I
NL
UK
D
F
I
NL
UK
D

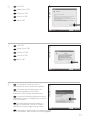
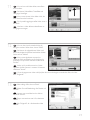
The Windows Firewall may warn you.
Click "Unblock" to allow your Nero to be updated.
Sie erhalten evtl. eine Warnung von der
Windows Firewall. Klicken Sie auf "Sperre
deaktivieren", damit sich Nero aktualisieren kann.
Le pare-feu de Windows affichera peut-être un
avertissement. Cliquez sur "Débloquer" pour activer la
mise à jour de Nero.
È possibile Windows Firewall visualizzi un
messaggio di avvertimento. Fare clic su "Unblock"
(Sblocca) per consentire l'aggiornamento di Nero.
De Firewall van Windows kan een waarschuwing geven.
Klik op "Uitschakelen", zodat uw Nero kan worden bijgewerkt.
Click "OK".
Klicken Sie auf "OK".
Cliquez sur "OK".
Fare clic su "OK".
Klik op "OK".
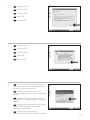
Click "OK".
Klicken Sie auf "OK".
Cliquez sur "OK".
Fare clic su "OK".
Klik op "OK".
15
6
7
8
UK
D
F
I
NL
UK
D
F
I
NL
UK
D
I
NL
F

16
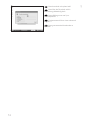
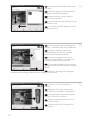
Nero downloads and updates itself.
Nero führt den Download und die
Aktualisierung selbstständig durch.
Nero télécharge et se met à jour
automatiquement.
L'aggiornamento di Nero viene scaricato ed
eseguito.
Nero gaat automatisch downloaden en
bijwerken.
9
F
I
NL
UK
D

17
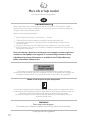
How to make a video disc?
Erstellen einer Video-Disc
Comment créer un disque vidéo ?
Guida alla creazione di un video disc
Hoe maak ik een video-cd?
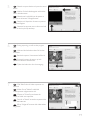
1
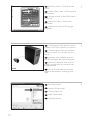
Start "Nero StartSmart Essentials".
Starten Sie "Nero StartSmart Essentials".
Lancez "Nero StartSmart Essentials".
Avviare "Nero StartSmart Essentials".
Start "Nero StartSmart Essentials".
UKUK
D
F
I
NL

Choose "Capture video".
Wählen Sie "Capture video".
Choisissez "Capture video".
Selezionare "Cattura video".
Kies "Capture video".
If you want to capture video from a camera,
connect it to your PC. Otherwise go to step 8.
Schließen Sie Ihren PC an, wenn Sie Video
von einer Kamera aufnehmen möchten.
Ansonsten fahren Sie mit Schritt 8 fort.
Si vous souhaitez capturer de la vidéo à
partir d'une caméra, raccordez-la à l'ordinateur.
Sinon, allez à l'étape 8.
Se si desidera catturare il video da una
camera, collegarla al PC. Altrimenti passare al
punto 8.
Als u video wilt laden vanaf een camera,
moet u hem op uw PC aansluiten. Ga anders
verder met stap 8.
Choose "Photo and Video" and "Make your
own DVD-Video".
Wählen Sie "Foto und Video" und "Eigenes
DVD-Video erstellen".
Choisissez "Photo et Vidéo" et "Créer votre
propre DVD-Vidéo".
Selezionare "Foto e video" e "Creare il
proprio DVD-Video".
Kies "Foto en video" en "Maak uw eigen
DVD-Video".
18
UK
I
UK
UK
D
I
NL
F
4
3
2
D
F
I
NL
D
F
I
NL

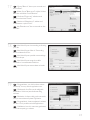
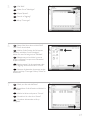
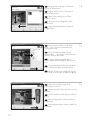
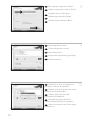
Click "Next" when all video sequences are
captured.
Klicken Sie auf "Weiter", sobald alle
Videosequenzen aufgenommen sind.
Cliquez sur "Suivant" quand toutes les
séquences vidéo sont capturées.
Fare clic su "Avanti" se tutte le sequenze video
sono state catturate.
Klik op "Volgende" wanneer alle videoreeksen
zijn geladen.
I
F
During capturing, you will see the progress
here.
Während der Aufnahme sehen Sie hier den
Fortschritt.
Pendant la capture, l'avancement s'affiche ici.
Durante il processo di cattura, qui sarà
possibile visualizzare l’avanzamento.
Tijdens het laden ziet u hier de voortgang.
Select the capture device and press the record
button.
Wählen Sie das Aufnahmegerät und drücken
Sie die Aufnahmetaste.
Sélectionnez le périphérique de capture et
appuyez sur le bouton d'enregistrement.
Selezionare il dispositivo di cattura e premere
il pulsante Registra.
Selecteer het apparaat waar u video vanaf wilt
laden en druk op de opnameknop.
19
UK
I
UK
UK
I
5
6
7
D
F
I
NL
D
NL
D
I
NL
F

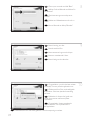
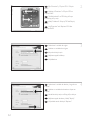
You can edit the loaded movies by choosing
"Edit Movie".
Sie können die geladenen Filme bearbeiten,
indem Sie "Film bearbeiten" wählen.
Vous pouvez éditer les films chargés en
choisissant "Editer le film".
È possibile modificare i film caricati
selezionando "Modifica Filmato".
U kunt de geladen films bewerken door
"Film bewerken" te kiezen.
Select the files and click "Open".
Wählen Sie die Dateien und klicken Sie auf
"Öffnen".
Sélectionnez les fichiers et cliquez sur "Ouvrir".
Selezionare i file e fare clic su "Apri".
Selecteer de bestanden en selecteer
"Openen".
F
If you want to add files from the hard disk,
choose "Add Video Files".
Wenn Sie Dateien von der Festplatte
hinzufügen möchten, wählen Sie "Videodaten
hinzufügen". Ansonsten fahren Sie mit Schritt 10
fort.
Si vous voulez ajouter des fichiers à partir du
disque dur, choisissez "Ajouter des fichiers vidéo".
Sinon, allez à l'étape 10.
Se si desidera aggiungere file dal disco fisso,
selezionare "Aggiungi File Video". Altrimenti passare
al punto 10.
Als u bestanden wilt toevoegen van de harde schijf, kiest u "Videobestanden toevoegen".
Ga anders verder met stap 10.
20
UK
UK
D
UK
I
10
9
8
D
I
NL
F
I
NL
D
I
NL
F
Strona się ładuje...
Strona się ładuje...
Strona się ładuje...
Strona się ładuje...
Strona się ładuje...
Strona się ładuje...
Strona się ładuje...
Strona się ładuje...
Strona się ładuje...
Strona się ładuje...
Strona się ładuje...
Strona się ładuje...
Strona się ładuje...
Strona się ładuje...
Strona się ładuje...
Strona się ładuje...
Strona się ładuje...
Strona się ładuje...
Strona się ładuje...
Strona się ładuje...
Strona się ładuje...
Strona się ładuje...
Strona się ładuje...
Strona się ładuje...
Strona się ładuje...
Strona się ładuje...
Strona się ładuje...
Strona się ładuje...
Strona się ładuje...
Strona się ładuje...
Strona się ładuje...
Strona się ładuje...
Strona się ładuje...
Strona się ładuje...
Strona się ładuje...
Strona się ładuje...
Strona się ładuje...
Strona się ładuje...
Strona się ładuje...
Strona się ładuje...
Strona się ładuje...
Strona się ładuje...
Strona się ładuje...
Strona się ładuje...
Strona się ładuje...
Strona się ładuje...
Strona się ładuje...
Strona się ładuje...
Strona się ładuje...
Strona się ładuje...
Strona się ładuje...
Strona się ładuje...
-
 1
1
-
 2
2
-
 3
3
-
 4
4
-
 5
5
-
 6
6
-
 7
7
-
 8
8
-
 9
9
-
 10
10
-
 11
11
-
 12
12
-
 13
13
-
 14
14
-
 15
15
-
 16
16
-
 17
17
-
 18
18
-
 19
19
-
 20
20
-
 21
21
-
 22
22
-
 23
23
-
 24
24
-
 25
25
-
 26
26
-
 27
27
-
 28
28
-
 29
29
-
 30
30
-
 31
31
-
 32
32
-
 33
33
-
 34
34
-
 35
35
-
 36
36
-
 37
37
-
 38
38
-
 39
39
-
 40
40
-
 41
41
-
 42
42
-
 43
43
-
 44
44
-
 45
45
-
 46
46
-
 47
47
-
 48
48
-
 49
49
-
 50
50
-
 51
51
-
 52
52
-
 53
53
-
 54
54
-
 55
55
-
 56
56
-
 57
57
-
 58
58
-
 59
59
-
 60
60
-
 61
61
-
 62
62
-
 63
63
-
 64
64
-
 65
65
-
 66
66
-
 67
67
-
 68
68
-
 69
69
-
 70
70
-
 71
71
-
 72
72


Philips SPD2512BM Instrukcja obsługi
- Kategoria
- Napędy dysków optycznych
- Typ
- Instrukcja obsługi
w innych językach
- español: Philips SPD2512BM Manual de usuario
- italiano: Philips SPD2512BM Manuale utente
- Deutsch: Philips SPD2512BM Benutzerhandbuch
- svenska: Philips SPD2512BM Användarmanual
- português: Philips SPD2512BM Manual do usuário
- français: Philips SPD2512BM Manuel utilisateur
- Türkçe: Philips SPD2512BM Kullanım kılavuzu
- English: Philips SPD2512BM User manual
- Nederlands: Philips SPD2512BM Handleiding
Powiązane artykuły
-
Philips SPD2525BD/97 Instrukcja obsługi
-
Philips SPD4002CC/05 Instrukcja obsługi
-
Philips SPD2412BD Instrukcja obsługi
-
Philips SPD6002BD/10 Instrukcja obsługi
-
Philips SPD2517BD/97 Instrukcja obsługi
-
Philips SPD6107BD/93 Instrukcja obsługi
-
-
-
Philips SPD3800CC/05 Instrukcja obsługi
-
Philips SPD4002CC/05 Instrukcja obsługi