
HU PL
SK
DE
EN
CZ
Manual
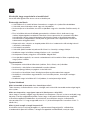
DEHUMIDIFIER G21
Model Impact 16


Thank you for purchasing our product!
Read this manual carefully prior to using the appliance.
Safety instructions
• Install this appliance on afirm level place to reduce vibration and noise.
• Do not place in water or other liquids.
• In order to prevent accidents, please do not use this dehumidifier if wires or other
connections are damaged.
• This appliance can be used by children aged from 8 years and above and people with
reduced physical, sensory or mental capabilities or lack of experience or knowledge if they
have been given supervision or instruction concerning the use of this appliance in asafe
way and understand the hazards invloved. Children shall not play with the appliance,
cleaning and user maintenance shall not be made by children without supervision.
• After you turn the appliance OFF, take the plug out of the socket.
• Indoors use only.
• Empty the water tank to prevent overflow and spill before restarting.
• Do not tilt as it may cause water leakage and damaging the appliance.
• Do not insert any hard objects into the appliance in case error and damage occur.
• If the supply cord is damaged, it must be replaced by aqualified person in order to avoid
any damage.
Warning:
• Do not place close to heating devices (flame or heaters, etc.).
• Do not turn OFF by pulling the power cord out of the socket.
• Do not use any flammable substances near this appliance.
• Do not clean with water, use adamp soft cloth.
• Do not wipe with chemical solvents, use anatural detergent.
• Do not tilt over 45°or place upside down.
Frequent questions
Why does the appliance store less water in the water tank in winter?
The temeprature is low and air is dry, not afault.
Why can’t the appliance run or stops running suddenly?
The water tank might be full of water or it is not installed properly – drain the water tank or re-install
it. The appliance might be in the „dehumidification mode“, the ambient temperature is lower or
higher than requested (it cannot be performed when the ambient temperature is < 5 °C or > 32 °C).
Why is hot air blown out from the air supply outlet?
The appliance extracts air in the room and the dehumidification unit cools the air. The temperature
decreases below the condensation point, the air condenses into water drops, which fall into the
water tank and the dehumidified air is heated by the temperature running unit. This can reduce
energy consumption and also accelerate dehumidification, therefore, hot air is blown out, not
afault.

Installation
• Please drain the water from the water tank before running the appliance.
• When the appliance is ON, please do not open doors and windows if possible since it can
save energy resources.
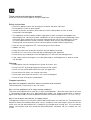
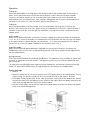
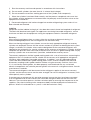
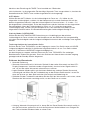
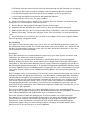
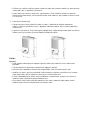
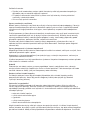
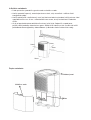
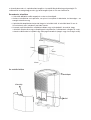
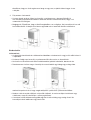
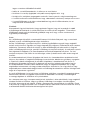
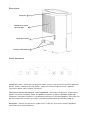
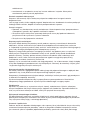
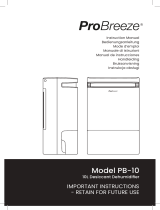
• When the dehumidifier is installed, acertain space must be reserved around the appliance.
The minimum distance above is 50 cm and 20 cm in any other direction, as shown in the
picture below.
• When big noise is found during operation of this dehumidifier: It is recommended to insert
pads or damping rubber sheets below this appliance. It can reduce the vibration and noise
and can also reduce damaging wood floor or carpet (due to vibrations or water leakage).
50cm
20cm
20cm
20cm
20cm
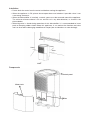
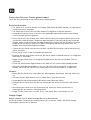
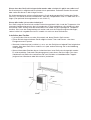
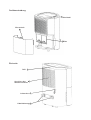
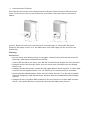
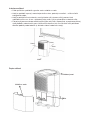
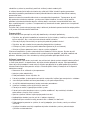
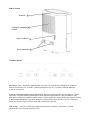
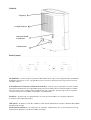
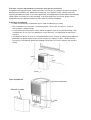
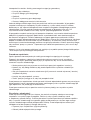
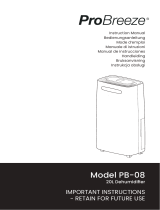
Components
Water tank
Filter
Control panel

back side
Handle
Air Outlet
Continuous
Drainage Mouth
Wires Hook
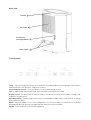
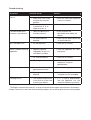
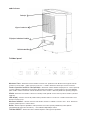
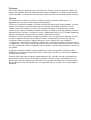
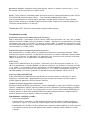
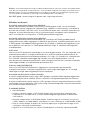
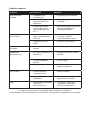
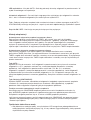
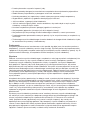
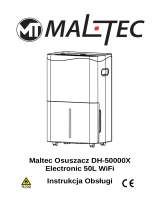
Control panel
Timer - 24h timer setup, press this key to set on/off time of the dehumidifier. The setting range is from 0 to 24h,
it will increase by 1 hour per press. Long press to cancel.
Internal drying function - Press this button to start the inside drying function.
Fan - In AUTO mode and Cloth dry mode, press this button to change the fan speed.
Display screen - In AUTO mode or Cloth dry mode, it will indicate the actual room humidity. In timing mode,
it indicates the setting time.
Humidity setting - In AUTO mode, press the key to set humidity, humidity range is from 30-80 %, it changes
by 5 % with every press.
Mode - When the appliance is on or the timing power is on, press this button to choose auto or continuous
dehumidifying (dry cloth function). The lights will flash when you choose the modes.
On/Off - Press the button to turn on/off the appliance.

Operation
Timing off
When the dehumidifier is running, press this button to adjust the time between 0 hour and 24
hours, Press the button once to increase the set time by 1 hour. After the set time exceeds
24 hours, the display returns to 0 to start the cycle again. When the set time is reached, the
dehumidifier turns off automatically. After setting is completed, the set time is confirmed after 5
seconds. In the ‘timer off’ state, the button light on the button is lit.
Timing on
When the dehumidifier is in the standby state, the method for adjusting the set time by the
button is the same as for timer ‘off’. When setting is completed, the set time is confirmed after 5
seconds. In the ‘time on’ state the light on the button is lit, and the set time is displayed on the
control panel.
AUTO mode
Select AUTO dehumidification. If the room humidity is higher than the set humidity or is between
+ 5 % or – 5 % of the set humidity, the compressor will start and the fan will run at the set speed.
If the room humidity is lower than the set humidity by – 5 %, then the compressor will stop but
the fan will run at the set speed. The default set humidity value is 50 %.
Cloth dry mode
Select CONTINUOUS dehumidification. Regardless of the relative humidity in the room, the
compressor starts, the fan runs at high speed by default, and the fan speed can be regulated via
the fan speed button.
Drying function
Press the DRYING button to start the drying process. The appliance starts at HIGH air speed and
releases air continuously for 30 minutes. The appliance turns to run at LOW air speed and lasts
for 15 minutes.
To stop, press the DRYING button again to cancel the process and recover to the prior running
mode. Or, press the POWER button to stop the process and recover to standby mode.
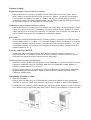
Water drainage
1. Manual
• When the water tank is full, the full water icon on LCD display flashes (the compressor, fan will
stop running), the buzzer sounds 10 times to remind the user till the water is drained.
• Place both hands respectively at the side of the back cover side of the depression, gently
remove the water tank and open the tank cover on the right side of the body, then pour the
water from the gap between water tank and the cover.
• Close the tank cover and rotate the water tank handle down, then put the water tank gently
back in to restart the appliance.

• Attention: when the water tank is full of water, please empty it. Before putting the water tank
into the dehumidifier, please confirm whether the floater rotates flexibly or not, then put it in
position using both hands.
2. Continuous drainage (Optional)
• If you don’t want to drain the water tank frequently, you can connect adrainage pipe (with
inner diameter 9 mm) to the drainage mouth to drain the water automatically.
• Note: Make sure the pipe is attached firmly. Do not use apipe longer than 60 cm. The height
of the drainage cannot surpass the height of the drainage mouth – possible water leakage.
Maintenance
Precautions:
• Please disconnect the power plug before maintenance or repair to prevent electric shock.
• If the dehumidifier is not used for along time, please disconnect the power suply.
• Please do not clean the appliance‘s body with chemical solvents such as alcohol, gasoline
etc..
• Please clean the water tank and its cover with soft cloth dipped in cold or warm water at
regular time to prevent mould inside the dehumidifer.
• Wipe the surface of the appliance slightly with wet cloth and do not use detergent or abrasive
in case the plastic surface is damaged.
• Clean the filter at least once per two weeks with cold or warm water. Do not use chemical
solvents or hot water.

The English version of the manual is an exact translation of the original manufacturer‘sinstructions.
Images used in this manual are for illustrational purposes only and may differ from the actual product.
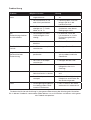
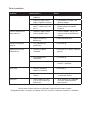
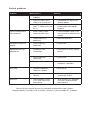
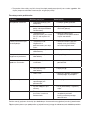
Symptoms Possible reason Solution
The dehumidifier does
not run.
• Power plug fell out. • Insert the plug into socket.
• Water tank full of water
or place dat incorrect
position.
• Drain the water tank and place
it back in correctly.
• The ambient temperature
is lower than 5 °C or
higher than 32 °C.
• Normal phenomenon.
The dehumidification
function is not effective.
• Room temperature or
humiditiy too low.
• In dry seasons the
dehumidification ability will
reduce.
• Air outlet and inlet
blocked.
• Clean up the object block the
air outlet and inlet.
Air is not blown out. • Air filter blocked. • Clean the air strainer.
Noise is abnormal during
operation.
• Appliance placed
improperly so that itis
inclined or unstable.
• Place the appliance on afirm
level place.
• Air strainer blocked. • Clean the air strainer.
• „Tittering“ sound. • The flowing sound of
refrigerant, anormal
phenomenon.
Water leakage • Connection of drainage
pipe becomes loose.
• Fasten drainage pipe.
• Drainage system is
blocked.
• Remove obstacles and
straighten out the waterpipe.
Frosting occurs • The ambient temperature
is low and itis in the state
of waiting to defrost.
• It is a normal phenomenon
and the appliance has the
automatic defrosting function.
Troubleshooting

Safety instructions for installing the device using the R290 refrigerant
gas
To avoid damage, place the unit in an upright position for at least 24 hours before initiation.
Make sure that the air outlet and air inlet are never blocked.
Only operate the unit on a horizontal surface to ensure no water leaks out.
Warnings
• Do not exceed impedance greeter than 0.236ohm in supply the appliance is connected to.
• Any person who is involved with working on or breaking into a refrigerant a refrigerant circuit
should hold a current valid certificate from an industry-accredited assessment authority.
• Remember the environment when disposing of packaging around the appliance and when the
appliance has reached its by date.
• A warning that the appliance shall be stored in a well-ventilated area where the size
corresponds to the room area as specified for operation.
• The appliance shall be stored so as to prevent mechanical damage from occurring.
• Information for spaces where refrigerant pipes are allowed, including statements
» that the installation of pipe-work shall be kept to a minimum;
» that pipe-work shall be protected from physical damage and, in the case of flammable
refrigerants, shall not be installed in an unventilated space;
» that compliance with national gas regulations shall be observed;
» that mechanical connections shall be accessible for maintenance purposes;
» that, for appliances containing flammable refrigerants, the minimum floor area of the room shall
be mentioned in the form of a table or a single figure without reference to a formula;
• A warning to keep any required ventilation openings clear of obstruction;
• A notice that servicing shall be performed only as recommended by the manufacturer;
• When the portable air conditioner or dehumidifier is turned on, the fan can work continuously
stable under normal conditions to provide the minimum air volume of 100m3/h even when the
compressor is closed due to the temperature controller.
• Use only implements recommended by the manufacturer for defrosting or cleaning
• Do not perforate any of the components in the refrigerant circuit. Refrigerant gas may be
odourless
• Use care when storing the appliance to prevent mechanical faults.
• Maintenance and repairs requiring the assistance of other qualified personnel must be carried
out under the supervision of specialists in the use of inflammable refrigerants.
CAUTION ON FIRE
READ THE MAUAL CAREFULLY BEFORE USING THE APPLIANCE
R290 refrigerant gas complies with European environmental directives.
Appliance shall be installed, operated and stored in a room with a floor area larger than 4 m2.

Additional warning for appliance with R290 refrigerant gas (refer to the rating plate
for the type of refrigerant gas used)
Checks to the area
Prior to beginning work on systems containing flammable refrigerants, safety checks are
necessary to ensure that the risk of ignition is minimised. For repair to the refrigerating system,
the following precaution shall be completed prior to conducting work on the system.
Work procedure
Work shall be undertaken under a controlled procedure so as to minimise the risk of a flammable
gas or vapour being present while the work is being performed.
General work area
All maintenance staff and others working in the local area shall be instructed on the nature of
work being carried out. Work in confined spaces shall be avoided.
Checking for presence of refrigerant
The area shall be checked with an appropriate refrigerant detector prior to and during work, to
ensure the technician is aware of potentially toxic or flammable atmospheres. Ensure that the
leak detection equipment being used is suitable for use with all applicable refrigerants, i.e.
non-sparking, adequately sealed or intrinsically safe.
Presence of fire extinguisher
If any hot work is to be conducted on the refrigerating equipment or any associated parts,
appropriate fire extinguishing equipment shall be available to hand. Have a dry powder or CO2
fire extinguisher adjacent to the charging area.
No ignition sources
No person carrying out work in relation to a refrigerating system which involves exposing any
pipe work shall use any sources of ignition in such a manner that it may lead to the risk of fire or
explosion. All possible ignition sources, including cigarette smoking, should be kept sufficiently
far away from the site of installation, repairing, removing and disposal, during which refrigerant
can possibly be released to the surrounding space. Prior to work taking place, the area around
the equipment is to be surveyed to make sure that there are no flammable hazards or ignition
risks.
Ventilated area
Ensure that the area is in the open or that it is adequately ventilated before breaking into the
system or conducting any hot work. A degree of ventilation shall continue during the period that
the work is carried out.
Checks to the refrigerating equipment
Where electrical components are being changed, they shall be fit for the purpose and to the
correct specification. At all times the manufacturer’s maintenance and service guidelines shall be
followed. If in doubt, consult the manufacturer’s technical department for assistance.
The following checks shall be applied to installations using flammable refrigerants:
• the actual refrigerant charge is in accordance with the room size within which the refrigerant
containing parts are installed;
• the ventilation machinery and outlets are operating adequately and are not obstructed;
• if an indirect refrigerating circuit is being used, the secondary circuit shall be checked for the
presence of refrigerant;
• marking to the equipment continues to be visible and legible. Markings and signs that are
illegible shall be corrected;

• refrigerating pipe or components are installed in a position where they are unlikely to be
exposed to any substance which may corrode refrigerant containing components, unless
the components are constructed of materials which are inherently resistant to being
corroded or are suitably protected against being so corroded.
Checks to electrical devices
Repair and maintenance to electrical components shall include initial safety checks and
component inspection procedures. If a fault exists that could compromise safety, then no
electrical supply shall be connected to the circuit until it is satisfactorily dealt with
Initial safety checks shall include:
• that capacitors are discharged: this shall be done in a safe manner to avoid possibility of
sparking;
• that no live electrical components and wiring are exposed while charging, recovering or
purging the system;
• that there is continuity of earth bonding.
Repairs to sealed components
During repairs to sealed components, all electrical supplies shall be disconnected from the
equipment being worked upon prior to any removal of sealed covers, etc. If it is absolutely
necessary to have an electrical supply to equipment during servicing, then a permanently
operating form of leak detection shall be located at the most critical point to warn of a potentially
hazardous situation.
Particular attention shall be paid to the following to ensure that by working on electrical
components, the casing is not altered in such a way that the level of protection is affected. This
shall include damage to cables, excessive number of connections, terminals not made to original
specification, damage to seals, incorrect fitting of glands, etc.
Ensure that seals or sealing materials have not degraded to the point that they no longer serve
the purpose of preventing the ingress of flammable atmospheres. Replacement parts shall be in
accordance with the manufacturer’s specifications.
Repair to intrinsically safe components
Do not apply any permanent inductive or capacitance loads to the circuit without ensuring that
this will not exceed the permissible voltage and current permitted for the equipment in use.
Intrinsically safe components are the only types that can be worked on while live in the presence
of a flammable atmosphere. Replace components only with parts specified by the manufacturer.
Other parts may result in the ignition of refrigerant in the atmosphere from a leak.
Cabling
Check that cabling will not be subject to wear, corrosion, excessive pressure, vibration, sharp
edges or any other adverse environmental effects. The check shall also take into account the
effects of aging or continual vibration from sources such as compressors or fans.
Detection of flammable refrigerants
Under no circumstances shall potential sources of ignition be used in the searching for or
detection of refrigerant leaks. A halide torch (or any other detector using a naked flame) shall not
be used.
Removal and evacuation
When breaking into the refrigerant circuit to make repairs – or for any other purpose –
conventional procedures shall be used. However, for flammable refrigerants it is important that
best practice is followed since flammability is a consideration.
The following procedure shall be adhered to:

• remove refrigerant;
• purge the circuit with inert gas;
• evacuate;
• purge with inert gas;
• open the circuit by cutting or brazing.
The refrigerant charge shall be recovered into the correct recovery cylinders. For appliances
containing flammable refrigerants the system shall be purged with oxygen-free nitrogen to render
the appliance safe for flammable refrigerants. This process may need to be repeated several
times. Compressed air or oxygen shall not be used for purging refrigerant systems.
For appliances containing flammable refrigerants, refrigerants purging shall be achieved by
breaking the vacuum in the system with oxygen-free nitrogen and continuing to fill until the
working pressure is achieved, then venting to atmosphere, and finally pulling down to a vacuum.
This process shall be repeated until no refrigerant is within the system. When the final oxygen-
free nitrogen charge is used, the system shall be vented down to atmospheric pressure to enable
work to take place. This operation is absolutely vital if brazing operations on the pipe-work are to
take place.
Ensure that the outlet for the vacuum pump is not close to any potential ignition sources and that
ventilation is available.
Charging procedures
In addition to conventional charging procedures, the following requirements shall be followed.
• Ensure that contamination of different refrigerants does not occur when using charging
equipment. Hoses or lines shall be as short as possible to minimise the amount of refrigerant
contained in them.
• Cylinders shall be kept in an appropriate position according to the instructions.
• Ensure that the refrigerating system is earthed prior to charging the system with refrigerant.
• Label the system when charging is complete (if not already).
• Extreme care shall be taken not to overfill the refrigerating system.
Prior to recharging the system, it shall be pressure-tested with the appropriate purging gas. The
system shall be leak-tested on completion of charging but prior to commissioning. A follow up
leak test shall be carried out prior to leaving the site.
Decommissioning
Before carrying out this procedure, it is essential that the technician is completely familiar
with the equipment and all its detail. It is recommended good practice that all refrigerants are
recovered safely. Prior to the task being carried out, an oil and refrigerant sample shall be taken
in case analysis is required prior to re-use of recovered refrigerant. It is essential that electrical
power is available before the task is commenced.
a) Become familiar with the equipment and its operation.
b) Isolate system electrically.
c) Before attempting the procedure, ensure that:
» mechanical handling equipment is available, if required, for handling refrigerant cylinders;
» all personal protective equipment is available and being used correctly;
» the recovery process is supervised at all times by a competent person;
» recovery equipment and cylinders conform to the appropriate standards.
d) Pump down refrigerant system, if possible.
e) If a vacuum is not possible, make a manifold so that refrigerant can be removed from various
parts of the system.

f) Start the recovery machine and operate in accordance with instructions.
g) Do not overfill cylinders (no more than 80 % volume liquid charge).
h) Do not exceed the maximum working pressure of the cylinder, even temporarily.
i) When the cylinders have been filled correctly and the process completed, make sure that
the cylinders and the equipment are removed from site promptly and all isolation valves on the
equipment are closed off.
j) Recovered refrigerant shall not be charged into another refrigerating system unless it has
been cleaned and checked.
Labelling
Equipment shall be labelled stating that it has been de-commissioned and emptied of refrigerant.
The label shall be dated and signed. For appliances containing flammable refrigerants, ensure
that there are labels on the equipment stating the equipment contains flammable refrigerant.
Recovery
When removing refrigerant from a system, either for servicing or decommissioning, it is
recommended good practice that all refrigerants are removed safely.
When transferring refrigerant into cylinders, ensure that only appropriate refrigerant recovery
cylinders are employed. Ensure that the correct number of cylinders for holding the total system
charge is available. All cylinders to be used are designated for the recovered refrigerant and
labelled for that refrigerant (i.e. special cylinders for the recovery of refrigerant). Cylinders shall be
complete with pressure-relief valve and associated shut-off valves in good working order. Empty
recovery cylinders are evacuated and, if possible, cooled before recovery occurs.
The recovery equipment shall be in good working order with a set of instructions concerning the
equipment that is at hand and shall be suitable for the recovery of all appropriate refrigerants
including, when applicable, flammable refrigerants. In addition, a set of calibrated weighing
scales shall be available and in good working order. Hoses shall be complete with leak-free
disconnect couplings and in good condition. Before using the recovery machine, check that
it is in satisfactory working order, has been properly maintained and that any associated
electrical components are sealed to prevent ignition in the event of a refrigerant release. Consult
manufacturer if in doubt.
The recovered refrigerant shall be returned to the refrigerant supplier in the correct recovery
cylinder, and the relevant waste transfer note arranged. Do not mix refrigerants in recovery units
and especially not in cylinders.
If compressors or compressor oils are to be removed, ensure that they have been evacuated
to an acceptable level to make certain that flammable refrigerant does not remain within the
lubricant. The evacuation process shall be carried out prior to returning the compressor to the
suppliers. Only electric heating to the compressor body shall be employed to accelerate this
process. When oil is drained from a system, it shall be carried out safely.

Danke, dass Sie unser Produkt gekauft haben!
Lesen Sie diese Anleitung vor der Verwendung sorgfältig durch.
Sicherheitshinweise
• Das Gerät muss auf einer ebenen und stabilen Oberfläche betrieben werden, um Vibrationen
und Geräusche zu vermeiden.
• Das Gerät darf nicht mit Wasser oder anderen Flüssigkeiten in Kontakt kommen.
• Verwenden Sie dieses Gerät nicht, wenn das Netzkabel oder die Schaltkreise beschädigt
sind. Es besteht Verletzungsgefahr.
• Dieses Gerät kann von Kindern ab 8 Jahren und Personen mit eingeschränkten physischen,
sensorischen oder geistigen Fähigkeiten oder Mangel an Erfahrung und Wissen verwendet
werden, sofern sie beaufsichtigt sind oder eingewiesen wurden und die Gefahren verstehen.
Kinder dürfen mit diesem Gerät nicht spielen. Reinigung und Wartung sollten nicht von
Kindern ohne Aufsicht durchgeführt werden.
• Trennen Sie das Gerät nach dem Ausschalten, vor dem Zurücksetzen und vor der Wartung
immer vom Netz.
• Dieses Gerät ist nur für den Innengebrauch bestimmt.
• Entleeren Sie den Wassertank, bevor Sie das Gerät wieder in Betrieb nehmen, um mögliches
Überfüllen zu vermeiden.
• Kippen Sie das Gerät nicht, um mögliche Schäden durch das Wasser aus dem Tank zu
vermeiden.
• Führen Sie keine harten Gegenstände in das Gerät ein. Es könnte so beschädigt werden.
• Wenn das Netzkabel beschädigt ist, muss es von einem Servicetechniker ausgetauscht
werden. Versuchen Sie niemals, das Kabel selbst auszutauschen oder es zu reparieren.
Hinweis:
• Stellen Sie das Gerät nicht in der Nähe von Wärmequellen (Heizkörper, Heizung, Herd usw.)
auf.
• Schalten Sie das Gerät niemals so aus, indem Sie es vom Netz trennen.
• Verwenden Sie keine brennbaren Substanzen in der Nähe des Geräts.
• Reinigen Sie das Gerät nicht mit Wasser. Verwenden Sie immer ein feuchtes und weiches
Tuch.
• Wischen Sie das Gerät nicht mit Chemikalien ab. Wenn das Gerät verschmutzt ist,
verwenden Sie ein neutrales Reinigungsmittel.
• Neigen Sie das Gerät nicht um mehr als 45° und stellen Sie es nie verkehrt um auf.
Häufige Fragen
Warum sammelt sich im Winter weniger Wasser im Wassertank?
Im Winter sind die Temperaturen niedrig und die Luft ist trocken, sodass das Gerät weniger
Feuchtigkeit aufnimmt als im Sommer.

Warum kann das Gerät nicht eingeschaltet werden oder schaltet sich gleich von selbst aus?
Der Wassertank ist möglicherweise voll oder falsch positioniert. Entleeren Sie den Wassertank
oder stellen Sie diesen in die richtige Position.
Die Außentemperaturen reichen möglicherweise für die ordnungsgemäße Funktion des Geräts
nicht aus. Das Gerät wird nicht funktionieren, wenn die Temperaturen unter 5°C oder über 32°C
liegen. (Der optimale Nutzungsbereich ist von 16-32°C.)
Warum bläst heiße Luft aus dem Lufteinlass?
Das Gerät saugt die Raumluft ab und die Entfeuchtungseinheit kühlt sie ab, die Temperatur sinkt
unter den Kondensationspunkt, die Luft kondensiert zu Wassertröpfchen, die schließlich in den
Wassertank fallen. Danach wird die entfeuchtete Luft wieder auf die ursprüngliche Temperatur
erwärmt. Dies kann den Energieverbrauch senken und auch die Entfeuchtung beschleunigen,
sodass heiße Luft ausgeblasen wird. Es handelt sich nicht um eine Fehlfunktion.
Installation des Gerätes
• Lassen Sie das Wasser aus dem Wassertank ab, bevor Sie das Gerät starten.
• Öffnen Sie bei eingeschaltetem Gerät möglichst keine Türen und Fenster - dies kann
Energieressourcen sparen.
• Wenn der Luftentfeuchter installiert ist, muss um das Gerät herum folgend Platz freigehalten
werden: über dem Gerät 50 cm und 20 cm in jede andere Richtung, wie in der Abbildung
unten gezeigt.
• Wenn während des Betriebs dieses Luftentfeuchters laute Geräusche festgestellt werden:
Es wird empfohlen, Pads oder Dämpfungsgummi unter dieses Gerät zu legen. Dies kann
Vibrationen und Geräusche reduzieren und auch Schäden an Holzböden oder Teppich
(aufgrund von Vibrationen oder Wasserlecks) reduzieren.
50cm
20cm
20cm
20cm
20cm

Gerätbeschreibung
Wassertank
Filter
Schalttafel
Rückseite
Griff
Anschluss des
Ablaufschlauches
Luftauslass
Kabelhalterung

Chalttafel
Zeiteinstellung - Drücken Sie diese Taste, um die Betriebsdauer des Luftentfeuchters
einzustellen. Der Einstellbereich beträgt 0-24 Stunden – jeder Tastendruck erhöht die Zeit um
1Stunde. Halten Sie gedrückt, um die Einstellung abzubrechen.
Funktion zum Trocknen der Innenteile des Gerätes - Drücken Sie diese Taste, um den Prozess
des Trocknens des Geräts zu starten. Dadurch kann die Bildung von Schimmel aufgrund der
feuchten Umgebung im Inneren des Geräts verhindert werden. Der gesamte Trocknungsvorgang
dauert etwa eine Stunde. Drücken Sie diese Taste erneut, um diese Funktion abzubrechen und
das zuvor laufende Programm wiederherzustellen.
Lüfter - Drücken Sie diese Taste im AUTO und Cloth dry Modus, um die Geschwindigkeit des
Lüfters (Luftzirkulation) zu ändern.
LED-Anzeige (16D) - Im AUTO und Cloth dry Modus zeigt die Anzeige die aktuelle
Luftfeuchtigkeit im Raum an. Im Modus mit eingestellter Zeit wird diese angezeigt.
Feuchtigkeitseinstellung - Durch das Drücken dieser Taste wird die Luftfeuchtigkeit im Bereich
von 30% - 80% angezeigt. Die Feuchtigkeitseinstellung ist nur im AUTO-Modus gültig.
Modus - Wählen Sie beim Einschalten des Geräts oder beim Starten des Timers den
gewünschten Modus (AUTO / CONTINUOUS) durch Drücken dieser Taste - die dem Modus
entsprechende Anzeige leuchtet auf.
ON / OFF Taste - Durch diese Taste wird das Gerät ein-, oder ausgeschaltet.
Arbeitsmethoden
Automatisches Ausschalten des Gerätes durch einen Timer
Wenn der Luftentfeuchter in Betrieb ist, drücken Sie die TIMER-Taste, um die Betriebsdauer von
1 bis 24 Stunden einzustellen. Mit einem Tastendruck erhöhen Sie die Einstellung um
1 Stunde - nach der eingestellten Dauer von 24 Stunden kehrt der Wert auf 1 Stunde zurück.
Nach Ablauf der gewählten Zeit schaltet sich das Gerät automatisch ab. Nach Auswahl der
gewünschten Betriebsdauer wird der gewählte Wert nach 5 Sekunden gespeichert. Wenn der
Timer ausgeschaltet ist, leuchtet die Kontrollleuchte der TIMER-Taste.
Automatisches Einschalten des Geräts über einen Timer
Wenn sich der Luftentfeuchter im Standby-Modus befindet, ist der Vorgang zum Bestimmen
der Betriebsdauer mit der TIMER-Taste derselbe wie beim Ausschalten des Timers. Wenn nach

Abschluss der Einstellung die TIMER-Taste innerhalb von 5 Sekunden
nicht funktioniert, ist die eingestellte Zeit bestätigt. Wenn der Timer ausgeschaltet ist, leuchtet die
Kontrollleuchte der TIMER-Taste und die eingestellte Zeit wird angezeigt.
AUTO Modus
Wählen Sie den AUTO-Modus. Ist die Luftfeuchtigkeit im Raum um + 5% höher als die
eingestellte Luftfeuchtigkeit, schaltet sich der Kompressor ein und der Ventilator läuft mit der
bereits eingestellten Drehzahl. Liegt die Luftfeuchtigkeit im Raum zwischen + 5 % oder – 5 %
der eingestellten Luftfeuchtigkeit, laufen der Kompressor und der Ventilator mit der eingestellten
Geschwindigkeit. Wenn die Luftfeuchtigkeit im Raum um -5 % unter der eingestellten
Luftfeuchtigkeit liegt, schaltet sich der Kompressor aus, der Ventilator läuft jedoch mit der
eingestellten Drehzahl weiter. Die Standardeinstellung der Luftfeuchtigkeit beträgt 50 %.
Cloth dry Modus CONTINUOUS)
Wählen Sie die KONTINUIERLICHE Entfeuchtung aus. Unabhängig von der relativen
Luftfeuchtigkeit im Raum schaltet sich der Kompressor ein, der Ventilator läuft standardmäßig
mit hoher Geschwindigkeit und die Luftgeschwindigkeit kann durch die zuständige Taste reguliert
werden.
Trocknungsfunktion der Innenteile des Geräts
Drücken Sie die Taste TROCKNEN, um den Vorgang zu starten. Das Gerät startet mit HOHER
Luftgeschwindigkeit und bläst für 30 Minuten lang kontinuierlich Luft aus. Das Gerät schaltet
dann für 15 Minuten auf NIEDRIGE Luftgeschwindigkeit um.
Um den Vorgang zu stoppen, drücken Sie erneut die Taste TROCKNEN. Der vorherigen
Betriebsmodus wird erneut gestartet. Durch das Drücken des Netzschalters wird der Vorgang
gestoppt und der Standby-Modus fortgesetzt.
Entleeren des Wassertanks
1. Manuelle Entleerung
• Wenn der Wassertank voll ist, blinkt das Symbol für den vollen Wassertank auf dem LED-
Display (Kompressor, Ventilator werden ausgeschaltet), ein akustisches Signal ertönt 10-
mal, um auf den vollen Wassertank aufmerksam zu machen.
• Legen Sie beide Hände seitlich auf die hintere Abdeckung, nehmen Sie den Wassertank
vorsichtig ab und öffnen Sie die Tankabdeckung an der rechten Gehäuseseite. Lassen Sie
dann das Wasser aus dem Spalt zwischen Wassertank und Abdeckung ab.
• Schließen Sie den Tankdeckel und drehen Sie den Griff des Wassertanks nach unten, setzen
Sie dann den Wassertank vorsichtig zurück, um das Gerät neu zu starten.
• Achtung: Wenn der Wassertank voll ist, leeren Sie ihn. Bevor Sie den Wassertank zurück in
das Gerät einsetzen, prüfen Sie, ob sich der Schwimmer flexibel drehen kann. Bringen Sie
den Tank mit beiden Händen wieder an seinen Platz.

2. Kontinuierliches Entleeren
Wenn Sie den Wassertank nicht häufig entleeren möchten, können Sie einen Ablaufschlauch
(9mm Durchmesser innen) an den Entfeuchter anschließen, damit das Wasser automatisch
abläuft.
Hinweis: Stellen Sie sicher, dass der Schlauch sicher befestigt ist. Verwenden Sie keinen
Schlauch, der länger als 60 cm ist. Der Ablauf darf nicht höher liegen als der Anschluss des
Schlauches.
Wartung
Maßnahmen:
• Um das Risiko eines Stromschlags zu verringern, ziehen Sie das Netzkabel ab, bevor Sie
Wartungs- oder Reparaturarbeiten durchführen.
• Trennen Sie das Gerät vom Netz, wenn Sie den Luftentfeuchter längere Zeit nicht benutzen.
• Reinigen Sie das Gehäuse des Geräts nicht mit chemischen Lösungsmitteln wie Alkohol,
Benzin usw.
• Reinigen Sie den Wassertank und den Deckel regelmäßig mit einem weichen, in kaltem oder
warmem Wasser angefeuchteten Tuch, um Schimmel im Luftentfeuchter zu vermeiden.
• Wischen Sie die Oberfläche des Geräts leicht mit einem feuchten Tuch ab und verwenden
Sie keine Reinigungs- oder Scheuermittel, da diese die Kunststoffoberfläche beschädigen
könnten.
• Reinigen Sie das waschbare Sieb mindestens alle zwei Wochen mit kaltem oder warmem
Wasser. Verwenden Sie keine chemischen Lösungsmittel oder heißes Wasser.

Problem Mögliche Ursache Lösung
Das Gerät funktioniert
nicht.
• Das Netzkabel ist nicht
angeschlossen.
• Schließen Sie das Netzkabel
an.
• Der Wassertank ist voll
oder falsch positioniert.
• Leeren Sie den Tank und
bringen Sie ihn in die
korrekte Position.
• Die Raumtemperatur ist
niedriger als 5 °C oder
höher als 32 °C.
• Normale Ursache, das Gerät
funktioniert unter diesen
Bedingungen nicht.
Die
Entfeuchtungsfunktion
ist nicht effektiv.
• Raumtemperatur oder
Luftfeuchtigkeit ist zu
niedrig.
• Im Sommer, wenn die
Luft trockener ist, ist die
Entfeuchtungsfunktion
reduziert.
• Der Luftauslass ist
blockiert.
• Entfernen Sie das Hindernis.
Das Gerät lässt keine
Luft ab.
• Der Filter ist verstopft /
verschmutzt.
• Reinigen Sie den Filter.
Ungewöhnliches
Geräusch bei der
Entfeuchtung.
• Das Gerät ist falsch
positioniert.
• Positionieren Sie das Gerät
auf eine ebene und feste
Oberfläche.
• Der Filter ist verstopft /
verschmutzt.
• Reinigen Sie den Filter.
• Leichtes Rauschen. • Normales Geräusch des
Kühlgeräts; dies ist in
Ordnung.
Wasserleck • Der Anschluss des
Ablaufschlauchs ist locker.
• Ziehen Sie den Anschluss
fest.
• Das Ablaufsystem ist
verstopft.
• Entfernen Sie mögliche
Hindernisse und richten Sie
den Schlauch gerade.
Frost • Die Umgebungstemperatur
ist niedrig und das Gerät
wartet auf Entfrosten.
• Dies ist normal, das Gerät
entfrostet sich automatisch.
Problemlösung
Die deutsche Version der Anleitung ist eine genaue Übersetzung der Anleitung des Herstellers.
Die in diesem Handbuch verwendeten Bilder dienen nur zur Illustration und können nicht genau
das Produkt entsprechen.
Strona się ładuje...
Strona się ładuje...
Strona się ładuje...
Strona się ładuje...
Strona się ładuje...
Strona się ładuje...
Strona się ładuje...
Strona się ładuje...
Strona się ładuje...
Strona się ładuje...
Strona się ładuje...
Strona się ładuje...
Strona się ładuje...
Strona się ładuje...
Strona się ładuje...
Strona się ładuje...
Strona się ładuje...
Strona się ładuje...
Strona się ładuje...
Strona się ładuje...
Strona się ładuje...
Strona się ładuje...
Strona się ładuje...
Strona się ładuje...
Strona się ładuje...
Strona się ładuje...
Strona się ładuje...
Strona się ładuje...
Strona się ładuje...
Strona się ładuje...
Strona się ładuje...
Strona się ładuje...
Strona się ładuje...
Strona się ładuje...
Strona się ładuje...
Strona się ładuje...
Strona się ładuje...
Strona się ładuje...
Strona się ładuje...
Strona się ładuje...
Strona się ładuje...
Strona się ładuje...
Strona się ładuje...
Strona się ładuje...
Strona się ładuje...
Strona się ładuje...
Strona się ładuje...
Strona się ładuje...
Strona się ładuje...
Strona się ładuje...
Strona się ładuje...
Strona się ładuje...
-
 1
1
-
 2
2
-
 3
3
-
 4
4
-
 5
5
-
 6
6
-
 7
7
-
 8
8
-
 9
9
-
 10
10
-
 11
11
-
 12
12
-
 13
13
-
 14
14
-
 15
15
-
 16
16
-
 17
17
-
 18
18
-
 19
19
-
 20
20
-
 21
21
-
 22
22
-
 23
23
-
 24
24
-
 25
25
-
 26
26
-
 27
27
-
 28
28
-
 29
29
-
 30
30
-
 31
31
-
 32
32
-
 33
33
-
 34
34
-
 35
35
-
 36
36
-
 37
37
-
 38
38
-
 39
39
-
 40
40
-
 41
41
-
 42
42
-
 43
43
-
 44
44
-
 45
45
-
 46
46
-
 47
47
-
 48
48
-
 49
49
-
 50
50
-
 51
51
-
 52
52
-
 53
53
-
 54
54
-
 55
55
-
 56
56
-
 57
57
-
 58
58
-
 59
59
-
 60
60
-
 61
61
-
 62
62
-
 63
63
-
 64
64
-
 65
65
-
 66
66
-
 67
67
-
 68
68
-
 69
69
-
 70
70
-
 71
71
-
 72
72


w innych językach
- Deutsch: G21 8595627422127 Benutzerhandbuch
- slovenčina: G21 8595627422127 Používateľská príručka
Inne dokumenty
-
Emerio DH-127463 Instrukcja obsługi
-
 Pro Breeze PB-15-UK-FBA Instrukcja obsługi
-
Taurus Alpatec DH 1201 Instrukcja obsługi
-
Concept OV1100 Instrukcja obsługi
-
 Pro Breeze PB-10-UK-FBA-2 Instrukcja obsługi
-
 Pro Breeze PB-08-UK-FBA Instrukcja obsługi
-
Taurus AC2600 RVKT Instrukcja obsługi
-
Warmtec OP-50 Instrukcja obsługi
-
 MALTEC Osuszacz Powietrza Pochłaniacz Wilgoci DH-50000X Electronic 50L Wi-Fi Instrukcja obsługi
-


