
ALLBOOK Y
USER MANUAL………………..2
MANUAL DE UTILIZARE……19
MANUAL DE USUARIO……..36
INSTRUKCJA OBSŁUGI…….54

2
Ⅰ. Precautions before Use
1. This product is suitable for use in non-tropic areas below
2,000 meters.
2. Prevent the Notebook PC from falling to the ground or
being strongly impacted otherwise.
3. Do not use it in the long term in any environment where
the air is too cold, too hot, too much humidity or with too
much dust. Do not expose the Notebook PC to direct
sunlight.
4. Avoid using it in the strong magnetic and strong static
environment as much as possible.
5. Once any water or other liquid splashes onto the
Notebook PC, close it immediately and do not use it until it
dries out.
6. For your own safety it is recommended not to keep the
device close to your body during charging and to place it on
a non flammable surface.
7. Do not clean the Notebook PC with any detergent
containing chemical element or other liquid to avoid causing
damage due to corrosion and becoming damp. If cleaning
is really necessary, clean it with dry soft cloth tissue paper.
8. Our company shall not bear any and all responsibilities
for loss or deletion of material inside the machine caused
due to abnormal software and hardware operation,
maintenance or any other accident.
9. Please back up your important material at any time to
avoid loss.
10. Please do not disassemble the Notebook PC by yourself;
otherwise you will lose the right to warranty.
11. User manual and the relevant software shall be updated
at any time. For updated software version, visit
www.allviewmobile.com to download by yourself, and no
notice shall be given otherwise. If any anything is found to

3
be inconsistent with the User Manual, the online version
shall prevail.
12. Replacement with incorrect type batteries may cause
explosion. Make sure to use original batteries.
To be taken into consideration:
In order to avoid any issues that may appear with services
that are no longer accepted by S.C. Visual Fan S.R.L.
(because S.C. Visual Fan S.R.L. reserves its right to cease
collaboration with any formerly-accepted service, existent
on the warranty certificate on the launching date of the
product lot), before taking a product to the service, please
consult the updated list of the existent accepted services
from the Allview website at the “Support & Service –
Authorized Service” section.
We do not take responsibility for the situation in which the
product is used in any way other that the one specified in
the manual. Our company reserves its right to bring
modifications in the content of the guide, without public
announcement.
These modifications will be listed on the company’s
website (www.allviewmobile.com) in the section dedicated
to the product.
The content of this guide may be different from the one in
electronic format, from the website. In this case, the latter
will be taken into consideration.
The applications destined for the product usage, and
provided by third parties, may be stopped or interrupted at
any moment. S.C. Visual Fan S.R.L. explicitly denies any
responsibility or any accountability regarding the
modification, stopping or suspension of the
services/content made available by third parties, through
this device. For more details about the product, go to
www.allviewmobile.com.

4
In the following cases, the product stops benefiting
from warranty:
- Lack of tag or warranty seals;
- Unauthorized interventions, including repairs executed by
people or firms that are unauthorized by the producer;
- The buyer not following the handling, transportation,
maintenance, installation, starting and usage conditions;
- Thermic, mechanic and plastic deteriorations of the
products caused by hits, exposure to heat sources, fires,
accidents, vibrations, weather conditions or neglect in
usage;
- Usage of batteries, power sources or other accessories
other than those approved by the producer;
- In the case in which the product has traces of food or
evidence of contact with any type of liquid (water, solvents,
oils, paints, acids and others) and this contact is proven
through traces of oxidation or through the presence of
liquids on any part of the product;
- No match between the serial number written on the
warranty certificate and the one on the product;
- Using it with other purposes other than those for which it
was conceived;
- Usage in inadequate conditions (wrong power tension,
higher level of humidity than the accepted one, dust);
- The seller is not accountable for the possible issues of
compatibility with the accessories purchased from other
companies and does not take any responsibility for the
sub-ensembles used on the systems, which do not
correspond, performance wise, with the specs of the
producer.

5.
Touch Pad : Touch Pad with multi-touch functionality
5
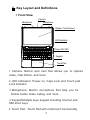
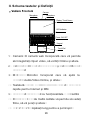
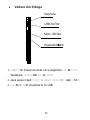
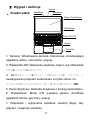
Ⅱ. Key Layout and Definitions
Front View
1.
Camera: Built-in web cam that allows you to capture
video, chat Online, and more.
2.
LED Indicators: Power on, Caps Lock and Touch pad
Lock indicator
3.
Microphone: Built-in microphone that help you for
Online Audio/ Video calling, and more
4. Keypad:Multiple keys keypad including Internet and
MM short keys
Camera
Display / Touch Screen
Power ON / OFF
Keypad
Touch Pad
MicrophoneMicrophone
LED Indicators

6
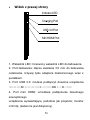
6.
Display: High quality IPS screen allows you to watch
movies, Play Games and more
7.
Power ON/OFF: Long press to Power ON/OFF.
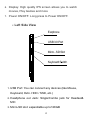
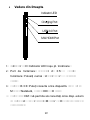
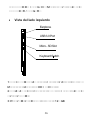
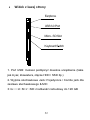
Left Side View
1. USB Port: You can connect any devices (like Mouse,
Keyboard, Extn. HDD / SSD, etc.)
2.
Headphone out Jack: Single/Combo jack for Headset&
MIC
3.
Micro-SD slot: expandable up to128GB
Earphone
USB 3.0 Port
Micro - SD Slot
Keyboard Switch

7
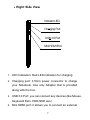
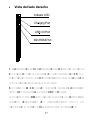
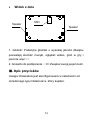
Right Side View
1.
LED Indication: Red LED indication for charging.
2.
Charging port: 3.5mm power connector to charge
your Notebook. Use only Adapter that is provided
along with the box.
3.
USB 3.0 Port: you can connect any devices (like Mouse,
Keyboard Extn. HDD/SSD aso.)
4.
Mini HDMI port: it allows you to connect an external
Indicator LED
Charging Port
USB 3.0 Port
Mini HDMI Port

8
display device, Like Projector, LCD Monitor,
aso. (Cable not included)
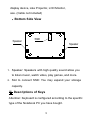
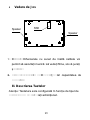
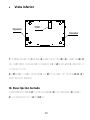
Bottom Side View
1.
Speaker: Speakers with high quality sound allow you
to listen music, watch video, play games, and more.
2.
Slot to connect SSD: You may expand your storage
capacity.
Ⅲ. Descriptions of Keys
Attention: Keyboard is configured according to the specific
type of the Notebook PC you have bought.
Speaker
SSD
Speaker

9
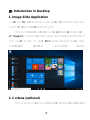
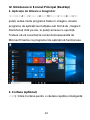
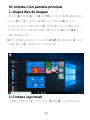
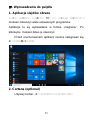
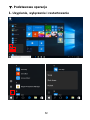
Ⅳ. Introduction to Desktop
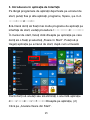
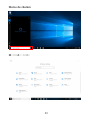
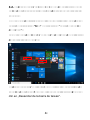
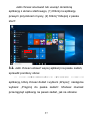
1. Image Slide Application
Windows 10 start image: On the start screen, you can see
many programs fixed in the image.
These application programs are displayed in the form
of “magnet”. As you click them, you can easily access
them.
You need to log on your Microsoft account before the
application program completely runs.
2. Cortana
(optional)
You may use Cortana
assistant
for fast smart searching.

10
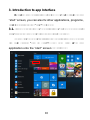
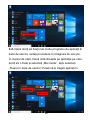
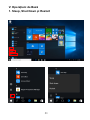
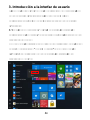
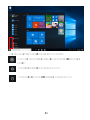
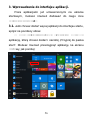
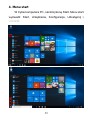
3. Introduction to app Interface
Besides the application programs already fixed on the
“start” screen, you can also fix other applications, programs,
folders, a.s.o.
to the "start" screen.
3.1.
If you want to fix more application programs on the start
interface, see the operation in the figure below.
In the start menu, right-click the application you want to
fix and select "Pin to Start". You can also drag the
application onto the “start” screen, as follows:

11
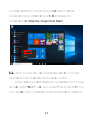
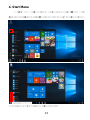
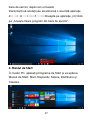
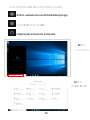
Conversely, if you want to cancel or delete a certain
application in the start screen, (1) Right-Click the
application, (2)
Click the “Unpin from Start”.
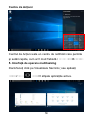
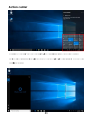
3.2. If you want to fix more application programs on the
taskbar, see the operation in the figure below.
In the start menu, right-click the application you want to
fix and select "More"
and then select
"Pin to taskbar". You
can also drag the application onto the taskbar, as follows:

12
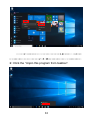
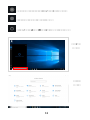
Conversely, if you want to cancel or delete a certain
application in the taskbar, (1) Right-Click the application,
(2) Click the “Unpin this program from taskbar”.

13
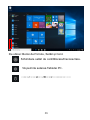
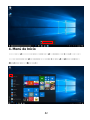
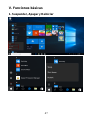
4. Start Menu
Under PC mode, press Start icon, Start Menu will
display including: Start, Device, Setup, Share, and Search.
Usually: Power, Settings and Account.

14
Change account setting/Lock/Sign out .
Let you set up the Table PC.
Sleep/Shut down/Restart the Notebook PC
Search
menu
Setup Menu
Setup
menu

15
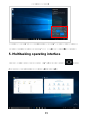
Action Center is a notification center which also allows
quick settings like Tablet / PC mode, Wi-Fi, BT a.s.o.
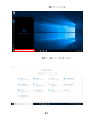
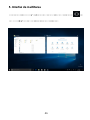
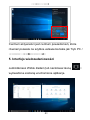
5. Multitasking operating interface
If you Click the Task View (or press the icon ), the
running applications will be displayed.
Action Center

16
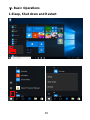
Ⅴ. Basic Operations
1.Sleep, Shut down and Restart

I. Înainte de utilizare
1. Acest produs se poate utiliza în zone din afara
tropicelor, la o altitudine sub 2000 de metri.
2. Aveți grijă ca Notebook PC să nu cadă sau să nu sufere
alte tipuri de impacturi puternice.
3. Nu îl utilizați pe termen îndelungat în niciun mediu în
care aerul este prea rece, prea fierbinte, unde este
umiditatea ridicată sau prea mult praf. Nu expuneți
Notebook PC la lumina directă a soarelui.
4. Evitați, pe cât de mult posibil, să-l folosiți în medii
magnetice sau statice.
5. Dacă intră în contact cu apa sau orice alt lichid,
închideți-l și nu îl utilizați până nu este complet uscat.
6. Pentru siguranța dvs. este recomandat ca in timpul
incărcării sa nu țineți dispozitivul in apropierea corpului și
să il plasați pe un suport neinflamabil.
7. Nu curățați Notebook PC cu niciun detergent care
conține elemente chimice, sau cu alte lichide, pentru a
evita deteriorarea sa din cauza coroziunii sau umezelii.
Dacă este necesară curățarea, folosiți o cârpă moale și
uscată sau un șervețel de hârtie.
8. Compania nu va fi responsabilă pentru pierderea sau
ștergerea de materiale din dispozitiv, cauzate de
manipularea incorectă a software-ului și hardware-ului, de
întreținere sau de orice alt accident.
9. Vă rugăm să faceți copii de rezervă la toate materialele
importante, pentru a evita pierderea lor.
10. Nu dezasamblați singuri Notebook PC; în acest caz,
veți pierde garanția.
11. Manualul de utilizare și software-ul necesar vor putea fi
actualizate oricând. Pentru versiunea de software
actualizată, vizitați www.allviemobile.com pentru a o
descărca, și nu veți mai primi alte notificări. Dacă apar
contradicții cu Manualul de Utilizare, va fi luată în
considerare versiunea online.
17

12. Înlocuirea bateriilor cu unele incorecte poate cauza
explozii. Asigurați-vă că utilizați bateriile originale.
De luat în considerare:
Pentru a evita problemele care pot sa apară cu service-uri
care nu mai sunt agreate de S.C. Visual Fan S.R.L.
(deoarece S.C. Visual Fan S.R.L își rezervă dreptul de a
înceta colaborarea cu orice service colaborator agreat,
existent pe certificatul de garanție la data punerii în
vânzare pe piată a lotului de produse), înainte de a duce
un produs în service vă rugăm să consultați lista
actualizată a service-urilor agreate existentă pe site-ul
Allview la secțiunea “Suport&Service - Service autorizat”.
Nu ne asumăm responsabilitatea în situația în care
produsul este utilizat în orice alt mod decât cel specificat în
manual. Compania își rezervă dreptul de a aduce
modificări la conținutul manualului, fără a anunța public
acest lucru.
Aceste modificări vor fi afișate pe site-ul companiei
(www.allviewmobile.com), în secțiunea dedicată
produsului.
Conținutul acestui manual poate diferi de cel în format
electronic, de pe site. În acest caz, cel din urmă va fi luat
în considerare. Aplicațiile destinate utilizării produsului și
oferite de părți terțe pot fi oprite sau întrerupte în orice
moment. S.C. Visual Fan S.R.L. se dezice în mod explicit
de orice responsabilitate sau răspundere privind
modificarea, oprirea ori suspendarea serviciilor/conținutului
puse la dispoziție de către terțe părți prin intermediul
acestui dispozitiv. Pentru mai multe detalii despre produs,
accesați www.allviewmobile.com.
18

În următoarele cazuri, produsul nu mai beneficiază de
garanție:
- Lipsa etichetei sau sigiliilor de garanție;
- Intervenții neautorizate, inclusiv reparații executate
de persoane sau firme neautorizate de producător;
- Cumpărătorul nu respectă condițiile de manevrare,
transportare, întreținere, instalare, pornire și utilizare;
- Deteriorări termice, mecanice și plastice ale
produsului, cauzate de lovituri, expunere la surse de
căldură, incendii, accidente, vibrații, condiții meteorologice
sau neglijență în utilizare;
- Utilizarea de baterii, surse de energie sau alte
accesorii în afara celor aprobate de producător;
- Produsul prezintă urme de mâncare sau dovezi de
contact cu orice tip de lichid (apă, solvenți, uleiuri,
vopseluri, acizi și altele), iar acest contact este dovedit prin
urme de oxidare sau prin prezența lichidelor pe orice parte
a produsului;
- Numărul de serie scris pe certificatul de garanție nu
este același cu cel de pe produs;
- Utilizarea în alte scopuri decât cele pentru care a fost
creat; - Utilizarea în condiții neadecvate (tensiune
greșită, nivel mai ridicat de umiditate decât cel acceptat,
praf);
- Vânzătorul nu poate fi tras la răspundere pentru
posibilele probleme de compatibilitate cu accesoriile
cumpărate de la alte companii și nu își va asuma
responsabilitatea pentru subansamblele utilizate pe sistem
care nu corespund, din punctul de vedere al performanței,
cu specificațiile producătorului.
19

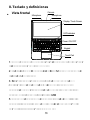
II. Schema tastelor și Definiții
Vedere
Frontală
1. Cameră: O cameră web încorporată care vă permite
să înregistrați clipuri video, să vorbiți Online și altele.
2. Indicatori LED: Pornire, Caps Lock și indicator Blocare
Touch pad
3. Microfon: Microfon încorporat care vă ajută la
apelurile Audio/Video Online, și altele.
4. Tastatură: Taste multiple, inclusiv cele de comenzi
rapide pentru Internet și MM.
5. Touch Pad: Touch Pad cu funcționalitate multi-tactilă
6. Display: Ecranul de înaltă calitate vă permite să vedeți
filme, să vă jucați și altele.
7. Pornire/Oprire: Apăsați lung pentru a porni/opri.
Camera
Display / Touch Screen
Power ON / OFF
Keypad
Touch Pad
MicrophoneMicrophone
LED Indicators
20
Strona się ładuje...
Strona się ładuje...
Strona się ładuje...
Strona się ładuje...
Strona się ładuje...
Strona się ładuje...
Strona się ładuje...
Strona się ładuje...
Strona się ładuje...
Strona się ładuje...
Strona się ładuje...
Strona się ładuje...
Strona się ładuje...
Strona się ładuje...
Strona się ładuje...
Strona się ładuje...
Strona się ładuje...
Strona się ładuje...
Strona się ładuje...
Strona się ładuje...
Strona się ładuje...
Strona się ładuje...
Strona się ładuje...
Strona się ładuje...
Strona się ładuje...
Strona się ładuje...
Strona się ładuje...
Strona się ładuje...
Strona się ładuje...
Strona się ładuje...
Strona się ładuje...
Strona się ładuje...
Strona się ładuje...
Strona się ładuje...
Strona się ładuje...
Strona się ładuje...
Strona się ładuje...
Strona się ładuje...
Strona się ładuje...
Strona się ładuje...
Strona się ładuje...
Strona się ładuje...
Strona się ładuje...
Strona się ładuje...
Strona się ładuje...
Strona się ładuje...
-
 1
1
-
 2
2
-
 3
3
-
 4
4
-
 5
5
-
 6
6
-
 7
7
-
 8
8
-
 9
9
-
 10
10
-
 11
11
-
 12
12
-
 13
13
-
 14
14
-
 15
15
-
 16
16
-
 17
17
-
 18
18
-
 19
19
-
 20
20
-
 21
21
-
 22
22
-
 23
23
-
 24
24
-
 25
25
-
 26
26
-
 27
27
-
 28
28
-
 29
29
-
 30
30
-
 31
31
-
 32
32
-
 33
33
-
 34
34
-
 35
35
-
 36
36
-
 37
37
-
 38
38
-
 39
39
-
 40
40
-
 41
41
-
 42
42
-
 43
43
-
 44
44
-
 45
45
-
 46
46
-
 47
47
-
 48
48
-
 49
49
-
 50
50
-
 51
51
-
 52
52
-
 53
53
-
 54
54
-
 55
55
-
 56
56
-
 57
57
-
 58
58
-
 59
59
-
 60
60
-
 61
61
-
 62
62
-
 63
63
-
 64
64
-
 65
65
-
 66
66


