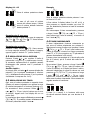
Brandt BPI6464B Instrukcja obsługi
- Kategoria
- Płyty
- Typ
- Instrukcja obsługi

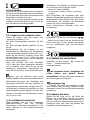
INSTRUCTION MANUAL EN
NÁVOD K POUŽITÍ CZ
BEDIENUNGSHANDBUCH DE
BRUGSVEJLEDNING DA
MANUALE DI ISTRUZIONI IT
BEDIENINGSHANDLEIDING NL
INSTRUKCJA OBSŁUGI PL
MANUAL DE INSTRUÇÕES PT
ИНСТРУКЦИЯ РУ
ΕΓΧΕΙΡΙΔΙΟ ΟΔΗΓΙΩΝ ΕΛ
Cooking Hob
Varná deska
Kochfeld
Kogeplade
Piano di cottura
Kookplaat Płyta
indukcyjna
Placa de cozedura
Индукционная плита для
приготовления пищи
Μαγειρικές εστίες

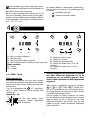
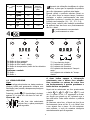
1.3
520
590
65,5
15
40
40
5
10
1.2.1
1.1.1
1.1
1.2
1.2.2
1.2.4
1.2.6
1.2.5
1.3.1
Nr
SERVIC
E
:
TY
P
E
:
CC
XXXXXXX
xxx-x xxV xx/xxHz
XXXX W-
X
XXXX
XXXXXXXX
XXXXXXXXX
XX XX XXXXX
ISM GROUPE 2 CLASSE B
XXXXXXX
520
590
523
593
R 6,5
R 13,5
490
560
5
65,5
1
1.2.3
A
B

- +
- +
2

3.2
3.1
4.6
4.6.1 4.6.34.6.2
Boost
Boost
3.3
3.4
3
4
5
5

Dear Customer,
You have just acquired a BRANDT product and we would like to thank you.
We have designed and made this product with you, your lifestyle and your requirements
in mind so that it meets your expectations. We have devoted our know-how, our
innovative spirit and the passion that has been guiding us for over 60 years.
In an effort to ensure that our products meet your requirements in the best possible
way, our Customer Relations department is at your disposal, to answer all your
questions and to listen to all your suggestions.
Visit our website www.brandt.com where you will find our latest innovations, as well
as useful and complementary information.
BRANDT is delighted to assist you every day and hopes you get the most out of your
purchase.
Important: Before using your appliance, read this user guide carefully
to familiarise yourself more quickly with its operation.
English

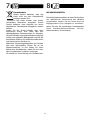
CONTENTS
Important safety advice and precautions .......................... 6
1 - Installation .................................................................. 8
Unpacking ........................................................................ 8
Fitting .............................................................................. 8
Connection ........................................................................8
2 - Identification ............................................................... 8
3 - Use ............................................................................... 8
Choice of cookware ............................................................ 8
Cooking zone selection ....................................................... 8
4 - Operation ..................................................................... 9
4.1 - Switching on/off .............................................................. 9
4.2 - Setting the power.......................................................... 10
4.3 - Setting the timer ........................................................... 10
4.4 - Independent timer ....................................................... 10
4.5 - Locking the controls ...................................................... 11
4.6 - Safety precautions and recommendations ........................ 11
5 - Care ........................................................................... 12
6 - Problems .................................................................... 13
7 - Environment .............................................................. 14
8 - Customer service ....................................................... 14
5
English

6
This appliance can be used by
children over 8 years old and
persons with reduced physical,
sensory or mental capabilities
or without experience and
knowledge if they have been
correctly informed or trained in
the use of the appliance in a safe
way and understand the hazards
involved.
Children must not play with the
appliance.
Children must not clean and
maintain the appliance without
supervision.
Children under 8 years old must
be kept away from the hob
unless they are supervised at all
times.
The appliance and its accessible
parts become hot during use.
Precautions must be taken to
avoid touching the heating
elements.
Metal objects such as knives,
forks, spoons and lids must not
be placed on the cooking surface
as they may heat up.
Your hob is equipped with a
child safety device that locks its
operation after use or during
cooking (See “Child Safety use”
section).
Your appliance complies with
applicable European Directives
and regulations.
In order to avoid interference
between your cooking hob and a
pacemaker, the pacemaker must
be designed and programmed in
compliance with the regulations
that apply to it. Ask the
pacemaker manufacturer or your
GP.
Leaving oil or fat to heat
unattended on a hob may be
dangerous and lead to fire.
NEVER attempt to extinguish a
fire with water. Instead, switch
off the appliance, then cover the
flame with a lid or a fire blanket.
CAUTION: cooking must be
monitored. Quick heating must
be monitored at all times.
Danger of fire: do not store
objects on the cooking areas.
If the surface is cracked,
disconnect the appliance to avoid
the risk of electric shock.
Do not use your hob until you
have replaced the glass worktop.
Avoid hard shocks from cookware:
although the vitroceramic glass
worktop is very sturdy, it is not
unbreakable.
Do not place any hot lids
flat on your cooking hob. A
suction effect may damage
the vitroceramic surface. Avoid
dragging cookware across the
surface, which may in the long-
term result in the degradation
IMPORTANT SAFETY INSTRUCTIONS TO BE READ
CAREFULLY AND KEPT FOR FUTURE USE.
This guide can be downloaded from the brand web site.
Safety instructions

7
of the decorative finish of the
vitroceramic top.
Never use a sheet of aluminium
for cooking. Never place items
wrapped in aluminium foil or
packaged in aluminium dishes on
your cooking hob. The aluminium
will melt and permanently
damage your appliance.
Do not store cleaning products
or flammable products in the
cabinet underneath your cooking
hob.
These hobs must be connected
to the power grid via an all-pole
cut-off device that complies with
installation regulations in effect.
A disconnection device must
be incorporated into the fixed
wiring.
If the power cable is damaged,
it should be replaced by the
manufacturer, its after-sales
service department or a similarly
qualified person to avoid danger.
Ensure that the power cables of
any electrical appliances plugged
in close to the hob are not in
contact with the cooking zones.
Never use a steam cleaner to
clean your cooking hob.
The appliance is not designed to
be switched on using an external
timer or a separate remote
control system.
WARNING: Only use hob
protectors designed by the
manufacturer of the cooking
appliance or listed as suitable in
the user guide, or included with
the appliance. Use of unsuitable
protectors could cause accidents.
Safety instructions

8
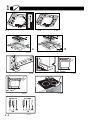
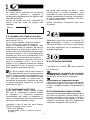
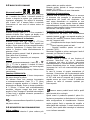
1.1 UNPACKING
For future use, remove all protective elements.
Check and respect the appliance’s characteristics
that appear on the nameplate.
Note in the boxes below the service and standard
references shown on this plate.
1.2 FITTING INTO THE WORK TOP
Check that the air intake and outlet are free of
obstruction (1.2.1).
For standard fitting, refer to diagrams A.
For flush-fitting, refer to diagrams B.
Comply with the information concerning the
fitting dimensions (in millimetres) of the work
top destined to receive the hob (1.2.2). Carefully
glue the sealing joint to the entire surround of
the glass hob (depending on model) (1.2.3),
before fitting.
Check that air circulates correctly
between the front and the back of your hob.
If you are installing the hob above a drawer
(1.2.4) or above a built-in oven (1.2.5), comply
with the dimensions provided on the illustrations
to ensure a sufficient air outlet at the front.
If your hob is located above your oven, the
hob’s thermal safety devices can impede the
simultaneous use of the hob and the oven’s
pyrolysis programme,
display code “F7” in the
control zones. In such circumstances we
recommend that you increase the hob’s
ventilation by creating an opening in the side of
the cabinet (8 x 5 cm).
1. 3 ELECTRIC CONNECTIONS
These hobs must be connected to the power grid
via an all-pole cut-off device that complies with
installation regulations in effect. A disconnection
device must be incorporated into the fixed wiring.
Identify the type of cable of your hob according
to the number of wires and colours:
- 5-wire cable (1.3.2 and 1.3.1):
a) green-yellow, b) blue, c) brown, d) black,
e) grey.
When switching your hob on or after a lengthy
power cut, a code is shown on the control pad
(this display is reserved for your after-sales
service, where applicable. The user of the hob
does not need to take notice of it).
This information disappears after around
30 seconds.
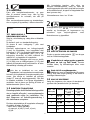
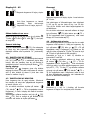
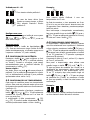
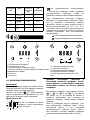
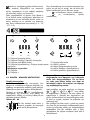
1
2
Identify your type of hob by comparing
the number and arrangement of burners, the
type of keypad and the total power of your
appliance using the illustrations with the
nameplate.
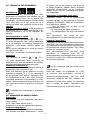
3.1 CHOICE OF COOKWARE
Cookware with the
symbol are compatible
with induction.
We suggest that you choose cookware
with a thick and flat bottom. The heat will be
distributed better and cooking will be more
uniform.
Advice on how to save energy
Cooking with the correctly sized lid saves energy.
If you use a glass lid, you can control your
cooking perfectly.
3
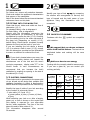
Diameter
of cooking
zone (cm)
Hob mod-
el
Maximum
power
of cook-
ing zone
(Watts)
Diameter of
the base of
the
pan (cm)
16
2200 11-16
18
2400 11-18
21
2400 12-21
26
2400 12-26
28 3600 11-28

4
9
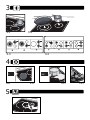
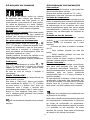
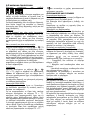
When several cooking zones are used at the
same time, the hob manages the power
distribution, so as not to exceed its total power.
When you use maximum power (Boost or P) on
several burners at once, position your cookware
according to the model of your hob, as indicated
on the illustrations (3.1 - 3.2 - 3.3 - 3.4).
In this way, you will avoid automatic power
limitation on one of the burners if positioning is
not optimal:
= recommended position.
= position to avoid.
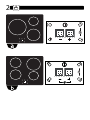
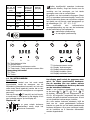
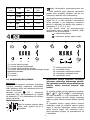
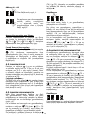
T1
T3
T7
T4
T2
T6T5
A1
A2
A3
A4
T1: Left Cooking Zone key
T2: On/Off key
T3: Back right Cooking Zone key
T4: Timer key / Front left Cooking Zone key
Depending on model
T5: - key
T6: + key
T1
T6
T4
T2
T5
A1
A2
A3
A4
T3
T7
T7: Front right cooking zone
A1: “Power” display
A2: Active cooking zone display
A3: “Timer” tens display
A4: “Timer” unit display
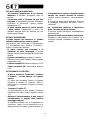
4.1 SWITCHING ON - OFF
Switching on:
When the appliance is powered on for the first
time, pressing any key cancels the display of the
indicator lights (if no keys are pressed, the lights
will switch off after seconds).
Press the
key (T2 on/off) of the hob, a “0”
displays in display A1 and a chaser in display A2.
Displays A1 - A2
If no cooking zone is selected, the
hob switches off after 8 seconds.
The display only indicates the information
concerning the last activated cooking zone.
To view the values for another operating
cooking zone, press the key for the zone
concerned.
After selecting a cooking zone by pressing
T1,
T3, T4 or T7) a “0” flashes in A1, and
2 segments forming an angle flash in A2 indicating
the active zone. You can then set the power level.
If you select another cooking zone, the angle for
the already operating zone will become fixed and
the angle for the last activated zone will flash. If
you do not select a power level, the cooking zone
will automatically switch off after 8 seconds.

10
Displays A1 - A2
Back right cooking zone power 1.
In the case of several cooking
zones switched on at the same
time, last active cooking zone
Front Right power 5.
Stopping a zone:
Press and hold the key for the zone to be switched
off
T1 or T3 or T4 or T7, a long
beep will sound.
General shutdown:
Press the on/off key (T2). A long beep sounds
and all the cooking zones switch off at the same
time, the display switches off or the
“H” symbol
(residual heat) appears.
4.2 SETTING THE POWER
Press
+
+ or
-
- to adjust the power from 1 to 9 then
P (P=maximum power or boost). When switching
on, you can move directly to maximum power "P"
by pressing the
-
- key (T5).
Quick access :
A double click on the
+
+ key allows direct access
to power 5 (if the power displayed is less than 4)
or directly to power 9 (if the power displayed is
between 4 and 8).
4.3 SETTING THE TIMER
Each cooking zone has a dedicated timer. This
can be set once the relevant cooking zone is in
operation (power >0).
To activate the timer, press
(T4) or
-
- +
+
+
(T5 + T6 for hobs with 4 cooking zones), a “0”
displays in display A4 with a fixed dot.
Press
+
+ (T6) or
-
- (T5)to set the time. It is possible
to directly access
99 minutes by pressing the
-
- key
from the beginning.
Example:
Back left cooking zone Power 1 with a timer set
to 13 min.
When the cooking is finished, “0” displays in A3
and A4, and a beep sounds for around 20 sec. To
deactivate it, press any control key.
To stop the timer manually, press and hold
(T4) or
-
- +
+
+
(T5 + T6 for hobs with 4 cooking
zones)
or go back down to 0 with the
-
- key (T5).
4.4 - INDEPENDENT TIMER
The independent timer only works on a selected
cooking zone with the power set to 0. Select the
cooking zone and press
(T4) or
-
- +
+
(T5 + T6
for hobs with 4 cooking zones) and enter a time
by pressing keys T5 or T6 (pressing T5 enables
you to go directly to 99 minutes).
The time increments 1 by 1 up to 15, then 5 by
5 up to 99.
To stop the timer, press and hold (T4) or
-
- +
+
(T5 + T6 for hobs with 4 cooking zones) if the
timer display is active. If not, select the cooking
zone by pressing T1 / T3 / T4 or T7, then press
and hold
(T4) or
-
- +
+
(T5 + T6 for hobs with
4 cooking zones), or press the key for the relevant
cooking zone, a confirmation beep will sound.
Example:
The timer (t = time) is active on the front right
cooking zone for a duration of 6 minutes.

11
4.5 LOCKING THE CONTROLS
Child safety:
Your hob has a child safety device which locks
the controls when the hob is not in use or during
cooking (to maintain the current settings). For
safety reasons, only the “off” control is always
active. It authorises a heating zone to be switched
off even when the hob is locked.
Locking:
If your hob is switched off: Press and hold
keys T3 + T7 until the "bloc" locking symbol
appears in the displays and a short beep confirms
the operation.
If your hob is switched on:
Press and hold keys
+ (T3 + T7) until the
"bloc" locking symbol appears in the displays and
a short beep confirms the operation. The display
for operating cooking zones alternately indicates
the power and “bloc”.
When you press the power or timer keys for the
operating zones:
"bloc" appears for 2 seconds and then switches
off.
Unlocking:
Press keys
+ (T3 + T7) at the same time
until the
"bloc” locking symbol disappears in the
display and 2 short beeps confirm the operation.
The locking is memorised in the case of a power
cut.
CLEAN LOCK function:
This function locks the hob off while it is being
cleaned.
To activate Clean Lock, press and release keys
T3 + T7 at the same time; a beep sounds
and the “bloc” symbol flashes in the displays.
After a predefined 1 min period, the lock will
automatically disengage. Two short beeps sound
and "bloc" switches off. You can stop the Clean
Lock at any time by pressing and holding keys
T3 + T7.
We do not recommend using any hob
protection mechanisms.
4.6 SAFETY PRECAUTIONS AND
RECOMMENDATIONS
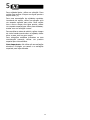
Residual heat:
After intensive use, the hob may remain hot for
several minutes.
The “H” symbol displays during this period (4.6.1).
Avoid touching the zones concerned during this
time.
Temperature limiter:
Each cooking zone is fitted with a safety sensor
that continuously monitors the temperature of
the bottom of the pan. If an empty pan is left on
a cooking zone that is switched on, this sensor
automatically adjusts the heat delivered by the
hob to minimise the risk of damage to the utensil
or hotplate.
Protection in the event of spillage:
The hob may shut down (with the special symbol
in the display) automatically and a beep
may sound (depending on the model) in any of
these 3 situations:
- Overflow that spills onto the control keys
(4.6.2) .
- Damp cloth placed over the keys.
- Metallic object placed on the control keys
(4.6.3).
Remove the object or clean and dry the keys and
resume cooking.
"Auto-Stop" system:
If you forget to switch off a pan, your hotplate has
an “Auto-Stop” safety function that automatically
switches off the forgotten cooking zone after a
pre-set time (between 1 and 10 hours based on
the power level setting).
If the safety system is triggered, the cooking
zone is shown as cut off with "AS" displayed on
the control panel and a beep sounds for about
2 minutes. To stop it, simply press any of the
control keys.
Sounds similar to the ticking of a clock may
be heard.
These sounds occur when the hob is in operation
and disappear or decrease according to the
heating configuration. Low whistling or humming
may also occur depending on the model and on
the quality of your pan. These noises are a normal
part of induction technology and do not indicate
a fault.

12
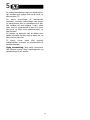
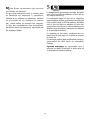
For light dirt, use a disinfectant sponge.
Thoroughly moisten the zone to be cleaned with
hot water, then wipe off (5).
For a build-up of baked-on dirt or sweet
overflows, use a disinfectant sponge and/or a
special glass scraper. Thoroughly moisten the
zone to be cleaned with hot water. Use a scraper
for glass to remove the large bits, finish off with
a disinfectant sponge, and then wipe off.
For rings and hard water residue, apply warm
white vinegar to the stain, leave on, then wipe
with a soft cloth.
For shiny metal streaks or weekly maintenance,
use a special vitroceramic glass product.
Important note: do not use any powders
or abrasive sponges. Use creams and special
delicate glassware sponges.
5

13
- The fan continues to function after your hob
is turned off.
This is normal. It cools the electronic parts.
- In the event of persistent malfunction.
Switch off your hob for 1 minute. If the problem
persists, contact the after-sales service.
6.1 DURING INITIAL USE:
- An indicator light appears. This is normal. It
will go away after 30 seconds.
- Your installation blows a fuse or one
side only of the hob works. The electrical
connection of your hob is incorrect. Check its
compliance (see connection chapter 1.3).
- The hob smells the first few times it is used
for cooking. The appliance is new. Heat up each
ring for half an hour with a saucepan full of water.
6.2 WHEN POWERING ON:
The hob does not work and the indicator
lights on the control panel are not on.
The appliance is not receiving electricity. The
electrical supply is defective or the connection
is incorrect. Inspect the electrical circuit breaker
and fuses.
- The hob does not work and another
message is displayed. The electronic board
is functioning poorly. Call the After-Sales Service
Department.
- The hob does not work, the symbol
is displayed. Unlock the child safety device (see
connection chapter 4.4).
- Error code F9: voltage less than 170 V
- Error code F0: voltage less than 5°C
6.3 DURING USE:
- The hob has stopped working. The symbol
is displayed and there is a sound
signal.
There was an overflow or an object is in contact
with the control panel. Clean or remove the
object, then begin cooking again.
- Code F7 is displayed.
The electronic circuits have overheated. Check
the hob’s ventilation (see chapter on fitting
1.2).
- During operation of a heating zone, the
keypad display continues to flash.
The cookware used is not compatible with
induction or its size is not suitable for the
burner (see chapter 3).
- The cookware makes noise and your hob
clicks during cooking (see chapter on Safety
precautions and recommendations 4.5).
This is normal with some types of cookware. This
is caused by the transfer of energy from the hob
to the cookware.
6

14
Protecting the environment
This symbol indicates that this product
should not be treated as household
waste.
Your appliance also contains a great
amount of recyclable material. It is marked with
this symbol to indicate that used appliances must
be disposed of in certified collection points.
Contact your town hall or your retailer for
the used appliance collection points closest to
your home. This way, the appliance recycling
organised by your manufacturer will be done
under the best possible conditions, in compliance
with European Directive on Waste Electrical and
Electronic Equipment.
This appliance’s packing materials are also
recyclable. Help recycle it and protect the
environment by dropping it off in the municipal
receptacles provided for this purpose.
We thank you for your help in protecting the
environment.
7
INTERVENTIONS
Any repairs to your appliance must be made by
a qualified professional accredited to work on the
brand. When you call, in order to facilitate processing
your request, make sure to have the following
information relating to your appliance in front of
you (commercial reference, service reference, serial
number).
8

Cesky
Vážená zákaznice, vážený zákazníku,
Právě jste si zakoupili výrobek společnosti BRANDT a my Vám děkujeme za důvěru,
kterou nám tím udělujete.
Tento výrobek jsme navrhli a vyrobili s ohledem na Vás, na Váš způsob života, Vaše
potřeby, aby co nejlépe odpovídal Vašim očekáváním. Využili jsme veškeré své know-
how, snahu o inovace a veškeré nadšení, které nás pohání již déle než 60 let.
Snažíme se neustále co nejlépe uspokojovat požadavky, které kladete na naše výrobky,
pracovníci našeho oddělení péče o zákazníky jsou Vám k dispozici a kdykoliv rádi
zodpoví Vaše dotazy nebo náměty.
Můžete se také připojit na naše internetové stránky www.brandt.com, kde naleznete
veškeré naše inovace i užitečné a doplňující informace.
BRANDT Vám s radostí pomáhá v každodenním životě a přeje vám, abyste svůj nákup
plně využili.
Důležité upozornění: Před uvedením přístroje do provozu si pozorně
přečtěte tento návod k instalaci a použití, abyste se rychleji seznámili
s jeho funkcemi.

OBSAH
Bezpečnost a důležitá varování ......................................... 6
1 - Instalace ...................................................................... 8
Vybalení ..........................................................................8
Zabudování ..................................................................... 8
Připojení ......................................................................... 8
2 - Identifikace ................................................................. 8
3 - Použití ......................................................................... 8
Výběr nádobí .....................................................................8
Výběr plotýnky ..................................................................8
4 - Provoz .......................................................................... 9
4.1 - Zapnutí/Vypnutí ..............................................................9
4.2 - Regulace výkonu ........................................................... 10
4.3 - Nastavení časovače ....................................................... 10
4.4 - Nezávislá minutka ......................................................... 10
4.5 - Zablokování ovládacích tlačítek ....................................... 11
4.6 - Bezpečnost a doporučení ............................................... 11
5 - Údržba ....................................................................... 12
6 - Neobvyklé situace ...................................................... 13
7 - Životní prostředí ........................................................ 14
8 - Služby spotřebitelům ................................................. 14
Cesky

6
Tento přístroj mohou používat
děti od 8 let věku a osoby
s omezenými tělesnými,
smyslovými nebo duševními
schopnostmi nebo
s nedostatkem zkušenosti
a znalostí, pouze pokud získaly
předtím pokyny týkající se
bezpečného používání přístroje
a chápou možná rizika.
Děti si nesmějí hrát s přístrojem.
Čištění a údržbu nesmějí děti
provádět bez dohledu.
Děti do 8 let věku musejí
být udržovány v bezpečné
vzdálenosti, nebo musejí být pod
stálým dohledem.
Přístroj a jeho dostupné části
jsou při používání teplé.
Je nutno přijmout opatření, aby
nedošlo k dotyku topných prvků.
Kovové předměty jako nože,
vidličky, lžíce a pokličky
nepokládejte na desku, mohou
se velmi zahřát.
Varná deska je vybavena dětskou
pojistkou, která ji při použití
zablokuje v poloze vypnutí nebo
v poloze vaření (viz kapitola:
použití dětské pojistky).
Váš přístroj odpovídá Evropským
směrnicím a předpisům, kterým
podléhá.
Aby nedocházelo k interferencím
mezi varnou deskou a Vaším
kardiostimulátorem, musí
být kardiostimulátor vyroben
a seřízen podle platných
předpisů. Informujte se
u výrobce nebo ošetřujícího
lékaře.
Vaření s olejem nebo tukem
na varné desce prováděné bez
dohledu může být nebezpečné
a může vést k požáru. NIKDY se
nesnažte uhasit oheň vodou, ale
vypněte vždy napájení zařízení
a překryjte plamen například
pokličkou nebo protipožárním
krytem.
POZOR: Vždy je nutno mít vaření
pod dohledem. Krátké vaření
vyžaduje nepřetržitý dohled.
Nebezpečí požáru: na varné
desce neskladujte předměty.
Je-li povrch prasklý, je třeba
přístroj odpojit, aby nedošlo k
zásahu elektrickým proudem.
Do výměny skleněné horní plochy
již přístroj nepoužívejte.
Zabraňte nárazům nádob:
sklokeramická plocha je velmi
odolná, nikoliv však nezničitelná.
Nepokládejte na varnou desku
horkou pokličku. Existuje riziko,
že efekt „baňky“ by poškodil
sklokeramickou desku. Netřete
o varnou desku nádobím, což
DŮLEŽITÉ BEZPEČNOSTNÍ POKYNY SI PŘED POUŽITÍM
POZORNĚ PŘEČTĚTE A USCHOVEJTE PRO BUDOUCÍ POUŽITÍ.
Tento návod je k dispozici ke stažení na internetových stránkách
značky.
Bezpečnostní pokyny

Bezpečnostní pokyny
by dlouhodobě mohlo poškodit
dekoraci na sklokeramické desce.
Na vaření nikdy nepoužívejte
alobal. Nikdy nepokládejte na
varnou desku výrobky zabalené
v alobalu nebo v hliníkové
vaničce. Hliník by se roztavil
a nevratně by poškodil varnou
desku.
Neuchovávejte ve skříňce pod
varnou deskou čistící nebo
hořlavé přípravky.
Pokud je poškozen napájecí
kabel, musí jej vyměnit výrobce,
jeho záruční servis nebo osoba
s podobnou kvalifikací, aby se
vyloučilo jakékoli riziko.
Zkontrolujte, zda se přívodní
kabel elektrického přístroje
zapojeného v blízkosti varné
desky nedotýká varných zón.
K údržbě desky nepoužívejte
parní čistič.
Přístroj není určen k zapínání
prostřednictvím externího
časového spínače nebo
samostatného dálkového
ovladače.
VÝSTRAHA: Používejte pouze
ochranné prvky navržené
výrobcem varného zařízení
uvedené v návodu k použití jako
vhodné nebo zařazené do balení
přístroje. Při použití nevhodných
chráničů může dojít k vážným
úrazům.
7

8
1.1 VYBALENÍ
Pro účely budoucího použití odstraňte veškeré
ochranné prvky. Zkontrolujte a dodržujte
parametry přístroje uvedené na štítku s údaji.
Poznačte si do následujících rámečků provozní
údaje a údaje o typové normě uvedené na tomto
štítku.
1.2 ZABUDOVÁNÍ DO PRACOVNÍ DESKY
Zkontrolujte, zda je přívod i odvod vzduchu
dokonale volný (1.2.1).
Pro standardní zabudování se podívejte na
obrázky A.
Pro vnější zabudování se podívejte na obrázky B.
Věnujte pozornost údajům o rozměrech pro
vestavbu (v milimetrech) do pracovní desky
podle údajů pro zabudování varné desky (1.2.2).
Opatrně přilepte těsnění po celém okraji skla
varné desky (1.2.3), než zahájíte vestavbu.
Zkontrolujte, zda mezi přední a zadní částí varné
desky volně proudí vzduch.
V případě instalace desky nad zásuvku (1.2.4)
nebo nad vestavnou troubu (1.2.5), dodržujte
rozměry uvedené na obrázcích, abyste zajistili
dostatečný výstup vzduchu vpředu.
Je-li trouba umístěna pod varnou deskou,
mohou tepelné pojistky omezovat souběžné
použití varné desky a trouby v režimu pyrolýzy,
zobrazení kódu „F7“ v oblasti ovladačů.
V takovém případě doporučujeme zlepšit
odvětrání varné desky zhotovením otvoru v boku
nábytku (8 cm x 5 cm).
1. 3 ELEKTRICKÉ ZAPOJENÍ
Tyto varné desky se musí připojit k síti pomocí
zásuvky nebo vícepólového jističe podle platných
pravidel instalace. Jistič musí být zabudován do
pevného rozvodu.
Identifikujte typ kabelu varné desky podle počtu
kabelů a barev:
- 5-žilový kabel (1.3.1.) :
a) zeleno-žlutý, b) modrý, c) hnědý, d) černý,
e) šedý.
Po zapnutí napájení varné desky nebo po
dlouhodobém výpadku elektrické energie se
na ovládací klávesnici zobrazí kód (tato část
je vyhrazena případně poprodejnímu servisu,
uživatel desky se tím nemusí zabývat).
Tyto informace se zobrazí asi po 30 sekundách.
Service :
Type :
1
2
Identifikujte svůj typ varné desky tak, že
porovnáte číslo a rozmístění
ploten, typ klávesnice a celkový výkon zařízení
podle obrázků a štítku s údaji.
3.1 VÝBĚR NÁDOBY
Nádoby se symbolem
jsou kompatibilní
s indukcí.
Doporučujeme vybírat nádobí se
silným a rovným dnem. Teplo se lépe
rozloží a vaření bude stejnoměrnější.
Rada pro úsporu energie
Vaření s dobře nasazenou poklicí vede
k úspoře energie. Pokud používáte skleněnou
poklici, můžete vaření dokonale kontrolovat.
3.2 VÝBĚR PLOTNY
Zvolte plotnu vhodnou pro rozměry dna Vaší
nádoby (viz tabulka). Pokud je dno nádoby příliš
malé, začne blikat ukazatel výkonu a plotna
nebude fungovat, i když je materiál nádoby
doporučený pro indukci.
3
Prů m ě r
plotny (cm)
Model
desky
Max. vý-
kon plotny
(Watt)
Průměr dna
nádobí (cm)
16
2200 11-16
18
2400 11-18
21
2400 12-21
26 2400 12-26
28 3600 11-28
Strona się ładuje...
Strona się ładuje...
Strona się ładuje...
Strona się ładuje...
Strona się ładuje...
Strona się ładuje...
Strona się ładuje...
Strona się ładuje...
Strona się ładuje...
Strona się ładuje...
Strona się ładuje...
Strona się ładuje...
Strona się ładuje...
Strona się ładuje...
Strona się ładuje...
Strona się ładuje...
Strona się ładuje...
Strona się ładuje...
Strona się ładuje...
Strona się ładuje...
Strona się ładuje...
Strona się ładuje...
Strona się ładuje...
Strona się ładuje...
Strona się ładuje...
Strona się ładuje...
Strona się ładuje...
Strona się ładuje...
Strona się ładuje...
Strona się ładuje...
Strona się ładuje...
Strona się ładuje...
Strona się ładuje...
Strona się ładuje...
Strona się ładuje...
Strona się ładuje...
Strona się ładuje...
Strona się ładuje...
Strona się ładuje...
Strona się ładuje...
Strona się ładuje...
Strona się ładuje...
Strona się ładuje...
Strona się ładuje...
Strona się ładuje...
Strona się ładuje...
Strona się ładuje...
Strona się ładuje...
Strona się ładuje...
Strona się ładuje...
Strona się ładuje...
Strona się ładuje...
Strona się ładuje...
Strona się ładuje...
Strona się ładuje...
Strona się ładuje...
Strona się ładuje...
Strona się ładuje...
Strona się ładuje...
Strona się ładuje...
Strona się ładuje...
Strona się ładuje...
Strona się ładuje...
Strona się ładuje...
Strona się ładuje...
Strona się ładuje...
Strona się ładuje...
Strona się ładuje...
Strona się ładuje...
Strona się ładuje...
Strona się ładuje...
Strona się ładuje...
Strona się ładuje...
Strona się ładuje...
Strona się ładuje...
Strona się ładuje...
Strona się ładuje...
Strona się ładuje...
Strona się ładuje...
Strona się ładuje...
Strona się ładuje...
Strona się ładuje...
Strona się ładuje...
Strona się ładuje...
Strona się ładuje...
Strona się ładuje...
Strona się ładuje...
Strona się ładuje...
Strona się ładuje...
Strona się ładuje...
Strona się ładuje...
Strona się ładuje...
Strona się ładuje...
Strona się ładuje...
Strona się ładuje...
Strona się ładuje...
Strona się ładuje...
Strona się ładuje...
Strona się ładuje...
Strona się ładuje...
Strona się ładuje...
Strona się ładuje...
Strona się ładuje...
Strona się ładuje...
Strona się ładuje...
Strona się ładuje...
Strona się ładuje...
Strona się ładuje...
-
 1
1
-
 2
2
-
 3
3
-
 4
4
-
 5
5
-
 6
6
-
 7
7
-
 8
8
-
 9
9
-
 10
10
-
 11
11
-
 12
12
-
 13
13
-
 14
14
-
 15
15
-
 16
16
-
 17
17
-
 18
18
-
 19
19
-
 20
20
-
 21
21
-
 22
22
-
 23
23
-
 24
24
-
 25
25
-
 26
26
-
 27
27
-
 28
28
-
 29
29
-
 30
30
-
 31
31
-
 32
32
-
 33
33
-
 34
34
-
 35
35
-
 36
36
-
 37
37
-
 38
38
-
 39
39
-
 40
40
-
 41
41
-
 42
42
-
 43
43
-
 44
44
-
 45
45
-
 46
46
-
 47
47
-
 48
48
-
 49
49
-
 50
50
-
 51
51
-
 52
52
-
 53
53
-
 54
54
-
 55
55
-
 56
56
-
 57
57
-
 58
58
-
 59
59
-
 60
60
-
 61
61
-
 62
62
-
 63
63
-
 64
64
-
 65
65
-
 66
66
-
 67
67
-
 68
68
-
 69
69
-
 70
70
-
 71
71
-
 72
72
-
 73
73
-
 74
74
-
 75
75
-
 76
76
-
 77
77
-
 78
78
-
 79
79
-
 80
80
-
 81
81
-
 82
82
-
 83
83
-
 84
84
-
 85
85
-
 86
86
-
 87
87
-
 88
88
-
 89
89
-
 90
90
-
 91
91
-
 92
92
-
 93
93
-
 94
94
-
 95
95
-
 96
96
-
 97
97
-
 98
98
-
 99
99
-
 100
100
-
 101
101
-
 102
102
-
 103
103
-
 104
104
-
 105
105
-
 106
106
-
 107
107
-
 108
108
-
 109
109
-
 110
110
-
 111
111
-
 112
112
-
 113
113
-
 114
114
-
 115
115
-
 116
116
-
 117
117
-
 118
118
-
 119
119
-
 120
120
-
 121
121
-
 122
122
-
 123
123
-
 124
124
-
 125
125
-
 126
126
-
 127
127
-
 128
128


Brandt BPI6464B Instrukcja obsługi
- Kategoria
- Płyty
- Typ
- Instrukcja obsługi
w innych językach
- čeština: Brandt BPI6464B Návod k obsluze
- italiano: Brandt BPI6464B Manuale del proprietario
- Deutsch: Brandt BPI6464B Bedienungsanleitung
- slovenčina: Brandt BPI6464B Návod na obsluhu
- português: Brandt BPI6464B Manual do proprietário
- English: Brandt BPI6464B Owner's manual
- dansk: Brandt BPI6464B Brugervejledning
- русский: Brandt BPI6464B Инструкция по применению
- Nederlands: Brandt BPI6464B de handleiding
Powiązane artykuły
-
Groupe Brandt BPI6411B Instrukcja obsługi
-
Brandt BPI9440B Instrukcja obsługi
-
-
-
-
-
-
-
-