
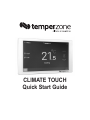
CLIMATE TOUCH
Quick Start Guide

QUICK START GUIDE
Climate Touch Wired Thermostat
Before you begin:
This thermostat is compatible with models OPA 465–960 c/w UC8 and ISD 171–351 c/w IUC.
A standard Au/NZ switch mounting/ush box is required (not supplied).
Gather both a small at head screwdriver and larger at head screwdriver.
Choose a suitable mounting location, away from drafts or direct sunlight, not behind doors or on a
non-insulated external wall. Also avoid placing the thermostat in areas where the air movement is
limited or areas not “typical” of the temperature of the room. Seal any holes that might introduce
draft from behind the device, ie wall cavities.
Parts supplied:
a. Climate Touchscreen c/w magnetic wall mounting bracket.
b. Terminal block connector plug (6 position).
c. Mounting plate PK 6/32" machine screws 25mm (x2)
Required:
Interface cable (4 core twisted pair shielded 0.25mm2) – available in varying
lengths from Temperzone
! CAUTION: Climate Touch has a temperature sensor that protrudes
6mm below the device. Take care not to pull or knock the sensor.
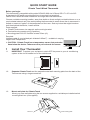
1 Install Your Thermostat
1.1 IMPORTANT To protect your equipment, switch OFF the power to your air conditioning
system at the circuit breaker box or the switchboard.
1.2 Separate Climate Touch and the magnetic metal wall mounting plate from the back of the
Touchscreen using a large screwdriver.
1.3 Mount wall plate for Climate Touch
Mount your new wall plate using the two screws supplied to a suitable pre-installed switch
mounting/ush box (not supplied).
screwdriver
ush box wall mounting plate

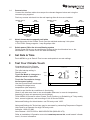
1.4 Connect wires
Connect the interface cable wires as per the relevant diagram below and using the
connector plug supplied.
Push any excess wire back into the wall opening after all wires are installed.
Climate Touch
12Vdc
12
B2
A2
0V
VCC
Gnd
B1
A1
Shielded twin
twisted pair
4 core
OPA
c/w UC8
Climate Touch
12Vdc
B2
A2
0V
VCC
Gnd
B1
A1
Shielded twin
twisted pair
4 core
12
B
A
0V
OSA
c/w UC8
ISD
c/w IUC
Shielded
twisted pair
2 core + screen
1.5 Attach thermostat to magnetic wall plate
Align the centre of the Climate Touch over the wall plate and snap it into place.
! CAUTION: Strong magnets – keep ngertips clear.
1.6 Switch power ON to the air conditioning system
Switch power ON to your air conditioning system at the circuit breaker box or the
switchboard. The Climate Touch will start immediately.
2 Set Date & Time
Touch MENU to go to 'Date & Time' screen and update to current settings.
3 Test Your Climate Touch
Congratulations! Your Climate
Touch thermostat is operational.
The initial startup setting is
Standby mode.
Touch the Mode to change to a
different mode of operation.
Touch the Fan mode to change
the fan speed setting.
Use the Up and Down arrowheads
to change the target room
temperature (aka setpoint).
Check to see that the air conditioner is functioning.
(Note: It will take some time to see a noticeable difference in room air temperature,
especially for large air spaces and new buildings.)
Touch MENU for access to other Climate Touch functions, eg Scheduling of 7 day weekly
timer, screen brightness, and recording of Unit & Service Details.
Advanced Settings for Administrator: use PIN entry code '1956'.
Advanced Settings for Technicians may be accessed by contacting Temperzone Support
Help Desk for a separate four digit PIN entry code:
Australia: 1800-211 800
New Zealand: 09-279 5250 or 0800-NZAIRCON (0800-692 472)
Refer to Installation & Operation manual at www.temperzone.biz; model search 'climate
touch', for more information.
Menu
Cool
Low
21.5
Target
HH:MM
21.5
°C
Disabled
Mode
Fan
Down
Up
On/Off
status message
°

Specications:
• Climate Touch CTC-1 part no. 201-000-789
• Screen 8" diagonal, resolution 1280 x 720 pixels WXGA, colour
• Power supply 12V DC (via UC8)
• Communication interface Modbus/RS-485
• Operating system Android
• Language support English only
• Temperature setting range: 16~30°C
• Temperature setting sensitivity: 0.5°C steps
• Temperature measurement range 5~50°C
• Enclosure re retardant PC+ABS
• Protection class IP 30
• Complies with AS/NZS 4268:2017
• Dimension 209×131×15 mm (W×H×D)
• Weight 435g
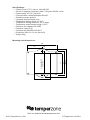
Mounting plate dimensions:
50
100 O/A
4Ø
55
70
85
FIXING CENTRE
82~85 mm
100
01/21 Pamphlet No. 4129
Visit our website www.temperzone.biz
© Temperzone Ltd 2021
-
 1
1
-
 2
2
-
 3
3
-
 4
4


w innych językach
- English: temperzone CTC-1 User guide
Inne dokumenty
-
Tesla Air to Water Heat Pump-TGTP-14HMDA1 Instrukcja obsługi
-
Amica BK3235.4DFOM Instrukcja obsługi
-
Amica FK244.4 Instrukcja obsługi
-
-
-
-
-
-