Huawei Ascend G7 Instrukcja obsługi
- Kategoria
- Smartfony
- Typ
- Instrukcja obsługi

G7
User Guide
Downloaded from www.vandenborre.be

i
Contents
Foreword
First-class functions
2Safe
2 Taking a photo before focusing the camera
3 Launching the camera from gallery
3 QR code
4 Privacy protection
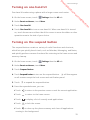
Getting started
6 Locking and unlocking the screen
7 Connecting to a Wi-Fi network
7 Turning on mobile data
7 Connecting your phone to a computer
8 Importing contacts from your old phone
9 Touchscreen gestures
10 Motion control
12 Status icons
14 Home
16 Notification
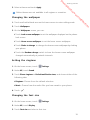
17 Accessing applications
18 Personalizing your phone
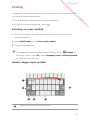
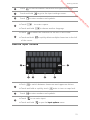
20 Texting
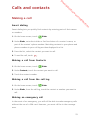
Calls and contacts
23 Making a call
25 Answering or rejecting a call
25 What you can do during a call
26 Answering a third-party call
26 Making a conference call
27 Using the call log
28 Turning on pocket mode
28 Call settings
29 Managing contacts
29 Searching for a contact
30 Importing or exporting contacts
32 Adding a contact to your favorites
32 Contact groups
Messaging and email
34 Sending a text message
Downloaded from www.vandenborre.be

Contents
ii
34 Replying to a message
34 Managing messages
36 Adding an email account
37 Sending an email
37 Checking your emails
38 Setting up an account
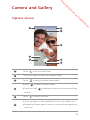
Camera and Gallery
39 Capture screen
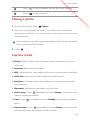
40 Taking a photo
40 Capture mode
42 Shooting a video
43 Video shooting mode
43 Camera settings
44 Gallery
Music and video
46 Adding songs
46 Listening to music
48 Creating a playlist
48 Playing a playlist
48 Deleting a playlist
48 Setting a song as the ringtone
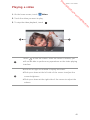
49 Playing a video
Network and sharing
50 Turning on mobile data
50 Wi-Fi network
51 Sharing your phone's mobile data connection
52 Transferring data through Bluetooth
53 Transferring data using Wi-Fi Direct
54 Transferring data between your phone and computer
55 Transferring data between your phone and a USB storage device
57 Multi-screen display
57 Huawei Beam
Applications
59 Managing applications
60 Backup
61 Phone Manager
62 Calendar
63 Clock
65 Weather
66 Note
66 FM radio
Downloaded from www.vandenborre.be

Contents
iii
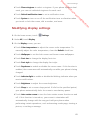
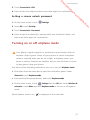
Phone settings
68 Turning on location services
68 Modifying tone settings
69 Modifying display settings
70 Turning on one-hand UI
70 Turning on the suspend button
71 Changing the lock screen style
72 Turning on or off airplane mode
73 Setting the PIN of your SIM card
73 Setting up an account
74 Restoring factory settings
75 Updating your phone
76 Setting the date and time
76 Changing the system language
76 Accessibility
Legal Notice
Downloaded from www.vandenborre.be

1
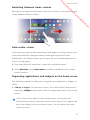
Foreword
This guide only applies to phones that are running EMUI 3.0. Please read this
guide carefully before you start using the phone.
All pictures and illustrations in this document are for your reference only. The
actual product may vary.
Symbols and definitions
Note
Highlights important information and tips, and
provides additional information.
Caution
Indicates potential problems that may arise, such
as device damage or data loss, if proper care or
attention is not given.
Warning
Indicates a potentially hazardous situation which,
if not avoided, could result in serious injury.
Downloaded from www.vandenborre.be

2
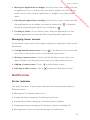
First-class functions
Safe
The Safe function helps you keep your important files and privacy protected.
Enabling the Safe
1.
On the home screen, touch
Files
.
2.
Under
Categories
or
Local
, touch .
3.
Touch
Enable
.
4.
Follow the onscreen instructions to enter passwords and answers to
security questions, and then touch
Done
.
Adding files to the Safe
1.
On the home screen, touch
Files
.
2.
Under
Categories
or
Local
, touch .
3.
Enter the password, and touch
Done
.
4.
Touch
Add
.
5.
Follow the onscreen instructions and select files you want to add to the
Safe.
6.
Touch
ADD
to add the selected files to the Safe.
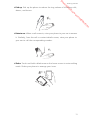
Taking a photo before focusing the camera
In all-focus mode, you can change the focus point of a photo after it's been
taken.
1.
On the home screen, touch
Camera
.
2.
Touch >
All-focus
to switch to all focus mode.
Downloaded from www.vandenborre.be

3
First-class functions
3.
Touch to take a photo.
4.
Go to Gallery, and select a photo that was taken in all-focus mode.
indicates photos taken in all-focus mode.
5.
Touch to enter all-focus editing mode.
6.
Touch an area of the photo to change the focus point to that location.
7.
Touch
Save as
.
Launching the camera from gallery
1.
On the home screen, touch
Gallery
.
2.
Flick down from the
Time
screen to display the viewfinder in half screen
mode and flick down again to open the camera.
Not all camera features are available in half screen mode.
3.
Touch to take a photo.
4.
Touch
Return
to return to Gallery.
QR code
You can scan QR codes using the camera and gallery.
Scanning a QR code using Gallery
1.
On the home screen, touch
Gallery
.
2.
Choose a QR code photo.
3.
Touch the photo. Gallery will automatically scan the QR code entry.
4.
Touch the QR code entry to view further details.
Scanning a QR code using Camera
1.
On the home screen, touch
Camera
.
Downloaded from www.vandenborre.be

First-class functions
4
2.
Frame the QR code with the camera. The camera will automatically scan
the QR code entry.
3.
Touch the QR code entry to view details.
Privacy protection
If you have private data in your phone that you wish to keep hidden from
others, you can enable privacy protection and set two different passwords,
one for yourself and one for guests.
Enabling privacy protection
1.
On the home screen, touch
Settings
.
2.
Under
All
, touch
Security
.
3.
Touch
Privacy protection
>
Let's start
.
4.
Select a password format.
5.
Follow the onscreen instructions to enter the owner password and visitor
password.
After privacy mode is enabled, entering your owner password allows access
to all content on your phone. Entering the visitor password allows access to
content that has not been protected.
Setting private information
1.
On the home screen, touch
Settings
.
2.
Under
All
, touch
Security
.
3.
Touch
Privacy protection
.
4.
Enter the owner password, and touch
Next
.
5.
Under
Set private data
, set your private contacts, albums, and applications.
Disabling privacy protection
1.
On the home screen, touch
Settings
.
Downloaded from www.vandenborre.be

5
First-class functions
2.
Under
All
, touch
Security
.
3.
Touch
Privacy protection
.
4.
Enter the owner password, and touch
Next
.
5.
Touch the
Privacy protection
switch to disable privacy protection.
After privacy protection is disabled, your owner password will function
as the screen unlock password and the visitor password will be invalid.
Downloaded from www.vandenborre.be

6
Getting started
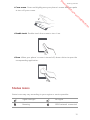
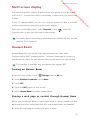
Locking and unlocking the screen
Locking the screen
•
Method 1: Press the power button to manually lock the screen.
•
Method 2: After being idle for a specified period of time, your phone
automatically locks its screen.
To set the screen lock method, touch
Settings
on the home screen.
On the displayed
General
tab, touch
Screen lock
>
Screen lock
.
Unlocking the screen
When the screen is off, press the power button to turn it on. Slide your finger
towards any direction to unlock the screen.
Downloaded from www.vandenborre.be

7
Getting started
Connecting to a Wi-Fi network
1.
Flick down from the status bar to open the notification panel.
2.
Under
Shortcuts
, touch and hold to display the Wi-Fi settings screen.
3.
Touch the Wi-Fi switch to turn on Wi-Fi. Your phone then scans for
available Wi-Fi networks and displays them.
4.
Touch the Wi-Fi network you want to connect to. If the Wi-Fi network is
encrypted, enter the password when prompted.
Turning on mobile data
1.
Flick down from the status bar to open the notification panel.
2.
Under
Shortcuts
, touch to turn on mobile data.
When you don't need to access the Internet, turn off mobile data to save
battery power and reduce data usage.
Connecting your phone to a computer
Use a USB cable to connect your phone to a computer, and follow the
onscreen instructions to select a connection mode to transfer photos, videos,
songs, and other files between your phone and computer.
Device file
manager (MTP)
Read, manage, and transfer files in your phone storage.
For details, see
MTP mode.
PC Suite (HiSuite)
HiSuite is a phone management software that works for
your computer. You can use it to back up and restore
phone data, install or remove applications, and
synchronize contacts, messages, photos, calendars, and
other files between your phone and computer. For
details, see
HiSuite mode.
Downloaded from www.vandenborre.be

Getting started
8
Importing contacts from your old phone
You can import contacts from your old phone in any of the following ways:
USB flash drive
If you have a microSD card installed, you can use your
phone as a USB storage device, read data from its
microSD card, and transfer data to and from a
computer. For details, see
USB flash drive mode.
SIM card
Copy your contacts on your SIM card to your new
phone. For details, see
Importing contacts from a SIM
card.
Storage device
If your old phone has been installed with a microSD
card, export contacts in your old phone as a .vcf file to
a microSD card, and then import the contacts to your
new phone. For details, see
Importing contacts from a
storage device.
Bluetooth
Turn on Bluetooth on both your old and new phones,
and import your contacts using Bluetooth. For details,
see
Importing contacts from a Bluetooth device.
Backup
If your old phone supports Backup, back up your
contacts, and restore them to your new phone. For
details, see Backup.
Computer
Synchronize your contacts from your old phone to a
computer, and use HiSuite to synchronize them to your
new phone. For details, see
HiSuite mode.
Other accounts
•
Install SNS applications and synchronize contacts from
your SNS accounts.
•
Log in to your Exchange account and synchronize your
contacts.
Downloaded from www.vandenborre.be

9
Getting started
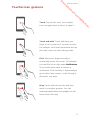
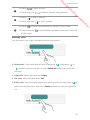
Touchscreen gestures
Touch
: Tap an item once. For example,
touch an application to select or open it.
Touch and hold
: Touch and leave your
finger on the screen for 2 seconds or more.
For example, touch and hold a blank area on
the home screen to enter editing mode.
Flick
: Move your finger vertically or
horizontally across the screen. For example,
you can flick left or right under
Notifications
of the notification panel to dismiss a
notification. Flick vertically or horizontally to
go to other home screens, scroll through a
document, and more.
Drag
: Touch and hold an item and then
move it to another position. You can
rearrange applications and widgets on the
home screen this way.
Downloaded from www.vandenborre.be

Getting started
10
Motion control
Motion control lets you control your phone using simple motions. For
example, mute the phone by turning over your phone or answer and make
calls quickly.
1.
On the home screen, touch
Settings
.
2.
Under
All
, touch
Motion control
.
3.
On the
Motions and gestures
screen, select an option, and select a motion
to enable it.
•
Flip
: Mute sounds and stop vibration from incoming calls, alarms, and
timers.
Spread apart and pinch together
: Spread
two fingers apart to zoom in, and pinch
them together to zoom out on a map, web
page, or picture.
Pinch three fingers together
: On the
home screen, pinch three fingers together to
display screen thumbnails.
Downloaded from www.vandenborre.be

11
Getting started
•
Pick up
: Pick up the phone to reduce the ring volume of incoming calls,
alarms, and timers.
•
Raise to ear
: When a call comes in, raise your phone to your ear to answer
it. Similarly, from the call or contact details screen, raise your phone to
your ear to call the corresponding number.
•
Shake
: Touch and hold a blank area on the home screen to enter editing
mode. Shake your phone to arrange your icons.
Downloaded from www.vandenborre.be

Getting started
12
•
Cover screen
: Cover and slightly press your phone's screen with your palm
to turn off your screen.
•
Double touch
: Double-touch the screen to turn it on.
•
Draw
: When your phone's screen is turned off, draw a letter to open the
corresponding application.
Status icons
Status icons may vary according to your region or service provider.
Signal strength No signal
Roaming GPRS network connected
Downloaded from www.vandenborre.be

13
Getting started
3G network connected
Enhanced Data Rates for
GSM Evolution (EDGE)
network connected
High Speed Packet Access
(HSPA) network
connected
Evolved High-Speed
Packet Access (HSPA+)
network connected
Long Term Evolution (LTE)
network connected
Airplane mode enabled
Bluetooth on
Receiving location data
from GPS
Vibration mode enabled Silence mode enabled
Alarms enabled Charging
Battery full Battery low
Call in progress Missed calls
New messages New emails
New voicemails Selecting an input method
Wi-Fi network available
Connected to a Wi-Fi
network
Uploading data Downloading data
Phone memory full Upcoming events
No SIM card found
Sign-in or synchronization
problem
Synchronizing data Synchronization failed
Portable Wi-Fi hotspot on More notifications
Connected to a VPN Headset plugged in
USB debugging mode
enabled
USB tethering on
Downloaded from www.vandenborre.be

Getting started
14
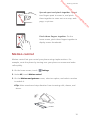
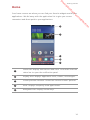
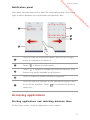
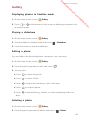
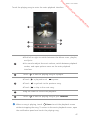
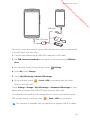
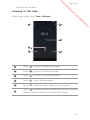
Home
Your home screens are where you can find your favorite widgets and all your
applications. We did away with the application list to give you a more
convenient and direct path to your applications.
Status bar: displays notifications and icons. Flick down from the
status bar to open the notification panel.
Display area: displays application icons, folders, and widgets.
Screen position indicator: shows the current screen's position.
Dock: displays frequently used applications.
Navigation bar: displays virtual keys.
1
2
3
4
5
1
2
3
4
5
Downloaded from www.vandenborre.be

15
Getting started
Switching between home screens
Running out of space on the home screen? Not to worry. Your phone lets you
create additional home screens.
Auto-rotate screen
If you rotate your phone when browsing a web page or viewing a photo, your
screen automatically changes between landscape and portrait views.
Additionally, this feature allows you to enjoy tilt sensor-based applications,
such as racing games.
1.
Flick down from the status bar to open the notification panel.
2.
Under
Shortcuts
, touch
Auto-rotate
to enable or disable the auto-rotate
screen function.
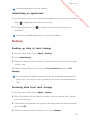
Organizing applications and widgets on the home screen
The following operations allow you to organize your application, widget, or
folder:
•
Adding a widget
: On the home screen, touch and hold a blank area to
display the
Widgets
option menu. Select a widget and drag it to the home
screen.
If the home screen doesn't have enough space, your phone will
automatically create a new home screen to the right of the original and
place the widget on the new home screen. You can have nine home
screens at most.
Downloaded from www.vandenborre.be

Getting started
16
•
Moving an application or widget
: On the home screen, touch and hold
an application icon or widget until your phone vibrates to enter editing
mode. You can then drag an application or widget to any fitting blank
space.
•
Deleting an application or widget
: On the home screen, touch and hold
the application icon or widget you want to delete until is displayed.
Drag the unwanted application icon or widget to .
•
Creating a folder
: On the home screen, drag one application on top
another application to create a folder containing both applications.
Managing home screens
On the home screen, pinch three fingers together to display the home screen
thumbnails.
•
Setting default home screen
: Touch at the bottom of the screen and
select the current home screen as the default home screen.
•
Moving a home screen
: Touch and hold the home screen until your
phone vibrates, and drag the home screens to adjust their positions.
•
Adding a home screen
: Touch to add a home screen.
•
Deleting a home screen
: Touch to delete a blank home screen.
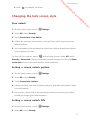
Notification
Status indicator
The status indicator on your phone indicates the following information in
different status:
•
Blinking red: The battery level is low.
•
Steady red (when charging): The battery level is low.
•
Steady yellow (when charging): The battery level is medium.
•
Steady green (when charging): The battery is almost or already full.
•
Blinking green: There are unread messages or notifications.
Downloaded from www.vandenborre.be
Strona jest ładowana ...
Strona jest ładowana ...
Strona jest ładowana ...
Strona jest ładowana ...
Strona jest ładowana ...
Strona jest ładowana ...
Strona jest ładowana ...
Strona jest ładowana ...
Strona jest ładowana ...
Strona jest ładowana ...
Strona jest ładowana ...
Strona jest ładowana ...
Strona jest ładowana ...
Strona jest ładowana ...
Strona jest ładowana ...
Strona jest ładowana ...
Strona jest ładowana ...
Strona jest ładowana ...
Strona jest ładowana ...
Strona jest ładowana ...
Strona jest ładowana ...
Strona jest ładowana ...
Strona jest ładowana ...
Strona jest ładowana ...
Strona jest ładowana ...
Strona jest ładowana ...
Strona jest ładowana ...
Strona jest ładowana ...
Strona jest ładowana ...
Strona jest ładowana ...
Strona jest ładowana ...
Strona jest ładowana ...
Strona jest ładowana ...
Strona jest ładowana ...
Strona jest ładowana ...
Strona jest ładowana ...
Strona jest ładowana ...
Strona jest ładowana ...
Strona jest ładowana ...
Strona jest ładowana ...
Strona jest ładowana ...
Strona jest ładowana ...
Strona jest ładowana ...
Strona jest ładowana ...
Strona jest ładowana ...
Strona jest ładowana ...
Strona jest ładowana ...
Strona jest ładowana ...
Strona jest ładowana ...
Strona jest ładowana ...
Strona jest ładowana ...
Strona jest ładowana ...
Strona jest ładowana ...
Strona jest ładowana ...
Strona jest ładowana ...
Strona jest ładowana ...
Strona jest ładowana ...
Strona jest ładowana ...
Strona jest ładowana ...
Strona jest ładowana ...
Strona jest ładowana ...
Strona jest ładowana ...
Strona jest ładowana ...
Strona jest ładowana ...
-
 1
1
-
 2
2
-
 3
3
-
 4
4
-
 5
5
-
 6
6
-
 7
7
-
 8
8
-
 9
9
-
 10
10
-
 11
11
-
 12
12
-
 13
13
-
 14
14
-
 15
15
-
 16
16
-
 17
17
-
 18
18
-
 19
19
-
 20
20
-
 21
21
-
 22
22
-
 23
23
-
 24
24
-
 25
25
-
 26
26
-
 27
27
-
 28
28
-
 29
29
-
 30
30
-
 31
31
-
 32
32
-
 33
33
-
 34
34
-
 35
35
-
 36
36
-
 37
37
-
 38
38
-
 39
39
-
 40
40
-
 41
41
-
 42
42
-
 43
43
-
 44
44
-
 45
45
-
 46
46
-
 47
47
-
 48
48
-
 49
49
-
 50
50
-
 51
51
-
 52
52
-
 53
53
-
 54
54
-
 55
55
-
 56
56
-
 57
57
-
 58
58
-
 59
59
-
 60
60
-
 61
61
-
 62
62
-
 63
63
-
 64
64
-
 65
65
-
 66
66
-
 67
67
-
 68
68
-
 69
69
-
 70
70
-
 71
71
-
 72
72
-
 73
73
-
 74
74
-
 75
75
-
 76
76
-
 77
77
-
 78
78
-
 79
79
-
 80
80
-
 81
81
-
 82
82
-
 83
83
-
 84
84


Huawei Ascend G7 Instrukcja obsługi
- Kategoria
- Smartfony
- Typ
- Instrukcja obsługi
w innych językach
- English: Huawei Ascend G7 User manual
Powiązane dokumenty
Inne dokumenty
-
Beko GM 15120 DX PR (INOX) Instrukcja obsługi
-
-
Moulinex M028ESMO28ESMIR Instrukcja obsługi
-
AEE Magicam S50+ Instrukcja obsługi
-
LG LGE610.AOREBK Instrukcja obsługi
-
LG LGD855.A6REWH Instrukcja obsługi
-
LG D331 Instrukcja obsługi
-
LG G3-D855 Instrukcja obsługi
-
LG LGV490.ATHABK Instrukcja obsługi
-
LG LGV400.ATURWH Instrukcja obsługi