IKEA VILSTA Induction Hob Instrukcja obsługi
- Kategoria
- Płyty
- Typ
- Instrukcja obsługi

VILSTA en
de
fr
nl
da
is
no
sv
cs
es
it
hu
pl

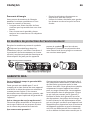
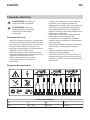
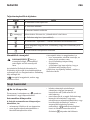
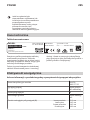
ENGLISH
Please refer to the last page of this manual for the full list of
IKEA appointed After Sales Service Provider and relative
national phone numbers.
DEUTSCH
Auf der letzten Seite dieser Broschüre nden Sie eine
vollständige Liste der oziellen IKEA After-Sales-Dienstleister
mit den jeweiligen nationalen Telefonnummern.
FRANÇAIS
Vous trouverez la liste complète des centres de service
après-vente choisis par IKEA et leurs numéros de téléphone
respectifs à la n de cette notice.
NEDERLANDS
Op de laatste pagina van deze handleiding vindt u de
volledige lijst van door IKEA erkende servicebedrijven voor
aftersales met de bijbehorende nationale telefoonnummers.
DANSK
Se sidste side i denne håndbog for at få en fuldstændig liste
over IKEAs udpegede eftersalgsserviceudbydere og de
tilhørende nationale telefonnumre.

ÍSLENSKA
Á öftustu síðu þessarar handbók er skrá yr alla veitendur
eftirsöluþjónustu sem útnefndir hafa verið af IKEA og
viðeigandi símanúmer í hverju landi.
NORSK
Se den siste siden i denne håndboken for en fullstendig liste
over IKEAs serviceleverandører og relevante telefonnumre i
de forskjellige landene.
SUOMI
Tämän oppaan viimeisellä sivulla on täydellinen luettelo
IKEA:n nimeämistä huoltopalveluista sekä heidän
puhelinnumeronsa.
SVENSKA
Var god se den sista sidan i denna handbok för en komplett
lista över IKEA:s auktoriserade serviceleverantör och
nationella telefonnummer.
ČESKY
Na poslední straně tohoto návodu je uveden úplný seznam
určených servisních zástupců pro značku IKEA a příslušná
vnitrostátní telefonní čísla.

ESPAÑOL
Consulte la última página de este manual, donde encontrará
una lista completa de los proveedores de servicio técnico
posventa autorizados por IKEA y los números de teléfono
correspondientes.
ITALIANO
Consultare l'elenco completo dei Centri di Assistenza
nominati da IKEA e dei relativi numeri di telefono nell'ultima
pagina del presente manuale.
MAGYAR
Az IKEA által kijelölt vevőszolgálatok teljes listáját és a
kapcsolódó nemzeti telefonszámokat jelen útmutató utolsó
oldalán olvashatja.
POLSKI
Pełny wykaz punktów serwisowych współpracujących z rmą
IKEA wraz z numerami telefonów w poszczególnych krajach
znajduje się na ostatniej stronie niniejszej instrukcji.


Contents
Safety information 6
Safety instructions 8
Installation 10
Electrical connection 11
Product description 13
Daily use 14
Cooking table 16
Cookware guidance 17
Care and cleaning 19
Troubleshooting 19
Technical data 21
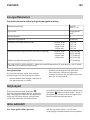
Energy eciency 22
Environmental concerns 22
IKEA guarantee 22
Subject to change without notice.
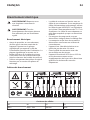
Safety information
Before the installation and use of the appliance, carefully read
the supplied instructions. The manufacturer is not responsible
if an incorrect installation and use causes injuries and
damage. Always keep the instructions with the appliance for
future reference.
Children and vulnerable people safety
•This appliance can be used by children aged from 8 years
and above and persons with reduced physical, sensory or
mental capabilities or lack of experience and knowledge if
they have been given supervision or instruction concerning
the use of the appliance in a safe way and understand the
hazards involved. Children of less than 8 years of age and
persons with very extensive and complex disabilities shall be
kept away from the appliance unless continuously
supervised.
•Children should be supervised to ensure that they do not
play with the appliance.
•Keep all packaging away from children and dispose of it
appropriately.
ENGLISH 6

•WARNING: The appliance and its accessible parts become
hot during use. Keep children and pets away from the
appliance when in use and when cooling down.
•If the appliance has a child safety device, it should be
activated.
•Children shall not carry out cleaning and user maintenance
of the appliance without supervision.
General Safety
•This appliance is for cooking purposes only.
•This appliance is designed for single household domestic
use in an indoor environment.
•This appliance may be used in, oces, hotel guest rooms,
bed & breakfast guest rooms, farm guest houses and other
similar accommodation where such use does not exceed
(average) domestic usage levels.
•WARNING: The appliance and its accessible parts become
hot during use. Care should be taken to avoid touching
heating elements.
•Do not operate the appliance by means of an external timer
or separate remote-control system.
•WARNING: Unattended cooking on a hob with fat or oil can
be dangerous and may result in re.
•Never use water to extinguish the cooking re. Switch o
the appliance and cover ames with e.g. a re blanket or lid.
•CAUTION: The cooking process has to be supervised. A short
term cooking process has to be supervised continuously.
•WARNING: Danger of re: Do not store items on the cooking
surfaces.
•Metallic objects such as knives, forks, spoons and lids should
not be placed on the hob surface since they can get hot.
•Do not use the appliance before installing it in the built-in
structure.
ENGLISH 7

•Disconnect the appliance from the electrical supply before
maintenance.
•Do not use a steam cleaner to clean the appliance.
•After use, switch o the hob element by its control and do
not rely on the pan detector.
•If the glass ceramic surface / glass surface is cracked, switch
o the appliance and unplug it from the mains. In case the
appliance is connected to the mains directly using junction
box, remove the fuse to disconnect the appliance from
power supply. In either case contact the Authorised Service
Centre.
•If the supply cord is damaged, it must be replaced by the
manufacturer, the Authorised Service Centre or similarly
qualied persons in order to avoid a hazard.
•WARNING: Use only hob guards designed by the
manufacturer of the cooking appliance or indicated by the
manufacturer of the appliance in the instructions for use as
suitable or hob guards incorporated in the appliance. The
use of inappropriate guards can cause accidents.
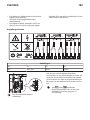
Safety instructions
Installation
Warning! The appliance must be
installed by the authorised
installer.
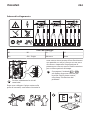
Follow the Assembly instructions
supplied with the appliance.
• Remove all the packaging.
• Do not install or use a damaged
appliance.
• Keep the minimum distance from other
appliances and units.
• Always take care when moving the
appliance as it is heavy. Always use safety
gloves and enclosed footwear.
• Seal the cut surfaces with a sealant to
prevent moisture from causing swelling.
• Protect the bottom of the appliance from
steam and moisture.
• Do not install the appliance next to a door
or under a window. This prevents hot
cookware from falling from the appliance
when the door or the window is opened.
• Make sure that the space underneath the
hob is sucient for air circulation.
• The bottom of the appliance can get hot.
If the appliance is installed above the
drawers, make sure to install a non-
combustible separation panel under the
appliances to prevent access to the
bottom.
ENGLISH 8

Electrical Connection
Warning! Risk of re and electric
shock.
• All electrical connections should be made
by the authorised installer.
• The appliance must be earthed if the
symbol ( ) is not printed on the rating
plate.
• Before carrying out any operation make
sure that the appliance is disconnected
from the power supply.
• Make sure that the parameters on the
rating plate are compatible with the
electrical ratings of the mains power
supply.
• Make sure the appliance is installed
correctly. Loose and incorrect electricity
mains cable or plug (if applicable) can
make the terminal become too hot.
• Use the correct electricity mains cable.
• Do not let the electricity mains cable
tangle.
• Make sure that a shock protection is
installed.
• Use the strain relief clamp on the cable.
• Make sure the mains cable or plug (if
applicable) does not touch the hot
appliance or hot cookware, when you
connect the appliance to the near
sockets.
• Do not use multi-plug adapters and
extension cables.
• Make sure not to cause damage to the
mains plug (if applicable) or to the mains
cable. Contact our Authorised Service
Centre or an electrician to change a
damaged mains cable.
• The shock protection of live and insulated
parts must be fastened in such a way that
it cannot be removed without tools.
• Connect the mains plug to the mains
socket only at the end of the installation.
Make sure that there is access to the
mains plug after the installation.
• If the mains socket is loose, do not
connect the mains plug.
• Do not pull the mains cable to disconnect
the appliance. Always pull the mains plug.
• Use only correct isolation devices: line
protecting cut-outs, fuses (screw type
fuses removed from the holder), earth
leakage trips and contactors.
• The electrical installation must have an
isolation device which lets you disconnect
the appliance from the mains at all poles.
The isolation device must have a contact
opening width of minimum 3 mm.
Use
Warning! Risk of injury, burns
and electric shock.
• Do not change the specication of this
appliance.
• Remove all the packaging, labelling and
protective lm (if applicable) before rst
use.
• Make sure that the ventilation openings
are not blocked.
• Do not let the appliance stay unattended
during operation.
• Set the cooking zone to “o” after each
use.
• Do not put cutlery or saucepan lids on the
cooking zones. They can become hot.
• Do not operate the appliance with wet
hands or when it has contact with water.
• Do not use the appliance as a work
surface or as a storage surface.
• If the surface of the appliance is cracked,
disconnect immediately the appliance
from the power supply. This to prevent an
electrical shock.
• Users with a pacemaker must keep a
distance of minimum 30 cm from the
induction cooking zones when the
appliance is in operation.
• When you place food into hot oil, it may
splash.
Warning! Risk of re and
explosion
• Fats and oil when heated can release
ammable vapours. Keep ames or
heated objects away from fats and oils
when you cook with them.
• The vapours that very hot oil releases can
cause spontaneous combustion.
ENGLISH 9

• Used oil, that can contain food remnants,
can cause re at a lower temperature
than oil used for the rst time.
• Do not put ammable products or items
that are wet with ammable products in,
near or on the appliance.
Warning! Risk of damage to the
appliance.
• Do not keep hot cookware on the control
panel.
• Do not put a hot pan cover on the glass
surface of the hob.
• Do not let cookware boil dry.
• Be careful not to let objects or cookware
fall on the appliance. The surface can be
damaged.
• Do not activate the cooking zones with
empty cookware or without cookware.
• Do not put aluminium foil on the
appliance.
• Cookware made of cast iron or with a
damaged bottom can cause scratches on
the glass / glass ceramic. Always lift these
objects up when you have to move them
on the cooking surface.
Care and cleaning
• Clean the appliance regularly to prevent
the deterioration of the surface material.
• Switch o the appliance and let it cool
down before cleaning.
• Do not use water spray and steam to
clean the appliance.
• Clean the appliance with a moist soft
cloth. Use only neutral detergents. Do not
use abrasive products, abrasive cleaning
pads, solvents or metal objects.
Service
• To repair the appliance contact the
Authorised Service Centre. Use original
spare parts only.
• Concerning the lamp(s) inside this
product and spare part lamps sold
separately: These lamps are intended to
withstand extreme physical conditions in
household appliances, such as
temperature, vibration, humidity, or are
intended to signal information about the
operational status of the appliance. They
are not intended to be used in other
applications and are not suitable for
household room illumination.
Disposal
Warning! Risk of injury or
suocation.
• Contact your local authority for
information on how to dispose of the
appliance.
• Disconnect the appliance from the mains
supply.
• Cut o the mains electrical cable close to
the appliance and dispose of it.
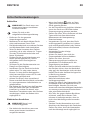
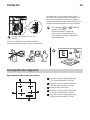
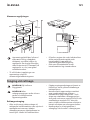
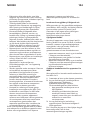
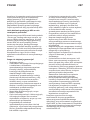
Installation
Warning! Refer to Safety
chapters.
ENGLISH 10

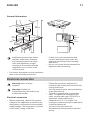
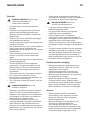
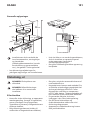
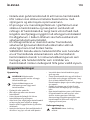
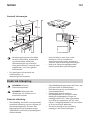
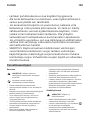
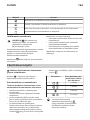
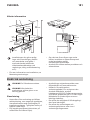
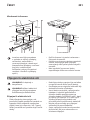
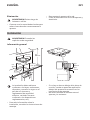
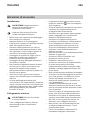
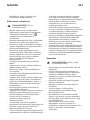
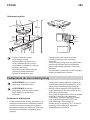
General information
min.
28 mm
max.
R 5 mm
490±1
mm
560±1
mm
520 mm
590 mm
min.
55 mm
min.
500 mm
min.
28 mm
min. 50 mm
min.
5 mm
Installation process must follow
the laws, ordinances, directives
and standards (electrical safety
rules and regulations, proper
recycling in accordance with the
regulations, etc.) in force in the
country of use!
• For further information on the installation
refer to the Assembly Instruction.
• If there is no oven beneath the hob,
install a separation panel under the
appliance according to the Assembly
Instruction.
• Do not use silicon sealant between the
appliance and the worktop.
Electrical connection
Warning! Refer to Safety
chapters.
Warning! All electrical
connections must be made by an
authorised installer.
Electrical connection
• Before connecting, check if the nominal
voltage of the appliance, provided on the
rating plate, corresponds to the available
supply voltage. The rating plate is located
on the lower casing of the hob.
• Follow the connection diagram (it is
located on the underneath surface of the
casing of the hob).
• Use only original spare parts provided by
spare parts service.
• The hob is supplied with a connection
cable. To replace the damaged mains
cable, use the cable type: H05V2V2-F or
equivalent, which withstands a
temperature of 70 °C or higher. The
connection cable may only be replaced by
a qualied electrician.
• You must have the means for
disconnection incorporated in the xed
wiring.
ENGLISH 11

• You must have the connection and the
connecting links carried out as shown in
the connection diagram.
• The appliance is double insulated and
does not require an earth connection.
• Secure the connecting cable with cable
clips or clamps.
• The appliance works either at 50 Hz or 60
Hz and does not require any additional
action from a qualied electrician in order
to switch between frequencies.
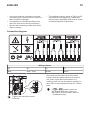
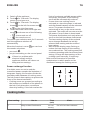
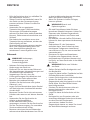
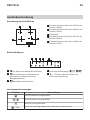
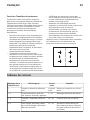
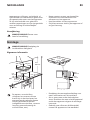
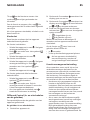
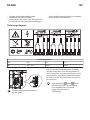
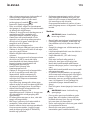
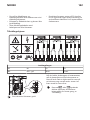
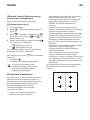
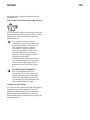
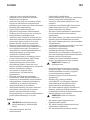
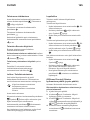
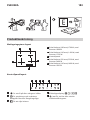
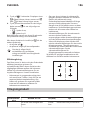
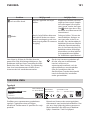
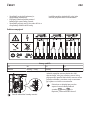
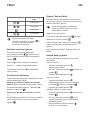
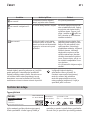
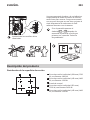
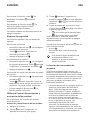
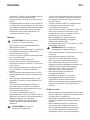
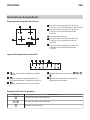
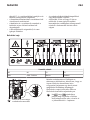
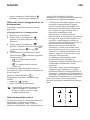
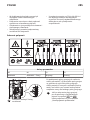
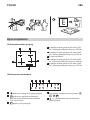
Connection diagram
Wiring colours
N2 N1 L2 L1
Blue Blue - Gray Brown Black
L2
N2
N1
L1
L2
N2
N1
L1
Tighten the terminal screws
securely!
Once you connect the hob to the mains,
check if all the cooking zones are ready to
use. Place a pot with some water on a
cooking zone and set the power setting for
each zone to the maximum level for a short
time.
If or symbol comes on
the display after you switch on
the hob for the rst time, refer to
"Troubleshooting".
ENGLISH 12

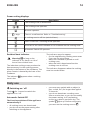
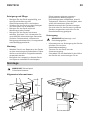
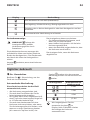
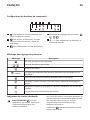
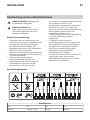
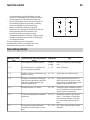
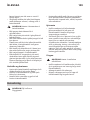
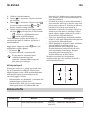
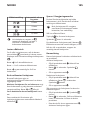
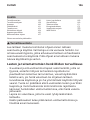
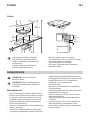
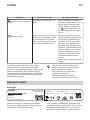
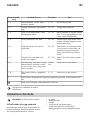
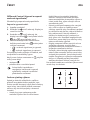
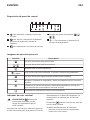
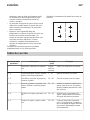
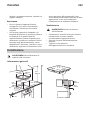
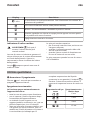
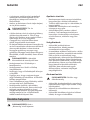
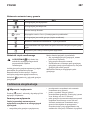
Product description
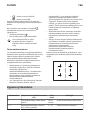
Cooking surface layout
3
5 1
2
4
1Single cooking zone (180 mm) 1700 W,
with Booster 1800 W
2Single cooking zone (145 mm) 1400 W,
with Booster 1500 W
3Control panel
4Single cooking zone (210 mm) 2200 W,
with Booster 2400 W
5Single cooking zone (145 mm) 1400 W,
with Booster 1500 W
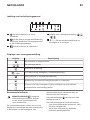
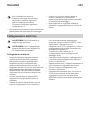
Control panel layout
1 32 4 5
1 To switch the hob on or o.
2 To activate and deactivate Lock / Child
Lock / Cleaning mode.
3 To select the cooking zone.
4Power setting display: , - , .
5 / To increase or decrease the heat
settings.
ENGLISH 13

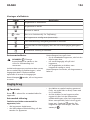
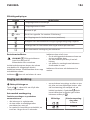
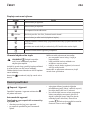
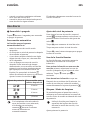
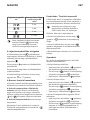
Power setting displays
Display Description
The cooking zone is deactivated.
- The cooking zone operates.
Booster operates.
+ digit There is a malfunction. Refer to "Troubleshooting".
A cooking zone is still hot (residual heat).
Lock / Child Lock / Cleaning mode operates.
Incorrect or too small cookware or no cookware on the cooking zone.
Automatic Switch O operates.
Residual heat indicator
Warning! As long as the
indicator is on, there is a risk of
burns from residual heat.
The induction cooking zones produce the
heat necessary for the cooking process
directly in the bottom of the cookware. The
glass ceramic is heated by the heat of the
cookware.
The indicator appears when a cooking
zone is hot.
The indicator may also appear:
• for the neighbouring cooking zones even
if you are not using them,
• when hot cookware is placed on cold
cooking zone,
• when the hob is deactivated but the
cooking zone is still hot.
The indicator disappears when the cooking
zone has cooled down.
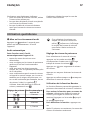
Daily use
Switching on / o
Touch for 1 second to switch the
appliance on / o.
Automatic Switch O
The function switches o the appliance
automatically if:
• all cooking zones are deactivated.
• you do not set the power setting after
switching on the appliance.
• you cover any symbol with an object (a
pan, a cloth, etc.) for longer than approx.
10 seconds.
• you do not deactivate a cooking zone
after a certain time, or you do not modify
the power setting, or if overheating
occurs (e.g. when a pan boils dry). The
symbol lights up. Before using again,
you must set the cooking zone to .
ENGLISH 14

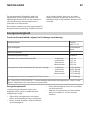
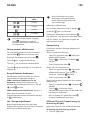
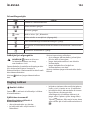
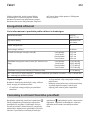
Power setting Automatic switch o
after
- 6 hours
- 5 hours
4 hours
- 1.5 hours
If cookware that is not suitable is
used, lights up on the display
and after 2 minutes the indicator
for the cooking zone deactivates.
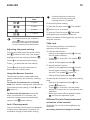
Adjusting the power setting
To set the cooking zone touch the sensor
eld related to this zone. The display
highlights the heat setting indication ( ).
Touch to increase the heat setting.
Touch to decrease the heat setting.
Touch and at the same time to
deactivate the cooking zone.
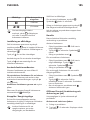
Using the Booster function
The Booster function makes additional
power available for the induction cooking
zones.
To activate the function for a cooking
zone: rst set the cooking zone and than set
the maximum heat setting. Touch until
comes on.
To deactivate the function: touch .
After a maximum of 10 minutes, the
induction cooking zones automatically
return to the power setting.
Lock / Cleaning mode
You can lock the control panel and keep the
cooking zones operating. It prevents an
accidental change of the power setting.
Use the function to clean the
surface of the hob during the
cooking session, if needed.
First set the power setting.
To start the function touch . The symbol
comes on for 4 seconds.
To stop the function touch . The power
setting that you set before comes on.
When you switch o the appliance, you also
stop this function.
Child Lock
This function prevents an accidental
operation of the appliance.
To activate the function:
• Switch on the appliance with . Do not
set the power settings.
• Touch for 4 seconds. The symbol
comes on.
• Switch o the appliance with .
To deactivate the function:
• Switch on the appliance with . Do not
set the power settings. Touch for 4
seconds. The symbol comes on.
• Switch o the appliance with .
To override the function for only one cooking
time:
• Switch on the appliance with . The
symbol comes on.
• Touch for 4 seconds. Set the power
setting in 10 seconds. You can operate the
appliance.
• When you switch o the appliance with
, the function operates again.
OSound Control (Deactivation and
activation of the sounds)
Originally the sounds of the appliance are
activated.
Activating and deactivating the sounds:
ENGLISH 15

1. Switch o the appliance.
2. Touch for 3 seconds. The display
comes on and goes out.
3. Touch for 3 seconds. The display
shows on the left front zone and
or on the right front zone.
4. Touch the sensor eld of the right rear
zone to choose one of the following:
• - the sounds are o,
• - the sounds are on.
To conrm your selection wait for 10 seconds
until the appliance switches o
automatically.
When the function is set to you can hear
the sounds only when:
• you touch .
• you put something on the control panel.
If there is a problem with
electrical supply and the
appliance switches o it does not
keep previous settings.
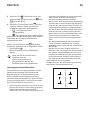
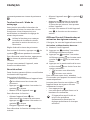
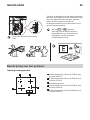
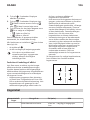
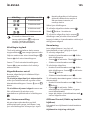
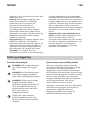
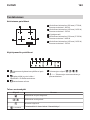
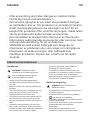
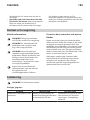
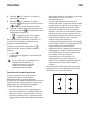
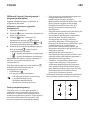
Power exchange function
If multiple zones are active and the
consumed power exceeds the limitation of
the power supply, this function divides the
available power between all cooking zones.
The hob controls heat settings to protect the
fuses of the house installation.
• Cooking zones are grouped according to
the location and number of the phases in
the hob. Each phase has a maximum
electricity loading. If the hob reaches the
limit of maximum available power within
one phase, the power of the cooking
zones will be automatically reduced.
• If more than one cooking zone is
activated at a time the power is reduced
and distributed between all the activated
zones. The power distribution is
maintained as long as the zones remain
activated. The zones will not return to the
full power if one of them is deactivated.
The power distribution ends only when all
zones or the hob have been deactivated.
• The heat setting display of the reduced
zones changes between the initially
selected heat setting and the reduced
heat setting.
• Wait until the display stops ashing or
reduce the heat setting of the cooking
zone selected last. The cooking zones will
continue operating with the reduced heat
setting. Change the heat settings of the
cooking zones manually, if necessary.
Refer to the illustration for possible
combinations in which power can be
distributed among the cooking zones.
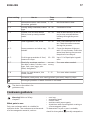
Cooking table
Heat setting Use to: Time
(min)
Hints
1 Keep cooked food warm. as nec‐
essary
Put a lid on the cookware.
ENGLISH 16

Heat setting Use to: Time
(min)
Hints
1 - 2 Hollandaise sauce, melt: butter,
chocolate, gelatine.
5 - 25 Mix from time to time.
1 - 2 Solidify: uy omelettes, baked
eggs.
10 - 40 Cook with a lid on.
2 - 3 Simmer rice and milk-based
dishes, heat up ready-cooked
meals.
25 - 50 Add at least twice as much liq‐
uid as rice, mix milk dishes
halfway through the proce‐
dure.
3 - 4 Stew vegetables, sh, meat. 20 - 45 Add a few tablespoons of wa‐
ter. Check the water amount
during the process.
4 - 5 Steam potatoes and other veg‐
etables.
20 - 60 Cover the bottom of the pot
with 1-2 cm of water. Check the
water level during the process.
Keep the lid on the pot.
4 - 5 Cook larger quantities of food,
stews and soups.
60 - 150 Up to 3 l of liquid plus ingredi‐
ents.
6 - 7 Gentle fry: escalope, veal cor‐
don bleu, cutlets, rissoles, saus‐
ages, liver, roux, eggs, pan‐
cakes, doughnuts.
as nec‐
essary
Turn over when needed.
7 - 8 Heavy fry, hash browns, loin
steaks, steaks.
5 - 15 Turn over when needed.
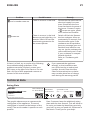
9 Boil water, cook pasta, sear meat (goulash, pot roast), deep-fry chips.
Boil large quantities of water. Booster is activated.
The data in the table is for
guidance only.
Cookware guidance
Warning! Refer to Safety
chapters.
What pots to use
Only use cookware which is suitable for
induction hobs. The cookware must be made
of a ferromagnetic material, such as:
• cast iron;
• enamelled steel;
• carbon steel;
• stainless steel (most types);
• aluminium with ferromagnetic coating or
a ferromagnetic plate.
To determine if a pot or pan is suitable,
check for the symbol (usually stamped on
ENGLISH 17

the bottom of the cookware). You can also
hold a magnet to the bottom. If it clings to
the underside, the cookware will work on the
induction hob.
To ensure optimum eciency, always use
pots and pans with a at bottom that
distributes the heat evenly. If the bottom is
uneven, this will aect power and heat
conduction.
How to use
Minimum diameter of pot / pan base for
the dierent cooking areas
To ensure that the hob operates properly,
the cookware must have a suitable minimum
diameter as well as cover one or more of the
reference points indicated on the surface of
the hob.
Always use the cooking zone that best
corresponds to the diameter of the bottom
of the cookware.
Cooking zone Cookware diame‐
ter [mm]
Left rear 125 - 145
Left front 125 - 210
Right rear 150 - 180
Right front 125 - 145
Empty or thin-based pots / pans
Do not use empty pots / pans or cookware
with thin bases on the hob as it will not be
able to monitor the temperature, or will turn
o automatically if the temperature is too
high. This may result in the damage of the
cookware or the hob surface. If such a
situation occurs, do not touch anything and
wait for all components to cool down.
If an error message appears, refer to
"Troubleshooting".
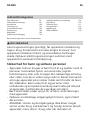
Hints / tips
Noises during cooking
When a cooking zone is active it may hum
briey. This is characteristic of all induction
cooking zones and does not impair either
the function or the life of the appliance. The
noise depends on the cookware used. If it
causes considerable disturbance, it might
help to change the cookware.
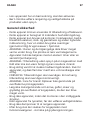
Normal operating noises of the induction
hob
lnduction technology is based on the
creation of electromagnetic elds to
generate heat directly on the bottom of
cookware. Pots and pans may cause a
variety of noises or vibrations depending on
how they are manufactured. These noises
are described as follows:
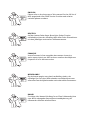
•Low humming (like a transformer): this
noise is produced when cooking at a high
heat level. lt is based on the amount of
energy transferred from the cooktop to
the cookware. The noise ceases or quiets
down when the heat level is reduced.
•Quiet whistling: this noise is produced
when the cooking vessel is empty. lt
ceases once liquids or food are placed in
the vessel.
•Crackling: this noise occurs with
cookware comprised of various materials
layered one upon the other. lt is caused
by the vibrations of the surfaces where
dierent materials meet. The noise occurs
on the cookware and can vary depending
on the amount of food or liquid and the
cooking method (e.g., boiling, simmering,
frying).
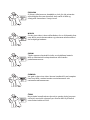
•Loud whistling: this noise occurs with
cookware comprised of dierent
materials layered one upon the other, and
when they are additionally used at
maximum output and also on two
cooking zones. The noise ceases or quiets
down when the heat level is reduced.
•Fan noises: for proper operation of the
electronic system, it is necessary to
regulate the temperature of the cooktop.
For this purpose, the cooktop is equipped
with a cooling fan, which is activated to
reduce and regulate the temperature of
the electronic system. The fan may also
ENGLISH 18

continue to run after the appliance is
turned o if the detected temperature of
the cooktop is still too hot after turning it
o.
•Rhythmic sounds, similar to the ticking
sound of a clock: this noise occurs only
when at least three cooking zones are
operating and disappears or weakens
when some of them are switched o. The
noises described are a normal element of
the described induction technology and
should not be regarded as defects.
Care and cleaning
General information
Warning! Switch o the appliance
and let it cool down before you
clean it.
Warning! For safety reasons, do
not clean the appliance with
steam blasters or high-pressure
cleaners.
Warning! Sharp objects and
abrasive cleaning agents will
damage the appliance. Clean the
appliance and remove the
residues with water and dish soap
after each use. Remove also the
remnants of the cleaning agents.
Scratches or dark stains on the
glass ceramic that cannot be
removed do not aect the
functioning of the appliance.
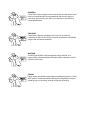
Removing the residues and stubborn
residues
Food containing sugar, plastics, or tin foil
residues should be removed at once. A
scraper is the best tool for cleaning the glass
surface. It is not supplied with the appliance.
Place a scraper on the hob surface at an
angle and remove residues by sliding the
blade over the surface. Clean the appliance
using a damp cloth and some dish soap.
Finally, wipe the glass surface dry with a
clean cloth.
Limescale rings, water rings, fat splashes, or
shiny metallic discolourations should be
removed after the appliance has cooled
down. Use only a specialised cleaner for
glass ceramic or stainless steel.
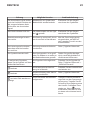
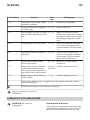
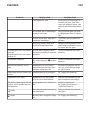
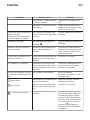
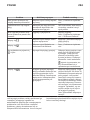
Troubleshooting
Warning! Refer to Safety
chapters.
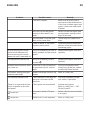
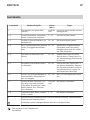
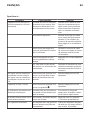
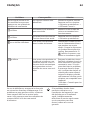
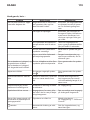
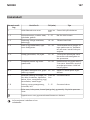
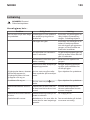
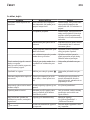
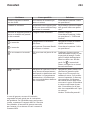
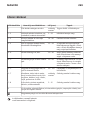
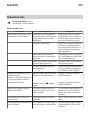
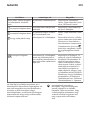
What to do if...
Problem Possible cause Remedy
You cannot switch on the ap‐
pliance or operate it.
The hob is not connected to
an electrical supply or it is
connected incorrectly.
Check if the hob is correctly
connected to the electrical
supply. Refer to the connec‐
tion diagram.
ENGLISH 19

Problem Possible cause Remedy
The fuse is blown. Make sure that the fuse is
the cause of the malfunction.
If the fuse is blown again and
again, contact an authorised
installer.
You did not set the power
setting in less than 10 sec‐
onds.
Switch on the hob again and
set the power setting in less
than 10 seconds.
You touched 2 or more sym‐
bols at the same time.
Touch only one symbol at a
time.
There is water or fat stains
on the control panel.
Clean the control panel and
wait for a few seconds before
activating again.
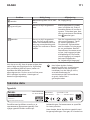
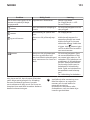
An acoustic signal sounds
and the hob switches o.
An acoustic signal sounds
when the hob is switched o.
You put something on one or
more symbols on the control
panel.
Remove the object from the
symbols.
The appliance switches o. You put something on the
symbol .
Remove the object from the
symbols.
Residual heat indicator does
not come on.
The zone is not hot because
it operated only for a short
time.
If the zone operated su‐
ciently long to be hot, speak
to the After Sales Service.
The power setting changes
between two levels.
Power exchange function op‐
erates.
Refer to "Daily use".
The symbols become hot. The cookware is too large or
you put it too near to the
controls.
Put large cookware on the
rear zones, if possible.
There is no signal when you
touch a symbol on the con‐
trol panel.
The signals are deactivated. Activate the signals.
Refer to "Daily use" > "O‐
Sound Control".
comes on. Automatic Switch O oper‐
ates.
Switch o the hob and switch
it on again.
comes on. Child Lock or Lock operates. Refer to "Daily use".
ENGLISH 20
Strona się ładuje...
Strona się ładuje...
Strona się ładuje...
Strona się ładuje...
Strona się ładuje...
Strona się ładuje...
Strona się ładuje...
Strona się ładuje...
Strona się ładuje...
Strona się ładuje...
Strona się ładuje...
Strona się ładuje...
Strona się ładuje...
Strona się ładuje...
Strona się ładuje...
Strona się ładuje...
Strona się ładuje...
Strona się ładuje...
Strona się ładuje...
Strona się ładuje...
Strona się ładuje...
Strona się ładuje...
Strona się ładuje...
Strona się ładuje...
Strona się ładuje...
Strona się ładuje...
Strona się ładuje...
Strona się ładuje...
Strona się ładuje...
Strona się ładuje...
Strona się ładuje...
Strona się ładuje...
Strona się ładuje...
Strona się ładuje...
Strona się ładuje...
Strona się ładuje...
Strona się ładuje...
Strona się ładuje...
Strona się ładuje...
Strona się ładuje...
Strona się ładuje...
Strona się ładuje...
Strona się ładuje...
Strona się ładuje...
Strona się ładuje...
Strona się ładuje...
Strona się ładuje...
Strona się ładuje...
Strona się ładuje...
Strona się ładuje...
Strona się ładuje...
Strona się ładuje...
Strona się ładuje...
Strona się ładuje...
Strona się ładuje...
Strona się ładuje...
Strona się ładuje...
Strona się ładuje...
Strona się ładuje...
Strona się ładuje...
Strona się ładuje...
Strona się ładuje...
Strona się ładuje...
Strona się ładuje...
Strona się ładuje...
Strona się ładuje...
Strona się ładuje...
Strona się ładuje...
Strona się ładuje...
Strona się ładuje...
Strona się ładuje...
Strona się ładuje...
Strona się ładuje...
Strona się ładuje...
Strona się ładuje...
Strona się ładuje...
Strona się ładuje...
Strona się ładuje...
Strona się ładuje...
Strona się ładuje...
Strona się ładuje...
Strona się ładuje...
Strona się ładuje...
Strona się ładuje...
Strona się ładuje...
Strona się ładuje...
Strona się ładuje...
Strona się ładuje...
Strona się ładuje...
Strona się ładuje...
Strona się ładuje...
Strona się ładuje...
Strona się ładuje...
Strona się ładuje...
Strona się ładuje...
Strona się ładuje...
Strona się ładuje...
Strona się ładuje...
Strona się ładuje...
Strona się ładuje...
Strona się ładuje...
Strona się ładuje...
Strona się ładuje...
Strona się ładuje...
Strona się ładuje...
Strona się ładuje...
Strona się ładuje...
Strona się ładuje...
Strona się ładuje...
Strona się ładuje...
Strona się ładuje...
Strona się ładuje...
Strona się ładuje...
Strona się ładuje...
Strona się ładuje...
Strona się ładuje...
Strona się ładuje...
Strona się ładuje...
Strona się ładuje...
Strona się ładuje...
Strona się ładuje...
Strona się ładuje...
Strona się ładuje...
Strona się ładuje...
Strona się ładuje...
Strona się ładuje...
Strona się ładuje...
Strona się ładuje...
Strona się ładuje...
Strona się ładuje...
Strona się ładuje...
Strona się ładuje...
Strona się ładuje...
Strona się ładuje...
Strona się ładuje...
Strona się ładuje...
Strona się ładuje...
Strona się ładuje...
Strona się ładuje...
Strona się ładuje...
Strona się ładuje...
Strona się ładuje...
Strona się ładuje...
Strona się ładuje...
Strona się ładuje...
Strona się ładuje...
Strona się ładuje...
Strona się ładuje...
Strona się ładuje...
Strona się ładuje...
Strona się ładuje...
Strona się ładuje...
Strona się ładuje...
Strona się ładuje...
Strona się ładuje...
Strona się ładuje...
Strona się ładuje...
Strona się ładuje...
Strona się ładuje...
Strona się ładuje...
Strona się ładuje...
Strona się ładuje...
Strona się ładuje...
Strona się ładuje...
Strona się ładuje...
Strona się ładuje...
Strona się ładuje...
Strona się ładuje...
Strona się ładuje...
Strona się ładuje...
Strona się ładuje...
Strona się ładuje...
Strona się ładuje...
Strona się ładuje...
Strona się ładuje...
Strona się ładuje...
Strona się ładuje...
Strona się ładuje...
Strona się ładuje...
Strona się ładuje...
Strona się ładuje...
Strona się ładuje...
Strona się ładuje...
Strona się ładuje...
Strona się ładuje...
Strona się ładuje...
Strona się ładuje...
Strona się ładuje...
Strona się ładuje...
Strona się ładuje...
Strona się ładuje...
Strona się ładuje...
Strona się ładuje...
Strona się ładuje...
Strona się ładuje...
Strona się ładuje...
Strona się ładuje...
Strona się ładuje...
Strona się ładuje...
Strona się ładuje...
Strona się ładuje...
Strona się ładuje...
Strona się ładuje...
Strona się ładuje...
Strona się ładuje...
Strona się ładuje...
Strona się ładuje...
Strona się ładuje...
Strona się ładuje...
Strona się ładuje...
Strona się ładuje...
Strona się ładuje...
Strona się ładuje...
Strona się ładuje...
Strona się ładuje...
Strona się ładuje...
Strona się ładuje...
Strona się ładuje...
Strona się ładuje...
Strona się ładuje...
Strona się ładuje...
Strona się ładuje...
Strona się ładuje...
Strona się ładuje...
Strona się ładuje...
Strona się ładuje...
Strona się ładuje...
Strona się ładuje...
Strona się ładuje...
Strona się ładuje...
Strona się ładuje...
Strona się ładuje...
Strona się ładuje...
Strona się ładuje...
Strona się ładuje...
Strona się ładuje...
Strona się ładuje...
Strona się ładuje...
Strona się ładuje...
Strona się ładuje...
Strona się ładuje...
Strona się ładuje...
Strona się ładuje...
Strona się ładuje...
Strona się ładuje...
Strona się ładuje...
Strona się ładuje...
Strona się ładuje...
Strona się ładuje...
Strona się ładuje...
Strona się ładuje...
Strona się ładuje...
Strona się ładuje...
Strona się ładuje...
Strona się ładuje...
Strona się ładuje...
Strona się ładuje...
Strona się ładuje...
Strona się ładuje...
Strona się ładuje...
Strona się ładuje...
Strona się ładuje...
Strona się ładuje...
Strona się ładuje...
Strona się ładuje...
Strona się ładuje...
Strona się ładuje...
Strona się ładuje...
Strona się ładuje...
Strona się ładuje...
Strona się ładuje...
Strona się ładuje...
Strona się ładuje...
Strona się ładuje...
Strona się ładuje...
Strona się ładuje...
Strona się ładuje...
Strona się ładuje...
Strona się ładuje...
Strona się ładuje...
Strona się ładuje...
Strona się ładuje...
Strona się ładuje...
Strona się ładuje...
-
 1
1
-
 2
2
-
 3
3
-
 4
4
-
 5
5
-
 6
6
-
 7
7
-
 8
8
-
 9
9
-
 10
10
-
 11
11
-
 12
12
-
 13
13
-
 14
14
-
 15
15
-
 16
16
-
 17
17
-
 18
18
-
 19
19
-
 20
20
-
 21
21
-
 22
22
-
 23
23
-
 24
24
-
 25
25
-
 26
26
-
 27
27
-
 28
28
-
 29
29
-
 30
30
-
 31
31
-
 32
32
-
 33
33
-
 34
34
-
 35
35
-
 36
36
-
 37
37
-
 38
38
-
 39
39
-
 40
40
-
 41
41
-
 42
42
-
 43
43
-
 44
44
-
 45
45
-
 46
46
-
 47
47
-
 48
48
-
 49
49
-
 50
50
-
 51
51
-
 52
52
-
 53
53
-
 54
54
-
 55
55
-
 56
56
-
 57
57
-
 58
58
-
 59
59
-
 60
60
-
 61
61
-
 62
62
-
 63
63
-
 64
64
-
 65
65
-
 66
66
-
 67
67
-
 68
68
-
 69
69
-
 70
70
-
 71
71
-
 72
72
-
 73
73
-
 74
74
-
 75
75
-
 76
76
-
 77
77
-
 78
78
-
 79
79
-
 80
80
-
 81
81
-
 82
82
-
 83
83
-
 84
84
-
 85
85
-
 86
86
-
 87
87
-
 88
88
-
 89
89
-
 90
90
-
 91
91
-
 92
92
-
 93
93
-
 94
94
-
 95
95
-
 96
96
-
 97
97
-
 98
98
-
 99
99
-
 100
100
-
 101
101
-
 102
102
-
 103
103
-
 104
104
-
 105
105
-
 106
106
-
 107
107
-
 108
108
-
 109
109
-
 110
110
-
 111
111
-
 112
112
-
 113
113
-
 114
114
-
 115
115
-
 116
116
-
 117
117
-
 118
118
-
 119
119
-
 120
120
-
 121
121
-
 122
122
-
 123
123
-
 124
124
-
 125
125
-
 126
126
-
 127
127
-
 128
128
-
 129
129
-
 130
130
-
 131
131
-
 132
132
-
 133
133
-
 134
134
-
 135
135
-
 136
136
-
 137
137
-
 138
138
-
 139
139
-
 140
140
-
 141
141
-
 142
142
-
 143
143
-
 144
144
-
 145
145
-
 146
146
-
 147
147
-
 148
148
-
 149
149
-
 150
150
-
 151
151
-
 152
152
-
 153
153
-
 154
154
-
 155
155
-
 156
156
-
 157
157
-
 158
158
-
 159
159
-
 160
160
-
 161
161
-
 162
162
-
 163
163
-
 164
164
-
 165
165
-
 166
166
-
 167
167
-
 168
168
-
 169
169
-
 170
170
-
 171
171
-
 172
172
-
 173
173
-
 174
174
-
 175
175
-
 176
176
-
 177
177
-
 178
178
-
 179
179
-
 180
180
-
 181
181
-
 182
182
-
 183
183
-
 184
184
-
 185
185
-
 186
186
-
 187
187
-
 188
188
-
 189
189
-
 190
190
-
 191
191
-
 192
192
-
 193
193
-
 194
194
-
 195
195
-
 196
196
-
 197
197
-
 198
198
-
 199
199
-
 200
200
-
 201
201
-
 202
202
-
 203
203
-
 204
204
-
 205
205
-
 206
206
-
 207
207
-
 208
208
-
 209
209
-
 210
210
-
 211
211
-
 212
212
-
 213
213
-
 214
214
-
 215
215
-
 216
216
-
 217
217
-
 218
218
-
 219
219
-
 220
220
-
 221
221
-
 222
222
-
 223
223
-
 224
224
-
 225
225
-
 226
226
-
 227
227
-
 228
228
-
 229
229
-
 230
230
-
 231
231
-
 232
232
-
 233
233
-
 234
234
-
 235
235
-
 236
236
-
 237
237
-
 238
238
-
 239
239
-
 240
240
-
 241
241
-
 242
242
-
 243
243
-
 244
244
-
 245
245
-
 246
246
-
 247
247
-
 248
248
-
 249
249
-
 250
250
-
 251
251
-
 252
252
-
 253
253
-
 254
254
-
 255
255
-
 256
256
-
 257
257
-
 258
258
-
 259
259
-
 260
260
-
 261
261
-
 262
262
-
 263
263
-
 264
264
-
 265
265
-
 266
266
-
 267
267
-
 268
268
-
 269
269
-
 270
270
-
 271
271
-
 272
272
-
 273
273
-
 274
274
-
 275
275
-
 276
276
-
 277
277
-
 278
278
-
 279
279
-
 280
280
-
 281
281
-
 282
282
-
 283
283
-
 284
284
-
 285
285
-
 286
286
-
 287
287
-
 288
288
-
 289
289
-
 290
290
-
 291
291
-
 292
292
-
 293
293
-
 294
294
-
 295
295
-
 296
296
-
 297
297
-
 298
298
-
 299
299
-
 300
300
-
 301
301
-
 302
302
-
 303
303
-
 304
304


IKEA VILSTA Induction Hob Instrukcja obsługi
- Kategoria
- Płyty
- Typ
- Instrukcja obsługi
w innych językach
- italiano: IKEA VILSTA Induction Hob Manuale utente
- Deutsch: IKEA VILSTA Induction Hob Benutzerhandbuch
- slovenčina: IKEA VILSTA Induction Hob Používateľská príručka
- svenska: IKEA VILSTA Induction Hob Användarmanual
- français: IKEA VILSTA Induction Hob Manuel utilisateur
- dansk: IKEA VILSTA Induction Hob Brugermanual
- Nederlands: IKEA VILSTA Induction Hob Handleiding
Powiązane artykuły
Inne dokumenty
-
Samsung NZ84J9770EK/EO Instrukcja obsługi
-
-
Hoover HTP644MCBB Instrukcja obsługi
-
Samsung NZ64A3747DK/EO Instrukcja obsługi
-
AEG HK634150XB Instrukcja obsługi
-
-
Kernau KIH 7634-6B Instrukcja obsługi
-
-
-
Candy CIES55MCTT Instrukcja obsługi