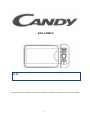
Candy CMXG 25 DCB Instrukcja obsługi
- Kategoria
- Mikrofale
- Typ
- Instrukcja obsługi
Niniejsza instrukcja jest również odpowiednia dla


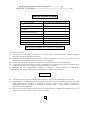
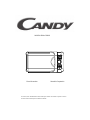
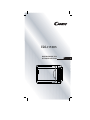
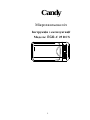
KUCHENKA MIKROFALOWA________________________
INSTRUKCJA OBSŁUGI
МИКРОВОЛНОВАЯ ПЕЧЬ _________________
ИНСТРУКЦИЯ ПО ЭКСПЛУАТАЦИИ
Мікрохвильова піч ________________________
Інструкція з експлуатації
PL
RU
UAH

1
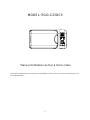
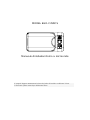
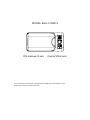
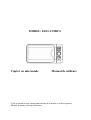
MODEL: EGO-C25DCS
Manuel d’utilisation du four à micro-ondes
Merci de lire attentivement ces instructions avant d’utiliser ce micro-ondes. Conservez cette notice pour une
prochaine utilisation.
Strona się ładuje...
Strona się ładuje...
Strona się ładuje...
Strona się ładuje...
Strona się ładuje...
Strona się ładuje...
Strona się ładuje...

9
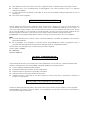
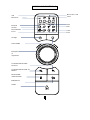
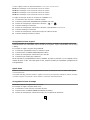
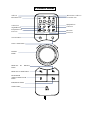
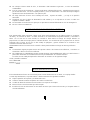
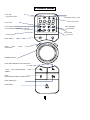
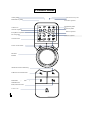
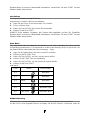
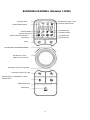
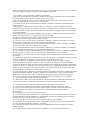
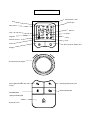
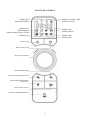
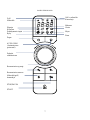
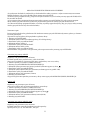
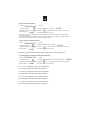
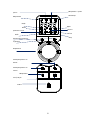
PANNEAU DE COMMANDE
Icônepâtes
Icônelégumes
Icônepizza
Icôneviandes
ToucheHorloge(CLOCK)
BoutonCuissonsautomatiques
SélecteurTEMPS–POIDS
Décongélationparpoids
Décongélationpartemps
Boutonsélectiondumodede
cuisson:MICROONDES/GRILL
BoutonFIN/PAUSE
BoutonSTART
IcônePâtisserie
IcôneCuissonMicro‐ondes
IcôneCuissonGrill
IcônePoisson
Strona się ładuje...
Strona się ładuje...
Strona się ładuje...

13
Nettoyage et entretien
1. Éteindre le four et retirez la fiche d'alimentation de la prise murale avant de le nettoyer.
2. Gardez l'intérieur du four propre. Lorsque des éclaboussures de liquides ou d'aliments surviennent et
adhèrent aux parois du four, essuyez-les avec un chiffon humide. Un détergent doux peut être utilisé si le
four est très sale. Évitez l'utilisation de pulvérisateur et d'autres produits nettoyants, car ils peuvent tâcher
ou abimer le revêtement intérieur.
3. Les surfaces extérieures doivent être nettoyées avec un chiffon humide. Pour éviter d'endommager les
pièces internes du four, l'eau ne doit pas pénétrer dans les ouvertures de ventilation.
4. Essuyez la porte des deux côtés, interne et externe, les joints de porte et les parties de contact
fréquemment avec un chiffon humide pour enlever les éclaboussures. Ne pas utiliser de nettoyant abrasif.
5. Ne pas muoiller le panneau de commande. Nettoyer avec un chiffon doux et humide. Lors du nettoyage
du panneau de commande, laissez la porte du four ouverte afin d'éviter au four de s’allumer
accidentellement.
6. Si de la vapeur s'accumule à l'intérieur ou à l'extérieur de la porte du four, essuyez avec un chiffon doux.
Cela peut se produire lorsque le four à micro-ondes est utilisé dans des conditions d'humidité élevée. Et
c'est normal.
7. Il est parfois nécessaire de retirer le plateau en verre pour le nettoyage. Lavez le plateau dans de l'eau
chaude savonneuse ou au lave-vaisselle.
8. L’Anneau circulaire de soutien du plateau tournant, et le plancher du four doivent être nettoyés
régulièrement pour éviter un bruit excessif. Il suffit d'essuyer la surface du fond du four avec un détergent
doux. L'anneau de roulement peut être lavé à l'eau savonneuse légère ou au lave-vaisselle. Lorsque vous
retirez l'anneau de roulement du plancher de la cavité pour le nettoyage, veillez à remettre dans la bonne
position.
9. Supprimer les odeurs de votre four en utilisant une tasse d'eau avec le jus et la peau d'un citron dans un
bol allant au micro pendant 5 minutes. Essuyez soigneusement et séchez avec un chiffon doux.
10. Quand il devient nécessaire de remplacer la lampe du four, veuillez consulter un technicien qualifié pour
la faire remplacer.
11. Le four doit être régulièrement nettoyé pour enlever tous les résidus de nourriture. A défaut de maintenir
le four dans un état de propreté, cela pourrait conduire à une détérioration de la surface qui pourrait nuire à
l'appareil et provoquer une situation dangereuse.
12. Veuillez ne pas jeter cet appareil dans la poubelle domestique, il doit être éliminé dans un centre
d'élimination pour particuliers fourni par les municipalités.
13. Lorsque le four à micro-ondes est utilisé dans sa fonction grill, il peut causer une légère fumée et une
légère odeur. Il s'agit d'un phénomène normal, car le four est constitué d'une plaque d'acier légèrement
recouverte d’huile de lubrification. Durant les premières utilisations, cette huile peut générer ces
phénomènes par combustion. Ce phénomène disparaît après une courte période d'utilisation.
Strona się ładuje...
Strona się ładuje...
Strona się ładuje...

3
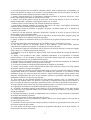
5. Non utilizzare il forno senza vassoio di vetro, supporto del rullo, e l'albero nelle loro posizioni corrette.
6. Accertarsi che il cavo di alimentazione sia danneggiato e non viene eseguito in forno o su qualsiasi
superficie o taglienti.
7. La presa deve essere facilmente accessibile, in modo che sia possibile scollegare facilmente in caso di
emergenza.
8. Non usare il forno all'aperto.
Questo apparecchio deve essere collegato a terra. Questo forno è dotato di un cavo con un filo di terra con
un polo di terra. Deve essere inserito in una presa a muro che è correttamente installata e messa a terra. In
caso di un corto circuito elettrico, messa a terra riduce il rischio di scosse elettriche fornendo un filo di fuga
per la corrente elettrica. Si raccomanda un circuito separato che serve solo il forno fornite. Utilizzando una
tensione elevata è pericolosa e può provocare un incendio o altro incidente causando danni forno.
ATTENZIONE L'uso improprio della spina di messa a terra può causare un rischio di scossa elettriche.
Nota
1.
Se avete domande circa la messa a terra o istruzioni elettriche, consultare un elettricista o di un servizio
personale qualificato.
2. Né il produttore né il rivenditore si assume alcuna responsabilità per danni al pregiudizio forno o
personali derivanti dalla mancata osservanza delle procedure di collegamento elettrico.
I fili di questo cavo principale sono colorati secondo il codice seguente:
Verde e Giallo = TERRA
Blu = NEUTRO
Marrone =DIRETTA
Il funzionamento del forno a microonde può causare interferenze con la radio, TV, o apparecchiature simili.
Quando c'è interferenza, può essere ridotta o eliminata adottando le seguenti misure:
1. Porta e sigillatura superficie pulita del forno.
2. Riorientare l'antenna di ricezione di radio o televisione.
3. Spostare il forno a microonde con rispetto al ricevitore.
4. Spostare il forno a microonde lontano dal ricevitore.
5. Collegare il forno a microonde in una presa diversa in modo che il forno a microonde e ricevitore si
trovino su circuiti diversi.
Quando si utilizza apparecchio elettrico precauzioni di sicurezza devono essere seguite, tra cui le seguenti:
AVVERTENZA: Per ridurre il rischio di ustioni, scosse elettriche, incendi, danni a persone o l'esposizione a
un'eccessiva energia a microonde:
ISTRUZIONI PER MESSA A TERRA
R
R
A
A
D
D
I
I
O
O
I
I
N
N
T
T
E
E
R
R
F
F
E
E
R
R
E
E
N
N
Z
Z
E
E
IMPORTANTI ISTRUZIONI DI SICUREZZA
Strona się ładuje...
Strona się ładuje...
Strona się ładuje...
Strona się ładuje...

8
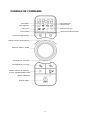
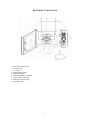
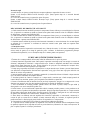
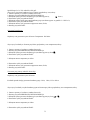
PANNELLO DI CONTROLLO
Microonde + Grill
Forno
Pasta
Dolci
Carne
Pizza
Grill
Microonde
Bevande
Verdure
Riscaldamento
Pesce
Orologio
AUTO MENU
Manopola
di
regolazione
SCONGELARE IN BASE
AL PESO
SCONGELARE IN BASE AL
TEMPO
MICROONDE
/GRILL/FORNO
END/PAUSA
START

9
z Dopo aver collegato il forno o dopo essere passati 60 secondi di inattivita‘ il forno entra in
modalita‘ di blocco e si puo‘ utilizzarlo solo dopo aver premuto il tasto START.
z Durante il settaggio di un programma si puo‘ tornare nella modalita‘ stand-by premendo il pulsante
END o attendendo 30 sec.
z Durante la cottura e‘ possibile mettere in pausa il forno premendo 1 volta il pulsante END.
Successivamente si puo‘ premere il pulsante START per riprendere il programma o premere il
pulsante END una seconda volta per uscire dal programma.
z Al termine della cottura il forno vi avvisera‘ ogni due minuti fino a che non si apre la porta o non si
prema un tasto.
Regolazione Orologio
Per esempio si voglia regolare l’orologio alle 8:30.
1. Premere il tasto OROLOGIO.
2. Ruotare la manopola per scegliere il tipo di orologio da utilizzare (12h/24h).
3. Premere START per confermare.
4. Ruotare la manopola fino a indicare le ore 8
5. Premere START per confermare.
6. Ruotare la manopola fino a indicare i minuti 30
7. Premere START per confermare.
NOTA: Durante la cottura si puo‘ visualizzare l’orario premendo il tasto OROLOGIO.
La cottura a microonde
Il massimo ntempo di cottura e‘ di 95 min. Ci sono 6 livelli di potenza (P0 – P100)
Per esempio si volgia cucinare per 5 minuti al livello P60 (60%).
1. Posizionare il cibo all’interno del forno e chiudere la porta.
2. Premere il tasto MICROONDE/GRILL/FORNO.
3. Ruotare la manopola per selezionare la funzione microonde
4. Premere START per confermare.
5. Ruotare la manopola per selezionare il livello di potenza P-60.
6. Premere START per confermare.
7. Ruotare la manopola per settare il tempo di cottura“5:00”.
8. Premere START per confermare.
NOTA: Durante la cottura e‘ possibile visionare il livello di potenza selezionato premendo il tasto
MICROONDE / GRILL
Cottura grill
COME IMPOSTARE I COMANDI FORNO
Strona się ładuje...
Strona się ładuje...
Strona się ładuje...
Strona się ładuje...
Strona się ładuje...
Strona się ładuje...
Strona się ładuje...
Strona się ładuje...

3
6. Do not operate the oven without glass tray, roller support, and shaft in their proper positions.
7. Make sure that the power supply cord is undamaged and does not run under the oven or over any hot or
sharp surface.
8. The socket must be readily accessible so that it can be easily unplugged in an emergency.
9. Do not use the oven outdoors.
This appliance must be grounded. This oven is equipped with a cord having a grounding wire with a
grounding plug. It must be plugged into a wall receptacle that is properly installed and grounded. In the event
of an electrical short circuit, grounding reduces risk of electric shock by providing an escape wire for the
electric current. It is recommended that a separate circuit serving only the oven be provided. Using a high
voltage is dangerous and may result in a fire or other accident causing oven damage.
WARNING Improper use of the grounding plug can result in a risk of electric shock.
Note
1. If you have any questions about the grounding or electrical instructions, consult a qualified electrician or
service person.
2. Neither the manufacturer nor the dealer can accept any liability for damage to the oven or personal injury
resulting from failure to observe the electrical connection procedures.
The wires in this cable main are colored in accordance with the following code:
Green and Yellow = EARTH
Blue = NEUTRAL
Brown = LIVE
Operation of the microwave oven can cause interference to your radio, TV, or similar equipment.
When there is interference, it may be reduced or eliminated by taking the following measures:
1. Clean door and sealing surface of the oven.
2. Reorient the receiving antenna of radio or television.
3. Relocate the microwave oven with respect to the receiver.
4. Move the microwave oven away from the receiver.
5. Plug the microwave oven into a different outlet so that microwave oven and receiver are on different
branch circuits.
When using electrical appliance basic safety precautions should be followed, including the following:
WARNING: To reduce the risk of burns, electric shock, fire, injury to persons or exposure to excessive
microwave energy:
G
G
R
R
O
O
U
U
N
N
D
D
I
I
N
N
G
G
I
I
N
N
S
S
T
T
R
R
U
U
C
C
T
T
I
I
O
O
N
N
S
S
R
R
A
A
D
D
I
I
O
O
I
I
N
N
T
T
E
E
R
R
F
F
E
E
R
R
E
E
N
N
C
C
E
E
I
I
M
M
P
P
O
O
R
R
T
T
A
A
N
N
T
T
S
S
A
A
F
F
E
E
T
T
Y
Y
I
I
N
N
S
S
T
T
R
R
U
U
C
C
T
T
I
I
O
O
N
N
S
S
Strona się ładuje...
Strona się ładuje...
Strona się ładuje...

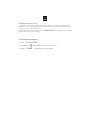
7
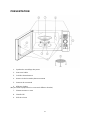
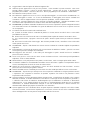
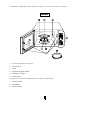
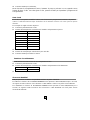
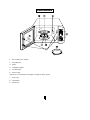
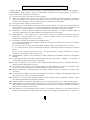
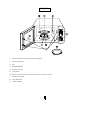
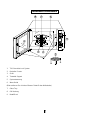
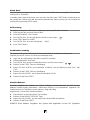
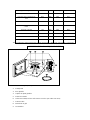
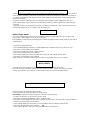
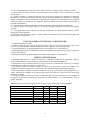
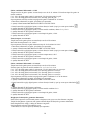
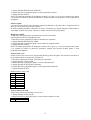
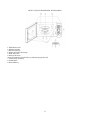
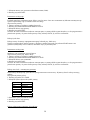
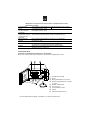
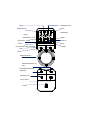
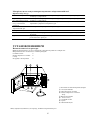
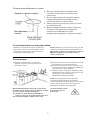
1. Door Safety Lock System
2. Oven Window
3. Shaft
4. Turntable Support
5. Control Panel
6. Wave Guide
(Please do not remove the mica plate covering the wave guide)
7. Glass Tray
8. Grill Heater
9. Metal Tray
P
P
A
A
R
R
T
T
N
N
A
A
M
M
E
E
S
S
Strona się ładuje...

9
z After plugging in the oven or waiting for 60 seconds without opertation in standby mode, the
system enter into lock mode, you can’t operate it until pressing START button.
z When setting a program, you can get the oven return to the standby mode after pressing
END/PAUSE button or waiting for 30 seconds.
z During cooking, you can pause the program by pressing END/PAUSE button once, and then press
START button to resume or press END/PAUSE button again to cancel it.
z After finishing a cooking program, the system will remind you once for every 2 minutes until you
press any button or open the oven door.
Setting digital clock
With the oven ready for input, touch the CLOCK button once or twice to set the digital clock in 12 or
24 hours cycle.
FOR EXAMPLE: Suppose you want to set the oven clock time to 8:30.
1. Press CLOCK button.
2. Turn DIGITAL KNOB to indicate the digital clock in 24 or 12 hours cycle.
3. Press START button to confirm.
4. Turn DIGITAL KNOB to indicate the hour digit 8.
5. Press START button to confirm.
6. Turn DIGITAL KNOB to indicate the minute digits until the screen shows 8: 30.
7. Press START button to confirm.
NOTE: During cooking, you can press CLOCK button to view the clock time.
Microwave cooking
The longest cooking time is 95 minutes.
There are six kinds of power level from P-00 to P100.
Suppose you want to cook for 5 minute at 60% power level.
1. Place food into the oven and close the door.
2. Press MICROWAVE/GRILL/CONVECTION button.
3. Turn DIGITAL KNOB to select microwave function and the screen shows .
4. Press START button to confirm.
5. Turn DIGITAL KNOB to select the power level until the screen shows P-60.
6. Press START button to confirm.
7. Turn DIGITAL KNOB to set the cooking time 5:00.
8. Press START button.
Note: During cooking, you can press MICROWAVE/GRILL/CONVECTION button to check the
cooking power.
H
H
O
O
W
W
T
T
O
O
S
S
E
E
T
T
T
T
H
H
E
E
O
O
V
V
E
E
N
N
C
C
O
O
N
N
T
T
R
R
O
O
L
L
S
S
Strona się ładuje...
Strona się ładuje...
Strona się ładuje...
Strona się ładuje...
Strona się ładuje...
Strona się ładuje...
Strona się ładuje...
Strona się ładuje...

3
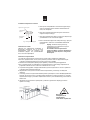
4. No coloque el horno donde el calor , la humedad o alta humedad se generan , o cerca de materiales
combustibles.
5. Para un correcto funcionamiento , el horno debe tener suficiente flujo de aire . Permitir 20cm de espacio
por encima del horno , 10 cm en la parte posterior y 5 cm en ambos lados . No cubra ni bloquee ninguna
apertura de este electrodoméstico . No quite los pies.
6. No haga funcionar el horno sin la bandeja de vidrio , soporte del rodillo , y el eje en la posición
adecuada.
7. Asegúrese de que el cable de alimentación está dañado y no se ejecuta en el horno o sobre una
superficie caliente o afilado.
8. La toma debe ser de fácil acceso para que se pueda desconectar fácilmente en caso de emergencia.
9. No use el horno en exteriores.
Este aparato debe estar conectado a tierra . Este horno está equipado con un cable que tiene un conductor
de tierra y un enchufe de tierra . Se debe enchufar a un tomacorriente de pared instalado y conectado a
tierra . En el caso de un corto circuito, la conexión a tierra reduce el riesgo de choque eléctrico al
proporcionar un cable de escape para la corriente eléctrica . Se recomienda que se proporcione un circuito
separado sólo el horno. El uso de un alto voltaje es peligroso y puede resultar en un incendio u otro
accidente causando daño al horno .
ADVERTENCIA El uso incorrecto de la conexión a tierra puede resultar en riesgo de descarga eléctrica.
Nota
1. Si usted tiene alguna pregunta acerca de la puesta a tierra o las instrucciones eléctricas , consulte a un
electricista o técnico de servicio calificado.
2. Ni el fabricante ni el distribuidor pueden aceptar ninguna responsabilidad por daños a la lesión horno o
personales derivados de la inobservancia de los procedimientos de conexión eléctrica .
Los hilos de este cable principal están coloreados de acuerdo con el siguiente código:
Verde y amarillo = TIERRA
Azul = NEUTRAL
Marrón =
VIVO
El funcionamiento del horno de microondas puede causar interferencia en su radio, TV o equipo similar.
Cuando hay interferencia, se puede reducir o eliminar tomando las siguientes medidas:
1. Limpio superficie de la puerta y el sellado del horno.
2. Vuelva a orientar la antena receptora de la radio o la televisión.
3. Cambie la ubicación del horno de microondas con respecto al receptor.
4. Mueva el horno de microondas lejos del receptor.
5. Enchufe el horno de microondas en otra toma de forma que el horno microondas y el receptor están en
circuitos diferentes.
INSTRUCCIONES DE CONEXIÓN A TIERRA
INTERFERENCIA DE RADIO
Strona się ładuje...
Strona się ładuje...
Strona się ładuje...

7
1. Sistema de bloqueo de la puerta de seguridad
2. Ventana del horno
3. Eje
4. Soporte giratorio
5. Panel de control
6. Guía Wave
(Por favor, no retire la placa de la mica que cubre la guía de onda)
7. Bandeja de Cristal
8. Grill calentador
9. Plato Crunchy
NOMBRES

8
C
C
O
O
N
N
T
T
R
R
O
O
L
L
P
P
A
A
N
N
E
E
L
L
Icono Microondas + Grill
Icono Convección
Icono espagueti
Icono Tartas
Icono Carne
Pizza icon
Icono Grill
Icono Microondas
Icono Café
Icono Verdura
Icono Keep Warm (Mantener Caliente)
Icono Pescado
Botón RELOJ
Botón AUTO COOK (Cocción
Automática)
MANDO DIGITAL
Botón DESCONGELACIÓN POR PESO
Botón DESCONGELACIÓN POR
TIEMPO
Botón
MICROONDAS/GRILL/CONVECCIÓN
Botón FIN/PAUSA
Botón INICIO
Strona się ładuje...
Strona się ładuje...
Strona się ładuje...
Strona się ładuje...
Strona się ładuje...
Strona się ładuje...
Strona się ładuje...

1
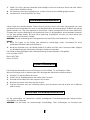
1. Versuchen Sie nicht, diesen Ofen mit der Tür offen zu betreiben, da der offenen Tür in
Betrieb schädliche Einwirkung von Mikrowellenenergie führen. Es ist wichtig, nicht zu
umgehen oder zu manipulieren mit den Sicherheitsverriegelungen
.
2. Versuchen Sie nicht, diesen Ofen mit der Tür offen zu betreiben, da der offenen Tür in
Betrieb schädliche Einwirkung von Mikrowellenenergie führen. Es ist wichtig, nicht zu
umgehen oder zu manipulieren mit den Sicherheitsverriegelungen
.
a. Den Ofen nicht betreiben, wenn es beschädigt ist. Es ist besonders wichtig, dass die
Ofentür richtig schließen, und dass es keine Schäden an der
ein. Tür (verbogen)
b.
c. Scharniere und Verriegelungen (gebrochen oder gelockert),
d. Türdichtungen und Dichtflächen.
3. Der Ofen sollte von niemandem außer qualifiziertem Fachpersonal eingestellt oder
repariert werden
.
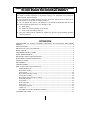
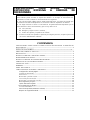
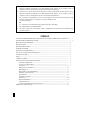
INHALT
VORSICHTSMASSNAHMEN FÜR MÖGLICHE übermäßiger MIKROWELLE ENERGY----- ---1
VERMEIDEN TECHNISCHE DATEN ------------------------------------------------------------------------------------------1
Bevor Sie sich an SERVICE----------------------------------------------------------------------------------- 2
INSTALLATION--------------------------------------------------------------------------------------------------- 2
ERDUNG ANLEITUNG----------------------------------------------------------------------------------------- 3
FUNKSTÖRUNGEN ---------------------------------------------------------------------------------------------------------------3
Wichtige Sicherheitshinweise--------------------------------------------------------------------------------- 3
Kochen in der Mikrowelle PRINCIPLES-------------------------------------------------------------------- 6
UTENSILS GUIDE---------------------------------------------------------------------------------------------- 6
TEILE------------------------------------------------------------------------------------------------------------- 7
CONTROL PANEL------------------------------------------------------------------------------------------ 8
Die Einstellung der Backofen-Steuerung--------------------------------------------------------------- 9
Einstellen digitale Uhr------------------------------------------------------------------------------- 9
Garen in der Mikrowelle--------------------------------------------------------------------------- 9
Grill Koch--------------------------------------------------------------------------------------------- 10
Mikrowelle und Grill Koch------------------------------------------------------------------------ 10
Heißluftgaren---------------------------------------------------------------------------------------- 11
Mikrowellen-und Heißluftgaren----------------------------------------------------------------- 11
Auftauen nach Gewicht--------------------------------------------------------------------------- 11
Schnellstart------------------------------------------------------------------------------------------ 11
Auftauen nach Zeit--------------------------------------------------------------------------------- 11
Auto-Koch ---------------------------------------------------------------------------------------------------------------112
Warmhaltefunktion--------------------------------------------------------------------------------- 112
Kindersicherung------------------------------------------------------------------------------------ 13
SCHUTZ automatischen Mechanismus------------------------------------------------------ 13
REINIGUNG UND PFLEGE---------------------------------------------------------------------------- 14
Strona się ładuje...

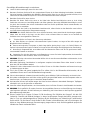
3
7. Stellen Sie sicher, dass das Netzkabel unbeschädigt ist und nicht unter dem Gerät oder über heißen
oder scharfen Oberfläche laufen.
8. Die Steckdose muss leicht zugänglich sein, so dass es leicht in einem Notfall gezogen werden.
9. Verwenden Sie nicht die Backofen im Freien.
Dieses Gerät muss geerdet werden. Dieser Ofen ist mit einer Schnur mit einem Erdungskabel mit einem
geerdeten Stecker ausgestattet. Es muss in eine Wandsteckdose, die ordnungsgemäß installiert und geerdet
gesteckt werden. Im Falle eines elektrischen Kurzschluss, Erdung verringert das Risiko eines elektrischen
Schlages durch sie eine Ableitung für den elektrischen Strom. Es wird empfohlen, einen separaten Stromkreis
nur der Ofen gestellt werden. Mit einer hohen Spannung ist gefährlich und kann zu einem Brand oder
anderen Unfällen mit Backofen Schäden.
WARNING Falsche Verwendung des Erdungssteckers kann das Risiko eines elektrischen Schlags.
Hinweis
1. Wenn Sie Fragen zu der Erdung oder elektrischen Anweisungen haben, konsultieren Sie einen
qualifizierten Elektriker oder Servicetechniker.
2. Weder der Hersteller noch der Händler haftet für Schäden am Ofen oder Personenschäden aufgrund
von Nichtbeachtung der elektrischen Verbindung Verfahren einzuhalten..
Die Drähte im Kabel wichtigsten sind in Übereinstimmung mit dem folgenden Code gefärbt:
Grün und Gelb = ERDE
Blau = NEUTRAL
Braun = LEBEN
Der Betrieb der Mikrowelle kann es zu Störungen von Ihrem Radio, TV, oder ähnliche Geräte.
Wenn es Störungen kann es reduziert oder durch die folgenden Maßnahmen behoben werden::
1. Reinigen Tür-und Dichtfläche des Ofens.
2. Richten Sie die Empfangsantenne des Radios oder Fernseher.
3. Relocate the microwave oven with respect to the receiver.
4. Move the microwave oven away from the receiver.
5. Plug the microwave oven into a different outlet so that microwave oven and receiver are on different
branch circuits.
Bei der Verwendung von elektrischen Gerätes grundlegende Sicherheitsvorkehrungen befolgt werden,
einschließlich der folgenden:
WARNING: Um die Gefahr von Verbrennungen, Stromschläge, Feuer, Verletzungen von Personen oder
E
E
R
R
D
D
U
U
N
N
G
G
S
S
A
A
N
N
W
W
E
E
I
I
S
S
U
U
N
N
G
G
E
E
N
N
F
F
U
U
N
N
K
K
S
S
T
T
Ö
Ö
R
R
U
U
N
N
G
G
E
E
N
N
W
W
I
I
C
C
H
H
T
T
I
I
G
G
E
E
S
S
I
I
C
C
H
H
E
E
R
R
H
H
E
E
I
I
T
T
S
S
H
H
I
I
N
N
W
W
E
E
I
I
S
S
E
E
Strona się ładuje...
Strona się ładuje...
Strona się ładuje...

7
1. Tür-Sicherheits-Lock System
2. Backofen Fenster
3. Shaft
4. Turntable Support
5. Systemsteuerung
6. Wave Guide
(Bitte entfernen Sie nicht den Glimmer Platte für den Wellenleiter)
7. Glass Tray
8. Grill Heizung
9. Metall-Rack
T
T
E
E
I
I
L
L
E
E
B
B
E
E
Z
Z
E
E
I
I
C
C
H
H
N
N
U
U
N
N
G
G
E
E
N
N
Strona się ładuje...

9
Nach dem Einstecken in den Ofen oder das Warten für 60 Sekunden ohne Opertation im
Standby-Modus, das System in den Lock-Modus zu gelangen, kann man nicht arbeiten, bis es
durch Drücken von START-Taste.
Bei der Einstellung eines Programms können Sie den Backofen Rückkehr in den Standby-Modus
nach dem Drücken END-Taste oder warten 30 Sekunden lang erhalten
Während des Kochens, können Sie das Programm anzuhalten, indem END-Taste einmal, und
drücken Sie dann die START-Taste, um fortzufahren, oder drücken Sie END-Taste erneut, um den
Vorgang abzubrechen.
Nach Abschluss eines Garprogramms, wird das System Sie einmal daran erinnern, für alle 2
Minuten, bis Sie eine Taste drücken oder die Tür öffnen.
Clock
Angenommen, Sie möchten den Backofen Uhrzeit bis 8.30 eingestellt.
1. Drücken Sie Taste CLOCK.
2. Drehen Sie DIAL DIGITAL die Digitaluhr in 24 oder 12 Stunden-Zyklus anzuzeigen.
3. Press START button to confirm.
4. Turn DIGITAL DIAL to indicate the hour digit “8”.
5. Press START button to confirm.
6. Turn DIGITAL DIAL to indicate the minute digits until the screen shows “8: 30”.
7. Press START button to confirm.
NOTE: During cooking, you can press CLOCK button to view the clock time.
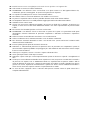
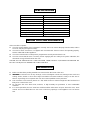
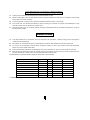
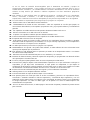
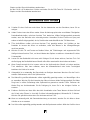
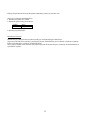
Microwave cooking
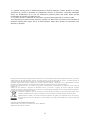
The longest cooking time is 95 minutes. There are six kinds of power level from P-00 to P100.
Suppose you want to cook for 5 minute at 60% power level.
1. Place food into the oven and close the door.
2. Press MICROWAVE / GRILL button.
3. Turn DIGITAL DIAL to select microwave function and the screen shows“ ”.
4. Press START button to confirm.
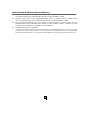
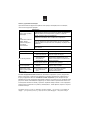
5. Turn DIGITAL DIAL to select the power level until the screen shows P-60.
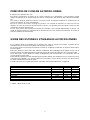
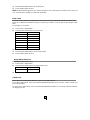
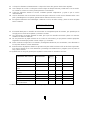
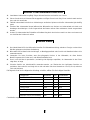
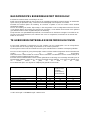
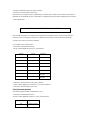
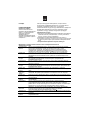
POWER
100%
80%
60%
40%
20%
0%
DISPLAY
P100
P-80
P-60
P-40
P-20
P-00
6. Press START button to confirm.
7. Turn DIGITAL DIAL to set the cooking time “5:00”.
8. Press START button.
NOTE: During cooking, you can press MICROWAVE / GRILL button to check the cooking power.
W
W
i
i
e
e
s
s
t
t
e
e
l
l
l
l
t
t
m
m
a
a
n
n
d
d
i
i
e
e
H
H
e
e
r
r
d
d
s
s
t
t
e
e
u
u
e
e
r
r
u
u
n
n
g
g
e
e
n
n
Strona się ładuje...
Strona się ładuje...

12
Piepton und der Ofen nicht betrieben werden kann.
Um die CHILD LOCK abbrechen: Drücken und halten Sie die END-Taste für 3 Sekunden, ertönt ein
Piepton und der Ofen betrieben werden kann
1. Schalten Sie das Gerät aus und ziehen Sie den Netzstecker aus der Steckdose, bevor Sie es
reinigen..
2. Halten Sie das Innere des Ofens sauber. Wenn die Nahrung spritzt oder verschüttete Flüssigkeiten
Backofenwände haften, mit einem feuchten Tuch abwischen. Mildes Reinigungsmittel verwendet
werden, wenn der Backofen sehr schmutzig werden. Vermeiden Sie den Einsatz von Spray und
andere scharfe Reinigungsmittel, da sie, Streifen oder matte Oberfläche der Tür färben kann.
3. TDie Außenflächen sollten mit einem feuchten Tuch gereinigt werden. Um Schäden an den
Bauteilen im Inneren des Ofens zu verhindern, sollte kein Wasser in die Lüftungsöffnungen
versickern werden
4. Wischen Sie die Tür und Fenster auf beiden Seiten, die Türdichtungen und angrenzende Teile
häufig mit einem feuchten Tuch, um Verschüttetes oder Spritzer zu entfernen. Verwenden Sie keine
Scheuermittel.
5. Lassen Sie das Bedienfeld nicht nass wird. Reinigen Sie mit einem weichen, feuchten Tuch. Bei
der Reinigung des Bedienfeld lassen Ofentür offen Ofen versehentlich einschalten verhindern.
6. Wenn Dampf sammelt sich im Inneren oder an der Außenseite der Ofentür, mit einem weichen
Tuch abwischen. Dies kann auftreten, wenn der Mikrowellenherd unter hoher Feuchtigkeit
betrieben wird. Und es ist normal.
7. Gelegentlich ist es notwendig, die Glasschale zum Reinigen abnehmen. Waschen Sie das Fach in
warmem Seifenwasser oder in der Spülmaschine.
8. Die Walze Ring und Backofenboden sollten regelmäßig gereinigt werden, um übermäßigen Lärm
zu vermeiden. Wischen Sie die Unterseite des Ofens mit einem milden Reinigungsmittel. Die Walze
Ring kann in milden Seifenlauge oder Spülmaschine gewaschen werden. Beim Entfernen der
Walze Ring aus Hohlraumboden für die Reinigung ist, lesen Sie in der richtigen Position zu
ersetzen.
9. Entfernen Gerüche aus Ihrem Ofen durch die Kombination einer Tasse Wasser mit dem Saft und
der Schale einer Zitrone in eine tiefe Schüssel mikrowellengeeignet, Mikrowelle für 5 Minuten.
Wischen Sie gründlich und trocknen Sie mit einem weichen Tuch.
10. Wenn es notwendig wird, die Garraumbeleuchtung zu wechseln, wenden Sie sich bitte an einen
Händler um es zu ersetzen
11. Der Ofen sollte regelmäßig gereinigt werden und alle Speisereste entfernt. Wird das Gerät in einem
R
R
E
E
I
I
N
N
I
I
G
G
U
U
N
N
G
G
U
U
N
N
D
D
P
P
F
F
L
L
E
E
G
G
E
E
Strona się ładuje...
Strona się ładuje...

2
VOORZORGSMAATREGELEN TER VOORKOMING
VAN BLOOTSTELLING AAN SCHADELIJKE
MICROGOLVEN
1. Probeer niet om deze microgolfoven te bedienen met de deur open. Dit kan resulteren in blootstelling
aan schadelijke microgolven. Het is belangrijk dat er niet aan de veiligheidsvergrendeling wordt gesleuteld
en dat deze niet wordt verbroken.
2. Plaats geen objecten tussen de voorkant van de magnetron en de deur, en zorg ervoor dat er geen vuil
of restanten van schoonmaakmiddel op de vergrendelingsoppervlakken achterblijven.
3. Gebruik de microgolfoven niet als deze beschadigd is. Het is belangrijk dat u de ovendeur steeds correct
sluit en dat er geen beschadigingen zijn aan :
a.
De deur (gebogen, vervormd)
b. De scharnieren en vergrendelingen (gebroken of los),
c. De deursluitingen en het deurvenster.
4. De microgolfoven mag enkel gerepareerd worden door een deskundig iemand.
Inhoudstafel
VOORZORGSMAATREGELEN TER VOORKOMING VAN BLOOTSTELLING AAN SCHADELIJKE
MICROGOLVEN --------------------------------------------------------------------------------------------------------------------- 2
TECHNISCHE GEGEVENS ------------------------------------------------------------------------------------------------------ 3
PROBLEEMOPLOSSING ALVORENS DE KLANTENSERVICE TE CONTACTEREN --------------------------- 3
INSTALLATIE ------------------------------------------------------------------------------------------------------------------------- 3
INSTRUCTIES OM HET TOESTEL AAN TE SLUITEN ------------------------------------------------------------------ 4
RISICO OP SCHADELIJKE MICROGOLVEN REDUCEREN ----------------------------------------------------------- 4
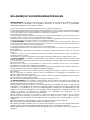
BELANGRIJKE VOORZORGSMAATREGELEN ---------------------------------------------------------------------------- 5
BASISPRINCIPES BEREIDINGEN MET MICROGOLF ------------------------------------------------------------------- 7
TE GEBRUIKEN MATERIALEN IN DE MICROGOLFOVEN ------------------------------------------------------------- 7
BENAMING ONDERDELEN EN TOEBEHOREN --------------------------------------------------------------------------- 8
BEDIENINGSPANNEEL ----------------------------------------------------------------------------------------------------------- 9
GEBRUIKSAANWIJZING -------------------------------------------------------------------------------------------------------- 11
De klok instellen ---------------------------------------------------------------------------------------------------------11
Koken met de microgolfoven -----------------------------------------------------------------------------------------11
Snelstartfunctie -----------------------------------------------------------------------------------------------------------11
Grillfunctie ---------------------------------------------------------------------------------------------------------------- 12
Koken met de microgolf+ Grill functie ------------------------------------------------------------------------------ 12
Combi functie (enkel van toepassing op de COMBI toestellen) -------------------------------------------- 12
Koken met de microgolf + Combi functie (enkel van toepassing op de COMBI toestellen) ----------12
Ontdooien op basis van gewicht ------------------------------------------------------------------------------------ 13
Ontdooien op basis van tijd ------------------------------------------------------------------------------------------ 13
Automatische kookprogramma’s ------------------------------------------------------------------------------------ 14
Warmhoudfunctie (enkel van toepassing op de COMBI toestellen) --------------------------------------- 14
Veiligheidsvergrendeling voor kinderen --------------------------------------------------------------------------- 14
REINIGING EN ONDERHOUD ------------------------------------------------------------------------------------------------- 15
Strona się ładuje...
Strona się ładuje...
Strona się ładuje...
Strona się ładuje...
Strona się ładuje...
Strona się ładuje...
Strona się ładuje...
Strona się ładuje...
Strona się ładuje...
Strona się ładuje...
Strona się ładuje...
Strona się ładuje...
Strona się ładuje...
Strona się ładuje...
Strona się ładuje...
Strona się ładuje...
Strona się ładuje...
Strona się ładuje...
Strona się ładuje...
Strona się ładuje...
Strona się ładuje...
Strona się ładuje...
Strona się ładuje...
Strona się ładuje...
Strona się ładuje...
Strona się ładuje...
Strona się ładuje...
Strona się ładuje...
Strona się ładuje...
Strona się ładuje...
Strona się ładuje...
Strona się ładuje...
Strona się ładuje...
Strona się ładuje...
Strona się ładuje...
Strona się ładuje...
Strona się ładuje...
Strona się ładuje...
Strona się ładuje...
Strona się ładuje...
Strona się ładuje...
Strona się ładuje...
Strona się ładuje...
Strona się ładuje...
Strona się ładuje...
Strona się ładuje...
Strona się ładuje...
Strona się ładuje...
Strona się ładuje...
Strona się ładuje...
Strona się ładuje...
Strona się ładuje...
Strona się ładuje...
Strona się ładuje...
Strona się ładuje...
Strona się ładuje...
Strona się ładuje...
Strona się ładuje...
Strona się ładuje...
Strona się ładuje...
Strona się ładuje...
Strona się ładuje...
Strona się ładuje...
Strona się ładuje...
Strona się ładuje...
Strona się ładuje...
Strona się ładuje...
Strona się ładuje...
Strona się ładuje...
Strona się ładuje...
Strona się ładuje...
Strona się ładuje...
Strona się ładuje...
Strona się ładuje...
Strona się ładuje...
Strona się ładuje...
Strona się ładuje...
Strona się ładuje...
Strona się ładuje...
Strona się ładuje...
Strona się ładuje...
Strona się ładuje...
Strona się ładuje...
Strona się ładuje...
Strona się ładuje...
Strona się ładuje...
Strona się ładuje...
Strona się ładuje...
Strona się ładuje...
Strona się ładuje...
-
 1
1
-
 2
2
-
 3
3
-
 4
4
-
 5
5
-
 6
6
-
 7
7
-
 8
8
-
 9
9
-
 10
10
-
 11
11
-
 12
12
-
 13
13
-
 14
14
-
 15
15
-
 16
16
-
 17
17
-
 18
18
-
 19
19
-
 20
20
-
 21
21
-
 22
22
-
 23
23
-
 24
24
-
 25
25
-
 26
26
-
 27
27
-
 28
28
-
 29
29
-
 30
30
-
 31
31
-
 32
32
-
 33
33
-
 34
34
-
 35
35
-
 36
36
-
 37
37
-
 38
38
-
 39
39
-
 40
40
-
 41
41
-
 42
42
-
 43
43
-
 44
44
-
 45
45
-
 46
46
-
 47
47
-
 48
48
-
 49
49
-
 50
50
-
 51
51
-
 52
52
-
 53
53
-
 54
54
-
 55
55
-
 56
56
-
 57
57
-
 58
58
-
 59
59
-
 60
60
-
 61
61
-
 62
62
-
 63
63
-
 64
64
-
 65
65
-
 66
66
-
 67
67
-
 68
68
-
 69
69
-
 70
70
-
 71
71
-
 72
72
-
 73
73
-
 74
74
-
 75
75
-
 76
76
-
 77
77
-
 78
78
-
 79
79
-
 80
80
-
 81
81
-
 82
82
-
 83
83
-
 84
84
-
 85
85
-
 86
86
-
 87
87
-
 88
88
-
 89
89
-
 90
90
-
 91
91
-
 92
92
-
 93
93
-
 94
94
-
 95
95
-
 96
96
-
 97
97
-
 98
98
-
 99
99
-
 100
100
-
 101
101
-
 102
102
-
 103
103
-
 104
104
-
 105
105
-
 106
106
-
 107
107
-
 108
108
-
 109
109
-
 110
110
-
 111
111
-
 112
112
-
 113
113
-
 114
114
-
 115
115
-
 116
116
-
 117
117
-
 118
118
-
 119
119
-
 120
120
-
 121
121
-
 122
122
-
 123
123
-
 124
124
-
 125
125
-
 126
126
-
 127
127
-
 128
128
-
 129
129
-
 130
130
-
 131
131
-
 132
132
-
 133
133
-
 134
134
-
 135
135
-
 136
136
-
 137
137
-
 138
138
-
 139
139
-
 140
140
-
 141
141
-
 142
142
-
 143
143
-
 144
144
-
 145
145
-
 146
146
-
 147
147
-
 148
148
-
 149
149
-
 150
150
-
 151
151
-
 152
152
-
 153
153
-
 154
154
-
 155
155
-
 156
156
-
 157
157
-
 158
158
-
 159
159
-
 160
160
-
 161
161
-
 162
162
-
 163
163
-
 164
164
-
 165
165
-
 166
166


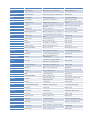
Candy CMXG 25 DCB Instrukcja obsługi
- Kategoria
- Mikrofale
- Typ
- Instrukcja obsługi
- Niniejsza instrukcja jest również odpowiednia dla
w innych językach
- español: Candy CMXG 25 DCB El manual del propietario
- italiano: Candy CMXG 25 DCB Manuale del proprietario
- Deutsch: Candy CMXG 25 DCB Bedienungsanleitung
- português: Candy CMXG 25 DCB Manual do proprietário
- français: Candy CMXG 25 DCB Le manuel du propriétaire
- English: Candy CMXG 25 DCB Owner's manual
- русский: Candy CMXG 25 DCB Инструкция по применению
- Nederlands: Candy CMXG 25 DCB de handleiding
- română: Candy CMXG 25 DCB Manualul proprietarului
Powiązane artykuły
Inne dokumenty
-
Beko MCF25210 Instrukcja obsługi
-
Euromaid MCG30 Instrukcja obsługi
-
Beko MWB 2310 EX Instrukcja obsługi
-
 COOKE LEWIS Built in Microwave Instrukcja obsługi
-
Gorenje MO20A4X Instrukcja obsługi
-
Electrolux EMT25207OX Instrukcja obsługi
-
Gorenje MO20A3X Instrukcja obsługi
-
Haier HOR45C5FT Instrukcja obsługi
-
Whirlpool MD544IXHA Instrukcja obsługi
-
Beko MCB25433BG Instrukcja obsługi
