
FACE RECOGNITION FUNCTIONS

Wszelkie prawa zastrzeżone © AAT Holding S.A.
2
Face recognition technology is available in 6000 series recorders and 3000 series cameras ending with the letter F in the
name. Face detection is performed by the camera which transmits the detection alarm and the position of the face in the
picture. The recorder performs a more accurate diagnosis. On the basis of the image it makes a face qualification. It can also
compare the recognized face with a certain probability to the face recorded in the face database. The recorder can also
activate the alarm function based on the qualification of the face to a specific group.
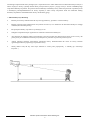
1. Installation recommendations
• The camera should be mounted so that the face appears "in front" in the camera image.
• The camera should be mounted at a height of 2 to 3.5 m depending on the lens position and view gain (H on the
image below).
• The inclination angle of the α camera should be less than 15 °
• To ensure the best possible recognition quality, the face should not be deviated by no less than 30 ° from the left or
right side in relation to the camera axis. The horizontal inclination angle should not exceed 20 °.
• The distance D is adjusted depending on the lens setting
• Ensure that the face is as even as possible. Underexposure or dark circles on the face significantly limit the
possibility of correct facial recognition.
• The choice of the scene should that the face is visible in the scene for at least 3 seconds (eg observation of the
corridor.)

Wszelkie prawa zastrzeżone © AAT Holding S.A.
3
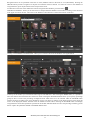
1. Configuration with NVR menu
1.1. Enable the face recognition function
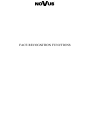
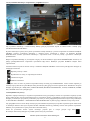
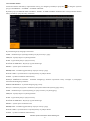
To enable face recognition functions click on main menu CAMERA > INTELLIGEN ANALYTICS > FACE DETECTION
Set the filed in FACE DETECTION column to ON to enable face detection alarms from the camera.
In DURATION field, you can set the time for which the recorder will generate an alarm in the range from 5 seconds to 2
minutes.
Set the ON in SAVE SOURCE INFORMATION column to save graphic file with scene information on camera SD card
Set the ON in SAVE FACE INFORMATION column to save graphic file with face infrmation on camera SD card.
If the DRAW AREA filed is cheked it’s possible to mark the face detection zone in scene.
If the box DRAW AREA is ticked it’s possible to mark the face detection zone in the scene. Press CLEAR button to erase
designated area.
Pressing the APPLY button activates the face detection function. If other image analysis functions have been started, they
will be disabled.
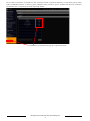
Pressing the PROCESSING MODE button launches a window in which you can configure the FACE ALARM response.
The following settings are available:
FACE DETECTION - the settings allow you to set the alarm response to face detection alarms generated in the camera. The
following alarm reactions are available:
Recording the selected channel, saving the snapshot, enable PUSH message, enabling the alarm out-put, preset select,
buzzer activation, activating full screen channel display, sending email with notification.
FACE MATCH PARAMETERS - allow to set parameters for recognizing engine in SIMILARITY field. Matching the
fields in CHANNEL SETTINGS allow to display pop-up message with face recognition information.
FACE MATCH - allow to set alarms for FACE MATCH. It is possible to generate alarm after qualifying the face to one of
the groups. The following settings are available:
Recording the selected channel, saving the snapshot, enable PUSH message, enabling the alarm out-put, preset select,
buzzer activation, activating full screen channel display, sending email with notification.

Wszelkie prawa zastrzeżone © AAT Holding S.A.
4
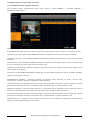
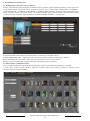
1.2. Displaying face alarms in live video
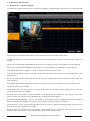
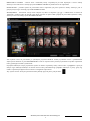
To display information about faces, right-click on the video image and click on "FACE RECOGNITION".
The bar on the right side of the window will display information about the recognition process. SNAP FACE column
displays information with a face image sent from the camera. In the RESULT column, information about the diagnosis will
be displayed along with a pattern face and a percentage of similarity. Recognitions are arranged in order from top to bottom.
After clicking the SIMILARITY it’s possible to set from which likelihood the faces will be displayed. Clicking the BACK
button closes the recognition menu.
Set the mouse cursor on the face image in the SNAP FACE column to open menu under the picture. The following settings
are available.
Adding faces to the base
Face search in recognized faces
Records play
Additional settings
To save the face to the base on the basis of recognition, press the REGISTER button. The face will be saved after pressing
the OK button. In the GROUP field, specify which group to save the face to. In addition to writing, there are fields such as:
NAME, SEX, BIRTHDAY, NATIVE PLACE, ID TYPE , ID NUMBER, MOBILE, No.
1.3. Face database management
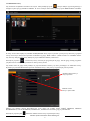
The recorder records information about all face recognition sent from cameras. The recorder saves the base of faces serving
as a model for face recognition in the transmitted image.
Browsing the database of recognized faces is available by pressing the face search button in the live recognition window or
by clicking on the SEARCH AND BACKUP> SMART SEARCH menu and selecting the FACE item on the left side of the
menu.
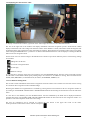
To view faces in the database, press the SEARCH button. All faces identified by the NVR will be displayed within the
specified time range. The START TIME and END TIME fields define the time intervals for the recognition results. It is
possible to search in comparison mode with a face image.
The face for comparison can be selected by pressing the plus button in the upper left corner of the menu.
In the open menu we have three sources of faces to compare:

Wszelkie prawa zastrzeżone © AAT Holding S.A.
5
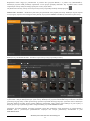
TARGET DATABASE - Opens a window with a library of faces of already recognized people saved in the database. Select
the face or faces and press the SELECT FACE button to add faces to the recognition.
FACE LIBRARY - Opens a window with a library of faces of already recognized people saved in the database. Select the
face or faces and press the SELECT FACE button to add faces to the recognition.
EXTERNAL FACES - A face comparison can also be made with a jpg photo with a resolution from 64 * 64 to 1920 * 1080
and a file size of up to 200 Kb. The file should be placed on a USB disk and connected to the USB port of the recorder.
Mark the face and press the SELECT FACE button.
If you have selected a face to be compared by pressing the SEARCH button, you will search for faces with a similarity
greater than that specified in the SIMILARITY field. If no face is selected, all face recognition that meets the search
conditions will be displayed. A single left-click on the recognized face image opens the window with the preview in the
lower right corner. Double-clicking on the image opens the full-screen preview window. Clicking the upper right corner of
the frame with the recognized photo opens the window with the recognition details.
To select a face pattern for comparison, click the plus button in the empty window.

Wszelkie prawa zastrzeżone © AAT Holding S.A.
6
1.3.1 Face literary
To start managing master face click the button in the lower left corner of the main menu and then choose SEARCH
AND BACKUP. In the newly opened menu, select the TARGET DATABSE from top menu.
On the left side of the window there is the MANAGEMENT tab which selection displays on the right side of the list menu
with groups of model faces. The factory configure recorder has three groups added: ALLOW LIST 1, ALLOW LIST 2 and
BLACK LIST. To create another group, click on the ADD GROUP button from the bottom of the menu.
Pressing the button opens the list of standard faces assigned to the group. If any faces have already been assigned to
the group, these will be displayed in the window on the left.
To add a face to the group, click on the ADD button. A window will open allowing you to add faces. Selecting the
SNAPSHOT GALLERY button allows you to add faces from the face database recognized by the recorder.
It is possible to add face identifying data such as : NAME, SEX, BIRTHDAY, NATIVE PLACE, ID TYPE, IN NUMBER,
MOBILE, NO and group identification in the GROUP field.
Pressing the plus button allows you to add an image from the database of recognized faces.
Adding a face image from
the diagnosis database
Adding a face image
from a USB drive

Wszelkie prawa zastrzeżone © AAT Holding S.A.
7
It is possible to add a face image from a USB disk after choosing the EXTERNAL FACES option.
Faces to the library can be added from a USB drive (as jpg files with resolutions from 64 * 64 to 1920 * 1080 and file sizes
up to 200 Kb) or from a database of already recognized faces.
Pressing the OK button adds the face to the selected group
The MODIFY button allows you to change the parameters of the face saved in the database.
The DELETE button allows you to delete a face after selecting it first.
The CLEAR ALL button removes all faces from the selected face group
The IMPORT / EXPORT button allows you to export or import a database with faces on a USB stick. The database can be
properly played only in recorders that have the same three characters separated by dots in the displayed firmware version.
When exporting files, you can use the file access encryption function.
NOTE: The correct transfer of the database is possible between the registrars whose software in the version name has three
identical characters separated by dots.
Pressing the PROCESSING MODE button displays a list of alarm actions that can be performed after face recognition
depending on to which group the assigned face will be qualified.
The following settings are available in the fields:
ENABLE ON. / OFF. - triggers an alarm when detecting faces from a group.
RECORD - starts recording the selected channel after detecting faces from the group
SNAPSHOT - saves a photo from the selected channel
PUSH - sends a push alarm when faces are detected
ALARM OUT - activation of the alarm output
BUZZER - activates the audio signal to detect faces from the group
POP-UP VIDEO - switch to full screen
E-MAIL - sending information about the alarm in an e-mail
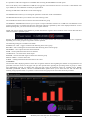
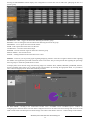
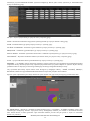
1.4 Statistics
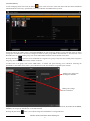
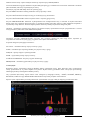
The recorder offers displaying statistics of the face recognition function. Data regarding the number of recognized faces are
presented in the form of bars in the graph. The pie chart presents data regarding the percentage share of groups to which
face qualification occurred. To display data, select the time range, the following ranges are available: DAY, WEEK,
MONTH, QUARTER, TODAY, and the CUSTOMIZATION option allows you to select the start and end dates. By
selecting the appropriate fields, it is possible to select cameras and groups from which data should be presented

Wszelkie prawa zastrzeżone © AAT Holding S.A.
8
1.5 ALARM SETTINGS
The alarm settings for the face recognition function are available by clicking the button and then selecting
SETTINGS> ALARM> FACE ALARM.
Selecting FACE DETECTION in the FACE ALARM option launches a window in which you can determine the response to
face detection functions in the camera.
Selecting FACE DETECTION in the FACE ALARM option launches a window in which you can determine the response to
face detection functions in the camera.
The following settings are available in the fields:
ENABLE ON. / OFF. - triggers an alarm when detecting faces from a group.
RECORD - starts recording the selected channel after detecting faces from the group
SNAPSHOT - saves a photo from the selected channel
PUSH - sends a push alarm when faces are detected
ALARM OUT - activation of the alarm output
BUZZER - activates the audio signal to detect faces from the group
POP-UP VIDEO - switch to full screen
E-MAIL - sending information about the alarm in an e-mail
Clicking FACE MATCH - starts the picture launches the configuration of alarms after recognizing the face. The following
settings are available for alarm configuration:
ENABLE ON. / OFF. - triggers an alarm when detecting faces from a group.
RECORD - starts recording the selected channel after detecting faces from the group
SNAPSHOT - saves a photo from the selected channel
PUSH - sends a push alarm when faces are detected
ALARM OUT - activation of the alarm output
BUZZER - activates the audio signal when detect faces from the group
POP-UP VIDEO - switch to full screen
E-MAIL - sending information about the alarm in an e-mail

Wszelkie prawa zastrzeżone © AAT Holding S.A.
9
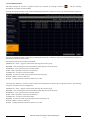
In order to display a window on the screen of the recorder in which information about the recognized face will be displayed,
select CHANNEL SELECTION in the menu at the top. Then, check the boxes in the ON column to display the window
with the recognized face for the selected channel.
Launching a pop-up window with a recognized face

Wszelkie prawa zastrzeżone © AAT Holding S.A.
10
2. Web interface management
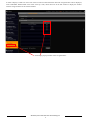
2.1. Configuring face detection in camera
The web interface allows access to the face management functions in a similar way as the function from the recorder menu.
Starting the face detection function on the camera is available in the FUNCTION PANEL > CAMERA > INTELIGENT
ANALYTICS > FACE DETECTION. Using the right mouse button, select the face detection area. The CLEAR button is
used to delete the area. To activate the face detection function in the camera, switch the FACE DETECTION field to ON. In
the LENGTH field you can set the duration of the alarm in the range from 5 seconds to 2 minutes.
SAVE SOURCE INFORMATION - enables scene recording to a jpg file on the memory card installed in the camera .
SAVE FACE INFORMATION - saving a jpg file with information about the face on the memory card
Clicking on the APPLY button saves the face recognition settings in the camera.
2.1. Face serach and playback
To search for a database with recognized faces, select in the SEARCH AND COPY > FACE menu
From the menu, select the SEARCH button. The recorder will display faces that have been recognized in the time range
specified by the START TIME and END TIME windows.

Wszelkie prawa zastrzeżone © AAT Holding S.A.
11
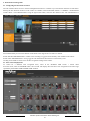
Recognized faces can be presented in the form of icons (SMALL button in the form of a list (DETAILS)). Pressing the
TRACK buttons presents recognition in the path of transitions between cameras. To search for a face in the database of
recognized faces, press the plus button in the left part of the menu.
To add a face to the base of the model face from the recognized face database, press the button .
TARGET DATABASE - allows you to select faces to compare from the database of saved faces. Clicking on the check box
in the upper left selects the face. Then click on the SELECT FACE button to confirm the selection of the face.
Clicking on SNAPSHOT GALLERY field - allows you to choose a face from the database of recognized faces.
At the top of the window you can mark the time range of searched faces. After clicking the MORE button, it is possible to
select the cameras from which the face selection is made. Clicking the SETTINGS button allows you to specify percentage
groups of faces as well as the percentage of diagnoses from which faces are to be selected. Then the SEARCH button
searches for faces according to the given parameters. Choose your faces by clicking on the field of choices in the upper left
corner of the displayed window and then click the SELECT FACE button. Pressing the SEARCH button will display
recognized faces for the time parameters specified in the START and END fields as well as the percentage similarity greater
than or equal to the parameter defined in the SIMILARITY field.

Wszelkie prawa zastrzeżone © AAT Holding S.A.
12
2.2. Target database - in this tab we have the ability to manage groups of faces that serve as patterns to be recognized. It is
also possible to generate statistics on recognized faces.
Selecting the MANAGE tab on the left allows you to manage a database of saved faces that can be considered as a facial
pattern to be recognized when you press the MANAGE button. The menu displays groups in which faces are saved.
Pressing the arrow button in the last column on the right opens the saved faces in the group. To add a face press the ADD
button, the add window will be displayed.
Enter the data identifying the person in the displayed fields and then press the ADD button.
In the window that appears, press SEARCH to display the recognized faces. Check the box with the upper left window and
then press the OK button. After choosing the face and entering data, press the OK button to enter the face into the database.
After selecting the check box in the upper left face window it’s possible to remove the face from the database with the
DELETE button or edit the face data stored in the database with the EDIT button.

Wszelkie prawa zastrzeżone © AAT Holding S.A.
13
Pressing the PROCESSING button displays the configuration of events that will be made after qualifying the face to a
specific group.
ENABLE ON. / OFF. - triggers an alarm when detecting faces from a group.
RECORD - starts recording the selected channel after detecting faces from the group
SNAPSHOT - saves a photo from the selected channel
PUSH - sends a push alarm when faces are detected
ALARM OUT - activation of the alarm output
BUZZER - activates the audio signal to detect faces from the group
POP-UP VIDEO - switch to full screen
E-MAIL - sending information about the alarm in an e-mail
Statistics - in this tab you can present graphs regarding displaying statistics of the face recognition function. Data regarding
the number of recognized are presented in the form of bars in the chart. The pie chart presents data regarding the percentage
share of groups to which face qualification occurred.
To display data, select the time range, the following ranges are available: DAY, WEEK, MONTH, QUARTER, TODAY,
and the ACCESS option allows you to select the start and end dates. By selecting the appropriate fields, it is possible to
select cameras and groups from which data should be presented.
2.3. Face alarm - Clicking in the FUNCTION PANEL item> ALARMS> FACE ALARMS opens a window for
configuring face detection alarms. The web alarm configuration menu is the same as the alarm settings that can be set in the
NVR recorder menu. The description of alarm settings is the same as described in section 1.5 Alarm settings in this manual.

Wszelkie prawa zastrzeżone © AAT Holding S.A.
14
2019-03-20 MB, JZ

FUNKCJA ROZPOZNAWANIA TWARZY

Wszelkie prawa zastrzeżone © AAT Holding S.A.
2
Technologia rozpoznawania twarzy dostępna jest w rejestratorach serii 6000 i kamerach serii 3000 zakończonych literą F w
nazwie. Wykrycie twarzy wykonuje kamera która przesyła alarm wykrycia i pozycję twarzy w obrazie. Dokładniejszego
rozpoznania dokonuje rejestrator. Na postawie obrazu dokonuje kwalifikacji twarzy. Może też porównać rozpoznaną twarz
z określonym prawdopodobieństwem do twarzy zapisanej w bazie twarzy. Rejestrator może też uruchomić funkcję
alarmową na podstawie zakwalifikowania twarzy do określonej grupy.
1. Zalecenia dotyczące instalacji
• Kamera powinna być zamontowana tak aby twarz pojawiała się „przodem” w obrazie kamery.
• Kamera powinna zostać zamontowana na wysokości od 2 do 3,5 m w zależności od ustawienia obiektywu i zasiągu
widzenia (H na obrazku poniżej).
• Kat pochylenia kamery α powinien być mniejszy od 15°
• Odległość rozpoznania D jest regulowana w zależności od ustawienia obiektywu
• Aby zapewnić jak najlepszą jakość rozpoznawania, twarz nie powinna być odchylona nie mniej niż 30° z lewej lub
prawej strony w stosunku do osi kamery. Kąt nachylenia w poziomie nie powinien przekroczyć 20°.
• Należy zapewnić możliwie równomierne oświetlenie twarzy. Niedoświetlenia lub cienie na twarzy znacznie
ograniczają możliwość poprawnego rozpoznania twarzy.
• Należy dobrać scenę tak aby twarz była widoczna w scenie przez przynajmniej 3 sekundy (np. obserwacja
korytarza. )

Wszelkie prawa zastrzeżone © AAT Holding S.A.
3
1. Konfigurowanie przy użyciu menu rejestratora
1.1. Uruchomienie funkcji rozpoznawania twarzy
Aby uruchomić funkcję rozpoznawania twarzy należy wybrać w menu KAMERA > ANALIZA OBRAZU >
WYKRYWANIE TWARZY
Należy ustawić pole WYKRYWANIE TWARZY w pozycję WŁ aby uruchomić wykrywanie twarzy w kamerze.
W polu DŁUGOŚĆ można ustawić czas przez jaki rejestrator będzie generował alarm w zakresie od 5 sekund do 2 minut.
Ustawienie pozycji WŁ w polu ZAPISZ OBRAZEK SCENY uruchamia zapis sceny na karcie pamięci w kamerze.
Ustawienie pozycji WŁ w polu ZAPISZ INFORMACJE TWARZY uruchamia zapis informacji o twarzy na karcie pamięci
w kamerze.
Jeśli zaznaczone jest pole NARYSUJ STREFĘ naciskając lewy przycisk myszki należy oznaczyć strefę wykrywania twarzy
w scenie. Naciśnięcie przycisku CZYŚĆ usuwa narysowaną scenę.
Naciskając przycisk USTAW uruchamia się funkcję wykrywania twarzy. Jeśli zostały uruchomione inne funkcję analizy
obrazu zostaną one wyłączone.
Naciśnięcie przycisku PRZETWARZANIE uruchamia okno w którym można skonfigurować reakcję ALARMU TWARZY.
Dostępne są następujące ustawienia:
WYKRYWANIE TWARZY - ustawienia pozwalają na ustawienie reakcji alarmowej na alarmy wykrycia twarzy
wygenerowane w kamerze. Dostępne są następujące reakcje alarmowe :
Uruchomienie nagrywania wybranego kanału, zapis zdjęcia, zdarzenie PUSH, uruchomienie wyjścia alarmowego, wybranie
presetu PTZ, uruchomienie brzęczyka, uruchomienie okna z powiadomieniem i wysłanie widomości e-mail.
PORÓWNAJ TWARZ - ustawienia reakcji alarmowej po rozpoznaniu twarzy. Rejestrator może wygenerować alarm w
zależności od zakwalifikowania rozpoznanej twarzy do zapisanej listy. Dostępne reakcje alarmowe to :
Uruchomienie nagrywania wybranego kanału, zapis zdjęcia, zdarzenie PUSH, uruchomienie wyjścia alarmowego, wybranie
presetu PTZ, uruchomienie brzęczyka, uruchomienie okna z powiadomieniem i wysłanie widomości e-mail.
WYBÓR KANAŁU - umożliwia włącznie funkcji porównywania twarzy dla kamer oraz granicznego podobieństwa dla
którego rejestrator będzie kwalifikował rozpoznanie.

Wszelkie prawa zastrzeżone © AAT Holding S.A.
4
1.2. Wyświetlanie informacji o rozpoznaniu w podglądzie na żywo
Aby wyświetlić informację o twarzach należy kliknąć prawym przyciskiem myszki na obrazie wideo i kliknąć opcję
„ROZPOZNAWANIE TWARZY”.
W pasku widocznym z prawej strony okna wyświetlone zostaną informacje o procesie rozpoznania. W kolumnie ZDJĘCIE
TWARZY zostanie wyświetlona informacja z obrazem twarzy przesłanym z kamery. W kolumnie WYNIK
PORÓWNANIA zostanie wyświetlona informacja o rozpoznaniu wraz z wzorcową twarzą i procentowo określonym
podobieństwem.
Kolejne rozpoznania układają się w kolejności od góry na dół. Po kliknięciu przycisku PODOBIEŃSTWO określa się od
jakiego prawdopodobieństwa rozpoznania wyświetlane będą twarze. Kliknięcie przycisku POWRÓT zamyka menu
rozpoznawania.
Ustawienia kursora myszki na obrazie twarzy w kolumnie ZDJĘCIE TWARZY otwiera menu pod zdjęciem. Dostępne są
następujące ustawienia.
Rejestracja twarzy w bazie
Wyszukiwanie w twarzy w rozpoznanych twarzach
Odtwarzanie nagrań
Dodatkowe ustawienia
Aby zapisać twarz w bazie na postawie rozpoznania należy nacisnąć przycisk REJESTRUJ. Twarz zostanie zapisana po
naciśnięciu przycisku OK. W polu GRUPA należy określić do jakiej grupy ma zostać zapisana twarz. Dodatkowo do zapisu
dostępne są pola takie jak : IMIĘ, PŁEĆ, DZIEŃ URODZIŃ, MIEJSCE POCHODZENIA, TYP ID, NUMER ID, NUMER
TEL, NUMER. Pola te nie są obligatoryjne.
1.3.Zarządzanie bazą twarzy
Rejestrator zapisuje informacje o wszystkich rozpoznaniach twarzy przesyłanych z kamer. W rejestratorze zapisuje się baza
twarzy służących jako wzór do rozpoznania twarzy w przesyłanym obrazie. Przeglądanie w bazie rozpoznanych twarzy jest
dostępne po naciśnięciu przycisku wyszukiwania przy twarzy w oknie podglądu rozpoznawania na żywo lub po kliknięciu
w menu SZUKAJ I SKOPIUJ > INTELIGENTNE WYSZUKIWANIE i wybraniu pozycji TWARZ z lewej strony menu.
Aby przeglądać twarze w bazie należy nacisnąć przycisk SZUKAJ. Wyświetlą się wszystkie rozpoznane przez NVR twarze
w określonym zakresie czasowym. W polach START i KONIEC określa się przedziały czasowe dla wyników rozpoznania.
Możliwe jest wyszukiwanie w trybie porównania z obrazem twarzy.
Twarz do porównania można wybrać naciskając przycisk plus w lewym górnym rogu menu.
W otwartym menu mamy dostępne trzy źródła wyboru twarzy do porównania :

Wszelkie prawa zastrzeżone © AAT Holding S.A.
5
BIBLIOTEKA TWARZY - Otwiera okno z biblioteką twarzy rozpoznanych już osób zapisanych w bazie. Należy
zaznaczyć twarz lub twarze i nacisnąć przycisk WYBIERZ TWARZ aby dodać twarze do rozpoznania.
ROZPOZNANE - pozwala wybrać do porównania twarze rozpoznane już przez rejestrator. Należy zaznaczyć pole w
górnym prawym rogu i nacisnąć przycisk WYBIERZ TWARZ.
ZEWNĘTRZNY - Porównanie twarzy może odbywać się także ze zdjęciem typu jpg o rozdzielczości od 64*64 do
1920*1080 i wielkości pliku do 200 Kb. Plik należy umieścić na dysku USB i podpiąć do portu USB rejestratora. Nalży
zaznaczyć twarz i nacisnąć przycisk WYBIERZ TWARZ.
Jeśli wybrano twarz do porównania po naciśnięciu przycisku SZUKAJ zostaną wyszukane twarze o podobieństwie
większym niż określono w polu PODOBIEŃSTWO. Jeśli nie wybrano twarzy zostaną wyświetlone wszystkie rozpoznania
twarzy spełniające warunki wyszukiwania.
Pojedyncze kliknięcie lewym przyciskiem myszki na obrazie rozpoznanej twarzy otwiera okno z podglądem w prawym
dolnym rogu. Podwójne kliknięcie na obrazie otwiera okno pełnoekranowego podglądu. Kliknięcie w prawy górny róg
ramki z rozpoznanym zdjęciem otwiera okno ze szczegółami rozpoznania.
Aby wybrać wzorzec twarzy do porównania należy kliknąć przycisk plus w pustym oknie.

Wszelkie prawa zastrzeżone © AAT Holding S.A.
6
1.3.1 Biblioteka twarzy
Aby uruchomić zarządzanie twarzami wzorcowymi należy kliknąć przycisk w lewym dolnym rogu menu głównego a
następnie wybrać pozycję SZUKAJ I SKPIUJ. W nowo otwartym menu nalży wybrać przycisk BIBLIOTEKA TWARZY.
Po lewej stronie okna znajduje się zakładka ZARZĄDZANIE której wybór wyświetla z prawej strony menu listy z grupami
twarzy wzorcowych. Fabrycznie rejestrator ma dodane trzy grupy: BIAŁA LISTA 1, BIAŁA LISTA 2 i CZARNA LISTA.
Aby utworzyć kolejną grupę należy kliknąć na przycisk DODAJ GRUPĘ z dołu menu.
Naciśnięcie przycisku otwiera listę twarzy wzorcowych przypisanych do grupy. Jeśli do grupy zostały przypisane
już jakieś twarze zostaną one wyświetlone w oknie po lewej stronie.
Aby dodać twarz do grupy należy kliknąć na przycisk DODAJ. Otworzy się okno pozwalające na dodawanie twarzy.
Wybranie przycisku ROZPOZNANE pozwala na dodanie twarzy z bazy twarzy rozpoznanych przez rejestrator.
Możliwe jest dodanie danych identyfikujących twarz takich jak NAME, PŁEĆ, DZIEŃ URODZIN, MIEJSCE
POCHODZENIA, TYP ID, NUMER ID, NUMER TEL., NUMER oraz określenie grupy w polu GRUPA.
Naciśnięcie przycisku plus umożliwia dodanie obrazu z bazy rozpoznanych twarzy.
Dodanie obrazu twarzy z
bazy rozpoznań
Dodanie obrazu
twarzy z dysku USB
Strona się ładuje...
Strona się ładuje...
Strona się ładuje...
Strona się ładuje...
Strona się ładuje...
Strona się ładuje...
Strona się ładuje...
Strona się ładuje...
-
 1
1
-
 2
2
-
 3
3
-
 4
4
-
 5
5
-
 6
6
-
 7
7
-
 8
8
-
 9
9
-
 10
10
-
 11
11
-
 12
12
-
 13
13
-
 14
14
-
 15
15
-
 16
16
-
 17
17
-
 18
18
-
 19
19
-
 20
20
-
 21
21
-
 22
22
-
 23
23
-
 24
24
-
 25
25
-
 26
26
-
 27
27
-
 28
28


w innych językach
- English: Novus NVR-6408-H1/F User manual
Powiązane artykuły
-
Novus NVR-6332-H2/F Instrukcja obsługi
-
-
-
-
Novus NVIP-4SD-6540/25/F Instrukcja obsługi
-
Novus NVIP-5VE-6202M Instrukcja obsługi
-
-
Novus NVIP-5VE-6201-II Instrukcja obsługi