
4
WIERTARKO-WKRĘTARKA Z
AKUMULATOREM LITOWO-JONOWYM
Wskazówki dotyczące obsługi i bezpieczeństwa
Tłumaczenie oryginalnej instrukcji obsługi
LITIJ-IONSKI AKUMULATORSKI VRTALNI VIJAČNIK
Navodila za upravljanje in varnostna opozorila
Prevod originalnega navodila za uporabo
LITIUM-IONTOVÝ AKU VRTACÍ
ŠROUBOVÁK
Pokyny pro obsluhu a bezpečnostní pokyny
Překlad originálního provozního návodu
LÍTIUM-IÓNOVÝ AKUMULÁTOROVÝ
VŔTACÍ SKRUTKOVAČ
Pokyny pre obsluhu a bezpečnostné pokyny
Preklad originálneho návodu na obsluhu
LITHIUM-ION CORDLESS DRILL
Operation and Safety Notes
Translation of original operation manual
LÍTIUM-ION AKKUS FÚRÓ-CSAVAROZÓ
Kezelési és biztonsági utalások
Az originál használati utasítás fordítása
LITHIUM-IONEN-AKKU-BOHRSCHRAUBER
Bedienungs- und Sicherheitshinweise
Originalbetriebsanleitung
LITHIUM-ION CORDLESS DRILL
PABS 10.8 A1

GB Operation and Safety Notes Page 5
PL Wskazówki dotyczące obsługi i bezpieczeństwa Strona 15
HU Kezelési és biztonsági utalások Oldal 25
SI Navodila za upravljanje in varnostna opozorila Stran 35
CZ Pokyny pro obsluhu a bezpečnostní pokyny Strana 45
SK Pokyny pre obsluhu a bezpečnostné pokyny Strana 55
DE / AT / CH Bedienungs- und Sicherheitshinweise Seite 65
Before reading, unfold the page containing the illustrations and familiarise yourself with all functions of the
device.
Przed przeczytaniem proszę rozłożyć stronę z ilustracjami, a następnie proszę zapoznać się z wszystkimi
funkcjami urządzenia.
Olvasás előtt kattintson az ábrát tartalmazó oldalra és végezetül ismerje meg a készülék mindegyik
funkcióját.
Pred branjem odprite stran s slikami in se nato seznanite z vsemi funkcijami naprave.
Před čtením si otevřete stranu s obrázky a potom se seznamte se všemi funkcemi přístroje.
Pred čítaním si odklopte stranu s obrázkami a potom sa oboznámte so všetkými funkciami prístroja.
Klappen Sie vor dem Lesen die Seite mit den Abbildungen aus und machen Sie sich anschließend mit allen
Funktionen des Gerätes vertraut.

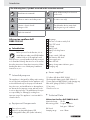
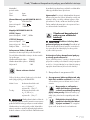
A B C D
1
4
1
9
12
10
11
6
7
8
5
3
2
4
2
16
14
15
13

5 GB
Table of contents
Introduction
Intended purpose ..........................................................................................................Page 6
Equipment Components ...............................................................................................Page 6
Items supplied ................................................................................................................Page 6
Technical Data ..............................................................................................................Page 6
General safety advice for electrical power tools
1.
Workplace safety .....................................................................................................Page 7
2.
Electrical safety .........................................................................................................Page 8
3. Personal safety ..........................................................................................................Page 8
4.
Careful handling and use of electrical power tools ...............................................Page 8
5. Use and handling of the cordless electrical power tool ........................................Page 9
Safety advice relating to cordless drill drivers ............................................................Page 9
Attention - Service lines! ................................................................................................Page 10
Original ancillaries / accessories .................................................................................Page 10
Before first use
Removing / charging / inserting rechargeable battery pack ......................................Page 10
Checking the battery status ..........................................................................................Page 10
Changing tools ..............................................................................................................Page 10
2 Gear Drive .................................................................................................................Page 11
Torque control / drill step ..............................................................................................Page 11
Preparing the tool for use
Changing the direction of rotation / unlocking the device .........................................Page 11
Switching ON / OFF .....................................................................................................Page 11
Activating the lock .........................................................................................................Page 11
Tips and Tricks ...............................................................................................................Page 11
Cleaning and Maintenance ........................................................................Page 12
Service .........................................................................................................................Page 12
Warranty ................................................................................................................... Page 12
Disposal ......................................................................................................................Page 13
Declaration of Conformity / Manufacturer .................................Page 13

6 GB
Introduction
Lithium-ion cordless drill
PABS 10.8 A1
Introduction
Before you use it for the first time, it is es-
sential that you make yourself fully familiar
with the functions of the appliance and
find out how to correctly handle electrically powered
tools. Read the following directions for use as well as
the safety instructions. Keep these instructions. When
handing the device on to a third party, hand these
instructions on, too.
Intended purpose
This appliance is designed for drilling and screwing
into wood, plastic and metal. Use the appliance only
as described and only for the purposes indicated.
Any other uses, and modifications to the appliance,
are deemed to be improper usage and may result
in serious physical injury. The manufacturer accepts
no responsibility for damage(s) resulting from
improper usage. The appliance is not intended for
commercial use.
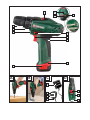
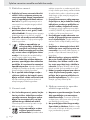
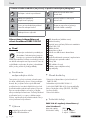
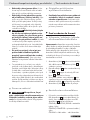
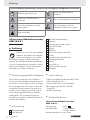
Equipment Components
1
Gear selector switch
2
Button for rechargeable battery LED
3
Rechargeable battery LED (status indication)
4
Bit garage
5
Direction of rotation switch/lock
6
ON / OFF switch
7
Soft-grip
8
Battery pack
9
Battery unlocking button
10
Light
11
Torque control / drill step
12
Quick-action drill chuck
13
Power supply unit
14
Status LED red
15
Battery charge status indicator green
16
Charging cap
Items supplied
1 Cordless drill driver PABS 10.8-A1
1 Rechargeable battery pack PABS 10.8-A1-1
1
Power supply unit PABS 10.8-A1-2 with charging cap
2 Bits in bit garage (CR-VPH1, CR-VPH2)
1 Carry case
1 Directions for use
Technical Data
Lithium-Ion Cordless Drill PABS 10.8-A1:
Nominal voltage: 10.8 V
Idle-running speed: 1st gear: 400 min
-1
2nd gear: 1300 min
-1
Drill chuck
clamping range: max. 10 mm
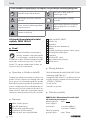
The following icons / symbols are used in this instruction manual:
Read instruction manual!
Keep children away from electrical
power tools!
Observe caution and safety notes! For indoor use only!
Caution – electric shock!
Danger to life!
Check that the device, mains lead
and plug are in good condition!
Explosive material!

7 GB
Maximum
drill diameter:
Steel: 8 mm
Wood: 20 mm
Rechargeable battery pack PABS 10.8-A1-1
:
Type: LITHIUM-ION
Nom. voltage: 10,8 V
Capacity: 1300 mAh
Power supply unit PABS 10.8 -LI-2:
INPUT:
Nominal voltage: 230 V
~
/ 50 Hz
OUTPUT:
Nominal voltage: 12 V
Rated current: 0.6 A
Charging time: approx. 3 hours
Noise / vibration data:
Measured values for noise are determined in accord-
ance with EN 60745. The A-weighted noise level
of the electrical power tool are typically:
Sound pressure level: 70 dB(A)
Sound power level: 80 dB(A)
Uncertainty K: 3 dB
Wear ear protection!
Total vibration (vector sum of three directions) is
calculated in accordance with EN 60745:
Drilling in metal: Vibration emission value
a
h, D
= 1.944 m / s
2
,
uncertainty K= 1.5 m / s
2
,
Screwing: Vibration emission value
a
h
= 2.101 m / s
2
,
uncertainty K= 1.5 m / s
2
.
WARNING!
The vibration level given in these
instructions has been measured in accordance with
a standardised measurement procedure specified
in EN 60745 and can be used to compare devices.
Different uses of the device give rise to different
vibration levels and in many cases they may exceed
the values given in these instructions. It is easy to
underestimate the vibration load if the electrical power
tool is used regularly in particular circumstances.
Note: If you wish to make an accurate assessment
of the vibration loads experienced during a particular
period of working, you should also take into account
the intervening periods of time when the device is
switched off or is running but is not actually in use.
This can result in a much lower vibration load over
the whole of the period of working.
General safety advice for
electrical power tools
WARNING!
Read all the safety advice
and instructions! Failure to observe the safety
advice and instructions may result in electric shock,
fire and / or serious injury.
Keep all the safety advice and instructions
in a safe place for future reference!
The term “electrical tool” used in the safety advice
refers to electrical tools powered by mains electrici-
ty (by means of a mains lead) and electrical tools
powered by rechargeable batteries (without a
mains lead).
1.
Workplace safety
a) Keep your working area clean and
well lit. Untidy or poorly lit working areas
can lead to accidents.
b)
Do not work with the device
in potentially explosive envi-
ronments in which there are
inflammable liquids, gases or dusts.
Electrical power tools create sparks, which can
ignite dusts or fumes.
c)
Keep children and other
people away while you are
operating the electrical tool.
Distractions can cause you to lose control of
the device.
Introduction / General safety advice for electrical power tools

8 GB
General safety advice for electrical power tools
2.
Electrical safety
a)
The mains plug on the device must match
the mains socket. The plug must not
be modified in any way. Do not use
an adapter plug with devices fitted
with a protective earth. Unmodified
plugs and matching sockets reduce the risk of
electric shock.
b) Avoid touching earthed surfaces such
as pipes, radiators, ovens and refrig-
erators with any part of your body.
There is an increased risk of electric shock if
your body is earthed
.
c) Keep the device away from rain or
moisture. Water entering an electrical device
increases the risk of electric shock.
d)
Do not use the mains lead for
any purpose for which it was
not intended, e.g. to carry the
device, to hang up the device or to pull
the mains plug out of the mains socket.
Keep the mains lead away from heat,
oil, sharp edges or moving parts of the
device. Damaged or tangled mains leads
increase the risk of electric shock.
e) When working outdoors with an
electrical power tool always use ex-
tension cables that are also approved
for use outdoors. The use of an extension
cable suitable for outdoor use reduces the risk
of electric shock.
f) Use a residual current device (RCD)
for protection if operating the electri-
cal power tool in a moist environment
is unavoidable. The use of an RCD reduces
the risk of electric shock.
3. Personal safety
a) Remain alert at all times, watch what
you are doing and always proceed
with caution. Do not use the device if
you are tired or under the influence of
drugs, alcohol or medication. One mo
ment
of carelessness when using the device can lead
to serious injury.
b)
Wear personal protective
equipment and always wear
safety glasses. The wearing of
personal protective equipment such as dust
masks, non-slip safety shoes, safety helmets or
ear protectors, appropriate to the type of elec-
trical power tool used and work undertaken,
reduces the risk of injury.
c) Avoid unintentional operation of the
device. Check that the electrical power
tool is switched off before you connect
it to the mains, pick it up or carry it.
Accidents can happen if you carry the device
with your finger on the ON / OFF switch or with
the device switched on.
d) Remove any setting tools or spanners
before you switch the device on. A tool
or spanner left attached to a rotating part of a
device can lead to injury.
e) Avoid placing your body in an unnat-
ural position. Keep proper footing
and balance at all times. By doing this
you will be in a better position to control the
device in unforeseen circumstances.
f) Wear suitable clothing. Do not wear
loose clothing or jewellery. Keep your
hair, clothing and gloves clear of mov-
ing parts. Loose clothing, jewellery or long
hair can become trapped in moving parts.
g) If vacuum dust extraction and collection
devices are fitted do not forget to
check
that they are properly connected and
correctly used. The use of these devices
reduces the hazard presented by dust.
4.
Careful handling and use
of electrical power tools
a) Do not overload the device. Always
use an electrical power tool that is
intended for the task you are under-
taking. By using the right electrical power
tool for the job you will work more safely and
achieve a better result.
b) Do not use an electrical power tool if
its switch is defective. An electrical power

9 GB
General safety advice for electrical power tools
tool that can no longer be switched on and off
is dangerous and must be repaired.
c)
Pull the mains plug out of the socket
and / or remove the rechargeable bat-
tery before you make any adjustments
to the device, change accessories or
when the device is put away. This pre-
caution is intended to prevent the device from
unintentionally starting.
d)
When not in use always ensure that
electrical power tools are kept out of
reach of children. Do not let anyone use
the device if he or she is not familiar
with it or has not read the instructions
and advice. Electrical power tools are dan-
gerous when they are used by inexperienced
people.
e) Look after the device carefully. Check
that moving parts are working prop-
erly and move freely. Check for any
parts that are broken or damaged
enough to detrimentally affect the
functioning of the device. Have dam-
aged parts repaired before you use
the device. Many accidents have their origins
in poorly maintained electrical power tools.
f) Keep cutting tools clean and sharp.
Carefully maintained cutting tools with sharp
cutting edges are less likely to jam and are
easier to control.
g) Use the electrical power tool, accesso-
ries, inserted tools etc. in accordance
with these instructions and advice, and
the stipulations drawn up for this par-
ticular type of device. In doing this, take
into account the working conditions
and the task in hand. The use of electrical
power tools for purposes other than those in-
tended can lead to dangerous situations.
5. Use and handling of the cord-
less electrical power tool
a) Charge a rechargeable battery unit
using only the charger recommended
by the manufacturer. Chargers are often
designed for a particular type of rechargeable
battery unit. There is the danger of fire if other
types of rechargeable battery units are used.
b) Only the rechargeable battery units
supplied are to be used with an elec-
trical power tool. The use of other recharge-
able battery units may lead to the danger of
injury or fire.
c) When they are not being used, store
rechargeable battery units away from
paperclips, coins, keys. nails, screws
or other small metal objects that could
cause the contacts to be bridged. Short-
circuiting the contacts of a rechargeable battery
unit may result in heat damage or fire.
d)
Fluids may leak out of rechargeable
battery units if they are misused. If
this happens, avoid contact with the
fluid. If contact occurs, flush the affect-
ed area with water. Seek additional
medical help if any of the fluid gets
into your eyes. Escaping battery fluid may
cause skin irritation or burns.
Safety advice relating
to cordless drill drivers
Securely support the workpiece. A workpiece
held in a clamp or vice is kept more securely in
place than one held by your hand.
WARNING!
POISONOUS DUSTS!
Harmful / noxious dusts generated from your
work represent a risk to the health of the person
operating the device and to anyone near the
work area.
Wear safety glasses and a dust
mask!
Do not drill any material containing
asbestos. Asbestos is a known carcinogen.
Hold the electrical power tool firmly.
High reaction torques may occur momentarily
during tightening or loosening of screws.
If the inserted tool jams, switch off the
electrical power tool immediately. Be
prepared for high reaction torques as they may
cause kickback. The inserted tool may jam if
the electrical power tool is overloaded or is
held at an angle to the workpiece.

10 GB
WARNING!
The inserted tool may
strike concealed electricity cables,
therefore when working you must
hold the electrical power tool by the
insulated handle areas only. Contact
with a live wire means that the metal parts of
the electrical power tools may become live and
this can result in an electric shock.
Before you carry out any tasks on the
device, transport or store it, make sure
that the direction of rotation switch is
in the middle position (lock). To prevent
the device from starting up unintentionally.
Children or persons who lack the knowledge or
experience to use the device or whose physical,
sensory or intellectual capacities are limited
must never be allowed to use the device without
supervision or instruction by a person responsi-
ble for their safety. Children must never be
allowed to play with the device.
Attention - Service lines!
WARNING!
Take steps to ensure that
you do not hit upon any service lines
(electricity, gas, water) when working
with electrical appliances. Check, if need be
with a service line detector, before you start to cut
or bore into a surface.
Original ancillaries /
accessories
Use only the ancillaries and accessories
that are detailed in the operating
instructions. The use of ancillaries and ac-
cessories other than those recommended in the
operating instructions could lead to an in-
creased risk of personal injury for you.
Before first use
Removing / charging / inserting
rechargeable battery pack
Note: The battery is supplied partially charged.
Charge the battery in the charging station for at
least three hours before first use. By doing this the
battery will operate at its highest capacity. You can
charge the Li-Ion battery at any time without risk of
shortening battery life. Interrupting the charging
process does not damage the battery.
1. In order to remove the rechargeable battery pack
8
, press the release buttons
9
and take the
rechargeable battery pack
8
out of the device.
2. Place the charging cap
16
onto the rechargeable
battery pack
8
.
3. Place the power supply unit
13
into the socket.
The status LED
14
will shine red.
4. The green charge indicator LED
15
shows you
that the charging process is complete and the
battery pack
8
is ready for use.
5. Insert the rechargeable battery pack
8
into
the device.
Checking the battery status
To check the battery status, press the button for
the rechargeable battery LED
2
(refer to main
diagram). The status or the remaining power
will be displayed in the rechargeable battery
LED
3
as follows:
RED / ORANGE / GREEN = maximum charge /
performance
RED / ORANGE = medium charge / performance
RED = low charge – recharge battery
Changing tools
Your cordless drill / screwdriver has a fully automat-
ic spindle lock
.
Once the motor has come to a halt, the drive shaft
is automatically locked, so that the chuck
12
can
be opened simply by turning it
.
General safety advice for electrical power tools / Before first use

11 GB
After you have inserted the required bit and fixed it
in place by turning the chuck
, you can immedi-
ately continue working. The spindle lock releases
itself automatically when the motor is started (by
operation of the ON / OFF switch
6
).
2 Gear Drive
Note: Move the gear selector switch
1
only
after the device has come to a standstill.
In the first gear (Gear selector switch
1
in Position: 1)
you achieve a speed of approx. 400 rpm and a high
torque. This setting is suitable for all screwing tasks.
In the second gear (Gear selector switch
1
in Position: 2)
It achieves a speed of up to approx. 1300 rpm, for
the carrying out of drilling tasks.
Torque control / drill step
You can use the torque control / drill step
11
to ad-
just the torque. When the value of the torque
setting is reached, the clutch disengages the drive
connection to the chuck.
Select a low setting for small screws, soft work
material.
Select a high setting for large screws, hard
work materials and for the extraction of screws.
For drilling work, select the drill setting by putting
the torque control / drill setting into the
position.
For drilling tasks, also push the gear selector
switch
1
to the front (Position: 2).
Preparing the tool for use
Changing the direction of
rotation / unlocking the device
Unlock the device and change the direction of rota-
tion by pressing the rotational direction switch
5
to the right or to the left.
Switching ON / OFF
Switching on:
To start the appliance squeeze on the ON /
OFF switch
6
and then keep it pressed down.
The light
10
comes on with a slightly or fully
pressed ON / OFF switch
6
and illuminates
the working area in poor lighting conditions.
Switching off:
To stop the appliance, release the ON / OFF
switch
6
.
Changing the rotational speed:
The ON / OFF switch
6
has a variable speed
control. Light pressure on the ON / OFF switch
6
causes the device to operate at a low speed. In-
creasing the pressure increases the speed.
Activating the lock
Press the rotational direction switch
5
into the
middle position. The ON / OFF switch
6
is
now blocked.
Tips and Tricks
When screwing into wood, metal and
other materials:
Screw bits are designated with their dimensions
and their shape. If you are unsure, always try
the particular screw bit out to see whether it sits
in the screw head without any free play.
Before you use the appliance, check to see
that the screw or drill bit is properly fitted, i.e.
located centrally in the chuck.
Torque:
Smaller screws and bits in particular can be
easily damaged if you adjust the appliance
with too high a torque and/or rotation speed.
Hard screw bed:
Particularly high torques can occur, for example
with metal screws tightened by socket tool bits.
Select a lower rotation speed.
Before first use / Preparing the tool for use

12 GB
Soft screw bed:
You should also select a low speed in order not
to damage the wood workpiece surface through
contact with the metal screw head. Use a coun-
tersinker.
When drilling into wood, metal and other
materials:
With small diameter drill bits use a high drill
speed. For large diameter drill bits, use a low
drill speed.
For hard materials, select a low drill speed.
For soft materials, select a high drill speed.
Secure or fix down the workpiece (if possible)
in a clamp or vice.
Mark the intended position of the hole with a
centre punch or a nail and select a low drill speed
for drilling.
Take the rotating drill bit out of the hole frequently
so that swarf or drill dust can be re-moved and
the hole and tool is ventilated.
Drilling in metal:
Use a metal drill bit (HSS). For the best results,
you should cool the bit with oil. Metal drill bits
can also be used to drill into plastic.
Drilling in wood:
Normally you should use a wood drill with a
centring point. You can screw small screws into
soft wood without the need for pre-drilling.
Cleaning and Maintenance
CAUTION! Place the direction of rotation
switch
5
into the middle position before carrying
out any tasks on the device, e.g. changing tools or
maintenance, or before transporting or storing the
device. Inadvertent operation of the ON / OFF
switch
6
may result in injury.
Always pull the mains adapter
13
out of the mains
socket and remove the battery pack before you
clean or maintain the device.
The Cordless Drill / Screwdriver is maintenance-free.
Always keep the device clean, dry and free of
oil or grease.
Clean the device immediately after you have
finished using it.
Do not allow any liquids to enter the device.
Use a cloth to clean the housing.
Never use petrol, solvents or cleaning agents
that might attack plastic.
Service
WARNING!
Have your device
repaired at the service centre or by
qualified specialist personnel using
original manufacturer parts only. This
will ensure that your device remains safe to use.
WARNING!
If the plug or lead needs
to be replaced, always have the
replacement carried out by the manu-
facturer or its service centre. This will
ensure that your device remains safe to use.
Warranty
The warranty for this appliance is for 3
years from the date of purchase. The ap-
pliance has been manufactured with care
and meticulously examined before deliv-
ery. Please retain your receipt as proof
of purchase. In the event of a warranty
claim, please make contact by telephone
with our Service Department. Only in this
way can a post-free despatch for your
goods be assured.
The warranty covers only claims for material and
maufacturing defects, but not for transport damage,
for wearing parts or for damage to fragile compo-
nents, e.g. buttons or batteries. This product is for
private use only and is not intended for commercial
use.
The warranty is void in the case of abusive and im-
proper handling, use of force and internal tamper-
ing not carried out by our authorized service branch.
Preparing the tool for use / Cleaning and Maintenance / Service / Warranty

13 GB
Your statutory rights are not restricted in any way
by this warranty.
The warranty period will not be extended by repairs
made unter warranty. This applies also to replaced
and repaired parts. Any damage and defects extant
on purchase must be reported immediately after
unpacking the appliance, at the latest, two days after
the purchase date. Repairs made after the expiration
of the warranty period are subject to payment.
GB
DES UK LTD
Tel.: 0871 5000 700 (£ 0.10 / minute)
e-mail: [email protected]
Disposal
The packaging comprises exclusively en-
vironmentally-friendly material. Dispose
of it in your local recycling containers.
Do not dispose of electrical
appliances with your domestic
waste!
According to the European Directive 2002 / 96 / EC,
concerning used electrical and electronic appliances
and its implementation in national law, superannu-
ated electrical appliances must be collected and
disposed of via an environmentally suitable recy-
cling facility.
Do not dispose of rechargeable
batteries with your household
refuse!
Defective or worn out rechargeable batteries must
be recycled according to Directive 2006 / 66 / EC.
Dispose of batteries and appliances over the existing
collection facilities.
Your local communal or municipal authorities can
provide information on how to dispose of the worn
out appliance.
Declaration of Conformity /
Manufacturer
We, Kompernaß GmbH, the person responsible for
documents: Mr Felix Becker, Burgstr. 21, D-44867
Bochum, Germany, hereby declare that this product
complies with the following standards, normative
documents and EU directives:
Machinery Directive
(2006 / 42 / EC)
EU Low Voltage Directive
(2006 / 95 / EC)
Electromagnetic Compatibility
(2004 / 108 / EC)
Applicable harmonized standards
EN 55014-1:2006, EN 55014-2/A2:2008
EN 55014-2:1997+A1, IEC 60335-2-29:2002+A1
IEC 60335-1:2001+A1+A2
EN 60335-1:2002+A1+A11+A12+A2+A13
EN 60335-2-29:2004, IEC 60745-1:2006
IEC 60745-2-1/A1:2008, IEC 60745-2-2/A1:2008
EN 60745-1:2009, EN 60745-2-1/A12:2009
EN 60745-2-2/A12:2009, EN 61000-3-2:2006
EN 61000-3-3:1995+A1+A2
EN 61000-6-3:2007, EN 62233:2008
Type / Appliance Designation:
Lithium-ion cordless drill PABS 10.8 A1
Date of manufacture (DOM): 09 - 2010
Serial number: IAN 56846
Bochum, 30.09.2010
Hans Kompernaß
- Managing Director-
We reserve the right to make technical
modifications in the course of further development.
Warranty / Disposal / Conformity Declaration / Manufacturer

14

15 PL
Spis zawartości
Wstęp
Przeznaczenie ...............................................................................................................Strona 16
Wyposażenie ................................................................................................................Strona 16
Zawartość zestawu .......................................................................................................Strona 16
Dane techniczne ...........................................................................................................Strona 17
Ogólne wskazówki bezpieczeństwa dla
elektronarzędzi ...................................................................................................Strona 17
1.
Bezpieczeństwo miejsca pracy ................................................................................Strona 18
2.
Bezpieczeństwo elektryczne ....................................................................................Strona 18
3. Bezpieczeństwo osób ..............................................................................................Strona 18
4.
Staranne obchodzenie się i użytkowanie narzędzi elektrycznych........................Strona 19
5. Używanie i obchodzenie się z narzędziem akumulatorowym ..............................Strona 19
Wskazówki dotyczące bezpieczeństwa dla wiertarkowkrętarek akumulatorowych ...Strona 20
Uwaga na przewody! ..................................................................................................Strona 20
Oryginalne akcesoria / dodatkowy sprzęt ..................................................................Strona 20
Przed uruchomieniem
Pakiet akumulatorowy: wyjmowanie / ładowanie / zakładanie ................................Strona 21
Sprawdzenie stanu naładowania akumulatora ..........................................................Strona 21
Zmiana narzędzi ...........................................................................................................Strona 21
Przekładania 2-biegowa ..............................................................................................Strona 21
Wybór momentu obrotowego / stopnia wiertarskiego................................................Strona 21
Uruchomienie
P
rzełączanie kierunku obrotów /
odblokowanie urządzenia .......................................Strona 22
Włączenie / Wyłączenie ..............................................................................................Strona 22
Aktywowanie blokady ..................................................................................................Strona 22
Wskazówki i porady ....................................................................................................Strona 22
Konserwacja i czyszczenie.........................................................................Strona 23
Serwis ..........................................................................................................................Strona 23
Gwarancja ...............................................................................................................Strona 23
Usuwanie ..................................................................................................................Strona 24
Deklaracja zgodności / Producent .......................................................Strona 24

16 PL
Wstęp
Wiertarko-wkrętarka z
akumula-
torem litowo-jonowym PABS 10.8 A1
Wstęp
Przed pierwszym uruchomieniem urzą-
dzenia zapoznaj się z jego funkcjami
oraz ogólnymi zasadami prawidłowej
obsługi elektronarzędzi. Prosimy o przeczytanie
poniższej instrukcji obsługi jak również wskazówek
dotyczących bezpieczeństwa. Prosimy o zachowa-
nie niniejszej instrukcji. W przypadku odstąpienia
urządzenia osobom trzecim, należy im przekazać
także wszystkie dokumenty.
Przeznaczenie
To urządzenie jest przeznaczone do wiercenia i
wkręcania w drewno, plastik i metal. Urządzenie
należy stosować zgodnie z opisem i w podanych
zakresach użytkowania. Jakiekolwiek inne użycie lub
zmiany urządzenia uważane są za niezgodne z
przeznaczeniem i kryją w sobie poważne niebez-
pieczeństwo wypadku. Producent nie bierze na
siebie żadnej odpowiedzialności w przypadku po-
wstania szkody, wynikającej z użytkowania urzą
dzenia
w sposób całkowicie niezgodny z przeznaczeniem.
Urządzenie nie nadaje się do celów komercyjnych.
Wyposażenie
1
Przełącznik wyboru biegu
2
Przycisk lampki LED akumulatora
3
Lampka LED akumulatora (wskazanie stanu
naładowania)
4
Gniazdo do przechowywania końcówek
5
Przełącznik kierunku obrotów / blokada
6
Przełącznik (WŁ. / WYŁ.)
7
Miękki uchwyt
8
Pakiet akumulatorowy
9
Przycisk odblokowujący akumulatora
10
Lampka oświetleniowa
11
Ustawianie momentu obrotowego /
stopnia wiertarskiego
12
Uchwyt wiertarski do szybkiego mocowania
13
Zasilacz
14
Lampka kontrolna LED czerwona
15
Lampka sygnalizacyjna stanu
naładowania, zielona
16
Pokrywka
Zawartość zestawu
1 Wiertarko-wkrętarka z akumulatorem litowo-
jonowym PABS 10.8 A1
1 Pakiet akumulatorowy PABS 10.8-A1-1
1 Zasilacz PABS 10.8-A1-2 z pokrywką
2 Końcówki w gnieździe (CR-VPH1, CR-VPH2)
1 Walizka do przenoszenia
1 Instrukcja obsługi
W niniejszej instrukcji obsługi urządzenia zastosowano następujące piktogramy:
Przeczytaj instrukcję obsługi!
Dzieci trzymać z daleka od narzę-
dzia elektrycznego!
Przestrzegaj wskazówek
ostrzegawczych i bezpieczeństwa!
Tylko do użytku w pomieszczeniach
wewnętrznych!
Ostrzeżenie przed porażeniem
prądem elektrycznym!
Zagrożenie dla życia!
Zwracać uwagę na nienaruszony stan
urządzenia, kabla sieciowego oraz
wtyczki sieciowej!
Niebezpieczeństwo wybuchu!

17 PL
Wstęp / Ogólne wskazówki bezpieczeństwa dla elektronarzędzi
Dane techniczne
Wiertarko-wkrętarka akumulatorowa
PABS 10.8-A1:
Napięcie nominalne: 10.8 V
Liczba obrotów na
biegu jałowym: 1. bieg: 400 min
-1
2. bieg: 1300 min
-1
Zakres mocowania
uchwytu wiertarskiego: maks. 10 mm
Maksymalna średnica
wiertła:
do stali: 8 mm
do drewna: 20 mm
Pakiet akumulatorowy PABS 10.8-A1-1:
Typ: LITOWOJONOWY
Napięcie znamionowe: 10,8 V
Pojemność: 1300 mAh
Zasilacz PABS 10.8 -LI-2:
WEJŚCIE / Input:
Napięcie nominalne: 230 V
~
/ 50 Hz
WYJŚCIE / Output:
Napięcie nominalne: 12 V
Prąd nominalny: 0,6 A
Czas trwania ładowania: ok. 3 godz.
Informacja dotycząca hałasu / drgań:
Wartość pomiarowa hałasu wyznaczona zgodnie
z EN 60745. Poziom hałasu elektronarzędzia wg
oceny A wynosi typowo:
Poziom ciśnienia hałasu: 70 dB(A)
Pozom mocy hałasu: 80 dB(A)
Niepewność pomiaru K: 3 dB
Zakładać ochronniki słuchu!
Sumaryczne wartości drgań (suma wektorów z trzech
kierunków) wyznaczone zgodnie z EN 60745:
Wiercenie w metalu: Wartość emisji drgań
a
h, D
= 1,944 m / s
2
,
Niepewność K = 1,5 m / s
2
,
Wkręcanie śrub: Wartość emisji drgań
a
h
= 2,101 m / s
2
,
Niepewność K = 1,5 m / s
2
.
OSTRZEŻENIE!
Podany w niniejszych in-
strukcjach poziom drgań wyznaczony został za
pomocą metody pomiarowej określonej w normie
EN 60745 i może zostać użyty do porównania
urządzeń.
Poziom wibracji będzie się różnił w zależności od
zastosowania elektronarzędzia i w niektórych
przypadkach może przekroczyć wartość podaną
w niniejszej instrukcji. Obciążenie drganiami może
być mniej uciążliwe, jeśli elektronarzędzie będzie
regularnie trzymane w ten sposób.
Wskazówka: Celem dokładnego oszacowania
obciążenia wibracjami w okresie określonego okresu
czasu pracy należy uwzględnić również te okresy,
w których urządzenie jest wyłączone lub wpraw-
dzie jest włączone, ale w rzeczywistości nie pracu-
je. Może to przyczynić się do znacznej redukcji
obciążenia wibracjami w całym okresie czasu pracy.
Ogólne wskazówki
bezpieczeństwa dla
elektronarzędzi
OSTRZEŻENIE!
Przeczytaj wszystkie
wskazówki dotyczące bezpieczeństwa
oraz instrukcje! Zaniedbania w przestrzeganiu
wskazówek dotyczących bezpieczeństwa oraz w
przestrzeganiu instrukcji mogą spowodować pora-
żenie prądem elektrycznym, pożar i / lub ciężkie
obrażenia ciała.
Przechowuj na przyszłość wszystkie
wskazówki dotyczące bezpieczeństwa
oraz instrukcje!
Używany we wskazówkach dotyczących bezpie-
czeństwa termin „narzędzie elektryczne“ odnosi się
do narzędzi elektrycznych zasilanych z sieci (z ka-
blem sieciowym) oraz do narzędzi elektrycznych
zasilanych
z akumulatorów (bez kabla sieciowego).

18 PL
Ogólne wskazówki bezpieczeństwa dla elektronarzędzi
1.
Bezpieczeństwo miejsca pracy
a) Utrzymywać stanowisko pracy w czy-
stości i dobrze oświetlone. Nieporządek
i nieoświetlone obszary robocze mogą prowa-
dzić do wypadków.
b)
Nie pracuj przy użyciu urzą-
dzenia w otoczeniu zagrożo-
nym eksplozją, w którym
znajdują się palne ciecze, gazy lub
pyły. Urządzenia elektryczne wytwarzają
iskry, które mogą zapalić pył lub pary.
c)
Podczas użytkowania urzą-
dzenia elektrycznego trzymaj
dzieci i inne osoby z daleka
od urządzenia. Przy odchyleniu możesz
stracić kontrolę nad urządzeniem.
2.
Bezpieczeństwo elektryczne
a) Wtyk sieciowy urządzenia musi
pasować do wtykowego gniazdka
sieciowego. W żaden sposób nie wol-
no zmieniać wtyku sieciowego urzą-
dzenia. Nie używaj żadnych wtyków
adapterowych razem z urządzeniami
wyposażonymi w uziemienie ochron
ne.
Niezmienione wtyki sieciowe i pasujące wtykowe
gniazdka sieciowe zmniejszają ryzyko poraże-
nia prądem elektrycznym.
b) Unikaj kontaktu fizycznego z powier-
zchniami uziemionymi takimi jak
powierzchnie rur, grzejników, kuchni
elektrycznych i lodówek. Istnieje podwyż-
szone niebezpieczeństwo porażenia prądem
elektrycznym, gdy twoje ciało jest uziemione.
c) Trzymaj urządzenie z daleka od desz-
czu i wilgoci. Wniknięcie wody do urządzenia
elektrycznego zwiększa ryzyko porażenia prą-
dem elektrycznym.
d)
Nie używaj kabla sieciowego w
sposób sprzeczny z jego prze-
znaczeniem, tj. do noszenia
urządzenia, zawieszania urzą dzenie
lub do wyciągania wtyku sieciowego
z wtykowego gniazdka sieciowego.
Trzymaj kabel z daleka od gorąca,
oleju, ostrych krawędzi lub porusza-
jących się części urządzeń. Uszkodzone
lub poplątane kable zwiększają ryzyko pora-
żenia prądem elektrycznym.
e)
Gdy pracujesz z urządzeniem elektrycz-
nym na dworze używaj wyłącznie
przedłużaczy, które są dopuszczone
również do pracy na dworze. Użycie
przedłużacza przystosowanego do stosowania
na dworze zmniejsza ryzyko porażenia prądem
elektrycznym.
f) Jeśli praca elektronarzędzia w otocze-
niu wilgotnym jest nie do uniknięcia,
należy zastosować wyłącznik prądu
uszkodzeniowego. Zastosowanie wyłącz-
nika prądu uszkodzeniowego zapobiega nie-
bezpieczeństwu porażenia prądem elektrycz
nym.
3. Bezpieczeństwo osób
a) Bądź stale uważny, zwracaj uwagę
na to co robisz i postępuj rozsądnie w
trakcie pracy z narzędziem elektrycz-
nym. Nie używaj narzędzia, gdy jesteś
zmęczony lub znajdujesz się pod
wpływem narkotyków, alkoholu lub
lekarstw. Chwila nieuwagi przy użytkowaniu
urządzenia może prowadzić do poważnych
obrażeń ciała.
b)
Noś osobiste wyposażenie
ochronne i zawsze okulary
ochronne. Noszenie osobistego
wyposażenia ochronnego takiego jak maska
przeciwpyłowa, buty antypoślizgowe, kask
ochronny lub ochrona słuchu stosownie do
sposobu użytkowania narzędzia elektrycznego
zmniejsza ryzyko obrażeń ciała.
c) Unikaj niezamierzonego uruchomienia.
Upewnij się, że narzędzie elektryczne
jest wyłączone zanim podłączysz je
do zasilania prądowego, uchwycisz je
lub będziesz je przenosił. Jeżeli podczas
przenoszenia urządzenia będziesz trzymał
palec na przełączniku WŁĄCZ. / WYŁĄCZ.
lub jeżeli urządzenie jest włączone, to może
to prowadzić do nieszczęśliwych wypadków.

19 PL
Ogólne wskazówki bezpieczeństwa dla elektronarzędzi
d) Usuń narzędzia do nastawiania urzą-
dzenia lub klucze płaskie zanim włą-
czysz urządzenie. Narzędzie lub klucz,
który znajduje się w obracającej się części
urządzenia może prowadzić do obrażeń ciała.
e) Unikaj nienormalnej postawy ciała.
Zadbaj o pewne stanowisko i w każdej
chwili utrzymuj równowagę. Dzięki temu
będziesz mógł lepiej kontrolować urządzenie,
zwłaszcza w nieoczekiwanych sytuacjach.
f) Noś odpowiednią odzież. Nie noś ob-
szernej odzieży ani biżuterii. Trzymaj
włosy, odzież i rękawice z daleka od
poruszających się części. Luźna odzież,
biżuteria lub długie włosy mogą zostać uchwy-
cone przez poruszające się części.
g) Jeżeli zostaną zamontowane urzą-
dzenia do odsysania i wychwytywania
pyłu, to upewnij się, że są one podłą-
czone i że będą prawidłowo używane.
Używanie tych urządzeń zmniejsza zagrożenie
wywoływane pyłem.
4.
Staranne obchodzenie
się i użytkowanie narzędzi
elektrycznych
a) Nie przeciążaj urządzenia. Używaj do
swojej pracy przeznaczonego do niej
narzędzia elektrycznego. Za pomocą odpo
-
wiedniego narzędzia elektrycznego pracujesz
lepiej i bezpieczniej w danym zakresie robót.
b) Nie używaj żadnego narzędzia elek-
trycznego, którego przełącznik jest
uszkodzony. Narzędzie elektryczne, które
nie daje się już więcej włączyć lub wyłączyć,
jest niebezpieczne i musi zostać naprawione.
c) Proszę usunąć wtyczkę z gniazdka
oraz / lub usunąć akumulator, zanim
rozpoczną państwo ustawienie urzą-
dzenia, wymianę części lub w przy-
padku odłożenia urządzenia. Niniejsze
przedsięwzięcie zapobiega niekontrolowanemu
rozruchowi niniejszego narzędzia elektrycznego.
d) Przechowuj nieużywane narzędzia
elektryczne poza zasięgiem dzieci. Nie
pozwól na użytkowanie urządzenia
osobom, które nie są z nim obznajo-
mione lub nie przeczytały niniejszych
instrukcji. Narzędzia elektryczne są niebez-
pieczne, gdy są używane przez osoby niedo-
świadczone.
e) Pielęgnuj starannie urządzenie.
Sprawdź, czy ruchome części urzą-
dzenia funkcjonują nienagannie i nie
zakleszczają się, czy części urządzenia
nie są złamane lub uszkodzone w ta-
kim stopniu, że funkcjonowanie urzą-
dzenia jest uszczuplone. Zleć naprawę
uszkodzonych części przed użyciem
urządzenia. Przyczyną wielu wypadków są
źle konserwowane narzędzia elektryczne.
f) Utrzymuj narzędzia tnące w stanie
ostrym i czystym. Starannie pielęgnowane
narzędzia tnące o ostrych krawędziach tną-
cych mniej zakleszczają się i dają się łatwiej
prowadzić.
g) Używaj narzędzia elektrycznego,
osprzętu, narzędzi wymiennych itp.
odpowiednio do niniejszych instrukcji
i w taki sposób, jaki jest zalecany dla
tego specjalnego typu urządzenia.
Uwzględniaj przy tym warunki robo-
cze i wykonywane czynności. Użycie
narzędzi elektrycznych do innych zastosowań
niż to przewidziano może prowadzić do nie-
bezpiecznych sytuacji.
5. Używanie i obchodzenie się z
narzędziem akumulatorowym
a) Ładuj akumulatory wyłącznie w tych
ładowarkach, które są zalecane przez
producenta. Dla ładowarki, która nadaje się
do określonego rodzaju akumulatorów istnieje
zagrożenie pożarowe, gdy będzie ona używana
z innymi akumulatorami.
b) W narzędziach elektrycznych stosuj
wyłącznie przewidziane dla nich aku-
mulatory. Używanie innych akumulatorów
może prowadzić do obrażeń ciała i zagrożenia
pożarowego.
c) Nieużywane akumulatory trzymaj z
daleka od spinaczy biurowych, monet,

20 PL
Ogólne wskazówki bezpieczeństwa dla elektronarzędzi
kluczy, gwoździ śrub oraz innych ma-
łych przedmiotów metalowych, które
mogłyby spowodować zmostkowanie
styków akumulatora. Skutkiem zawarcia
styków akumulatora mogą być oparzenia lub
pożar.
d)
W przypadku nieprawidłowego za-
stosowania akumulatora może z niego
wyciec ciecz. Unikaj kontaktu z nią.
W razie przypadkowego kontaktu
spłucz ją wodą. Jeżeli ta ciecz dostanie
się do oka, to dodatkowo skorzystaj
z pomocy lekarskiej. Wyciekła ciecz aku-
mulatorowa może prowadzić do podrażnień
skóry lub oparzeń.
Wskazówki dotyczące
bezpieczeństwa dla
wiertarkowkrętarek
akumulatorowych
Zabezpiecz przedmiot obrabiany. Przedmiot
obrabiany przytrzymywany za pomocą urzą-
dzenia mocującego lub imadła jest trzymany
pewniej niż ręką.
OSTRZEŻENIE!
TRUJĄCE PYŁY!
Powstające wskutek obróbki szkodliwe / trujące
pyły stanowią zagrożenie dla zdrowia dla osoby
obsługującej urządzenie lub osób znajdujących
się w pobliżu.
Noś okulary ochronne i maskę prze-
ciwpyłową!
Nie obrabiaj materiału zawierającego
azbest. Azbest jest uznawany za rakotwórczy.
Trzymaj mocno narzędzie elektryczne.
Przy dokręcaniu lub luzowaniu śrub mogą krót-
kotrwale wystąpić duże momenty reakcji.
Wyłączaj natychmiast narzędzie elek-
tryczne, gdy założone do niego na-
rzędzie zablokuje się. Bądź przygotowany
na duże momenty reakcji, które powodują
odrzut. Założone narzędzie zablokuje się, gdy
narzędzie elektryczne zostanie przeciążone lub
ustawi się skośnie w przedmiocie obrabianym.
OSTRZEŻENIE!
Chwytaj narzędzie
elektryczne wyłącznie za izolowane
powierzchnie chwytne, gdy wykonu-
jesz roboty, w trakcie których założone
narzędzie może natrafić na ukryte
przewody prądowe. Styczność z przewo-
dem pod napięciem spowoduje, że części me-
talowe narzędzia elektrycznego również znajdą
się pod napięciem, co prowadzi do porażenia
prądem elektrycznym
Przy robotach na urządzeniu oraz w
trakcie transportu względnie prze-
chowywania urządzenia ustawiaj
przełącznik kierunku obrotów w po-
zycji środkowej (blokada). W ten sposób
zapobiegniesz niezamierzonemu rozruchowi
narzędzia elektrycznego.
Dzieciom lub osobom, którym brak wiedzy lub
doświadczenia w obchodzeniu się z urządze-
niem oraz osobom, które są ograniczone pod
względem ich fizycznych, sensorycznych lub
duchownych zdolności, nie wolno obsługiwać
urządzenia bez nadzoru lub wskazówek osoby
odpowiedzialnej za ich bezpieczeństwo. Dzieci
muszą być nadzorowane, aby nie bawiły się
urządzeniem.
Uwaga na przewody!
OSTRZEŻENIE!
Podczas pracy przy
użyciu urządzenia upewnij się, że nie ma
zagrożenia natrafienia na przewody
elektryczne, gazowe lub wodno-kanali-
zacyjne. Przed nawierceniem otworu w ścianie
lub inną obróbką sprawdź przyrządem do wykry-
wania przewodów, czy w ścianie nie znajdują się
żadne przeszkody.
Oryginalne akcesoria /
dodatkowy sprzęt
Korzystaj zawsze z akcesoriów i
dodatkowego sprzętu, podanego w
instrukcji użytkowania. Korzystanie z in-
nych narzędzi lub akcesoriów, niż podano w
instrukcji obsługi może doprowadzić do obrażeń.

21 PL
Przed uruchomieniem
Przed uruchomieniem
Pakiet akumulatorowy:
wyjmowanie / ładowanie /
zakładanie
Wskazówka: Akumulator jest dostarczany w
stanie
częściowo naładowanym. Przed uruchomieniem
najlepiej ładować akumulator co najmniej przez 3
godziny w ładowarce. W ten sposób zostanie za-
pewniona pełna moc akumulatora. Akumulator lito-
wo-jonowy można naładować w każdej chwili nie
skracając przez to żywotności akumulatora. Prze-
rwanie procesu ładowania akumulatora nie powo
duje
uszkodzenia akumulatora.
1. Celem wyjęcia zestawu akumulatorów
8
na-
leży nacisnąć przycisk zwalniający
9
i wycią-
gnąć zestaw akumulatorów
8
z urządzenia.
2. Nałożyć pokrywę
16
do ładowania na ze-
staw akumulatorów
8
.
3. Włożyć zasilacz
13
do gniazdka sieciowego.
Lampka kontrolna LED
14
zapala się na czer-
wono.
4. Zielona lampka sygnalizacyjna stanu nałado-
wania LED
16
sygnalizuje, iż proces ładowania
został zakończony a akumulator
8
jest gotowy
do użycia.
5. Wsunąć zestaw akumulatorów
8
do urządze
nia.
Sprawdzenie stanu
naładowania akumulatora
Celem sprawdzenia stanu akumulatora należy
nacisnąć przycisk lampki LED akumulatora
2
(patrz również rysunek główny). Stan nałado-
wania wzgl. pozostała moc wskazywana jest za
pomocą lampki LED
3
w sposób następujący:
Kolor CZERWONY / POMARAŃ
CZOWY /
ZIE-
LONY
= maksymalne naładowanie / moc Kol
or
CZERWONY / POMARAŃCZOWY = średnie
naładowanie / moc
Kolor CZERWONY = słabe naładowanie –
akumulator należy naładować
Zmiana narzędzi
Wkrętarko-wiertarka akumulatorowa posiada auto-
matyczną blokadę wrzeciona
.
Zatrzymanie silnika powoduje unieruchomienie ca
łego
układu przeniesienia napędu, pozwalającego na
otwarcie uchwytu szybkomocującego
12
poprzez
obrót
.
Po założeniu odpowiedniego narzędzia
i za-
blokowaniu uchwytu wiertarskiego poprzez obrót,
możesz od razu przystąpić do dalszej pracy.
Blokada trzpienia zwalnia się automatycznie wraz
z uruchomieniem silnika (naciśnięcie przycisku
WŁ. / WYŁ.
6
).
Przekładania 2-biegowa
Wskazówka: Naciskaj przełącznik wybierako-
wy biegów
1
wyłącznie w stanie zatrzymanym
urządzenia.
Na pierwszym biegu (przełącznik
wybierakowy
1
w położeniu: 1)
ustawić liczbę obrotów ok. 400 obr. / min i wysoki
moment obrotowy. Ustawienie to nadaje się do
wszystkich prac wkręcania.
Na drugim biegu (przełącznik wybiera-
kowy
1
w położeniu: 2)
uzyskasz prędkość obrotową 1300 obr. / min.
pozwalającą na wiercenie otworów.
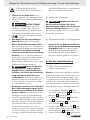
Wybór momentu obrotowego /
stopnia wiertarskiego
Siłę obrotu można ustawić poprzez dobór momentu
obrotowego / stopnia wiertarskiego
11
. W przypad-
ku osiągnięcia nastawionej siły obrotów, sprzęgło
odłącza napęd.
Niski zakres wybieraj do niewielkich śrub i
miękkich materiałów.
Wysoki zakres wybieraj do dużych śrub,
twardych materiałów wzgl. wykręcania śrub.
Strona jest ładowana ...
Strona jest ładowana ...
Strona jest ładowana ...
Strona jest ładowana ...
Strona jest ładowana ...
Strona jest ładowana ...
Strona jest ładowana ...
Strona jest ładowana ...
Strona jest ładowana ...
Strona jest ładowana ...
Strona jest ładowana ...
Strona jest ładowana ...
Strona jest ładowana ...
Strona jest ładowana ...
Strona jest ładowana ...
Strona jest ładowana ...
Strona jest ładowana ...
Strona jest ładowana ...
Strona jest ładowana ...
Strona jest ładowana ...
Strona jest ładowana ...
Strona jest ładowana ...
Strona jest ładowana ...
Strona jest ładowana ...
Strona jest ładowana ...
Strona jest ładowana ...
Strona jest ładowana ...
Strona jest ładowana ...
Strona jest ładowana ...
Strona jest ładowana ...
Strona jest ładowana ...
Strona jest ładowana ...
Strona jest ładowana ...
Strona jest ładowana ...
Strona jest ładowana ...
Strona jest ładowana ...
Strona jest ładowana ...
Strona jest ładowana ...
Strona jest ładowana ...
Strona jest ładowana ...
Strona jest ładowana ...
Strona jest ładowana ...
Strona jest ładowana ...
Strona jest ładowana ...
Strona jest ładowana ...
Strona jest ładowana ...
Strona jest ładowana ...
Strona jest ładowana ...
Strona jest ładowana ...
Strona jest ładowana ...
Strona jest ładowana ...
Strona jest ładowana ...
Strona jest ładowana ...
Strona jest ładowana ...
-
 1
1
-
 2
2
-
 3
3
-
 4
4
-
 5
5
-
 6
6
-
 7
7
-
 8
8
-
 9
9
-
 10
10
-
 11
11
-
 12
12
-
 13
13
-
 14
14
-
 15
15
-
 16
16
-
 17
17
-
 18
18
-
 19
19
-
 20
20
-
 21
21
-
 22
22
-
 23
23
-
 24
24
-
 25
25
-
 26
26
-
 27
27
-
 28
28
-
 29
29
-
 30
30
-
 31
31
-
 32
32
-
 33
33
-
 34
34
-
 35
35
-
 36
36
-
 37
37
-
 38
38
-
 39
39
-
 40
40
-
 41
41
-
 42
42
-
 43
43
-
 44
44
-
 45
45
-
 46
46
-
 47
47
-
 48
48
-
 49
49
-
 50
50
-
 51
51
-
 52
52
-
 53
53
-
 54
54
-
 55
55
-
 56
56
-
 57
57
-
 58
58
-
 59
59
-
 60
60
-
 61
61
-
 62
62
-
 63
63
-
 64
64
-
 65
65
-
 66
66
-
 67
67
-
 68
68
-
 69
69
-
 70
70
-
 71
71
-
 72
72
-
 73
73
-
 74
74


Parkside PABS 10.8 A1 - MANUAL 4 Operation and Safety Notes
- Typ
- Operation and Safety Notes
- Ten podręcznik jest również odpowiedni dla
w innych językach
- slovenčina: Parkside PABS 10.8 A1 - MANUAL 4
Powiązane dokumenty
-
Parkside PABS 10.8 C2 Operation and Safety Notes
-
Parkside Power Screwdriver X18V Instrukcja obsługi
-
Parkside PABS 18-LI B2 Operation and Safety Notes
-
Parkside PABS 18 A1 Instrukcja obsługi
-
Parkside PABS10.8-LI Instrukcja obsługi
-
-
-
-
Parkside PABS 14.4 A1 Operation and Safety Notes
-
