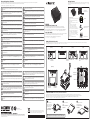
Gigabyte BRIX BACE-3000 Skrócona instrukcja obsługi
- Typ
- Skrócona instrukcja obsługi
Strona się ładuje...

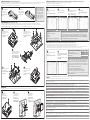
Screw the HDD cage in place
in the boom panel.
將安裝好硬碟的硬碟插槽固
定回BRIX底 蓋。
Push down unl the
modules click into place.
當 記 憶 體 固定 於插 槽後,
再 輕 輕下壓 至 定 點。
Mul-BIOS Allows you to choose BIOS mode according to the OS of your choice
Hier können Sie den BIOS-Modus entsprechend dem Betriebssystem Ihrer Wahl wählen / Permet de choisir le mode BIOS selon le système d'exploitaon de votre choix
Le permite elegir el modo de BIOS de acuerdo con el sistema operavo de su elección / Permite escolher o modo de BIOS conforme o SO de sua preferência
Ti consente di selezionare la modalità BIOS in accordo con la tua scelta del sistema Operavo / Мульти-BIOS: Позволяет выбрать режим BIOS в соответствии с ОС, исходя из предпочтений пользователя
Çoklu-BIOS: isteğiniz doğrultusunda BIOS modunu seçmenize olanak sağlar / お好みのOSに応じてBIOSモードを 選 択できます / 멀티 BIOS: 선택한 OS에 따라서 바이오스 모드 선택을 허용
Press “Del” during device start up to
enter BIOS.
開機後按啟Del鍵進入BIOS設定 畫 面。
1
Select “UEFI system”, “Legacy system”
or “Linux system” from “OS selecon”
on menu bar.
在BIOS主選單選取”OS selecon”後,選 擇
要安裝的OS類型。
2
B. Memory Installaon : DDR3 Low Voltage (1.35v)
Arbeitsspeicher Installaon DDR3 Low Voltage (1,35 V) / Installaon de la mémoire DDR3 en basse tension (1.35v) / Instalación de la Memoria DDR3 de bajo voltaje (1.35v) / Instalação da memória DDR3 de Baixa Voltagem (1.35V)
Installazione Memoria DDR3 Low Voltage (1,35V) / Установка модулей ОЗУ DDR3 Low Voltage (1,35 В) / Instalacja pamięci DDR3 nisko napięciowych (1.35V) / Bellek Yerleşrilmesi DDR3 Düşük Voltaj (1.35v)
安裝記憶體 / 安装内存 / モリの増 設 方法 DDR3L(1.35v) / 메모리 설치 DDR3 Low Voltage (1.35v)
2
Carefully insert SO-DIMM
memory modules.
小心並由下至上安裝
SO-DIMM記憶體於記憶
體 插槽。
1
USB Power On Funcon Allows device power on via USB. Useful when mounted behind a display or TV
USB Power On Funkon / Foncon Démarrage par USB / Función USB Power On / Função USB Power On / Funzione USB Power On
Функция USB Power On / Opcja USB Power On / USB Güç Açık Fonksiyonu
USB埠啟動功能 / USB接口启动功能 / USB機器からの電源ON機能 / USB 포트를 이용한 전원 켜기
VESA Bracket
VESA-Halterung / Support VESA / soporte VESA / Suporte VESA / Staffa VESA / Крепление VESA / Uchwyt VESA / VESA Desteği / VESA支架 / VESA支架 / VESA対 応 ブ ラケ ット / VESA 브래킷
1
C. SATA 6Gbps HDD: How to install 2.5” HDD
SATA 6Gbps: Wie die 2.5 "HDD richg installieren / Disque dur SATA 6Gbps : Comment installer le disque dur 2.5" / SATA 6Gbps HDD: Cómo instalar HDD de 2.5" / HDD SATA 6Gbps: Como instalar o HDD 2.5"
HDD SATA 6Gbps: Come installare il disco da 2,5" / SATA 6 Гбит/c: Порядок инсталляции 2,5-дюйм накопителя HDD / SATA 6Gbps: jak zainstalować HDD 2.5' / SATA 6Gbps: 2.5” HDD 'yi nasıl yerleşrebilirim
SATA 6Gbps硬碟: 安裝2.5"硬碟 / SATA 6Gbps硬盘: 安装2.5"硬盘 / SATA 6Gbps HDD: 2.5HDをインストールする方法 / SATA 6Gbps HDD: 2.5” HDD를 설치하는 방법
1
4
3
2
5
Support
Unterstützung / Support / Soporte / Suporte / Supporto / Техническая поддержка / Wsparcie / Destek / 支援 / 支持 / サポート / 지원
● 테스트한 메모리,무선어댑터 지원 관련 목록은 hp://www.gigabyte.com 을 참조 하십시오 ● 최신 드라이버 및BIOS의 업데이트는 홈페이지 hp://www.gigabyte.com 에서 다운로드하십시오. ● 제품 지원에
대한 상세한 내용은 홈페이지 hp://www.gigabyte.com 를 참조하십시오.
● 動作 確認済みのメモリ、2.5"SATA HDD、ワイヤレスアダプター、OSのリストについては、次のサイトで確認できます: hp://www.gigabyte.com ● 最新のドライバーおよびBIOSのアップデートをダウン
ロードの場合、次を参照してください。 ● 製品のサポート情報については、次を参照ください。
● For a list of tested memory, 2.5” HDD, wireless adapters and OS supported, go to: hp://www.gigabyte.com ● To download the latest drivers and BIOS updates, go to: hp://www.gigabyte.com ● For product
support, go to: hp://www.gigabyte.com
● Pour obtenir une liste de mémoire, disques 2.5” HDD, adaptateurs sans fil et systèmes d'exploitaon compable, veuillez vous rendre sur : hp://www.gigabyte.fr ● Télécharger la dernier version de mis à jour du
bios et des pilotes, veuillez vous rendre sur: hp://www.gigabyte.fr ● Pour l'assistance produit, veuillez vous rendre sur : hp://www.gigabyte.fr
● Para obtener una lista de memorias probadas, HDD 2.5", adaptadores inalámbricos y sistemas operavos compables, visite: hp://es.gigabyte.com ● Para descargar los úlmos controladores y
actualizaciones de BIOS, vaya a: hp://es.gigabyte.com ● Para el soporte del producto, visite: hp://es.gigabyte.com
● Para a lista de memórias testadas, HDD 2.5", adaptadores wireless e Sistemas Operacionais suportados, acesse: hp://br.gigabyte.com ● Para baixar os drivers mais recentes e atualizações de BIOS, acesse:
hp://br.gigabyte.com ● Para suporte ao produto, acesse: hp://br.gigabyte.com
● Per una lista di compabilità di HDD 2,5", memorie, adaori Wireless e OS supporta visita: hp://www.gigabyte.com ● Per scaricare gli ulmi Driver e BIOS visita: hp://www.gigabyte.com ● Per
supporto visita: hp://www.gigabyte.com
● Eine Liste mit geprüem Arbeitsspeicher, 2.5” HDD, drahtlosen Adaptern und unterstützten Betriebssystemen finden Sie bie unter: hp://www.gigabyte.com ● Für den Download aktuellster Treiber und
BIOS-Updates gehen Sie bie zu: hp://www.gigabyte.com ● Unterstützung zu Produkten finden Sie bie unter: hp://www.gigabyte.com
● Подробная информация о протестированных модулях ОЗУ, 2.5” HDD и модулях беспроводной связи под управлением совместимой ОС размещена по адресу: hp://www.gigabyte.com ● Для загрузки
актуальных драйверов и обновлений версии BIOS воспользуйтесь ссылкой: hp://www.gigabyte.com ● Информация о технической поддержке продукта размещена по адресу: hp://www.gigabyte.com
● Test edilen haza listesi için, 2.5” HDD, kablosuz adaptörler ve desteklenen OS için, ilgili adrese gidiniz: hp://www.gigabyte.com ● En son sürücüleri ve BIOS güncellemelerini indirmek için, ilgili adrese gidiniz:
hp://www.gigabyte.com ● Ürün desteği için, ilgili adrese gidiniz: hp://www.gigabyte.com
● Listę kompatybilnych komponentów (pamięć, 2.5” HDD, karty rozszerzeń) oraz systemów operacyjnych można znaleźć pod adresem: hp://gigabyte.com ● Najnowsze wersje sterowników oraz BIOSu można pobrać
ze strony:hp://www.gigabyte.com ● Aby uzyskać wsparcie dotyczące produktów proszę wejść na stronę internetową: hp://www.gigabyte.com
● 如需已測試記憶體、2.5" SATA HDD、無線介面卡和支援的作業系統清單,請前往hp://www.gigabyte.com ● 若要下載最新驅動程式和BIOS更 新 ,請 前 往 :hp://www.gigabyte.com ● 如需產
品 支 援 資 訊 ,請 前 往 :hp://www.gigabyte.com
● 如需已测试内存、2.5" SATA HDD、无线适配卡和支持的操作系统列表,请前往:hp://www.gigabyte.com ● 若要下载最新驱动程序和BIOS更 新 ,请 前 往 :hp://www.gigabyte.com ● 如需产品支持信
息 ,请 前 往 :hp://www.gigabyte.com
Note: The BRIX & BRIX s require
DDR3L SO-DIMM system
memory. This is the low voltage
DDR3 memory that offers great
performance at a lower 1.35v.
注 意:技 嘉 BRIX & BRIX s僅支
援低電壓DDR3 SO-DIMM記憶
體。低 耗電 的1.35V記憶體提
供了同標準記憶體模組一樣出
色 的性 能。
Unscrew and remove the
boom panel, disconnecng
the SATA cable.
移除BRIX底蓋並取下主機
板上的SATA線。
Flip the boom panel and
unscrew the four screws holding
the HDD cage in place.
翻轉底蓋並鬆開固定硬碟插槽
的4顆 螺 絲。
Install the HDD in the cage using
the screws provided and connect
the SATA cable to the HDD.
將硬碟插入硬碟插槽並使用包
裝隨附的4顆 螺 絲 固 定 硬 碟,將
SATA線另一端連接於硬碟連接
埠。
Connect the SATA cable to the
motherboard and reinstall the
boom panel.
安裝主機板端的SATA線,裝 回
BRIX底 蓋。
2
Aach the VESA mounng
plate to the rear of a
compable display using
the screws provided.
安裝隨附的VESA支撐架
於支援VESA支撐架的電
腦 螢 幕 或 電 視 機 後 背。
3
The BRIX can now be
mounted by sliding the
device into place.
將已安裝VESA支撐架
螺絲的BRIX插入VESA支
撐 架 的 滑 軌 孔,向 下 壓
至定位點後即可固定。
Aach the screws
provided on the
underside of the BRIX.
安裝隨附的VESA支撐
架螺絲於BRIX底 部。
System Requirements
- Win 7
- Win 8.x (Install ulity required)
系統需求
- Windows 7
- Windows 8或以上的版本(需安裝額外的應用程式)
Note: ‘USB Power On’ funconality in Windows 8 and above requires an addional Windows patch. This is provided
on GIGABYTE’s official website labeled ‘USB Power-On Patch’. Your GIGABYTE BRIX can be powered on via a connected
USB device such as a keyboard or mouse, offering greater convenience when mounted behind a display or monitor.
注 意:在 Windows 8或以上的版本環境下需要額外的應用程式來啟動"USB Power On"功能。你可以 透 過 技 嘉官網
的產品支援與更新下載"USB Power-On Patch"來執行。USB Power On提供了方便的開機功能,使用者可以透過連接
到BRIX上的USB裝置啟動BRIX;讓 安 裝 於 顯 示 器 後 方 的 BRIX更 方便 使 用。
Press “Del” during device start up to
enter BIOS.
開機後按啟Del鍵進入BIOS設 定 畫面。
1
Select “Chipset” from the menu.
在BIOS主選單選取”Chipset”。
2
Manually configure “Erp Low Power State
Mode” sengs to “Disabled”.
進入Chipset的Erp Low Power State
Mode選項,手動控制將其”Disabled”。
3
Press F4 to Save and Exit.
按啟F4存儲設定並離開BIOS選單重新
開機。
4
Note: You have to select the OS mode in the BIOS before
installing any OS on your BRIX.
注 意:需在BIOS選單中先選擇所要使用的OS模 式,你
的BRIX才能安裝OS。
UEFI system Win 8.x
Legacy system Win 7
Linux system Linux
Note: Due to a lack of legacy EHCI controller support from Intel on the 5th and 6th
generaon CPU, the USB 3.0 ports of the BRIX unit are not compable with USB 2.0
devices. To help you install your operang system, GIGABYTE provides a tool which is
preloaded on the driver CD called "Windows 7 Install Ulity/GbtUSBMaker.exe". This
tool helps you to create an installaon USB dongle which includes the driver necessary
for backward compability. To install Windows 7 using this tool, please follow these
steps :
- Plug a USB 3.0 drive (4GB minimum) into another computer.
- Launch the "Windows 7 Install Ulity/GbtUSBMaker.exe" tool.
- Add the Windows 7 installaon files and USB 3.0 drivers to your USB drive.
- Plug the USB drive to your BRIX unit and follow the steps to install the OS.
Aer the installaon of the OS and drivers, the USB 3.0 ports will be backward
compable with USB 2.0 devices.
-
 1
1
-
 2
2


Gigabyte BRIX BACE-3000 Skrócona instrukcja obsługi
- Typ
- Skrócona instrukcja obsługi
w innych językach
- italiano: Gigabyte BRIX BACE-3000 Guida Rapida
- Deutsch: Gigabyte BRIX BACE-3000 Schnellstartanleitung
- português: Gigabyte BRIX BACE-3000 Guia rápido
- English: Gigabyte BRIX BACE-3000 Quick start guide
Powiązane artykuły
-
Gigabyte GB-BPCE-3350C Instrukcja obsługi
-
-
-
Gigabyte GB-BXBT-1900 Instrukcja obsługi
-
-
Gigabyte GB-BRi5H-8250 Instrukcja obsługi
-
-
Gigabyte BRIXs Skrócona instrukcja obsługi
-
-