
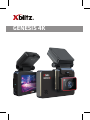
GENESIS 4K

2
A1
2
3
5
8
7
4
6
9
10
11
12
RST

3
13
B

4
PL
INSTRUKCJA OBSŁUGI
WIDEOREJESTRATOR
Przed użyciem należy dokładnie zapoznać się z załączoną instrukcją obsługi oraz
wskazówkami bezpieczeństwa.
PRZEZNACZENIE PRODUKTU
Kamera samochodowa Xblitz Genesis 4K umożliwia monitorowanie trasy, pozycji i
prędkości Twojego pojazdu oraz rejestrowanie wszelkich zdarzeń drogowych.
01. ZESTAW
1. Wideorejestrator
2. Moduł GPS
3. Ładowarka samochodowa
4. Instrukcja obsługi
5. Klipsy na kable
6. Łopatka do podważania taśmy
7. Czytnik kart microSD na USB
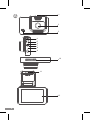
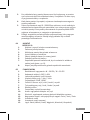
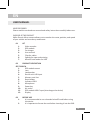
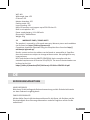
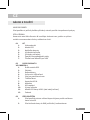
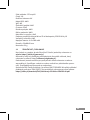
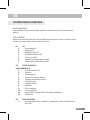
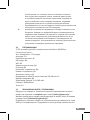
02. OPIS PRODUKTU
PATRZ RYS. A
1. Mocowanie modułu GPS
2. Obiektyw
3. Głośnik
4. Wejście mini-USB urządzenia
5. Slot karty pamięci
6. Klawisz reset
7. Dioda sygnalizacyjna LED
8. Mikrofon
9. Klawisz zasilania
10. Wylot powietrza
11. Wejście USB-C modułu GPS (ładuje również urządzenie)
12. Wyświetlacz
03. PRZED UŻYCIEM
1. Zaleca się używanie markowych kart microSD
2. Przed włożeniem karty do rejestratora należy ją sformatować.

5
3. Przy wkładaniu karty pamięci kamera musi być wyłączona, w przeciw-
nym razie może dojść do uszkodzenia karty i urządzenia. To samo tyczy
się wyjmowania karty z urządzenia.
4. Kiedy karta pamięci się zapełni, najstarsze niezabezpieczone nagrania
zostaną nadpisane.
5. Zaleca się ustawienie opcji G - SENSOR na minimum, w celu uniknięcia
zabezpieczania niepotrzebnych materiałów i tym samym utraty miejsca
na karcie pamięci. Kartę należy sformatować w systemie plików FAT32
najpierw w komputerze, a następnie w rejestratorze.
6. Dźwięk: urządzenie posiada mikrofon pojemnościowy, który nagrywa
wszelkie odgłosy otoczenia. Dźwięki mogą nakładać się na siebie
powodując zniekształcenia.
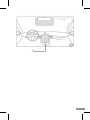
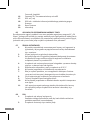
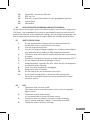
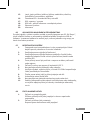
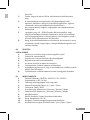
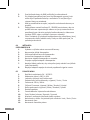
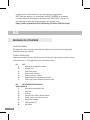
04. MONTAŻ
PATRZ RYS. B
1. Wybierz i wyczyść miejsce montażu kamery.
2. Zamontuj uchwyt kamery.
3. Włóż kartę pamięci do gniazda w kamerze.
4. Umieść kamerę w uchwycie.
5. Skieruj obiektyw kamery w stronę jezdni.
6. Podepnij zasilacz do kamery.
7. Poprowadź przewód zasilacza tak, by nie zasłaniał ci widoku w
trakcie jazdy (patrz: rys. B).
8. Wepnij wtyczkę zasilacza do gniazda zapalniczki samochodu.
05. FUNKCJE MENU
1. Rozdzielczość nagrywania: 4K – 30 FPS / 2K – 30 FPS
2. Kodowanie wideo: h.265 / h.264
3. Jednostki prędkości: km/h lub mph
4. Uśpienie ekran: wył / 1 min / 3 min
5. Częstotliwość: 50HZ / 60HZ
6. Czułość G-Sensor: wył / niski / średni / wysoki
7. Tryb parkingowy: wył / niski / średni / wysoki
8. Detekcja ruchu
9. Format daty: wybór formatu daty
10. Audio: nagrywanie dźwięku: wł / wył
11. Głośność: regulowanie poziomu głośności dźwięków systemu
12. Nagrywanie w pętli: czas pojedynczych nagrań: 1min / 3min / 5min
13. Ustawienie czasu
14. Ustawienie strefy czasowej
15. Język: Polski, Włoski, Czeski, Węgierski, Niemiecki, Hiszpański,

6
Francuski, Angielski
16. Formatuj SD – formatowanie karty microSD
17. GPS: wł / wył
18. GPS Info – dokładne informacje dokładnego położenia geogra-
cznego
19. Reset systemu
20. Informacje
06. APLIKACJA DO ODTWARZANIA NAGRAŃ I TRASY
Do odtwarzania nagrań, prędkości oraz trasy pojazdu sugerujemy program PC „GX
Player”, którego plik instalacyjny zostaje automatycznie zapisywane na każdej karcie
micro-SD montowanej w urządzeniu. W ustawieniach aplikacji można zmienić język,
jednostki miary oraz rodzaj map na jakich użytkownik chce pracować”.
07. ŚRODKI OSTROŻNOŚCI
1. Nie należy samodzielnie rozmontowywać kamery ani ingerować w
jej budowę. W przypadku wystąpienia awarii należy skontaktować
się z serwisem.
2. Używaj wyłącznie oryginalnych akcesoriów.
3. Korzystaj wyłącznie z oryginalnej ładowarki dołączonej do zestawu.
Użytkowanie innego zasilacza może źle wpływać na działanie
urządzenia, baterii czy modułu GPS.
4. Urządzenia nie można wykorzystywać niezgodnie z prawem obowią-
zującym w danym kraju lub regionie.
5. Dopuszczalne temperatury pracy urządzenia to 0-35 °C
6. Nie narażaj urządzenia na uszkodzenia oraz uderzenia.
7. Dbaj o czystość produktu, a w szczególności obiektywu. Podczas
czyszczenia nie korzystaj z detergentów oraz środków chemicznych.
8. Czyść wyłącznie gdy urządzenie jest odłączone od zasilania.
9. Trzymaj urządzenie poza zasięgiem dzieci.
10. Nie wystawiaj urządzenia na działanie bardzo wysokich temperatur
oraz ognia.
11. Jeśli wyczujesz zapach palonego plasku lub elektroniki z kamery
jak najszybciej odłącz urządzenie od zasilania i skontaktuj się z
serwisem.
08. FAQ
1. Urządzenie nie włącza/ wyłącza się.
Powodem takiego zachowania może być stałe źródło zasilania w
gnieździe zapalniczki samochodowej.
2. Urządzenie restartuje się w trakcie jazdy.

7
Zaleca się sprawdzenie źródła zasilania.
3. Urządzenie nie nagrywa w pętli (nagrywa losowo).
Należy sprawdzić ustawienie funkcji „wykrywania ruchu” – powinna
być wyłączona.
4. Urządzenie pokazuje komunikat „karta pełna”.
Należy sprawdzić funkcję „G-sensor” oraz „trybu parkingowego”
i ustawić je na minimum. Kartę należy sformatować w formacie
FAT32 najpierw w komputerze, a następnie w rejestratorze.
5. Urządzenie nagrywa szumy, zniekształcony, niewyraźny dźwięk.
Urządzenie posiada bardzo czuły mikrofon, który nagrywa wszelkie
odgłosy z otoczenia. Nagrane dźwięki mogą nakładać się na siebie.
Nawiew powietrza przedniej szyby również może zniekształcać
dźwięk.
6. Urządzenie nie odpowiada.
Wciśnij krótko przycisk RESET lub przywróć urządzenie do ustawień
fabrycznych.
7. Na nagraniu występują poprzeczne pasy.
Błędne ustawienie wartości częstotliwości odświeżania obrazu.
Ustaw wartość częstotliwości na 50Hz lub 60Hz w zależności od
ustawień lokalnych.
09. UWAGA
1. W związku z ciągłym doskonaleniem produktów producent zastrze-
ga sobie możliwość zmiany w urządzeniu oraz jego zestawie bez
wcześniejszego informowania. Niektóre funkcje opisane w niniejszej
instrukcji mogą się nieznacznie różnić od rzeczywistości.
2. Należy używać wyłącznie oryginalnej ładowarki o prądzie ładowania
5V/2A. Nie podłączać bezpośrednio do gniazda 220/230V. Niesto-
sowanie się do zaleceń może spowodować uszkodzenie kamery lub
doprowadzić do niebezpiecznych sytuacji.
3. Jeśli urządzenie posiada moduł GPS to on może tracić połączenie
z satelitą w przypadku przebywania w zamkniętych pomieszcze-
niach lub przejazdu podziemnym tunelem, czasami również mogą
występować losowe zakłócenia sygnały spowodowane np. innymi
urządzeniami generującymi zakłócenia np. falami elektromagnetycz-
nymi z pojazdu obok. Producent nie bierze odpowiedzialności, za
ewentualne błędy lub nieprecyzyjne wskazywanie pozycji przez GPS.
4. Funkcja trybu parkingowego oparta jest o zasilanie bateryjne.
Kamera z naładowaną baterią i aktywnym trybem parkingowym po
wykryciu wstrząsu uruchomi się i zarejestruje krótkie nagranie, a

8
następnie wyłączy się automatycznie aby ograniczyć zużycie baterii.
Producent nie bierze odpowiedzialności za niezarejestrowanie
ewentualnych szkód powstałych podczas korzystania kamery w
trybie parkingowym.
10. SPECYFIKACJA
Dotykowy wyświetlacz IPS 3” o rozdzielczości 640x360 px
Sensor: Sony Starvis
Kąt widzenia: 170 stopni
Przysłona: 1.8
Rozdzielczość nagrywania: 4K
Moduł GPS: TAK
WiFi: NIE
Szeroki kąt widzenia: TAK
G-Sensor: TAK
Detekcja ruchu: TAK
Tryb parkingowy: TAK
Nagrywanie w pętli: TAK
Obsługa kart pamięci Micro SD do 256 GB klasy 10
Wbudowany mikrofon: TAK
Zasilanie: bateria: Li-Po 280 mAh
Wymiary: 36x86x54mm
Waga: 91g
11. KARTA GWARANCYJNA/ REKLAMACJE
Produkt objęty jest 24-miesięczną gwarancją. Warunki gwarancji można znaleźć na
stronie: hps://xblitz.pl/gwarancja/
Reklamacje należy zgłaszać za pomocą formularza reklamacyjnego znajdującego się
pod adresem: hp://reklamacje.kgktrade.pl/
Szczegóły, kontakt oraz adres serwisu można znaleźć na stronie: www.xblitz.pl. Spe-
cykacje i zawartość zestawu mogą ulec zmianie bez powiadomienia. Przepraszamy
za wszelkie niedogodności.
KGK Trade deklaruje, że urządzenie XBLITZ GENESIS 4K jest zgodne z istotnymi
wymaganiami dyrektywy 2014/53/EU. Tekst deklaracji można znaleźć pod linkiem:
hps://xblitz.pl/download/DOC/deklaracja-CE-Xblitz-GENESIS-4K.pdf

9
EN
USER MANUAL
VIDEO RECORDER
Please read the enclosed user manual and safety instrucons carefully before use.
PURPOSE OF THE PRODUCT
Xblitz Genesis 4K car camera allows you to monitor the route, posion, and speed
of your vehicle and record any road events.
01. KIT
1. Video recorder
2. GPS module
3. Car charger
4. User manual
5. Clips for cables
6. Spatula for tape undermining
7. MicroSD card reader for USB
02. PRODUCT DESCRIPTION
SEE FIGURE A
1. GPS module mount
2. Lens
3. Loudspeaker
4. Device mini-USB input
5. Memory card slot
6. Reset buon
7. Indicator LED 8.
8. Microphone
9. Power key
10. Air outlet
11. GPS module USB-C input (also charges the device)
12. Display
03. BEFORE USE
1. It is recommended to use a branded microSD card before using
this device.
2. It is important to format the card before inserng it into the DVR.

10
3. The camera must be turned o when inserng the memory card,
otherwise the card and the device may be damaged. The same
applies to removing the card from the device.
4. When the memory card becomes full, the oldest unprotected
recordings will be overwrien.
5. It is recommended that you set the G – SENSOR opon to minimum
to avoid protecng unnecessary footage and thus losing memory
card space. The card should be formaed in FAT32 le system rst
on your computer, then on the recorder.
6. Audio: The device is equipped with a condenser microphone that
records all ambient sounds. The sounds may overlap, causing
distoron.
04. INSTALLATION
SEE FIGURE B
1. Select and clean a mounng locaon for the camera.
2. Mount the camera bracket.
3. Insert the memory card into the camera.
4. Place the camera in the camera mount.
5. Point the camera lens towards the roadway.
6. Connect the power adapter to the camera.
7. Route the power cable so that it does not obstruct your view while
driving (see picture B).
8. Plug the power adapter into the cigaree lighter socket of the car.
05. MENU FUNCTIONS
1. Recording Resoluon: 4K—30 FPS / 2K – 30 FPS 2.
2. Video encoding: h.265 / h.264
3. Speed units: km/h or mph
4. Screen standby: o / 1 min / 3 min
5. Frequency: 50HZ / 60HZ
6. G-Sensor Sensivity: O / Low / Medium / High
7. Parking Mode: O / Low / Medium / High
8. Moon detecon
9. Date Format: Select date format
10. Audio: Audio recording: On / O
11. Volume: adjust the volume of the system sounds
12. Loop Recording: me of individual recordings: 1min / 3min / 5min
13. Time seng
14. Time zone seng
15. Language: Polish, Italian, Czech, Hungarian, German, Spanish,
French, English

11
16. Format SD – format microSD card
17. GPS: on / o
18. GPS Info – precise informaon of exact geographical posion
19. System Reset
20. Informaon
06. APPLICATION FOR RECORDING AND ROUTE PLAYBACK
For the source of the signal, speed and vehicle locaon, we use the PC programme
„GX Player”, the installaon le of which is automacally saved on each micro-SD
input to the soware. In the applicaon sengs, you can change the language, the
unit of measurement and the type of map on which the funcon wishes to work.
07. SAFETY PRECAUTIONS
1. Do not disassemble or tamper with the camera yourself. If a
malfuncon occurs, contact the service center.
2. Use only original accessories.
3. Use only the original charger supplied. Use of other power adaptor
may aect the device, baery or GPS module performance.
4. This device may not be used in conict with the law in your country
or region.
5. The device is designed to operate at temperatures between 0-35 °C.
6. Do not subject the device to damage or shock.
7. Keep the product, especially the lens, clean. Do not use detergents
or chemicals when cleaning.
8. Clean only when the device is unplugged.
9. Keep out of reach of children.
10. Do not expose this unit to extreme heat or re.
11. If you smell burning plasc or electronic odor coming from
the camera, unplug the device as soon as possible and contact
customer service.
08. FAQ
1. The device does not turn on/o.
The reason may be a constant power source in the car cigaree
lighter socket.
2. The device restarts while driving.
It is recommended to check the power source.
3. The device does not record in a loop (it records randomly).
Check “moon detecon” seng – it should be turned o.
4. The device shows “card full” message.

12
Check “G-sensor” and “parking mode” and set them to minimum.
The card should be formaed in FAT32 format rst in your compu-
ter, then in the DVR.
5. The device records noisy, distorted, unclear sound.
The device has a very sensive microphone which records all bac-
kground noises. The recorded sounds may overlap. The windshield
air intake may also distort the sound.
6. The device does not respond.
Briey press RESET or reset the unit to factory default sengs.
7. Cross stripes appear on the recording.
Incorrect seng of the frame rate value. Set the frequency value to
50Hz or 60Hz depending on local sengs.
09. NOTE
1. In the interest of connuous product improvement, the manufac-
turer reserves the right to change the unit and its package without
prior noce. Some funcons described in this manual may dier
slightly from reality.
2. Use only the original charger with a charging current of 5V/2A. Do
not connect directly to a 220/230V socket. Failure to do so may
damage the camera or lead to dangerous situaons.
3. If the device is equipped with a GPS module, it may lose connecon
with the satellite when indoors or travelling through underground
tunnels, somemes there may also be random signal disturbances
caused by e.g. other devices generang interference, e.g. electro-
magnec waves from a vehicle nearby. The manufacturer is not re-
sponsible for any errors or inaccuracies in the GPS posion display.
4. The parking mode funcon is based on baery power. A camera
with a charged baery and acve parking mode will, upon detecng
a shock, start up and record a short recording and then switch o
automacally to reduce baery consumpon. The manufacturer
accepts no responsibility for failure to record any damage caused
when using the camera in parking mode.
10. SPECIFICATIONS
3” IPS touch screen display with 640x360 px resoluon
Sensor: Sony Starvis
Viewing angle: 170 degrees
Aperture: 1.8
Recording resoluon: 4K
GPS module: YES

13
WiFi: NO
Wide angle view: YES
G-Sensor: YES
Moon detecon: YES
Parking mode: YES
Loop recording: YES
Micro SD memory card support up to 256 GB class 10
Built-in microphone: YES
Power supply baery: Li-Po 280 mAh
Dimensions: 36x86x54mm
Weight: 91g
11. WARRANTY CARD / COMPLAINTS
The product is covered by a 24-month warranty. Warranty terms and condions
can be found at: hps://xblitz.pl/gwarancja/
Complaints should be submied using the complaint form found at: hp://
reklamacje.kgktrade.pl/
Details, contact and service address can be found at: www.xblitz.pl. Specica-
ons and contents are subject to change without noce. We apologize for any
inconvenience.
KGK Trade declares that the XBLITZ GENESIS 4K device complies with the
essenal requirements of Direcve 2014/53/EU. The text of the declaraon can
be found at the link:
hps://xblitz.pl/download/DOC/deklaracja-CE-Xblitz-GENESIS-4K.pdf
DE
BEDIENUNGSANLEITUNG
VIDEO-RECORDER
Bie lesen Sie die beiliegende Gebrauchsanweisung und die Sicherheitshinweise
vor dem Gebrauch sorgfälg durch.
ZWECK DES PRODUKTS
Mit der Xblitz Genesis 4K-Autokamera können Sie die Route, die Posion und die
Geschwindigkeit Ihres Fahrzeugs überwachen und alle Ereignisse auf der Straße
aufzeichnen.

14
01. KIT
1. Videorekorder
2. GPS-Modul
3. Autoladegerät
4. Benutzerhandbuch
5. Klemmen für Kabel
6. Spatel zum Untergraben des Bandes
7. MicroSD-Kartenleser für USB
02. PRODUKTBEZEICHNUNG
SIEHE ABBILDUNG A
1. GPS-Modul-Halterung
2. Objekv
3. Lautsprecher
4. Geräte-Mini-USB-Eingang
5. Steckplatz für Speicherkarten
6. Reset-Taste
7. LED-Anzeige 8.
8. Mikrofon
9. Power-Taste
10. Luauslass
11. GPS-Modul USB-C-Eingang (lädt auch das Gerät auf)
12. Anzeige
03. VOR DER VERWENDUNG
1. Es wird empfohlen, eine microSD-Markenkarte zu verwenden,
bevor Sie dieses Gerät benutzen.
2. Es ist wichg, die Karte zu formaeren, bevor sie in den DVR
eingesetzt wird.
3. Die Kamera muss beim Einsetzen der Speicherkarte ausgeschaltet
sein, da sonst die Karte und das Gerät beschädigt werden können.
Dasselbe gilt für das Enernen der Karte aus dem Gerät.
4. Wenn die Speicherkarte voll ist, werden die ältesten ungeschützten
Aufnahmen überschrieben.
5. Es wird empfohlen, die Opon G - SENSOR auf ein Minimum einzu-
stellen, um zu vermeiden, dass unnöges Filmmaterial geschützt
wird und dadurch Speicherplatz auf der Karte verloren geht. Die
Karte sollte zuerst auf Ihrem Computer und dann auf dem Rekorder
im FAT32-Dateisystem formaert werden.
6. Audio: Das Gerät ist mit einem Kondensatormikrofon ausgestaet,
das alle Umgebungsgeräusche aufnimmt. Die Geräusche können

15
sich überschneiden, was zu Verzerrungen führt.
04. INSTALLATION
SIEHE ABBILDUNG B
1. Wählen Sie einen Montageort für die Kamera aus und reinigen
Sie ihn.
2. Moneren Sie die Kamerahalterung.
3. Setzen Sie die Speicherkarte in die Kamera ein.
4. Setzen Sie die Kamera in die Kamerahalterung ein.
5. Richten Sie das Kameraobjekv auf die Fahrbahn.
6. Schließen Sie den Netzadapter an die Kamera an.
7. Verlegen Sie das Netzkabel so, dass es Ihre Sicht während der Fahrt
nicht behindert (siehe Abbildung B).
8. Stecken Sie den Netzadapter in die Zigareenanzünderbuchse
des Autos.
05. MENÜFUNKTIONEN
1. Aufnahmeauösung: 4K-30 FPS / 2K - 30 FPS 2.
2. Video-Kodierung: h.265 / h.264
3. Geschwindigkeitseinheiten: km/h oder mph
4. Bildschirm-Standby: aus / 1 min / 3 min
5. Frequenz: 50HZ / 60HZ
6. G-Sensor-Empndlichkeit: Aus / Niedrig / Miel / Hoch
7. Parkmodus: Aus / Niedrig / Miel / Hoch
8. Bewegungserkennung
9. Datumsformat: Wählen Sie das Datumsformat
10. Audio: Audio-Aufnahme: Ein / Aus
11. Lautstärke: Einstellung der Lautstärke der Systemtöne
12. Loop-Aufnahme: Zeit der einzelnen Aufnahmen: 1min / 3min / 5min
13. Zeiteinstellung
14. Einstellung der Zeitzone
15. Sprache: Polnisch, Italienisch, Tschechisch, Ungarisch, Deutsch,
Spanisch, Französisch, Englisch
16. SD formaeren - microSD-Karte formaeren
17. GPS: ein/aus
18. GPS Info - präzise Informaonen über die genaue geograsche
Posion
19. System zurücksetzen
20. Informaonen
06. ANWENDUNG FÜR DIE AUFNAHME UND WIEDERGABE VON ROUTEN

16
Für die Quelle des Signals, die Geschwindigkeit und die Fahrzeugortung verwenden
wir das PC-Programm „GX Player”, dessen Installaonsdatei automasch auf jeder
micro-SD gespeichert wird, die in die Soware eingegeben wird. In den Einstellun-
gen der Anwendung können Sie die Sprache, die Maßeinheit und die Art der Karte,
auf der die Funkon arbeiten möchte, ändern.
07. SICHERHEITSVORKEHRUNGEN
1. Nehmen Sie die Kamera nicht auseinander und nehmen Sie keine
Manipulaonen an ihr vor. Wenn eine Fehlfunkon auri, wenden
Sie sich an das Servicezentrum.
2. Verwenden Sie nur Originalzubehör.
3. Verwenden Sie nur das mitgelieferte Original-Ladegerät. Die
Verwendung eines anderen Netzteils kann die Leistung des Geräts,
des Akkus oder des GPS-Moduls beeinträchgen.
4. Dieses Gerät darf nicht im Widerspruch zu den Gesetzen in Ihrem
Land oder Ihrer Region verwendet werden.
5. Das Gerät ist für den Betrieb bei Temperaturen zwischen 0-35 °C
ausgelegt.
6. Setzen Sie das Gerät keinen Schäden oder Stößen aus.
7. Halten Sie das Produkt, insbesondere das Objekv, sauber. Verwen-
den Sie zur Reinigung keine Reinigungsmiel oder Chemikalien.
8. Reinigen Sie das Gerät nur, wenn es vom Stromnetz getrennt ist.
9. Außerhalb der Reichweite von Kindern auewahren.
10. Setzen Sie das Gerät nicht extremer Hitze oder Feuer aus.
11. Wenn Sie brennenden Kunststo oder elektronischen Geruch aus
der Kamera riechen, ziehen Sie so schnell wie möglich den Netzstec-
ker und wenden Sie sich an den Kundendienst.
08. FAQ
1. Das Gerät lässt sich nicht ein-/ausschalten.
Der Grund dafür kann eine konstante Stromquelle in der Zigaree-
nanzünderbuchse des Autos sein.
2. Das Gerät startet während der Fahrt neu.
Es wird empfohlen, die Stromquelle zu überprüfen.
3. Das Gerät zeichnet nicht in einer Schleife auf (es zeichnet zufällig
auf).
Überprüfen Sie die Einstellung „Bewegungserkennung” - sie sollte
ausgeschaltet sein.
4. Das Gerät zeigt die Meldung „Karte voll” an.
Überprüfen Sie „G-Sensor” und „Parkmodus” und stellen Sie sie
auf Minimum. Formaeren Sie die Karte im FAT32-Format zuerst in

17
Ihrem Computer und dann im DVR.
5. Das Gerät nimmt laute, verzerrte und undeutliche Geräusche auf.
Das Gerät verfügt über ein sehr empndliches Mikrofon, das alle
Hintergrundgeräusche aufnimmt. Die aufgenommenen Geräusche
können sich überschneiden. Auch der Lueinlass in der Windschutz-
scheibe kann den Ton verzerren.
6. Das Gerät reagiert nicht.
Drücken Sie kurz RESET oder setzen Sie das Gerät auf die Werkse-
instellungen zurück.
7. Auf der Aufnahme erscheinen Querstreifen.
Der Wert für die Bildfrequenz ist falsch eingestellt. Stellen Sie den
Frequenzwert je nach den örtlichen Einstellungen auf 50 Hz oder
60 Hz ein.
09. ANMERKUNG
1. Im Interesse einer konnuierlichen Produktverbesserung behält
sich der Hersteller das Recht vor, das Gerät und seine Verpackung
ohne vorherige Ankündigung zu ändern. Einige in diesem Handbuch
beschriebene Funkonen können leicht von der Realität abweichen.
2. Verwenden Sie nur das Original-Ladegerät mit einem Ladestrom
von 5V/2A. Schließen Sie es nicht direkt an eine 220/230-V-Stec-
kdose an. Andernfalls kann die Kamera beschädigt werden oder zu
gefährlichen Situaonen führen.
3. Wenn das Gerät mit einem GPS-Modul ausgestaet ist, kann es in
geschlossenen Räumen oder bei Fahrten durch unterirdische Tunnel
die Verbindung zum Satelliten verlieren, manchmal kann es auch zu
zufälligen Signalstörungen kommen, die z. B. durch andere Geräte
verursacht werden, die Interferenzen erzeugen, z. B. elektroma-
gnesche Wellen von einem Fahrzeug in der Nähe. Der Hersteller
ist nicht verantwortlich für Fehler oder Ungenauigkeiten in der
GPS-Posionsanzeige.
4. Die Funkon des Parkmodus basiert auf der Baerieleistung. Eine
Kamera mit geladenem Akku und akvem Parkmodus startet bei
Erkennung eines Stoßes und zeichnet eine kurze Aufnahme auf
und schaltet sich dann automasch ab, um den Akkuverbrauch zu
verringern. Der Hersteller übernimmt keine Verantwortung für die
Nichtaufzeichnung von Schäden, die durch die Verwendung der
Kamera im Parkmodus verursacht werden.
10. SPEZIFIKATIONEN
3” IPS-Touchscreen-Display mit einer Auösung von 640x360 Pixeln

18
Sensor: Sony Starvis
Betrachtungswinkel: 170 Grad
Blende: 1.8
Aufnahmeauösung: 4K
GPS-Modul: JA
WiFi: NEIN
Weitwinkelansicht: JA
G-Sensor: JA
Bewegungserkennung: JA
Parkmodus: YES
Loop-Aufnahme: JA
Unterstützung von Micro SD-Speicherkarten bis zu 256 GB Klasse 10
Eingebautes Mikrofon: JA
Baerie für die Stromversorgung: Li-Po 280 mAh
Abmessungen: 36x86x54mm
Gewicht: 91g
11. GARANTIEKARTE / REKLAMATIONEN
Für das Produkt gilt eine 24-monage Garane. Die Garanebedingungen
nden Sie unter: hps://xblitz.pl/gwarancja/
Beschwerden sollten unter Verwendung des Beschwerdeformulars eingereicht
werden, das unter folgender Adresse zu nden ist: hp://reklamacje.kgktrade.
pl/
Details, Kontakt und Serviceadresse nden Sie unter: www.xblitz.pl. Änderungen
der technischen Daten und des Inhalts ohne Vorankündigung vorbehalten. Wir
entschuldigen uns für etwaige Unannehmlichkeiten.
KGK Trade erklärt, dass das Gerät XBLITZ GENESIS 4K mit den grundlegenden An-
forderungen der Richtlinie 2014/53/EU übereinsmmt. Der Text der Erklärung
kann unter dem Link gefunden werden:
hps://xblitz.pl/download/DOC/deklaracja-CE-Xblitz-GENESIS-4K.pdf

19
CZ
NÁVOD K POUŽITÍ
VIDEO RECORDÉR
Před použim si pečlivě přečtěte přiložený návod k použi a bezpečnostní pokyny.
ÚČEL VÝROBKU
Kamera do auta Xblitz Genesis 4K umožňuje sledovat trasu, polohu a rychlost
vozidla a zaznamenávat všechny událos na silnici.
01. KIT
1. Videorekordér
2. Modul GPS
3. Nabíječka do auta
4. Uživatelská příručka
5. Příchytky pro kabely
6. Špachtle na podkopávání pásky
7. Čtečka karet MicroSD pro USB
02. POPIS PRODUKTU
VIZ OBRÁZEK A
1. Držák modulu GPS
2. Objekv
3. Reproduktory
4. Vstup mini-USB zařízení
5. Slot pro paměťovou kartu
6. Tlačítko Reset
7. Kontrolka LED 8.
8. Mikrofon
9. Klíč napájení
10. Výstup vzduchu
11. Modul GPS Vstup USB-C (také nabíjí zařízení)
12. Zobrazit
03. PŘED POUŽITÍM
1. Před použim tohoto zařízení doporučujeme použít značkovou
kartu microSD.
2. Před vložením karty do DVR je důležité ji naformátovat.

20
3. Fotoaparát musí být při vkládání paměťové karty vypnutý, jinak
může dojít k poškození karty i přístroje. Totéž pla pro vyjmu
karty ze zařízení.
4. Když se paměťová karta zaplní, nejstarší nechráněné záznamy se
přepíší.
5. Doporučujeme nastavit možnost G - SENSOR na minimum, aby
nedocházelo k ochraně nepotřebných záběrů a m ke ztrátě místa
na paměťové kartě. Kartu je třeba naformátovat v souborovém
systému FAT32 nejprve v počítači a poté v rekordéru.
6. Zvuk: Zařízení je vybaveno kondenzátorovým mikrofonem, který
zaznamenává všechny okolní zvuky. Zvuky se mohou překrývat, což
způsobuje zkreslení.
04. INSTALACE
OBRÁZEK B
1. Vyberte a vyčistěte místo pro montáž kamery.
2. Namontujte držák fotoaparátu.
3. Vložte paměťovou kartu do fotoaparátu.
4. Umístěte fotoaparát do držáku.
5. Namiřte objekv fotoaparátu směrem k vozovce.
6. Připojte napájecí adaptér k fotoaparátu.
7. Napájecí kabel veďte tak, aby vám při jízdě nebránil ve výhledu
(viz obrázek B).
8. Zapojte napájecí adaptér do zásuvky zapalovače cigaret ve vozidle.
05. FUNKCE MENU
1. Rozlišení záznamu: 2K - 30 FPS 2.
2. Kódování videa: h.265 / h.264
3. Jednotky rychlos: km/h nebo mph
4. Pohotovostní režim obrazovky: vypnuto / 1 min / 3 min
5. Frekvence: 50 Hz / 60 Hz
6. Citlivost G-senzoru: Vypnuto / Nízká / Střední / Vysoká
7. Režim parkování: Vypnuto / Nízká / Střední / Vysoká
8. Detekce pohybu
9. Formát data: Zvolte formát data
10. Zvuk: Zvukový záznam: Záznam: Zapnuto / Vypnuto
11. Hlasitost: nastavení hlasitos zvuků systému
12. Nahrávání ve smyčce: čas jednotlivých nahrávek: 1min / 3min /
5min
13. Nastavení času
14. Nastavení časového pásma
Strona się ładuje...
Strona się ładuje...
Strona się ładuje...
Strona się ładuje...
Strona się ładuje...
Strona się ładuje...
Strona się ładuje...
Strona się ładuje...
Strona się ładuje...
Strona się ładuje...
Strona się ładuje...
Strona się ładuje...
Strona się ładuje...
Strona się ładuje...
Strona się ładuje...
Strona się ładuje...
Strona się ładuje...
Strona się ładuje...
Strona się ładuje...
Strona się ładuje...
Strona się ładuje...
Strona się ładuje...
Strona się ładuje...
Strona się ładuje...
Strona się ładuje...
Strona się ładuje...
Strona się ładuje...
Strona się ładuje...
Strona się ładuje...
Strona się ładuje...
Strona się ładuje...
Strona się ładuje...
-
 1
1
-
 2
2
-
 3
3
-
 4
4
-
 5
5
-
 6
6
-
 7
7
-
 8
8
-
 9
9
-
 10
10
-
 11
11
-
 12
12
-
 13
13
-
 14
14
-
 15
15
-
 16
16
-
 17
17
-
 18
18
-
 19
19
-
 20
20
-
 21
21
-
 22
22
-
 23
23
-
 24
24
-
 25
25
-
 26
26
-
 27
27
-
 28
28
-
 29
29
-
 30
30
-
 31
31
-
 32
32
-
 33
33
-
 34
34
-
 35
35
-
 36
36
-
 37
37
-
 38
38
-
 39
39
-
 40
40
-
 41
41
-
 42
42
-
 43
43
-
 44
44
-
 45
45
-
 46
46
-
 47
47
-
 48
48
-
 49
49
-
 50
50
-
 51
51
-
 52
52


w innych językach
- slovenčina: Xblitz Genesis 4K Návod na obsluhu
- română: Xblitz Genesis 4K Manualul proprietarului
Powiązane artykuły
-
Xblitz GO 2 Instrukcja obsługi
-
-
-
-
-
-
-
-
-