
OPS
OPS-KL756V
ENGLISH - DEUTSCH - FRANCAIS - ESPANOL - ITALIANO - POLISH
USER MANUAL
BEDIENUNGSANLEITUNG
MANUEL D’UTILISATION
MANUAL DEL USUARIO
MANUALE UTENTE
PODRECZNIK UZYTKOWNIKA


English - 1 -
CONTENTS
SIGNS USED IN THIS MANUAL ............................ 1
SAFETY PRECAUTIONS .......................................1
INTRODUCTION .................................................... 2
USING YOUR PRODUCT MORE EFFECTIVELY 4
TROUBLESHOOTING ..........................................4
IMPORTANT NOTIFICATIONS ..............................4
OPS PC SPECIFICATION ......................................6
CONNECTION SCHEME ...................................... 7
PIN CONNECTIONS (JAE TX25-80) .....................8
and power supply shall comply with Limited Power
Source requirements.
Do not unplug the device while it is running on any
DS product.
Do not cut the power of the device while it’s running.
At rst, shut down the device then, unplug it from the
platform in which the device is plugged.
Warning
Disconnect your system from the power source in
case of a long period of disuse.
RTC Battery
A button cell lithium battery is used as a continuous
voltage supply for RTC Power. A CR2032 battery is
used rated at 3.0 volts.
CAUTION
RISK OF EXPLOSION IF BATTERY IS REPLACED
BY AN INCORRECT TYPE. DISPOSE OF
USED BATTERIES ACCORDING TO THE
INSTRUCTIONS.
Important
Do not change the battery by yourself. It should be
changed by customer service with the same ratings
and battery model.
Batteries must not be exposed to excessive heat such
as sunshine, re or the like.
Never dispose of batteries in re or with hazardous
or ammable materials as this can cause them to
explode.
Recycle dead batteries; do not put with the normal
household waste.
Warning
Do not ingest the battery, Chemical Burn Hazard.
This product or the accessories supplied with the
product may contain a coin/button cell battery. If the
coin/button cell battery is swallowed, it can cause
severe internal burns in just 2 hours and can lead
to death.
Keep new and used batteries away from children.
If the battery compartment does not close securely,
stop using the product and keep it away from chil-
dren.
If you think batteries might have been swallowed or
placed inside any part of the body, seek immediate
medical attention.
Cleaning
Important
Disconnect your product from the power supply before
cleaning it.
SIGNS USED IN THIS MANUAL
Some words and phrases are written in a dierent
format to get your attention.
Warning: Serious injury or death risk
Important: Important instructions should be read
carefully in order to prevent yourself, stored data and
computer parts from any damage
Note: Notes are being used to put emphasis on
useful information and critical points regarding the
product.
SAFETY PRECAUTIONS
In order to prevent the product from being damaged,
extend its service time, and ensure your normal use
and personal safety, please carefully read the whole
guide and the related safety precautions and strictly
follow the requirements in it.
Do not shake the product. Ensure that it stays in a
balanced stance on its position.
Do not throw or drop any object on the product.
Do not interfere on the product’s surface with a sharp
object.
Do not keep the product in a humid environment.
Do not spill water or other liquids onto the product.
Do not keep your product in an extremely cold or hot
environment.
Do not keep pressing the power switch or the reset
button(if available). Avoid interrupt power failure
during system's running, which might also physically
damage the operating system.
Power
Rated Supply: DC 12V – DC 19V
Warning
The product must be fed from an appropriate SELV
power supply according to IEC/EN 60950-1 standard

English - 2 -
Do not clean your the product while it is switched on.
Use a soft and damp cloth to clean the product. Do
not use chemical cleaners, liquid, sprayed cleaning
agents or wet cloth to clean the product. Do not apply
cleanser directly on your computer.
Vent holes of your product
Vent holes on the cabin of the product ensures stable
performance of your computer without overheating.
Do not block these openings in anyway.
Important
Do not put any objects in the vent holes of your
product. This may cause re or short circuit of the
inner parts of your product.
Temperature & Fire
Do not place the product near re or excessive heat
sources.
Lightning
In order to prevent a potential electrical shock, unplug
the device and remove your product’s power cords
during lightning.
Repair
Unless a basic implementation on the product is
specied by the producer’s technical department on
a document, do not repair the product by yourself.
Otherwise, your guarantee may get suspended and
you may risk your health or your product. In case of
need, consult your authorized service.
Note
Informations in this manual are for reference only.
Images and descriptions may slightly vary between
this manual and the actual product you have.
INTRODUCTION
Thank you for choosing our product. This guide will
help you to better understand the device. Therefore,
please carefully read the whole Guide before you
operate the device.
We believe that you will get extremely satised with
this product and hope that you will have pleasant and
productive times with it.
This product provides a modern design that is
compatible with all OPS Standardized Digital Signage
products.
Since all essential components that compose the
product are all together, it is easy to use and user-
friendly.

English - 3 -
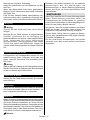
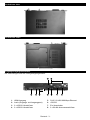
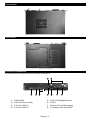
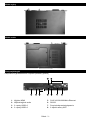
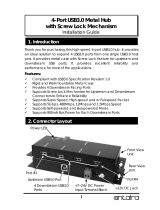
Top view
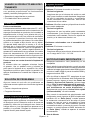
Bottom view
Input/Output Connections
The connections are illustrated as shown below.
6 7
1. HDMI Out
2. Audio (In & Out)
3. 2 x USB 2.0 ports
4. 2 x USB 3.0 ports
5. RJ45 10/100/1000 Mbps Ethernet
6. RS232
7. On/O Button
8. 2 x WiFi Antenna Connectors

English - 4 -
USING YOUR PRODUCT MORE EF-
FECTIVELY
Paying attention to the following points with respect
to your product will provide a stable performance and
also prolong its life.
• Ensuring security of your product
• Daily care of your product
Daily Care
Environmental Factors
Ambient temperature must be between 0°C - 40°C
while the product is running. Do not directly expose
the product to humidity, high temperature, re, direct
sun light and dust while using it. The vent holes of
the product will allow it perform safer without system
overheating. Do not cover these holes or do not
prevent air ow with an object. Position the product
at least 15 cm away from strong magnetic field
generating electrical devices such as TV, refrigerator
or large speakers. Do not suddenly take your product
from a cold environment and suddenly put it in a warm
environment. A sudden temperature change of 10°C
may cause some of the internal parts to malfunction.
Do not put your product on an uneven surface.
Points to be taken into consideration while clean-
ing the product
Your system must be turned o while cleaning the
product. Please use a soft and damp piece of cloth for
cleaning its surface. Do not use chemical cleansers to
clean the product. Do not directly apply the cleaning
material on your product.
TROUBLESHOOTING
Some troubleshooting issues are mentioned in this
chapter under the following titles:
• Points to be checked rst
• Frequently asked questions
Points to be checked rst
When a problem occurs, it is very important to
diagnose this problem correctly. Try to nd out what
it is. Determine what causes the problem and under
which category it falls. Write down the error codes
and messages displayed on the screen, if possible.
Contact technical support to get support.
Frequently Asked Questions
Sound Issues
Problem: Sound system is not working.
Check the following:
Be sure that sound volume is not low and sound
is not muted. Ensure that the sound driver and
its application are installed properly. Check cable
connections.
Problem: External microphone and auditory devices
are not working
Check the following:
Make sure that the cables are properly and rmly
connected. Check that the driver is installed. Check
sound settings and whether the system is muted
or not.
Issues about turning on the system
Problem: System does not start.
Check The Following:
Be sure that power voltage is in a range of DC
12V – DC 19V.
IMPORTANT NOTIFICATIONS
• Wake-on-Wireless LAN (WoWLAN) is not supported
• Hot plug and audio via the HDMI Out port is not
supported. If you want to extend the image via HDMI
cable, plug the HDMI cable into the HDMI Out port
rst and then turn on the OPS.
• In order to use RTC alarm, make sure that your
Windows conguration is set correctly. Enter the
Control Center > Power Options menu and click
on “Choose what the power buttons do” rst.
Then click on “Change settings that are currently
unavailable” and make sure that the “Turn on fast
startup(recommended)” option is unchecked.
• If only admin password is set, you can enter the
BIOS by simply clicking on “Enter” when password
window pops up to avoid a deadlock in case the
password has been forgotten. If you do not want that,
you should set both admin and user passwords. This
way, you will not be able to enter BIOS by clicking on
“Enter” when password window pops up.
• Ubuntu Usage
In some versions of Ubuntu Operating System
the platform in which the OPS is plugged may be
detected as a second screen due to the HDMI Out
port on the OPS.
In case of no signal or no menu is displayed
on settings screen or only the background is
displayed after Ubuntu installation, enter the BIOS
> Advanced > Power Conguration menu and
disable EDP to HDMI option. In this case, you can
see Ubuntu screen normally but you will not be able
to use HDMI Out port of the OPS.
Alternatively, you can keep the Windows button
pressed down and press the button “P” consecutively

English - 5 -
until you see the Ubuntu screen and then set the
resolution to 1920x1080.
• The cases mentioned below may change the boot
priority of the SSD/HDD and thus the Operating
System may not be able to boot.
- after 3 wrong BIOS password entries
- after the installation of a new type of SSD/HDD
- after the Sata Controller option in the BIOS >
Chipset > Sata and RST Conguration menu is
disabled/enabled
In order to boot the Operating System normally,
enter the BIOS > Boot menu and set your SSD/
HDD as Boot Option#1 or simply enter the BIOS,
select Optimized Defaults (F9) and press Enter.
Then select Save and Exit (F10) and press Enter
again. Alternatively, you can press the “F9” and “F10”
buttons for the same functions.
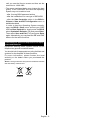
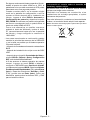
Information for Users on Disposal of Old Equip-
ment and Batteries
Equipment bearing these symbols should not be
disposed as general household waste.
You should look for appropriate recycling facilities and
systems for the disposal of these products.
For more information, please contact the local
authority or the dealer where you purchased the
product.
Notice: The sign Pb below the symbol for batteries indicates
that this battery contains lead.
Products
Battery

English - 6 -
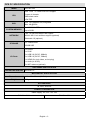
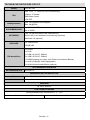
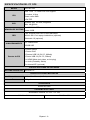
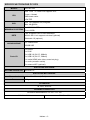
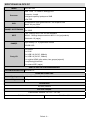
OPS PC SPECIFICATION
Model OPS-KL756V
CPU
Intel
®
Core
TM
i5-7300U with vPro Support
2 cores, 4 threads
3MB smart cache
15W TDP
GPU
Intel
®
HD Graphics 620, Integrated
Max. 4K @30Hz
SYSTEM MEMORY
2 x SO-DIMM DDR4
Up to 32GB
NETWORK
LAN: 10/100/1000 Mbps LAN support
WLAN: 802.11 a/c wireless support (optional)
Bluetooth 4.0 (optional)
STORAGE
2.5” 500GB HDD
256GB SSD
I/O Ports
1 x RS232
1 x RJ45
2 x USB 3.0 (5V DC, 900mA)
2 x USB 2.0 (5V DC, 500mA)
1 x HDMI Out (only video, no hot plug)
1 x Audio (In & Out)
2 x WiFi antenna (optional)
SOFTWARE SPECIFICATION
OPERATING SYSTEM Windows 10
MECHANICAL SPECIFICATION
Dimensions 180 x 119 x 30 mm (WxDxH)
Weight 800 gr
ACCESSORIES
IB, QSG, Antenna
POWER CONSUMPTION
Rated Supply: DC 12V – DC 19V
DC 12V – 3.3A DC 19V – 2.2A

English - 7 -
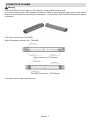
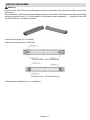
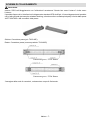
CONNECTION SCHEME
Warning
Insert the OPS into the slot with the “This Side Out” warning label facing outside.
Your product has an 80 pin OPS standard connection interface. Interconnection of the product and another
board (i.e. docking board, monitor board or main board…) is provided by JAE TX/24TX25 plug and receptacle
connectors.
Left: Plug connector (p/n: TX25-80P)
Right: Receptacle connector (p/n: TX24-80P)
Plug Connector / TX25 Pinout
Receptacle Connector / TX24 Pinout
*Connector series image, reference only.

English - 8 -
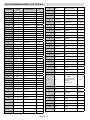
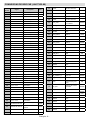
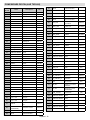
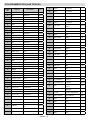
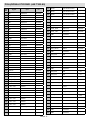
PIN CONNECTIONS (JAE TX25-80)
PIN
NO
Signal Description I/O
1 NC DisplayPort OUT
2 NC DisplayPort OUT
3 GND Ground -
4 NC DisplayPort OUT
5 NC DisplayPort OUT
6 GND Ground -
7 NC DisplayPort OUT
8 NC DisplayPort OUT
9 GND Ground -
10 NC DisplayPort OUT
11 NC DisplayPort OUT
12 GND Ground -
13 NC DisplayPort OUT
14 NC DisplayPort OUT
15 NC DisplayPort IN
16 GND Ground -
17 TMDS_CLK- DVI-D OUT
18 TMDS_CLK+ DVI-D OUT
19 GND Ground -
20 TMDS0- DVI-D OUT
21 TMDS0+ DVI-D OUT
22 GND Ground -
23 TMDS1- DVI-D OUT
24 TMDS1+ DVI-D OUT
25 GND Ground -
26 TMDS2- DVI-D OUT
27 TMDS2+ DVI-D OUT
28 GND Ground -
29 DVI_DDC_DATA DVI_D I/O
30 DVI_DDC_CLK DVI_D I/O
31 DVI_HPD DVI_D IN
32 GND Ground -
33 +12V~+19V Power -
34 +12V~+19V Power -
35 +12V~+19V Power -
36 +12V~+19V Power -
37 +12V~+19V Power -
38 +12V~+19V Power -
39 +12V~+19V Power -
40 +12V~+19V Power -
41 PWROK System power OK OUT
42 WAKE System wake OUT
43 RSVD Reserved pins -
44 RSVD Reserved pins -
45 RSVD Reserved pins -
46 RSVD Reserved pins -
47 RSVD Reserved pins -
48 RSVD Reserved pins -
49 RSVD Reserved pins -
50 SYS_FAN System Fan Control OUT
51 UART_RXD UART 3.3V IN
52 UART_TXD UART 3.3V OUT
53 GND Ground -
54 StdA_SSRX- USB3.0 IN
55 StdA_SSRX+ USB3.0 IN
56 GND Ground -
57 StdA_SSTX- USB3.0 OUT
58 StdA_SSTX+ USB3.0 OUT
59 GND Ground -
60 USB_PN2 USB I/O
61 USB_PP2 USB I/O
62 GND Ground -
63 USB_PN1 USB I/O
64 USB_PP1 USB I/O
65 GND Ground -
66 USB_PN0 USB I/O
67 USB_PP0 USB I/O
68 GND Ground -
69 AZ_LINEOUT_L Audio-Lch OUT
70 AZ_LINEOUT_R Audio-Rch OUT
71 CEC Consumer Electronic Control I/O
72 PB_DET Pluggable Board Detect OUT
73 PS_ON Pluggable Signal ON IN
74 PWR_STATUS PowerGood
OUT
(OC)
75 GND Ground -
76 GND Ground -
77 GND Ground -
78 GND Ground -
79 GND Ground -
80 GND Ground -

Deutsch - 1 -
INHALT
IN DIESEM HANDBUCH
VERWENDETE ZEICHEN .....................................1
SICHERHEITSMASSNAHME ................................1
EINFÜHRUNG ........................................................2
EFFEKTIVERE VERWENDUNG DES GERÄTS ..4
FEHLERSUCHE UND -BEHEBUNG .....................4
WICHTIGE BENACHRICHTIGUNGEN .................. 4
TECHNISCHE DATEN DES OPS PC ....................6
ANSCHLUSSSCHEMA .........................................7
SOCKELVERBINDUNGEN (JAE TX25-80) ...........8
Netzstrom
Nennspeisespannung: Gleichstrom 12 V – 19 V
Warnung
Das Gerät muss über ein passendes, dem Standard
IEC/EN 60950-1 entsprechendes SELV-Netzteil
versorgt werden und die Stromversorgung muss
den Anforderungen der Begrenzten Stromquelle
entsprechen.
Trennen Sie das Gerät niemals vom Stromnetz,
solange es auf einem DS-Gerät läuft.
Trennen Sie das Gerät niemals vom Stromnetz,
solange es im Betrieb ist. Schalten Sie stets zuerst
das Gerät ab, trennen Sie dann das Gerät von der
Plattform, an das es angeschlossen ist.
Warnung
Ziehen Sie bitte den Netzstecker, wenn Sie die Anlage
über einen längeren Zeitraum nicht benutzen wollen.
RTC Akku
Eine Lithium-Knopfzelle wird als kontinuierliche
Spannungszufuhr für die RTC-Stromversorgung
verwendet. Eine auf 3,0 Volt ausgelegte CR2032-
Batterie wird verwendet.
VORSICHT
BEI DER VERWENDUNG DES
FALSCHEN BATTERIETYPS BESTEHT
EXPLOSIONSGEFAHR. ENTSORGEN SIE
DIE GEBRAUCHTEN BATTERIEN DEN
ANWEISUNGEN ENTSPRECHEND.
Wichtig
Wechseln Sie niemals die Batterie selbständig aus.
Der Austausch gegen eine Batterie mit den gleichen
Leistungswerten und des gleichen Modells darf nur
durch den Kundendienst erfolgen.
Batterien dürfen nicht zu großer Hitze wie direkter
Sonneneinstrahlung, Feuer oder Vergleichbarem
ausgesetzt werden.
Werfen Sie Batterien niemals ins Feuer bzw. in
Gefahrenstoe oder entammbare Materialien, da
dies zu Explosionen führen kann.
Recyceln Sie Batterien gemäß den geltenden
gesetzlichen Vorschriften. Entsorgen Sie diese nicht
in den normalen Hausmüll.
Warnung
Batterien dürfen niemals verschluckt werden. Es be-
steht chemische Verätzungsgefahr.
Dieses Gerät bzw. das zum Gerät mitgelieferte Zu-
behör enthält möglicherweise eine Knopfzellbatterie.
Wenn die Knopfzellenbatterie verschluckt wird, führt
dies innerhalb 2 Stunden zu schweren internen Ver-
IN DIESEM HANDBUCH VERWENDETE
ZEICHEN
Einige Wörter und Phrasen sind in einem anderen
Format gehalten, um Ihre Aufmerksamkeit zu wecken.
Warnung: Schweres oder tödliches
Verletzungsrisiko
Wichtig: Wichtige Anweisungen sind aufmerksam
zu lesen, damit Sie sich selber, Ihre gespeicherten
Daten sowie den Computer und dessen Teile vor
möglichen Schäden schützen können.
Hinweis: Hinweise dienen dazu, um auf nützliche
Informationen und wichtige Fragen zu diesem Produkt
hinzuweisen.
SICHERHEITSMASSNAHME
Für die Vermeidung von Schäden am Gerät,
die Verlängerung seiner Lebensdauer sowie die
Gewährleistung einer reibungslosen Nutzung lesen
Sie sich bitte die gesamte Bedienungsanleitung sowie
die dazugehörigen Sicherheitshinweise durch und
befolgen Sie diese auf das Genauste.
Das Gerät darf nicht geschüttelt werden. Sorgen
Sie dafür, dass das Gerät in einer ausbalancierten
Position steht.
Werfen Sie keine Objekte gegen das Gerät, und
lassen Sie nichts darauf fallen.
Wirken Sie nicht mit einem scharfen Gegenstand auf
die Oberäche des Geräts ein.
Stellen Sie das Gerät nicht in einer feuchten
Umgebung auf.
Schütten Sie kein Wasser oder andere Flüssigkeiten
auf das Gerät.
Stellen Sie das Gerät nicht in einer sehr kalten bzw.
sehr heißen Umgebung auf.
Halten Sie den Netzschalter bzw. die Reset-Taste
(sofern vorhanden) nicht gedrückt. Vermeiden Sie
Unterbrechungen der Stromzufuhr bei laufendem
Gerät, da diese auch das Betriebssystem physikalisch
beschädigen könnten.

Deutsch - 2 -
ätzungen mit möglicher Todesfolge.
Halten Sie gebrauchte und neue Batterien von Kin-
dern fern.
Wenn das Batteriefach nicht sicher geschlossen.
stoppen Sie die Verwendung des Geräts und halten
Sie Kinder fern.
Falls Sie den Verdacht haben, dass Batterien ver-
schluckt wurden oder in irgendeinen Körperteil plat-
ziert wurde, suchen Sie sofort medizinische Hilfe auf.
Reinigung
Wichtig
Trennen Sie das Gerät vom Netz, bevor Sie es
reinigen.
Reinigen Sie Ihr Gerät niemals im eingeschalteten
Zustand. Verwenden Sie zur Reinigung der
Geräteoberächen ein weiches, leicht angefeuchtetes
Tuch. Verwenden Sie keine chemischen
Reinigungsmittel, Reinigungssprays oder nasse
Tücher zum Putzen des Bildschirms. Tragen Sie
niemals direkt Reinigungsmittel auf Ihren Computer
auf.
Lüftungslöcher des Geräts
Lüftungslöcher am Gerätegehäuse sorgen für eine
stabile Leistung Ihres Computer, ohne dass sich
dieser überhitzt. Blockieren Sie keinesfalls diese
Önungen.
Wichtig
Stecken Sie keine Objekte in die Lüftungslöchern Ihres
Geräts. Dies könnte zu Bränden oder Kurzschlüssen
an den Innenteilen des Geräts führen.
Temperatur & Brände
Setzen Sie das Gerät keinem direkten Sonnenlicht
oder Hitze aus.
Blitzschlag
Ziehen Sie den Netzstecker des Geräts und entfernen
Sie dessen Netzkabel während eines Gewitters, um
einen möglichen Stromschlag zu vermeiden.
Reparieren
Sofern nicht eine grundlegende Implementierung des
Geräts von der technischen Abteilung des Herstellers
auf einem Dokument speziziert ist, dürfen Sie das
Gerät nicht selbständig reparieren. Andernfalls könnte
Ihre Garantie erlöschen, bzw. könnten Sie Schäden für
Gesundheit oder an dem Gerät riskieren. Falls nötig,
konsultieren Sie Ihren zuständigen Kundendienst.
Hinweis
Bewahren Sie dieses Handbuch für ein späteres
Nachschlagen auf. Die Abbildungen und
Beschreibungen in dieser Bedienungsanleitung
können sich leicht von Ihrem tatsächlichen Gerät
unterscheiden.
EINFÜHRUNG
Vielen Dank, dass Sie sich für unser Gerät entschieden
haben. Diese Anleitung wird Ihnen helfen, die
Funktionsweise des Geräts besser zu verstehen.
Lesen Sie sich diese daher in Gänze sorgfältig durch,
bevor Sie das Gerät in Betrieb nehmen.
Wir glauben, dass Sie äußerst zufrieden mit diesem
Gerät sein werden, und hoen, dass es Ihnen eine
angenehme und produktive Nutzung ermöglicht.
Dieses Gerät verfügt über ein modernes Design,
das mit allen standardisierten OPS-Digital Signage-
Produkten kompatibel ist.
Da alle essentiellen Komponenten des Geräts
vorhanden sind, lässt es sich einfach und bequem
verwenden.

Deutsch - 3 -
Ansicht von oben
Ansicht von unten
Eingang/Ausgang-Anschlüsse
Die Verbindungen sind wie unten gezeigt angeordnet.
6 7
1. HDMI-Ausgang
2. Audio (Eingangs- und Ausgangsport)
3. 2 x USB 2.0-Anschlüsse
4. 2 x USB 3.0-Anschlüsse
5. RJ45, 10/100/1000 Mbps Ethernet
6. <RS232
7. Ein-/Ausschalter
8. 2 x WLAN-Antennenanschlüsse

Deutsch - 4 -
EFFEKTIVERE VERWENDUNG DES
GERÄTS
Die Beachtung der folgenden Punkte gewährleistet
den stabilen Betrieb des Geräts und verlängert dessen
Lebensdauer.
• Die Sicherheit Ihres Geräts gewährleisten
• Tägliche Pege Ihres Geräts
Tägliche Pege
Umwelteinüsse
Die Umgebungstemperatur muss zwischen 0°C–40°C
liegen, wenn das Gerät in Betrieb ist. Setzen Sie
das in Betrieb befindliche Gerät nicht direkter
Feuchtigkeit, hohen Temperaturen, oenem Feuer,
direkter Sonneneinstrahlung oder Staub aus.
Die Lüftungsschlitze des Geräts sichern des
Betriebsbereitschaft und verhindern, dass es zu
einer Überhitzung des Systems kommt. Decken
Sie diese Löcher nicht ab, und behindern Sie den
Luftuss nicht, indem Sie etwas davor stellen. Stellen
Sie das Gerät mit einem Mindestabstand von 15 cm
zu allen elektrischen Geräten auf, die ein starkes
elektromagnetisches Feld erzeugen, dazu zählen
beispielsweise Fernsehgeräte, Kühlschränke oder
größere Lautsprecher. Bringen Sie das Gerät nicht
plötzlich aus einer kalten in eine warme Umgebung.
Eine plötzliche Temperaturänderung von mehr als
10°C kann zu Fehlfunktionen einzelner interner
Baugruppen führen. Platzieren Sie Ihr Produkt nicht
auf einer unebenen Oberäche.
Punkte, die bei der Reinigung des Geräts zu
beachten sind
Ihr System muss abgeschaltet sein, während
Sie das Gerät reinigen. Verwenden Sie bitte zur
Reinigung der Geräteoberflächen ein weiches,
leicht angefeuchtetes Tuch. Verwenden Sie keine
chemischen Reinigungsmittel zur Reinigung des
Geräts. Tragen Sie niemals direkt Reinigungsmittel
auf das Gerät auf.
FEHLERSUCHE UND -BEHEBUNG
Einige mögliche Probleme bei der Fehlersuche
werden in diesem Kapitel unter den folgenden Titeln
aufgeführt:
• Punkte, die zuerst zu prüfen sind
• Häug gestellte Fragen
Punkte, die zuerst zu prüfen sind
Wenn ein Problem auftritt, ist es sehr wichtig, dessen
Natur und Ursache korrekt festzustellen. Versuchen
Sie herauszunden, worum es sich handelt. Stellen
Sie die Ursache für das Problem fest und unter welche
Kategorie es fällt. Notieren Sie sich, wenn möglich,
die auf dem Bildschirm gezeigten Fehlercodes und
Meldungen. Kontaktieren Sie den Technischen
Kundendienst für weitere Hilfe.
Häug gestellte Fragen
Soundprobleme
Problem: Das System arbeitet nicht.
Prüfen Sie Folgendes:
Stellen Sie sicher, dass die Tonlautstärke nicht sehr
niedrig bzw. der Ton nicht stummgeschaltet ist.
Kontrollieren Sie, ob der Soundtreiber und dessen
Anwendungsprogramms ordnungsgemäß installiert
worden sind. Überprüfen Sie die Anschlüsse.
Problem: Das externe Mikrofon und die
Aufnahmegeräte funktionieren nicht
Prüfen Sie Folgendes:
Stellen Sie sicher, dass die Kabel richtig und sicher
angeschlossen sind. Überprüfen Sie, ob der Treiber
installiert ist. Prüfen Sie die Soundeinstellungen
und ob das System stumm gestellt ist oder nicht.
Probleme beim Einschalten des Systems
Problem: Das System startet nicht.
Prüfen Sie Folgendes:
Stellen Sie sicher, dass die Versorgungsspannung
bei Gleichstrom 12 V – 19 V liegt.
WICHTIGE BENACHRICHTIGUNGEN
• Wake-on drahtlose LAN (WoWLAN) wird nicht
unterstützt.
• Einbau im laufenden Betrieb und Audio über HDMI
Eingangsport wird nicht unterstützt. Wenn Sie das
Bild über ein HDMI-Kabel verlängern möchten,
stecken Sie das HDMI-Kabel zuerst in den HDMI-
Ausgang und schalten Sie dann den OPS ein.
• Stellen Sie sicher, dass Ihre Windows-Konguration
richtig eingestellt ist, um den RTC-Alarm verwenden
zu können. Rufen Sie das Menü Control Center>
Energieoptionen auf und klicken Sie zuerst
auf „Wählen Sie aus was die Ein / Aus-Tasten
tun“. Klicken Sie dann auf „Einstellungen ändern,
die derzeit nicht verfügbar sind“ und stellen Sie
sicher, dass die Option „Schnellstart einschalten
(empfohlen)“ deaktiviert ist.

Deutsch - 5 -
• Wenn nur das Administrator-Passwort festgelegt ist,
können Sie das BIOS aufrufen, indem Sie einfach
auf „Enter“ klicken, wenn das Passwortfenster
erscheint, um einen Deadlock zu vermeiden, falls
das Passwort vergessen wurde. Wenn Sie das
nicht möchten, sollten Sie sowohl ein Administrator-
Passwort als auch ein Benutzerpasswort festlegen.
Dadurch können Sie das BIOS nicht aufrufen, indem
Sie auf „Enter“ klicken, wenn das Passwortfenster
erscheint.
• Nutzung von Ubuntu
In einigen Versionen des Ubuntu-Betriebssystems
wird die Plattform, an der der OPS angeschlossen ist,
möglicherweise aufgrund des HDMI-Ausgangsports
des OPS als ein zweiter Bildschirm erkannt.
Wenn auf dem Einstellungsbildschirm kein
Signal oder kein Menü angezeigt wird oder
nach der Installation von Ubuntu nur der
Hintergrund angezeigt wird, rufen Sie das Menü
BIOS>Erweitert>Leistungskonguration auf und
deaktivieren Sie die Option EDP zu HDMI. In diesem
Fall können Sie den Ubuntu-Bildschirm so sehen wie
der normalerweise angezeigt wird, aber Sie können
den HDMI-Ausgangsport des OPS nicht verwenden.
Alternativ, können Sie die Windows-Taste gedrückt
halten und die Taste „P“ hintereinander drücken, bis
der Bildschirm von Ubuntu angezeigt wird und die
Auösung auf 1920x1080 eingestellt wird.
• Bei den unten genannten Fälle kann die
Startreihenfolge der SSD/HDD geändert werden
und das Betriebssystem kann möglicherweise
nicht booten.
- nach 3 falschen BIOS-Passworteingaben
- nach der Installation von einem neuen Typ von
SSD/HDD
- nachdem die Option Sata Controller im Menü
BIOS>Chipsatz>Sata und RST-Konfiguration
deaktiviert/aktiviert ist
Um das Betriebssystem normal zu booten, rufen
Sie das Menü BIOS>Boot auf und stellen Sie Ihre
SSD/HDD auf die Boot Option#1 ein oder rufen Sie
einfach das BIOS auf, wählen Sie Standardwerte
(F9) und drücken Sie die Eingabetaste. Wählen Sie
dann Speichern und Beenden (F10) und drücken
Sie erneut die Eingabetaste. Alternativ, können Sie
die Tasten „F9“ und „F10“ für die gleichen Funktionen
drücken.
Verwenderinformationen zur Entsorgung von
Altgeräten und Batterien
Geräte, die diese Symbole tragen, dürfen nicht als
Haushaltsmüll entsorgt werden.
Für die Entsorgung dieser Produkte müssen Sie
sich nach geeigneten Recycling-Einrichtungen oder
Systeme umsehen.
Für weitere Informationen kontaktieren Sie bitte die
örtlich zuständigen Stellen oder den Händler, bei dem
Sie das Produkt gekauft haben.
Hinweis: Das unten abgebildete Pb-Symbol für Akkus zeigt
an, dass dieser Akku Blei enthält.
Produkte
Batterie

Deutsch - 6 -
TECHNISCHE DATEN DES OPS PC
Modell OPS-KL756V
CPU
Intel
®
Core
TM
i5-7300U mit vPro Unterstützung
2 Kerne, 4 Threads
3MB Smart Cache
15W TDP
Grakprozessor
Intel
®
HD Graphics 620, Integriert
Max. 4K @30Hz
SYSTEMSPEICHER
2 x SO-DIMM DDR4
Bis zu 32GB
NETZWERK
LAN: 10/100/1000 Mbps LAN-Unterstützung
WLAN: 802.11 a/c drahtlose Unterstützung (optional)
Bluetooth 4.0 (optional)
SPEICHER
2,5” 500GB HDD
256GB SSD
E/A-Anschlüsse
1 x RS232
1 x RJ45
2 x USB 3.0 (5V DC, 900mA)
2 x USB 2.0 (5V DC, 500mA)
1 x HDMI Ausgang (nur video, kein Einbau im laufenden Betrieb)
1 x Audio (Eingangs- und Ausgangsport)
2 x WLAN-Antennenanschlüsse (optional)
SOFTWAREBESCHREIBUNG
BETRIEBSSYSTEM Windows 10
MECHANISCHE EIGENSCHAFTEN
Maße 180 x 119 x 30 mm (BxTxH)
Gewicht 800 g
ZUBEHÖR
IB, QSG, Antenne
LEISTUNGSAUFNAHME
Nennspeisespannung: Gleichstrom 12 V – 19 V
Gleichstrom 12V – 3,3A Gleichstrom 19V – 2,2A

Deutsch - 7 -
ANSCHLUSSSCHEMA
Warnung
Stecken Sie die OPS-Einheit in den Steckplatz mit dem Hinweisetikett „Diese Seite nach außen“ nach außen
gerichtet ein.
Das Gerät hat eine OPS Standard-Verbindungsschnittstelle mit 80 Stiften. Die Zusammenschaltung des Geräts
und einer weiteren Platine (z. B. Dockingplatine, Monitorplatine oder Hauptplatine …) erfolgt durch den JAE
TX/24TX25-Stecker und Buchsenstecker.
Links: Steckverbinder (p/n: TX25-80P)
Rechts: Steckverbinder (p/n: TX24-80P)
Steckverbinder / TX25 Pinbelegung
Buchsenstecker / TX24 Pinbelegung
*Abbildung der Verbinderserie, nur zu Referenz.

Deutsch - 8 -
SOCKELVERBINDUNGEN (JAE TX25-80)
STECKERNR. Signal Beschreibung E/A
1 NC DisplayPort AUSGANG
2 NC DisplayPort AUSGANG
3 GND Masse -
4 NC DisplayPort AUSGANG
5 NC DisplayPort AUSGANG
6 GND Masse -
7 NC DisplayPort AUSGANG
8 NC DisplayPort AUSGANG
9 GND Masse -
10 NC DisplayPort AUSGANG
11 NC DisplayPort AUSGANG
12 GND Masse -
13 NC DisplayPort AUSGANG
14 NC DisplayPort AUSGANG
15 NC DisplayPort IN
16 GND Masse -
17 TMDS_CLK- DVI-D AUSGANG
18 TMDS_CLK- DVI-D AUSGANG
19 GND Masse -
20 TMDS0- DVI-D AUSGANG
21 TMDS0+ DVI-D AUSGANG
22 GND Masse -
23 TMDS1- DVI-D AUSGANG
24 TMDS1+ DVI-D AUSGANG
25 GND Masse -
26 TMDS2- DVI-D AUSGANG
27 TMDS2+ DVI-D AUSGANG
28 GND Masse -
29 DVI_DDC_DATA DVI_D E/A
30 DVI_DDC_CLK DVI_D E/A
31 DVI_HPD DVI_D IN
32 GND Masse -
33 +12V~+19V Netzstrom -
34 +12V~+19V Netzstrom -
35 +12V~+19V Netzstrom -
36 +12V~+19V Netzstrom -
37 +12V~+19V Netzstrom -
38 +12V~+19V Netzstrom -
39 +12V~+19V Netzstrom -
40 +12V~+19V Netzstrom -
41 PWROK Systemschaltung OK AUSGANG
42 WAKE System-wake AUSGANG
43 RSVD Reservierte Stecker -
44 RSVD Reservierte Stecker -
45 RSVD Reservierte Stecker -
46 RSVD Reservierte Stecker -
47 RSVD Reservierte Stecker -
48 RSVD Reservierte Stecker -
49 RSVD Reservierte Stecker -
50 SYS_FAN
Systemeigene
Lüftungssteuerung
AUSGANG
51 UART_RXD UART 3.3V IN
52 UART_TXD UART 3.3V AUSGANG
53 GND Masse -
54 StdA_SSRX- <USB3.0 IN
55 StdA_SSRX+ <USB3.0 IN
56 GND Masse -
57 StdA_SSTX- <USB3.0 AUSGANG
58 StdA_SSTX+ <USB3.0 AUSGANG
59 GND Masse -
60 <USB_PN2 USB E/A
61 <USB_PP2 USB E/A
62 GND Masse -
63 <USB_PN1 USB E/A
64 <USB_PP1 USB E/A
65 GND Masse -
66 <USB_PN0 USB E/A
67 <USB_PP0 USB E/A
68 GND Masse -
69 AZ_LINEOUT_L Audio-Lch AUSGANG
70 AZ_LINEOUT_R Audio-Rch AUSGANG
71 CEC
Consumer
Electronic Control
(komponentenüber
greifende
Ansteuerung)
E/A
72 PB_DET Steckplatineerkennung AUSGANG
73 PS_ON
Einsteckbares Signal
EIN
IN
74 PWR_STATUS PowerGood AUS (OC)
75 GND Masse -
76 GND Masse -
77 GND Masse -
78 GND Masse -
79 GND Masse -
80 GND Masse -

Français - 1 -
CONTENU
SYMBOLES UTILISÉS DANS CE MANUEL .......... 1
PRÉCAUTIONS DE SÉCURITÉ ............................1
INTRODUCTION .................................................... 2
UTILISATION PLUS EFFICACE
DE VOTRE APPAREIL ..........................................4
DÉPANNAGE ........................................................4
NOTIFICATIONS IMPORTANTES .........................4
SPÉCIFICATION OPS POUR PC ..........................6
SCHÉMA DE CONNEXION ...................................7
CONNEXIONS DE BROCHE (JAE TX25-80) ........8
Alimentation
Alimentation nominale : CC 12 V – CC 19 V
Avertissement
Le produit doit être alimenté par une source
d'alimentation SELV appropriée conforme à la norme
IEC / EN 60950-1 et doit être conforme aux exigences
relatives à la source d'alimentation limitée.
Ne débranchez pas l’appareil lorsqu'il est en cours
d'exécution sur tout produit DS.
Ne coupez pas l’alimentation de l’appareil lorsqu'il
est en cours d'exécution. Tout d’abord, éteignez
l’appareil, puis, débranchez-le de la plate-forme à
laquelle il est branché.
Avertissement
Déconnectez votre système de la source d’alimentation
en cas d’inactivité prolongée.
Batterie RTC
Une pile de type bouton au lithium fournit une
alimentation continue pour l'horloge en temps réel.
Une pile CR2032 est utilisée avec une tension
nominale de 3,0 volts.
ATTENTION:
RISQUE D’EXPLOSION EN CAS DE
REMPLACEMENT DES PILES PAR UN
TYPE INAPPROPRIÉ. METTEZ AU REBUT
LES PILES USÉES CONFORMÉMENT À LA
RÉGLEMENTATION LOCALE.
Important
Ne changez pas la pile vous-même. Faites-la
changer par le service client avec le modèle et les
caractéristiques correspondants.
N'exposez pas les piles à une chaleur excessive telle
que celle du soleil, du feu ou autre.
Ne vous débarrassez pas des piles en les jetant au feu
ou avec des matières dangereuses ou inammables.
Elles pourraient exploser.
Veuillez faire recycler les piles usées ; ne les mettez
pas au rebut avec les autres ordures ménagères.
Avertissement
N'avalez pas la pile. Les produits chimiques y conte-
nus pourraient vous brûler.
Ce produit ou les accessoires fournis avec celui-ci
pourraient contenir une pile bouton. L'ingestion
d'une pile bouton peut causer non seulement de sé-
vères brûlures internes en seulement 2 heures, mais
aussi le décès.
Gardez les nouvelles et anciennes piles hors de por-
tée des enfants.
Si le compartiment à piles ne se ferme pas correcte-
SYMBOLES UTILISÉS DANS CE
MANUEL
Certains mots et phrases sont écrits dans un format
diérent an d’attirer votre attention.
Avertissement : Blessures graves ou risque
de mort
Important : Désigne les instructions importantes
à lire attentivement an de vous éviter tout préjudice
corporel ou des dommages sur les données
enregistrées et les pièces de l’ordinateur.
Remarque : Les remarques sont utilisées pour
mettre l'accent sur les informations utiles et les points
pertinents concernant l’appareil.
PRÉCAUTIONS DE SÉCURITÉ
Pour éviter que l’appareil ne subisse des dommages,
pour prolonger sa durée de vie et pour assure votre
utilisation normale et votre sécurité, lisez attentivement
tout le guide et les précautions de sécurité y associées
et suivez strictement les exigences y aérentes.
Évitez de secouer l’appareil. Assurez-vous qu’il est
placé dans une position stable.
Ne jetez pas ou ne laissez pas tomber des objets
sur l’appareil.
Évitez de frotter tout objet tranchant sur la surface
de l’appareil.
Ne conservez pas l’appareil dans un endroit humide.
Ne versez pas de l’eau ou tout autre liquide sur
l’appareil.
Évitez de conserver votre appareil dans un
environnement très froid ou très chaud.
N’appuyez pas l’interrupteur d’alimentation ou le
bouton de réinitialisation en le maintenant enfoncé (si
disponible). Évitez les interruptions dues aux pannes
de courant lorsque le système est en marche, car cela
pourrait causer des dommages physiques au système
de fonctionnement.

Français - 2 -
ment, arrêtez d'utiliser le produit et tenez-le hors de
la portée des enfants.
Si vous pensez que des piles ont été avalées ou lo-
gées n'importe où à l'intérieur du corps, consultez de
toute urgence un médecin.
Nettoyage
Important
Débranchez votre l'appareil de l'alimentation
électrique avant de le nettoyer.
Ne nettoyez pas votre appareil lorsqu'il est allumé.
Utilisez un chion doux et humide pour nettoyer
l’appareil. N’utilisez pas d’agents nettoyant chimiques,
liquides, en spray ou un chion humide pour nettoyer
l’appareil. Évitez d’appliquer le produit de nettoyage
directement sur l’ordinateur.
Orices d’aération de votre appareil
Les orifices d’aération du meuble de l’appareil
assurent une performance stable de votre ordinateur
sans le surchauer. N'obstruez en aucun cas ces
orices.
Important
Ne placez aucun objet dans les orices d'aération de
l'appareil. Ceci pourrait entraîner un incendie ou un
court-circuit des pièces internes de votre appareil.
Température et incendie
Ne placez pas l’appareil à proximité du feu ou à des
sources de chaleur excessives.
Foudre
Pour éviter un éventuel choc électrique, débranchez
et retirez les cordons d’alimentation de votre appareil
pendant la foudre.
Réparation
Sauf disposition expresse écrite par le département
technique du fabricant sur une exécution de base
de l’appareil, évitez de réparer vous-même votre
appareil. Autrement, votre garantie peut être
suspendue et vous mettrez en péril votre santé ou
votre appareil. Consultez le service compétent dans
le domaine, le cas échéant.
Remarque
Les informations contenues dans ce manuel sont
uniquement à titre de référence. Les images et les
descriptions contenues dans ce manuel peuvent
légèrement être diérentes de votre appareil.
INTRODUCTION
Nous vous remercions d'avoir choisi notre produit. Ce
guide vous permet de mieux comprendre l’appareil.
Toutefois, veuillez lire attentivement le guide tout
entier avant de mettre votre appareil en marche.
Nous pensons que vous serez très satisfait de cet
appareil et nous espérons que vous passerez des
moments et un temps d’exploitation agréables.
Cet appareil propose un design moderne, qui est
compatible avec tous les produits de signalisation
numérique normalisé OPS.
La mise en commun de tous les composants
essentiels de l’appareil fait qu’il soit facile à utiliser
et convivial.
Strona się ładuje...
Strona się ładuje...
Strona się ładuje...
Strona się ładuje...
Strona się ładuje...
Strona się ładuje...
Strona się ładuje...
Strona się ładuje...
Strona się ładuje...
Strona się ładuje...
Strona się ładuje...
Strona się ładuje...
Strona się ładuje...
Strona się ładuje...
Strona się ładuje...
Strona się ładuje...
Strona się ładuje...
Strona się ładuje...
Strona się ładuje...
Strona się ładuje...
Strona się ładuje...
Strona się ładuje...
Strona się ładuje...
Strona się ładuje...
Strona się ładuje...
Strona się ładuje...
Strona się ładuje...
Strona się ładuje...
Strona się ładuje...
Strona się ładuje...
Strona się ładuje...
Strona się ładuje...
Strona się ładuje...
Strona się ładuje...
Strona się ładuje...
Strona się ładuje...
-
 1
1
-
 2
2
-
 3
3
-
 4
4
-
 5
5
-
 6
6
-
 7
7
-
 8
8
-
 9
9
-
 10
10
-
 11
11
-
 12
12
-
 13
13
-
 14
14
-
 15
15
-
 16
16
-
 17
17
-
 18
18
-
 19
19
-
 20
20
-
 21
21
-
 22
22
-
 23
23
-
 24
24
-
 25
25
-
 26
26
-
 27
27
-
 28
28
-
 29
29
-
 30
30
-
 31
31
-
 32
32
-
 33
33
-
 34
34
-
 35
35
-
 36
36
-
 37
37
-
 38
38
-
 39
39
-
 40
40
-
 41
41
-
 42
42
-
 43
43
-
 44
44
-
 45
45
-
 46
46
-
 47
47
-
 48
48
-
 49
49
-
 50
50
-
 51
51
-
 52
52
-
 53
53
-
 54
54
-
 55
55
-
 56
56


VESTEL OPS150-71 Instrukcja obsługi
- Typ
- Instrukcja obsługi
- Niniejsza instrukcja jest również odpowiednia dla
w innych językach
- español: VESTEL OPS150-71 Manual de usuario
- italiano: VESTEL OPS150-71 Manuale utente
- Deutsch: VESTEL OPS150-71 Benutzerhandbuch
- français: VESTEL OPS150-71 Manuel utilisateur
- English: VESTEL OPS150-71 User manual
Inne dokumenty
-
Sharp PN-ZB03PC Instrukcja obsługi
-
 ANTAIRA USB-HUB4K3 Instrukcja instalacji
-
Amazon Basics B07V3G97KZ Instrukcja obsługi
-
AmazonBasics U3-3UE04-Grey Instrukcja obsługi
-
Samsung PIM-BQ7P Instrukcja obsługi
-
-
AVTech - Velleman CCTVPROM17 Instrukcja obsługi
-
-
Samsung SBB-PB28E Instrukcja obsługi
-
ASROCK B450 Pro4 Instrukcja instalacji
