
A
B
C
1
2
A
B
C
D
1
2
日期
签字
底图总号
旧底图总号
描校
描图
借(通)用件登记
日期
日期
标准化
处数
工艺
审核
设计
标记
更改文件号
审定
批准
校对
签名
张
第
张
共
广东美的集团股份有限公司
数
量
阶段标记
量重
比例
D
美的洗涤电器制造有限公司
REV.
1
1
1
00
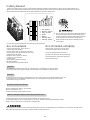
WH I RLPOOL
(WPL4.3)
128
80
:
1. PANTONE BLACK C
2.
3. A4 A5
4. ,
5.
2
ADG 120 A+
6710007414

Gebrauchsanweisung
Instructions for use
Mode d’emploi
Gebruiksaanwijzing
Istruzioni per l’uso
Brugsanvisning
Bruksanvisning
Käyttöohje
Manual de utilização
Instrucciones para el uso
Instrukcje użytkowania
Használati utasítás
ИнструкциЯ за употреба
Návod k použití
Návod na použitie
Instruc∑iuni de utilizare
Инструкции по эксплуатации


ENGLISH Instructions for use Page 4
POLSKI Instrukcje użytkowania Strona
30

Read this Manual
Dear Customer,
This appliance is intended to be used in household
and similar applications such as:
- Staff kitchen areas in shops, ofces and other
working environments;
- Farm houses;
- By clients in hotels, motels and other residential
type environments;
- Bed and breakfast type environments.
• Please carefully read this manual before using the
dishwasher, it will help you to use and maintain the
dishwasher properly.
• Keep it to refer to it at a later date.
• Pass it on to any subsequent owner of the
appliance.
This manual contains sections on safety Instructions,
Operating Instructions, Installation Instructions and
Troubleshooting Tips, etc.
Before Calling for Service
• To review the section on troubleshooting Tips will
help you to solve some common problems by
yourself.
• If you can not solve the problems by yourself,
please ask for the help of professional technicians.
NOTE:
The manufacturer, following a policy of constant
development and updating of the product, may
make modications without giving prior notice.
1) Safety Information
.............................................. 5
2) Disposal
.............................................................. 6
3) Operating Instructions
....................................... 7
Control Panel ........................................................ 7
Dishwasher Features ........................................... 7
4) Prior using for the rst time
.............................. 8
A Water Softener .................................................. 8
B Loading the Salt into the Softener ..................... 9
C Fill the Rinse Aid Dispenser .............................. 9
D Function of Detergent ..................................... 11
5) Loading the Dishwasher Basket
..................... 13
Attention before or after loading the Dishwasher
Baskets ............................................................... 13
Loading the upper Basket .................................. 13
Loading the Lower Basket .................................. 14
Cutlery Basket .................................................... 15
6) Starting a washing programme....................... 16
Wash Cycle Table ............................................... 16
Turning on the Appliance .................................... 17
Change the Programme ..................................... 17
At the End of the Wash Cycle ............................. 17
7) Maintenance and cleaning............................... 18
Filtering System .................................................. 19
Caring for the Dishwasher .................................. 19
8) Installation instruction
..................................... 20
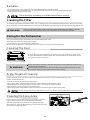
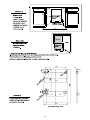
Please carefully read the installation instruction 21
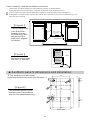
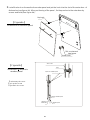
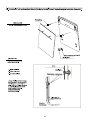
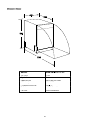
Aesthetic panel’s dimensions and installation .... 21
Tension adjustment of the door spring ............... 23
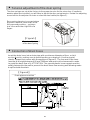
Connection of drain hoses .................................. 23
Dishwasher installation steps ............................. 24
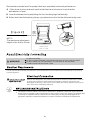
About Electricity Connecting .............................. 25
Water Connection ............................................... 25
9) Troubleshooting Tips
....................................... 26
Before calling for service .................................... 27
Error codes ......................................................... 28
Technical information .......................................... 29
4

This appliance must be grounded. In the event of a
malfunction or breakdown, grounding will reduce
the risk of anelectric shock by providing a path of
least resistance of electric current. This appliance
is equipped with a cord having an equipment-
grounding conductor and a grounding plug.
The plug must be plugged into an appropriate outlet
that is installed and grounded in accordance with
all local codes and ordinances.
Improper connection of the equipment-grounding
conductor can result in the risk of an electric shock.
Check with a qualified electrician or service
representative if you are in doubt whether the
appliance is properly grounded. Do not modify the
plug provided with the appliance; If it does not fit
the outlet. Ha ve a proper outlet installed by a
qualified electrician.
Keep children away from detergent and rinse aid, keep
child away from the open door of the dishwasher,
there could still be some det ergent left inside.
ren
Do not abuse, sit on, or stand on the door or dish
rack of the dishwasher.
Do not wash plastic items unless they are marked
dishwasher safe or the equivalent. For plastic items
n
ot so marked, check the manufacturer's
recommendations.
Us eo nly deter gent and rinse ad di tives
design ed for an aut om atic dishwash er.
Ne ver use s oap, laun dryd e te rg ent, orh and
wa shin gdeterg ent inyour dishwa sher. K eep
these pr oducts out of th ere ach of child ren.
During installation,the powersupplymustnot
be excessiv ely ordangerouslybentorflattened.
Do not tamper with controls.
Do not operate your dishwasher unless all
enclosure panels are proper ly in place. Open
the door very carefully if the dishwasher is
operating, there is a risk of water squirting out.
Do not place any heavy objects the
door when it is open. The appliance could tip
forward.
on or stand on
When load in g items t o be w ash ed:
1)Locatesharp itemssothat theyarenot likely
todamagethedoorseal;
2 Warning: Kni ves and other ute nsil swi th
sh a rp poi n t s mu st be l oa ded in t he basket
w it h their poi ntsd own or p lace di n a
horizontalposition.
)
When us ingyour dishw asher, you sh ould
preve ntpl astic items from comin gi ntocontac t
wit hthe he ating elem ent.(This i nstruction is onl y
applica ble to m achines with avi sual heat in g
ele ment.)
I fthe s upply cord i sd amaged, it mus tberepl aced
by the m anu facturer or it sse rvic eag ent ora
si mi larly qua li fie dperson in or de r to a void a
hazar d.
Pl ease dispos e of pack ing mater ials pr oper ly.
U se the dishwasher only for its intended functi on.
Remove the door tothe washing compartmentwhen
removing an old dishwasher from service or discarding it.
Dishwasher detergentsare stronglyalkaline, they
can be extrem elyd angerous i f s w a l l ow e d.A voi d
contact wi th skin and eye san dkeep child ren away
from th e di shwasherwhen t he d oor isopen.
Check that the detergent comparmentisempty
aft er compl et ionof the wash cycl e.
The appl ian ceis to be co nn ected to t hewater
mainsusingnew hosesets and thatoldhose-sets
should no t b e reuse d .
The maximumnumber of place settingstobe
was hed i s 9.
The maximumpermissibleinletwater pressureis
1Mp a .
The minimum permissibleinletwater pressureis
0.04Mpa.
Children should be supervised to ensure that they do
not play with the appliance.
T his appliance is not intended for use by persons
(including children with reduced physical, sensory or
mental capabilities, or lack of experience and
knowledge ,unless they have been given supervision
o r instruction concerning use of the appliance by a
person responsible for their safety .
)
When usin g your dis hw ashe r, fo ll ow the precaut ions lis ted b elow:
Th edoors h oul d not be left o pen,
since th isco ul d increase the risk of tr ipping.
5

D ispo se of t hed is hwasher pac kagi ngm aterial c orrectly.
All pa ckaging mate rials can be r ec yc led.
Pl ast ic pa rts ar em arked w itht hes tandar di nternat ional abbrevi ations:
PE fo r polyethylen e,e .g.sheet wr apping m ater ial
PS for polystyrene,e.g.paddingmaterial
PO M polyox ymethylene, e.g. pla stic clips
PP pol ypr opy lene ,e. g. Salt fill er
AB S Acr yl onitr ileB utad ieneStyrene ,e.g. Contro l Panel .
Packaging materialcouldbedangerous for children!
Fo rdi sposing ofpa ckage an d thea ppl iance ple ase got o arecycling centre. Ther efore cut
off the powersupplycable and makethe doorclosingdeviceunusable.
Cardboard packaging ismanufactured fromrecycled paperand shouldbe disposedin the
w aste p aper c ollect ion for re cy cling .
By en suring th ispr oduct is dispose dof corr ect ly, you will hel ppre vent po tentialnegat ive
con seque nces for the envi ronm ent a nd human h eal th, w hic h could ot her wise be caus ed
byinappropriatewaste handlingof this product.
Fo rm ored eta iled infor mation a bou t rec ycli ngo fthis pro duct ,ple ase c on tact your loca l
ci tyoff ice and your hou sehold w as te dis posal servic e.
DISPOSAL :Do not dispose th is pr oduct as unsort edmunicipal wa ste. Collect ion of such
waste sep arately forspec ial t reatment is necessar y.
WARNING!
6

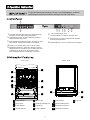
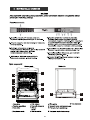
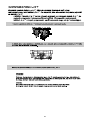
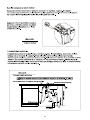
To get the best performance from your dishwasher, read all
operating instructions before using it for the first time.
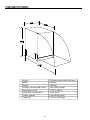
Back View
Front view
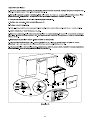
4
Power light: To come on when Power ON/OFF
button is pressed down.
8
7
6
ON/OFF Button: To turn on/off the power supply.
Display : To display delay time or error codes.
5
3
1
Salt and Rinse A id Warning Light: To come on when
the softener or dispenser needs to be refilled.
2
Program indicator light: when you select washing
program, the correspond light will display.
Program Key-press:To select washing program
when press the Key-press.
Delayed Start Button: Press this button to set the
delayed hours for washing. You can delay the start
of washing up to 24 hours. One press o
n this
button delays the start of washing by one hour.
3in1 indicator lig ht / 3in1
functions Button: To select and show 3in1
Main Filter
Detergent Dispenser
Cup Shelf
Cutlery Basket
Coarse Filter
Rinse Aid Dispen ser
Inlet pipe conn ector
Drain pipe connector
Low er Basket
Spray Arms
Upper Basket
1
Salt Container
5
6
7
8
9
10
12
11
3
2
4
11 12
1
2
3
4
5
6
7
8
9
10
on
O ff
13
Tray ass
13
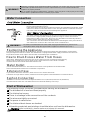
7

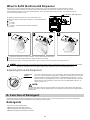
Befo re using you r dishwashe r for th e first time:
Th ewat er so ftener m ust be set manu ally, usin gthe wa terha rd ness dia l.
The wat er so ften eris des igned to rem ove min eral san dsa lts fr omthew ater, w hich woul dh ave
adetrimentalor adverseeffect ontheoperationofthe appliance.Thehigher the
content of th es e minerals an dsa lts,the harde ryour w ater is. The s of te ner shou ld be
adju sted acco rdi ngt othe ha rdness of the wat erin you rar ea.Your loca lWaterA uthority
can adviseyouonthehardnessofthewaterinyour area.
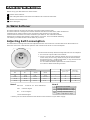
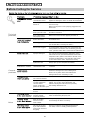
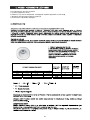
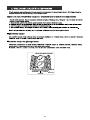
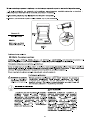
Adjusting Salt Consumption
Th edishwasher isdesigned to allow f oradjustment i n the amo untof salt co nsumed bas ed onthe ha rdne ss o f
the waterused.This is intendedtooptimiseandcustomisethelevel of salt consumption.
1. Unscrewthecapfromthe saltcontainer.
2. T herei s ar ing on the con tainer wit ha na rrow o nit (see figure
ontheside),ifnecessary, rotate thering intheanticlockwise
dire ction fromth e"-" Settingtow ardthe"+"sign, basedonthe
hardne sso f the w at er be ing used.
It is rec omm end edthat a djust me nts shou ldbe m ade in
acco rd ance wit h the f oll owing sch eme :
Contact yo ur local wat erbo ard for infor mation on the hardne ssof your w ater su pply.
dH
mm ol /l
0~1 40~8 0~1.4
/
0
/
14~3 98~22 1.4~3.9 - 20 50
39~8022~45 3.9~8 Mid 40 25
+
60 16
fH
0~1 0
10~28
28~56
Clar ke
°
Clark:British degree
°
fH: French degree
°
DH : Ger man degree
dH=1.25 Clarke =1.78 fH=0.178mmol/l
Note:1
°°
WATER HARDNESS
SelectorPosition
Salt consumption
(gram/cycle)
Aut o no my
(cycles/1kgs)
Pl eas e fol lo w the st eps bel owf oradjustmentin salt cons um ptio n.
°
""/
"-"
"+ "
"Mid"
Note:2
Settingtowardthe"+"sign
Settingtowardthe"-"sign
Settingtowardbetween
the "-" si gn and "+" sign
No salt n eed added
45~60 80~1 07 56~75 8~11
A. Water Softener
A. Set t he wate rsof tener
C. Fil l the r i nse ai d d i spen s er
D. Fillindetergent
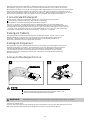
B. Add 1.5K gd ishwasher sa ltan dthen ful lfil lthe salt con tainer w ith w at er
8

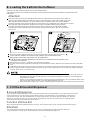
1.The salt con tai ner must onl y be r efilled when t he salt warn inglight in t he control pan elcomes on.
Depend ing on how w ell the s alt diss olve s, th esa lt warni ng light may st ill be on eventhough the
salt contai ner is filled .
If ther eis n osa ltwarning light in the con trol p anel( for some Mode ls),you c an estim at e when to f ill
the salt i nto the softene r by the cyc les that t he dishwashe r has run.
2. If ther ea re spills of the salt ,a soa kor a rapid pro gram s hould be run to remove the excessiv esa lt.
Always u se the salt i ntended for u sewith di shwasher.
The sa lt c ont ain er i sl ocated ben eath the l ower basket and shoul db efilled a se xplaine di n the
foll ow ing:
Attention!
Only use salt spe cifi ca lly designe df ort he use i ndi shw ash er s!E very other t ype of
salt no tspeci f ically de sig ned fo r t heu se in ad ishwas her, espe ciallyt able salt, will
damage t hew ater sof tener. I n case of da mages caused by the use of un sui table
salt t he ma nuf acture rdoe s notgive anywarrant y nor is liabl e forany damage s caused.
Only f il lwi ths alt just b efore start ingone of th eco mplete washi ngp ro gr ams.
This wi ll p revent any g rains of sa ltorsalty wate r, w hich ma y have b een spill ed,
remain ing on the bottom o ft he m achi ne for anype riod of ti me, which may cause
c o rros io n.
B. Loading the Salt Into the Softener
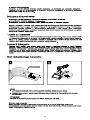
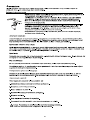
C. Fill the RinseAid Dispenser
Th er inse aid i sr elea se dd uring t he final rin seto pr event wate rfrom f orming drop lets o ny o ur dish es, wh ic h can leave
spots and s treaks. It al so improve sdryi ngby allow in g water to ro ll off the d ishe s. Your di shwasher is designed t o
useliqu id rin sea ids.The rinse a iddi spenser i sl ocat ed inside t hed oor next tot he deter gent di spens er. To fill the
dispenser,openthecapandpourthe rinse aidintothedispenseruntil thelevel indicatorturnscompletelybla ck.
Thevolum eo ft her ins eaid contai neris about 110 ml.
RinseAid Dispenser
Function of RinseAid
Rinse aid is aut omat ic ally a dded duri ng the last r inse, ensur ing thor ough rin sing, and spo tan d st reak free dryi ng.
Attention!
Only use branded rinse aidfordishwasher.Neverfill therinseaiddispenserwithanyothersubstances
(e.g. Di shw asher cleani ng ag en t, liq uid dete rge nt).Th is would dam age the app lian ce.
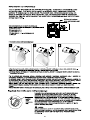
A Removethe lower basket andthenunscrewandremovethecapfromthesaltcontainer.
B U
se a fun n el to f il l t he s alt c ont ai ne r wi th a bout 1 .5 kg of di s hwa she r s a lt ,
th en ple ase re m ove the s al t f un ne l fr om all p ro duc ti on.
C
Fullfillthe saltcontainer with water.Itisnormalfor a smallamountofwater to come
outofthesaltcontainer.
D Af te rf il li ng the co ntainer , sc rew the c apt igh tly b ack clo ckwise.
E Usually, t he salt warni ng light will st op bei ng il luminat ed with in 2-6 days af te r th esa lt c ontain erha s be en fi lled wi t h
sal t.
F Immediat ely aft erfill ingthe sal t into th es alt cont ainer,a wa shing p rogram s hould be start ed (Wes uggest to use the
soak or r apid pr ogram). Othe rwi set he filte r system , pump or o ther i mp ortant par tsof th e machine m ay be dam aged
by salty w ater. Th is is o uto f wa rr anty.
9

Toopen t he di spen ser,t urn the cap to the " open" (le ft) ar row an d l if t it o ut .
Po ur the rins e ai d int o the dispe nser,being car eful not to o verfi ll .
Replace the cap by inserting i ta ligned wit h "open" arrow and turnin git t ot he closed ( ri ght) arrow.
Adjusting RinseAid Dispenser
The ri nse aid dis penser ha ssi x or four s etti ngs.Al ways sta rt with t hed ispens er
set o n"4". If sp ot s and p oo r dr ying are a p roblem, incre ase the amount of r inse
aid d ispensed b y remov ing thed ispe nserlid an drot ating the di al to "5" .If the
dishes s til l are not dryi ng prope rlyo r are s hows pots, adj ustt he di altothe n ext
highe r lever un til your dishes a resp ot-f ree. The recomm en ded setting is "4".
(Factory valueis "4".)
Increasethe dose ifthereare drops of waterorlimespotsonthedishes after washing.
Reduce itifthere aresticky whitishstains on yourdish esorabluishfilmonglasswareor
knifeblades.
1
2
3
As th eri nse aid d iminishe s, t he siz eo f th e black do t
ontherinseaidlevel indicator changes, as illustratedbelow.
Full
3/4full
1/2full
1/4full- Should refillto eliminate spotting
Em pty
Adjust lever
(Rinse)
When to Refill the RinseAid Dispenser
Ifther ei s no rins e-ai d wa rning light in t hec ont rolp anel, you can estimat ethe amount from the colo ur
oft he opti cal l evel ind icator C loc ated ne xtto t hec ap. When th erin se-a idc onta iner i sfu ll, the wh ole
indicato rwil l bedark .As t her inse -aid diminishes, t hes ize of the dar k do t decreases. You shou ldn ever let
t he rins e aid lev el fa l l 1 / 4 f ull.
durin gthe next wa sh. Don' tf orget t ore plac ethe cap be for e you clos edis hwa she rd oor.
Cl ean u p a n y rins e aid sp illed whi le du ri n g fill i ngwi th an ab so rbent cloth t o a v oid ex cessi ve foam i ng
NOTE:
Deterge nts wi th its chem ic al ingred ients a re ne ce ssary t or emove dir t,c rus hdir t an dtrans port it ou tof the di shw as her.
Mostofth ecommercial qualitydetergentsaresuitableforthisp urpose.
D. Function of Detergent
Detergents
The reare 3 sort s of dete rgents
1.Withphosphate andwithchlorine
2.With phos phate and without c hlorine
3.Wit hou t phosph at e and with out chlor ine
""
C (R i nse - Ai di nd ic at or )
6
10

AmountofDetergentto Use
Prop erU se of De terg ent
Use only det erge nts pecifical lym ade for the u sein dish wa sher s.Ke ep your det ergent fr esh and dry.
Don't putpowdereddetergentinto thedispenseruntil you'reready towash dishes.
Dishwash erdetergent i sco rrosive! Ta kec are to kee pi tout of reach of c hildren.
WARNING!
Based ontheir chemicalcomposition, detergentscan besplitin two basictypes:
The useof normal washingprogramsincombinationwith concentrated detergents
redu ces poll ut ionand is good for your dish es; these was hp rog rams are spe cifically mat che d
to t he di rt- diss olving pro pert i es o fthe e nz yme s of the conc ent rated deterg ent. For this reas on
normal washprogramsin whichconcentrated detergentsareusedcanachie vethe same
resultsthatcanotherwiseonlybe achievedusing intensive programs.
“”
“”
“”
Detergent tablets of different brandsdissolveatdifferentspeeds.Forthis reasonsome
dete rgen tta blets ca nnot dissolve and dev elop the irfu ll cle ani ngpower dur ing s ho rt
prog ra ms. There fore plea se u se l ong prog ram swh enu sing de terg ent t ablet s, t o
ensu re the complete r e mov al of de t er g e n t re sidu als.
The dispens er m ust b ere fille dbe fore the star tofeach was hcy cle f ollowing the inst ructi ons
provided in t he w ash cycletable . You rdis hwa sher use sle ssde tergent and rins eaid tha n
Conventionaldis hwasher.Generally, onlyonetablespoon of detergent isneededfor
anormalwashload. Moreheavily soileditemsneedmoredetergent.Alwaysaddthe
dete rgen tjus tbe fore star ting the dish was her, oth erw ise it coul d ge t damp and w ill not
di s solv e prope rl y.
Concentrated Detergent
DetergentTablets
DetergentDispenser
Always add the detergent j us t before start ingeach wash cycle.
Onlyusebrandeddetergentaidfordishwasher.
If the lid i scl osed: press release butt on.T he li d will sp ring open.
conventional, alkalinedetergentswith causticcomponents
l ow a lkali neconcentr ated deterge nts w i t h natura l e nzy mes
Normally new pu lverised det ergent is wi th out phospha te.T hus the wate rso ftener fu nction o f
phosphate i s no t given. In th is ca se w e re com me nd t o f i l l s a l t i n t h e salt co ntai n er even when
the hardness o fwate ris only 6 d H. If dete rgen tsw itho utph osphate are used in the case of hard wat er
often whi tes pots appear on d ishe sa ndglasses. In th is cas epl ease add mo redeter gen t toreach
better r esul ts. D etergen ts with o ut chlor in e d o on ly ble ac h a lit tle. Stro ngandcol o u red s p o ts w i ll no t
beremo ved com pl etely. I nth isc ase pleas ech oos ea p rogram with ahigher tem perature .
°
11

I fyou
use 3in 1ta blets in o ther pr ograms, t he appliance wi ll not achi eve ago odperfo rm ance.
Only the 3in1 fun ction (for the prog ram :i nt ensi ve/N orm al/ Eco. ) Can be used w it h3in 1t ablet s.
Fillt he de ter gent disp enserw ith deter gen t.
Th e marki ng ind i c ates th e do si ng l evel s , as
i ll us tra ted o n the ri gh t:
Th eplace o fmain w ashcyclede terg ent placed ,
M IN me ans appr oximatel y20 go f detergen t.“”
Th epla ceo fpr e-wash c ycle det er ge nt place d,
app roximately 5 go f detergen t
Pleaseo bse rvethem anu fact urer s do sing and storage
Recommendationsasstatedonthedetergent packaging.
Close the lid and press untilit locks in place.
I f th e d i shes ar e h eavil y soil ed, pl ace an addi tio nal
detergen tdo sei n the pre- wash deterg ent cham be r. This deter gent will takeeffe ctd urin g the pre- wash p has e.
A
B
Fill in Detergent
You find in formation ab ou t the a mo unto fdet er gent forth esi ngle pro gramme ont he last p age .
Pl ea seaware ,tha t accordi ng t ot he lev elso iling and the spec if ic har dness of water d iffer ence sa re possib le.
Pleaseobservethemanufacturer'srecommendations onthe detergentpackaging.
When us ing3in1 combi nation / com pa ct Deter gents ,pleas epa y atten tiont o make sur e that
the size of th e com bi natio n detergents fits to the di spenser so that combinat ion
deterge ntsc anb e easil yp utinto the di spe nser, and the dispen ser would not b eb roken.
,
Your dish wa sher h as a 3in1 fu ncti onw hich needs no sa lta ndrin se aid bu ta 3 In 1 tablet.
This dishwas her c om esw itha 3in 1tabl et cont ainer as an acce ssory.
1.The figure belowshowshowto hangthe3in1 tabletcontainer ontheupperbasket.
2. Rot atet he up per spra yeran dch ange the locat ion o fthe conta ine r toen sure the uppe rsp rayer is no t
obstructedby the3in 1 tabletcontainer.Refertothe figurebelow forreference.
3.Put the 3in1tabletintothecontainer ,thenstartthe 3in1program.
How To Use The 3IN1 Function
6
12

Fo
rb
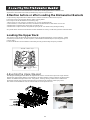
es tpe rforma nce oft h ed ishwashe r,f o llow t he se lo ading gu ideline s. Featur es and
appea rance of bask etsand cut ler yb askets may vary f rom your m odel .
Attention before or after Loading the Dishwasher Baskets
Scr ape off any la rgea mou ntsof le ftover fo od. Soft enrem nants of bur nt food in p ans .
It i sn ot necess ar y to r inse the dishes un der runni ng wat er.
Plac eo bjects int he dishw asher in f ollowing wa y:
1.Items su ch as cups , glass es , pots /pans, etc. a re faced downw ards.
2.Curved i tems,or ones w ith rece sses, sho uld b el oaded as lant so that water can r un off.
3.All utensils are stacked securely andcan not tipover.
4.All uten sils are place di n the wa yt ha t t he spr aya rms can rota te fr eely d ur ingwash ing.
Ve rysma ll item s shou ldnot be w ashed in the d ishw ash er a st hey coul d easily fa ll ou t of theb askets.
Bowl M Bowl L() ()
Glasses
Dessert plate
Saucers
Cups
Front
(Eg g )
Gravy ladle
Loading the Upper Rack
The u p pe r rac k i s des ig n ed to ho ld m or e delic at e and ligh ter d ishw are such as gl asses, cof fee
and tea c up and sauc ers, as well as pl at es,small b ow lsand sha ll owpa ns(as lo ng a sthe yar e
not too di rty ).
Pos ition the dishes a ndc ookware so t hat t hey do not g et m ovedby t he spray of wate r.
Upper wheels
Lower wheels
Adjusting the UpperBasket
The height of the up per b ask etcan be adj usted i n order to create mo re spa ce for lar geutensi ls
bothfor theupper/lowerbasket.Theheightof the upperbasketcanbeadjusted byplacingthe
wheels on di fferent h eigh tof the r ails. Lo ng items , serving cutl ery, salad se rver sa nd kn ives
should be pl aced on the shel fso t hat t hey do not o bstr uct t he rota tion o fth es pr ay a rms.
The shelf ca nb e fold ed b ac k or be rem ovedwhen not requ ired for us e.
13

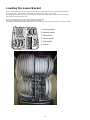
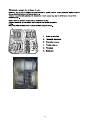
Loading the Lower Basket
Werecommendthatyouplacelargeitems whicharemostdifficultto cleanintothelower basket:
pots, pans,lids,servingdishesandbowls, ass hownin thefigureto theright.
I t isp refer abl e to pl ace ser ving dis hes a nd li ds onthe s ide of the ra c ksin order to avoi db locking
therotationofthetopsprayarm.
Pots, servingbowls, etc.must always beplacedtopdown.
D eep pot ssh ould bes lante dt o allow w ater t of lowo ut.
Th eb ott om baske t fe ature f ol d down tin ero ws so th at l arger or m or e pot san dp ans c anb elo aded .
1. Cutlery basket
2. Dessert plates
3. Soup plates
4. Dinner plates
5. Oval platter
6. Saucer
14

Cutlery Basket
For w ashing in th ed ishw ashe rthe fol lowing cutl ery/di shes
Cutle rywith w ooden, h orn chi na or
mothe r-of-pe arlh andl es
Plas tic items that a renot h eatresis tant
Older c utle ry with glued p arts that are not
temperatureresistant
Bonded cutleryitemsordishes
Pewte r or coop er it ems
Crystalglass
Steel i tems subj ectto rusti ng
Woodenplatters
Items madefrom synthetic fibre s
Do not p utin item sthat are d irty of c igaret teash,c and le wax,lacq uer or pai nt.
If you b uy new dish es please m ake sur eth at they are suitab le for d ishwa shers.
Sometypes of g las ses c an beco me
dullafteralargenumbe rofwashes
Si lver and al u minu m pa rts hav e a
tendenc yto disc ol our du ri ng was hin g
Glaze d pa tt er n s m a y f ad e i f mach in e
was he d fre q uently
Pl ease d o not overl o adyou r dis hwashe r. Th ere is on l y s pace f or 9 stan dar d d ishes. D o not
us ed ish that isno t sui tabl ef or dish wa shers .Th isi s importa nt f orgo od resu lts and fo r
reasonableenergyconsume.
B efore lo adin g the dis hes, you sho uld:
Removelargeleft-over
S ofte nre mnants of bur nt f ood inp ans
Dishesandcutlerymustnotimpedetherotationof thesprayarms
Lo ad holl ow i tems suc has cup s,g lass es, p ans etc. with the ope ning do wnwards s ot hat
w ater cannot colle ctin the con tain ero r a deep b ase
NOT E:
NOT E:
Arenotsuitable
Are of limitedsuitability
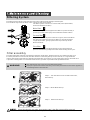
Loading cutleryanddishes
When loadingthe dishes andcutlery, pleasenote:
Cutlery sh ould b eplace di n the cut lery ba ske t with th eh andles a tt he bottom. I f the rack ha sside b askets, the
spoons sh ould b elo aded sep arat ely into the appr opri ate sl ots ,es pecial ly l on g utensil s sho ul d be pl aced in t he
horizont al posi tion at th efr on tof the uppe rbasket a ss how nin the pict ure.
Alwa ysl oadsh arp utensi ls wi th the s harp
poin t dow n!
1 2 3456 7
3553
1551
3553
3553
1561
3213
3244
1244
2244
2214
1214
7274
1. Tea spoons
2. Dessert spoons
3. Soup spoons
4. Forks
5. Knives
6. Serving forks
7. Serving spoons
Do not le ave any item e x tend thro ugh bot tom .
Knivesandotherutensilswith sharp points
mustbe l oad ed in th eba sket with th ei rpo ints
dow no r plac ed i n an hor izon tal p osit ion.
Itis dangeroustoopenthedoor whenwashing, becausethe hotwatermaybe scaldedtoyou.The doorshould not be
leftintheopenpositionsincethiscouldpresentatrippinghazard.
15

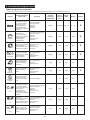
6. STARTING A WASHING PROGRAMME
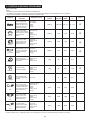
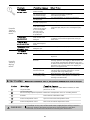
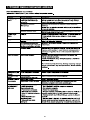
Wash Cycle Table
NOTE
•
★ Meaning: need to ll rinse into the Rinse-Aid Dispenser.
• * En50242: This program is the test cycle, the rinse-aid dispenser setting is recommended to be set to position 6.
• The power consumption of off-mode is 0W, left-on model is 0.4W.
Programm
Cycle selection
information
Description of cycle
Detergent
pre/main
Running
time (min)
Energy
(Kwh)
Water
(l)
Rinse
For all soiled loads,
such as pots, pans,
casserole dishes and
dishes that have been
sitting with dried food
on them for a while.
Pre-Wash
AUTOWash
Rinse
Rinse
Drying
5/22 g 120-160 0.8 - 1.1 9 - 12
★
Intensive
For heaviest soiled
crockery, and normally
soiled pots pans dishes
etc with dried on
soiling;
Pre-wash (50°C)
Wash (65°C)
Rinse
Rinse
Rinse (55°C)
Drying
5/22 g 120 1.13 16.0
★
Normal
For normally soiled
loads, such as pots
plates glasses and
lightly soiled pans.
Pre-wash
Wash (55°C)
Rinse
Rinse (65°C)
Drying
5/22 g 155 1.09 13.0
★
Eco
* EN 50242
Standard daily cycle for
normally soiled loads,
such as pots plates
glasses.
Pre-wash
Wash (50°C)
Rinse (60°C)
Drying
5/22 g 175 0.77 10.5
★
Express
A shorter wash for
lightly soiled loads and
quick wash
Wash (40°C)
Rinse
Rinse (40°C)
15 g 30 0.5 9.0
Delicate
For lightly soiled
crockery and glass
Pre-wash
Wash (40°C)
Rinse
Rinse (60°C)
Drying
15 g 95 0.71 13.0
★
Pre-wash
To rinse dishes that
you plan to wash later
that day.
Pre-wash
8 0.01 3.0
+
Intensive
+
3 in1
For the heaviest soiled
loads, such as pots,
pans, casserole dishes
and dishes that have
been sitting with dried
food on them for a
while.
Pre-wash (50°C)
Wash (65°C)
Rinse
Rinse
Rinse (55°C)
Drying
3 in1 120 1.13 16.0
+
Normal
+
3 in1
For normally soiled
loads, such as pots,
plates, glasses and
lightly soiled pans.
Pre-wash (50°C)
Wash (55°C)
Rinse
Rinse (65°C)
Drying
3 in1 150 1.08 13.5
+
Eco
+
3 in1
For lightly soiled
loads, such as plates,
glasses, bowls and
lightly soiled pans.
Pre-wash
Wash (50°C)
Rinse (65°C)
Drying
3 in1 160 0.84 10.5
Normally soiled crockery. “Standard Program” the most efcient in terms of its combined energy and water consumption.
16

Premi se:
1. Acycle tha ti s und erway can on ly be modif ied if it has on ly been runn ing
for a sho rttime. Other wise, t he detergen t mayh ave alrea dy been released ,
and the appli ance m ay have alr eady draine dt he wash wat er. If th is is the case,
the dete rgen t dispens er must be refi lled( se et he s ection entitl ed " Lo ading the
Detergent" ).
2. Presscurrentprog.Button more than3 secondstocanceltheprogram ,
then you can chan ge the p rogr am t othe d es ire dcy cle s et ting (s eet he section
entitl ed " St arting a was hcyc le. . . " ) .
3. P re ss o ne of ot he rs pr og.B utton mor et han 3 s econds to cancel ther uning program ,
transla set he program whi ch you pr ess.
4. P re ss t he displ ay bu tton mo re than 3 seco nds to re- edit disp lay ti me.
WARNING!
It is dangeroustoopenthedo or when was hing,becausethe hot watermay scald you.
When t he w orki ng cycle has fini shed , t he b u z zer of th e d i sh w as h e r w i l l s oundf or 8 sec on ds, t hen st op. Tu r n off
t he a pplia n ce using the ON/ OFF b ut ton, shut o ff the w ater supp ly a n d o pen the d o or of th e dish washer.
Wait for afew minutesbeforeunloadingth edishwashertoavoidhandlingthedishesandutensilswhilethey
are still hota ndm ore suscep tible to br eak age. The yw ill al sod rybe tter.
Openthedoor carefully.
H ot d ishes are sensit ive tokno cks. The dis hes should ther efore be a ll owedto co ol d own arou nd 15 mi nut es
befor er emovingfrom theappli anc e.
O pen the dish washer' sdo or, l eaveit aj ar and w ai t af ew min ut es bef or er emoving t hedis hes. In this w ay they
w il lbe cooler and thedryin gwi ll be im proved.
Unloading the dishwasher
It is n ormal t hatthe dishw ashe ris wet i nsid e.
Empt yth el owerbasket first a nd then the up peron e.T hiswill av oi d water dri ppin gfro mt he upper Bas ket onto
the di shes in the lower on e.
Turning On theAppliance
Change the Program...
Forgot toAdd a Dish?
AttheEndoftheWashCycle
Sta rting a cycle wash
1 Drawout the lowerandupper basket, load the dishesand pushthem back.
It is commen de d to lo ad t hel ower bask et f irst, then th e upper o ne(s eet he s ectio ne nti tled
Loadingthe Dishwasher ).
2 P our in the det e rg en t ( see t h e se ction enti tl e d Sa l t, Det ergent an d Ri ns eAid ).
3 I ns ert the plu gin tot he socket .The pow er s uppl yi s 220 -240 VAC /50 HZ ,the spe cific ation of th e
socket is 10A 25 0VA C. M ake sure thatt he wa ter suppl yis turned on to f ull p ress ure.
4
“”
“”
Ope nthe door, p ress the ON/OFF butto n, and t heON/OFF l ight will turn on.
Press th epro gra mbu tton to a sired wa shcycle. and close th ed oor.After 3s econds, the mach ine will work.
Aforgot ten dish can be added at any time before the de tergent cup opens.
Load the forgotten dishes.
Close the door, the dishwasher will start running again
after 10 seconds.
After the spray arms stop wor king,you can open the door
completely.
2
Open the door a little to stop the washing.
1
3
4
2. Tur n of f the wat er ta p!
1.Switc ho ffth edishwa she r by p ressing the ON/OFF bu tton .
Th eb uzze rof the dishw asher m oos for 8se conds, o nly i nth isca se th ep rogramm eha sen ded .
Switch Off theDishwasher
17

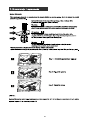
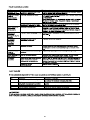
The filter pre ventslar ger remnant sof food or ot her objects f rom get ting inside th ep um.
Theresidues may blockthefilter, in thiscase they mustbe removed.
The filter syst em consi sts of a coar se filter, aflat (Main f ilter)
A n da mi c ro fi lte r( F i ne fi lte r ) .
Food and soil particles trapped inthisfilterarepulverizedbya
specia ljet onthe l owe r spray a rma ndw asheddown t od rain.
Larg er it ems, s uc h as pie c esof bo nes or glas s, t ha t could blo ck
thedrainaretrappedin the coarse filter.To remove theitems
caugh t by the filter,ge nt ly sque eze the tapon th et op of t his
filterandliftout.
Thisfilter holds soilandfood residuesinthe sumpareaand
preventsitfrombeing redepositon the dishes duringwashcycle.
Main filter
1
Coarse filter
2
Fine filter
3
2
3
1
Filtering System
Filterassembly
Thefilter efficiently
For b est p erfo rm ance and res ults, the filt er mustbe cle aned re gul arly. t hisr eason, it isa goo dide at o
r em ove th ela rger foo dparticl estr app edin the filte r aftere ach was h cyc leb yri nsing the sem ici rcular filte rand
c up u nder runnin gw ater. To re move th efil terd evice ,p ull th ecu pha ndle inthe upwa rdd irection.
re mo vesf ood part icle sfro mth ewa shw ater,all owin git to be rec ycle dd uring t he cycl e.
For
WARNING!
T he dish washer must ne ver beused wi t hout t he fil ters.
Imp ro per r ep lace men tof the f ilter may reduce the perform anc elev el of the applia nce
and damagedishesand utensils.
St ep 1 Turn the filter in ant i-clockwis ed irection,
t hen li ft it up.
:
St ep 2 lif t the Ma in fil te rup:
Step 3 lift theFinefilter up:
When following this procedure from step 1 to step 3, the filter system will be removed;
when foll owing it from Step 3 to Step 1, the f ilter system will be installed.
18

The cont ro lpane lcan be clea ned by using a l ightly dampen edc loth.
Afte rcl eaning, m ake sure to dry i tt horoug hly.
For the exte ri or, us e a g ood appl iance po li s h wax.
Neveru sesharp objects, sco ur ing pa ds orhar sh c lea ners on a ny part o fthe di shwasher.
ProtectAgain st Freezing
1.Cutofftheelectricalpower to thedishwasher.
2.Tur noff th ew at er suppl yan ddis connec tth ew ater inlet pi pe from the wate rval ve.
3.Drainthewater fromthe inlet pipeandwater valve.(Useapanto catch thewater)
4.Reconnect t hewater i nl et pipe to the wa ter val ve.
5.Remove the fil ter at the bottom of the tub and use a spong eto soak up wate r in the sump.
pl ease take fros tprot ectio n meas ureso nt he dishw asher in wint er. Ever y fter wa shingc ycles,
pl ease operat eas follows
time a
:
Caring for the Dishwasher
- Inspec tthe filt er sfor blo ckingaftere ver y timethe di shwa sher ha sbe enused .
- By uns crew ing t he coar sefi lter, you can remove t he filter syst em .Re movea nyfoo dre mna nts and
cleanthefilters underrunningwater.
Remarks:
Cleaning the Filter
Cleaning The Door
To clean t h e c o a rse f ilt er a nd t he fi n e fi l t e r, us e a cleani n g bru sh . Reas semble the f ilt er par ts as shownin th e fi gures
on th e last pa ge a nd r eins ert t he e nti re ass emb ly in the dis hwa sher, pos itio ning i ti n i ts se at and pres sing dow nwa rds .
Theentirefilter assembly shouldbe cleaned once a week.
Whencleaning the filters, don't knock onthem. Otherwise, thefilterscould be
contortedandtheperformance ofthe dishwashercouldbedecreased.
WARNING!
To clean thee dge ar oundthedoor, you shoul du seo nly a soft wa rm, d am p cloth.
To avoid pene trat i ono f wa teri nto the d oor lock and el ectrical com po nents, do not
usea spray cleaner of any kind.
WARNING!
Never u se a spr ay cl ean er t ocl ean t he door panel asit m ay dam age the door loc k
and electricalcomponents.
Abr asive ag ent so r som epa pe r towels s hou ld not be use db ecau seof th eris ko f
sc r a t c hing o r l eav ing spots on the s tain less steel s urfa ce.
Cleaning the SprayArms
It is nece ssary to clean thespray a rms regul arly in order to
remove th ea ccumulation of s calefrom the har d water
and thus preve ntblocking ofspray arm j etsand bearin gs.
We Sug ges tto poke the blocked spray ar mj ets wit ha nee dle
to ensure good washi ng effect.
I f you r dishwa sher cannot wor k be ca u se o f the ic e, ple a se conta ctprofessio nal s erv ice perso ns.
Unscrew
19
Strona jest ładowana ...
Strona jest ładowana ...
Strona jest ładowana ...
Strona jest ładowana ...
Strona jest ładowana ...
Strona jest ładowana ...
Strona jest ładowana ...
Strona jest ładowana ...
Strona jest ładowana ...
Strona jest ładowana ...
Strona jest ładowana ...
Strona jest ładowana ...
Strona jest ładowana ...
Strona jest ładowana ...
Strona jest ładowana ...
Strona jest ładowana ...
Strona jest ładowana ...
Strona jest ładowana ...
Strona jest ładowana ...
Strona jest ładowana ...
Strona jest ładowana ...
Strona jest ładowana ...
Strona jest ładowana ...
Strona jest ładowana ...
Strona jest ładowana ...
Strona jest ładowana ...
Strona jest ładowana ...
Strona jest ładowana ...
Strona jest ładowana ...
Strona jest ładowana ...
Strona jest ładowana ...
Strona jest ładowana ...
Strona jest ładowana ...
Strona jest ładowana ...
Strona jest ładowana ...
Strona jest ładowana ...
Strona jest ładowana ...
Strona jest ładowana ...
Strona jest ładowana ...
Strona jest ładowana ...
Strona jest ładowana ...
-
 1
1
-
 2
2
-
 3
3
-
 4
4
-
 5
5
-
 6
6
-
 7
7
-
 8
8
-
 9
9
-
 10
10
-
 11
11
-
 12
12
-
 13
13
-
 14
14
-
 15
15
-
 16
16
-
 17
17
-
 18
18
-
 19
19
-
 20
20
-
 21
21
-
 22
22
-
 23
23
-
 24
24
-
 25
25
-
 26
26
-
 27
27
-
 28
28
-
 29
29
-
 30
30
-
 31
31
-
 32
32
-
 33
33
-
 34
34
-
 35
35
-
 36
36
-
 37
37
-
 38
38
-
 39
39
-
 40
40
-
 41
41
-
 42
42
-
 43
43
-
 44
44
-
 45
45
-
 46
46
-
 47
47
-
 48
48
-
 49
49
-
 50
50
-
 51
51
-
 52
52
-
 53
53
-
 54
54
-
 55
55
-
 56
56
-
 57
57
-
 58
58
-
 59
59
-
 60
60
-
 61
61


w innych językach
- English: Whirlpool ADG 120 A+ User guide
Powiązane dokumenty
Inne dokumenty
-
LG WTT15PGW Instrukcja obsługi
-
Aeg-Electrolux FAV45250VI Instrukcja obsługi
-
Amica DFV41E6AISMG Instrukcja obsługi
-
Samsung DMM770B Instrukcja obsługi
-
Samsung DW60M6050BB Instrukcja obsługi
-
eta 138490000F bílá Instrukcja obsługi
-
Samsung DW60M6040BB Instrukcja obsługi
-
-
-
Electrolux ESF452 Instrukcja obsługi