Eneo VMC-10.4LED-CM Quick Installation Manual
- Typ
- Quick Installation Manual

Quick Installation Guide
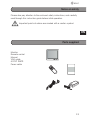
10.4“ (26.4cm) LCD/TFT Monitor,
1024x768, LED, 12VDC,
black metal housing
VMC-10.4LED-CM
DE
EN
FR
PL
RU

22
Inhalt
Inhalt ...........................................................................................................................2
Sicherheitshinweise .................................................................................................3
Lieferumfang .............................................................................................................3
Produktbeschreibung und Anschlüsse ................................................................4
Funktionen .................................................................................................................6
Power EIN/AUS ....................................................................................................6
Modus (TV/AV) ......................................................................................................7
Menü (MENU) ....................................................................................................... 7
OSD MELDUNGEN ............................................................................................11
Weitere Informationen ......................................................................................... 11

3
DE
EN
FR
PL
RU
3
DE
EN
FR
PL
RU
Sicherheitshinweise
Bitte beachten Sie auch die beiliegenden Sicherheitshinweise und lesen
Sie diese Anleitung vor Inbetriebnahme sorgfältig durch. Wichtige Hinweise
sind mit einem Achtungsymbol gekennzeichnet.
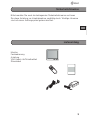
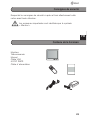
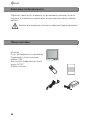
Lieferumfang
Monitor
Fernbedienung
Anleitung
VGA Kabel <x5/Schaltnetzteil
Stromkabel

44
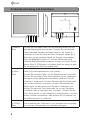
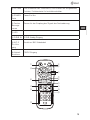
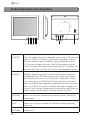
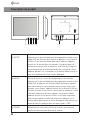
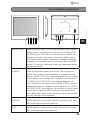
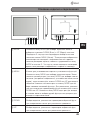
Produktbeschreibung und Anschlüsse
① Modus-
Taste
Drücken Sie die Modus-Taste, um das Bildschirmmenü zur Aus-
wahl der Signalquelle einzublenden. Drücken Sie mehrfach die
Taste Down oder Up oder die Modus-Taste um die Quelle zu
markieren. Drücken Sie dann die Menü-Taste oder warten Sie 3
Sekunden, um die markierte Quelle als Auswahl zu bestätigen.*
Wenn die Bildgröße auf dem PC nicht der horizontalen oder
vertikalen Bildschirmgröße entspricht, drücken und halten Sie die
Modus-Taste (2-3 Sekunden) und warten dann ein wenig, so dass
Sie die geeignetste Bildschirmgröße sehen.
② Menü-
Taste
Taste für Einstellungsbildschirm und -funktion
Drücken Sie die Menü-Taste, um das Bildschirmmenü aufzurufen.
Drücken Sie die Modus-Taste dann mehrfach, um im Hauptmenü
den gewünschten Menüpunkt auszuwählen (Bildmenü, Einstel-
lungsmenü, Audiomenü). Drücken Sie dann die Taste Down oder
Up, um das Untermenü aufzurufen. Drücken Sie mehrfach die
Modus-Taste, um das gewünschte Symbol zu markieren, und
drücken Sie dann die Taste Down oder Up, um den Parameter
zu erhöhen oder zu verringern bzw. zu ändern. Drücken Sie die
Menü-Taste einmal, um zum Hauptmenü zurückzukehren, um eine
andere Funktion auszuwählen, oder drücken Sie sie zweimal, um
das Bildschirmmenü zu verlassen.
③ DOWN-
Taste
Zum Auswählen des Untermenüs, zum Verringern der ausgewähl-
ten Funktion, Funktionstaste für Lautstärke verringern.

5
DE
EN
FR
PL
RU
5
DE
EN
FR
PL
RU
④ UP-Taste Zum Auswählen des Untermenüs, zum Erhöhen der ausgewählten
Funktion, Funktionstaste für Lautstärke erhöhen.
⑤ POWER-
Taste
Power Ein/Aus
⑥ Fernbe-
dienungs-
sensor
Sensor für den Empfang des Signals der Fernbedienung.
⑦ LED -
⑧ D-SUB IN D-SUB Analog Eingang
⑨ AV1,2
Ein-/Aus-
gang
Anschluss BNC Videokabel
⑩ Netzteil-
anschluss
12VDC Eingang

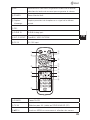
66
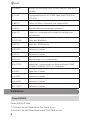
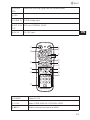
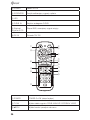
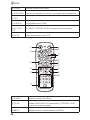
① POWER Drücken Sie die Power-Taste, um das Gerät ein- oder auszu-
schalten.
② TV/AV Eingangswahltaste für AV (FBAS Video) oder DSUB ANA-
LOG (PC).
③ ▲▼CH Tasten zur Menü-/Untermenü- und Kanalauswahl.
④ MENU Ruft das Menü auf und ändert Funktionen.
⑤ ◂▸ VOL Tasten zur Lautstärkeeinstellung oder Einstellung eines
Menüpunktes
⑥ PICTURE Aufruf des Bild-Menüs
⑦ SETUP Aufruf des SETUP-Menüs
⑧ SOUND Taste ohne Funktion
⑨ MUTE Taste ohne Funktion
⑩ RECALL Statusanzeige und Lautstärkepegel
⑪ AUTOPIC Anwahl der 4 unterschiedlichen Bildeinstellungen (USER,
DYNAMIC, NORMAL, MILD) im Videomodus
⑫ SLEEP Taste ohne Funktion
⑬ CH.SET Taste ohne Funktion
⑭ A.MEMO Taste ohne Funktion
⑮ 0~9 KEY Taste ohne Funktion
Funktionen
Power EIN/AUS
Power EIN/AUS Taste
1) Drücken Sie die Power-Taste. Das Gerät ist an.
2) Drücken Sie die Power-Taste erneut. Das Gerät ist aus.

7
DE
EN
FR
PL
RU
7
DE
EN
FR
PL
RU
Modus (TV/AV)
Taste zur Auswahl des Eingangssignals aus D-Sub Analog / AV1 / AV2
* Einstellen mit CH ▲▼
* Einstellen mit Modus-Taste (Schlüssel-Taste)
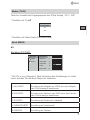
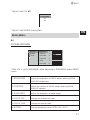
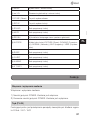
Menü (MENU)
AV:
Bild-Menü (PICTURE)
* Mit VOL ▸ zum Untermenü. Nach Abschluss der Einstellungen im Unter-
menü, drücken Sie die Menü-Taste zum Verlassen.
1) HELLIGKEIT Einstellung der Helligkeit von VIDEO ohne die Helligkeit
von D-Sub Analog zu beeinflussen.
2) KONTRAST Einstellung des Kontrasts von VIDEO ohne den Kontrast
von D-Sub Analog zu beeinflussen.
3) SCHÄRFE Einstellung der Schärfe des Videobilds.
4) FARBINTENSITÄT Einstellung der Farbintensität.
5) FARBTON Einstellung des Farbtons.
DSUB ANALOG
AV1
AV2
SOURCE
PICTURE
COLOR
SETUP
- +
- +
- +
- +
- +
- +
BRIGHTNESS
CONTRAST
H POSITION
V POSITION
PHASE
PIXEL FREQ.
75
50
50
50
14
100

88
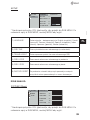
6) SYSTEM Einstellung des Videosystems NTSC, PAL, AUTO.
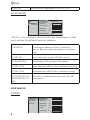
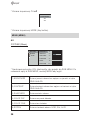
SETUP (SETUP)
* Mit VOL ▸ zum Untermenü. Nach Abschluss der Einstellungen im Unter-
menü, drücken Sie die Menü-Taste zum Verlassen.
1) SPRACHE Einstellung der Sprachen Englisch, Französisch,
Deutsch, Spanisch, Italienisch, Japanisch und Korea-
nisch.
2) OSD ZEIT Zeit (in Sekunden), bis das OSD-Menü erlischt.
3) TRANSPARENZ Einstellung der OSD-Hintergrund-Transparenz.
4) OSD H POS. Verschieben des OSD-Fensters in horizontaler Richtung.
5) OSD V POS. Verschieben des OSD-Fensters in vertikaler Richtung.
6) RÜCKSETZEN AUF
WERKSEINSTELLUN-
GEN
Rücksetzen auf Werkseinstellungen löscht alle OSD-
Informationen.
DSUB ANALOG:
PICTURE
(1*/,6+
- +
- +
- +
- +
2))
PICTURE
SETUP
LANGUAGE
OSD TIME
TRANSLUCENT
OSD H POS.
OSD V POS.
FACTORY RESET
10
14
50
50
PICTURE
COLOR
SETUP
- +
- +
- +
- +
- +
- +
BRIGHTNESS
CONTRAST
H POSITION
V POSITION
PHASE
PIXEL FREQ.
75
50
50
50
14
100

9
DE
EN
FR
PL
RU
9
DE
EN
FR
PL
RU
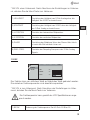
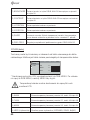
* Mit VOL ▸zum Untermenü. Nach Abschluss der Einstellungen im Unterme-
nü, drücken Sie die Menü-Taste zum Verlassen.
1) HELLIGKEIT Einstellung der Helligkeit von D-Sub Analog ohne die
Helligkeit von VIDEO zu beeinflussen.
2) KONTRAST Einstellung der Helligkeit von VIDEO ohne die Helligkeit
von D-Sub Analog zu beeinflussen.
3) H POSITION Einstellen der horizontalen Bildposition.
4) V POSITION Einstellen der vertikalen Bildposition.
5) PHASE Einstellung der Bildphase Wenn der Phasen-Wert falsch
ist weist das Bild vertikale Linien auf.
6) PIXEL FREQ. Einstellen der Sampling-Frenquenz des D-Sub Analog
Signals.
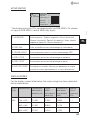
FARBE
Der Farbton kann von rötlichem Weiß auf bläuliches Weiß geändert werden.
Die einzelnen Farbkomponenten sind ebenfalls anpassbar.
* Mit VOL ▸ zum Untermenü. Nach Abschluss der Einstellungen im Unter-
menü, drücken Sie die Menü-Taste zum Verlassen.
Die Farbtemperatur kann gemäß der LCD Spezifikationen ange-
passt werden.
1) 9300K Änderung der Farbtemperatur: Rot 42 Grün 52 Blau 50
PICTURE
COLOR
SETUP
9300K 7300K 6500K USER
RED
GREEN
BLUE
- +
- +
- +
50
50
50

1010
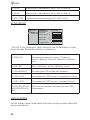
2) 7300K Änderung der Farbtemperatur: Rot 51 Grün 46 Blau 46
3) 6500K Änderung der Farbtemperatur: Rot 40 Grün 54 Blau 54
4) BENUTZER Individuelle Benutzereinstellung (ROT, GRÜN, BLAU)
SETUP (SETUP)
* Mit VOL ▸ zum Untermenü. Nach Abschluss der Einstellungen im Unter-
menü, drücken Sie die Menü-Taste zum Verlassen.
1) SPRACHE Einstellung der Sprachen Englisch, Französisch,
Deutsch, Spanisch, Italienisch, Japanisch und Korea-
nisch.
2) OSD ZEIT Zeit (in Sekunden), bis das OSD-Menü erlischt.
3) TRANSPARENZ Einstellung der OSD-Hintergrund-Transparenz.
4) OSD H POS. Verschieben des OSD-Fensters in horizontaler Richtung.
5) OSD V POS. Verschieben des OSD-Fensters in vertikaler Richtung.
6) RÜCKSETZEN AUF
WERKSEINSTELLUN-
GEN
Rücksetzen auf Werkseinstellungen löscht alle OSD-
Informationen.
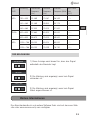
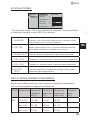
DISPLAY MODES
For the display modes listed below, the screen image has been optimized
during manufacture.
(1*/,6+
- +
- +
- +
- +
2))
PICTURE
SETUP
LANGUAGE
OSD TIME
TRANSLUCENT
OSD H POS.
OSD V POS.
FACTORY RESET
10
14
50
50

11
DE
EN
FR
PL
RU
11
DE
EN
FR
PL
RU
MO-
DUS
Auflösung Horizontale
Frequenz
(Hz)
Vertikale
Frequenz
(Hz)
Pixeltakt
Frequenz (MHz
Sync Pola-
rität
(H/V)
VGA 720 x 400 31.469 70.087 28.322 - / +
640 x 480 31.469 59.940 25.175 - / -
640 x 480 37.500 75.000 31.500 - / -
SVGA 800 x 600 37.880 60.300 40.000 + / +
800 x 600 46.875 75.000 49.500 + / +
XGA 1024 x 768 45.000 60.004 65.000 - / -
1024 x 768 60.023 75.029 78.750 + / +
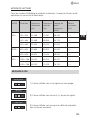
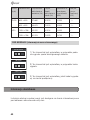
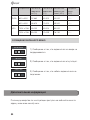
OSD MELDUNGEN
1) Diese Anzeige weist darauf hin, dass das Signal
außerhalb des Bereichs liegt.
2) Die Meldung wird angezeigt, wenn kein Signal
vorhanden ist.
3) Die Meldung wird angezeigt, wenn kein Signal-
Kabel angeschlossen ist.
OUT OF RANGE
CHECK CABLE
NO SIGNAL
Das Benutzerhandbuch und weitere Software-Tools sind auf der eneo Web-
site unter www.eneo-security.com verfügbar.
Weitere Informationen

12
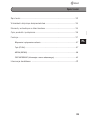
Contents
Contents ................................................................................................................. 12
Notes on safety ..................................................................................................... 13
Parts supplied ........................................................................................................ 13
Product description and connections ............................................................... 14
Functions ................................................................................................................ 16
Power ON/OFF ...................................................................................................16
Mode (TV/AV) ......................................................................................................16
MENU (MENU) ...................................................................................................17
OSD MESSAGE .................................................................................................21
Further information .............................................................................................. 21

13
DE
EN
FR
PL
RU
Notes on safety
Please also pay attention to the enclosed safety instructions, and carefully
read through this instruction guide before initial operation.
Important points of advice are marked with a caution symbol.
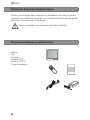
Parts supplied
Monitor
Remote control
Manual
VGA cable
AC/DC SMPS
Power cable

14
Product description and connections
① MODE Press the mode button to be appeared source select OSD box and
press the DOWN, UP button or mode button repeatedly th press
the menu button or wait 3 second to select highlighted source.*
If PC picture size does not match with full horizontal or vertical
screen size, press the mode button continuously(2~3 second) and
wait for a little while then you can see the most appropriate screen.
② MENU Button to Setup Screen and Function.Press the menu button to
be appeared Menu OSD box and press the mode button repea-
tedly to select the main menu(Picture menu, Setup menu, Audio
menu), then press the DOWN or UP button to enter to sub menu,
press the mode button repeatedly to highlight icon that user wants,
press the DOWN, UP button to increase, decrease or change the
function. Push the Menu button once to return to the main menu to
select another function or press twice to exit from the OSD.
③ DOWN Select the sub menu, decrease the selected function, hot key for
volume down.
④ UP Select the sub menu, increase the selected function, hotkey for
volume up.
⑤ POWER Power On/O

15
DE
EN
FR
PL
RU
⑥ IR-SEN-
SOR
Sensor for receiving signal from the remote control
⑦ LED -
⑧ D-SUB IN D-SUB Analog input
⑨ AV1,2 IN/
OUT
BNC tye, EXTERNAL VIDEO
⑩ DC IN DC 12V Input
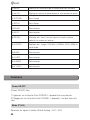
① POWER Power On/Off
② TV/AV Select DSUB ANALOG/ EXTERNAL VIDEO
③ ▲▼CH Selects channel and moves to MENU

16
④ MENU Selects menu and changes function
⑤ ◂▸ VOL Controls Volume and changes MENU level
⑥ PICTURE Picture selection button
⑦ SETUP Setup selection button
⑧ SOUND No use button
⑨ MUTE No use button
⑩ RECALL Displays present status and volume level
⑪ AUTOPIC Selects DYNAMIC, NORMAL, MILD, USER for PICTURE
⑫ SLEEP No use button
⑬ CH.SET No use button
⑭ A.MEMO No use button
⑮ 0~9 KEY No use button
Functions
Power ON/OFF
Power ON/OFF key
1) Push POWER button. Power is on.
2) Push POWER button again. Power is off.
Mode (TV/AV)
Its function is to change external video signals to D-Sub Analog / AV1 /
AV2

17
DE
EN
FR
PL
RU
* Adjust it with CH ▲▼
* Adjust it with MODE (Key button)
MENU (MENU)
AV:
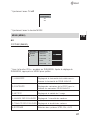
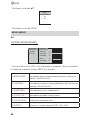
PICTURE (PICTURE)
* With VOL ▸, go to SUB MENU. After adjusting in SUB MENU, press MENU
to exit.
1) BRIGHTNESS Adjust the brightness of VIDEO without affecting DSUB
ANALOG’s bright-ness.
2) CONTRAST Adjust the contrast of VIDEO without affecting DSUB
ANALOG contrast.
3) SHARPNESS Adjust the sharpness of video image.
4) COLOR TINT Change the richness of color.
5) COLOR TONE Change the tone of color.
6) SYSTEM Change broadcast system NTSC, PAL, AUTO
DSUB ANALOG
AV1
AV2
SOURCE
PICTURE
COLOR
SETUP
- +
- +
- +
- +
- +
- +
BRIGHTNESS
CONTRAST
H POSITION
V POSITION
PHASE
PIXEL FREQ.
75
50
50
50
14
100

18
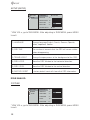
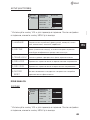
SETUP (SETUP)
* With VOL ▸, go to SUB MENU. After adjusting in SUB MENU, press MENU
to exit.
1) LANGUAGE Change language English, French, German, Spanish,
Italian, Japanese, Korean.
2) OSD TIME The number of seconds that the OSD will remain visible
before disappearing.
3) TRANSLUCENT Change the opaqueness of the background of the OSD.
4) OSD H POS. Move the OSD Window to the horizontal direction.
5) OSD V POS. Move the OSD Window to the vertical direction.
6) FACTORY RESET A factory default reset will clear all of OSD information.
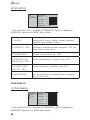
DSUB ANALOG:
PICTURE
* With VOL ▸, go to SUB MENU. After adjusting in SUB MENU, press MENU
to exit.
(1*/,6+
- +
- +
- +
- +
2))
PICTURE
SETUP
LANGUAGE
OSD TIME
TRANSLUCENT
OSD H POS.
OSD V POS.
FACTORY RESET
10
14
50
50
PICTURE
COLOR
SETUP
- +
- +
- +
- +
- +
- +
BRIGHTNESS
CONTRAST
H POSITION
V POSITION
PHASE
PIXEL FREQ.
75
50
50
50
14
100

19
DE
EN
FR
PL
RU
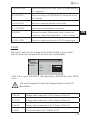
1) BRIGHTNESS Adjust the brightness of DSUB ANALOG without affecting
AV’s brightness.
2) CONTRAST Adjust the contrast of DSUB ANALOG without aff ecting
AV’s contrast.
3) H POSITION Adjust the horizontal position of the image.
4) V POSITION Adjust the vertical position of the image.
5) PHASE Remove the noises. When phase value is wrong, the
image has vertical lines especially in 1 dot on and off.
6) PIXEL FREQ. Adjust the sampling frequency of DSUB analog signal.
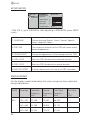
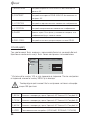
COLOR
The tone of color can be changed from red-dish white to bluish white.
The individual color components are also user customizable.
* With VOL ▸, go to SUB MENU. After adjusting in SUB MENU, press MENU
to exit.
The color temperature could be changed based on the LCD
specification.
1) 9300K Change color temperature : Red 42 Green 52 Blue 50
2) 7300K Change color temperature : Red 51 Green 46 Blue 46
3) 6500K Change color temperature : Red 40 Green 54 Blue 54
4) USER User customizable. (RED, GREEN, BLUE)
PICTURE
COLOR
SETUP
9300K 7300K 6500K USER
RED
GREEN
BLUE
- +
- +
- +
50
50
50

20
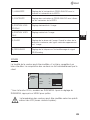
SETUP (SETUP)
* With VOL ▸, go to SUB MENU. After adjusting in SUB MENU, press MENU
to exit.
1) LANGUAGE Change language English, French, German, Spanish,
Italian, Japanese, Korean.
2) OSD TIME The number of seconds that the OSD will remain visible
before disappearing.
3) TRANSLUCENT Change the opaqueness of the background of the OSD.
4) OSD H POS. Move the OSD Window to the horizontal direction.
5) OSD V POS. Move the OSD Window to the vertical direction.
6) FACTORY RESET A factory default reset will clear all of OSD information.
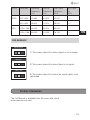
DISPLAY MODES
For the display modes listed below, the screen image has been optimized
during manufacture.
MODE Resolution Horizontal
Frequency
(Hz)
Vertical
Frequency
(Hz)
Pixel Clock
Frequency
(MHz
Sync Pola-
rity
(H/V)
VGA 720 x 400 31.469 70.087 28.322 - / +
640 x 480 31.469 59.940 25.175 - / -
640 x 480 37.500 75.000 31.500 - / -
(1*/,6+
- +
- +
- +
- +
2))
PICTURE
SETUP
LANGUAGE
OSD TIME
TRANSLUCENT
OSD H POS.
OSD V POS.
FACTORY RESET
10
14
50
50
Strona się ładuje...
Strona się ładuje...
Strona się ładuje...
Strona się ładuje...
Strona się ładuje...
Strona się ładuje...
Strona się ładuje...
Strona się ładuje...
Strona się ładuje...
Strona się ładuje...
Strona się ładuje...
Strona się ładuje...
Strona się ładuje...
Strona się ładuje...
Strona się ładuje...
Strona się ładuje...
Strona się ładuje...
Strona się ładuje...
Strona się ładuje...
Strona się ładuje...
Strona się ładuje...
Strona się ładuje...
Strona się ładuje...
Strona się ładuje...
Strona się ładuje...
Strona się ładuje...
Strona się ładuje...
Strona się ładuje...
Strona się ładuje...
Strona się ładuje...
Strona się ładuje...
Strona się ładuje...
Strona się ładuje...
Strona się ładuje...
Strona się ładuje...
Strona się ładuje...
-
 1
1
-
 2
2
-
 3
3
-
 4
4
-
 5
5
-
 6
6
-
 7
7
-
 8
8
-
 9
9
-
 10
10
-
 11
11
-
 12
12
-
 13
13
-
 14
14
-
 15
15
-
 16
16
-
 17
17
-
 18
18
-
 19
19
-
 20
20
-
 21
21
-
 22
22
-
 23
23
-
 24
24
-
 25
25
-
 26
26
-
 27
27
-
 28
28
-
 29
29
-
 30
30
-
 31
31
-
 32
32
-
 33
33
-
 34
34
-
 35
35
-
 36
36
-
 37
37
-
 38
38
-
 39
39
-
 40
40
-
 41
41
-
 42
42
-
 43
43
-
 44
44
-
 45
45
-
 46
46
-
 47
47
-
 48
48
-
 49
49
-
 50
50
-
 51
51
-
 52
52
-
 53
53
-
 54
54
-
 55
55
-
 56
56


Eneo VMC-10.4LED-CM Quick Installation Manual
- Typ
- Quick Installation Manual
w innych językach
- Deutsch: Eneo VMC-10.4LED-CM
- français: Eneo VMC-10.4LED-CM
- English: Eneo VMC-10.4LED-CM
- русский: Eneo VMC-10.4LED-CM
Powiązane artykuły
Inne dokumenty
-
NEC MultiSync® LCD1700V Instrukcja obsługi
-
 Miro Displays TD570 Instrukcja obsługi
-
Samsung SMT-4011P Instrukcja obsługi
-
Emprex Color TFT LCD Monitor LM1541 Instrukcja obsługi
-
TechniSat Wegavision FHD24A Instrukcja obsługi
-
Blaupunkt BLA-32C124I Instrukcja obsługi
-
Haier LE32F600C Instrukcja obsługi
-
Samsung HE46A Instrukcja obsługi
