
Модель: MR354
Model: MR354
Owner’s manual. Garment steamer
Instrukcja obsługi. Generator pary
Manualul proprietarului. Generator de aburi
Руководство по эксплуатации. Парогенератор
Керівництво з експлуатації. Парогенератор
EN
PL
UA
RU
RO
Виріб сертифіковано
в Україні
091

2
1
Pictures/ Rysunki/ Figuri/ Рисунки/ Малюнки

3
EN
Dear customer, we thank you for purchase of goods!
Functionality, design and conformity to the quality standards guarantee
to you reliability and convenience in use of this device.
Please read and comply with these original instructions prior to the initial
operation of your appliance and store them for later use of subsequent
owners.
The Garment steamer is intended for home use only.
Technical specications
Model: MR-354
Electrical supply:
Alternating current- AC;
Rated voltage 220-240V;
Rated frequency 50Hz;
Power consumption: 1500 W;
Protective class II;
Protection class IPX0
Steam generation time: approximately 40 seconds.

4
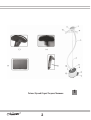
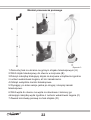
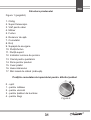
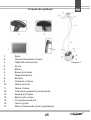
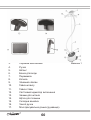
Description of the appliance
Picture1| page 2
1. Hook
2. Telescopic stand
3. Steam tip
4. Handle
5. Hose
6. Water tank
7. Switch
8. Wheels
9. Drain valve
10. Hose nut
11. Stand nut
12. Power indicator light
13. Trousers clamp
14. Fabric brush
15. Folding hanger
16. Handle cover
17. Mini-ironing board (mitten).
Appliance switch positions for various fabrics
0-o
1-silk
2-viscose
3-cotton
4-jeans
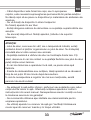
Safety instructions
When using your appliance, basic safety precautions should always be
followed, including the following:
Picture 2

5
ATTENTION!
- NEVER immerse the appliance, cable or plug in any liquid.
- NEVER touch the appliance with wet or damp hands.
- Always unplug the appliance to ll or drain the water, before
disassembling, cleaning and storing.
- Turn o the appliance before moving to another place of operation.
- Otherwise, there is a risk to get an electric shock!
- DO NOT let children or untrained persons use the appliance without
supervision.
- Only plug the appliance into an outlet with an earthed (ground) contact.
- Do not use automatic switching devices, for example, timer.
- DO NOT let children or untrained persons use the appliance without
supervision.
Use of low-quality electric extension pieces or adapters of mains plug
may cause damage of the electric device and re.
- Children should be supervised to ensure that they do not play with the
appliance.
- In the interest of safety, regular periodic close checks should be
carried out on the supply cord to ensure no damage is evident. This
appliance is not intended for use by persons (including children) with
reduced physical, sensory or mental capabilities, or lack of experience
and knowledge, unless they have been given supervision or instruction
concerning use of the appliance by a person responsible for their safety.
Should there be any signs that the cord is damaged in the slightest
degree, the entire appliance should be returned be authorized service
engineer.
- DO NOT leave the appliance unnecessarily plugged in. Disconnect the
plug from the mains when the appliance is not being used.
- DO NOT use the power cord or the appliance in order to pull the plug
out of the socket.
EN

6
- Do not let the cord hang over the edge of a table or counter or touch
hot surfaces.
- Move the appliance by holding it by the telescopic stand.
- DO NOT leave the appliance without supervision when it is connected
to the power supply.
- DO NOT leave the appliance exposed to the weather (rain, sun, etc. ).
ATTENTION!
- The steam ow exiting the tip is of high temperature; avoid direct
contact of body parts with the steam ow. Never direct steam at people
or animals.
- The metal surface of the steam tip gets very hot. Be careful as you may
get burned by touching the hot surface or the steam ow.
- If turned over, hot water may spill out of the appliance.
- Allow the appliance to cool for at least 30 minutes after turning o
before disassembling or cleaning.
During of non-compliance with the aforementioned rules arises the risk
of burns!
- Do not add chemical additives, perfumes or substances that reduce
the calcium content in water. Clean the appliance as described in this
manual. Failure to adhere to these rules will lead to the termination of
the warranty service!
- It is recommended to use distilled or demineralized water for lling.
- Do not use the appliance with an empty water tank. Always check the
water level in the tank before and during use.
- Do not twist, wring or drop the hose on the oor.

7
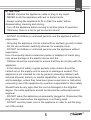
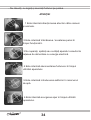
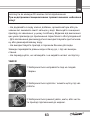
ATTENTION!
1 It is forbidden to direct steam at people or animals.
2 It is forbidden to equip/remove the brush while the
appliance is in operation.
3 It is forbidden to repair, wash or clean the appliance
when plugged in.
4 It is forbidden to disconnect the hose while the
appliance is in operation.
5 It is forbidden to add chemical additives to the water
tank.
6 It is forbidden to drain water while the appliance is in
operation.
EN

8
Actions in extreme situations:
- If a device tumbled into water, immediately, unplug the device, not
touching to the device or water.
- In case of appearance from appliance of smoke, sparkling, strong smell
of a burn isolation, immediately stop use the device, unplug the device,
appeal to the nearest service center.
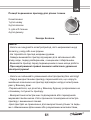
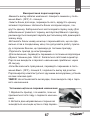
Operation
Before the rst use:
Remove packing and advertising materials and stickers.
- Inspect the appliance and make sure that there are no damages
appliance, power line cord and plug.
- Unwind the power line cord completely.
Note: Some parts are in the packaging material at the back, please
carefully check both sides of the packaging material.
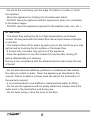
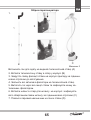
Assembly of the steam generator
Picture 3

9
1. Install the clothes hook on the top telescopic stand (А)
2. Insert the telescopic stand into the hole in the body (В)
3. Turn the stand nut on the body of the appliance clockwise until it is
tightened.
4. Release all clamp latches on the telescopic stand.
5. Pull out all sections of the stand one by one and x each with a clamp-
latch.
6. Insert the hose into the hose hole on the body and secure it by turning
the hose nut clockwise. (С)
7. Hang the steam tip onto the stand hook (D)
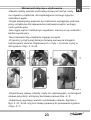
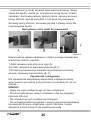
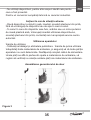
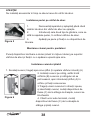
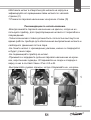
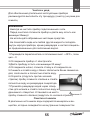
Recommendations for use
- Always hang the steam tip on the hook when not using the appliance to
prevent the hose from bending or damaging.
- The telescopic stand must be fully extended during operation of the
appliance to ensure straightening of the hose and free movement of
steam ow.
- Do not pull the hose with excessive force, otherwise it will be damaged
and steam will leak.
- Do not move the appliance by holding it by the hose.
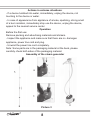
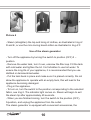
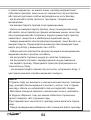
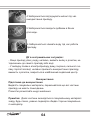
- Press and hold the steam tip for longer at the edges, collars of clothing.
Steam them back and front from top to bottom as illustrated in Img.4 /А
and В.
- Straighten the sleeves of clothes when steaming them, press and hold
the steam tip at the edges of the sleeves - Img.4/С.
EN

10
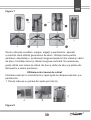
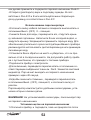
Picture 4
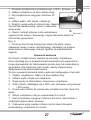
- Steam (straighten) the top and lining of clothes, as illustrated in Img.4/
D and Е, or use the mini-ironing board-mitten as illustrated in Img.4/ F.
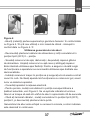
Use of the steam generator
- Turn o the appliance by turning the switch to position (OFF) 0 –
position.
- Remove the water tank, turn it over, unscrew the ller cap. Fill the tank
with cold water and tighten the lid. It is forbidden to use hot water. To
ensure the long life of your appliance, it is recommended that you use
distilled or demineralized water.
- Put the tank back in place and make sure it is placed correctly. Do not
allow the appliance to operate with an empty tank, this will lead to the
appliance becoming damaged.
- Plug in the appliance.
- To turn on, turn the switch to the position corresponding to the selected
fabric, see Img.2. The indicator light comes on. Steam will begin to exit
the steam tip after approximately 40 seconds.
- When you are nished ironing, turn the switch to the position (OFF),
0-position, and unplug the appliance from the outlet.
The steam generator is equipped with convenient accessories, the

11
installation of which is described below.
WARNING! Do not install accessories while steam is being
ejected from the steam tip.
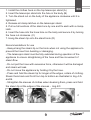
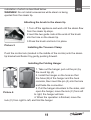
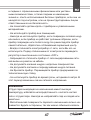
Attaching the brush to the steam tip
1.Turn o the appliance and wait until the steam ow
from the steam tip stops.
2.nsert the two guide rods at the ends of the brush
into the hole on the steam tip.
3.Press the brush and lock it in place.
Installing the Trousers Clamp
Push the nozzle lock (located in the middle of the nozzle) onto the steam
tip bracket and xate it by gently pushing forward.
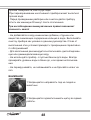
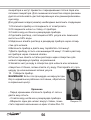
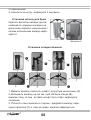
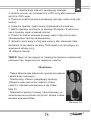
Installing the Folding Hanger
1. Take out the hanger, pull out the pin (by
the round tip) (А)
2. Install the hanger on the hook so that
the holes (B) of the hanger and the hook
coincide, then insert the pin (A) into the hole
and xate the connection.
3. Pull the hanger shoulders to the sides, and
open the hanger, move the lock (C) from left
to right, the hanger will lock.
4. When the operation is nished, move the
lock (C) from right to left, and fold the hanger.
EN
Picture 5
Picture 6

12
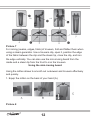
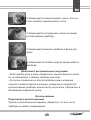
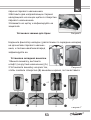
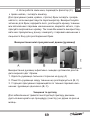
Picture 7
For ironing (seams, edges, folds) of trousers, fold and atten them when
using a steam generator. Use a trousers clip, open it, position the edge
of the fabric between the clip and the steam tip, close the clip, and iron
the edge vertically. You can also use the mini-ironing board from the
inside and a steam tip from the front to iron the trousers.
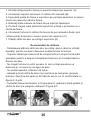
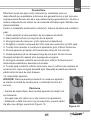
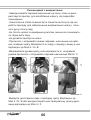
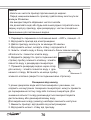
Using the mini-ironing board
Using the mitten allows to smooth out outerwear and trousers eectively
and quickly.
1. Equip the mitten on the back of your hand (А).
Picture 8

13
2. Place the mitten at the back of the fabric to be ironed (В,С).
3. While ironing, move the steam tip and mitten along the fabric at the
same time (В, С).
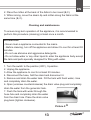
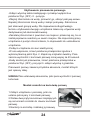
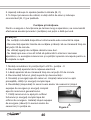
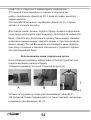
Cleaning and maintenance
To ensure long-term operation of the appliance, it is recommended to
perform this procedure (cleaning) at least once a month.
ATTENTION!
- Never clean a appliance connected to the mains.
- Before cleaning, turn o the appliance and allow it to cool for at least 30
minutes.
- Do not use abrasive and aggressive detergents.
- Do not allow water or any other liquid to enter the appliance body except
the tank and parts specially designed for lling with water.
1. Turn the switch to the position (OFF), 0-position.
2. Unplug the appliance.
3. Allow the appliance to cool for at least 30 minutes.
4. Disconnect the hose, fold the stand and disconnect it.
5. Remove and drain the water tank. Fill the tank with fresh water, rinse
and completely drain the water.
6. Open (unscrew counterclockwise) the drain valve plug and completely
drain the water from the generator tank.
7. Flush the tank with water through the
hose hole and completely drain the water
from the drain hole. Place the drain valve
plug back (tighten clockwise).
EN
Picture 9

14
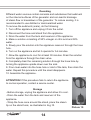
Descaling
Dierent water sources contain minerals and substances that sediment
on the internal surfaces of the generator and can lead to blockage
of steam ow or breakdown of the generator. To reduce scaling, it is
recommended to use distilled or demineralized water.
To remove the sediment (scale), do the following:
1. Turn o the appliance and unplug it from the outlet.
2. Disconnect the hose and stand from the appliance.
3. Drain the water from the tank and reservoir of the appliance.
4. Make a solution consisting of 50% vinegar or citric acid and 50%
water.
5. Slowly pour the solution into the appliance reservoir through the hose
hole.
6. Turn on the appliance and let it operate for 5-6 minutes.
7. Allow the appliance to cool for at least 30 minutes. Drain the solution
from the appliance through the drain valve.
8. Completely drain the remaining solution through the hose hole by
turning the appliance upside down over the sink.
9. Pour clean water into the hose hole or inlet of the tank, then drain the
water. Repeat this procedure until the smell disappears.
10. Assemble the appliance.
ATTENTION! If this procedure fails to return the appliance
to normal operation, contact a service center.
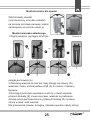
Storage
- Before storage, unplug the appliance and allow it to cool.
- Drain the water from the tank and reservoir of the
appliance.
- Wrap the hose once around the stand, place the steam
tip on the stand hook, as illustrated in Img.10.
Picture 10

15
Store the appliance in a cool, dry and clean place beyond the
access of children and people with limited physical and mental abilities.
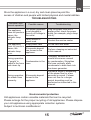
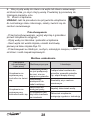
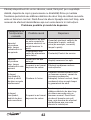
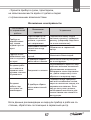
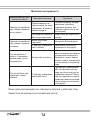
TROUBLESHOOTING
Environmental protection
Old appliances contain valuable materials that can be recycled.
Please arrange for the proper recycling of old appliances. Please dispose
your old appliances using appropriate collection systems.
Subject to technical modications!
EN
Deviation from
normal operation
Possible reason Troubleshooting
The appliance
does not produce
steam, the
indicator lamp
is o.
The steam generator
is not plugged in,
there is no voltage in
the outlet
Plug the power cord into a
power outlet, check the power
outlet (for example, plug a lamp
into it).
Faulty switch or
power cord
Contact the service center.
The appliance
does not produce
steam, the
indicator lamp
is on.
Empty water tank Fill the tank with water.
A limescale deposit
has formed in the
appliance.
Perform cleaning as instructed
in this manual.
During operation,
a “gurgle” is
heard in the hose
and steam tip
Condensation in the
hose
“Gurgling” sounds are a
normal occurrence caused
by condensation. Straighten
the hose vertically, allow
condensate to drain back into
the steam generator.
During operation,
the steam ows
unevenly..
A limescale deposit
formed in the
appliance.
Periodical stops or weakening
of the steam ow for a few
seconds is normal. If steam
does not ow for a longer
period, descaling must be
performed as instructed in this
manual.
Picture 10

16
Dziękujemy za zakup sprzętu rmy!
Funkcjonalność, wygląd oraz wysoka jakość gwarantują Państwu
niezawodność i łatwość korzystania z niniejszego urządzenia.
Prosimy o uważne przeczytanie niniejszej instrukcji obsługi i
zachowanie jej jako podręcznika przez cały okres użytkowania
urządzenia.
Urządzenie służy wyłącznie do użytku w domowego.
Dane techniczne
Model: MR-354
Zasilanie:
Rodzaj prądu - zmienny;
Nominalna częstotliwość 50Hz;
Nominalne napięcie (skala) 220-240V;
Nominalna moc 1500W
Klasa ochrony przed porażeniem prądem II;
Ochrona obudowy przed wilgocią zwykła, odpowiada IPX0;
Czas generowania pary: około 40 sekund.

17
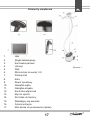
Elementy urządzenia
1. Hak
2. Stojak teleskopowy
3. Końcówka parowa
4. Uchwyt
5. Wąż
6. Zbiorniczek na wodę 1,6 l
7. Przełącznik
8. Koła
9. Zawór spustowy
10. Nakrętka węża
11. Nakrętka stojaka
12. Kontrolka włączenia
13. Klip do spodni
14. Szczotka do tkaniny
15. Składający się wieszak
16. Futerał uchwytu
17. Mini deska do prasowania (rękaw).
Rysunek 1

18
Pozycje przełącznika urządzenia dla różnego typu tkanin
0-wyłączono
1-dla jedwabiu
2-dla wiskozy
3- dla tkanin bawełnianych
4-dla dżinsów
Środki bezpieczeństwa
UWAGA!
- Nigdy nie należy zanurzać napęd elektryczny, przewód zasilający
i wtyczkę w wodzie lub innych płynach.
- Nie brać urządzenia mokrymi rękoma.
- Zawsze należy wyłączać urządzenie z gniazdka, w
celu napełnienia wodą lub jej spuszczenia, a także przed
rozmontowaniem, czyszczeniem i przechowywaniem.
- Należy odłączyć urządzenie przed przeniesieniem do innego
miejsca pracy.
- W przypadku nie przestrzegania zasad może dojść do
porażenia prądem!
- Nigdy nie zostawiać włączonego urządzenia bez kontroli!
- Przed rozpoczęciem pracy należy się upewnić, czy napięcie sieci
podane na urządzeniu odpowiada napięciu sieci elektrycznej w
Państwa domu.
-Upewnij się, że gniazdko elektryczne w twoim domu jest
przeznaczone dla poboru mocy urządzenia.
- Wykorzystywanie przedłużaczy elektrycznych lub przejściówek
wtyczki przewodu może spowodować uszkodzenie sprzętu oraz
pożar.
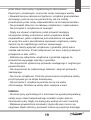
- Niniejsze urządzenie nie jest przeznaczone do obsługiwania
Rysunek 2

19
przez dzieci oraz osoby z ograniczonymi zdolnościami
zycznymi i umysłowymi, oraz przez osoby niemające wiedzy
i doświadczenia w zakresie korzystania z urządzeń gospodarstwa
domowego, jeśli nie są one pod kontrolą, lub nie zostały
przeszkolone przez osoby odpowiedzialne za ich bezpieczeństwo.
- Nie pozwalać dzieciom na zabawę urządzeniem i opakowaniem.
- Nie korzystać z urządzenia na zewnątrz.
- Nigdy nie używać urządzenia, jeżeli przewód zasilający
lub wtyczka zostały uszkodzone, jeżeli urządzenie działa
nieprawidłowo, jeżeli urządzenie jest uszkodzone lub wpadło
do wody. Nie wolno samodzielnie naprawiać urządzenia, należy
zwrócić się do najbliższego centrum serwisowego.
- Zawsze należy wyłączać urządzenie z gniazdka, jeżeli praca
została zakończona. Przed odłączeniem od sieci, należy przekręcić
przełącznik w stan «OFF».
- Zabrania się odłączanie urządzenia z gniazdka ciągnąc za
przewód lub wyrywając wtyczkę z gniazdka.
- Nie dopuszczać stykania się przewodu zasilającego z nagrzanymi
powierzchniami.
- Nie dopuszczać do nadmiernego załamań i skręceń przewodu
zasilającego.
- Nie rzucać urządzenie. Podczas przenoszenia urządzenia należy
przytrzymywać go za stojak teleskopowy.
- Nie korzystać z urządzenia podczas burzy lub wiatru
sztormowego. Możliwe są wtedy skoki napięcia w sieci.
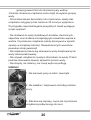
UWAGA!
- Strumień pary wychodzących z końcówki ma wysoką temperaturę,
należy więc unikać bezpośredniego kontaktu części ciała ze
strumieniem pary. Nigdy nie kieruj pary wodnej do ludzi i zwierząt.
- Metalowa powierzchnia końcówki z dysza dla pary mocno się
nagrzewa. Bądź ostrożny, ponieważ można się poparzyć dotykając

20
gorącej powierzchni lub strumienia pary wodnej.
-Podczas obracania urządzenia może dojść do wylania gorącej
wody.
- Przed dokonaniem demontażu lub czyszczenia, należy dać
urządzeniu ostygnąć przez minimum 30 minut po wyłączeniu.
W przypadku nieprzestrzegania powyższych zasad występuje
ryzyko oparzeń!
- Nie dodawać do wody dodatkowych środków chemicznych,
zapachów oraz środków zmniejszających zawartości wapnia w
wodzie. Czyszczenia urządzenia należy dokonywać w sposób
opisany w niniejszej instrukcji. Niespełnienie tych warunków
powoduje utratę gwarancji!
- Dla napełnienia zaleca się stosowanie wody destylowanej lub
wody zdemineralizowanej.
- Nie używać urządzenia z pustym zbiornikiem na wodę. Przed i
podczas stosowania zawsze sprawdzić poziom wody.
- Nie skręcaj, nie załamuj, nie rzucaj węża na podłogę.
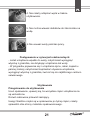
UWAGA!
1. Nie kierować pary na ludzi i zwierzęta.
2. Nie wkładać / zdejmować szczotkę podczas
pracy.
3. Zabrania się naprawy, mycia lub czyszczenia
urządzenia podłączonego do sieci.
Strona się ładuje...
Strona się ładuje...
Strona się ładuje...
Strona się ładuje...
Strona się ładuje...
Strona się ładuje...
Strona się ładuje...
Strona się ładuje...
Strona się ładuje...
Strona się ładuje...
Strona się ładuje...
Strona się ładuje...
Strona się ładuje...
Strona się ładuje...
Strona się ładuje...
Strona się ładuje...
Strona się ładuje...
Strona się ładuje...
Strona się ładuje...
Strona się ładuje...
Strona się ładuje...
Strona się ładuje...
Strona się ładuje...
Strona się ładuje...
Strona się ładuje...
Strona się ładuje...
Strona się ładuje...
Strona się ładuje...
Strona się ładuje...
Strona się ładuje...
Strona się ładuje...
Strona się ładuje...
Strona się ładuje...
Strona się ładuje...
Strona się ładuje...
Strona się ładuje...
Strona się ładuje...
Strona się ładuje...
Strona się ładuje...
Strona się ładuje...
Strona się ładuje...
Strona się ładuje...
Strona się ładuje...
Strona się ładuje...
Strona się ładuje...
Strona się ładuje...
Strona się ładuje...
Strona się ładuje...
Strona się ładuje...
Strona się ładuje...
Strona się ładuje...
Strona się ładuje...
Strona się ładuje...
Strona się ładuje...
Strona się ładuje...
Strona się ładuje...
-
 1
1
-
 2
2
-
 3
3
-
 4
4
-
 5
5
-
 6
6
-
 7
7
-
 8
8
-
 9
9
-
 10
10
-
 11
11
-
 12
12
-
 13
13
-
 14
14
-
 15
15
-
 16
16
-
 17
17
-
 18
18
-
 19
19
-
 20
20
-
 21
21
-
 22
22
-
 23
23
-
 24
24
-
 25
25
-
 26
26
-
 27
27
-
 28
28
-
 29
29
-
 30
30
-
 31
31
-
 32
32
-
 33
33
-
 34
34
-
 35
35
-
 36
36
-
 37
37
-
 38
38
-
 39
39
-
 40
40
-
 41
41
-
 42
42
-
 43
43
-
 44
44
-
 45
45
-
 46
46
-
 47
47
-
 48
48
-
 49
49
-
 50
50
-
 51
51
-
 52
52
-
 53
53
-
 54
54
-
 55
55
-
 56
56
-
 57
57
-
 58
58
-
 59
59
-
 60
60
-
 61
61
-
 62
62
-
 63
63
-
 64
64
-
 65
65
-
 66
66
-
 67
67
-
 68
68
-
 69
69
-
 70
70
-
 71
71
-
 72
72
-
 73
73
-
 74
74
-
 75
75
-
 76
76


w innych językach
Powiązane artykuły
Inne dokumenty
-
Scarlett sc-gs130s07 Instrukcja obsługi
-
Philips GC534 Instrukcja obsługi
-
-
Scarlett SC-GS130S19 Instrukcja obsługi
-
-
Philips ClearTouch GC532 Instrukcja obsługi
-
-
Zelmer ZIR81000 (Stacja parowa IR8100) Instrukcja obsługi
-
eta Steamio 1290 90000 Instrukcja obsługi
-
Rowenta IS6300 Instrukcja obsługi