
PROG.4'05 6/4/05 16:14 Página 1
Strona się ładuje...
Strona się ładuje...

PROG.4'05 6/4/05 16:14 Página 4
Strona się ładuje...

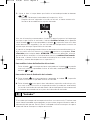
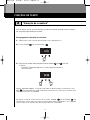
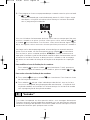
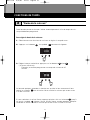
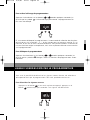
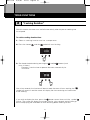
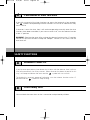
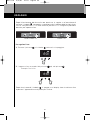
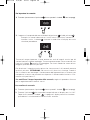
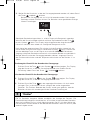
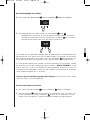
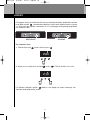
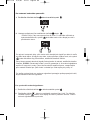
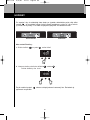
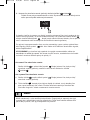
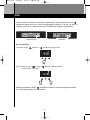
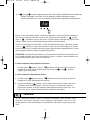
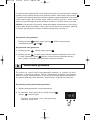
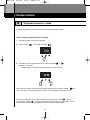
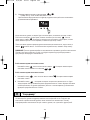
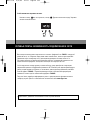
Para ajustar la hora:
1. Pulse el botón y comenzará a parpadear el símbolo .
2. Ajuste la hora pulsando los botones y/o .
Ejemplo: Hora actual 12:30.
Al conectar el horno a la red eléctrica o tras un corte en el suministro eléctrico, par-
padeará el símbolo , siempre que el mando selector de funciones de cocinado
esté en posición “0”; Si no es así, llévelo a “0” y siga el procedimiento descrito para
ajustar la hora.
RELOJ
Después de unos segundos el símbolo se apagará y la pantalla mostrará la hora
fijada. El aparato estará listo para utilizar.
6
INCORRECTO CORRECTO
PROG.4'05 6/4/05 16:14 Página 6

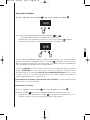
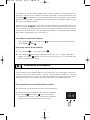
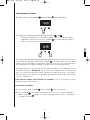
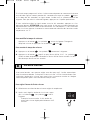
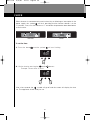
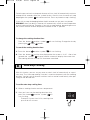
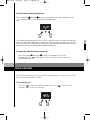
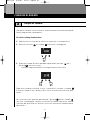
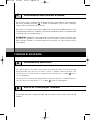
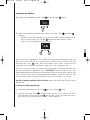
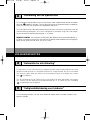
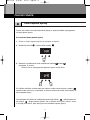
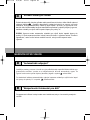
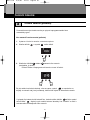
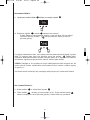
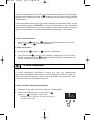
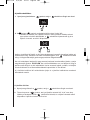
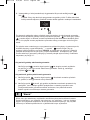
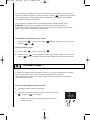
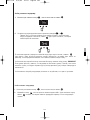
Para ajustar la duración del cocinado:
1. Seleccione una función de cocinado y ajuste una temperatura.
2. Pulse el botón y comenzará a parpadear el símbolo .
3. Ajuste el tiempo deseado pulsando los botones y/o (máximo
10 horas).
Ejemplo: Deseo programar una duración de
cocinado de 45 minutos.
En caso de querer visualizar la hora pulse repetidas veces el botón hasta que
parpadee el símbolo , la pantalla mostrará la hora actual durante unos segundos
y una vez finalizado ese tiempo volverá a mostrar los minutos que restan para que
finalice el cocinado.
Después de unos segundos la función se activará, el horno empezará a funcionar,
el símbolo quedará iluminado de forma fija y la pantalla pasará a mostrar los
minutos que restan para que finalice el cocinado.
“Duración del Cocinado”
a
Mediante esta función, el horno se desconecta automáticamente al finalizar el tiempo
de cocción previamente programado.
FUNCIONES DE TIEMPO
7
PROG.4'05 6/4/05 16:14 Página 7
Strona się ładuje...
Strona się ładuje...
Strona się ładuje...
Strona się ładuje...
Strona się ładuje...
Strona się ładuje...
Strona się ładuje...

15
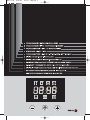
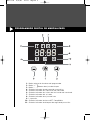
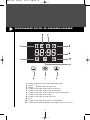
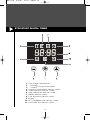
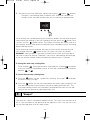
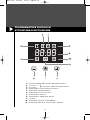
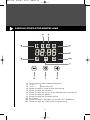
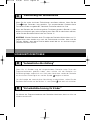
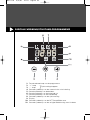
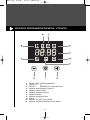
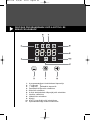
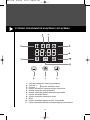
PROGRAMADOR DIGITAL DE ARRANQUE-PARAGEM
1. Botão de selecção de funções do programador
2. Botão “+”
3. Botão “-“
4. Símbolo indicador de paragem automática
5. Símbolo indicador da duração da cozedura
6. Símbolo indicador da hora de finalização da cozedura
7. Símbolo indicador do avisador
8. Símbolo indicador de acerto da hora
9. Ecrã
10. Símbolo indicador do forno NET Comp@tible
11. Símbolo indicador do bloqueio de segurança para crianças
}
Botões de acerto da hora
PROG.4'05 6/4/05 16:14 Página 15

16
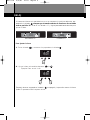
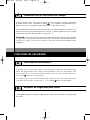
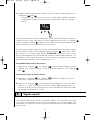
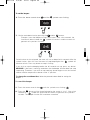
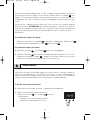
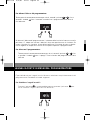
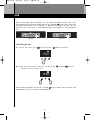
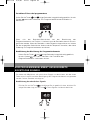
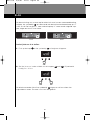
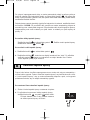
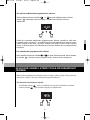
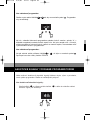
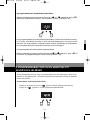
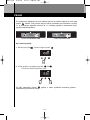
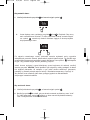
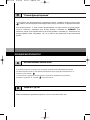
Para acertar a hora:
1. Prima o botão e ficará intermitente.
2. Acerte a hora premindo o botão e/ou .
Exemplo: Hora actual 12:30.
Quando se liga o forno à rede eléctrica ou quando existe um corte no fornecimento
de corrente eléctrica, o símbolo fica intermitente sempre que o comando de
selecção de funções de cocção estiver na posição “0”; se não for esse o caso, colo-
que o comando na posição “0” e siga as instruções dadas para acertar a hora.
RELÓGIO
Alguns segundos depois, o símbolo apaga-se e o ecrã mostra a hora programa-
da. O aparelho está pronto para ser utilizado.
INCORRECTO CORRECTO
PROG.4'05 6/4/05 16:14 Página 16

17
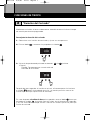
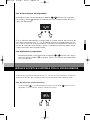
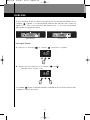
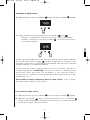
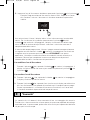
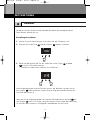
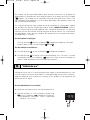
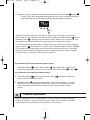
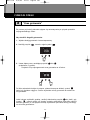
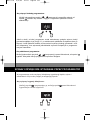
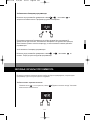
Para programar a duração da cozedura:
1. Seleccione uma função de cocção e uma temperatura.
2. Prima o botão e ficará intermitente .
3. Programe o tempo desejado premindo os botões e/ou (máximo
10 horas).
Exemplo: Pretendo programar uma duração de cozedura
de 45 minutos.
Se quiser visualizar a hora, prima várias vezes o botão até o símbolo ficar
intermitente; o ecrã mostra a hora actual durante alguns segundos e, em seguida,
volta a mostrar os minutos que faltam para terminar a cozedura.
Alguns segundos depois, a função é activada, o forno começa a funcionar, o sím-
bolo fica aceso de forma permanente e o ecrã passa a mostrar os minutos que
faltam para terminar a cozedura.
“Duração da cozedura”
a
Através desta função, o forno desliga-se automaticamente quando acabar o tempo
de cocção programado previamente.
FUNÇÕES DE TEMPO
PROG.4'05 6/4/05 16:14 Página 17

18
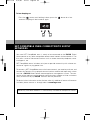
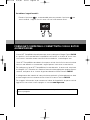
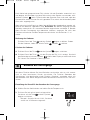
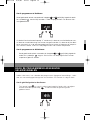
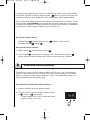
Através desta função, pode programar seu forno para que se desligue automatica-
mente em uma hora determinada. A função “Finalização da cozedura” é utilizada
simultaneamente com a função “Duração da cozedura” para que o forno se ligue e
desligue automaticamente após ter funcionado durante o tempo pretendido.
Para alterar a duração da cozedura:
Prima o botão e ficará intermitente . Altere a duração da cozedura premin
do os botões e/ou .
Para anular a duração da cozedura:
1. Prima o botão e ficará intermitente .
2. Prima o botão até o tempo indicado no ecrã ser “0:00”. Alguns segundos
depois, o símbolo apaga-se e o ecrã mostra a hora actual. A função de dura
ção da cozedura foi anulada.
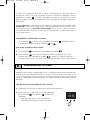
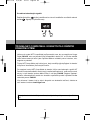
Para programar a hora de finalização da cozedura:
1. Seleccione uma função de cocção e uma temperatura.
2. Seleccionada previamente a duração da cozedura,
prima o botão e osímbolo ficará intermitente.
Exemplo: Hora actual 12:30, duração da cozedura
programada previamente como 45 minutos.
Ao chegar ao fim do tempo programado, o forno desliga-se automaticamente e
emite uma série de avisos sonoros durante 60 segundos, ao mesmo tempo em que
o símbolo fica intermitente. Uma vez decorridos esses 60 segundos, o forno deixa
de emitir os avisos, mas o símbolo continua intermitente. Para que o símbolo se apa-
gue, prima um botão qualquer.
Se quiser silenciar o aviso sonoro antes de terminados os 60 segundos, prima um
botão qualquer. ATENÇÃO: quando se executa esta operação, o forno passa da
forma automática ao funcionamento manual e continua a cozinhar. Por tanto, se ten-
ciona terminar de cozinhar, não se esqueça de colocar os comandos de selecção
de funções e de temperaturas na posição “0”.
“Finalização da cozedura”
b
PROG.4'05 6/4/05 16:14 Página 18
Strona się ładuje...
Strona się ładuje...
Strona się ładuje...
Strona się ładuje...
Strona się ładuje...
Strona się ładuje...

25
PROGRAMMATEUR DIGITAL DE MARCHE/ARRÊT
1. Bouton de sélection des fonctions du programmateur
2. Bouton “+”
3. Bouton “-“
4. Symbole de l’arrêt automatique
5. Symbole de la durée de la cuisson
6. Symbole indicateur de fin de cuisson
7. Symbole du signal sonore
8. Symbole du réglage de l’heure
9. Écran
10. Symbole indicateur de four NET Comp@tible
11. Symbole indicateur de verrouillage sécurité pour enfants
}
Boutons de réglage du temps
PROG.4'05 6/4/05 16:14 Página 25

26
Pour régler l’heure:
1. Appuyez sur le bouton . Le symbole commence à clignoter.
2. Réglez l’heure en appuyant sur les boutons et/ou .
Exemple: heure actuelle 12:30.
Si vous branchez le four au réseau électrique ou en cas de coupure d’électricité, le
symbole clignote si la commande de sélection des fonctions de cuisson est
réglée sur “0”. Dans le cas contraire, positionnez-la sur “0” et suivez la procédure
décrite pour le réglage de l’heure.
HORLOGE
Le symbole s’éteint au bout de quelques secondes et l’écran affiche l’heure fixée.
L’appareil est prêt à être utilisé.
INCORRECT CORRECT
PROG.4'05 6/4/05 16:14 Página 26

27
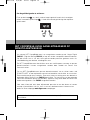
Pour régler la durée de la cuisson:
1. Sélectionnez une fonction de cuisson et réglez la température..
2. Appuyez sur le bouton . Le symbole commence à clignoter.
3. Réglez le temps souhaité en appuyant sur les boutons et/ou
(10 heures maximum).
Exemple: je souhaite programmer un temps de cuisson de 45
minutes.
Si vous souhaitez visualiser l’heure, appuyez plusieurs fois sur le bouton jusqu’à
ce que le symbole clignote, l’écran affiche l’heure actuelle pendant quelques
secondes et affiche ensuite les minutes qui restent avant la fin de la cuisson.
Au bout de quelques secondes la fonction est activée, le four commence à fonc-
tionner, le symbole reste allumé et l’écran affiche les minutes qui restent avant
la fin de la cuisson.
“Durée de la cuisson”
a
Cette fonction permet au four de s’arrêter automatiquement à la fin du temps de cuis-
son préalablement programmé.
FONCTIONS DE TEMPS
PROG.4'05 6/4/05 16:14 Página 27
Strona się ładuje...
Strona się ładuje...
Strona się ładuje...
Strona się ładuje...
Strona się ładuje...
Strona się ładuje...
Strona się ładuje...

35
STOP/START DIGITAL TIMER
1. Timer function selector button
2. “+”button
3. “-“ button
4. Automatic disconnection indicator symbol
5. Cooking duration indicator symbol
6. Stop Cooking time indicator symbol
7. Beeper indicator symbol
8. Time adjustment indicator symbol
9. Screen
10. NET Comp@tible oven indicator symbol
11. Child safety lock indicator symbol
}
Time adjustment buttons
PROG.4'05 6/4/05 16:14 Página 35

36
To set the time:
1. Press the button and the symbol will start flashing.
2. Set the time by pressing the and/or buttons.
Example: Current time 12:30:00.
When the oven is connected to the mains electricity or following an interruption in the
power supply, the symbol will flash, providing that the function selector is in the
“0” position; if not, turn the selector to “0” and follow the procedure described below
to set the time.
CLOCK
After a few seconds the symbol will go off and the screen will display the time
set. The appliance will be ready for use.
WRONG RIGHT
PROG.4'05 6/4/05 16:14 Página 36

37
To set the cooking duration time:
1. Select a cooking function and set a temperature.
2. Press the button and the symbol will start flashing.
3. Set the desired duration by pressing the and/or buttons (maxi
mum 10 hours).
Example: I want the timer to operate the oven automatically for
45 minutes.
If you wish to display the time, press the button several times until the symbol
flashes. The screen will display the current time for a few seconds and will then go
back to displaying the countdown of time remaining before cooking finishes.
After a few seconds, the function will be activated, the oven will start working, the
symbol will remain lit and the screen will display the time remaining until conclusion
of the cooking.
“Cooking Duration”
a
With this function, the oven turns itself off automatically when the pre-set cooking time
has elapsed.
TIMER FUNCTIONS
PROG.4'05 6/4/05 16:14 Página 37
Strona się ładuje...
Strona się ładuje...
Strona się ładuje...
Strona się ładuje...
Strona się ładuje...
Strona się ładuje...
Strona się ładuje...

45
PROGRAMMATORE DIGITALE DI
ATTIVAZIONE-DISATTIVAZIONE
1. Pulsante selettore delle funzioni del programmatore
2. Pulsante “+”
3. Pulsante “-“
4. Simbolo della disattivazione automatica
5. Simbolo del tempo di cottura
6. Simbolo dell’ora di fine cottura
7. Simbolo della suoneria
8. Simbolo della regolazione dell’ora
9. Il display
10. Simbolo del forno NET Comp@tible
11. Simbolo del blocco di sicurezza per i bambini
}
Pulsanti per l’impostazione della durata
PROG.4'05 6/4/05 16:14 Página 45

46
Per regolare l’ora:
1. Premere il pulsante e il simbolo comincerà a lampeggiare.
2. Impostare l’ora servendosi del pulsante e/o del pulsante .
Esempio: Ora 12:30.
Dopo l’allacciamento del forno alla rete elettrica o in seguito a un’interruzione di
corrente, il simbolo lampeggia, a condizione che il selettore delle funzioni di cot-
tura sia sulla posizione “0”. In caso contrario, portarlo su “0” e seguire la procedura
descritta per impostare l’ora.
OROLOGIO
Dopo alcuni secondi il simbolo si spegne e sul display viene visualizzata l’ora
impostata. L’apparecchiatura è pronta per l’utilizzo.
NON CORRETTO CORRETTO
PROG.4'05 6/4/05 16:14 Página 46

47
To set the cooking duration time:
1. Selezionare una funzione di cottura e impostare una temperatura.
2. Premere il pulsante e il simbolo comincerà a lampeggiare.
3. Impostare il tempo di cottura desiderato premendo il pulsante e/o il
pulsante (massimo 10 ore).
Esempio: Programmazione di un tempo di cottura di 45 minuti.
Per visualizzare l’ora, premere ripetutamente il pulsante finché il simbolo
non inizia a lampeggiare; il display visualizzerà l’ora effettiva per alcuni secondi
al termine dei quali tornerà a mostrare i minuti che mancano al completamento
della cottura.
Dopo alcuni secondi la funzione si attiva, il forno entra in funzione, il simbolo
è acceso in modo fisso e il display indica i minuti che mancano al termine della
cottura.
“Tempo di cottura”
a
Con questa funzione, il forno si disattiva automaticamente al termine del tempo di
cottura programmato in precedenza.
FUNZIONI DI DURATA
PROG.4'05 6/4/05 16:14 Página 47
Strona się ładuje...
Strona się ładuje...
Strona się ładuje...
Strona się ładuje...
Strona się ładuje...
Strona się ładuje...
Strona się ładuje...

55
DIGITALE START-/STOP-EINSTELLUNG
1. Funktionswahltaste des Programmierelements
2. Taste „+“
3. Taste „-“
4. Symbol Anzeige für automatische Abschaltung
5. Symbol Anzeige der Gardauer
6. Symbol Anzeige der Uhrzeit für das Beenden des Garvorgangs
7. Symbol Anzeige des Melders
8. Symbol Anzeige der Uhrzeiteinstellung
9. Das Display
10. Symbol Anzeige für Backofen mit Funktion NET Comp@tible
11. Symbol Anzeige der Kinder-Sicherheitsblockierung
}
Zeiteinstelltasten
PROG.4'05 6/4/05 16:14 Página 55

56
Einstellung der Uhr:
1. Drücken Sie auf die Taste und das Symbol beginnt zu blinken.
2. Stellen Sie die Uhrzeit ein, indem Sie auf die Tasten und/oder drücken.
Beispiel: Aktuelle Uhrzeit 12:30.
Beim Anschließen des Backofens an die Stromversorgung oder nach einer
Unterbrechung der Stromversorgung blinkt das Symbol immer dann, wenn der
Backofen-Wahlschalter sich auf Position “0“ befindet. Sollte dies nicht der Fall sein,
stellen Sie ihn auf Position “0“ und folgen Sie den Anweisungen zur Einstellung der
Uhr.
UHR
Nach einigen Sekunden erlischt das Symbol und auf dem Display erscheint die
eingestellte Uhrzeit. Das Gerät ist betriebsbereit.
FALSCH RICHTIG
PROG.4'05 6/4/05 16:14 Página 56
Strona się ładuje...

58
Mit dieser Funktion können Sie Ihren Backofen so einstellen, dass er sich automa-
tisch zu einer bestimmten Uhrzeit ausschaltet. Die Funktion “Beenden des
Garvorgangs” wird gleichzeitig mit der Funktion “Gardauer“ verwendet, damit sich
der Backofen nach Ablauf der gewünschten Betriebszeit automatisch ein- und auss-
chaltet.
Änderung der Gardauer:
Drücken Sie auf die Taste und das Symbol beginnt zu blinken. Ändern
Sie die Gardauer, indem Sie auf die Tasten und/oder drücken.
Löschen der Gardauer:
1. Drücken Sie auf die Taste und das Symbol beginnt zu blinken.
2. Drücken Sie auf die Taste , bis das Display die Zeit “0:00“ anzeigt. Nach eini
gen Sekunden erlischt das Symbol und auf dem Display erscheint die aktue
lle Uhrzeit. Die Gardauer ist damit gelöscht.
Einstellung der Uhrzeit für das Beenden des Garvorgangs:
1. Wählen Sie eine Kochfunktion und stellen Sie die Temperatur ein.
2. Drücken Sie bei vorher bereits eingestellter
Gardauer auf die Taste und das Symbol
beginnt zu blinken.
Beispiel: Aktuelle Uhrzeit 12:30, Gardauer
vorher auf 45 Minuten eingestellt.
Nach Ablauf der programmierten Zeit schaltet sich der Backofen automatisch aus
und beginnt, 60 Sekunden lang eine Reihe akustischer Signale auszusenden, wäh-
rend das Symbol blinkt. Danach ertönt der Signalton zwar nicht mehr, aber das
Symbol blinkt weiter. Drücken Sie auf irgendeine Taste, damit das blinkende Symbol
nicht mehr angezeigt wird.
Wenn das akustische Signal vor Ablauf der 60 Sekunden abgebrochen werden soll,
drücken Sie ebenfalls irgendeine Taste. ACHTUNG: Bei diesem Vorgang wird der
Backofen automatisch auf manuellen Betrieb umgeschaltet und bleibt in Betrieb.
Wenn Sie den Garvorgang also abbrechen möchten, vergessen Sie nicht, den
Funktionswahlschalter und den Temperaturwahlschalter auf die Position “0“ zu
stellen.
“Beenden des Garvorgangs”
b
PROG.4'05 6/4/05 16:14 Página 58
Strona się ładuje...
Strona się ładuje...
Strona się ładuje...
Strona się ładuje...
Strona się ładuje...
Strona się ładuje...
Strona się ładuje...
Strona się ładuje...
Strona się ładuje...
Strona się ładuje...
Strona się ładuje...
Strona się ładuje...
Strona się ładuje...
Strona się ładuje...
Strona się ładuje...
Strona się ładuje...
Strona się ładuje...
Strona się ładuje...
Strona się ładuje...
Strona się ładuje...
Strona się ładuje...
Strona się ładuje...
Strona się ładuje...
Strona się ładuje...
Strona się ładuje...
Strona się ładuje...
Strona się ładuje...
Strona się ładuje...
Strona się ładuje...
Strona się ładuje...
Strona się ładuje...
Strona się ładuje...
Strona się ładuje...
Strona się ładuje...
Strona się ładuje...
Strona się ładuje...
Strona się ładuje...
Strona się ładuje...
Strona się ładuje...
Strona się ładuje...
Strona się ładuje...
Strona się ładuje...
Strona się ładuje...
Strona się ładuje...
Strona się ładuje...
Strona się ładuje...
Strona się ładuje...
Strona się ładuje...
Strona się ładuje...
Strona się ładuje...
Strona się ładuje...
Strona się ładuje...
Strona się ładuje...
Strona się ładuje...
Strona się ładuje...
Strona się ładuje...
Strona się ładuje...
Strona się ładuje...
Strona się ładuje...
Strona się ładuje...
Strona się ładuje...
Strona się ładuje...
Strona się ładuje...
Strona się ładuje...
Strona się ładuje...
Strona się ładuje...
-
 1
1
-
 2
2
-
 3
3
-
 4
4
-
 5
5
-
 6
6
-
 7
7
-
 8
8
-
 9
9
-
 10
10
-
 11
11
-
 12
12
-
 13
13
-
 14
14
-
 15
15
-
 16
16
-
 17
17
-
 18
18
-
 19
19
-
 20
20
-
 21
21
-
 22
22
-
 23
23
-
 24
24
-
 25
25
-
 26
26
-
 27
27
-
 28
28
-
 29
29
-
 30
30
-
 31
31
-
 32
32
-
 33
33
-
 34
34
-
 35
35
-
 36
36
-
 37
37
-
 38
38
-
 39
39
-
 40
40
-
 41
41
-
 42
42
-
 43
43
-
 44
44
-
 45
45
-
 46
46
-
 47
47
-
 48
48
-
 49
49
-
 50
50
-
 51
51
-
 52
52
-
 53
53
-
 54
54
-
 55
55
-
 56
56
-
 57
57
-
 58
58
-
 59
59
-
 60
60
-
 61
61
-
 62
62
-
 63
63
-
 64
64
-
 65
65
-
 66
66
-
 67
67
-
 68
68
-
 69
69
-
 70
70
-
 71
71
-
 72
72
-
 73
73
-
 74
74
-
 75
75
-
 76
76
-
 77
77
-
 78
78
-
 79
79
-
 80
80
-
 81
81
-
 82
82
-
 83
83
-
 84
84
-
 85
85
-
 86
86
-
 87
87
-
 88
88
-
 89
89
-
 90
90
-
 91
91
-
 92
92
-
 93
93
-
 94
94
-
 95
95
-
 96
96
-
 97
97
-
 98
98
-
 99
99
-
 100
100
-
 101
101
-
 102
102
-
 103
103
-
 104
104
-
 105
105
-
 106
106
-
 107
107
-
 108
108
-
 109
109
-
 110
110
-
 111
111
-
 112
112
-
 113
113
-
 114
114
-
 115
115
-
 116
116
-
 117
117
-
 118
118
-
 119
119
-
 120
120
-
 121
121
-
 122
122
-
 123
123
-
 124
124


Groupe Brandt 5H-213X Instrukcja obsługi
- Typ
- Instrukcja obsługi
w innych językach
- čeština: Groupe Brandt 5H-213X Návod k obsluze
- español: Groupe Brandt 5H-213X El manual del propietario
- italiano: Groupe Brandt 5H-213X Manuale del proprietario
- Deutsch: Groupe Brandt 5H-213X Bedienungsanleitung
- slovenčina: Groupe Brandt 5H-213X Návod na obsluhu
- português: Groupe Brandt 5H-213X Manual do proprietário
- français: Groupe Brandt 5H-213X Le manuel du propriétaire
- English: Groupe Brandt 5H-213X Owner's manual
- русский: Groupe Brandt 5H-213X Инструкция по применению
- Nederlands: Groupe Brandt 5H-213X de handleiding