
LED SOLAR SPOTLIGHT
IAN 97740
LED-SOLAR-STRAHLER
Montage-, Bedienungs- und Sicherheitshinweise
LED SOLAR SPOTLIGHT
Assembly, operating and safety instructions
REFLEKTOR SOLARNY LED
Wskazówki montażu, obsługi i bezpieczeństwa
SOLARNI LED-REFLEKTOR
Navodila za montažo, uporabo in varnostna navodila
LED SOLÁRNÍ REFLEKTOR
Pokyny k montáži, obsluze a bezpečnostní pokyny
LED SOLÁRNY REFLEKTOR
Pokyny pre montáž, obsluhu a bezpečnostné pokyny
NAPELEMES LED REFLEKTOR
Szerelési, használati és biztonsági tudnivalók

GB Assembly, operating and safety instructions Page 5
PL Wskazówki montażu, obsługi i bezpieczeństwa Strona 16
HU Szerelési, használati és biztonsági tudnivalók Oldal 28
SI Navodila za montažo, uporabo in varnostna navodila Stran 39
CZ Pokyny k montáži, obsluze a bezpečnostní pokyny. Strana 52
SK Pokyny pre montáž, obsluhu a bezpečnostné pokyny Strana 63
DE / AT / CH Montage-, Bedienungs- und Sicherheitshinweise Seite 74

3
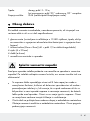
A
B C
D
1
7
9
4
7 88
62 3
45

4
E
F
10
11

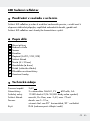
5 GB
Intended use ............................................................................Page 6
Parts description ..................................................................Page 6
Technical Data ........................................................................ Page 6
Scope of delivery.................................................................Page 7
General safety instructions .........................................Page 7
Safety instructions for rechargeable
batteries ...................................................................................... Page 8
Function........................................................................................Page 8
Before use
Charging the rechargeable batteries............................................Page 9
Assembly
Mounting the spotlight ...................................................................Page 9
Mounting the solar cell ..................................................................Page 10
Connecting the solar cell to the main unit ....................................Page 10
Start-up ........................................................................................Page 11
Maintenance / changing batteries .........................Page 12
Winter-time use .....................................................................Page 12
Cleaning and Care .............................................................. Page 12
Troubleshooting ...................................................................Page 13
Disposal ....................................................................................... Page 13
Warranty ....................................................................................Page 14

6 GB
LED solar spotlight
Intended use
The LED solar spotlight is intended to illuminate outdoor areas without elec-
trical connection, e.g. garden sheds, garages, etc. The LED solar spotlight
is not suitable for commercial use.
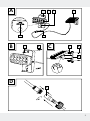
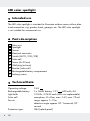
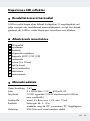
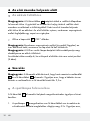
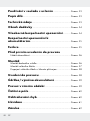
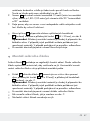
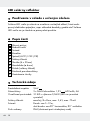
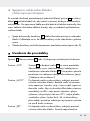
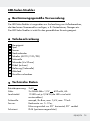
Parts description
1 Main unit
2 Spotlight
3 Sensor
4 Electrical connector
5 Switch (AUTO / OFF / PIR)
6 Solar cell
7 Screw (4 x 30 mm)
8 Wall plug (ø 6 mm)
9 Bracket (solar cell)
10 Rechargeable battery compartment
11 Locking screws
Technical Data
Operating voltage: 3.6 V
Rechargeable battery: 3 x NiMH battery 1.2 V , 600 mAh, AA
Light bulb: 10 LEDs, 0.06 W each (LEDs not replaceable)
Solar cell: amorphous, 8 x 8 cm, max. 5.4 V, max. 70 mA
Sensor: range: approx. 5–12 m,
detection angle: approx. 90° horizontal, 90°
vertical
Protection type: IP44 (splash-proof)

7 GB
Scope of delivery
Check immediately after unpacking that the parts are complete and that
the product is in proper condition.
1 Main unit (consisting of spotlight with 10 LEDs, sensor, mounting bracket
with built-in batteries and built-in control)
1 Solar cell (8 cm x 8 cm) (incl. approx. 2.5 m power cable)
4 Screws (4 x 30 mm)
4 Wall plugs (ø 6 mm)
1 Instructions for assembly and use
General safety instructions
Before using the product, please familiarise yourself with all of the safety
information and instructions for use! When passing this product on to
others, please also include all the documents!
This appliance can be used by children aged from 8 years and above
and persons with reduced physical, sensory or mental capabilities or
lack of experience and knowledge if they have been given supervision
or instruction concerning use of the appliance in a safe way and un-
derstand the hazards involved. Children shall not play with the appli-
ance. Cleaning and user maintenance shall not be made by children
without supervision.
Never leave children unsupervised with the packaging material. The
packaging material represents a danger of suffocation. Children fre-
quently underestimate the dangers.
Keep children out of the area you are working in. A large number of
screws and other small parts are included with delivery. These may
prove life-threatening if swallowed or inhaled.
Do not use this article if you notice any damage!

8 GB
Safety instructions for
rechargeable batteries
DANGER TO LIFE! Keep rechargeable batteries away
from children. If accidentally swallowed seek immediate medical
attention!
CAUTION! EXPLOSION HAZARD!
Never throw rechargeable batteries into fire or water!
Do not exert mechanical loads to batteries!
Do not use single-use batteries.
Never short-circuit or open rechargeable batteries.
Risk of property damage
Only use the specified battery type!
When inserting the battery ensure that it is inserted the right way round!
This is shown in the battery compartment!
If necessary, clean the battery and device contacts before inserting the
battery!
Function
The solar cell 6 converts energy from sunlight into electricity. This recharges
the battery inside the battery compartment 10 via the power cable.
These batteries store the electricity fed by the solar cell. Fully charged bat-
teries will provide about 2 hours of light on the „PIR“ setting, and about
8 hours on „AUTO“.
In summer completely drained batteries take about 2 to 4 days to fully
recharge in constant sunlight. The batteries must be charged prior to initial
use (see „Charging rechargeable batteries“).

9 GB
Before use
Charging the rechargeable batteries
Note: The rechargeable batteries inside the main unit 1 are fully charged
at delivery. However, they may already have lost charge during transport
from the manufacturer to the retail location. Therefore charge the batteries
prior to use. During summer, initial charging will take at least one day in
constant sunlight.
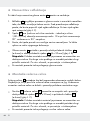
Set the switch 5 to the „OFF“ position.
Note: In constant sunlight (depending on the season) drained batteries
should take two to ten days to charge.
Note: the built-in charging controller of the LED solar spotlight prevents
the rechargeable batteries from overcharging.
Replace the rechargeable batteries if the light output does not improve
after charging (Fig. E).
Assembly
Note: Before mounting, decide where you want to mount the solar cell 6
and the main unit 1. Please remember the cord between the solar cell and
the main unit is approx. 2.5 m long.
Mounting the spotlight
Please remember when selecting the location for mounting the main unit 1:
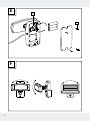
1. The connection between the spotlight 2 and the main unit is flexible
and should be able to illuminate the selected area. Please remember
to slightly loosen the swivel screw before moving the spotlight. Tighten
the swivel screw afterwards (see Fig. F).

10 GB
2. Depending on the mounting height (ideally between 1.80 m – 2.00 m)
the sensor 3 has a detection range of max. 12 m with a detection
angle of 90° horizontally and 90° vertically.
3. Be sure the sensor is not illuminated by street lighting at night. This can
influence its functioning.
Secure the main unit 1 using two of the enclosed wall plugs 8
(ø 6 mm) and two of the enclosed screws 7 (4 x 30 mm) (see Fig. B).
Note: The enclosed mounting material is suitable for ordinary masonry
construction. Other wall substrates may require other fastening materi-
als. Seek specialist advice when in doubt.
After mounting, check that the main unit is fitted securely.
Mounting the solar cell
The solar cell 6 requires direct sunlight when possible. Ideally, the solar
cell surface will be directed to the south. The enclosed mounting base will
ensure the solar cell is mounted horizontally.
Mount the bracket 9 of the solar cell 6 to a vertical wall using the
enclosed screws 7 (4 x 30 mm) and the enclosed wall plugs 8
(ø 6 mm) (see Fig. C).
Note: The enclosed mounting material is suitable for ordinary masonry
construction. Other wall substrates may require other fastening materi-
als. Seek specialist advice when in doubt.
After mounting, verify the solar cell is fitted securely.
Then attach the solar cell as shown in Fig. C.
Next adjust the solar cell to face south.
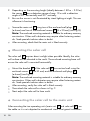
Connecting the solar cell to the main unit
After mounting the two operating units (main unit 1 and solar cell 6) run
the cable so it is not subjected to mechanical stress. Use typical installation

11 GB
material such as cable clamps or conduit to fasten the cable, to prevent
damage to the insulation.
Connect the plug connector 4 from the main unit cable and the solar
cell. Please note these plug-in connector only fit one way.
Screw the two plug-in connectors together using the swivel nut (see
Fig. D).
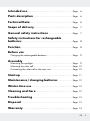
Start-up
The switch 5 on the main unit 1 (Fig. A) features the following functions:
Position „OFF“: Sensor 3 and spotlight 2 are off. In direct sunlight
the rechargeable batteries are charged by the solar
cell 6. Use this setting to charge drained batteries
(see „Charging the rechargeable batteries“).
Position „AUTO“: The solar cell charges the batteries in sunlight. The
spotlight will automatically switch on at dusk and off
in daylight. To ensure a long life the LEDs will not be
fully powered in this setting, but only provide approx.
25 % of their full light power (eco mode). When fully
charged, the batteries will provide approx. 8 hours of
light in this setting.
Position „PIR“: The solar cell charges the batteries in sunlight. The
sensor will activate the spotlight at twilight or in the
dark as soon as movement is detected. The light ON
time is preset to approx. 1.5 minutes. If additional
movement is detected during these 1.5 minutes, the
light ON time will reset. In this setting the LEDs will be
fully powered. With the batteries fully charged the
charge on this setting will provide light for a total of
approx. 2 hours.

12 GB
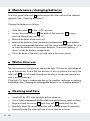
Maintenance / changing batteries
To ensure good solar cell 6 performance the solar cell must be cleaned
regularly (see „Cleaning and care“).
Change the batteries as follows:
Slide the switch 5 to the „OFF“ position.
Loosen the cover screws 11 the back of the main unit 1 using a
cross-tip screwdriver (see Fig. E).
Remove the back of the main unit.
Remove the batteries from the battery compartment 10 and replace
with new rechargeable batteries with the same technical data. Be sure
to insert the batteries in the correct direction. The correct polarity is
shown inside the battery compartment.
Close the back of the main unit and secure the cover screws.
Winter-time use
The low amount of sunlight may reduce the light ON time at night depend-
ing on the on-time. Due to the low position of the sun please also verify the
solar cell 6 is out of shade throughout the day in winter and remove ice
and snow as necessary.
If the light ON time is inadequate due to the weather, recharge or replace
the batteries (see„Charging the rechargeable batteries“ or „changing batteries“).
Cleaning and Care
Switch off the LED solar spotlight before cleaning.
Use a slightly dampened, lint-free cloth and mild cleaning agent to clean.
Regular check the sensor 3 and solar cell 6 particularly for dirt.
Regularly clean the sensor and solar cell to ensure proper functionality.
Especially keep the solar cell free of snow and ice in winter.

13 GB
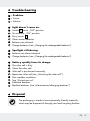
Troubleshooting
= Problem
= Cause
= Solution
Light doesn‘t come on.
Switch
5 set to „OFF“ position.
Set switch to „ON“ position.
Dirty sensor 3.
Clean motion detector.
Batteries are drained.
Charge batteries (see „Charging the rechargeable batteries“).
Spotlight is flickering.
Batteries are almost drained.
Charge batteries (see „Charging the rechargeable batteries“).
Battery quickly loses its charge.
The solar cell is dirty.
Clean the solar cell.
Solar cell is positioned incorrectly.
Reposition solar cell (see „Mounting the solar cell“).
Poor weather conditions.
See „Winter-time use“.
Defective batteries.
Replace batteries (see „Maintenance/changing batteries“).
Disposal
The packaging is made of environmentally friendly materials,
which may be disposed of through your local recycling facilities.

14 GB
Contact your local community or municipal administration for more details
on how to dispose your worn-out product.
To help protect the environment, please dispose of the product
properly, and not in household waste, when it has reached the
end of its useful life. Please contact your local authority for infor-
mation on collection points and their opening hours.
Faulty or used rechargeable batteries must be recycled in accordance with
Directive 2006 / 66 / EC. Return rechargeable batteries and / or the appli-
ance using the recycling facilities provided.
Pb
Environmental damage through incorrect disposal
of the rechargeable batteries!
Rechargeable batteries may not be disposed of with the usual domestic
waste. Therefore dispose of used batteries through your municipal collec-
tion site.
Warranty
The device has been manufactured to strict quality guidelines and meticu-
lously examined before delivery. In the event of product defects you have
legal rights against the retailer of this product. Your legal rights are not
limited in any way by our warranty detailed below.
The warranty for this device is 3 years from the date of purchase. Should
this device show any fault in materials or manufacture within three years
from the date of purchase, we will repair or replace it – at our choice –
free of charge to you.
The warranty period begins on the date of purchase. Please keep the origi-
nal sales receipt in a safe location. This document is required as your proof

15 GB
of purchase. This warranty becomes void if the device has been damaged
or improperly used or maintained.
The warranty applies to faults in material or manufacture. This warranty
does not cover product parts subject to normal wear, thus possibly consid-
ered consumables (e.g. batteries) or for damage to fragile parts, e.g.
switches, rechargeable batteries or glass parts.

16 PL
Zastosowanie zgodne z przeznaczeniem .... Strona 17
Opis części .............................................................................. Strona 17
Dane techniczne................................................................. Strona 17
Zakres dostawy ................................................................ Strona 18
Ogólne wskazówki dot. bezpieczeństwa .... Strona 18
Wskazówki dotyczące bezpieczeństwa
użytkowania akumulatorów ................................ Strona 19
Działanie ................................................................................. Strona 19
Przed pierwszym uruchomieniem
Ładowanie akumulatorów .......................................................... Strona 20
Montaż
Montaż reflektora ....................................................................... Strona 21
Montaż ogniwa solarnego ......................................................... Strona 22
Podłączenie ogniwa solarnego do urządzenia głównego ...... Strona 22
Uruchomienie....................................................................... Strona 23
Konserwacja / wymiana akumulatorów ..... Strona 23
Użytkowanie wokresie zimowym .................. Strona 24
Czyszczenie ipielęgnacja .......................................... Strona 24
Usuwanie usterek ............................................................ Strona 25
Utylizacja ................................................................................ Strona 26
Gwarancja ............................................................................. Strona 26

17 PL
Reflektor solarny LED
Zastosowanie zgodne z przeznaczeniem
Reflektor solarny LED przeznaczony jest do oświetlenia zewnętrznego,
wmiejscach nieposiadających własnego przyłącza elektrycznego, np.
altany ogrodowe, garaże itp. Reflektor solarny LED nie jest przeznaczony
do użytku komercyjnego.
Opis części
1 Urządzenie główne
2 Reflektor punktowy
3 Czujnik
4 Złącze wtykowe
5 Przełącznik (AUTO / OFF / PIR)
6 Ogniwo solarne
7 Śruba (4 x 30 mm)
8 Kołek (ø 6 mm)
9 Uchwyt (ogniwa solarnego)
10 Komora akumulatorów
11 Śruby zamykające
Dane techniczne
Napięcie robocze: 3,6 V
Akumulatory: 3 akumulatory NiMH 1,2 V , 600 mAh, AA
Elementy świetlne: 10 diod LED po 0,06 W (wymiana diod LED nie jest
możliwa)
Ogniwo solarne: amorficzne, 8 x 8 cm, maks. 5,4 V, maks. 70 mA

18 PL
Czujnik: Zasięg: ok. 5–12 m,
kąt detekcji: ok. 90° wpoziomie, 90° wpionie
Stopień ochrony: IP44 (bryzgoszczelność)
Zakres dostawy
Bezpośrednio po wypakowaniu należy sprawdzić, czy zestaw jest kompletny
oraz czy urządzenie znajduje się w nienagannym stanie.
1 urządzenie główne (składające się zreflektora z10 diodami LED,
czujnika, obudowy montażowej zwbudowanymi akumulatorami oraz
wbudowanym urządzeniem sterującym)
1 ogniwo solarne (8 cm x 8 cm) (zkablem zasilającym odługości ok. 2,5 m)
4 śruby (4 x 30 mm)
4 kołki (ø 6 mm)
1 instrukcja montażu iobsługi
Ogólne wskazówki dot. bezpieczeństwa
Przed pierwszym użyciem produktu należy zapoznać się ze wszystkimi
wskazówkami dotyczącymi obsługi ibezpieczeństwa! W przypadku prze-
kazania produktu innej osobie należy dołączyć do niego całą jego doku-
mentację!
Niniejsze urządzenie może być używane przez dzieci od lat 8 oraz
osoby oograniczonej sprawności fizycznej, sensorycznej lub umysło-
wej lub nieposiadające doświadczenia iwiedzy, jeśli pozostają pod
nadzorem lub zostały pouczone wkwestii bezpiecznego użycia urzą-
dzenia irozumieją wynikające zniego zagrożenia. Dzieci nie mogą
bawić się urządzeniem. Czyszczenie i konserwacja nie mogą być
przeprowadzane przez dzieci bez nadzoru.
Nigdy nie należy pozostawiać dzieci bez nadzoru zmateriałem opa-
kowaniowym. Istnieje niebezpieczeństwo uduszenia się materiałem

19 PL
opakowaniowym. Dzieci często nie zdają sobie sprawy zniebezpie-
czeństw.
Podczas montażu należy pilnować, aby wpobliżu miejsca pracy
nie było dzieci. W zestawie znajduje się wiele śrub i innych małych
elementów. W razie ich połknięcia lub przedostania się do dróg
oddechowych mogą stanowić zagrożenie dla życia.
W razie stwierdzenia jakichkolwiek uszkodzeń nie używać urządzenia!
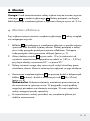
Wskazówki dotyczące bezpieczeństwa
użytkowania akumulatorów
ZAGROŻENIE ŻYCIA! Akumulatory nie powinny
dostać się w ręce dzieci. W przypadku połknięcia należy natychmiast
udać się do lekarza!
OSTROŻNIE! NIEBEZPIECZEŃSTWO WYBUCHU!
Nigdy nie należy wrzucać akumulatorów do ognia lub wody!
Należy chronić akumulatory przed obciążeniem mechanicznym!
Nie stosować baterii jednorazowego użytku.
Akumulatorów nie należy zwierać ani / lub otwierać.
Niebezpieczeństwo szkód materialnych
Używać wyłącznie zalecanego rodzaju akumulatorów!
Podczas wkładania baterii do urządzenia należy zwrócić uwagę na
prawidłowe ułożenie biegunów! Prawidłowe ułożenie jest oznaczone
wkomorze baterii!
Wrazie potrzeby przed włożeniem baterii oczyścić ich styki istyki
urządzenia!
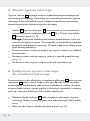
Działanie
Ogniwo solarne 6 przetwarza energię świetlną słońca na energię elek-
tryczną. Przez podłączony kabel zasilający ogniwo ładuje akumulatory
wbudowane wkomorze akumulatorów 10 .

20 PL
Akumulatory magazynują energię dostarczoną przez ogniwo solarne.
Całkowicie naładowane akumulatory dostarczają przy ustawieniu „PIR”
energię na ok. 2 godziny świecenia, przy ustawieniu „AUTO” – na około
8 godzin.
Całkowite naładowanie zupełnie rozładowanych akumulatorów trwa w
lecie przy regularnym nasłonecznieniu około 2 do 4 dni. Akumulatory
muszą być naładowane przed pierwszym uruchomieniem lampy (zobacz
„Ładowanie akumulatorów”).
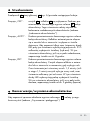
Przed pierwszym uruchomieniem
Ładowanie akumulatorów
Uwaga: Akumulatory wbudowane w urządzeniu głównym 1 są w chwili
dostawy naładowane. Wczasie transportu od producenta do punktu
sprzedaży mogą jednakże częściowo się rozładować. Dlatego należy na-
ładować akumulatory przed pierwszym uruchomieniem. Pierwsze ładowa-
nie trwa w lecie przy regularnym nasłonecznieniu co najmniej jeden dzień.
Ustawić przełącznik 5 wpozycji „OFF”.
Wskazówka: Przy regularnym nasłonecznieniu (w zależności od pory
roku) rozładowane akumulatory powinny naładować się wciągu od dwóch
do dziesięciu dni.
Wskazówka: Wbudowany regulator ładowania reflektora solarnego
LED zapobiega przeładowaniu akumulatorów.
Należy wymienić akumulatory, jeśli moc lampy nie poprawia się po ich
naładowaniu (rys. E).
Strona jest ładowana ...
Strona jest ładowana ...
Strona jest ładowana ...
Strona jest ładowana ...
Strona jest ładowana ...
Strona jest ładowana ...
Strona jest ładowana ...
Strona jest ładowana ...
Strona jest ładowana ...
Strona jest ładowana ...
Strona jest ładowana ...
Strona jest ładowana ...
Strona jest ładowana ...
Strona jest ładowana ...
Strona jest ładowana ...
Strona jest ładowana ...
Strona jest ładowana ...
Strona jest ładowana ...
Strona jest ładowana ...
Strona jest ładowana ...
Strona jest ładowana ...
Strona jest ładowana ...
Strona jest ładowana ...
Strona jest ładowana ...
Strona jest ładowana ...
Strona jest ładowana ...
Strona jest ładowana ...
Strona jest ładowana ...
Strona jest ładowana ...
Strona jest ładowana ...
Strona jest ładowana ...
Strona jest ładowana ...
Strona jest ładowana ...
Strona jest ładowana ...
Strona jest ładowana ...
Strona jest ładowana ...
Strona jest ładowana ...
Strona jest ładowana ...
Strona jest ładowana ...
Strona jest ładowana ...
Strona jest ładowana ...
Strona jest ładowana ...
Strona jest ładowana ...
Strona jest ładowana ...
Strona jest ładowana ...
Strona jest ładowana ...
Strona jest ładowana ...
Strona jest ładowana ...
Strona jest ładowana ...
Strona jest ładowana ...
Strona jest ładowana ...
Strona jest ładowana ...
Strona jest ładowana ...
Strona jest ładowana ...
Strona jest ładowana ...
Strona jest ładowana ...
Strona jest ładowana ...
Strona jest ładowana ...
Strona jest ładowana ...
Strona jest ładowana ...
Strona jest ładowana ...
Strona jest ładowana ...
Strona jest ładowana ...
Strona jest ładowana ...
Strona jest ładowana ...
-
 1
1
-
 2
2
-
 3
3
-
 4
4
-
 5
5
-
 6
6
-
 7
7
-
 8
8
-
 9
9
-
 10
10
-
 11
11
-
 12
12
-
 13
13
-
 14
14
-
 15
15
-
 16
16
-
 17
17
-
 18
18
-
 19
19
-
 20
20
-
 21
21
-
 22
22
-
 23
23
-
 24
24
-
 25
25
-
 26
26
-
 27
27
-
 28
28
-
 29
29
-
 30
30
-
 31
31
-
 32
32
-
 33
33
-
 34
34
-
 35
35
-
 36
36
-
 37
37
-
 38
38
-
 39
39
-
 40
40
-
 41
41
-
 42
42
-
 43
43
-
 44
44
-
 45
45
-
 46
46
-
 47
47
-
 48
48
-
 49
49
-
 50
50
-
 51
51
-
 52
52
-
 53
53
-
 54
54
-
 55
55
-
 56
56
-
 57
57
-
 58
58
-
 59
59
-
 60
60
-
 61
61
-
 62
62
-
 63
63
-
 64
64
-
 65
65
-
 66
66
-
 67
67
-
 68
68
-
 69
69
-
 70
70
-
 71
71
-
 72
72
-
 73
73
-
 74
74
-
 75
75
-
 76
76
-
 77
77
-
 78
78
-
 79
79
-
 80
80
-
 81
81
-
 82
82
-
 83
83
-
 84
84
-
 85
85


w innych językach
- slovenčina: LIVARNO 97740 Návod na obsluhu
Powiązane dokumenty
-
LIVARNO 331371 Instrukcja obsługi
-
-
-
-
-
-
-
-
-