Bestway Hydrium Steel Pool Instrukcja obsługi
- Typ
- Instrukcja obsługi

www.bestwaycorp.com
Visit Bestway YouTube channel
S-S-005666

2
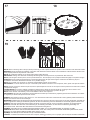
Attention!
Before setting up your pool
ensure your selected location is
completely firm and level.
Assemble the pool on the
provided ground cloth.
Atenção!
Antes de montar a sua piscina
certifique-se que a localização
que seleccionou está
completamente firme e nivelada.
Monte a piscina sobre o pano
de pavimento fornecido.
¡Atención!
Antes de instalar la piscina
asegúrese de que la
ubicación elegida esté
nivelada. Monte la piscina
sobre la esterilla de suelo
incluida.
Huomaa!
Varmista ennen uima-altaan
asentamista, että altaan alusta
on täysin tasainen ja luja. Kokoa
allas toimitukseen sisältyvän
pohjakankaan päälle.
Attenzione!
Prima di montare la piscina,
accertarsi che il luogo scelto
per l’installazione sia
compatto e in piano.
Assemblare la piscina sul
telo in dotazione.
ΠΡΟΣΟΧΉ!
ΠΡΙΝ ΣΤΉΣΕΤΕ ΤΗΝ ΠΙΣΊΝΑ
ΣΑΣ, ΒΕΒΑΙΩΘΕΊΤΕ ΌΤΙ Η
ΘΈΣΗ ΠΟΥ ΕΠΙΛΈΞΑΤΕ ΕΊΝΑΙ
ΣΤΈΡΕΗ ΚΑΙ ΕΠΊΠΕΔΗ.
ΣΥΝΑΡΜΟΛΟΓΉΣΤΕ ΤΗΝ
ΠΙΣΊΝΑ ΠΆΝΩ ΣΤΟ
ΠΑΡΕΧΌΜΕΝΟ ΓΕΩΎΦΑΣΜΑ.
Внимание!
Прежде чем устанавливать
бассейн, убедитесь, что
выбранное вами место
твердое и совершенно
ровное. Сборку бассейна
выполняйте на земле на
подложке, входящей в
комплект.
Attention!
Avant de monter votre piscine,
assurez-vous que l’emplacement
choisi est parfaitement ferme et
plat. Assemblez la piscine sur le
tapis de sol fourni.
Beakta följande!
Innan du sätter upp din pool
måste du försäkra dig om att
platsen är fullständigt fast och
jämn. Montera ihop den på det
tillhandahållna markskyddet.
Figyelem!
A medence felállítása előtt
győződjön meg arról, hogy a
kiválasztott helyszín megfelelő
keménységű és vízszintes
felszínű. Szerelje össze a
medencét a mellékelt talajtakaró
textilen.
Ważne!
Przed złożeniem basenu
upewnij się, że podłoże jest
twarde i równe. Basen
montuj na dołączonej do
zestawu płachcie.
Achtung!
Vergewissern Sie sich, dass der
gewählte Untergrund absolut
fest und eben ist, bevor Sie den
Pool aufbauen. Montieren Sie
den Pool auf dem mitgelieferten
Bodentuch.
Aandacht!
Verzeker u, alvorens uw
zwembad te monteren, dat de
door u gekozen plaats volledig
vlak en stevig is. Monteer het
zwembad op het
meegeleverde grondzeil.
S-S-005666

3
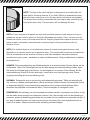
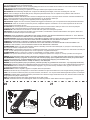
NOTE: The liner of the steel wall pool is designed to be smaller than the
steel wall for technical reasons. If you find it difficult to assemble the liner,
place the liner under the sun for one hour which will make it more pliable.
You should then be able to assemble the liner step by step, stretching it by
hand at the same time. This procedure will not damage the liner.
NOTA: O forro da piscina de parede em aço está concebido para ser mais pequeno do que a
parede em aço por motivos técnicos. Se sentir dificuldade em montar o forro, coloque-o ao sol
durante uma hora, o que o irá tornar mais flexível. Depois já deverá ser capaz de montar o forro
passo a passo, esticando-o manualmente ao mesmo tempo. Este procedimento não irá
danificar o forro.
NOTA: Por motivos técnicos, el revestimiento interno de la piscina de pared de acero está
diseñado en un tamaño menor que la pared de acero. Si le resulta difícil montar el revestimiento,
sitúe el revestimiento al sol durante una hora y será más manejable. Así podrá montar el
revestimiento paso a paso, estirándolo a mano simultáneamente. Este procedimiento no dañará
el revestimiento.
HINWEIS:
Die Innenverkleidung des Stahlwandpools ist aus technischen Gründen kleiner als die
Außenwand. Wenn Sie Schwierigkeiten bei der Anbringung der Innenverkleidung haben, legen
Sie diese eine Stunde lang in die Sonne, um sie biegsamer zu machen. Dann können Sie die
Innenverkleidung Schritt für Schritt anbringen, indem diese von Hand gezogen wird. Dieser
Vorgang beschädigt die Innenverkleidung nicht.
HUOMAA:
Terässeinän vuoren on tarkoitus olla terässeinää pienempi. Tähän on teknisiä syitä.
Jos vuorta on vaikeaa saada paikalleen, jätä se aurinkoon yhdeksi tunniksi. Lämmennyttä vuorta
on helpompi käsitellä. Vuoren asettaminen paikoilleen tulisi onnistua tämän jälkeen vähän
kerrallaan venyttämällä vuorta samalla käsin. Tämä toimenpide ei vahingoita vuorta.
OPMERKING: De bekleding van het zwembad met stalen wanden is ontworpen om kleiner te zijn
dan de stalen wand omwille van technische redenen. Als u het moeilijk vindt om de bekleding te
monteren, plaats de bekleding gedurende één uur onder de zon waardoor ze soepelder zal zijn. U
zou dan de bekleding stap voor stap moeten kunnen monteren door deze tegelijkertijd met de
hand uit te rekken. Deze procedure zal de bekleding niet beschadigen.
S-S-005666

NOTA:
Il rivestimento della piscina con pareti in acciaio è progettato per essere più piccolo delle pareti in
acciaio per motivi tecnici. Se montare il rivestimento risulta difficile, posizionare il rivestimento sotto il sole per
un'ora in modo che diventi più flessibile. Inoltre, montare il rivestimento passo dopo passo, tirandolo
contemporaneamente con le mani. Questa procedura non danneggia il rivestimento.
REMARQUE:
La bâche de la piscine à paroi en acier est conçue pour être plus petite que la paroi en acier
pour des raisons techniques. Si vous avez du mal à monter la bâche, placez-la en plein soleil pendant une
heure, elle sera alors plus facile à plier. Vous devriez être alors en mesure de monter la bâche pas à pas, tout
en tirant dessus manuellement. Cette procédure n’abîmera pas la bâche.
ΣΗΜΕΙΩΣΗ:
Η ΕΠΈΝΔΥΣΗ ΠΙΣΊΝΑΣ ΜΕ ΧΑΛΎΒΔΙΝΟ ΤΟΊΧΩΜΑ ΈΧΕΙ ΣΧΕΔΙΑΣΤΕΊ ΓΙΑ ΝΑ ΕΊΝΑΙ
ΜΙΚΡΌΤΕΡΗ ΑΠΌ ΤΟ ΧΑΛΎΒΔΙΝΟ ΤΟΊΧΩΜΑ ΓΙΑ ΤΕΧΝΙΚΟΎΣ ΛΌΓΟΥΣ. ΑΝ ΔΥΣΚΟΛΕΥΤΕΊΤΕ ΝΑ
ΣΥΝΑΡΜΟΛΟΓΉΣΕΤΕ ΤΗΝ ΕΠΈΝΔΥΣΗ, ΤΟΠΟΘΕΤΉΣΤΕ ΤΗΝ ΕΠΈΝΔΥΣΗ ΣΤΟΝ ΉΛΙΟ ΓΙΑ ΜΙΑ ΏΡΑ, ΚΆΤΙ
ΠΟΥ ΘΑ ΤΗΝ ΚΑΤΑΣΤΉΣΕΙ ΠΙΟ ΕΎΚΑΜΠΤΗ. ΣΤΗ ΣΥΝΈΧΕΙΑ ΘΑ ΠΡΈΠΕΙ ΝΑ ΜΠΟΡΈΣΕΤΕ ΝΑ
ΣΥΝΑΡΜΟΛΟΓΉΣΕΤΕ ΤΗΝ ΕΠΈΝΔΥΣΗ ΒΉΜΑ ΠΡΟΣ ΒΉΜΑ, ΤΑΥΤΌΧΡΟΝΑ ΤΕΝΤΏΝΟΝΤΆΣ ΤΗΝ ΜΕ ΤΟ
ΧΈΡΙ. ΑΥΤΉ Η ΔΙΑΔΙΚΑΣΊΑ ΔΕ ΘΑ ΠΡΟΚΑΛΈΣΕΙ ΖΗΜΙΆ ΣΤΗΝ ΕΠΈΝΔΥΣΗ.
ПРИМЕЧАНИЕ.
По техническим причинам лайнер стальной стенки бассейна рассчитан так, что его
размер меньше, чем стальная стенка. Если вам трудно натянуть лайнер, положите его на солнце на
один час, в результате чего он станет более пластичным. После этого вы сможете постепенно установить
лайнер, одновременно растягивая его руками. Эта процедура не приведет к повреждению лайнера.
UWAGA:
Ze względów technicznych wkładka do stalowej ściany basenu jest mniejsza niż stalowa ściana.
Jeśli wystąpią trudności w dopasowaniu wkładki, wkładkę należy wystawić na godzinę na działanie promieni
słonecznych, aby stała się bardziej elastyczna. Potem należy stopniowo dopasowywać wkładkę, jednocześnie
rozciągając ją za pomocą ręki. Taki sposób postępowania nie spowoduje uszkodzenia wkładki.
MEGJEGYZÉS:
Az acélfalú medence bevonatát műszaki okokból az acélfalnál kisebb méretűre tervezték.
Ha nehezére esik a bevonat összeépítése, tegye ki egy órára a napra, hogy hajlíthatóbbra puhuljon. Ezt
követően az anyagot kézzel nyújtva, lépésenként összeépítheti a bevonatot. Ez az eljárás nem tesz kárt a
bevonatban.
OBS!
Stålväggspoolens liner är utformad för att vara mindre än stålväggen av tekniska skäl. Om du tycker att
det är svårt att montera linern, lägg den då i solen under en timme vilket gör den mer böjbar. Därefter bör du
kunna montera linern stegvis, sträck den samtidigt för hand. Den här proceduren skadar inte linern.
4
S-S-005666

Carefully read, understand, and follow all information
in this user manual before installing and using the
swimming pool. These warnings, instructions, and safety
guidelines address some common risks of water recreation, but they cannot cover all risks and
dangers in all cases. Always use caution, common sense, and good judgment when enjoying
any water activity. Retain this information for future use.
Non Swimmers safety
- Continuous, active, and vigilant supervision of weak swimmers and non-swimmers by a
competent adult is required at all times (remembering that children under five are at the
highest risk of drowning).
- Designate a competent adult to supervise the pool each time it is being used.
- Weak swimmers or non-swimmers should wear personal protection equipment when using
the pool.
- When the pool is not in use, or unsupervised, remove all toys from the swimming pool and
its surrounding to avoid attracting children to the pool.
Safety devices
- In order to prevent children from drowning, it is recommended to secure the access to the
pool with a protection device. In order to prevent children climbing from the inlet and outlet
valve, it is recommended to install a barrier (and secure all doors and windows, where
applicable) to prevent unauthorized access to the swimming pool.
- Barriers, pool covers, pool alarms, or similar safety devices are helpful aids, but they are
not substitutes for continuous and competent adult supervision.
Safety equipment
- It is recommended to keep rescue equipment (e.g. a ring buoy) by the pool.
- Keep a working phone and a list of emergency phone numbers near the pool.
Safe use of the pool
- Encourage all users especially children to learn how to swim.
- Learn Basic Life Support (Cardiopulmonary Resuscitation - CPR) and refresh this
knowledge regularly. This can make a life-saving difference in the event of an emergency.
- Instruct all pool users, including children, what to do in case of an emergency.
- Never dive into any shallow body of water. This can lead to serious injury or death.
- Do not use the swimming pool when using alcohol or medication that may impair your
ability to safely use the pool.
- When pool covers are used, remove them completely from the water surface before
entering the pool.
- Protect pool occupants from water related illnesses by keeping the pool water treated and
practicing good hygiene. Consult the water treatment guidelines in the user’s manual.
- Store chemicals (e.g. water treatment, cleaning or disinfection products) out of the reach of
children.
- Use the signage as outlined below. Signage is to be displayed in a prominent position
within 2m of the pool.
- Keep children under supervision in the aquatic environment. No diving.
- Removable ladders shall be placed on a horizontal surface.
- Irrespective of materials used for swimming pool construction, accessible surfaces have to
be checked regularly to avoid injuries.
- Regularly monitor bolts and screws; splinters or any sharp edges to avoid injuries.
ATTENTION: Do not leave the drained pool outside. The empty pool is liable to being
deformed and/or displaced due to wind.
- If have a filter pump, refer to the pump’s manual for instructions.
WARNING! The pump cannot be used while people are inside the pool!
- If have a ladder, refer to the ladder’s manual for instructions.
WARNING! The use of a swimming pool implies compliance with the safety instructions
described in the operating and maintenance guide. In order to prevent drowning or other
serious injuries, pay particular attention to the possibility of unexpected access to the
swimming pool by children under 5 years by securing the access to it, and, during the
bathing period, keep them under constant adult supervision.
NOTE: When installing the pool, the position of skimmer should be opposite to the main
wind direction. The placement of the ladder in the pool shall be away from the skimmer.
Please read carefully and keep for future reference.
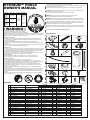
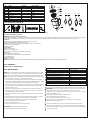
PART LIST
Parts Reference
01 02 03
04 05 06
07 08
09
10
11
1312
14 15 16
17 18
19 20
5
S-S-005666
PP P6743 P6743 P6743
Coated Steel P6744 P6745 P61233
Stainless Steel 304 P6746 P6746 P6746
Steel P6747 P6747 P6747
Stainless Steel 304 P6748 P6748 P6748
P6762 P6762 P6762
F6H202 F6H202 F6H202
PP P6990 P6990 P6990
PVC P6750 P6751 P61235
PVC 56284ASS17 56285ASS17 56384ASS17
P6756 P6756 P6756
Coated Steel P61452 P61453 P61454
Coated Steel P6757 P6757 P6757
Steel P6761 P6761 P6761
PP P6759 P6759 P6759
Stainless Steel 304 P61491 P61491 P61491
P6(H1)1229 P6(H1)1229 P6(H1)1229
P6H1317
P61473
P6H1317
P61473
P6H1317
P61473
Plastic
EPE
No. Name Material
10’ x 48’’
Spare Part No.Qty Qty Qty
12’ x 48’’
Spare Part No.
15’ x 48’’
Spare Part No.
1
2
3
4
5
6
7
8
9
10
11
12
13
14
15
16
17
18
19
20
8
8
122
8
26
1
2
32
16
1
1
1
8
8
8
16
1
1
20
8
8
8
122
8
26
1
2
32
16
1
1
1
8
8
8
16
1
1
20
8
10
10
146
10
26
1
2
40
20
1
1
1
10
10
10
20
1
1
20
10
Upper Joint Protector
Top Platform
M6x11 Bolt
Top Metal Piece
M6 Nut
Skimmer
Hose Adaptor
Rail Connector
Rail
Liner
3M Self-adhesive tape
Steel wall
Pool Vertical Support
Bottom Metal Piece
Bottom Joint Protector
ST4x14 Screw
Control Valve
Pool Inlet Strainer
Clips
Foam protector
! WARNING !
DimensionItem No. Kit Type
Aboveground
swimming
pool kit
Filtration
System
Ladder
Ground
Cloth
Accessories
3.00 m x 1.20 m
(10' x 48")
3.60 m x 1.20 m
(12' x 48")
4.60 m x 1.20 m
(15' x 48")
#56566
#56563
#56567
#56564
#56574
#56571
#56575
#56572
#56384
#56382
#56385
#56383
HYDRIUM
TM
POOLS
OWNER’S MANUAL

001
002
003
004 005 006 007 008
009
010
Tools Required (not included):
Installation usually takes approximately 2 hours with 2-3 people excluding earthworks and filling.
PART LIST OF SKIMMER
Cover P6991
Basket P6776
Skimmer P6777
Weir P6992
Gasket P6993
Face plate P6780
M5x22 screw /
O-ring /
Plug P6813
001
002
003
004
005
006
007
008
009
010
1
1
1
1
1
1
1
12
1
1
NO.
Hose attachment
QuantityName Spare Part No.
P6774
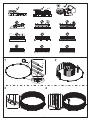
POOL ASSEMBLY
Please refer to diagram steps.
POOL MAINTENANCE
Warning: If you do not adhere to the maintenance guidelines covered herein, your health
might be at risk, especially that of children. Pool water treatment is essential for the safety of
the users. Using chemicals inappropriately will cause property damage and personal injury.
NOTE: The pump is used to circulate the water and to filter small particles. In order to keep
your pool water clean and hygienic, you must also add chemicals.
1. It is recommended not to fill the pool with catchment water, drilling water, or drainage
well water: these waters generally contain polluted organic substances including nitrates
and phosphates. Filling pools with water from the public network is advised.
2. Always keep your pool clean and apply the correct pool chemicals. Unsanitary water is a
serious health hazard. It is recommended to use disinfectant, flocculant, acid or alkali
chemicals to treat your pool.
3. Clean the PVC liner regularly with non-abrasive brushes or a pool vacuum cleaner.
4. Throughout the season, the water filtration system must run long enough each day to
clean the entire volume of water in the pool.
5. Check the filter cartridge (or sand in a sand filter) regularly and replace dirty cartridges
(or sand).
6. Regularly check the screws, bolts and all the metal parts for rust. Replace if necessary.
7. If it rains, check that the water level is not higher than the specified level.
If water exceeds the specified levels, drain the pool to the specified level.
8. Do not use the pump when the pool is in use.
9. Cover the pool when not in use.
10. For pool water treatment, the pH value is very important.
ATTENTION: Do not leave the drained pool outside.
The following parameters ensure good quality water
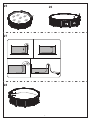
WINTERIZATION
If you do not want to dismantle the pool in winter, please observe the following instructions:
IMPORTANT: Do not drain all of the pool water. If you do so, the pool may be damaged
by strong wind. Drain the water to 10cm below the inlet valve on the pool wall.
1. Drain the water to 10cm below the inlet valve on the pool wall. You can use a pump or a
garden hose (Diagrams 27, 28).
2. Treat the pool water with a suitable chemical product.
3. Remove the filtration system from the pool.
You can leave the inlets/outlets attached to the pool.
4. Also remove any other pool accessories and store them in a dry and cool place.
5. Protect the pool with the pool cover.
If you want to dismantle the pool in winter, please observe the following instructions:
1. Drain the pool with a garden hose, or use a drain pump to empty the pool (Diagram 27).
2. Clean all pool parts with a sponge and soap with a neutral pH. Dry them and tidy them away
in a dry and clean place.
SELECTING A SUITABLE LOCATION
WARNING: Leveling is extremely important.
Carefully select the location for your new pool. This is the most important decision you will have to make to ensure the safety and success of your pool’s construction. A poorly-chosen
location could cause problems in the future that may cause injury, death or financial loss. Read carefully the checklist below when selecting where to set up your pool.
Acceptable:
Flat, level, firm and dry ground with easy access to all sides of the pool
Exposed to direct sunlight, preferable in the morning
Safe access to electricity for running the filter pump and other pool accessories
Easy to access to a water source
Protection from wind
Unacceptable:
Sloping, uneven ground
Sandy, rocky or soggy ground
Close to wooden construction (e.g. pergolas and decking)
Next to trees
Overhead wires and clotheslines
Drains, electric wires or gas pipelines underneath the site
Poor or little drainage
High flood risk locations
High wind conditions
NOTE: Remove the higher ground rather than filling the low laying ground. All grass and sod under entire pool area must be removed.
Parameters
Water clarity
Colour of the water
Turbidity in FNU/NTU
Nitrate concentration above that of fill water in mg/l
Total organic carbon (TOC) in mg/l
Redox potential against Ag/AgCI 3,5 m KCl in mV
pH value
Free active chlorine (without cyanuric acid) in mg/l
Free chlorine used in combination with cyanuric acid in mg/l
Cyanuric acid in mg/l
Combined chlorine in mg/l
Values
clear view of the pool bottom
no
colour should be observed
max. 1,5 (preferably less than 0,5)
max. 20
max. 4,0
min. 650
6,8 to 7,6
0,3 to 1,5
1,0 to 3,0
max 100
max 0,5 (preferably close to 0,0 mg/l)
6
S-S-005666

0°
1.5cm
1
1
2
3
1~1.5cm
#08
#09
#14
2
3 4
31
S-S-005666

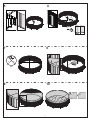
5
7 8
109
#03
#05
#11
#20
6
A=B
A B
#10
#19
32
S-S-005666

11 12
13
14
15 16
#09
#08
#09
1
2
3
1~1.5CM
#04
#03#13
#04
#02
#03
#15
#03
33
S-S-005666

34
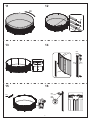
17
19
18
#01
#16
#01
6cm
A
B
C
D
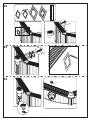
NOTE:
Before connecting valve to the pool, fill the pool leaving 5 - 6cm of space between the position of the connection valve and water surface.
WARNING! Never permanently install the connection valve before the water is within a few centimeters of them because the liner has
to be properly taut from the pressure of the water.
NOTE: Be careful the splinters or any sharp edges when cutting the pool.
IMPORTANT: Cutting more liner than necessary will damage and void the pool liner, so please trim with extra care.
NOTA:
Antes de ligar a válvula à piscina, encha a piscina deixando 5 - 6cm de espaço entre a posição da válvula de ligação e a superfície da água.
ATENÇÃO! Nunca instale permanentemente a válvula de ligação antes da água estar a alguns centímetros de distância, porque o
revestimento deve estar devidamente esticado com a pressão da água.
NOTA: Tome cuidado com as lascas ou quaisquer arestas afiadas quando cortar a piscina.
IMPORTANTE: O corte de mais forro do que o necessário pode danificar e esvaziar o forro da piscina, assim, apare com especial cuidado.
NOTA: Antes de conectar la válvula a la piscina, llene la piscina dejando unos 5/6 cm de espacio entre la posición de la válvula de conexión
y la superficie del agua.
¡ADVERTENCIA! No proceda a realizar la instalación definitiva de la válvula de conexión antes de que el agua se encuentre a unos
centímetros de ellos, ya que el revestimiento debe estar perfectamente estirado bajo la presión del agua.
NOTA: Preste atención a las astillas y a los bordes afilados cuando corte la piscina.
IMPORTANTE: Recortar más revestimiento del estrictamente necesario provocará daños y dejará la garantía del revestimiento sin validez.
Le rogamos que extreme las precauciones al recortar.
HINWEIS:
Füllen Sie den Pool bis zu einer Höhe von 5 - 6cm zwischen der Position des Anschlussventils und der (späteren) Wasseroberfläche mit
Wasser, bevor Sie das Ventil am Pool befestigen.
WARNUNG! Installieren Sie das Anschlussventil nie dauerhaft, bevor der Pool nicht bis zu einer Höhe von einigen Zentimetern unterhalb der
hierfür vorgesehenen Öffnungen mit Wasser gefüllt ist, da die Innenverkleidung durch den Wasserdruck erst korrekt gespannt werden muss.
HINWEIS: Seien Sie vorsichtig beim Zerschneiden des Pools und nehmen Sie sich in Acht vor Spänen, Spreißeln und scharfen Kanten.
WICHTIG: Schneiden Sie nicht mehr Innenverkleidung ab, als unbedingt erforderlich, da dies die Innenverkleidung beschädigt und
unbrauchbar macht. Gehen Sie daher beim Entfernen mit besonderer Sorgfalt vor.
HUOMAA: Täytä allas ennen venttiilin kytkemistä altaaseen jättäen 5‒6 cm tilaa liitäntäventtiilin ja vedenpinnan välille.
VAROITUS! Älä koskaan asenna liitäntäventtiiliä kiinteästi, ennen kuin veden pinta on muutaman senttimetrin päässä niistä, koska
allasmuovi on ensin saatava riittävän kireälle veden paineen avulla.
HUOMAA: Varo tikkuja tai muita teräviä reunoja, kun leikkaat allasta.
TÄRKEÄÄ: Jos allasmuovia leikataan enemmän kuin on tarpeen, allasmuovi vaurioituu ja se on hyödytön, joten ole erityisen huolellinen leikatessasi.
S-S-005666

35
20 21
OPMERKING: Vooraleer de klep te verbinden met het zwembad, vul het zwembad en laat daarbij 5 - 6 cm ruimte tussen de positie
van de aansluitingsklep en het wateroppervlak.
WAARSCHUWING! Installeer nooit de aansluitingsklep permanent voor het water binnen enkele cm ervan staat omdat de bekleding
strak genoeg moet zijn door de druk van het water.
OPMERKING: Wees voorzichtig voor splinters of scherpe randen bij het snijden van het zwembad.
BELANGRIJK: Meer bekleding afsnijden dan nodig zal de bekleding beschadigen, wees dus voorzichtig als u dit doet.
NOTA: Prima di collegare la valvola alla piscina, riempire la piscina lasciando 5-6 cm di spazio fra la posizione della valvola di
collegamento e la superficie dell'acqua.
AVVERTENZA! Installare definitivamente la valvola di collegamento solo dopo che l'acqua arriva ad alcuni centimetri di distanza da
essa, poiché il rivestimento deve essere teso adeguatamente con la pressione dell'acqua.
NOTA: Fare attenzione a schegge o bordi appuntiti quando si taglia la piscina.
IMPORTANTE: Tagliare in modo eccessivo potrebbe danneggiare il rivestimento, per cui l'operazione richiede particolare attenzione.
REMARQUE: Avant de raccorder la vanne à la piscine, remplissez la piscine en laissant 5 à 6 cm entre la position de la vanne de
communication et la surface de l’eau.
ATTENTION! Ne montez jamais de manière permanente la vanne de communication avant que l’eau ne se trouve à quelques
centimètres d'elle car la bâche doit être correctement tendue par la pression de l'eau.
REMARQUE: Faites attention aux écailles ou à toute arête vive quand vous découpez la piscine.
IMPORTANT: Si vous découpez plus de bâche que le nécessaire, cela abîmera et rendra inutile la bâche de la piscine, faites donc
particulièrement attention lorsque vous la découpez.
ΣΗΜΕΙΩΣΗ: ΠΡΙΝ ΣΥΝΔΕΣΕΤΕ ΤΗ ΒΑΛΒΙΔΑ ΣΤΗΝ ΠΙΣΙΝΑ, ΓΕΜΙΣΤΕ ΤΗΝ ΠΙΣΙΝΑ ΑΦΗΝΟΝΤΑΣ ΑΠΟΣΤΑΣΗ 5 - 6εκατ. ΜΕΤΑΞΥ
ΤΗΣ ΘΕΣΗΣ ΤΗΣ ΒΑΛΒΙΔΑΣ ΣΥΝΔΕΣΗΣ ΚΑΙ ΤΗΣ ΕΠΙΦΑΝΕΙΑΣ ΤΟΥ ΝΕΡΟΥ.
ΠΡΟΕΙΔΟΠΟΙΗΣΗ! ΠΟΤΕ ΜΗΝ ΤΟΠΟΘΕΤΕΙΤΕ ΤΗ ΒΑΛΒΙΔΑ ΣΥΝΔΕΣΗΣ ΠΡΙΝ ΤΟ ΝΕΡΟ ΦΤΑΣΕΙ ΕΝΤΟΣ ΜΕΡΙΚΩΝ ΕΚΑΤΟΣΤΩΝ
ΑΠΟ ΑΥΤΑ, ΔΙΟΤΙ Η ΕΠΕΝΔΥΣΗ ΠΡΕΠΕΙ ΝΑ ΕΙΝΑΙ ΣΩΣΤΑ ΤΕΝΤΩΜΕΝΗ ΑΠΟ ΤΗΝ ΠΙΕΣΗ ΤΟΥ ΝΕΡΟΥ.
ΣΗΜΕΙΩΣΗ: ΠΡΟΣΕΧΕΤΕ ΓΙΑ ΑΚΙΔΕΣ Η ΑΙΧΜΗΡΕΣ ΑΚΜΕΣ ΟΤΑΝ ΚΟΒΕΤΕ ΤΗΝ ΠΙΣΙΝΑ.
ΣΗΜΑΝΤΙΚΟ: Η ΚΟΠΗ ΠΕΡΙΣΣΟΤΕΡΗΣ ΕΠΕΝΔΥΣΗΣ ΑΠΟ ΟΣΟ ΧΡΕΙΑΖΕΤΑΙ ΘΑ ΚΑΤΑΣΤΡΕΨΕΙ ΚΑΙ ΘΑ ΑΚΥΡΩΣΕΙ ΤΗΝ
ΕΠΕΝΔΥΣΗ ΤΗΣ ΠΙΣΙΝΑΣ, ΓΙΑ ΑΥΤΟ ΠΑΡΑΚΑΛΟΥΜΕ ΚΟΨΤΕ ΜΕ ΜΕΓΑΛΗ ΠΡΟΣΟΧΗ.
ПРИМЕЧАНИЕ: Перед тем, как присоединить клапан к бассейну, наполните бассейн водой, не доходя 5-6 сантиметров до
места расположения соединительного клапана.
ВНИМАНИЕ! Не закрепляйте окончательно соединительный клапан, пока вода не будет находиться в нескольких сантиметрах
от них, так как чаша должна расправиться и плотно прилегать под давлением воды.
ПРИМЕЧАНИЕ: Будьте осторожны и следите за обломками и острыми углами, отрезая чашу.
ВАЖНО: Если отрезать больше чаши, чем нужно, это может повредить и привести ее в негодность, поэтому отрезайте очень аккуратно.
UWAGA:
Przed podłączeniem zaworu do basenu napełnij basen pozostawiając odstęp 5 – 6 cm między położeniem zaworu łączącego a powierzchnią wody.
OSTRZEŻENIE! W żadnym przypadku nie montuj na stałe zaworu łączącego przed napełnieniem basenu wodą do wysokości kilku
centymetrów poniżej niego, ponieważ wkładka basenu musi się odpowiednio naprężyć pod naciskiem wody.
UWAGA: Podczas przecinania basenu uważaj na zadziory i ostre krawędzie.
WAŻNE:
Nie przecinaj wykładziny więcej niż potrzeba, ponieważ spowoduje to jej uszkodzenie i zniszczenie – tnij z najwyższą ostrożnością.
MEGJEGYZÉS: A szelepnek a medencéhez csatlakoztatása előtt töltse fel a medencét vízzel úgy, hogy a vízszint 5 vagy 6 cm-rel a csatlakozószelep helyzete alatt legyen.
FIGYELMEZTETÉS!
Soha ne szerelje be a csatlakozószelepet véglegesen, míg a víz nincs néhány centiméterre tőlük, ugyanis a bevonatot a víz
nyomásának megfelelően ki kell feszítenie.
MEGJEGYZÉS: A medence vágásakor vigyázzon a sorjákkal, illetve éles peremekkel.
FONTOS: Ha több bevonatot vág ki a szükségesnél, az a medencebevonat sérüléséhez és a garancia elvesztéséhez vezet, ezért a kivágást rendkívüli gondossággal végezze.
OBS! Innan du ansluter ventilerna till poolen, fyll poolen med vatten, men lämna 5 – 6cm utrymme mellan anslutningsventilens position och vattenytan.
VARNING! Installera aldrig anslutningsventilen permanent innan vattnet når några centimetrar under den, eftersom linern måsta vara
riktigt spänd men hjälp av vattnets tryck.
OBS! Var försiktig med flisor eller andra vassa kanter när du skär poolen.
VIKTIGT: Att skära mer liner än nödvändigt kan skada och förstöra poollinern. Skär därför med extra noggrannhet.
#17
#18
5~6CM
S-S-005666

22
23
24
008
#07
010
008
006
36
S-S-005666

25
26
28
27
15cm
10cm
37
S-S-005666

S-S-005666
38
Please choose the type of your pool:
REQUIRED INFORMATION - PLEASE WRITE THE SHIPPING ADDRESS
Please write the Batch Number and Item Code located near the drain valve
Name: Address:
Zip Code: Retailer:
Country: City:
Mobile: Telephone:
E-mail:
Item Code:Batch Number:
TO: Bestway
®
Service Department Date:
Date of purchase:
Customer Code Number:
Limited BESTWAY
®
Manufacturer’s Warranty
The product you have purchased comes with a limited warranty. Bestway
®
stands behind our quality guarantee and assures, through a replacement warranty, your product will
be free from manufacturer’s defects.
The following provision is only valid within the European member state countries. The legal regulation of Directive 1999/44/EC will not be effected by this BESTWAY limited
warranty.
To enact a warranty claim, this form must be completed and submitted with a copy of your receipt/purchase to your local Bestway After Sales Center. Before any claims can be
accepted, the Bestway After Sales Center may ask you to send a piece of the defective part to the center (e.g. a cut out of the production batch number / drain valve). Please
contact your local Bestway After Sales Center before sending any documents. They will provide full instructions of what is needed for your claim.
Bestway
®
is not responsible for economic loss due to water or chemical costs. Bestway
®
will not replace any products deemed to have been damaged due to negligence or
having been used outside of the owner’s manual guidelines.
Bestway’s warranty covers manufacturing defects discovered while unpacking the product or during use, within the limits of use and respectful of warnings and instructions
given within the user’s manual. This warranty applies only to products which have not been modified by any 3rd parties. The product must be stored and handled in accordance
with the technical recommendations.
The Limited Warranty is valid for the period indicated above. The warranty start date is the date of sale shown on the original receipt/purchase invoice.
FAX/E-MAIL/TEL: Please refer to your country according to the information found on the back cover or on our website: www.bestwaycorp.com.
Please provide your address details in full. Note: Incomplete address details will result in delayed shipments.
Bestway reserves the right to charge for redelivery of undelivered packages where the recipient is at fault.
Fax:
Batch Number
Item Code
Problem description
Item is torn / Leaking
Missing part (Please use the code for the missing part. This can be found in the owner's manual.)
Other (Please describe)
Faulty welding Faulty upper ring Faulty drain valve
Bestway reserves the right to request photographic evidence of defective parts, or to require sending the item for additional testing. In order to best assist you, we
request all information you provide to be complete.
FOR FAQ, MANUALS, VIDEOS OR SPARE PARTS, PLEASE VISIT OUR WEBSITE: www.bestwaycorp.com
VIDEOS ARE ALSO AVAILABLE ON OUR BESTWAY CHANNEL ON YOU TUBE: www.youtube.com/user/BestwayService
IMPORTANT: ONLY THE DAMAGED PART WILL BE REPLACED, NOT THE COMPLETE SET.
#BXXXXX
BWXXXXXXXXX
YYYY-MM-DD
-
 1
1
-
 2
2
-
 3
3
-
 4
4
-
 5
5
-
 6
6
-
 7
7
-
 8
8
-
 9
9
-
 10
10
-
 11
11
-
 12
12
-
 13
13
-
 14
14


Bestway Hydrium Steel Pool Instrukcja obsługi
- Typ
- Instrukcja obsługi
w innych językach
Powiązane artykuły
-
Bestway 57270 Instrukcja obsługi
-
Bestway 57448 Instrukcja obsługi
-
Bestway 56404 Steel Pro Power Pro Frame Pool 3.00m x 2.01m x 66cm Instrukcja obsługi
-
Bestway 56279 Instrukcja obsługi
-
Bestway 56629 Instrukcja obsługi
-
-
-
Bestway 2300 Instrukcja obsługi
-
Bestway Flowclear 58515 Instrukcja obsługi
-
Inne dokumenty
-
Steinbach SPEED-UP 010015 Instrukcja obsługi
-
Melissa 243-010 Instrukcja obsługi
-
Step2 Play & Shade Pool 716099 Instrukcja obsługi
-
 swim and fun MV15331222 Instrukcja obsługi
-
-
Danfoss Expansion Card Instrukcja instalacji
-
Pentair Pool Products LX 5000G Instrukcja instalacji
-
 swim fun 1940 Frisbee FX2 Pool Robot Instrukcja obsługi
-
-
Beckett Water Gardening RLU100 Instrukcja obsługi

