
Video Sound Collaboration System for Huddle Rooms
Quick Start Guide
Guide de démarrage rapide
Kurzanleitung
Guía de inicio rápido
クイックスタートガイド
快速入门指南
커잔 라이 퉁
Инструкция по началу работы
Always update the firmware to the latest version.
Please refer to the user’s manual that provides detailed information on how to
use the product.
You can download the latest firmware and user’s manual from the following
website:
https://uc.yamaha.com/products/video-sound-bar/huddle-room-system/
Assurer que vous utilisez toujours la version la plus récente.
Reportez-vous au manuel de l'utilisateur qui fournit des informations détaillées
sur l'utilisation du produit.
Vous pouvez télécharger le logiciel le plus récent et le manuel de l'utilisateur à
partir du site Web suivant:
https://uc.yamaha.com/products/video-sound-bar/huddle-room-system/
Bringen Sie die Firmware ihres Systems auf den neuesten Stand.
Vor benutzung lesen Sie bitte die Bedinungsanleitung um sich mit dem Gebrauch
des Gerätes vertraut zu machen.
Die Firmware und Bedienungsanleitung können von der folgenden Webseite
geladen werde:
https://uc.yamaha.com/products/video-sound-bar/huddle-room-system/
Actualice siempre el firmware a la versión más reciente.
Consulte el manual del usuario que proporciona información detallada sobre
cómo utilizar el producto.
Puede descargar el último firmware y manual del usuario desde el siguiente sitio
web:
https://uc.yamaha.com/products/video-sound-bar/huddle-room-system/
常にファームウェアを最新バージョンに更新してください。
製品の使用方法の詳細については、ユーザーズマニュアルを参照してください。
以下のWeb サイトから最新情報をダウンロードできます。
マニュアル
https://sound-solution.yamaha.com/download/
ファームウェア
https://uc.yamaha.com/products/video-sound-bar/huddle-room-system/
始终确保固件更新到最新版本。
请参阅用户手册中提供的有关如何使用产品的详细信息。
您可以从以下网站下载最新的固件和用户手册:
https://uc.yamaha.com/products/video-sound-bar/huddle-room-system/
Всегда обновляйте прошивку до последней версии.
Пожалуйста, обратитесь к руководству пользователя, которое содержит
подробную информацию о том, как использовать продукт.
Вы можете загрузить последнюю версию прошивки и руководство
пользователя со следующего веб-сайта:
https://uc.yamaha.com/products/video-sound-bar/huddle-room-system/
CS-700
RU
KO
CN
JP
SP
DE
FR
Video Conference System / Système de vidéoconférence
ビデオ会議システム
/ 视频电话会议终端
EN

2
English . . . . . . . . . . . . . . . . . . . . . . . . . . . . . . . . . . . . . . . . . . . . . . . . . . . 3
Français . . . . . . . . . . . . . . . . . . . . . . . . . . . . . . . . . . . . . . . . . . . . . . . . . 11
Deutsch . . . . . . . . . . . . . . . . . . . . . . . . . . . . . . . . . . . . . . . . . . . . . . . . . 19
Español . . . . . . . . . . . . . . . . . . . . . . . . . . . . . . . . . . . . . . . . . . . . . . . . . . 27
日本語 . . . . . . . . . . . . . . . . . . . . . . . . . . . . . . . . . . . . . . . . . . . . . . . . . . 35
中文 . . . . . . . . . . . . . . . . . . . . . . . . . . . . . . . . . . . . . . . . . . . . . . . . . . . 44
한국어. . . . . . . . . . . . . . . . . . . . . . . . . . . . . . . . . . . . . . . . . . . . . . . . . 52
Русский . . . . . . . . . . . . . . . . . . . . . . . . . . . . . . . . . . . . . . . . . . . . . . . . . 60
EEA Precaution Information . . . . . . . . . . . . . . . . . . . . . . . . . . . . . . . . 69
EEA Guarantee Information . . . . . . . . . . . . . . . . . . . . . . . . . . . . . . . . . 71
Simplified Declaration of Conformity . . . . . . . . . . . . . . . . . . . . . . . . . 73
List of International Distributors . . . . . . . . . . . . . . . . . . . . . . . . . . . . . 75

English
3
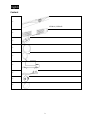
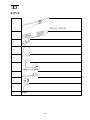
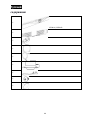
Content
1 x
CS700-AV, CS700-SP
1 x
4 x
1 x
1 x
1 x
1 x
2 x
2 x

English
4
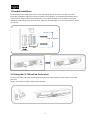
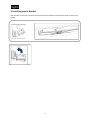
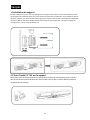
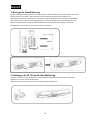
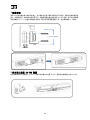
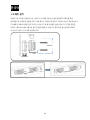
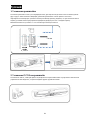
1. Bracket installation
Install the bracket with 4 appropriate screws on the wall, spacing two pair of screws as far apart as possible.
Ensure that the bracket is tight to the wall or the spacers to avoid vibration. If installed below the display ensure
that the distance is big enough to fit the CS-700 unit. You can adjust the depth of the installation by using the
appropriate number of spacers (0-2) on each side. Maximum mounting height is 2m / 6’ 8” from the floor. Always
use 4 screws.
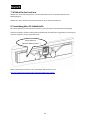
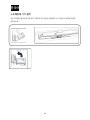
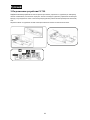
2. Placing the CS-700 unit on the bracket
Position the CS-700 in such a way that the two hooks in the front of the bracket fit into the cavities on the lower
part of the
CS-700. Ensure that the CS-700 is safely held by the hooks.
0x, 1x, 2x
≥ 3 ¾ in / 95 mm

English
5
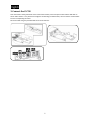
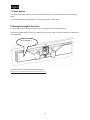
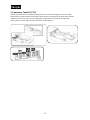
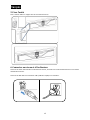
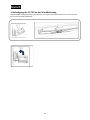
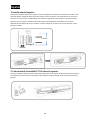
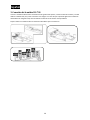
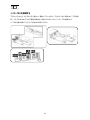
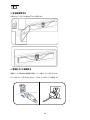
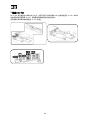
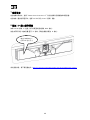
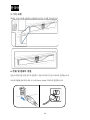
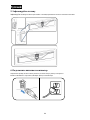
3. Connect the CS-700
Once the CS-700 is safely positioned on the hooks of the bracket, connect the power cable and the USB cable to
the CS-700 as shown. If it is planned to manage the CS-700 using the web browser, also connect the network cable
into the corresponding connector.
Secure the cable using the provided cable ties to the CS-700 unit.

English
6
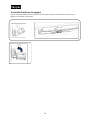
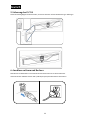
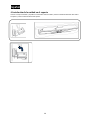
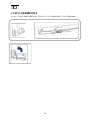
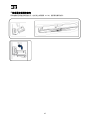
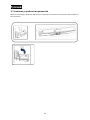
4. Installing unit in Bracket
Once all cables are correctly connected and secured, tilt the CS-700 back on the bracket and push it pack into the
bracket.

English
7
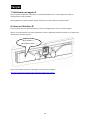
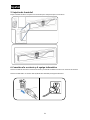
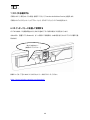
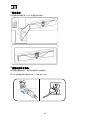
5. Secure unit
Secure the CS-700 unit in the bracket with the provided machine screws.
6. Connect to power and computer
Connect the power cord to the power supply, and plug the power cord into a mains power connector.
Connect the USB cable to a USB 3 (USB Super Speed) connector on the computer

English
8
7. Select device
In your operating system select the “Yamaha AudioVideo Device” as your default audio playback and recording
device.
In your unified communications application, select the CS-700 as the Video device.
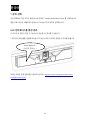
8. Manage through IP interface
If an IP connection was made to the CS-700, the unit is configured to receive a DHCP address.
Press the two middle buttons (volume up / Bluetooth) for 5 seconds, and the system will speak the IP address that
was assigned to it.
For more information, download the full documentation:
https://uc.yamaha.com/products/video-sound-bar/huddle-room-system/
My IP address is …

English
9
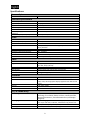
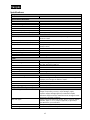
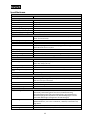
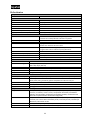
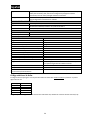
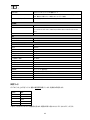
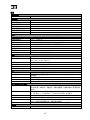
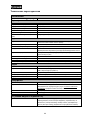
Specifications
Power adapter
Model Number
ADP-38DR A
Bluetooth Specifications
Bluetooth specification version
2.1 + EDR
Supported profiles
HFP (1.6), A2DP
Supported Codecs
SBC, mSBC, CVSD
Wireless output
Class 2
Maximum communication distance
10 m
Radio frequency (Operational
frequency)
2,402 MHz to 2,480 MHz
Maximum output power (EIRP)
4.0 dBm (2.5 mW)
Audio
Speaker Bar
4 Speaker elements with tweeter and mid-woofer on left and right
Speaker Frequency Response
160 – 20,000 Hz
Max SPL
90 dB at 1m
Microphones
4 microphone dynamic beamforming array with human voice
activity detection
Microphone Coverage
120 degrees audio pickup, best results within 12 feet / 3.60m
Microphone Frequency Response
160 – 16,000 Hz
Full Duplex Audio
Yes
Echo Cancellation
Ultra-wideband adaptive AEC
LED indicator
Call activity and microphone mute/unmute
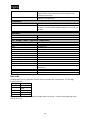
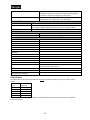
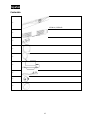
Video
Camera Sensor
High Definition CMOS
Image resolution
1080p, 30 fps (USB 3.0/3.1)
640 x 360, 30 fps (USB 2.0)
Video Mute
Digital privacy control
LED Indicators
Camera activity and video stream mute/unmute
UVC Support
UVC 1.5
Field of View
120 degrees diagonally
Interfaces
Mount Connector
Wall Mount Bracket for above or below display mounting
USB Host Port
USB with strain relief
Audio, video, HID and graphics display supported over USB 2.0 and
3.0/3.1
Ethernet
RJ 45, 10M / 100M
Bluetooth®
Yes. HFP and A2DP support
Aux Audio Input
3.5mm Stereo
SIP (-SP model only)
Call Handling
Make, Answer, Hold, Resume, Transfer (Blind and Supervised),
Forwarding, Do not disturb, Redial, Call Timer, Call ID, Speed Dial,
Missed Call Notifications, Voice Mail Notifications (Call Manager
configured)
Call Bridging
Supports Bridging SIP and USB Calls. Join, Split, Hold, Resume, 2+1+1
Lines: Up to 2 SIP calls, 1 USB call, 1 Bluetooth® call, plus the user
Codecs
G.711 (A-law and μ-law), G.722, G.726, G.729
DTMF Support
RTP event, SIP in-band, SIP info package

English
10
Security
SRTP/SRTCP Support (RFC 1889), IETF SIP support (RFC 3261 and
companion RFCs), SSIP, Password protected configuration files,
Password protected login
Network & Provisioning
DHCP or Static IP, Server Based Central Provisioning, Web Portal for
Individual Unit Configuration
Compliance
Safety
IEC60065, IEC60950, IEC62368
EMC
CISPR13/CISPR22/CISPR32/ FCC/J55013/ ETSI EN 300 328 / ETSI EN
302 291-2 / ETSI EN 300 330-2 EN55024/ CISPR24 or 35 and ETSI EN
301 489-1
Environmental
RoHS, Reach, WEEE
Warranty
Global except for EU
1 Year return to factory
European Union
2 Year return to factory
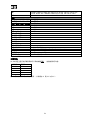
Size, Weight, Power, Operating Temperature
Height
3.9in/98.75mm
Length
2.7in/68.5mm
Width
34.in/861.7mm
Weight (incl. bracket)
7.3 lbs/3.3kg
Input Voltage (power supply)
100-240 VAC
Input Current (power supply)
1A
Input Frequency (power supply)
50-60 Hz
Input Voltage (CS-700)
15V
Input Current (CS-700)
2.4A
Power consumption (max)
36 W
Power consumption (network stand-by)
1.6 W
Stand-by time
20 minutes (user selectable)
Power Cord Length
10ft/3m - Please order correct SKU for regional power cord
requirements
Operating Temperature
32 to 104 °F (0 to 40 °C)
Storage Temperature
-22 to 131 °F (-30 to 55 °C)
Operating / Storage Relative Humidity
20%-85% (non-condensing)
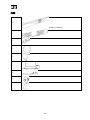
Date code
The date code on the CS-700 label indicates when the product was manufactured. The first digit
indicates the year.
First digit
Calendar year
7
2017
8
2018
9
2019
0
2020
1
2021
The second and third digits indicate the calendar week in that year – from 01 at the beginning of the
year to 52 (or 53).

Français
11
Contenu
1 x
CS700-AV, CS700-SP
1 x
4 x
1 x
1 x
1 x
1 x
2 x
2 x

Français
12
1. Installation du support
Installer le support sur le mur avec 4 vis appropriées, en espaçant deux et deux vis autant que possible. S’assurer
que le support est solidement fixé au mur ou aux entretoises pour éviter les vibrations. S’il est installé en-dessous
de l’écran, s’assurer que l’écart est suffisamment grand pour insérer l’unité CS-700. La profondeur de l’installation
peut être ajustée en utilisant le nombre adéquat d’entretoises (0-2) de chaque côté. La hauteur maximale de
montage est à 2 m du sol. Toujours utiliser 4 vis.
2. Placer l’unité CS-700 sur le support
Positionner l’unité CS-700 de manière à ce que les deux crochets sur le devant du support s’insèrent
dans les cavités de la partie inférieure de l’unité CS-700. S’assurer que l’unité CS-700 est fermement
maintenue par les crochets.
0x, 1x, 2x
≥ 95 mm

Français
13
3. Connecter l’unité CS-700
Une fois que l’unité CS-700 est solidement positionnée sur les crochets du support, connecter le câble
d’alimentation et le câble USB à l’unité CS-700, comme illustré. Si une gestion de l’unité CS-700 à l’aide du
navigateur internet est prévue, connecter également le câble réseau au connecteur correspondant.
Fixer le câble à l’unité CS-700 en utilisant les attaches de câble fournies.

Français
14
4. Installer l’unité sur le support
Une fois que tous les câbles sont correctement connectés et fixés, incliner l’unité CS-700 vers l’arrière sur le
support et la repousser sur le support.

Français
15
5. Fixer l’unité
Fixer l’unité CS-700 sur le support avec les vis machine fournies.
6. Connecter au réseau et à l’ordinateur
Connecter le cordon d’alimentation à l’alimentation secteur, et brancher le cordon d’alimentation à un connecteur
d’alimentation secteur.
Connecter le câble USB à un connecteur USB 3 (USB ultra-rapide) sur l’ordinateur.

Français
16
7. Sélectionner un appareil
Dans le système d’exploitation, sélectionner « Yamaha AudioVideo Device » comme appareil de lecture et
d’enregistrement audio par défaut.
Dans l’application de communications unifiées, sélectionner l’unité CS-700 comme appareil vidéo.
8. Gérer via l’interface IP
Si une connexion IP à la CS-700 a été effectuée, l’unité est configurée pour recevoir une adresse DHCP.
Appuyer sur les deux boutons du milieu (augmenter le volume / Bluetooth) pendant 5 secondes, et le système dira
l’adresse IP lui ayant été assignée.
Pour de plus amples informations, télécharger la documentation complète :
https://uc.yamaha.com/products/video-sound-bar/huddle-room-system/
My IP address is …
(Mon adresse IP est …)

Français
17
Spécifications
Adaptateur secteur
Numéro de modèle
ADP-38DR A
Spécifications Bluetooth
Version des caractéristiques Bluetooth
2.1 + EDR
Profils pris en charge
HFP (1.6), A2DP
Codec pris en charge
SBC, mSBC, CVSD
Sortie sans fil
Class 2
Distance maximale de communication
10 m
Fréquence radio (fréquence opérationnelle)
2 402 MHz à 2 480 MHz
Puissance de sortie maximale (EIRP)
4,0 dBm (2,5 mW)
AUDIO
Barre haut-parleur
4 éléments haut-parleurs avec haut-parleurs aigu et medium à
gauche et à droite
Réponse en fréquence du haut-parleur
160 – 20 000 Hz
Niveau de pression acoustique (SPL) max.
90 dB à 1 m
Microphones
4 microphones dynamiques directionnels avec détection d’activité
vocale (humaine)
Couverture du microphone
Couverture audio à 120°, meilleurs résultats jusqu’à 3,60 m
Réponse en fréquence du microphone
160 – 16 000 Hz
Audio duplex intégral
Oui
Annulation de l’écho
Annulation de l’écho acoustique (AEC) à bande ultralarge adaptable
Témoin LED
Activité d’appel et désactivation / activation du microphone
Vidéo
Capteur caméra
CMOS haute définition
Résolution d’image
1080 p, 30 images/s (USB 3.0/3.1)
640 x 360, 30 images/s (USB 2.0)
Cache caméra
Cache caméra numérique
Témoin LED
Activité de la caméra et désactivation / activation flux vidéo
Prise en charge UVC
UVC 1.5
Champ visuel
120° en diagonale
INTERFACES
Connecteur de montage
Support mural pour montage écran au-dessus ou en dessous
Port hôte USB
USB avec décharge de traction; Audio, vidéo, HID et affichage
graphique pris en charge via USB 2.0 et 3.0/3.1
Ethernet
RJ45, 10 M / 100 M
Bluetooth®
Oui. Prise en charge HFP et A2DP
Entrée audio aux.
Stéréo de 3,5 mm
SIP (modèle -SP uniquement)
Gestion des appels
Appeler, répondre, mettre en attente, reprendre, transférer
(aveugle ou supervisé), renvoyer, ne pas déranger, rappel,
compteur d’appel, affichage appelant, numérotation rapide,
notifications d’appel manqué, notifications de la messagerie vocale
(gestionnaire des appels configuré)
Relais des appels
Support relais SIP et appels USB. Joindre, diviser, mettre en attente,
reprendre, lignes 2 + 1 + 1 : jusqu’à 2 appels SIP, 1 appel USB, 1
appel Bluetooth®, plus l’utilisateur
Codecs
G.711 (loi A et loi μ), G.722, G.726, G.729
Prise en charge DTMF
Événement RTP, SIP en bande, pack informations SIP

Français
18
Sécurité
Support SRTP / SRTCP (RFC 1889), support IETF SIP (RFC 3261
accompagnés de RFC), SSIP, fichiers de configuration protégés par
mot de passe, connexion protégée par mot de passe
Réseau & approvisionnement
DHCP ou IP statique, approvisionnement central basé sur serveur,
portail internet pour configuration unité individuelle
CONFORMITÉ
Sûreté
IEC 60065, IEC 60950, IEC 62368
CEM
CISPR 13 / CISPR 22 / CISPR 32 / FCC / J55013 / ETSI EN 300 328 / ETSI EN 302
291-2 / ETSI EN 300 330-2 EN55024 / CISPR 24 ou 35 et ETSI EN 301 489-1
Environnement
RoHS, Reach, DEEE
GARANTIE
Mondiale à l’exception de l’UE
1 an de garantie retour usine
Union européenne
2 ans de garantie retour usine
TAILLE, POIDS, ALIMENTATION, TEMPÉRATURE DE FONCTIONNEMENT
Hauteur
98,75 mm
Longueur
68,5 mm
Largeur
861,7 mm
Poids (support inclus)
3,3 kg
Tension d’entrée (alimentation électrique)
100-240 VAC
Courant d’entrée (alimentation électrique)
1 A
Fréquence d’entrée (alimentation
électrique)
50-60 Hz
Tension d’entrée (CS-700)
15 V
Courant d’entrée (CS-700)
2,4 A
Consommation électrique (maximum)
36 W
Consommation électrique (réseau stand-by)
1,6 W
Temps d'attente
20 minutes (sélectionnable par l'utilisateur)
Longueur du cordon d’alimentation
3 m – Commander UGS adaptée aux exigences régionales en
matière de cordon d’alimentation
Température de fonctionnement
de 0 à 35 °C
Température de stockage
de -30 à 55 °C
Humidité relative de
fonctionnement / stockage
20 %-85 % (sans condensation)
Code de date
Le code de date sur l’étiquette du CS-700 indique quand le produit a été fabriqué. Le premier chiffre indique
l’année.
Premier
chiffre
Année
calendaire
7
2017
8
2018
9
2019
0
2020
1
2021
Les deuxième et troisième chiffres indiquent la semaine calendaire de l’année concernée, de 01 au début de
l’année à 52 (ou 53).

Deutsch
19
Inhalt
1 x
CS700-AV, CS700-SP
1 x
4 x
1 x
1 x
1 x
1 x
2 x
2 x

Deutsch
20
1. Montage der Wandhalterung
Bringen Sie die Halterung an der Wand mit vier Schrauben an. Setzen Sie dabei jeweils zwei Schrauben so weit von
einander entfernt wie möglich. Stellen Sie sicher, dass die Halterung straff gegen die Wand bzw. den
Abstandhalter platziert ist, um Vibrationen zu vermeiden. Falls die Halterung unter einem Bildschirm angebracht
wird, stellen Sie sicher, dass der Abstand groß genug ist und dem CS-700 System ausreichend Platz bietet. Den
Abstand zur Wand können Sie über die Zahl der Abstandhalter (0-2) auf jeder Seite regulieren. Maximale
Montagehöhe ist 2m vom Boden. Benutzen Sie stets vier Schrauben.
2. Anbringen des CS-700 an die Wandhalterung
Halten Sie das CS-700 so, dass die beiden vorn an der Wandhalterung herausstehenden Haken in die beiden
Hohlräume am unteren Teil des CS-700 passen.
Stellen Sie sicher, dass das CS-700 sicher von den beiden Haken getragen wird.
0x, 1x, 2x
≥ 95 mm
Strona jest ładowana ...
Strona jest ładowana ...
Strona jest ładowana ...
Strona jest ładowana ...
Strona jest ładowana ...
Strona jest ładowana ...
Strona jest ładowana ...
Strona jest ładowana ...
Strona jest ładowana ...
Strona jest ładowana ...
Strona jest ładowana ...
Strona jest ładowana ...
Strona jest ładowana ...
Strona jest ładowana ...
Strona jest ładowana ...
Strona jest ładowana ...
Strona jest ładowana ...
Strona jest ładowana ...
Strona jest ładowana ...
Strona jest ładowana ...
Strona jest ładowana ...
Strona jest ładowana ...
Strona jest ładowana ...
Strona jest ładowana ...
Strona jest ładowana ...
Strona jest ładowana ...
Strona jest ładowana ...
Strona jest ładowana ...
Strona jest ładowana ...
Strona jest ładowana ...
Strona jest ładowana ...
Strona jest ładowana ...
Strona jest ładowana ...
Strona jest ładowana ...
Strona jest ładowana ...
Strona jest ładowana ...
Strona jest ładowana ...
Strona jest ładowana ...
Strona jest ładowana ...
Strona jest ładowana ...
Strona jest ładowana ...
Strona jest ładowana ...
Strona jest ładowana ...
Strona jest ładowana ...
Strona jest ładowana ...
Strona jest ładowana ...
Strona jest ładowana ...
Strona jest ładowana ...
Strona jest ładowana ...
Strona jest ładowana ...
Strona jest ładowana ...
Strona jest ładowana ...
Strona jest ładowana ...
Strona jest ładowana ...
Strona jest ładowana ...
Strona jest ładowana ...
-
 1
1
-
 2
2
-
 3
3
-
 4
4
-
 5
5
-
 6
6
-
 7
7
-
 8
8
-
 9
9
-
 10
10
-
 11
11
-
 12
12
-
 13
13
-
 14
14
-
 15
15
-
 16
16
-
 17
17
-
 18
18
-
 19
19
-
 20
20
-
 21
21
-
 22
22
-
 23
23
-
 24
24
-
 25
25
-
 26
26
-
 27
27
-
 28
28
-
 29
29
-
 30
30
-
 31
31
-
 32
32
-
 33
33
-
 34
34
-
 35
35
-
 36
36
-
 37
37
-
 38
38
-
 39
39
-
 40
40
-
 41
41
-
 42
42
-
 43
43
-
 44
44
-
 45
45
-
 46
46
-
 47
47
-
 48
48
-
 49
49
-
 50
50
-
 51
51
-
 52
52
-
 53
53
-
 54
54
-
 55
55
-
 56
56
-
 57
57
-
 58
58
-
 59
59
-
 60
60
-
 61
61
-
 62
62
-
 63
63
-
 64
64
-
 65
65
-
 66
66
-
 67
67
-
 68
68
-
 69
69
-
 70
70
-
 71
71
-
 72
72
-
 73
73
-
 74
74
-
 75
75
-
 76
76


Yamaha Video Sound Collaboration System for Huddle Rooms [CS-700] Instrukcja obsługi
- Typ
- Instrukcja obsługi
- Ten podręcznik jest również odpowiedni dla
w innych językach
- čeština: Yamaha Video Sound Collaboration System for Huddle Rooms [CS-700] Uživatelský manuál
- español: Yamaha Video Sound Collaboration System for Huddle Rooms [CS-700] Manual de usuario
- italiano: Yamaha Video Sound Collaboration System for Huddle Rooms [CS-700] Manuale utente
- Deutsch: Yamaha Video Sound Collaboration System for Huddle Rooms [CS-700] Benutzerhandbuch
- português: Yamaha Video Sound Collaboration System for Huddle Rooms [CS-700] Manual do usuário
- français: Yamaha Video Sound Collaboration System for Huddle Rooms [CS-700] Manuel utilisateur
- 日本語: Yamaha Video Sound Collaboration System for Huddle Rooms [CS-700] ユーザーマニュアル
- English: Yamaha Video Sound Collaboration System for Huddle Rooms [CS-700] User manual
- dansk: Yamaha Video Sound Collaboration System for Huddle Rooms [CS-700] Brugermanual
- русский: Yamaha Video Sound Collaboration System for Huddle Rooms [CS-700] Руководство пользователя
- Nederlands: Yamaha Video Sound Collaboration System for Huddle Rooms [CS-700] Handleiding
- română: Yamaha Video Sound Collaboration System for Huddle Rooms [CS-700] Manual de utilizare
Powiązane dokumenty
-
Yamaha CS-700 instrukcja
-
Yamaha CS-700 Extension Microphone [XM-CS-700] Instrukcja obsługi
-
-
-
-
-
-
-
-