Indesit AQ7F 29 U (EU) instrukcja
- Kategoria
- Pralki
- Typ
- instrukcja

EN
1
English,1
Contents
Installation, 2-3
Unpacking and levelling
Connecting the electricity and water supplies
Technical data
Description of the machine, 4-5
Control panel
Running a wash cycle, 6
Wash cycles and options, 7
Table of wash cycles
Wash options
Detergents and laundry, 8
Detergent
Preparing the laundry
Washing recommendations
Load balancing system
Precautions and advice, 9
General safety
Disposal
Opening the porthole door manually
Care and maintenance, 10
Cutting off the water and electricity supplies
Cleaning the machine
Cleaning the detergent dispenser drawer
Caring for your appliance drum
Cleaning the pump
Checking the water inlet hose
Trouble shooting, 11
Assistance, 12
EN
WASHING MACHINE
AQUALTIS
AQ7F 29 U
Instructions for
installation and use
RO
Românã,25
PL
Polski,13

EN
2
Installation
This instruction manual should be kept in a safe place
for future reference. If the washing machine is sold,
given away or moved, please ensure the manual is kept
with the machine, so that the new owner may benefit
from the advice contained within it.
Read these instructions carefully: they contain vital
information relating to the safe installation and operation
of the appliance.
Inside the pack containing this manual, you will also
find the guarantee and all the details necessary for
installation.
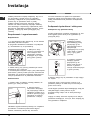
Unpacking and levelling
Unpacking
1. Once you have removed all the packaging from the
washing machine, make sure it has not been damaged
during transportation.
If it has been damaged, contact the retailer and do not
proceed any further with the installation process.
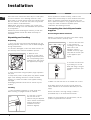
2. Remove the 4
protective screws (used
during transportation) and
the corresponding spacer,
located on the rear part of
the appliance (see figure).
3. Close off the holes using the plastic plugs supplied in
the pack.
4. Keep all the parts in a safe place; they will be needed
again if the washing machine is moved to another
location, to prevent the inside of the appliance being
damaged.
Packaging materials should not be used as toys for
children.
Levelling
1. Place the washing machine on a flat sturdy floor,
without resting it up against walls or cabinets.
2. If the floor is uneven,
the front feet of the
machine may be adjusted
until it reaches a horizontal
position (the angle of
inclination must not
exceed 2 degrees).
If the appliance is levelled correctly, it will be more
stable and much less likely to cause vibrations and noise
while it is operating, particularly during the spin cycle.
If it is placed on carpet or a rug, adjust the feet in such
a way as to allow a sufficient ventilation space
underneath the washing machine.
Connecting the electricity and water
supplies
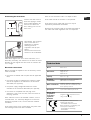
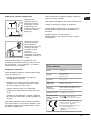
Connecting the water inlet hose
Before connecting the inlet hose to the water supply,
run the water until it is perfectly clear.
1. Connect the inlet hose
to the machine by
screwing it onto the cold
water inlet of the
appliance, which is
situated on the top right-
hand side of the rear part
of the appliance (see
figure).
2. Connect the inlet hose
by screwing it to a cold
water tab using a 3/4 gas
threaded connection (see
figure).
3. Make sure that the hose is not folded over or bent.
The water pressure at the tap must fall within the
values indicated in the Technical data table (see next
page).
If the inlet hose is not long enough, contact a
specialised shop or an authorised technician.
Never use second-hand or old inlet hoses; use the
products supplied with the machine.

EN
3
65 - 100 cm
Connecting the drain hose
Connect the drain hose to
drain duct piping or a wall
drain located between 65
and 100 cm above the
floor, making sure it is not
bent at all.
Alternatively, rest the drain
hose on the side of a
washbasin or bathtub,
fastening the duct
supplied to the tap (see
figure).
The free end of the hose
should not be underwater.
We advise against the use of hose extensions; if it is
absolutely necessary, the extension must have the same
diameter as the original hose and must not exceed 150
cm in length.
Electrical connections
Before plugging the appliance into the electricity socket,
make sure that:
the socket is earthed and complies with all applicable
laws;
the socket is able to withstand the maximum power
load of the appliance as indicated in the Technical
data table (see opposite);
the power supply voltage falls within the values
indicated in the Technical data table (see opposite);
the socket is compatible with the plug of the
appliance. If this is not the case, have the socket or
the plug replaced.
The machine must not be installed outdoors, even in
covered areas. It is extremely dangerous to leave the
appliance exposed to rain, storms and other weather
conditions.
The mains socket must remain within easy reach after
the washing machine has been installed.
Do not use extension cords or multiple sockets.
The cable should not be bent or compressed.
The power supply cable and plug must only be
replaced by authorised technicians.
Warning! The company shall not be held responsible in
the event that these regulations are not respected.
Technical data
Model
AQ7F 29 U
Dimensions
width 59.5 cm
height 85 cm
depth 58 cm
Capacity
from 1 to 7 kg
Electrical
connections
please refer to the technical data
plate fixed to the machine
Water connections
maximum pressure 1 MPa (10 bar)
minimum pressure 0.05 MPa (0.5 bar)
drum capacity 52 litres
Spin speed
up to 1200 rotations per minute
Energy rated
programmes
according to
regulation
EN 60456
programme ; temperature 60°C;
using a load of 7 kg.
This appliance conforms to the
following EC Directives:
- 89/336/EEC dated 03/05/89
(Electromagnetic Compatibility) and
subsequent modifications
- 2006/95/EC (Low Voltage)
- 2002/96/EC

EN
4
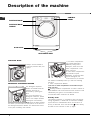
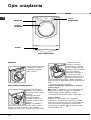
CONTROL
PANEL
PORTHOLE DOOR
PORTHOLE DOOR
HANDLE
KICK STRIP
ADJUSTABLE FEET
3
1
2
Description of the machine
PORTHOLE DOOR
Always use the handle to
open the porthole door (see
figure).
DETERGENT DISPENSER DRAWER
The detergent dispenser
drawer is located inside the
machine and can be
accessed by opening the
door.
For more information on
detergent measures, please
refer to the chapter entitled
Detergents and laundry.
Note: stick the label showing
the wash cycle descriptions and options on the front of
the detergent dispenser drawer. You will find the sticker
in the pack containing this manual.
1. pre-wash compartment:
use powder detergent.
Before pouring in the
detergent, make sure that
extra compartment 3 has
been removed.
2. main wash compartment:
use powder or liquid
detergent. If using the latter
type of detergent, we
recommend it is poured into
the drawer immediately before you start the washing
machine.
3. extra compartment: Bleach
The use of extra compartment 3 excludes the pre-
wash function.
washing additives compartment: for fabric softener or
liquid additives. We recommend that the maximum level
indicated by the grille is not exceeded, and that
concentrated fabric softeners are diluted.
Standby mode
This washing machine, in compliance with new energy
saving regulations, is fitted with an automatic standby
system which is enabled after about 30 minutes if no
activity is detected. Press the ON-OFF
button briefly
and wait for the machine to start up again.

EN
5
TEMPERATURE button
WASH CYCLE
SELECTOR knob
OPTION buttons with
indicator lights
DOOR LOCKED
indicator light
START/PAUSE
button with indicator
light
WASH
CYCLE
PHASE
icons
SPIN button
DELAYED
START
button
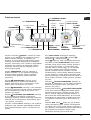
CONTROL PANEL
LOCK button with
indicator light
Button withON/OFF
indicator light
ECO indicator light
OPTION buttons with
indicator lights
TEMPERATURE
display
SPIN display
DELAYED START/CYCLE
DURATIONdisplay
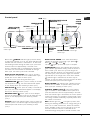
Control panel
Button with ON/OFF indicator light: press this briefly
to switch the machine on or off. The green indicator light
indicates that the machine is switched on. To switch off
the washing machine during the wash cycle, press and
hold the button for approximately 3 seconds; if the
button is pressed briefly or accidentally the machine will
not switch off. If the machine is switched off during a
wash cycle, this wash cycle will be cancelled.
WASH CYCLE SELECTOR knob: may be turned in
either direction. To select the most suitable wash cycle,
please refer to the Table of wash cycles.
The knob will not move during the wash cycle.
TEMPERATURE
button: press to modify or exclude
the temperature setting; the value selected will appear
on the display above (see Running a wash cycle).
SPIN CYCLE
button: press to modify or exclude the
spin cycle; the value selected will appear on the display
above (see Running a wash cycle).
DELAYED START
button: press to set a delayed
start for the selected wash cycle; the set delay time will
appear on the display above (see Running a wash
cycle).
OPTION buttons with indicator lights: press to select the
available options. The indicator light corresponding to the
selected option will remain lit (see Running a wash
cycle).
WASH CYCLE PHASE icons: these illuminate to
indicate the progress of the wash cycle (Wash
Rinse
Spin Drain ).
The text
lights up when the cycle is complete.
START/PAUSE button with indicator light: when the
green indicator light flashes slowly, press the button to
start a wash cycle. Once the cycle has begun the
indicator light will remain lit in a fixed manner. To pause
the wash cycle, press the button again; the indicator
light will flash in an orange colour. If the Door locked
indicator light is switched off, the door may be
opened. To start the wash cycle from the point at which
it was interrupted, press the button again.
DOOR LOCKED
indicator light: indicates that the
porthole door is locked. To open the door, pause the
wash cycle (see Running a wash cycle).
CONTROL PANEL LOCK
button with indicator
light: to activate or deactivate the control panel lock,
press and hold the button for approximately 2 seconds.
when the indicator light is illuminated, the control panel is
locked. This means it is possible to prevent wash cycles
from being modified accidentally, especially where there
are children in the home.
ECO indicator light: the
icon lights up when, after
altering the washing parameters, an energy saving of at
least 10% is made. Furthermore, before the machine
enters Standby mode, the icon will light up for a few
seconds; when the machine is switched off the
estimated energy saving will be around the 80% mark.

EN
6
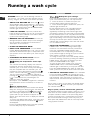
WARNING: before you use the washing machine for
the first time, run a wash cycle with detergent and no
laundry, using the 90° cottons cycle without pre-wash.
1. SWITCH THE MACHINE ON. Press the
button.
All the indicator lights will illuminate for 1 second; the
indicator light corresponding to the
button will then
remain lit in a fixed manner and the START/PAUSE
indicator light will flash slowly.
2. LOAD THE LAUNDRY. Open the porthole door.
Load the laundry, making sure you do not exceed the
maximum load value indicated in the table of wash
cycles on the following page.
3. MEASURE OUT THE DETERGENT. Pull out the
detergent dispenser drawer and pour the detergent
into the relevant compartments as described in
Description of the machine.
4. CLOSE THE PORTHOLE DOOR.
5. SELECT THE PROGRAMME. Turn the WASH
CYCLE SELECTOR KNOB right or left, until you have
selected the desired wash cycle. A temperature and
spin speed is set for each wash cycle; these may be
adjusted.
6. CUSTOMISE THE WASH CYCLE. Use the
relevant buttons on the control panel:
Modify the temperature and/or spin
speed.
The machine automatically displays the maximum
temperature and spin speed values set for the
selected cycle, or the most recently-used settings if
they are compatible with the selected cycle. The
temperature can be decreased by pressing the
button, until the cold wash ( ) setting is reached.
The spin speed may be progressively reduced by
pressing the
button, until it is completely excluded
(
). If these buttons are pressed again, the
maximum values are restored.
Exception: if the Cottons programme is selected,
the temperature can be increased up to a value of
90°C.
Set a delayed start.
Press the button until you have reached the desired
delay time. During the setting process, the delay time
is shown on the display and the
symbol flashes.
After selecting a delayed start time, the fixed
symbol and the cycle duration will appear on the
display. Press the button once to display the selected
delay time.
To remove the delayed start option, press the button
until the display shows the text OFF; the
symbol
will disappear.
Once the START/PAUSE button has been pressed,
the time delay may only be decreased.
Modify the cycle settings.
Press the OPTION buttons to customise the wash
cycle in accordance with your own requirements.
Press the button to activate the option; the
corresponding indicator light will switch on.
Press the button again to disable the option; the
indicator light will switch off.
If the selected option is not compatible with the
selected wash cycle, this incompatibility will be
signalled by the flashing of the indicator light and a
sound alert (3 beeps); the option will not be activated.
If the selected option is not compatible with another
option that has been selected previously, the indicator
light corresponding to the first option selected will flash
and only the second option will be activated; the
indicator light corresponding to the button will remain
lit in a constant manner.
7. START THE PROGRAMME. Press the START/
PAUSE button. The corresponding indicator light
remains lit in a fixed manner and the porthole door
locks (the
DOOR LOCKED indicator light
illuminates). The icons corresponding to the wash
cycle phases will light up during the cycle to indicate
which phase is currently in progress.
To change a wash cycle once it has already started,
pause the washing machine by pressing the START/
PAUSE button; then select the desired cycle and
press the START/PAUSE button again.
To open the door during a wash cycle, press the
START/PAUSE button; if the DOOR LOCKED
indicator light is switched off you may open the door.
Press the START/PAUSE button again to restart the
wash cycle from the point at which it was interrupted.
8. THE END OF THE WASH CYCLE. This is indicated
by the illuminated text END. The porthole door may
be opened immediately. If the START/PAUSE indicator
light is flashing, press the button to end the cycle.
Open the door, unload the laundry and switch off the
machine.
If you wish to cancel a cycle which has already begun,
press and hold the
button until the cycle stops and
the machine switches off.
Bag for quilts, curtains and delicate garments
The Aqualtis washing machine makes it easier for you to
wash even the most valuable and delicate garments in
complete confidence thanks to the special bag which
protects the laundry (this is supplied with the machine).
We recommend that the bag is used every time you
wash quilts and padded items with an outer layer made
using synthetic material.
Running a wash cycle

EN
7
Wash options
Super Wash
This option offers a high-performance wash due to the
greater quantity of water used in the initial phase of the
cycle, and due to the increased wash cycle duration, is
particularly useful for the
removal of stubborn stains.
It can be used with or
without bleach. If you desire
bleaching, insert the extra
tray compartment (3) into
compartment 1. When
pouring in the bleach, be
careful not to exceed the
max level marked on the
central pivot (see figure).
To bleach laundry without
carrying out a full wash cycle, pour the bleach into the
extra compartment 3, select the "Rinse" cycle
and
activate the "Super Wash" option
.
It cannot be used in conjunction with
, , , , ,
, , .
Easy Iron
By selecting this option, the wash and spin cycles will be
modified in order to reduce the formation of creases.
At the end of the cycle the washing machine
drum will rotate slowly; the Easy Iron and START/
PAUSE indicator lights will flash. To end the cycle press
the START/PAUSE button or the Easy Iron button.
For the Silk
wash cycle, the machine will end the
cycle while the laundry is soaking and the Easy
Iron indicator light will flash. To drain the water so that
the laundry may be removed, press the START/PAUSE
button or the Easy Iron button.
It cannot be used in conjunction with
, , , , .
Time Saver
If you select this option, the wash cycle duration will be
reduced by 30%-50%, depending on the selected cycle,
thereby guaranteeing simultaneous water and energy
saving. Use this cycle for lightly soiled garments.
It cannot be used in conjunction with
, , , ,
, , , , .
Extra rinse
By selecting this option, the efficiency of the rinse is
increased and optimal residual detergent removal is
guaranteed. It is particularly useful for skin which is
sensitive to detergents. We recommend this option is
used with a full load of washing, or when a large amount
of detergent is required.
It cannot be used in conjunction with
, , .
3
1
2
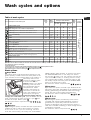
(*) The duration of the wash cycles can be checked
on the display.
(*) Note: 10 minutes after the START, the machine will recalculate the time remaining until the end of the wash cycle on the basis of the load inside it; this
value will then be shown on the display.
Wash cycles and options
Table of wash cycles
For all Test Institutes:
1) Test wash cycle in compliance with regulation EN 60456: set wash cycle
with a temperature of 60°C.
2) Long wash cycle for cottons: set wash cycle
with a temperature of 40°C.
3) Short wash cycle for cottons: set wash cycle
with a temperature of 40°C.
Icon Description of the wash cycle
Max.
temp.
(°C)
Max.
speed
(rpm)
Detergent and additives
Max.
load
(kg)
Cycle
duration
Detergent
for wash
Fabric
softener
Bleach
Cottons wash cycles
Cottons
with pre-wash
(Add detergent to the relevant compartment).
90° 1200
ll
- 7
Cottons (1):
heavily soiled whites and resistant colours.
60°
(Max. 90°)
1200
lll
7
Cottons (2):
heavily soiled whites and delicate colours.
40° 1200
lll
7
Coloured
Cottons (3)
40° 1200
lll
7
Shirts
40° 600
lll
2
Jeans
40° 800
ll
- 3,5
Special programmes
Baby:
heavily soiled delicate colours
40° 800
lll
3
Durable
Synthetics
60° 800
lll
3
Delicate
Synthetics
40° 800
lll
3
"Bed & Bath"
for bedlinen and towels.
60° 1200
lll
7
Duvets:
for down-stuffed garments.
30° 1000
ll
- 2
Silk:
for garments in silk and viscose, lingerie.
30° 0
ll
- 1
Wool:
for wool, cashmere, etc.
40° 600
ll
- 1,5
Mix 30':
to refresh lightly soiled garments quickly (not suitable for
wool, silk and clothes which require washing by hand)
30° 800
ll
- 3
Partials wash cycles
Rinse - 1200 -
ll
7
Spin - 1200 - - - 7
Drain - 0 - - - 7

EN
8
Detergents and laundry
Detergent
The type and quantity of detergent required depend on
the type of fabric you are washing (cotton, wool, silk,
etc.), as well as its colour, the washing temperature, the
level of soiling and the hardness of the water in the area.
Measuring out the detergent carefully will avoid wastage
and help to protect the environment: although they are
biodegradable, detergents still contain ingredients which
alter the balance of nature.
We recommend the following:
use powder detergents for white cotton garments and
pre-washing.
use liquid detergents for delicate cotton garments and
for all low-temperature wash cycles.
use gentle liquid detergents for wool and silk
garments.
The detergent should be poured into the relevant
compartment - or the dispenser placed directly inside
the drum - before the wash cycle begins. In the latter
case, it will not be possible to select the Cottons with
pre-wash cycle.
Do not use hand washing detergents because these
create too much foam.
Preparing the laundry
Shake out the garments before loading them into the
machine.
Divide the laundry according fabric type (symbol on the
washing instruction label) and colour, making sure you
separate the coloured garments from the white ones;
Empty all pockets and check the buttons;
Do not exceed the values listed in the Table of wash
cycles, which refer to the weight of the laundry when dry.
How much does your laundry weigh?
1 sheet 400-500 g
1 pillowcase 150-200 g
1 tablecloth 400-500 g
1 bathrobe 900-1200 g
1 towel 150-250 g
1 pair of jeans 400-500 g
1 shirt 150-200 g
Washing recommendations
Shirts: use the special Shirts wash cycle to wash
shirts in different fabrics and colours to guarantee they
receive the best possible care.
Jeans: use the special Jeans
wash cycle for all
denim garments; turn inside out before washing and use
a liquid detergent.
Baby: use the special Baby
wash cycle to remove
the remove the soiling typically caused by babies, while
removing all traces of detergent from nappies in order to
prevent the delicate skin of babies from suffering allergic
reactions. The cycle has been designed to reduce the
amount of bacteria by using a greater quantity of water
and optimising the effect of special disinfecting additives
added to the detergent. At the end of the wash cycle,
the machine will slowly rotate the drum; to end the cycle
press the START/PAUSE button.
Silk: use the special Silk
wash cycle to wash all silk
garments. We recommend the use of special detergent
which has been designed to wash delicate clothes.
Curtains: use the Silk
wash cycle. These should
be folded and placed inside the bag provided.
Wool: is the only washing machine brand to have been
awarded the prestigious Woolmark Platinum Care
endorsement (M.0508) by the Woolmark Company,
which means that all woollen garments may be washed
in the washing machine, even those which state hand
wash only
on the label. The Wool wash cycle can
be used to wash all woollen garments in the washing
machine while guaranteeing optimum performance.
Duvets: to wash single duvets (the weight of which
should not exceed 2 kg), cushions or clothes padded
with goose down such as puffa jackets, use the special
Duvets
wash cycle. We recommend that duvets
are placed in the drum with their edges folded inwards
(see figure) and that no more than ¾ of the total volume
of the drum is used. To achieve the best results, we
recommend that a liquid detergent is used and placed
inside the detergent dispenser drawer.
Quilts: to wash quilts with a synthetic outer layer, use
the bag provided and set the wash cycle to Duvets
.
Bedlinen and towels: use the Bed & Bath
cycle
to wash laundry from all over the house; this optimises
fabric softener performance and helps you save time and
energy. We recommend the use of powder detergent.
Stubborn stains: it is wise to treat stubborn stains with
solid soap before washing, and to use the Cottons with
pre-wash cycle.
Load balancing system
Before every spin cycle, to avoid excessive vibrations
before every spin and to distribute the load in a uniform
manner, the drum rotates continuously at a speed which
is slightly greater than the washing rotation speed. If,
after several attempts, the load is not balanced
correctly, the machine spins at a reduced spin speed. If
the load is excessively unbalanced, the washing
machine performs the distribution process instead of
spinning. To encourage improved load distribution and
balance, we recommend small and large garments are
mixed in the load.

EN
9
Precautions and tips
The machine was designed and constructed in
accordance with international safety regulations. The
following information is provided for safety reasons and
must therefore be read carefully.
General safety
This appliance was designed for domestic use only.
This appliance is not intended for use by persons
(including children) with reduced physical, sensory or
mental capabilities, or lack of experience and
knowledge, unless they have been given supervision
or instruction concerning use of the appliance by a
person responsible for their safety. Children should be
supervised to ensure that they do not play with the
appliance.
Do not touch the machine when barefoot or with wet
or damp hands or feet.
Do not pull on the power supply cable when
unplugging the appliance from the electricity socket.
Hold the plug and pull.
Do not touch the drained water as it may reach
extremely high temperatures.
Never force the porthole door. This could damage the
safety lock mechanism designed to prevent
accidental opening.
If the appliance breaks down, do not under any
circumstances access the internal mechanisms in an
attempt to repair it yourself.
Always keep children well away from the appliance
while it is operating.
If it must be moved, proceed with the help of two or
three people and handle it with the utmost care.
Never try to do this alone, because the appliance is
very heavy.
Before loading laundry into the washing machine,
make sure the drum is empty.
Disposal
Disposing of the packaging materials: observe local
regulations so that the packaging may be re-used.
The European Directive 2002/96/EC relating to Waste
Electrical and Electronic Equipment (WEEE) states
that household appliances should not be disposed of
using the normal solid urban waste cycle. Exhausted
appliances should be collected separately in order to
optimise the cost of re-using and recycling the
materials inside the machine, while preventing
potential damage to the atmosphere and to public
health. The crossed-out dustbin is marked on all
products to remind the owner of their obligations
regarding separated waste collection.
For more information relating to the correct disposal of
household appliances, owners should contact their
local authorities or appliance dealer.
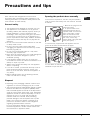
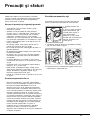
Opening the porthole door manually
In the event of a powercut, the door may be opened in
order to remove the laundry from the machine. Proceed
as follows:
1. Remove the plug from the
electrical socket.
2. To prevent water from
escaping when the door is
opened, make sure that the
level of the water is lower
than the seal around the
porthole door; if this is not
the case, remove any
excess water using the drain
hose (see figure).
3. Insert the key supplied with the appliance into the
groove at the side, as illustrated in the figure.
4. Press down on the key while pulling the handle
outwards to open the door.

EN
10
1
2
Cutting off the water and electricity
supplies
Turn off the water tap after every wash cycle. This will
limit wear on the hydraulic system in the machine and
help to prevent leaks.
Unplug the appliance when cleaning it and during all
maintenance work.
Cleaning the machine
The outer parts and rubber components of the appliance
can be cleaned using a soft cloth soaked in lukewarm
soapy water. Do not use solvents or abrasives.
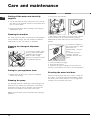
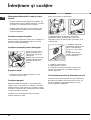
Cleaning the detergent dispenser
drawer
To remove the drawer, press
lever (1) and pull the drawer
outwards (2) (see figure).
Wash it under running
water; this procedure should
be repeated frequently.
Caring for your appliance drum
Always leave the door ajar to prevent unpleasant
odours from forming.
Cleaning the pump
The washing machine is fitted with a self-cleaning pump
which does not require any maintenance. Sometimes,
small items (such as coins or buttons) may fall into the
protective pre-chamber at the base of the pump.
Make sure the wash cycle has finished and unplug the
appliance.
To access the pre-chamber:
1. take off the cover panel on the front of the machine
by first pressing it in the centre and then pushing
downwards on both sides until you can remove it (see
figures);
2. position a container so
that it will collect the water
which flows out
(approximately 1.5 l) (see
figure);
3. unscrew the lid by
rotating it in an anti-
clockwise direction (see
figure);
4. clean the inside thoroughly;
5. screw the lid back on;
6. reposition the panel, making sure the hooks are
securely in place before you push it onto the appliance.
Checking the water inlet hose
Check the inlet hose at least once a year. If there are
any cracks, it should be replaced immediately: during
the wash cycles, water pressure is very strong and a
cracked hose could easily split open.
1
2
Care and maintenance

EN
11
Trouble shooting
Your washing machine could occasionally fail to work. Before contacting the Technical Assistance Centre
(see Assistance), make sure that the problem cannot be not solved easily using the following list.
Problem:
The washing machine does not
switch on.
The wash cycle does not start.
The washing machine does not fill
with water.
The washing machine door
remains locked.
The machine continuously fills
with water and drains.
The washing machine does not
drain or spin.
The machine vibrates a lot during
the spin cycle.
The washing machine leaks.
The icons corresponding to the
Phase in progress flash rapidly
at the same time as the ON/OFF
indicator light.
There is too much foam.
The washing machine door
remains locked.
Possible causes / Solutions:
The appliance is not plugged into the socket fully, or not enough to make
contact.
There is no power in the house.
The door is not closed properly.
The START/PAUSE button has not been pressed.
The water tap has not been opened.
A delayed start has been set.
The water inlet hose is not connected to the tap.
The hose is bent.
The water tap has not been opened.
There is no water supply in the house.
The pressure is too low.
The START/PAUSE button has not been pressed.
If you have selected the Baby
cycle or the Easy iron option, when
the wash cycle has finished the machine will slowly rotate the drum; to end
the cycle press the START/PAUSE button or the Easy iron
button. If
you have selected the Silk
wash cycle, the machine will end the cycle
while the laundry is soaking; to drain the water so that the laundry may be
removed, press the START/PAUSE button or the Easy iron
button.
The drain hose is not fitted at a height between 65 and 100 cm from the
floor (see Installation).
The free end of the hose is under water (see Installation).
If the dwelling is on one of the upper floors of a building, there may be
problems relating to water drainage, causing the washing machine to fill
with water and drain continuously. Special anti-draining valves are available
in shops and help to prevent this inconvenience.
The wall drainage system is not fitted with a breather pipe.
The wash cycle does not include draining: Some wash cycles require the
drain phase to be started manually (see Wash cycles and options).
The Easy iron option is enabled: to complete the wash cycle, press the
START/PAUSE button (Wash cycles and options).
The drain hose is bent (see Installation).
The drainage duct is clogged.
The drum was not unlocked correctly during installation (see Installation).
The machine is not level (see Installation ).
The machine is trapped between cabinets and walls (see Installation).
The load is unbalanced (see Detergents and laundry).
The water inlet hose is not screwed on properly (see Installation).
The detergent dispenser is blocked (to clean it, see Care and
maintenance).
The drain hose is not fixed in place properly (see Installation).
Switch off the machine and unplug it, wait for approximately 1 minute and
then switch it back on again. If the problem persists, contact the Technical
Assistance Service.
The detergent is not suitable for machine washing (it should display the text
for washing machines or hand and machine wash, or the like).
Too much detergent was used.
Perform the manual unlocking procedure (see Precautions and tips).
Note: To exit Demo mode, press and hold the two ON/OFF and START/PAUSE buttons simultaneously for 3 seconds.

EN
12
Before calling for Assistance:
Check whether you can solve the problem by yourself (see Trouble shooting);
Restart the wash cycle to check whether the problem has been solved;
If it has not, contact the Authorised Technical Assistance Service.
If the washing machine has been installed or used incorrectly, you will have to pay for the call-out service.
Always request the assistance of authorised technicians.
Please have the following information to hand:
the type of problem;
the appliance model (Mod.);
the serial number (S/N).
The above information can be found on the data plate located on the appliance itself.
Assistance

13
PL
Polski
Spis treci
Instalacja, 14-15
Rozpakowanie i wypoziomowanie
Pod³¹czenia hydrauliczne i elektryczne
Dane techniczne
Opis urz¹dzenia, 16-17
Pulpit sterowania
Jak wykonaæ cykl prania, 18
Programy i opcje, 19
Tabela programów
Opcje
rodki pior¹ce i bielizna, 20
rodek pior¹cy
Przygotowanie bielizny
Zalecenia dotycz¹ce prania
System równowa¿enia ³adunku
Zalecenia i rodki ostro¿noci, 21
Ogólne zasady bezpieczeñstwa
Utylizacja
Rêczne otwieranie drzwiczek
Utrzymanie i konserwacja, 22
Od³¹czenie wody i pr¹du elektrycznego
Czyszczenie maszyny
Czyszczenie szufladki na rodki pior¹ce
Czyszczenie bêbna
Czyszczenie pompy
Kontrola przewodu doprowadzaj¹cego wodê
Nieprawid³owoci w dzia³aniu i sposoby
ich usuwania, 23
Serwis Techniczny, 24
PL
PRALKA
AQUALTIS
AQ7F 29 U
Instrukcja instalacji i obs³ugi

PL
14
Instalacja
Nale¿y zachowaæ niniejsz¹ ksi¹¿eczkê, aby móc z
niej skorzystaæ w ka¿dej chwili. W przypadku
sprzeda¿y, odst¹pienia lub przeprowadzki nale¿y
upewniæ siê, ¿e pozostanie razem z pralk¹.
Nale¿y uwa¿nie przeczytaæ instrukcjê obs³ugi:
zawiera ona wa¿ne informacje dotycz¹ce instalacji
oraz w³aciwego i bezpiecznego u¿ytkowania pralki.
W kopercie zawieraj¹cej niniejsz¹ instrukcjê, oprócz
gwarancji, znajduj¹ siê detale pomagaj¹ce przy
instalacji.
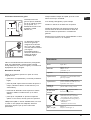
Rozpakowanie i wypoziomowanie
Rozpakowanie
1. Po wypakowaniu pralki upewniæ siê, ¿e nie dozna³a
uszkodzeñ podczas transportu.
W przypadku stwierdzenia uszkodzeñ nie pod³¹czaæ
jej i skontaktowaæ siê ze sprzedawc¹.
2. Odkrêciæ 4 ruby
ochronne umocowane na
czas transportu oraz
odpowiedni¹ rozpórkê,
znajduj¹ce siê w czêci
tylnej (patrz rysunek).
3. Zatkaæ otwory przy pomocy plastikowych korków
znajduj¹cych siê w kopercie.
4. Przechowywaæ wszystkie czêci; jeli pralka bêdzie
przenoszona, powinny zostaæ ponownie zamontowane
uszkodzeñ celu unikniêcia uszkodzeñ wewnêtrznych.
Czêci opakowania nie s¹ zabawkami dla dzieci.
Poziomowanie
1. Ustawiæ pralkê na p³askiej i twardej pod³odze; nie
opieraæ jej o ciany lub meble.
2. Skompensowaæ
nierównoci odkrêcaj¹c
lub przykrêcaj¹c nó¿ki a¿
urz¹dzenie znajdzie siê w
po³o¿eniu poziomym (jego
nachylenie nie powinno
przekraczaæ 2 stopnii).
Dok³adne wypoziomowanie powoduje, ¿e urz¹dzenie
jest stabilne i umo¿liwia wyeliminowanie drgañ i
ha³asów, zw³aszcza podczas fazy wirowania.
W razie ustawienia na dywanie lub wyk³adzinie
dywanowej nale¿y tak wyregulowaæ nó¿ki, aby pod
pralk¹ pozostawa³a wolna przestrzeñ niezbêdna dla
wentylacji.
Pod³¹czenia hydrauliczne i elektryczne
Pod³¹czenie rury pobierania wody
Przed pod³¹czeniem przewodu zasilaj¹cego do sieci
wodoci¹gowej spuciæ wodê a¿ do pojawienia siê
przejrzystej wody.
1. Pod³¹czyæ do
urz¹dzenia przewód
doprowadzaj¹cy wodê,
przykrêcaj¹c go do
odpowiedniego otworu
dop³ywowego,
znajduj¹cego siê w tylnej
czêci pralki, z prawej
strony u góry (patrz
rysunek)..
2. Pod³¹czyæ przewód
zasilaj¹cy poprzez
przykrêcenie go do
zaworu wody zimnej z
otworem z gwintem
rurowym drobnozwojowym
¾ (patrz rysunek).
3. Zwróciæ uwagê, aby na przewodzie nie by³o zagiêæ
ani zwê¿eñ.
Cinienie wody w kurku powinno mieciæ siê w
przedziale podanym w tabeli Danych technicznych
(patrz strona obok).
Jeli d³ugoæ przewodu doprowadzaj¹cego wodê jest
niewystarczaj¹ca, nale¿y zwróciæ siê do
specjalistycznego sklepu lub do autoryzowanego
technika.
Nigdy nie nale¿y stosowaæ u¿ywanych lub starych
przewodów zasilaj¹cych, lecz tych, które znajduj¹ siê
na wyposa¿eniu urz¹dzenia.

15
PL
65 - 100 cm
Pod³¹czenie przewodu odp³ywowego
Pod³¹czyæ rurê
odp³ywow¹ wody do
kanalizacji lub otworu
spustowego w cianie
umieszczonego na
wysokoci od 65 cm do 1
m od ziemi, unikaj¹c
zginania jej.
Alternatywnie mo¿na
oprzeæ j¹ na brzegu
zlewu lub wanny,
przymocowuj¹c do kranu
za³¹czony do pralki
prowadnik (zobacz
rysunek).
Wolny koniec rury
odp³ywowej nie powinien
pozostawaæ zanurzony w
wodzie.
Odradza siê u¿ywanie rur-przed³u¿aczy; jeli
przed³u¿acz jest jednak konieczny, powinien mieæ on
ten sam przekrój, co rura oryginalna, i nie powinien
przekraczaæ 150 cm d³ugoci.
Pod³¹czenie elektryczne
Przed w³o¿eniem wtyczki do gniazdka elektrycznego
nale¿y siê upewniæ, czy:
gniazdko posiada uziemienie i jest zgodne z
obowi¹zuj¹cymi przepisami;
gniazdko jest w stanie wytrzymaæ maksymalne
obci¹¿enie mocy urz¹dzenia, wskazane w tabeli
Danych technicznych (patrz obok);
napiêcie zasilania mieci siê w wartociach
wskazanych w tabeli Danych technicznych (patrz
obok);
gniazdko jest kompatybilne z wtyczk¹ urz¹dzenia.
W przeciwnym razie nale¿y wymieniæ gniazdko lub
wtyczkê.
Nie nale¿y instalowaæ pralki na otwartym powietrzu,
nawet jeli miejsce to jest chronione daszkiem, gdy¿
wystawienie urz¹dzenia na dzia³anie deszczu i burz
jest bardzo niebezpieczne.
Po zainstalowaniu urz¹dzenia gniazdko elektryczne
powinno byæ ³atwo dostêpne.
Nie u¿ywaæ przed³u¿aczy ani wtyczek wielokrotnych.
Kabel nie powinien byæ zgiêty ani zgnieciony.
Kabel zasilania elektrycznego oraz wtyczka mog¹
byæ wymieniane wy³¹cznie przez upowa¿nionych
techników.
Uwaga! Producent nie ponosi ¿adnej
odpowiedzialnoci, jeli powy¿sze normy nie bêd¹
przestrzegane.
Dane techniczne
Model
AQ7F 29 U
Wymiary
szerokoæ cm 59,5
wysokoæ cm 85
g³êbokoæ cm 58
Pojemnoæ
od 1 do 7 kg
Dane pr¹du
elektrycznego
dane techniczne umieszczone s¹ na
tabliczce na maszynie
Dane sieci
wodoci¹gowej
Maksymalne cinienie 1 MPa (10 barów)
cinienie minimalne 0,05 MPa (0,5 barów)
pojemnoæ bêbna 52 litrów
Szybkoæ wirowania
do 1200 obrotów na minutê
Programy kontrolne
zgodnie z przepisami
EN 60456
program ; temperatura 60°C;
wykonane przy 7 kg za³adowanej bielizny.
Urz¹dzenie to zosta³o wyprodukowane
zgodnie z nastêpuj¹cymi przepisami EWG:
- 89/336/CEE z dn. 03/05/89
(o Kompatybilnoci Elektromagnetycznej)
wraz z kolejnymi zmianami
- 2006/95/CE (o Niskim Napiêciu)
- 2002/96/CE

PL
16
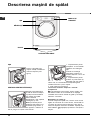
PULPIT
STEROWANIA
DRZWICZKI
UCHWYT
DRZWICZEK
PODEST
REGULOWANE NÓ¯KI
3
1
2
Opis urz¹dzenia
DRZWICZKI
W celu otwarcia drzwiczek
pos³ugiwaæ siê zawsze
odpowiednim uchwytem
(patrz rysunek).
SZUFLADKA NA RODKI PIOR¥CE
Znajduje siê wewn¹trz
maszyny, aby uzyskaæ do
niej dostêp nale¿y otworzyæ
drzwiczki.
Informacje dotycz¹ce
dozowania rodków
pior¹cych znajduj¹ siê w
rozdziale rodki pior¹ce i
bielizna.
Uwaga: na szufladkê na
proszek nale¿y nakleiæ
naklejkê z opisem programów i opcji. Naklejka
znajduje siê w kopercie z niniejsz¹ instrukcj¹ obs³ugi.
1. pojemnik do prania
wstêpnego: stosowaæ
rodek pior¹cy w proszku.
Przed wsypaniem rodka
pior¹cego nale¿y sprawdziæ,
czy nie jest w³o¿ona
dodatkowa przegródka 3.
2. pojemnik do prania:
stosowaæ rodek pior¹cy w
proszku lub w p³ynie. W
tym ostatnim przypadku
zaleca siê wlaæ go bezporednio przed uruchomieniem
pralki.
3. dodatkowy pojemnik: Wybielacz
U¿ycie dodatkowego pojemniczka 3 wyklucza
pranie wstêpne.
pojemnik na dodatkowe rodki: zmiêkczaj¹ce lub
dodatki p³ynne. Zaleca siê nigdy nie przekraczaæ
maksymalnego poziomu podanego na siatce i
rozcieñczaæ skoncentrowane rodki zmiêkczaj¹ce.
Funkcja stand by
Pralka ta, w myl nowych norm europejskich
zwi¹zanych z oszczêdnoci¹ elektryczn¹, posiada
system auto wy³¹czenia (stand by), który w³¹cza siê
po 30 minutach nie u¿ytkowania. Ponownie lekko
wcisn¹æ przycisk ON-OFF
i poczekaæ, a¿ pralka
ponownie w³¹czy siê.

17
PL
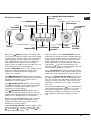
Przycisk
OPÓNIONE
URUCHOMIENIE
Pulpit sterowania
Przycisk z kontrolk¹ ON/OFF: nacisn¹æ na chwilê
przycisk w celu w³¹czenia lub wy³¹czenia maszyny.
Zielona kontrolka wskazuje, ¿e maszyna jest
w³¹czona. W celu wy³¹czenia pralki podczas prania
konieczne jest d³u¿sze przytrzymanie naciniêtego
przycisku, przez oko³o 3 sek.; krótkie lub przypadkowe
naciniêcie nie wystarczy do wy³¹czenia maszyny.
Wy³¹czenie maszyny podczas trwaj¹cego prania
anuluje program prania.
Pokrêt³o PROGRAMÓW: mo¿e byæ obracane w
obydwu kierunkach. W celu wybrania najlepszego
programu nale¿y sprawdziæ Tabela programów.
W czasie trwania programu pokrêt³o pozostaje
nieruchome.
Przycisk
TEMPERATURY: nacisn¹æ w celu
dokonania zmiany lub wykluczenia temperatury,
wartoæ wskazywana jest na umieszczonym wy¿ej
ekranie (patrz Jak wykonaæ cykl prania).
Przycisk
WIROWANIE: nacisn¹æ w celu dokonania
zmiany lub wykluczenia wirówki, wartoæ wskazywana
jest na umieszczonym wy¿ej ekranie (patrz Jak
wykonaæ cykl prania).
Przycisk
OPÓNIONE URUCHOMIENIE: nacisn¹æ
w celu ustawienia opónionego uruchomienia
wybranego programu, wartoæ ustawionego opónienia
widoczna jest na umieszczonym wy¿ej ekranie (patrz
Jak wykonaæ cykl prania).
Przyciski i kontrolki OPCJI: nacisn¹æ w celu wybrania
dostêpnych opcji. Kontrolka odpowiadaj¹ca wybranej
opcji pozostanie w³¹czona (patrz Jak wykonaæ cykl
prania).
Ikony FAZY PRANIA: w³¹czaj¹ siê wskazuj¹c
zaawansowanie cyklu (Pranie
P³ukanie
Wirowanie
Wypompowanie ).
Napis
zapala siê, kiedy cykl zostaje zakoñczony.
Przycisk z kontrolk¹ START/PAUSE: kiedy zielona
kontrolka pulsuje powoli nale¿y nacisn¹æ przycisk w
celu uruchomienia prania. Po uruchomieniu cyklu
kontrolka wieci w sposób ci¹g³y. W celu wybrania
trybu pauzy podczas prania nacisn¹æ ponownie
przycisk, kontrolka zacznie pulsowaæ w kolorze
pomarañczowym. Jeli kontrolka Blokada drzwiczek
jest wy³¹czona, mo¿na otworzyæ drzwiczki pralki.
W celu ponownego uruchomienia prania od miejsca, w
którym zosta³o przerwane, nale¿y ponownie nacisn¹æ
przycisk.
Kontrolka
BLOKADA DRZWICZEK: wskazuje, ¿e
drzwiczki s¹ zablokowane. W celu otwarcia drzwiczek
konieczne jest w³¹czenie pauzy cyklu (patrz Jak
wykonaæ cykl prania).
Przycisk oraz kontrolka
BLOKADA PRZYCISKÓW:
w celu uruchomienia lub wy³¹czenia blokady panelu
sterowania przytrzymaæ naciniêty przycisk przez
oko³o 2 sekundy. W³¹czona kontrolka wskazuje, ¿e
panel sterowania zosta³ zablokowany. W ten sposób
uniemo¿liwia siê dokonywanie przypadkowych zmian
w programach, zw³aszcza, jeli w domu obecne s¹
dzieci.
Kontrolka ECO: Ikona
w³¹czy siê, gdy, podczas
zmiany parametrów prania, zostanie zaoszczêdzone
co najmniej 10% energii. Przed wejciem maszyny w
tryb Stand by, ikona zawieci siê przez kilka sekund;
gdy maszyna jest wy³¹czona, odzysk energii
elektrycznej okrelony jest na oko³o 80%.
Przycisk TEMPERATURY
Pokrêt³o
PROGRAMÓW
Przyciski i kontrolki
OPCJI
Kontrolka
BLOKADA
DRZWICZEK
Przycisk z kontrolk¹
START / PAUZA
Ikony FAZY
PRANIA
Przycisk WIROWANIE
Przycisk oraz kontrolka
BLOKADA
PRZYCISKÓW
Przycisk z kontrolk¹
ON/OFF
Kontrolka
EKO
Przyciski i
kontrolki
OPCJI
Ekran TEMPERATURY
Ekran
WIROWANIE
Ekran OPÓNIONY START/
TRWANIE CYKLU

PL
18
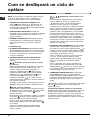
UWAGA: kiedy po raz pierwszy u¿ywa siê pralki
nale¿y wykonaæ cykl prania bez wsadu, ale z u¿yciem
rodka pior¹cego nastawiaj¹c program bawe³ny 90°
bez prania wstêpnego.
1. W£¥CZENIE URZ¥DZENIA. Nacisn¹æ przycisk
.
Wszystkie kontrolki w³¹cz¹ siê na 1 sekundê, po
czym pozostanie w³¹czona na sta³e kontrolka
przycisku
, kontrolka START/PAUSE bêdzie
powoli pulsowa³a.
2. ZA£ADUNEK BIELIZNY. Otworzyæ drzwiczki.
W³o¿yæ bieliznê uwa¿aj¹c, aby nie przekroczyæ
wielkoci ³adunku wskazanej w tabeli programów na
nastêpnej stronie.
3. DOZOWANIE RODKA PIOR¥CEGO. Wysun¹æ
szufladkê i wsypaæ rodek pior¹cy do odpowiednich
pojemników, tak jak wyjaniono to w Opis
urz¹dzenia.
4. ZAMKNIÊCIE DRZWICZEK.
5. WYBÓR PROGRAMU. Obracaæ POKRÊT£EM
PROGRAMÓW w prawo lub w lewo, a¿ do wybrania
odpowiedniego programu, do programu dobrana
zostanie temperatura, szybkoæ wirowania oraz
intensywnoæ prania, które mog¹ byæ zmieniane.
6. PERSONALIZACJA CYKLU PRANIA Pos³ugiwaæ
siê odpowiednimi przyciskami panelu sterowania:
Zmieniæ temperaturê i/lub wirowanie.
Maszyna automatycznie wywietla temperaturê i
przewidziane maksymalne wartoci dla ustawionego
programu lub ostatnie wartoci, jeli s¹ zgodne z
wybranym programem. Poprzez naciniêcie
przycisku
zmniejsza siê stopniowo temperaturê
a¿ do prania w zimnej wodzie (
). Poprzez
naciniêcie przycisku
zmniejsza siê stopniowo
wirowanie a¿ do jego wy³¹czenia (
). Dodatkowe
naciniêcie przycisków przywróci maksymalne
przewidywane wartoci.
Wyj¹tek: wybieraj¹c program Bawe³na
temperaturê mo¿na podnieæ a¿ do 90°.
Nastawiæ opóniony start.
Nacisn¹æ odpowiedni przycisk, a¿ do uzyskania
¿¹danego czasu opónienia. Podczas ustawiania
wywietlony zostanie czas opónienia wraz z
pulsuj¹cym symbolem
.
Po nastawieniu opónionego startu na ekranie
zostanie wywietlony nieruchomy symbol
i czas
cyklu. Po jednorazowym naciniêciu przycisku
wywietlony zostaje czas ustawionego opónienia.
W celu usuniêcia opónionego startu nale¿y
nacisn¹æ przycisk, a¿ na ekranie uka¿e siê napis
OFF; symbol
zganie.
Po naciniêciu przycisku START/PAUSE wartoæ
opónienia mo¿e byæ zmieniana jedynie malej¹co.
Zmiana charakterystyki cyklu.
Naciskaæ przyciski OPCJE w celu personalizacji
prania zgodnie z w³asnymi wymaganiami.
Nacisn¹æ przycisk w celu uruchomienia opcji;
zawieci siê odpowiednia kontrolka.
Nacisn¹æ ponownie przycisk w celu wy³¹czenia
opcji; kontrolka zganie.
Jeli wybrana opcja nie jest zgodna z nastawionym
programem, niezgodnoæ zostanie zasygnalizowana
przez pulsowanie kontrolki i sygna³ akustyczny
(3 sygna³y) a opcja nie bêdzie aktywowana.
Jeli wybrana opcja nie jest zgodna z inn¹,
ustawion¹ uprzednio, kontrolka odpowiadaj¹ca
pierwszej opcji bêdzie pulsowaæ i uruchomiona
zostanie jedynie opcja druga, kontrolka
uruchomionej opcji bêdzie wieciæ stale.
7. URUCHOMIENIE PROGRAMU. Nacisn¹æ przycisk
START/PAUZA. Odpowiednia kontrolka zawieci
sta³ym wiat³em a drzwiczki zostan¹ zablokowane
(kontrolka BLOKADA DRZWICZEK
wieci siê).
Ikony odpowiadaj¹ce fazom prania zawiec¹ siê
podczas cyklu wskazuj¹c bie¿¹c¹ fazê.
W celu dokonania zmiany programu w czasie
trwania cyklu nale¿y wybraæ funkcjê pauzy
naciskaj¹c na przycisk START/PAUSE a nastêpnie
wybraæ ¿¹dany cykl i nacisn¹æ ponownie przycisk
START/PAUSE. W celu otworzenia drzwi, gdy cykl
prania jest w³¹czony nale¿y nacisn¹æ przycisk
START/PAUSE; jeli kontrolka BLOKADA
DRZWICZEK
jest zgaszona otwarcie drzwi
bêdzie mo¿liwe. Nacisn¹æ ponownie przycisk
START/PAUSE, aby uruchomiæ program od
momentu, w którym zosta³ przerwany.
8. KONIEC PROGRAMU. Wskazywany jest przez
zawiecenie napisu END. Drzwiczki pralki mo¿na
otworzyæ natychmiast. Jeli kontrolka START/
PAUSE pulsuje, nacisn¹æ przycisk w celu
zakoñczenia cyklu. Otworzyæ drzwiczki, wyj¹æ
bieliznê i wy³¹czyæ urz¹dzenie.
Jeli uruchomiony ju¿ cykl ma byæ anulowany nale¿y
przytrzymaæ d³u¿ej naciniêty przycisk
, a¿ cykl
zostanie przerwany i urz¹dzenie wy³¹czy siê.
Torba na pikowane ko³dry, zas³ony i delikatne
tkaniny
Dziêki specjalnemu workowi dostarczonemu z
produktem, pralka Aqualtis pozwala na wypranie
cennych i delikatnych rzeczy chroni¹c je przed
zniszczeniem. Zaleca siê zastosowaæ go do prania
ko³der pikowanych i puchowych z syntetycznym
wsypem.
Jak wykonaæ cykl prania

19
PL
Opcje
Super Pranie
Dziêki zastosowaniu wiêkszej iloci wody podczas fazy
pocz¹tkowej cyklu i zastosowaniu d³u¿szego czasu, opcja
ta gwarantuje pranie o wysokiej skutecznoci.
Funkcja ta przydatna jest w celu usuwania bardziej
opornych plam. Mo¿e byæ
u¿ywana z i bez wybielacza.
Jeli zamierza siê wykonaæ
cykl wybielania nale¿y
wstawiæ dodatkowy
pojemniczek 3, na
wyposa¿eniu, do przegródki
1. Nie przekraczaæ
maksymalnej iloci
wybielacza w p³ynie, podanej
na g³ównym wskaniku
(zobacz rysunek). Aby
wykonaæ tylko wybielanie bez kompletnego cyklu prania,
nale¿y wlaæ wybielacz do dodatkowego pojemnika 3 i
nastawiæ program P³ukanie
oraz uruchomiæ funkcjê
Super Pranie
.
Nie mo¿na jej zastosowaæ przy programach
, , ,
, , , , .
£atwe Prasowanie
Wybieraj¹c tê opcjê pranie oraz wirowanie zostan¹
odpowiednio zmienione w celu ograniczenia powstawania
zgnieceñ. Po zakoñczeniu cyklu pralka wykona powolne
obroty bêbna, kontrolki £atwe Prasowanie oraz START/
PAUSE bêd¹ pulsowa³y. W celu zakoñczenia cyklu
nacisn¹æ przycisk START/PAUSE lub przycisk £atwe
Prasowanie. W programie Jedwab
urz¹dzenie
zakoñczy cykl moczeniem bielizny i kontrolka £atwe
Prasowanie bêdzie pulsowa³a. W celu odprowadzenia
wody i wyjêcia prania nale¿y nacisn¹æ przycisk START/
PAUSE lub przycisk £atwe Prasowanie.
Nie mo¿na jej zastosowaæ przy programach
, , ,
, .
Oszczêdnoæ Czasu
Gdy wybrana zostanie ta opcja trwanie programu zostanie
zmniejszone o 30% do 50% na podstawie wybranego
cyklu, gwarantuj¹c w tym samym czasie oszczêdnoæ
wody i energii. Nale¿y u¿ywaæ tego cyklu dla tkanin, które
nie s¹ zbyt brudne.
Nie mo¿na jej zastosowaæ przy programach
, , ,
, , , , , .
Super P³ukanie
Wybieraj¹c tê opcjê zwiêksza siê skutecznoæ p³ukania i
zapewnia siê maksymalne usuwanie rodka pior¹cego.
Jest przydatne dla w³ókna szczególnie wra¿liwego na
rodki pior¹ce. Radzimy u¿ywaæ tej opcji z pralk¹ o pe³nym
wsadzie i z wiêksz¹ iloci¹ rodka pior¹cego.
Nie mo¿na jej zastosowaæ przy programach
, , .
3
1
2
(*) Uwaga: po oko³o 10 minutach od START, urz¹dzenie na podstawie wsadu obliczy i poka¿e czas pozosta³y do zakoñczenia programu.
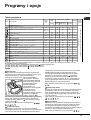
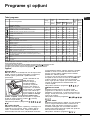
Programy i opcje
Tabela programów
(*) Mo¿liwa jest kontrola czasu trwania programów na
wywietlaczu.
Dla wszystkich Instytucji homologacyjnych:
1) Program kontrolny zgodny z norm¹ EN 60456: ustawiæ program
, wybieraj¹c temperaturê 60°C.
2) Program bawe³na, d³ugi: ustawiæ program
, wybieraj¹c temperaturê 40°C.
3) Program bawe³na, krótki: ustawiæ program
, wybieraj¹c temperaturê 40°C.
Ikona Opis programu
Temp.
maks.
(°C)
Prêdkoæ
maks.
(obroty na
minutê)
rodki pior¹ce i dodatki
£adunek
max (kg)
Czas
trwania
cyklu
rodek
pior¹cy
rodek
zmiêkczaj¹cy
Wybielacz
Programy Bawe³na
Bawe³na
z praniem wstêpnym
(Dodawaæ detergent do odpowiedniego pojemnika).
90° 1200
ll
- 7
Bawe³na
(1):
tkaniny bia³e i kolorowe, wytrzyma³e, mocno zabrudzone.
60°
(Max. 90°)
1200
ll l
7
Bawe³na
(2):
tkaniny bia³e i kolorowe, delikatne, mocno zabrudzone.
40° 1200
ll l
7
Bawe³na kolorowa
(3)
40° 1200
ll l
7
Koszule
40° 600
ll l
2
Jeans
40° 800
ll
- 3,5
Programy Specjalne
Baby:
tkaniny kolorowe, delikatne, mocno zabrudzone.
40° 800
ll l
2
Syntetyczne
trwa³e
60° 800
ll l
3
Syntetyczne
delikatne
40° 800
ll l
3
Pociel i Rêczniki:
do bielizny pocielowej i k¹pielowej.
60° 1200
ll l
7
Puch:
do odzie¿y wype³nionej gêsim puchem.
30° 1000
ll
- 2
Jedwab:
do jedwabiu, wiskozy, bielizny.
30° 0
ll
- 1
We³na:
do we³ny, kaszmiru, itp.
40° 600
ll
- 1,5
Mix 30:
w celu szybkiego odwie¿enia lekko zabrudzonych tkanin
(niewskazany dla we³ny, jedwabiu i tkanin przeznaczonych do prania rêcznego).
30° 800
ll
- 3
Programy czêciowe
P³ukanie
- 1200 -
ll
7
Wirowanie
- 1200 - - - 7
Wypompowanie
- 0 - - - 7

PL
20
rodki pior¹ce i bielizna
rodek pior¹cy
Wybór oraz iloæ rodka pior¹cego zale¿ne s¹ od
rodzaju tkaniny (bawe³na, we³na, jedwab...), od koloru,
od temperatury prania, od stopnia zabrudzenia oraz od
twardoci wody.
Dok³adne dozowanie rodka pior¹cego zapobiega
marnotrawstwu i przyczynia siê do ochrony
rodowiska: rodki pior¹ce, mimo ¿e ulegaj¹
biodegradacji, zawsze zawieraj¹ sk³adniki, które
zak³ócaj¹ równowagê rodowiska naturalnego.
Zaleca siê:
stosowanie rodków pior¹cych w proszku dla tkanin
z bia³ej bawe³ny i do prania wstêpnego.
stosowanie rodków pior¹cych w p³ynie dla
delikatnych tkanin z bawe³ny oraz dla wszystkich
programów z nisk¹ temperatur¹.
stosowanie p³ynnych rodków pior¹cych do we³ny i
jedwabiu.
rodek pior¹cy powinien byæ w³o¿ony przed
rozpoczêciem prania do odpowiedniej komory lub do
dozownika wk³adanego bezporednio do bêbna. W
takim przypadku nie mo¿na wybraæ cyklu Bawe³na z
praniem wstêpnym.
Nie u¿ywaæ rodków do prania rêcznego, poniewa¿
tworz¹ za du¿o piany.
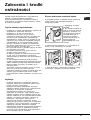
Przygotowanie bielizny
Rozprostowaæ dobrze ubrania przed w³o¿eniem ich
do pralki.
Podzieliæ bieliznê wed³ug rodzajów tkaniny (symbol
na etykiecie ubrania) oraz koloru uwa¿aj¹c na
oddzielenie odzie¿y kolorowej od bia³ej;
Opró¿niæ kieszenie i sprawdziæ guziki;
Nie przekraczaæ wartoci wskazanych w Tabela
programów odnosz¹cych siê do ciê¿aru bielizny
suchej.
Ile wa¿y bielizna?
1 przecierad³o 400 500 gr
1 poszewka 150 200 gr
1 obrus 400 500 gr
1 szlafrok 900 1200 gr
1 rêcznik do r¹k 150 250 gr
1 spodnie jeansowe 400 500 gr
1 koszula 150 200 gr
Zalecenia dotycz¹ce prania
Koszule: Nale¿y u¿ywaæ odpowiedniego programu
Koszule
do prania koszul z ró¿nego materia³u i
koloru w celu zagwarantowania jak najlepszej ochrony
ubrañ.
Jeans: u¿ywaæ odpowiedniego programu Jeans
dla
wszystkich ubrañ z tkaniny Denim; wywróciæ ubrania
przed praniem i u¿ywaæ rodka pior¹cego w p³ynie.
Baby: u¿ywaæ odpowiedniego programu Baby
w
celu usuniêcia brudu typowego dla dzieci i usun¹æ
rodek pior¹cy z tkanin w celu unikniêcia reakcji
alergicznych delikatnej skóry dzieci. Cykl ten zosta³
opracowany w celu ograniczenia liczby bakterii
poprzez wykorzystanie wiêkszej iloci wody i
optymalizacji dzia³ania specjalnych dodatków
higienizuj¹cych, którymi uzupe³niany jest rodek
pior¹cy.
Po zakoñczeniu prania urz¹dzenie wykona seriê
wolnych obrotów bêbna, aby zapobiec powstawaniu
zagnieceñ; w celu zakoñczenia cyklu nale¿y nacisn¹æ
przycisk START/PAUSE.
Jedwab: stosowaæ odpowiedni program Jedwab
do prania wszelkiej odzie¿y jedwabnej. Zaleca siê
stosowanie specjalnego rodka pior¹cego do tkanin
delikatnych.
Firany: zastosowaæ program Jedwab
. Nale¿y je
z³o¿yæ i w³o¿yæ do dostarczonego worka.
We³na: to jedyna pralka, która uzyska³a presti¿owe
oznaczenie Woomark Platinium Care (M.0508) od The
Woolmark Company, która certyfikuje pranie w pralce
wszystkich wyrobów we³nianych, tak¿e posiadaj¹cych
oznaczenie Tylko pranie rêczne
. Dziêki
programowi We³na w pralce mo¿na praæ wszystkie
ubrania z we³ny z gwarancj¹ najwy¿szych osi¹gów.
Puch: aby wypraæ produkty pikowane z puchem gêsim
takie jak ko³dry pojedyncze (nie wa¿¹cej wiêcej jak 2
kg), poduszki, kurtki puchowe nale¿y zastosowaæ
w³aciwy program Puch
. Nale¿y w³o¿yæ produkty
puchowe do bêbna wyginaj¹c rogi do wnêtrza (patrz
rysunki)) ale tak, aby nie przekroczyæ ¾ jego
pojemnoci.
Aby uzyskaæ optymalne wyniki prania zaleca siê
wlanie do szufladki p³ynnego rodka do prania.
Ko³dry pikowane: aby wypraæ ko³dry pikowane z
syntetycznym wype³nieniem, nale¿y zastosowaæ
dostarczony w tym celu worek i ustawiæ program
Puch
.
Bielizna k¹pielowa i pocielowa: pralka pozwala na
pranie bielizny z ca³ego domu w jednym tylko cyklu
Pociel i Rêczniki
, który optymalizuje zu¿ycie
rodka zmiêkczaj¹cego i pozwala Ci na
zaoszczêdzenie czasu i pieniêdzy. Zalecamy
stosowanie rodka pior¹cego w proszku.
Uporczywe zabrudzenia: dobrze jest wypraæ
uporczywe zaplamienia p³ynnym myd³em przed praniem
oraz zastosowaæ program Bawe³na z praniem wstêpnym.
System równowa¿enia ³adunku
Aby unikn¹æ nadmiernych drgañ i jednorodnie roz³o¿yæ
wsad, przed ka¿dym wirowaniem bêben wykonuje
nieco szybsze obroty ni¿ podczas prania. Jeli po
zakoñczeniu kolejnych prób wsad nie zostanie
roz³o¿ony w sposób wywa¿ony, urz¹dzenie dokona
wirowania z szybkoci¹ mniejsz¹ od przewidywanej.
W przypadku wyst¹pienia nadmiernego
niezrównowa¿enia pralka dokona roz³o¿enia wsadu
zamiast odwirowania. Aby zapewniæ lepsze roz³o¿enie
wsadu oraz jego w³aciwe zrównowa¿enie, zaleca siê
wymieszanie du¿ych i ma³ych sztuk bielizny.
Strona się ładuje...
Strona się ładuje...
Strona się ładuje...
Strona się ładuje...
Strona się ładuje...
Strona się ładuje...
Strona się ładuje...
Strona się ładuje...
Strona się ładuje...
Strona się ładuje...
Strona się ładuje...
Strona się ładuje...
Strona się ładuje...
Strona się ładuje...
Strona się ładuje...
Strona się ładuje...
-
 1
1
-
 2
2
-
 3
3
-
 4
4
-
 5
5
-
 6
6
-
 7
7
-
 8
8
-
 9
9
-
 10
10
-
 11
11
-
 12
12
-
 13
13
-
 14
14
-
 15
15
-
 16
16
-
 17
17
-
 18
18
-
 19
19
-
 20
20
-
 21
21
-
 22
22
-
 23
23
-
 24
24
-
 25
25
-
 26
26
-
 27
27
-
 28
28
-
 29
29
-
 30
30
-
 31
31
-
 32
32
-
 33
33
-
 34
34
-
 35
35
-
 36
36


Indesit AQ7F 29 U (EU) instrukcja
- Kategoria
- Pralki
- Typ
- instrukcja
w innych językach
Powiązane artykuły
Inne dokumenty
-
Whirlpool AQ83D 29X EU/B instrukcja
-
Ariston AQ7L 105 U Karta katalogowa
-
Hotpoint AQ7L 29 U (EU) instrukcja
-
-
HOTPOINT/ARISTON AQLF9D 69 U (EU)/B instrukcja
-
-
Hotpoint Ariston AQ7F 29 U H (EU) instrukcja
-