Neomounts PLASMA-M-W2250 Instrukcja obsługi
- Typ
- Instrukcja obsługi

INSTRUCTION MANUAL
WWW.NEOMOUNTS.COM
PLASMA-W2500BLACK/SILVER
PLASMA-M2500(T)BLACK/SILVER
PLASMA-W2250BLACK/SILVER
PLASMA-M2250BLACK/SILVER
EN
NL
DE
FR
IT
ES
PT
DK
NO
SE
FI
PL
CS
SK
RO
Floor stand
Vloersteun
Bodenständer
Support au sol
Supporto da pavimento
Soporte de suelo
Suporte de chão
Gulvstander
Gulv stativ
Golvstativ
Lattiateline
Podlahový stojan
Podlahový stojan
Stativ pentru podea
min 1145 mm - max 1645 mm
min 1481 mm - max 1981 mm
min 1030 mm - max 1530 mm
1035 mm
735 mm
900 mm
1035 mm
890 mm
420 mm
100 mm
165 mm
440 mm
735 mm
640 mm
min 1440 mm - max 1940 mm
min 1120 mm - max 1620 mm
min 1190 mm - max 1690 mm
1035 mm
860 mm
420 mm 165 mm
440 mm
735 mm
640 mm
0°/90°
640 mm
min 1172 mm - max 1672 mm
min 837 mm - max 1337 mm
897 mm
100 mm

Attach the base (E) to the vertical support (D)
Fixer la base (E) au support vertical (D)
Fissare la base (E) al supporto verticale (D)
Fixar a base (E) ao suporte vertical (D)
screen
et vers l’écran
Installare la barra superiore (A) con i fori asolati rivolti verso l’alto e verso lo schermo e
installare la barra inferiore (B) con i fori asolati rivolti verso il basso e verso lo schermo
Instalar a barra superior (A) com os orifícios ranhurados virados para cima e para o
ecrã e instalar a barra inferior (B) com os orifícios ranhurados virados para baixo e
para o ecrã
the mount
supporto
la altura del soporte
Prima e mantenha premidos os botões do controlo remoto (L) para
ajustar a altura do suporte
EN
NL
DE
FR
IT
ES
PT
PL
EN
NL
DE
FR
IT
ES
PT
PL
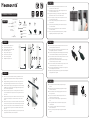
PARTS
EN
NL
DE
FR
IT
ES
PT
PL
EN
NL
DE
FR
IT
ES
PT
PL
EN
NL
DE
FR
IT
ES
PT
PL
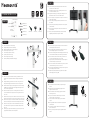
PLASMA-M2250BLACK/SILVER
STEP 1
STEP 2
STEP 3
STEP 4
STEP 5
E
A
B
F
C
L
G
D
DL
Tool
Pencil Drill Tape measure
0-130 kg200x200 -
800x600 mm
120-170 cm
C. “Lift&Lock”-brackets (x2)
A. Upper bar (x1)
B. Lower bar (x1)
D. Motorised
column (x1)
E. Trolley (x1)
F. M8x40mm (x4)
G. M8x85mm (x2)
I. M8x16mm (x4)
H. M6x30mm (x2)
J. M6x16mm (x4)
L. Control unit (x1) M. Cable clip (x3)K. Power cable (x1)

Attach the base (D) to the vertical support (C)
Fixer la base (D) au support vertical (C)
Fissare la base (D) al supporto verticale (C)
Fixar a base (D) ao suporte vertical (C)
Assemble and install the frame (A) to the column (C)
Zet het frame in elkaar en installeer het frame (A) aan de kolom (C)
Assemblez et installez le cadre (A) sur la colonne (C)
Installare la piastra VESA (A) alla colonna (C)
Montar e instalar a placa VESA (A) na coluna (C)
EN
NL
DE
FR
IT
ES
PT
PL
EN
NL
DE
FR
IT
ES
PT
PL
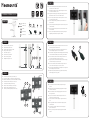
PARTS
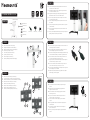
PLASMA-M2500BLACK/SILVER
STEP 1
STEP 1
D
A
F
F
G
G
E
E
C
EC
Tool
Pencil Drill Tape measure
0-150 kg200x200 -
800x600 mm
111-161 cm
B. “Lift&Lock”-brackets (x2)
A. Frame (x1)
C. Motorised
column (x1)
D. Trolley (x1)
the mount
supporto
la altura del soporte
ajustar a altura do suporte
EN
NL
DE
FR
IT
ES
PT
PL
EN
NL
DE
FR
IT
ES
PT
PL
EN
NL
DE
FR
IT
ES
PT
PL
STEP 3
STEP 4
STEP 5
B
STEP 2
E. M8x40mm (x8)
F. M8x75mm (x4)
H. M8x16mm (x4)
G. M8 (x4)
I. M6x16mm (x4)
K. Control unit (x1) L. Cable clip (x3)J. Power cable (x1)

Attach the base (D) to the vertical support (C)
Fixer la base (D) au support vertical (C)
Fissare la base (D) al supporto verticale (C)
Fixar a base (D) ao suporte vertical (C)
Install the frame (A) to the column (C)
Installeer het frame (A) aan de kolom (C)
Installez le cadre (A) sur la colonne (C)
Installare la piastra VESA (A) alla colonna (C)
Instalar la placa VESA (A) a la columna (C)
Instalar a placa VESA (A) na coluna (C)
EN
NL
DE
FR
IT
ES
PT
PL
EN
NL
DE
FR
IT
ES
PT
PL
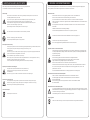
PARTS
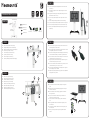
PLASMA-M2500TBLACK/SILVER
STEP 1
STEP 1
D
F
E
A
C
C
Tool
Pencil Drill Tape measure
0-150 kg200x200 -
800x600 mm
Vert. 89-139 cm
Hor. 95-145 cm
B. Vertical brackets (x2)
A. Tiltable
frame (x1)
C. Motorised
column (x1)
D. Trolley (x1)
STEP 2
cavo di alimentazione (I) al supporto e alla presa
mount
van de steun aan te passen
porto
altura del soporte
a altura do suporte
EN
NL
DE
FR
IT
ES
PT
PL
EN
NL
DE
FR
IT
ES
PT
PL
EN
NL
DE
FR
IT
ES
PT
PL
STEP 3
STEP 4
STEP 5
B
EB
F
I
secure them (F)
zet ze vast (F)
Bodenständer und sichern Sie sie (F)
riser (F)
zabezpiecz (F)
E. M8x40mm (x8)
F. M6x70mm (x4)
H. M6x16mm (x4)
G. M8x16mm (x4)
J. Control unit (x1) K. Cable clip (x3)I. Power cable (x1)

""
1
2
1
2
2
2
3
Monteer de kolom (D) aan de muur
Fixez la colonne (D) au mur
Conecte la columna (D) a la pared
screen
et vers l’écran
Installare la barra superiore (A) con i fori asolati rivolti verso l’alto e verso lo schermo
e installare la barra inferiore (B) con i fori asolati rivolti verso il basso e verso lo
schermo
Instalar a barra superior (A) com os orifícios ranhurados virados para cima e para o
ecrã e instalar a barra inferior (B) com os orifícios ranhurados virados para baixo e
para o ecrã
EN
NL
DE
FR
IT
ES
PT
PL
EN
NL
DE
FR
IT
ES
PT
PL
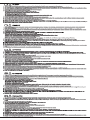
PARTS
PLASMA-W2250BLACK/SILVER
STEP 1
STEP 2
O
A
B
I
E
F G
D
Tool
Pencil Drill Tape measure
Tool Pencil
Drill
Tape measure
0-130 kg200x200 -
800x600 mm
105-155 cm
C. “Lift&Lock”-brackets (x2)
A. Upper bar (x1)
B. Lower bar (x1)
D. Motorised
column (x1)
O. Levelling feet (x4)
cavo di alimentazione (M) al supporto e alla presa
the mount
van de steun aan te passen
porto
la altura del soporte
Prima e mantenha premidos os botões do controlo remoto (N) para
ajustar a altura do suporte
EN
NL
DE
FR
IT
ES
PT
PL
EN
NL
DE
FR
IT
ES
PT
PL
EN
NL
DE
FR
IT
ES
PT
PL
STEP 3
STEP 4
STEP 5
C
N M
N
E. Z-Bracket
(x2)
F. Hexagon sliding
block with bolt (x2)
H. 8mm
(x2)
G. M8
(x2)
I. M8x85mm (x2)
K. M8x16mm (x4)
J. M6x30mm (x2)
L. M6x16mm (x4)
N. Control unit (x1) P. Cable clip (x3)M. Power cable (x1)

Monteer de kolom (C) aan de muur
Fixez la colonne (C) au mur
Conecte la columna (C) a la pared
EN
NL
DE
FR
IT
ES
PT
PL
PARTS
PLASMA-W2500BLACK/SILVER
STEP 1
STEP 2
Tool
Pencil Drill Tape measure
Tool Pencil
Drill
Tape measure
0-150 kg200x200 -
800x600 mm
119-169 cm
B. “Lift&Lock”-brackets (x2)
A. Frame (x1)
C. Motorised
column (x1)
D. Levelling feet (x4)
cavo di alimentazione (N) al supporto e alla presa
the mount
van de steun aan te passen
porto
la altura del soporte
Prima e mantenha premidos os botões do controlo remoto (O) para
ajustar a altura do suporte
EN
NL
DE
FR
IT
ES
PT
PL
EN
NL
DE
FR
IT
ES
PT
PL
EN
NL
DE
FR
IT
ES
PT
PL
STEP 3
STEP 4
STEP 5
B
O N
O
Assemble and install the frame (A) to the column (C)
Zet het frame in elkaar en installeer het frame (A) aan de kolom (C)
Assemblez et installez le cadre (A) sur la colonne (C)
Installare la piastra VESA (A) alla colonna (C)
Montar e instalar a placa VESA (A) na coluna (C)
EN
NL
DE
FR
IT
ES
PT
PL
A
I
IC
""
1
2
1
2
2
2
3
D
E
E. Z-Bracket
(x2)
F. Square sliding
block with bolt (x2)
H. 8mm
(x2)
G. M8
(x2)
O. Control unit (x1) P. Cable clip (x3)N. Power cable (x1)
E. M8x40mm (x8)
F. M8x75mm (x4)
H. M8x16mm (x4)
G. M8 (x4)
I. M6x16mm (x4)
F G


IMPORTANT HAZARD & SAFETY NOTES
Electrical safety
General tips for mechanical safety
Special tips for moveable und free standing units
Special tips for wall mounted units
Instructions for disposal
Elektrische Sicherheit
Allgemeine Hinweise zur mechanischen Sicherheit
Besondere Hinweise für fahrbare und freistehende Systeme
Besondere Hinweise für wandmontierte Systeme
Entsorgungshinweis
GEFAREN- & SICHERHEITSHINWEISE

-
 1
1
-
 2
2
-
 3
3
-
 4
4
-
 5
5
-
 6
6
-
 7
7
-
 8
8
-
 9
9


Neomounts PLASMA-M-W2250 Instrukcja obsługi
- Typ
- Instrukcja obsługi
w innych językach
- español: Neomounts PLASMA-M-W2250 Manual de usuario
- Deutsch: Neomounts PLASMA-M-W2250 Benutzerhandbuch
- português: Neomounts PLASMA-M-W2250 Manual do usuário
- français: Neomounts PLASMA-M-W2250 Manuel utilisateur
- English: Neomounts PLASMA-M-W2250 User manual
Powiązane artykuły


Inne dokumenty
-
Sony SU-W210 Instrukcja obsługi
-
Garmin Reactor 40-kickerautopilot Instrukcja instalacji
-
Garmin Reactor™ 40 Kicker Autopilot Instrukcja instalacji
-
Chief ICMPFM2T03 Instrukcja instalacji
-
-
Garmin Montana<sup></sup> 600 Instrukcja obsługi
-
Garmin GPSMAP® 276Cx Instrukcja obsługi
-
Manual de Montana 600 Instrukcja obsługi
-