DREAME H11 Max Instrukcja obsługi
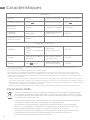
- Kategoria
- Odkurzacze
- Typ
- Instrukcja obsługi

Please read this manual carefully before use and retain it
for future reference.
Wet and Dry Vacuum
User Manual


THANK YOU
FOR PURCHASING THIS DREAME
WET AND DRY VACUUM.
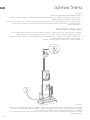
Registration Quick Start
Welcome to register a Dreame account by
scaning the QR code. You are available
for the User Manual and Special Oers.
With it you are obtaining a high quality product that is
engineered for optimal performance.
If you have any questions on the product,
please contact us: [email protected].

Contents
EN Dreame H11 Max Wet and Dry Vacuum User Manual 001
DE Dreame H11 Max Kabellos Nass-Trockensauger
Bedienungsanleitung 021
FR Dreame H11 Max Aspirateur eau et poussière sans l
Manuel d'utilisation 041
IT Dreame H11Max Aspirapolvere Secco Umido senza
Fili Manuale d'Uso 061
ES Manual de Usuario de Aspirador Inalámbrico Seco-Húmedo
Dreame H11 Max 081
RU Беспроводной пылесос для влажной и сухой уборки
Dreame H11 Max Инструкция по эксплуатации 101
PL Instrukcja obsługi Bezprzewodowego Odkurzacza do pracy
na sucho i mokro Dreame H11 Max 121
SA H11 Max 161
HE 141
שמתשמל ךירדמ Dreame לש H11 Max יטוחלא קבא באוש

1
EN
• When using an electrical appliance, basic precautions should always be followed,
including the following:
• READ ALL INSTRUCTIONS BEFORE USING (THIS APPLIANCE). Failure to follow the
warnings and instructions may result in electric shock, re and/or serious injury.
To reduce the risk of re, electric shock, or injury:
Safety Information
WARNING-
Important Safety Instructions
For Household Use Only
• Use only as described in this user guide. Use only manufacturer's recommended
attachments.
• Use indoors only, on non-carpeted oor surfaces such as vinyl, tile, sealed wood, etc.
Be careful not to run over loose objects or edges of area rugs. Stalling the brush may
result in premature belt failure.
• Do not allow to be used as a toy. Close attention is necessary when used by or near
children, pets or plants.
• Do not use a ammable or combustible liquid to clean a oor./Do not use to pick up
ammable or combustible liquids, such as gasoline, or use in areas where they may
be present.
• For the purposes of recharging the battery, only use the detachable supply
unit provided with this appliance. Use only with YLS0251B-E260090 (EU) /
YLS0251A-A260090 (AU) supply unit.
• Recharge the vacuum only with the charger specied by the manufacturer. A charger
that is suitable for one type of battery pack may create a risk of re when used with
another battery pack.
• Do not immerse the vacuum in liquid. Use only on oor moistened by cleaning process.
• This appliance can be used by children aged from 8 years and above and persons with
reduced physical, sensory or mental capabilities or lack of experience and knowledge
if they have been given supervision or instruction concerning use of the appliance
in a safe way and understand the hazards involved. Children shall not play with the
appliance. Cleaning and user maintenance shall not be made by children without
supervision.
• This appliance is not intended for use by persons (including children) with reduced
physical, sensory or mental capabilities, or lack of experience and knowledge, unless
they have been given supervision or instruction concerning use of the appliance by a
person responsible for their safety.
• Children should be supervised to ensure that they do not play with the appliance.
• Plastic lm can be dangerous. To avoid the danger of suocation, keep it away from
children.
• Keep hair, loose clothing, ngers, and all parts of the body away from openings and
moving parts of the appliance and its accessories.

2
EN Safety Information
• Only use the type and amount of liquids specied under the operations section of
this guide.Liquid must not be directed towards equipment containing electrical
components.
• Do not put any object into openings.Do not use the vacuum when any opening is
blocked; keep free of dust, lint, hair, and anything that may reduce air ow.
• Do not use it without lters in place.
• Do not use the vacuum with damaged cord or plug.If the cord or plug is damaged, it
must be replaced by the manufacturer, its service agent or similarity qualied persons
in order to avoid a hazard.
• Do not use the vacuum to pick up ammable or combustible liquids, such as
petroleum, or use the vacuum in areas where they may be present.
• Do not pick up toxic material (chlorine bleach, ammonia, drain cleaner, etc.). Do not
pick up hard or sharp objects such as glass, nails,screws,coins, etc..
• Do not use the appliance in an enclosed space lled with vapour given o by oil-
based paint, paint thinner, some moth-proong substances, ammable dust, or other
explosive or toxic vapour.Do not pick up anything that is burning or smoking, such as
cigarettes, matches or hot ashes.
• Do not charge the unit outdoors. Do not recharge, disassemble, heat above 60° C, or
incinerate.
• Charger base output terminals should not be short-circuited. Do not use it with
damaged cable or charger. If the appliance has been dropped, damaged, left
outdoors, dropped into water, or is not working as it should, return it to a service
center.
• Keep the charger cable away from heated surfaces. Do not handle the charger plug or
appliance with wet hands. To unplug, grasp the charger plug, rather than the cable.
• Do not pull or carry charger by cable, use cable as a handle, close door on cable, or
pull cable around sharp edges or corners.
• Switch o when not in use, before cleaning, maintainingor servicing the appliance,
and before connecting or disconnecting the tool with a moving brush.
• The appliance must be disconnected from the power supply when removing the
battery. Keep batteries out of the reach of children. Never put batteries in mouth. If
swallowed, contact your physician or local poison control.
• Do not use appliance that is damaged or modied. Damaged or modied batteries
may exhibit unpredictable behavior resulting in re, explosion or risk of injury.
• Do not expose the appliance to re or excessive temperature. Exposure to re or
temperature above 130° C may cause an explosion.
• Follow all charging instructions and do not charge the appliance outside of the
temperature range specied in the battery and increase the risk of re.
• Do not incinerate the appliance even if it is severely damaged. The battery must be
disposed of safely, and it must be removed from the appliance before it is scrapped to
avoid an explosion in the re.
• Under abusive conditions, never contact the battery from which the liquid may be
ejected. If contact accidentally occurs, rinse with water. If liquid contacts eyes, seek
medical help immediately. Liquid ejected from the battery may cause irritation or
burns.
• Ensure that the appliance is placed on a horizontal surface. Do not use the appliance

3
EN
at the same position if the appliance is equipped with a brush roller and the handle is
not completely upright. Do not store the appliance in a place where it may freeze.
• Use extra care when cleaning on stairs.
• Prevent unintentional starting. Ensure the switch is in the OFF-position before picking
up or carrying the appliance. Carrying the appliance with your nger on the switch or
energizing appliance that have the switch on invites accidents.
• This appliance contains batteries that are only replaceable by skilled persons.
Safety Information
SAVE THESE INSTRUCTIONS
IMPORTANT SAFEGUARDS
• Have servicing performed by a qualied repair person using only identical
replacement parts. This will ensure that the safety of the product is maintained.
• Do not modify or attempt to repair the appliance excepts as indicated in the
instructions for use and care.
• Do not use and store in extremely hot or cold environments (below 0℃ /32° F or above
40° C/104° F). Please charge the cordless vacuum in temperature above 0℃ /32° F and
below 40℃ /104° F).
• If appliance has been dropped, damaged, left outdoors, dropped into water, or is
not working as it should, never attempt to operate it. Please have it repaired at an
authorized service center.
We, Dreame Trading (Tianjin) Co., Ltd., hereby, declares that this equipment is in
compliance with the applicable Directives and European Norms, and amendments.
The full text of the EU declaration of conformity is available at the following internet
address: www.dreame-technology.com
For detailed e-manual, please go to
https://www.dreame-technology.com/pages/user-manuals-and-faqs

4
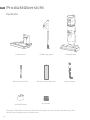
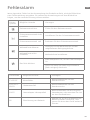
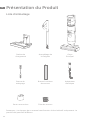
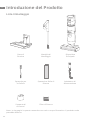
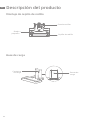
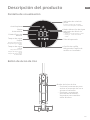
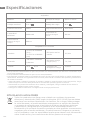
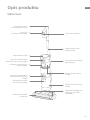
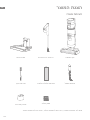
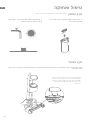
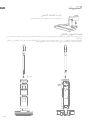
EN Product Overview
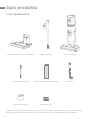
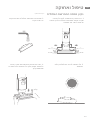
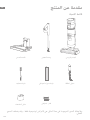
Packing List
Handle Assembly Main Body
Power Adapter
Charging Base
Accessory Holder
Cleaning Brush Back-up Roller Brush
Back-up Filter
Note:The images in this manual are for illustrative purposes only. The actual product
may dier.

5
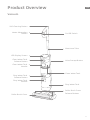
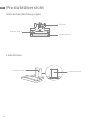
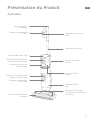
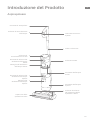
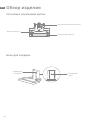
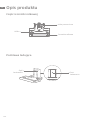
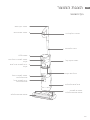
EN
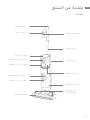
Water Absorption
Button
Product Overview
Vacuum
Aluminum Tube
Voice Prompt Button
Clean Water Tank
Dirty Water Tank
Roller Brush Cover
Release Buttons
Self-Cleaning Button
On/O Switch
LED Display Screen
Clean Water Tank
Handle
Dirty Water Tank
Handle
Roller Brush Cover
Clean Water Tank
Release Button
Dirty Water Tank
Release Button

6
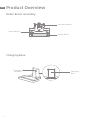
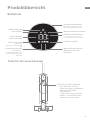
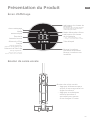
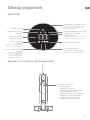
EN Product Overview
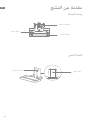
Roller Brush Assembly
Charging Base
Charging
Contacts Charging
Port
Small Wheel
Auxiliary Wheel
Roller Brush

7
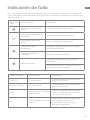
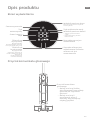
EN
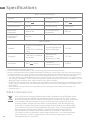
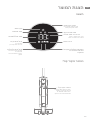
Product Overview
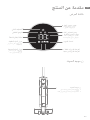
Display Screen
Water Absorption Mode
Tube Blocked
Roller Brush Stuck /
Roller Brush Not Installed
Dirty Water Tank
Battery Level Indicator
Self-Cleaning
Auto Mode
Battery Status/
Error
Clean Water Tank
Blinking orange:
clean water tank empty
Blinking red:
dirty water tank full
dirty water tank not
installed
• Green: battery level > 20%
• Orange: battery level ≤ 20%
Voice Prompt Button
Voice Prompt Button
• Press briey to activate
voice prompt or adjust the
volume
• Press and hold for 3
seconds to switch between
languages
Dust Level Indicator
The color of the curve changes
with the amount of dust in real
time

8
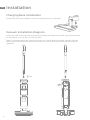
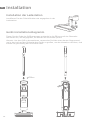
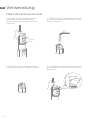
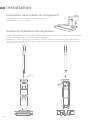
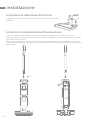
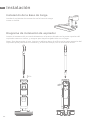
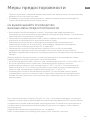
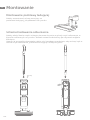
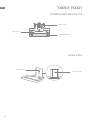
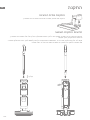
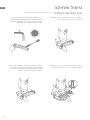
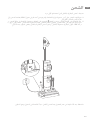
EN Installation
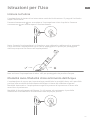
Vacuum Installation Diagram
Insert the end of the handle assembly vertically into the port on the top of the vacuum
as indicated, you will feel it click in place.
Note: To disassemble the handle, please use a hard object to reach into the hole on
the back of the vacuum to press the contacts, and at the same time pull the handle
upwards.
2
1
咔哒
Click
Charging Base Installation
Install the accessory holder into the charging base as indicated.

9
EN
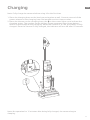
Charging
Note: Fully charge the vacuum before using it for the rst time.
1. Place the charging base on the level ground against a wall. Connect one end of the
power adapter to the charging base and another end to a home socket.
2. Place the vacuum on the charging base, the on the screen lights up to indicate the
charging status. The number on the display screen represents the current battery
level in a percentage during charging. When the number is at 100, the battery is fully
charged. Once the vacuum is fully charged, the indicator will turn o after10 seconds.
Note: No operation for 15 minutes after being fully charged, the vacuum begins
sleeping.

咔哒
10
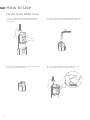
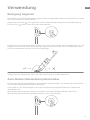
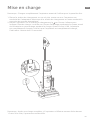
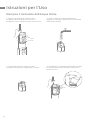
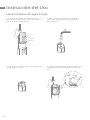
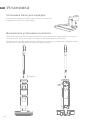
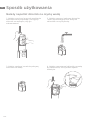
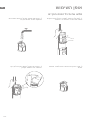
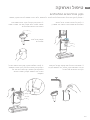
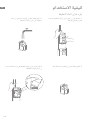
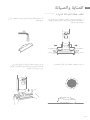
EN How to Use
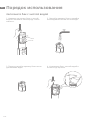
Fill the Clean Water Tank
1. Press the clean water tank release
button and pull the tank outward to
remove it.
3. Tightly close the tank cover after the
water has been added.
2. Open the tank cover and add enough
clean water to the clean water tank.
4. Install the clean water tank into the
main body until you hear a click.
Click

<40°<140°
11
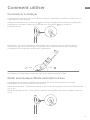
EN
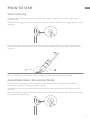
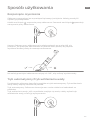
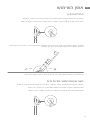
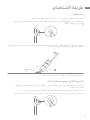
How to Use
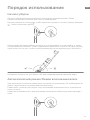
Start Cleaning
Auto Mode/Water Absorption Mode
The vacuum is equipped with an upright/tilt switch. Please use it at an angle after
turning it on.
Short press the to power on and the vacuum starts cleaning. Press again to stop
working.
The vacuum is powered on by default in Auto mode, you can switch to the Water
Absorption mode according to actual needs.
Auto Mode: The vacuum will adjust the suction power according to the stains on the
ground.
Water Absorption Mode: If there is water on the ground, the water absorption mode can
be selected to clean it up.
Note: When the vacuum is working, do not lift it up and downor move it, and do not
tilt the vacuum to one side or lay it at to protect against the dirty water back into the
vacuum.
Do not recline the vacuum more than 140° to protect against water leakage.

12
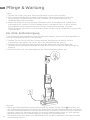
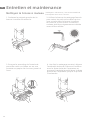
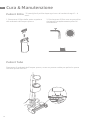
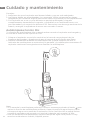
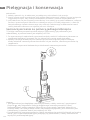
EN Care & Maintenance
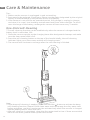
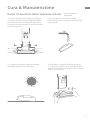
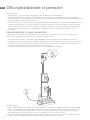
One-Click Self-Cleaning
1. Place the vacuum upright on the charging base after designated cleanups and make
sure the clean water tank is full.
2. Press the self-cleaning button on the top of the handle briey, the self-cleaning
indicator lights up on the screen and the self-cleaning starts.
3. The vacuum will continue to recharge after the self-cleaning is nished.
* The self-cleaning function can be enabled only when the vacuum is charged and the
battery level is more than 10%.
Tips:
1. Make sure the vacuum is unplugged in and not working.
2. Parts need to be replaced if necessary. Please use the parts designated by the original
factory to avoid damage to the product due to unsuitability.
3. If the vacuum is not used for an extended period, fully charge it, unplug its charger,
and store it in a cool, low-humidity environment away from direct sunlight. To avoid
over-discharge of the battery, recharge the vacuum at least once every 3 months.
Note:
• If the deep self-cleaning is needed, press and hold the button to activate the deep
self-cleaning function. Please ll the clean water tank and empty the dirty water tank
before activation, and this function can be activated only when the vacuum is charged
and the battery level is more than 30%.
• After self-cleaning is completed, clean the dirty water tank in time. If there are residual
stains on the base, please clean up the base in time.

咔哒
13
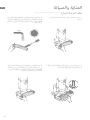
EN
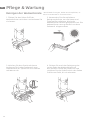
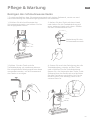
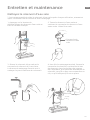
Care & Maintenance
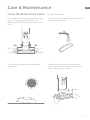
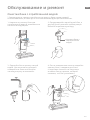
Clean the Roller Brush Cover
1. As shown in the gure, press the roller
brush cover release buttons on both
sides outward to remove the roller brush
cover.
2. Rinse the roller brush cover with clean
water until it is clean.
3. The cover must be thoroughly dried
before use.
4. Align the brush cover with the right
slot on the vacuum and press the cover
down until you hear a click.
Click
* Clean it as needed.

14
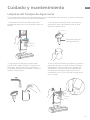
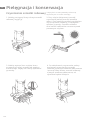
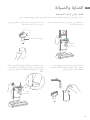
EN Care & Maintenance
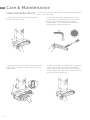
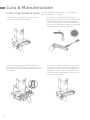
Clean the Roller Brush
1. Pull up the left handle of the roller
brush and take it out.
2. Use the included cleaning brush to
remove hairs and debris that get stuck
in the roller brush and rinse it with
clean water. The roller brush must be
thoroughly dried before use.
3. Wipe the dust from the dust intake with
a dry cloth or paper towel. Never rinse it
with water.
4. After cleaning is completed, align the
right end of the roller brush with the
right slot on the vacuum and push the
left end into the left slot on the vacuum
until it clicks into place.
* Clean it as needed, it is recommended to replace it
every 3 to 6 months.

咔哒
15
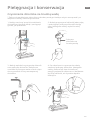
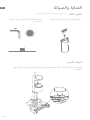
EN
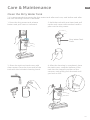
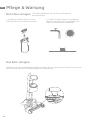
1. Press the dirty water tank release
button and pull it out as indicated.
Care & Maintenance
Clean the Dirty Water Tank
* It is recommended to empty the dirty water tank after each use, and before and after
the self-cleaning function is enabled.
3. Rinse the tank and tank cover with
clean water. Clean the inner wall of the
tank with the included cleaning brush.
2. Hold the tank with one hand and pull
up the tank cover with another hand to
pour out the dirty water.
4. After the cleaning is completed, close
the tank cover, snap the bottom of the
tank into the support position of the
vacuum, and gently push the tank until
you hear a click.
Click
Dirty Water Tank
Cover

16
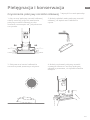
EN
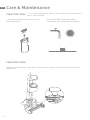
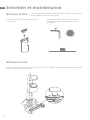
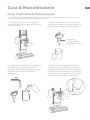
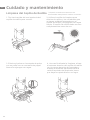
Remove the dirty water tank, wipe it with a damp cloth to clean up the dirt in the tube
before use.
Clean the Tube
Care & Maintenance
Clean the Filter
1. Remove the lter from the top of the
dirty water tank.
2. Rinse the lter with clean water.
Thoroughly dry it before re-installing it.
* It is recommended to clean it after each use and replace it
every 3 to 6 months.
Strona się ładuje...
Strona się ładuje...
Strona się ładuje...
Strona się ładuje...
Strona się ładuje...
Strona się ładuje...
Strona się ładuje...
Strona się ładuje...
Strona się ładuje...
Strona się ładuje...
Strona się ładuje...
Strona się ładuje...
Strona się ładuje...
Strona się ładuje...
Strona się ładuje...
Strona się ładuje...
Strona się ładuje...
Strona się ładuje...
Strona się ładuje...
Strona się ładuje...
Strona się ładuje...
Strona się ładuje...
Strona się ładuje...
Strona się ładuje...
Strona się ładuje...
Strona się ładuje...
Strona się ładuje...
Strona się ładuje...
Strona się ładuje...
Strona się ładuje...
Strona się ładuje...
Strona się ładuje...
Strona się ładuje...
Strona się ładuje...
Strona się ładuje...
Strona się ładuje...
Strona się ładuje...
Strona się ładuje...
Strona się ładuje...
Strona się ładuje...
Strona się ładuje...
Strona się ładuje...
Strona się ładuje...
Strona się ładuje...
Strona się ładuje...
Strona się ładuje...
Strona się ładuje...
Strona się ładuje...
Strona się ładuje...
Strona się ładuje...
Strona się ładuje...
Strona się ładuje...
Strona się ładuje...
Strona się ładuje...
Strona się ładuje...
Strona się ładuje...
Strona się ładuje...
Strona się ładuje...
Strona się ładuje...
Strona się ładuje...
Strona się ładuje...
Strona się ładuje...
Strona się ładuje...
Strona się ładuje...
Strona się ładuje...
Strona się ładuje...
Strona się ładuje...
Strona się ładuje...
Strona się ładuje...
Strona się ładuje...
Strona się ładuje...
Strona się ładuje...
Strona się ładuje...
Strona się ładuje...
Strona się ładuje...
Strona się ładuje...
Strona się ładuje...
Strona się ładuje...
Strona się ładuje...
Strona się ładuje...
Strona się ładuje...
Strona się ładuje...
Strona się ładuje...
Strona się ładuje...
Strona się ładuje...
Strona się ładuje...
Strona się ładuje...
Strona się ładuje...
Strona się ładuje...
Strona się ładuje...
Strona się ładuje...
Strona się ładuje...
Strona się ładuje...
Strona się ładuje...
Strona się ładuje...
Strona się ładuje...
Strona się ładuje...
Strona się ładuje...
Strona się ładuje...
Strona się ładuje...
Strona się ładuje...
Strona się ładuje...
Strona się ładuje...
Strona się ładuje...
Strona się ładuje...
Strona się ładuje...
Strona się ładuje...
Strona się ładuje...
Strona się ładuje...
Strona się ładuje...
Strona się ładuje...
Strona się ładuje...
Strona się ładuje...
Strona się ładuje...
Strona się ładuje...
Strona się ładuje...
Strona się ładuje...
Strona się ładuje...
Strona się ładuje...
Strona się ładuje...
Strona się ładuje...
Strona się ładuje...
Strona się ładuje...
Strona się ładuje...
Strona się ładuje...
Strona się ładuje...
Strona się ładuje...
Strona się ładuje...
Strona się ładuje...
Strona się ładuje...
Strona się ładuje...
Strona się ładuje...
Strona się ładuje...
Strona się ładuje...
Strona się ładuje...
Strona się ładuje...
Strona się ładuje...
Strona się ładuje...
Strona się ładuje...
Strona się ładuje...
Strona się ładuje...
Strona się ładuje...
Strona się ładuje...
Strona się ładuje...
Strona się ładuje...
Strona się ładuje...
Strona się ładuje...
Strona się ładuje...
Strona się ładuje...
Strona się ładuje...
Strona się ładuje...
Strona się ładuje...
Strona się ładuje...
Strona się ładuje...
Strona się ładuje...
Strona się ładuje...
Strona się ładuje...
Strona się ładuje...
Strona się ładuje...
Strona się ładuje...
Strona się ładuje...
Strona się ładuje...
Strona się ładuje...
Strona się ładuje...
Strona się ładuje...
Strona się ładuje...
-
 1
1
-
 2
2
-
 3
3
-
 4
4
-
 5
5
-
 6
6
-
 7
7
-
 8
8
-
 9
9
-
 10
10
-
 11
11
-
 12
12
-
 13
13
-
 14
14
-
 15
15
-
 16
16
-
 17
17
-
 18
18
-
 19
19
-
 20
20
-
 21
21
-
 22
22
-
 23
23
-
 24
24
-
 25
25
-
 26
26
-
 27
27
-
 28
28
-
 29
29
-
 30
30
-
 31
31
-
 32
32
-
 33
33
-
 34
34
-
 35
35
-
 36
36
-
 37
37
-
 38
38
-
 39
39
-
 40
40
-
 41
41
-
 42
42
-
 43
43
-
 44
44
-
 45
45
-
 46
46
-
 47
47
-
 48
48
-
 49
49
-
 50
50
-
 51
51
-
 52
52
-
 53
53
-
 54
54
-
 55
55
-
 56
56
-
 57
57
-
 58
58
-
 59
59
-
 60
60
-
 61
61
-
 62
62
-
 63
63
-
 64
64
-
 65
65
-
 66
66
-
 67
67
-
 68
68
-
 69
69
-
 70
70
-
 71
71
-
 72
72
-
 73
73
-
 74
74
-
 75
75
-
 76
76
-
 77
77
-
 78
78
-
 79
79
-
 80
80
-
 81
81
-
 82
82
-
 83
83
-
 84
84
-
 85
85
-
 86
86
-
 87
87
-
 88
88
-
 89
89
-
 90
90
-
 91
91
-
 92
92
-
 93
93
-
 94
94
-
 95
95
-
 96
96
-
 97
97
-
 98
98
-
 99
99
-
 100
100
-
 101
101
-
 102
102
-
 103
103
-
 104
104
-
 105
105
-
 106
106
-
 107
107
-
 108
108
-
 109
109
-
 110
110
-
 111
111
-
 112
112
-
 113
113
-
 114
114
-
 115
115
-
 116
116
-
 117
117
-
 118
118
-
 119
119
-
 120
120
-
 121
121
-
 122
122
-
 123
123
-
 124
124
-
 125
125
-
 126
126
-
 127
127
-
 128
128
-
 129
129
-
 130
130
-
 131
131
-
 132
132
-
 133
133
-
 134
134
-
 135
135
-
 136
136
-
 137
137
-
 138
138
-
 139
139
-
 140
140
-
 141
141
-
 142
142
-
 143
143
-
 144
144
-
 145
145
-
 146
146
-
 147
147
-
 148
148
-
 149
149
-
 150
150
-
 151
151
-
 152
152
-
 153
153
-
 154
154
-
 155
155
-
 156
156
-
 157
157
-
 158
158
-
 159
159
-
 160
160
-
 161
161
-
 162
162
-
 163
163
-
 164
164
-
 165
165
-
 166
166
-
 167
167
-
 168
168
-
 169
169
-
 170
170
-
 171
171
-
 172
172
-
 173
173
-
 174
174
-
 175
175
-
 176
176
-
 177
177
-
 178
178
-
 179
179
-
 180
180
-
 181
181
-
 182
182
-
 183
183
-
 184
184
-
 185
185
-
 186
186


DREAME H11 Max Instrukcja obsługi
- Kategoria
- Odkurzacze
- Typ
- Instrukcja obsługi
w innych językach
- español: DREAME H11 Max Manual de usuario
- italiano: DREAME H11 Max Manuale utente
- Deutsch: DREAME H11 Max Benutzerhandbuch
- français: DREAME H11 Max Manuel utilisateur
Powiązane artykuły
Inne dokumenty
-
Tineco Floor One S3 Instrukcja obsługi
-
KALORIK TKG SKV 1004 Instrukcja obsługi
-
Amica Aqua Joran VM 9003 Vacuum Cleaner Instrukcja obsługi
-
eta Raggio 5225 90000 Instrukcja obsługi
-
-
eta Aquilo PRO Instrukcja obsługi
-
Cecotec 2500 Instrukcja obsługi
-
Roborock Q Revo Instrukcja obsługi
-
Tesla RoboStar iQ400 Plus Robotic Vacuum Cleaner Instrukcja obsługi
-
Bissell Lift-Off 30K7 SERIES Instrukcja obsługi