Indesit DSR 57T94 CA EU instrukcja
- Kategoria
- Zmywarki
- Typ
- instrukcja
Niniejsza instrukcja jest również odpowiednia dla

DSR 57T94
1
EN
English
Operating instructions
DISHWASHER - Contents
Operating instructions,1
Precautions and advice, 2-3
Assistance, 8
Product Data, 9
Installation, 11-12
Description of the appliance, 13
Refined salt and rinse aid, 14
Loading the racks, 15-16
Detergent and dishwasher use, 17
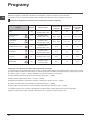
Wash cycles, 18
Special wash cycles and options, 19
Care and maintenance, 20
Troubleshooting, 21
PL
Polski
Instrukcja obsługi
ZMYWARKA - Spis treści
Instrukcja obsługi, 1
Zalecenia i środki ostrożności, 3-4
Serwis Techniczny, 8
Karta produktu, 9
Instalacja, 22-23
Opis urządzenia, 24
Sól regeneracyjna i środek nabłyszczający, 25
Ładowanie koszy, 26-27
Środek myjący i obsługa zmywarki, 28
Programy, 29
Programy specjalne i opcje, 30
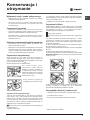
Konserwacja i obsługa, 31
Nieprawidłowe działanie i możliwe środki zaradcze, 32
CS
Česky
Návod k použití
MYČKA NÁDOBÍ -Obsah
Návod k použití, 1
Opatření a rady, 4-5
Servisní služba, 8
Informační list výrobku, 10
Instalace, 33-34
Popis zařízení, 35
Regenerační sůl a Leštidlo, 36
Plnění košů, 37-38
Mycí prostředek a použití myčky, 39
Programy, 40
Speciální programy a Volitelné funkce, 41
Údržba a péče, 42
Poruchy a způsob jejich odstranění, 43
SK
Slovensky
Návod na použitie
UMÝVAČKA RIADU - Obsah
Návod na použitie, 1
Opatrenia a rady, 5-6-7
Servisná služba, 8
Opis výrobku, 10
Inštalácia, 45-46
Popis zariadenia, 47
Regeneračná soľ a Leštidlo, 48
Naplňte koše
, 49-50
Umývací prostriedok a použitie umývačky, 51
Programy, 52
Špeciálne programy a Voliteľné funkcie, 53
Údržba a starostlivosť, 54
Poruchy a spôsob ich odstránenia, 55

2
EN
Precautions and advice
This appliance was designed and
manufactured in compliance with international
safety standards. The following information
has been provided for safety reasons and
should be read carefully.
Keep this instruction manual in a safe place
for future reference. If the appliance is sold,
given away or moved, make sure the manual
is kept with the machine.
Read the instructions carefully, as they
include important information on safe
installation, use and maintenance.
This appliance was designed for domestic
use or similar applications, for example:
- farmhouses;
- use by guests in hotels, motels and other
residential settings;
- bed & breakfasts.
Remove the appliance from all packaging
and make sure it was not damaged during
transportation. If it was damaged, contact
the retailer and do not proceed any further
with the installation process.
General safety
• This appliance should not be operated
by children younger than 8 years, people
with reduced physical, sensory or mental
capacities, or inexperienced people
who are not familiar with the product,
unless they are given close supervision
or instructions on how to use it safely and
are made aware by a responsible person
of the dangers its use might entail.
• Children must not play with the appliance.
• It is the user's responsibility to clean and
maintain the appliance. Children should
never clean or maintain it unless they are
given supervision.
• The appliance was designed for domestic
use inside the home and is not intended
for commercial or industrial use.
• The appliance must be used to wash
domestic crockery in accordance with the
instructions in this manual.
• The appliance must not be installed
outdoors, even in covered areas. It is
extremely dangerous to leave the machine
exposed to rain and storms.
• Do not touch the appliance when barefoot.
• When unplugging the appliance always
pull the plug from the mains socket. Do
not pull on the cable.
• The water supply tap must be shut off
and the plug should be removed from
the electrical socket at the end of every
cycle and before cleaning the appliance
or carrying out any maintenance work.
• The maximum number of place settings is
shown in the product sheet.
• If the appliance breaks down, do not under
any circumstances touch the internal parts
in an attempt to perform the repair work
yourself.
• Do not lean or sit on the open door: this
may cause the appliance to overturn.
• The door should not be left open as it may
create a dangerous obstacle.
• Keep detergent and rinse aid out of reach
of children.
• The packaging material should not be
used as a toy.
• Knives and other utensils with sharp
edges must be placed either with the
points/blades facing downwards in the
cutlery basket or horizontally on the tip-up
compartments or in the tray/third basket,
if available.
• Connect the appliance to the water mains
using the new supply hose provided with
the appliance. Do not re-use the old hose.
• Install the back side of a free-standing
dishwasher against a wall.
Disposal
• To dispose of any packaging materials,
follow local legislation so that the
packagings may be reused.
• The European Directive 2012/19/EU
relating to Waste Electrical and Electronic
Equipment (WEEE) states that household
appliances should not be disposed of
using the normal solid urban waste cycle.
Exhausted appliances should be collected
separately in order to optimise the cost of
reusing and recycling the materials inside
the machine, while preventing potential
damage to the atmosphere and public
health. The crossed-out dustbin symbol
shown on all products reminds the owners
of their obligations regarding separated
waste collection.
For further information relating to the correct
disposal of household appliances, owners
may contact the relevant public authority or
the local appliance dealer.

3
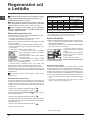
Saving energy and respecting the
environment
Saving water and energy
• Only begin a wash cycle when the
dishwasher is full. While waiting for the
dishwasher to be filled, prevent unpleasant
odours with the Soak cycle
(if available, see
Wash Cycles).
• Select a wash cycle that is suited to the
type of crockery and to the soil level using
the Table of Wash Cycles:
- For dishes with a normal soil level, use
the Eco wash cycle, which guarantees low
energy and water consumption levels.
- If the load is smaller than usual activate
the Half Load option
(see Special wash cycles
and options, if available).
• If your electricity supply contract gives
details of electricity-saving time bands, run
the wash cycles when electricity prices are
lower. The Delayed Start option can help
you organise the wash cycles accordingly
(see Special wash cycles and options, if available).
PL
Zalecenia i środki ostrożności
Niniejsze urządzenie zostało
zaprojektowane i wyprodukowane zgodnie z
międzynarodowymi normami
bezpieczeństwa. Poniższe ostrzeżenia
podane zostały ze względów bezpieczeństwa
i należy je uważnie przeczytać.
Należy zachować niniejszą książeczkę
instrukcji dla przyszłych konsultacji. W
przypadku sprzedaży, odstąpienia lub
przeprowadzki należy dopilnować, aby
została przekazana wraz z urządzeniem
nowemu właścicielowi.
Uważnie przeczytać instrukcję: zawiera
ona ważne informacje dotyczące instalacji,
użytkowania i bezpieczeństwa.
To urządzenie zostało zaprojektowane
do użytku domowego lub podobnych
zastosowań, na przykład:
- w domach kolonijnych;
- do użytku przez klientów w hotelach, motelach
i innych obiektach typu mieszkaniowego;
- w pensjonatach bed and breakfast.
Rozpakować urządzenie i sprawdzić, czy nie
zostało uszkodzone podczas transportu. Jeśli
okazałoby się uszkodzone, nie podłączać go,
lecz skontaktować się ze sprzedawcą.
Bezpieczeństwo ogólne
• Niniejsze urządzenie może być używane
przez dzieci powyżej 8 roku życia oraz
osoby o ograniczonych zdolnościach
fizycznych, zmysłowych i umysłowych
lub nie posiadające jego odpowiedniej
znajomości lub doświadczenia, pod
warunkiem, że znajdują się one pod
ścisłym nadzorem odpowiedzialnej za
nie osoby bądź też otrzymały instrukcje
dotyczące bezpiecznego użytkowania
urządzenia oraz zrozumiały związane z
nim zagrożenia.
• Dzieci nie powinny bawić się urządzeniem.
• Czyszczenie oraz konserwację urządzenia
musi przeprowadzać użytkownik. Nie mogą
być one przeprowadzane przez dzieci bez
nadzoru.
• Urządzenie jest przeznaczone do użytku
nieprofesjonalnego wewnątrz pomieszczeń
mieszkalnych.
• Urządzenie powinno być używane do
mycia naczyń w warunkach domowych
zgodnie z niniejszymi instrukcjami.
• Urządzenia nie należy instalować na
świeżym powietrzu, nawet w miejscu
zadaszonym, gdyż wystawienie go na
działanie deszczu i burz jest bardzo
niebezpieczne.
• Nie dotykać zmywarki, stojąc boso na
podłodze.
• Przy wyjmowaniu wtyczki z gniazdka nie
ciągnąć za kabel, lecz trzymać za wtyczkę.
• Po zakończeniu każdego cyklu i przed
przystąpieniem do czyszczenia i
konserwacji urządzenia należy zamknąć
zawór wody i wyjąć wtyczkę z gniazdka.
• Maksymalna ilość nakryć jest podana w
karcie produktu.
• W razie uszkodzenia w żadnym wypadku
nie ingerować w wewnętrzne mechanizmy
urządzenia i nie próbować go samodzielnie
naprawiać.
• Nie opierać się ani nie siadać na otwartych
drzwiach: urządzenie mogłoby się
przewrócić.
• Nie należy pozostawiać otwartych drzwi
zmywarki, gdyż można się o nie potknąć.
• Trzymać detergenty i płyn nabłyszczający
z dala od dzieci.
t
• Noże i przyrządy o ostrych krawędziach
należy wkładać do kosza na sztućce, tak
aby czubki/ostrza były skierowane do dołu,
lub układać w położeniu poziomym na
półeczkach lub na tacy/trzecim koszu w

4
modelach, w których są one zainstalowane.
• Należy podłączyć urządzenie do
sieci wodnej, stosując nowy przewód
doprowadzający wodę; nie należy używać
starego przewodu.
• Podczas ustawiania zmywarek
wolnostojących, tylna część musi być
zwrócona w kierunku ściany.
Utylizacja
• Utylizacja materiałów opakowaniowych:
dostosować się do lokalnych przepisów;
w ten sposób opakowanie będzie mogło
zostać ponownie wykorzystane.
• Dyrektywa wspólnotowa 2012/19/EU w
sprawie zużytego sprzętu elektrycznego
i elektronicznego (WEEE) przewiduje,
że sprzęt gospodarstwa domowego nie
powinien być usuwany jako nieposortowane
odpady komunalne. Zużyte urządzenia
powinny podlegać selektywnej zbiórce w
celu uzyskania maksymalnego wskaźnika
odzysku i recyklingu ich materiałów
składowych oraz uniknięcia ewentualnych
zagrożeń dla zdrowia i środowiska. Symbol
przekreślonego kosza umieszczany
jest na wszystkich produktach w celu
przypominania o obowiązku segregacji
odpadów.
W celu uzyskania bliższych informacji na
temat prawidłowego złomowania urządzeń
gospodarstwa domowego ich właściciele
mogą się zwrócić do właściwych służb
publicznych lub do sprzedawców tych
urządzeń.
Oszczędność i ochrona środowiska
Oszczędność wody i energii
• Uruchamiać zmywarkę tylko z pełnym
ładunkiem. W oczekiwaniu na napełnienie
maszyny zapobiegać przykrym zapachom
przy pomocy cyklu namaczania
(jeśli jest on
dostępny - zob. Programy).
• Wybierać programy odpowiednie do
rodzaju naczyń i stopnia zabrudzenia,
stosując się do Tabeli programów:
- dla naczyń normalnie zabrudzonych
stosować program Eco, który zapewnia
niskie zużycie energii i wody.
- przy ograniczonym ładunku włączyć opcję
Połowa ładunku
(
jeśli jest on dostępny - zob.
Programy specjalne i opcje).
• Jeśli zawarta umowa na dostawę energii
elektrycznej przewiduje strefy czasowe
oszczędności energetycznej, uruchamiać
zmywarkę w godzinach obowiązywania
niższej taryfy. Opcja Opóźnienia startu
może pomoc w takiej organizacji zmywania
(jeśli jest ona dostępny - zob. Programy specjalne i
opcje).
CS
Opatření a rady
Zařízení bylo navrženo a vyrobeno
v souladu s platnými mezinárodními
bezpečnostními předpisy. Tato upozornění
jsou uváděna z bezpečnostních důvodů a
je třeba si je pozorně přečíst.
Je velmi důležité tento návod uschovat,
aby jej bylo možné kdykoli dle potřeby
konzultovat. V případě prodeje, darování
nebo přestěhování zařízení se ujistěte, že
návod zůstane uložen v jeho blízkosti.
Pozorně si přečtěte uvedené pokyny:
Obsahují důležité informace o instalaci,
použití a bezpečnosti.
Toto zařízení bylo navrženo pro použití v
domácnosti nebo pro podobné aplikace,
jako například:
- hospodářská stavení;
- použití zákazníky v hotelu, motelu nebo
jiných prostředích rezidenčního typu;
- penziony typu „bed and breakfast“.
Po rozbalení zařízení zkontroluje, zda
během přepravy nedošlo k jeho poškození.
V případě, že je poškozeno, je nezapojujte
a obraťte se na prodejce.
Základní bezpečnostní pokyny
• Tento elektrospotřebič mohou používat
děti ve věku od 8 let a osoby se sníženými
fyzickými, senzorickými nebo duševními
schopnostmi nebo osoby bez zkušeností
nebo potřebné znalosti, když jsou pod
dozorem odpovědné osoby, případně
poté, co jim byly poskytnuty pokyny
týkající se bezpečného použití zařízení
a pochopení souvisejících nebezpečí.
• Děti si nesmí hrát se zařízením.
• Čištění a údržbu zařízení musí provádět
uživatel. Nesmí je provádět děti bez
dozoru.
• Toto zařízení bylo navrženo výhradně pro
neprofesionální použití v domácnosti.
• Zařízení musí být používání na mytí
nádobí v domácnosti podle pokynů
uvedených v tomto návodu.

5
• Zařízení nesmí být nainstalováno venku,
a to ani v případě, že by se jednalo o
místo chráněné před nepřízní počasí,
protože je velmi nebezpečné vystavit jej
působení deště a bouří.
• Nedotýkejte se myčky nádobí bosýma
nohama.
• Nevytahujte zástrčku ze zásuvky
elektrického rozvodu tahem za kabel,
ale uchopením za zástrčku.
• Na konci každého cyklu a před
provedením operací čištění a údržby
je třeba zavřít kohoutek přívodu vody a
odpojit zástrčku ze zásuvky elektrického
rozvodu.
• Maximální počet jídelních souprav je
uveden v technickém listu výrobku.
• Při výskytu poruchy se v žádném případě
nepokoušejte o opravu vnitřních částí
zařízení.
• Neopírejte se o otevřená dvířka a
nesedejte si na ně: zařízení by se mohlo
převrátit.
• Dvířka nesmí zůstat v otevřené poloze,
protože by mohla představovat nebezpečí
zakopnutí.
• Udržujte mycí prostředek a leštidlo mimo
dosah dětí.
• Obaly nejsou hračky pro děti!
• Nože a nástroje s ostrými hroty musí být
umístěny do košíku na příbory s hroty/
ostřími obrácenými směrem dolů nebo
do vodorovné polohy na sklopné držáky
nebo na tác/do třetího koše u modelů,
jejichž je součástí.
• Zařízení musí být připojeno k rozvodu
vody novou přívodní hadicí a stará
přívodní hadice nesmí být znovu použita.
• Když se jedná o volně instalovatelnou
myčku nádobí, její zadní strana musí být
umístěna ke stěně.
Likvidace
• Likvidace obalových materiálů: Při jejich
odstraňování postupujte v souladu
s místním předpisy a dbejte na možnou
recyklaci.
• Evropská směrnice 2012/19/EU o odpadu
tvořeném elektrickými a elektronickými
zařízeními (RAEE) předpokládá, že
elektrospotřebiče nesmí být likvidovány
v rámci běžného pevného městského
odpadu. Vyřazená zařízení musí být
sesbírána zvlášť za účelem zvýšení
počtu recyklovaných a znovu použitých
materiálů, ze kterých jsou složena, a za
účelem zabránění možným ublížením na
zdraví a škodám na životním prostředí.
Symbolem je přeškrtnutý koš, který je
uveden na všech výrobcích s cílem
připomenout povinnosti spojené se
separovaným sběrem.
Podrobnější informace týkající
se správného způsobu vyřazení
elektrospotřebičů z provozu mohou
jejich držitelé získat tak, že se obrátí na
navrženou veřejnou instituci nebo na
prodejce.
Jak ušetřit a brát ohled na životní
prostředí
Šetření vodou a energií
• Uvádějte myčku nádobí do chodu pouze
tehdy, když je naplněna. Během čekání
na naplnění zařízení zabraňte vzniku
nepříjemného zápachu použitím cyklu
Namáčení
(je-li součástí - viz Programy)
.
• Zvolte program vhodný pro druh nádobí
a stupeň znečištění; podívejte se do
Tabulky programů:
- pro běžně znečištěné nádobí použijte
program Eko, který zaručuje nízkou
spotřebu energie a vody.
- při menším množství nádobí použijte
volitelnou funkci Poloviční náplň
(je-li
součástí - viz Speciální programy a Volitelné funkce).
• V případě, že vaše smlouva na dodávku
elektrické energie předpokládá používání
časových pásem pro šetření elektrickou
energií, provádějte mytí v časových
pásmech se sníženou sazbou. Volitelná
funkce Odložený start může napomoci
organizaci mycích cyklů uvedeným
způsobem
(
je-li součástí - viz Speciální programy
a Volitelné funkce).
SK
Opatrenia a rady
Zariadenie bolo navrhnuté a vyrobené
v súlade s medzinárodnými bezpečnostnými
normami. Tieto upozornenia sú uvádzané
z bezpečnostných dôvodov a je potrebné
si ich pozorne prečítať.
Je dôležité tento návod uschovať, kvôli
prípadnému neskoršiemu nahliadnutiu.
V prípade predaja, darovania alebo
presťahovania zariadenia zabezpečte, aby
návod zostal vždy jeho súčasťou.

6
Pozorne si prečítajte uvedené pokyny: Sú
zdrojom dôležitých informácií, týkajúcich
sa inštalácie, použitia a bezpečnosti.
Toto zariadenie bolo navrhnuté pre použitie
v domácnosti alebo pre podobné aplikácie,
ako napríklad:
- hospodárske príbytky;
- použitie zákazníkmi v hoteli, moteli alebo
iných rezidenčných zariadeniach;
- penzióny typu „bed and breakfast“.
Po rozbalení zariadenia skontrolujte, či
počas prepravy nedošlo k jeho poškodeniu.
Ak je poškodené, nezapájajte ho a obráťte
sa na predajcu.
Základné bezpečnostné pokyny
• Tento elektrospotrebič smú používať deti
vo veku do 8 rokov a osoby so zníženými
fyzickými, zmyslovými alebo duševnými
schopnosťami, alebo osoby bez
skúseností alebo potrebných znalostí, len
ak sú pod dozorom zodpovednej osoby,
alebo ak boli poučení o bezpečnom
použití zariadenia a ak pochopili súvisiace
nebezpečenstvá.
• Deti sa so zariadením nesmú hrať.
• Čistenie a údržbu zariadenia musí
vykonávať užívateľ. Túto činnosť nesmú
vykonávať deti bez dozoru.
• Toto zariadenie bolo navrhnuté pre
neprofesionálne použitie vo vnútri bytu/
domu.
• Zariadenie musí byť používané na
umývanie riadu v domácnosti, podľa
pokynov uvedených v tomto návode.
• Zariadenie nesmie byť nainštalované
v exteriéri, a to ani v prípade, keď sa
jedná o chránený priestor, pretože
jeho vystavenie dažďu alebo búrke je
mimoriadne nebezpečné.
• Nedotýkajte sa umývačky riadu bosými
nohami.
• Nevyťahujte zástrčku zo zásuvky
elektrickej siete ťahaním za kábel, ale
uchopením za zástrčku.
• Na konci každého cyklu pred čistením
a údržbou je potrebné zatvoriť kohútik
prívodu vody a odpojiť zástrčku zo
zásuvky elektrického rozvodu.
• Maximálny počet jedálenských súprav je
uvedený v technickom liste výrobku.
• V prípade poruchy sa v žiadnom prípade
nepokúšajte zasahovať do vnútorných
častí, v snahe o opravu.
• Neopierajte sa o otvorené dvierka a
nesadajte si na ne: zariadenie by sa
mohlo prevrátiť.
• Nenechávajte dvierka otvorené, pretože
by ste mohli o ne zakopnúť.
• Udržujte umývací prostriedok a leštidlo
mimo dosahu detí.
• Obaly nie sú hračky pre deti!
• Nože a náradie s ostrými hrotmi musia
byť uložené do košíka na príbory hrotmi/
ostrím obráteným smerom dolu, alebo
musia byť uložené do vodorovnej polohy
na sklopné držiaky alebo na podnos/do
tretieho koša, ak je súčasťou daného
modelu.
• Zariadenie musí byť pripojené k rozvodu
vody novou prívodnou hadicou a stará
prívodná hadica nesmie byť opätovne
použitá.
• Ak sa jedná o voľne inštalovateľnú
umývačku riadu, jej zadná strana musí
byť umiestnená ku stene.
Likvidácia
• Likvidácia obalových materiálov: Obaly
zlikvidujte v súlade s miestnymi predpismi
kvôli umožneniu ich recyklácie.
• Európska smernica 2012/19/EU o odpade
z elektrických a elektronických zariadení
(OEEZ) predpisuje, že elektrospotrebiče
nesmú byť zlikvidované v rámci bežného
tuhého komunálneho odpadu. Vyradené
zariadenia musia byť zozbierané
separovane kvôli optimalizácii stupňa
opätovného použitia a recyklácie
materiálov, z ktorých sú vyrobené,
a kvôli zamedzeniu možných škôd
na zdraví a na životnom prostredí.
Symbol preškrtnutého koša, uvedený na
všetkých takýchto výrobkoch, upozorňuje
na povinnosti spojené so separovaným
zberom.
Podrobnejšie informácie, týkajúce
sa správneho spôsobu vyradenia
elektrospotrebičov z prevádzky, môžu
ich držitelia získať od poverenej verejnej
inštitúcie alebo od predajcu.

7
Ako ušetriť a brať ohľad na životné
prostredie
Šetrenie vodou a energiou
• Používajte umývačku riadu len vtedy,
keď je naplnená. Počas čakania na
naplnenie zariadenia zabráňte vzniku
nepríjemného zápachu spustením cyklu
Namáčania
(ak je súčasťou - viď Programy)
.
• Zvoľte program vhodný pre druh riadu
a stupeň znečistenia podľa Tabuľky
programov:
- pre bežné znečistenie riadu použite
program Eko, ktorý zaručuje nízku
spotrebu energie a vody.
- pri menšom množstve riadu použite
voliteľnú funkciu Polovičná náplň
(ak
je súčasťou - viď Špeciálne programy a Voliteľné
funkcie).
• V prípade dodávky elektrickej energie
v časových pásmach pre šetrenie
elektrickou energiou, používajte
umývačku v časových pásmach so
zníženou sadzbou. Voliteľná funkcia
Oneskorený štart vám umožní používať
umývačku práve v tomto čase
(
ak je
súčasťou - viď Špeciálne programy a Voliteľné
funkcie).

8
EN
Assistance
Before contacting Assistance:
• Check whether the problem can be resolved using the
Troubleshooting guide
(see Troubleshooting).
• Restart the programme to check whether the problem
has ceased to exist.
• If the problem persists, contact the Authorised Technical
Assistance Service.
Never use the services of unauthorised technicians.
Please have the following information to hand:
• The type of malfunction.
• The appliance model (Mod.).
• The serial number (S/N).
This information can be found on the appliance data plate
(see Description of the appliance)
.
PL
Serwis Techniczny
Przed zwróceniem się do Serwisu Technicznego:
• Sprawdzić, czy problemu nie można rozwiązać
samodzielnie
(patrz Nieprawidłowości w działaniu i
sposoby ich usuwania).
• Ponownie uruchomić program, aby przekonać się, czy
usterka nie ustąpiła.
• W przeciwnym wypadku skontaktować się z
autoryzowanym Serwisem Technicznym.
Zwracać się wyłącznie do autoryzowanych
techników.
Podać:
• rodzaj nieprawidłowości;
• model urządzenia (Mod.);
• numer seryjny (S/N).
Informacje te znajdują się na tabliczce znamionowej
umieszczonej na urządzeniu
(patrz Opis urządzenia).
CS
Servisní služba
Před přivoláním servisní služby:
• Zkontrolujte, zda nejste schopni poruchu odstranit sami
(viz Poruchy a způsob jejich odstranění).
• Znovu uveďte do chodu mycí program s cílem ověřit,
zda byla porucha odstraněna.
• V případě negativního výsledku se obraťte na
Autorizovanou servisní službu.
Nikdy se neobracejte s žádostí o pomoc na
neautorizované techniky.
Při hlášení poruchy uveďte:
• druh poruchy;
• model zařízení (Mod.);
• výrobní číslo (S/N).
Tyto informace jsou uvedeny na štítku s jmenovitými údaji,
umístěném na zařízení. (viz Popis zařízení).
SK
Servisná služba
Skôr ako sa obrátite na Servisnú službu:
• Skontrolujte, či nie ste schopní poruchu odstrániť sami
(viď Poruchy a spôsob ich odstránenia).
• Opätovne uveďte do chodu umývací program, s cieľom
overiť, či bola porucha odstránená.
• V prípade negatívneho výsledku sa obráťte na Servisnú
službu alebo na autorizovaného technika;
Nikdy sa neobracajte so žiadosťou o pomoc na
neautorizovaných technikov.
Pri hlásení poruchy uveďte:
• druh poruchy;
• model zariadenia (Mod.);
• výrobné číslo (S/N).
Tieto informácie sú uvedené na štítku s technickými údajmi,
umiestnenom na zariadení. (viď Popis zariadenia).

9
Product Fiche
Brand
INDESIT
Model
DSR 57T94
Rated capacity in standard place settings (1)
10
Energy efciency class on a scale from A+++ (low consumption) to D (high consumption)
A++
Energy consumption per year in kWh (2)
211
Energy consumption of the standard cleaning cycle in kWh
0.74
Power consumption of the off-mode in W
0.5
Power consumption of the left-on mode in W
5.0
Water consumption per year in litres (3)
2520
Drying efcacy class on a scale from G (low efcacy) to A (high efcacy)
A
Programme time for standard cleaning cycle in minutes
180
The duration of the left-on mode in minutes
12
Noise in dB(A) Re 1pW
44
Built-in model
No
NOTES
1) The information on the label and che relates to the standard cleaning cycle, this programme is suitable to clean normally soiled
tableware and it is the most efcient programme in terms of combined energy and water consumption. The standard cleaning cycle
corresponds to the Eco cycle.
2) Based on 280 standard cleaning cycles using cold water ll and the consumption of the low power modes. Actual energy consumption
depends on how the appliance is used.
3) Based on 280 standard cleaning cycles. Actual water consumption depends on how the appliance is used.
EN
Product Data (product fiche)
Karta produktu
Marka
INDESIT
Nazwa modelu
DSR 57T94
Pojemność znamionowa, wyrażona liczbą standardowych kompletów naczyń (1)
10
Klasa efektywności energetycznej, skla od A+++ (niskie zużycie) do D (wysokie zużycie)
A++
Zużycie energii w kWh rocznie (2)
211
Zużycie energii w standardowym cyklu zmywania w kWh
0.74
Zużycie energii w trybie wyłączenia i trybie czuwania w W
0.5
Zużycie energii w trybie włączenia i trybie czuwania w W
5.0
Roczne zużycie wody w litrach rocznie (3)
2520
Klasa efektywności suszenia, skala od G (minimalna efektywność) do A (maksymalna efektywność)
A
Czas programu dla standardowego cyklu zmywania w minutach
180
Czas trwania trybu czuwania w minutach
12
Poziom emitowanego hałasu w dB(A) re1 pW
44
Model do zabudowy
Nie
Uwagi
1) Informacja, że cykl jest odpowiedni do zmywania normalnie zabrudzonych zastaw stołowych oraz że jest najbardziej efektywnym
programem pod względem łącznego zużycia energii i wody dla tego rodzaju zastawy stołowej; Standardowy cykl zmywania odpowiada
cyklowi Eco.
2) Na podstawie 280 standardowych cykli zmywania, przy użyciu zimnej wody, oraz w trybie niskiego zużycia energii. Rzeczywiste
zużycie energii zależy od sposobu użycia urządzenia.
3) Na podstawie 280 standardowych cykli zmywania. Rzeczywiste zużycie energii zależy od sposobu użycia urządzenia.
PL
Karta produktu

10
CS
Informační list výrobku
Informační list výrobku
Značka
INDESIT
Model
DSR 57T94
Kapacita počtu standardních sad nádobí (1)
10
Třída energetické účinnosti na stupnici A+++ (nejnižší spotřeba) až D (vysoká spotřeba)
A++
Roční spotřeba energie v kWh (2)
211
Spotřeba energie standardního mycího cyklu v kWh
0.74
Spotřeba energie ve vypnutém stavu ve W
0.5
Spotřeba energie v režimu ponechání v zapnutém stavu ve W
5.0
Roční spotřeba vody v litrech za rok (3)
2520
Třída účinnosti sušení na stupnici od G (minimální účinnost) až po A (maximální účinnost)
A
Délka programu při standardním mycím cyklu v minutách
180
Délka režimu ponechání v zapnutém stavu v minutách
12
Emise hluku v dB(A) re 1 pW
44
Vestavný spotřebič
Ne
1) Informace uvedené na štítku a v informačním listu se vztahují na standardní mycí cyklus. Tento program je vhodný pro mytí
běžně znečištěného nádobí. Jedná se o nejúčinnější program z hlediska kombinované spotřeby energie a vody. Standardní mycí
cyklus koresponduje s cyklem Eco.
2) Na základě 280 standardních mycích cyklů při použití studené vody a spotřeby v režimu nízké spotřeby energie. Skutečná
spotřeba energie závisí na tom, jak je spotřebič používán.
3) Na základě 280 standardních mycích cyklů. Skutečná spotřeba vody závisí na tom, jak je spotřebič používán.
SK
Opis výrobku
Opis výrobku
Značka
INDESIT
Model
DSR 57T94
Kapacita počtu štandardných súprav riadu (1)
10
Trieda energetickej účinnosti na stupnici A+++ (najnižšia spotreba) až D (vysoká spotreba)
A++
Ročná spotreba energie v kWh (2)
211
Spotreba energie štandardného umývacieho cyklu v kWh
0.74
Spotreba energie vo vypnutom stave vo W
0.5
Spotreba energie v režime ponechania v zapnutom stave vo W
5.0
Ročná spotreba vody v litroch za rok (3)
2520
Trieda účinnosti sušenia na stupnici od G (minimálna účinnosť) až po A (maximálna účinnosť)
A
Dĺžka programu pri štandardnom umývacom cykle v minútach
180
Dĺžka režimu ponechania v zapnutom stave v minútach
12
Emisa hluku v dB(A) re 1 pW
44
Vstavaný spotrebič
Nie
1) Informácie uvedené na štítku a v informačnom liste sa vzťahujú na štandardný umývací cyklus. Tento program je vhodný
na umývanie bežne znečisteného riadu. Jedná sa o najúčinnejší program z hľadiska kombinovanej spotreby energie a vody.
Štandardný umývací cyklus korešponduje s cyklom Eco.
2) Na základe 280 štandardných umývacích cyklov pri použití studenej vody a spotreby v režime nízkej spotreby energie.
Skutočná spotreba energie závisí na tom, ako je spotrebič používaný.
3) Na základe 280 štandardných umývacích cyklov. Skutočná spotreba vody závisí na tom, ako je spotrebič používaný.

11
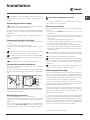
EN
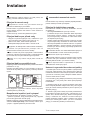
If the appliance must be moved at any time, keep it in an
upright position; if absolutely necessary, it may be tilted onto
its back.
Connecting the water supply
Adaptation of the water supply for installation should only
be performed by a qualified technician.
The water inlet and outlet hoses may be positioned towards
the right or the left in order to achieve the best possible
installation.
Make sure the dishwasher does not bend or squash the
hoses.
Connecting the water inlet hose
• To a 3/4” gas cold or hot water connection point (max.
60°C).
• Run the water until it is perfectly clear.
• Screw the inlet hose tightly into position and turn off the
tap.
If the inlet hose is not long enough, contact a specialist
store or an authorised technician
(see Assistance)
.
The water pressure must be within the values indicated
in the Technical Data table - otherwise the dishwasher may
be function properly.
Make sure the hose is not bent or compressed.
Connecting the water outlet hose
Connect the outlet hose to a drain duct with a minimum
diameter of 2 cm. (A)
The outlet hose connection must be at a height ranging from
40 to 80 cm from the floor or surface where the dishwasher
rests.
Before connecting the water outlet hose to the sink drain,
remove the plastic plug (B).
Anti-flooding protection
To ensure floods do not occur, the dishwasher:
- is provided with a special system which blocks the water
supply in the event of anomalies or leaks from inside the
appliance.
Some models are also equipped with the supplementary
safety device New Acqua Stop*, which guarantees anti-
flooding protection even in the event of a supply hose rupture.
WARNING: HAZARDOUS VOLTAGE!
Under no circumstances should the water inlet hose be cut
as it contains live electrical parts.
Electrical connection
Before inserting the plug into the electrical socket, make
sure that:
• The socket is earthed and complies with current
regulations;
• the socket can withstand the maximum load of the
appliance as shown on the data plate located on the inside
of the door
(see chapter Description of the appliance);
• The power supply voltage falls within the values indicated
on the data plate on the inside of the door.
• The socket is compatible with the plug of the appliance. If
this is not the case, ask an authorised technician to replace
the plug (
see Assistance
). Do not use extension cables or
multiple sockets.
Once the appliance has been installed, the power supply
cable and the electrical socket should be easily accessible.
The cable should not be bent or compressed.
If the power supply cable is damaged, have it replaced
by the manufacturer or its authorised Technical Assistance
Service in order to prevent all potential hazards.
(See
Assistance)
The Company shall not be held responsible for any
incidents, if these regulations are not observed.
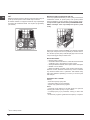
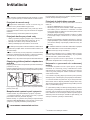
Positioning and levelling
1. Position the dishwasher on a level sturdy floor. If the floor is
uneven, the front feet of the appliance may be adjusted until
it reaches a horizontal position. If the appliance is levelled
correctly, it will be more stable and much less likely to move
or cause vibrations and noise while it is operating.
2. Before recessing the dishwasher, stick the adhesive
transparent strip
* under the wooden shelf in order to protect
it from any condensation which may form.
3. Place the dishwasher so that its sides or back panel are in
contact with the adjacent cabinets or the wall. This appliance
can also be recessed under a single worktop
*
(see the
Assembly instruction sheet)
.
4
*. To adjust the height of the rear foot, turn the red hexagonal
bushing on the lower central part at the front of the dishwasher
using a hexagonal spanner with an opening of 8 mm. Turn the
spanner in a clockwise direction to increase the height and
in an anticlockwise direction to decrease it.
(see Building-in
instruction sheet attached to the documentation)
Installation
MIN 40 cm
MAX 80 cm
* Only available in selected models.

12
EN
Advice regarding the first wash cycle
After the installation, remove the stoppers from the racks and
the retaining elastic elements from the upper rack
(if any).
Water softener settings
Before starting the first wash cycle, set the hardness lev-
el of
the water from the mains supply.
(see chapter Rinse
aid and refined salt).
First load the softener tank with water, then introduce about
1 kg of salt. It is perfectly normal for water to flow out.
As soon as this procedure is complete, run a wash cycle.
Only use salt that has been specifically designed for dish-
washers.
After the salt has been poured into the machine, the LOW
SALT indicator light
* switches off.
If the salt container is not filled, the water softener and
the heating element may be damaged as a result.
Technical data
Dimensions
width 45 cm
height 85 cm
depth 60 cm
Capacity 10 standard place-settings
Water supply pressure
0,05 ÷ 1MPa (0.5 ÷ 10 bar)
7,25 psi – 145 psi
Power supply voltage See appliance data plate
Total absorbed power See appliance data plate
Fuse See appliance data plate
This dishwasher conforms to the
following European Community
Directives:
-2006/95/EC (Low Voltage)
-2004/108/EC (Electromagnetic
Compatibility)
-2009/125/EC (Comm. Reg.
1016/2010) (Ecodesign)
-97/17/EC (Labelling)
-2012/19/ CE Waste Electrical
and Electronic Equipment (WEEE)
* Only available in selected models.
The machine has a buzzer/set of tones
(depending on the
dishwasher model
) to inform the user that a command has
been implemented: power on, cycle end etc.
The symbols/indicator lights/LEDs on the control panel/
display may vary in colour and may have a flashing or fixed
light
(depending on the dishwasher model)
.
The display
* provides useful information concerning the
type of wash cycle, drying/wash-cycle phase, remaining
time, temperature etc.

13
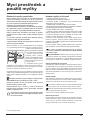
EN
Display
Low Salt
indicator light
Low Rinse Aid
indicator light
Washing
indicator light
Wash cycle
number indicator
Half Load Option indicator lights
Multi-functional Tablets
Option indicator light (Tabs)
Delayed Start Option
indicator light
Wash-Cycle Remaining
Time indicator
Drying
indicator light
Display
Select Wash
Cycle button
Start/Pause button
and indicator light
Multi-functional Tablets
Option button (Tabs)
Delayed Start
Option button
Half Load Option button
ON/OFF/RESET
button
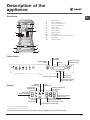
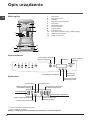
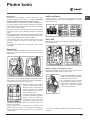
Overall view
Description of the
appliance
Control panel
***
Only in completely built-in models.
* Only available in selected models.
The number and type of wash cycles and options may vary depending on the dishwasher model.
1. Upper rack
2. Upper spray arm
3. Tip-up compartments
4. Rack height adjuster
5. Lower rack
6. Lower spray arm
7. Cutlery basket
8. Washing filter
9. Salt dispenser
10. Detergent and rinse aid dispensers
11. Data plate
12. Control Panel***

14
EN
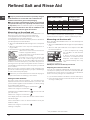
Refined Salt and Rinse Aid
(°dH = hardness measured in German degrees - °f = hardness
measured in French degrees – mmol/l = millimoles per litre)
Measuring out the rinse aid
Rinse aid makes dish DRYING easier. The rinse aid dispenser
should be filled:
• When the LOW RINSE AID indicator light on the panel/display
is lit *;
• When the dark optical indicator on the dispenser door “E”
becomes transparent.
1. Open the dispenser by turning
the cap "G" in an anticlockwise
direction.
2. Pour in the rinse aid, making
sure it does not overflow from the
dispenser. If this happens, clean
the spill immediately with a dry
cloth.
3. Screw the cap back on.
NEVER pour the rinse aid directly into the tub.
Adjusting the amount of rinse aid
If you are not completely satisfied with the drying results, you
can adjust the quantity of rinse aid used. Turn the adjuster “F”.
A maximum of 4 levels can be set according to the dishwasher
model. The factory setting is for a medium level.
• If you see bluish streaks on the dishes, set a low number (1-2).
• If there are drops of water or limescale marks on the dishes,
set a high number (3-4).
Only use products which have been specifically designed
for dishwashers. Do not use table salt or industrial salt.
Follow the instructions given on the packaging.
If you are using a multi-function product, we recommend
that you add salt in any case, especially if the water is hard
or very hard.
(Follow the instructions given on the packaging.)
If you do not add salt or rinse aid, the LOW SALT* and
LOW RINSE AID
* indicator lights will remain lit.
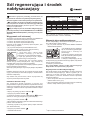
Measuring out the refined salt
The use of salt prevents the formation of LIMESCALE on the
dishes and on the machine's functional components.
• It is important that the salt dispenser be never empty.
• It is important to set the water hardness.
The salt dispenser is located in the lower part of the dishwasher
(see Description)
and should be filled:
• When the LOW RINSE AID indicator light in the control panel
is lit *;
• When the green float* on the cap of the salt dispenser is no
longer visible.
• See autonomy in the water hardness table.
1. Remove the lower rack and unscrew the
container cap (anticlockwise).
2. Only the first time you do this: fill the water
dispenser up to the edge.
3. Position the funnel
(see figure)
and
fill the salt container right up to its edge
(approximately 1 kg); it is not unusual for a little water to leak out.
4. Remove the funnel and wipe any salt residue away from the
opening; rinse the cap under running water and then screw it on.
It is advisable to perform this procedure every time you add salt
to the container.
Make sure the cap is screwed on tightly, so that no detergent can
get into the container during the wash cycle (this could damage
the water softener beyond repair).
Whenever you need to add salt, we recommend carrying out
the procedure before the washing cycle is started.
Setting the water hardness
For perfect water softener operation, it is essential that the
adjustment be based on the water hardness in your house. Ask
your local water supplier for this information. The factory setting
is for medium water hardness.
• Switch the dishwasher on using the On/Off button.
• Switch it off using the On/Off button
• Hold down the START/PAUSE button for 5 seconds until
you hear a beep.
• Switch it on using the On/Off button
• The display shows the current selection level number and the
salt indicator light.
• Press button P to select the desired hardness level
(see
Hardness Table).
• Switch it off using the On/Off button
• Setting is complete!
Water Hardness Table
Average autonomy
salt dispenser with 1
wash cycle per day
level °dH °fH mmol/l months
1 0 - 6 0 - 10 0 - 1 7 months
2 6 - 11 11 - 20 1.1 - 2 5 months
3 12 - 17 21 - 30 2.1 - 3 3 months
4 17 - 34 31 - 60 3.1 - 6 2 months
5
*
34 - 50 61 - 90 6.1 - 9 2/3 weeks
For values between 0°f and 10°f, we do not recommend the use
of salt. A setting of 5 may increase cycle duration.
* Only available in selected models.

15
EN
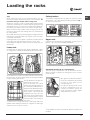
Loading the racks
Tips
Before loading the racks, remove all food residues from the
crockery and empty liquids from glasses and containers. No
preventive rinsing is needed under running water.
Arrange the crockery so that it is held in place firmly and does
not tip over; and arrange the containers with the openings facing
downwards and the concave/convex parts placed obliquely,
thus allowing the water to reach every surface and flow freely.
Make sure that the lids, handles, trays and frying pans do not
prevent the spray arms from rotating. Place any small items in
the cutlery basket.
Since plastic dishes and non-stick frying pans usually retain more
water drops, their drying will be not so good as that of ceramic
or stainless-steel dishes.
Lightweight items such as plastic containers should be placed
in the upper rack and arranged so that they cannot move.
After loading the appliance, make sure that the spray arms can
rotate freely.
Lower rack
The lower rack can hold pans, lids, dishes, salad bowls, cutlery
etc. Large plates and lids should ideally be placed at the sides.
Very soiled dishes and pans should be placed in the lower rack
because in this sector the water sprays are stronger and allow
a higher washing performance.
Several dishwasher models are
fitted with tip-up sectors
*.
They can be used in a vertical
position when arranging dishes or
in a horizontal position (lower) to
load pans and salad bowls easily.
Some models are equipped with
Vertical Zone, special pull-out
supports
*in the rear of the rack
that can be used to support frying
pans and baking pans in a more
vertical position, thus taking up
less space.
In order to use it, just get hold of the coloured grip and pull it
upwards while rotating it forward. The supports can slide right
and left to fit the size of the crockery.
*Only available in selected models with different numbers and
positions.
Cutlery basket
The basket is equipped with top grilles for improved cutlery
arrangement. The cutlery basket should be positioned only at
the front of the lower rack.
Upper rack
Load this rack with delicate and lightweight crockery such as
glasses, cups, saucers and shallow salad bowls.
Adjustable position tip-up compartments*
The side tip-up compartments can be positioned at three
different heights to optimize the arrangement of the crockery
inside the rack.
Wine glasses can be placed safely in
the tip-up compartments by inserting
the stem of each glass into the
corresponding slot.
For optimum drying results incline
the tip-up compartments more. To
change the inclination, pull up the
tip-up compartment, slide it slightly
and position it as you wish.

16
EN
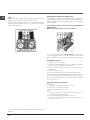
Tray*
Some dishwasher models are fitted with a sliding tray which
can be used to hold small crockery and cutlery.
For optimum washing performance, avoid positioning bulky
crockery directly below the tray. The cutlery tray can be
removed
(see Figure.)
Adjusting the height of the upper rack
The height of the upper rack can be adjusted: high position
to place bulky crockery in the lower rack and low position to
make the most of the tip-up compartments by creating more
space upwards.
The height of the upper rack should be adjusted WHEN THE
RACK IS EMPTY.
NEVER raise or lower the rack on one side only.
If the rack is equipped with a Lift-Up
device*
(see figure)
, lift
it up by holding its sides. To restore the lower position, press
the levers (A) at the sides of the rack and follow the rack down.
Unsuitable crockery
• Wooden crockery and cutlery.
• Delicate decorated glasses, artistic handicraft and antique
crockery. Their decorations are not resistant.
• Parts in synthetic material which do not withstand high
temperatures.
• Copper and tin crockery.
• Crockery soiled with ash, wax, lubricating grease or ink.
The colours of glass decorations and aluminium/silver pieces can
change and fade during the washing process. Some types of
glass (e.g. crystal objects) can become opaque after a number
of wash cycles too.
Damage to glass and crockery
Caused by:
• Type of glass and glass production process.
• Chemical composition of detergent.
• Water temperature of rinse cycle.
Tips:
• Only use glasses and porcelain guaranteed by the
manufacturer as dishwasher safe.
• Use a delicate detergent suitable for crockery.
• Collect glasses and cutlery from the dishwasher as soon as
the wash cycle is over.
*Only available in selected models with different numbers and
positions.

17
EN
Detergent and
dishwasher use
Measuring out the detergent
Good washing results also depend on the correct amount of
detergent being used. Exceeding the stated amount does not
result in a more effective wash and increases environmental
pollution.
The amount can be adjusted to the soil level.
In the case of normally soiled items, use approximately either
25g (powder detergent) or 25ml (liquid detergent). If tablets
are used, one tablet will be enough.
If the crockery is only lightly soiled or if it has been rinsed
with water before being placed in the dishwasher, reduce
the amount of detergent used accordingly.
For good washing results also follow the instructions shown
on the detergent box.
For further questions please ask the detergent producers.
Open the detergent dispenser using button D and measure out
the detergent according to the Table of wash cycles:
• powder or liquid:
compartments A (wash
detergent) and B (pre-wash
detergent)
• tablets: when the cycle
requires 1 tablet, place it in
compartment A and close
cover C; when it requires 2
tablets, place the second tablet
on the bottom of the appliance.
Remove detergent residues from the edges of the compartment
and close cover C until it clicks.
The detergent dispenser automatically opens up at the right time
according to the wash cycle.
If all-in-one detergents are used, we recommend using the TABS
option, because it adjusts the cycle so that the best washing and
drying results are always achieved.
Only use detergent which has been specifically designed
for dishwashers.
DO NOT USE washing up liquid.
Using excessive detergent may result in foam residues
remaining in the machine after the cycle has ended.
To achieve the best washing and drying results, the combined
use of detergent, rinse aid liquid and refined salt is required.
We recommend using detergents that do not contain
phosphates or chlorine, as these products are harmful
to the environment.
Starting the dishwasher
1. Turn the water tap on.
2. Press the ON/OFF button.
3. Open the door and pour in a suitable amount of detergent
(see Measuring out the detergent.)
4. Load the racks
(see Loading the racks)
and close the door.
5. Select the wash cycle in accordance with the type of
crockery and its soil level
(see Table of wash cycles)
by
pressing the P button.
6. Select the wash options
*
(see Options).
7. Press the Start/Pause button to start the cycle (fixed light):
a long beep signals the start of the wash cycle, the cycle
indicator lights up and the display shows the cycle number
and the time remaining until the end of the cycle.
8.
Two short beeps and one long beep indicate the end of the
wash cycle, the Start/Pause button switches off and the word END
appears on the display.
Switch off the appliance by pressing
the ON/OFF button.
9. Wait for a few minutes before removing the crockery - to
avoid burns. Unload the racks, beginning with the lower level.
The machine will switch off automatically during long
periods of inactivity in order to minimise electricity
consumption.
AUTO WASH CYCLES*: some models of dishwasher are
equipped with a special sensor which can be used to assess
the level of soiling and automatically select the most efficient and
economic wash cycle accordingly. The duration of the auto wash
cycles may vary due to the operation of the sensor.
Changing a wash cycle in progress
If a mistake was made in the wash-cycle selection process, it is
possible to change the cycle provided that it has only just begun:
Once the wash cycle has started, in order to change the wash
cycle switch off the machine by pressing and holding the ON/
OFF/Reset button. Switch it back on using the same button and
select the desired wash cycle and options.
Adding extra crockery
Press the Start/Pause button and open the door, taking care to
avoid the escaping steam. Then place the crockery inside the
dishwasher. Press the Start/Pause button: The cycle will start
again after a long beep has been emitted.
If the delayed start has been set, at the end of the countdown
the wash cycle will not start. It will stay in Pause mode.
Press the Start/Pause button to pause the machine; the wash
cycle is stopped.
At this stage the wash cycle cannot be changed.
Accidental interruptions
If the door is opened during the wash cycle or there is a power
cut, the cycle stops. It starts again from the point at which it
was interrupted once the door has been shut or the electricity
supply restored.
* Only available in selected models.

18
EN
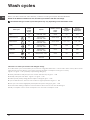
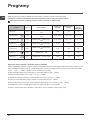
Wash cycle
Wash cycle
which
include
drying
Options
Approximate
duration of wash
cycles
h:min.
Water
consumption
(l/cycle)
Energy
consumption
(KWh/cycle)
1. Eco Yes
Delayed start –
Half Load - Tabs
03:00 9,0 0,74
2. Auto Intensive Yes
Delayed start –
Half Load - Tabs
02:20 - 03:00 13,0 - 14,0 1,20 - 1,45
3. Auto Normal Yes
Delayed start –
Half Load - Tabs
01:40 - 02:20 13,5 – 14,5 1,00 - 1,20
4. Daily No
Delayed start –
Half Load - Tabs
01:00 13,0 1,00
5. Delicates Yes
Delayed start –
Half Load - Tabs
01:40 9,0 0,90
6. Express No Delayed start – Tabs 00:25 8,0 0,45
7. Prewash No
Delayed start –
Half Load
00:10 4,0 0,01
Wash-cycle data is measured under laboratory conditions according to European Standard EN 50242.
Based on the different conditions of use, the wash-cycle duration and data can change.
The number and type of wash cycles and options may vary depending on the dishwasher model.
Wash cycles
Instructions on wash-cycle selection and detergent dosage
1. The ECO wash cycle is the standard cycle to which the energy label data refers. It can be used to wash crockery with a normal
soil level and is the most efficient cycle in terms of energy and water consumption for this type of crockery.
4 gr/ml**+ 21 gr/ml – 1 Tab
(**Quantity of pre-washing detergent)
2. Heavily soiled dishes and pans (not to be used for delicate items). 25 gr/ml – 1 Tab
3. Normally soiled pans and dishes. 4 gr/ml**+ 21 gr/ml – 1 Tab
4. Limited quantity of daily soiling (ideal for 4 place settings) 25 gr/ml – 1 Tab
5. Cycle for delicate items, which are more sensitive to high temperatures 25 gr/ml – 1 Tab
6. Fast cycle to be used for slightly dirty dishes (ideal for 2 place settings) 21 gr/ml – 1 Tab
7. Pre-wash while awaiting completion of the load with the dishes from the next meal. No detergent.
Standby consumption: Left-on mode consumption: 5 W - Off mode consumption: 0.5 W.

19
EN
Notes:
Optimum performance levels when using the “Daily" and
"Express” cycles can be achieved by respecting the specified
number of place settings.
To reduce consumption even further, only run the dishwasher
when it is full.
Note for Test Laboratories: for information on comparative
EN testing conditions, please send an email to the following
address: [email protected]
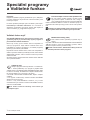
Special wash cycles
and Options
Wash options*
The OPTIONS may only be set, changed or reset after the
wash cycle has been selected and before the Start/Pause
button has been pressed.
Only the options which are compatible with the type of wash
cycle set may be selected. If an option is not compatible
with the selected wash cycle
(see Table of wash cycles)
, the
corresponding symbol flashes rapidly 3 times.
If an option is selected which is not compatible with another
(previously selected) option, it will flash 3 times and switch
off, while the most recently selected option will remain active.
To deselect an option which has been set by mistake, press
the corresponding button again.
Multi-functional tablets Option (Tabs)
This option optimises washing and drying results.
When using multi-functional tablets, press the
MULTI-FUNCTIONAL TABLETS button; the corresponding
symbol will light up. If the button is pressed again, the option
will be deselected.
The “Multi-functional tablets” option results in a
longer wash cycle.
Delayed start Option
It is possible to delay the start time of the cycle by a
period of time between 1 and 24 hours:
1. Select the desired wash cycle and any other options
required; press the DELAYED START button. The indicator
light will go on. Use the same button to select when the wash
cycle will start (h01, h02 etc.)
2. Confirm the selection using the START/PAUSE button to
start the countdown.
3. Once this time has elapsed, the DELAYED START indicator
light goes off and the wash cycle begins.
To deselect the DELAYED START option, press the DELAYED
START button until the text OFF appears.
The Delayed Start function cannot be set once a wash
cycle has started.
Half load Option using the upper or lower rack
If there are not many dishes to be washed, a half
load cycle may be used in order to save water,
electricity and detergent. Select the wash cycle and then
press the HALF LOAD button: the indicator corresponding
to the chosen rack lights up and the wash cycle starts only
in the upper or lower rack.
Remember to load the upper or lower rack only, and
to reduce the amount of detergent accordingly.
* Only available in selected models.

20
EN
C
1
A
3
Care and maintenance
Shutting off the water and electricity supplies
•
Turn
off the water tap after every wash cycle to avoid leaks.
•
Always
unplug the appliance when cleaning it and when
performing maintenance work.
Cleaning the dishwasher
•
The
external surfaces of the machine and the control panel
can be cleaned using a non-abrasive cloth which has been
dampened with water. Do not use solvents or abrasive
products.
•
Any
marks on the inside of the appliance may be removed
using a cloth dampened with water and a little vinegar.
Preventing unpleasant odours
•
Always
keep the door of the appliance ajar in order to avoid
moisture from forming and being trapped inside the machine.
•
Clean
the seals around the door and detergent dispensers
regularly using a damp sponge. This will avoid food becoming
trapped in the seals, which is the main cause behind the
formation of unpleasant odours.
Cleaning the spray arms
Food residue may become encrusted onto the spray arms
and block the holes used to spray the water. It is therefore
recommended that you check the arms from time to time and
clean them with a small non-metallic brush.
The two spray arms may both be removed.
To remove the upper spray arm,
turn the plastic locking ring in an
anti-clockwise direction. The upper
spray arm should be replaced
so that the side with the greater
number of holes is facing upwards.
The lower spray arm can be
removed by pressing on the side
tabs and pulling it upwards.
Cleaning the water inlet hose*
If the water hoses are new or have not been used for an extended
period of time, let the water run to make sure it is clear and free
of impurities before performing the necessary connections. If this
precaution is not taken, the water inlet could become blocked
and damage the dishwasher.
Clean the water inlet filter at the tap outlet regularly.
- Turn off the water tap.
- Unscrew the end of the water inlet hose, remove the filter and
clean it carefully under running water.
- Re-place the filter and screw the water hose back into position.
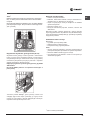
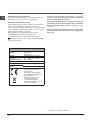
Cleaning the filters
The filter assembly consists of three filters which remove food
residues from the washing water and then recirculate the water.
They must be cleaned if you wish to achieve the best results
in every wash.
Clean the filters regularly.
The dishwasher must not be used without filters or if the filter
is loose.
• After several washes, check the filter assembly and if necessary
clean it thoroughly under running water, using a non-metallic
brush and following the instructions below:
1. Turn the cylindrical filter C in an anti-clockwise direction and
pull it out
(fig. 1).
2. Remove the cup filter B by exerting a slight pressure on the
side flaps
(fig. 2);
3. Slide out the stainless-steel plate filter A.
(fig. 3).
4. Inspect the trap and remove any food residues. NEVER
REMOVE the wash-cycle pump protection
(black detail) (fig.4).
After cleaning the filters, re-place the filter assembly and fix it in
position correctly; this is essential for maintaining the efficient
operation of the dishwasher.
Leaving the machine unused for extended
periods
• Disconnect the appliance from the electricity supply and shut
off the water tap.
• Leave the door of the appliance ajar.
• When you return, run a wash cycle when the dishwasher is
empty.
* Only available in selected models.
Strona się ładuje...
Strona się ładuje...
Strona się ładuje...
Strona się ładuje...
Strona się ładuje...
Strona się ładuje...
Strona się ładuje...
Strona się ładuje...
Strona się ładuje...
Strona się ładuje...
Strona się ładuje...
Strona się ładuje...
Strona się ładuje...
Strona się ładuje...
Strona się ładuje...
Strona się ładuje...
Strona się ładuje...
Strona się ładuje...
Strona się ładuje...
Strona się ładuje...
Strona się ładuje...
Strona się ładuje...
Strona się ładuje...
Strona się ładuje...
Strona się ładuje...
Strona się ładuje...
Strona się ładuje...
Strona się ładuje...
Strona się ładuje...
Strona się ładuje...
Strona się ładuje...
Strona się ładuje...
Strona się ładuje...
Strona się ładuje...
Strona się ładuje...
Strona się ładuje...
-
 1
1
-
 2
2
-
 3
3
-
 4
4
-
 5
5
-
 6
6
-
 7
7
-
 8
8
-
 9
9
-
 10
10
-
 11
11
-
 12
12
-
 13
13
-
 14
14
-
 15
15
-
 16
16
-
 17
17
-
 18
18
-
 19
19
-
 20
20
-
 21
21
-
 22
22
-
 23
23
-
 24
24
-
 25
25
-
 26
26
-
 27
27
-
 28
28
-
 29
29
-
 30
30
-
 31
31
-
 32
32
-
 33
33
-
 34
34
-
 35
35
-
 36
36
-
 37
37
-
 38
38
-
 39
39
-
 40
40
-
 41
41
-
 42
42
-
 43
43
-
 44
44
-
 45
45
-
 46
46
-
 47
47
-
 48
48
-
 49
49
-
 50
50
-
 51
51
-
 52
52
-
 53
53
-
 54
54
-
 55
55
-
 56
56


Indesit DSR 57T94 CA EU instrukcja
- Kategoria
- Zmywarki
- Typ
- instrukcja
- Niniejsza instrukcja jest również odpowiednia dla
w innych językach
- slovenčina: Indesit DSR 57T94 CA EU Užívateľská príručka
- English: Indesit DSR 57T94 CA EU User guide
Powiązane artykuły
Inne dokumenty
-
HOTPOINT/ARISTON LSFF 9M124 CX EU instrukcja
-
HOTPOINT/ARISTON LSFF 9H124 CX EU instrukcja
-
Whirlpool LSTF 9M115 C EU instrukcja
-
HOTPOINT/ARISTON LSTF 9H124 CL EU instrukcja
-
HOTPOINT/ARISTON LSTB 4B00 EU instrukcja
-
-
-
Ariston LTF 11H132 Instrukcja obsługi
-
-
Emos P5551 Instrukcja obsługi