
IO-HOO-0609/9
(05.2018)
Kitchen extractor hood / Kaminhaube / Okap
nadkuchenny / Kuchyňského odsavače /
Kuchynského odsávača / Hotă de bucătărie /
Tűzhely feletti páraelszívó / Кухненски аспиратор /
Campana extractora de cocina / Exaustor de cozinha
OKP6651S / OKP6651SW /
OKP9651S
OPERATING INSTRUCTIONS EN
GEBRAUCHSANWEISUNG DE
INSTRUKCJA OBSŁUGI PL
NÁVOD K OBSLUZE CS
NÁVOD NA OBSLUHU SK
INSTRUCŢIUNE DE DESERVIRE RO
HASZNÁLATI UTASÍTÁS HU
ИНСТРУКЦИЯ ЗА ОБСЛУЖВАНЕ BG
MANUAL DE INSTRUCCIONES ES
MANUAL DE INSTRUÇÕES PT


- 3 -
NOTES ON SAFETY 8
UNPACKING 11
DISPOSAL OF OLD APPLIANCE 11
OPERATION 12
KITCHEN HOOD CONTROLS 12
OFF-TIMER 12
OTHER IMPORTANT INFORMATION CONCERNING THE OPERATION OF THE HOOD 13
CLEANING AND MAINTENANCE 14
MAINTENANCE 14
GREASE FILTER 14
ACTIVATED CHARCOAL FILTER 14
LIGHT 14
WARRANTY AND AFTER SALES SERVICE 15
WARRANTY 15
SICHERHEITSHINWEISE 17
AUSPACKEN 21
ENTSORGUNG VON ALTGERÄTEN 21
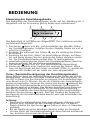
BEDIENUNG 22
STEUERUNG DER DUNSTABZUGSHAUBE 22
TIMER (AUSSCHALTVERZÖGERUNG DER DUNSTABZUGSHAUBE) 22
ANDERE WICHTIGE INFORMATIONEN ZUR BEDIENUNG DER DUNSTABZUGSHAUBE 23
REINIGUNG UND WARTUNG 23
WARTUNG 23
FETTFILTER 24
AKTIVKOHLEFILTER 24
BELEUCHTUNG 24
GARANTIE, NACHVERKAUF-SERVICE 25
GARANTIE 25
EN- Table of contents
DE- Inhaltsverzeichnis
WSKAZÓWKI DOTYCZĄCE BEZPIECZEŃSTWA 27
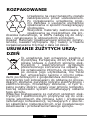
ROZPAKOWANIE 31
USUWANIE ZUŻYTYCH URZĄ DZEŃ 31
OBSŁUGA 32
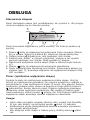
STEROWANIE OKAPEM 32
TIMER (OPÓŹNIONE WYŁĄCZENIE OKAPU) 32
INNE WAŻNE INFORMACJE DOTYCZĄCE OBSŁUGI OKAPU 33
CZYSZCZENIE I KONSERWACJA 34
KONSERWACJA 34
FILTR PRZECIWTŁUSZCZOWY 34
FILTR WĘGLOWY 34
OŚWIETLENIE 34
GWARANCJA, OBSŁUGA POSPRZEDAŻOWA 35
GWARANCJA 35
PL- Spis treści

- 4 -
BEZPEČNOSTNÍ POKYNY 37
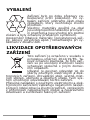
VYBALENÍ 40
LIKVIDACE OPOTŘEBOVANÝCH ZAŘÍZENÍ 40
OBSLUHA 41
OVLÁDÁNÍ ODSAVAČE 41
ČASOVAČ (OPOŽDĚNÉ VYPNUTÍ ODSAVAČE) 41
JINÉ DŮLEŽITÉ INFORMACE O OBSLUZE ODSAVAČE 42
ČIŠTĚNÍ A ÚDRŽBA 43
ÚDRŽBA 43
PROTITUKOVÝ FILTR 43
UHLÍKOVÝ FILTR 43
OSVĚTLENÍ 43
ZÁRUKA, POPRODEJNÍ SERVIS 44
ZÁRUKA 44
BEZPEČNOSTNÉ POKYNY POUŽÍVANIA 46
ROZBALENIE 50
LIKVIDÁCIA ZARIADENÍ 50
OBSLUHA 51
OVLÁDANIE ODSÁVAČA 51
ČASOVAČ (ONESKORENÉ VYPNUTIE ODSÁVANIA) 51
INÉ DÔLEŽITÉ INFORMÁCIE TÝKAJÚCE SA POUŽÍVANIA ODSÁVAČA 52
ČISTENIE A ÚDRŽBA 53
KONZERVÁCIA 53
PROTITUKOVÝ FILTER 53
UHLÍKOVÝ FILTER 53
OSVETLENIE 53
ZÁRUKA, POPREDAJNÝ SERVIS 54
ZÁRUKA 54
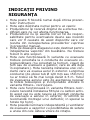
INDICAȚII PRIVIND SIGURANȚA 56
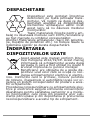
DESPACHETARE 60
ÎNDEPĂRTAREA DISPOZITIVELOR UZATE 60
OPERARE 61
CONTROL HOTĂ 61
TIMER (ÎNTÂRZIE OPRIREA HOTEI) 61
ALTE INFORMAȚII IMPORTANTE PENTRU OPERAREA HOTEI 62
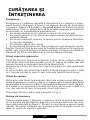
CURĂŢAREA ŞI ÎNTREŢINEREA 63
ÎNTREŢINERE 63
FILTRUL ÎMPOTRIVA GRĂSIMILOR 63
FILTRUL DE CARBON 63
SISTEM DE ILUMINARE 63
GARANŢIE, SERVICII POSTVÂNZARE 64
GARANŢIA 64
CS- Obsah
SK- Obsah
RO - Cuprins

- 5 -
HU - Tartalomjegyzék
BG - Съдържание
BIZTONSÁGI UTASÍTÁSOK 66
KICSOMAGOLÁS 70
A HASZNÁLT KÉSZÜLÉKEK ELTÁVOLÍTÁSA 70
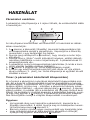
HASZNÁLAT 71
PÁRAELSZÍVÓ VEZÉRLÉSE 71
TIMER (A PÁRAELSZÍVÓ KÉSLELTETETT KIKAPCSOLÁSA) 71
A PÁRAELSZÍVÓ MŰKÖDÉSÉVEL KAPCSOLATOS EGYÉB FONTOS INFORMÁCIÓK 72
TISZTÍTÁS ÉS KARBANTARTÁS 73
KARBANTARTÁS 73
ZSÍRSZŰRŐ 73
SZÉNSZŰRŐ 73
VILÁGÍTÁS 73
GARANCIA ÉS VÁSÁRLÁS UTÁNI SZERVIZ 74
GARANCIA 74
ПРЕПОРЪКИ ОТНОСНО БЕЗОПАСНОСТТА 76
РАЗОПАКОВАНЕ 80
ОБЕЗВРЕЖДАНЕ НА ИЗНОСЕНИ УРЕДИ 80
ОБСЛУЖВАНЕ 81
УПРАВЛЕНИЕ НА АБСОРБАТОРА 81
ТАЙМЕР (ИЗКЛЮЧВАНЕ НА АБСОРБАТОРА СЪС ЗАКЪСНЕНИЕ) 81
ДРУГИ ВАЖНИ ИНФОРМАЦИИ ЗА ОБСЛУЖВАНЕТО НА АБСОРБАТОРА 82
ПОЧИСТВАНЕ И ПОДДРЪЖКА 83
ПОДДРЪЖКА 83
ФИЛТЪР ЗА МАЗНИНИ 83
ВЪГЛЕН ФИЛТЪР 83
ОСВЕТЛЕНИЕ 83
ГАРАНЦИЯ, СЛЕД ПРОДАЖБЕНО ОБСЛУЖВАНЕ 84
ГАРАНЦИЯ 84
ES - Tabla de contenidos
INDICACIONES RELACIONADAS CON SEGURIDAD 86
DESEMBALAJE 90
ELIMINACIÓN DE APARATOS USADOS 90
USO 91
CONTROL DE CAMPANA 91
TEMPORIZADOR (RETRASO DE LA DESACTIVACIÓN DE LA CAMPANA) 91
OTRA INFORMACIÓN IMPORTANTE RELATIVA AL USO DE LA CAMPANA 92
LIMPIEZA Y CONSERVACIÓN 93
MANTENIMIENTO 93
FILTRO DE GRASA 93
FILTRO DE CARBÓN 93
ILUMINACIÓN 93
GARANTÍA, ATENCIÓN DE POST VENTA 94
GARANTÍA 94

- 6 -
PT - Índice
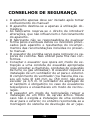
CONSELHOS DE SEGURANÇA 96
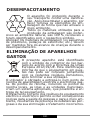
DESEMPACOTAMENTO 100
ELIMINAÇÃO DE APARELHOS GASTOS 100
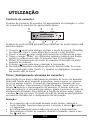
UTILIZAÇÃO 101
CONTROLO DO EXAUSTOR 101
TIMER (DESLIGAMENTO ATRASADO DO EXAUSTOR) 101
OUTRAS INFORMAÇÕES IMPORTANTES SOBRE A UTILIZAÇÃO DO EXAUSTOR 102
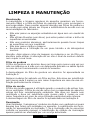
LIMPEZA E MANUTENÇÃO 103
MANUTENÇÃO 103
FILTRO DE GORDURA 103
FILTRO DE CARVÃO 103
ILUMINAÇÃO 103
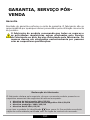
GARANTIA, SERVIÇO PÓS-VENDA 104
GARANTIA 104

- 7 -
Dear customer,
From now on, your daily housework will be easier
than ever before. Your appliance is excepon-
ally easy to use and extremely ecient. Aer reading
these Operang Instrucons, operang the appliance
will be easy.
Before being packaged and leaving the manufacturer,
the appliance was thoroughly checked with regard to
safety and funconality.
Before using the appliance, please carefully read
these Operang Instrucons. By following these
instrucons carefully you will be able to avoid any
problems in using the appliance. It is important to
keep these Operang Instrucons and store them in a
safe place so that they can be consulted at any me.
Follow these instrucons carefully in order to avoid
possible accidents.
Sincerely,

- 8 -
NOTES ON SAFETY
• Before using the appliance, please carefully read
this manual!
• The appliance is designed for household use only.
• The manufacturer reserves the right to introduce
changes, which do not aect operation of the ap-
pliance.
• The manufacturer shall not be liable for any dam-
age or re caused by the appliance resulting from
failure to follow instructions in this manual.
• Cooker hood is designed to remove cooking
odours. Do not use cooker hood for other pur-
poses.
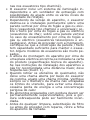
• Connect the cooker hood operating in extraction
mode to a suitable ventilation duct (do NOT con-
nect the cooker to smoke or ue gas ducts, which
are in use). It requires installation of the air ex-
traction duct to the outside. The length of the
duct (usually a pipe of Ø 120 or 150 mm) should
not be longer than 4-5 m. An air extraction duct
is also required for telescopic and furniture hoods
in absorption mode.
• Cooker hood operating in air recirculation mode
requires the installation of an activated charcoal
lter. In this case, installing an extractor duct is
not required, however it is recommended to in-
stall an air guide vane (Mainly in chimney cooker
hoods).
• The cooker hood features independent lighting
and exhaust fan that can be operated at one of
several speeds.
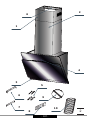
• Depending on the type, the hood is designed to
be permanently attached to a vertical wall over
a gas or electric stove (chimney and universal
hoods); on the ceiling over a gas or electric stove
(island hoods); on the vertical built in furniture
over a gas or electric stove (telescopic and built-
in hoods). Before installing, make sure that the

- 9 -
wall/ceiling structure is strong enough to suspend
the hood. Some hoods are very heavy.
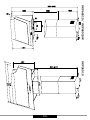
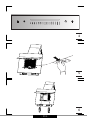
• For details of the installation distance above an
electric hob please refer to product technical
sheet If the installation instructions of the gas
cooker specify a greater distance, this must be
taken into account (Fig. 1).
• Do not leave an open ame under the hood.
When the pots are removed from the burner, set
the minimum ame. Always make sure that the
ame does not extend outside the pot, because it
causes unwanted loss of energy and a dangerous
concentration of heat.
• When cooking on fat, supervise the pans con-
stantly, because overheated fat can ignite.
• Unplug the appliance before any cleaning, replac-
ing the lter or repair work.
• Cooker hood grease lter should be cleaned at
least once a month, because the lter saturated
with fat is ammable.
• Ensure adequate ventilation (air ow) if other
equipment such as liquid fuel stoves or heaters
are operated in the room in addition the cooker
hood. When the cooker hood is simultaneously
operated with burning appliances requiring ade-
quate fresh air from the room to work properly,
their safe operation is possible if under pressure
around these appliances is a maximum of 0.004
mbar (this does not apply when the cooker hood
is used as an odour lter)
• Do not lean on the hood.
• The hood should be cleaned regularly both inside
and out (AT LEAST ONCE A MONTH, following the
indications concerning maintenance provided in
this manual)..Failure to adhere to the rules con-
cerning cleaning the hood and replacing lters
results in a re risk.
• If the power cord is damaged it should be re-
placed by a specialised service centre.
• Ensure that it is possible to disconnect the ap-

- 10 -
pliance from the mains by removing the plug or
switching o the bi-polar switch.
• This appliance is not intended for use by persons
(including children) with physical, mental or sen-
sory handicaps, or by persons inexperienced or
unfamiliar with the appliance, unless under su-
pervision or in accordance with the instructions
as communicated to them by persons responsible
for their safety.
• Particular attention should be paid not to allow
unaccompanied children to use the appliance.
• Make sure voltage indicated on the nameplate
corresponds to the local mains supply voltage.
• Before use, extend and straighten the power cord.
• Packaging materials (bags, polyethylene, poly-
styrene, etc.) should be kept away from children
during unpacking.
• Before connecting the hood to the mains power
supply always check that the power cord is prop-
erly installed and is not trapped by the appliance.
Do not connect the appliance to the mains until
assembly is complete.
• Do not operate your kitchen hood without the al-
uminium grease lters.
• It is strictly forbidden to cook dishes under on an
open ame (ambé) under your kitchen hood.
• Always strictly adhere to regulations issued by the
competent local authorities regarding the techni-
cal and safety requirements for fume extraction.
• Failing to tighten bolts and fasteners in accord-
ance with these instructions may endanger life
and health.
• Hanging kitchen hoods operate only in air circu-
lation / odour absorber mode
• WARNING! Failure to install the screws or xing
device in accordance with these instructions may
result in electrical hazards.

- 11 -
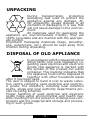
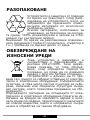
UNPACKING
During transportation, protective
packaging was used to protect the
appliance against any damage. Af-
ter unpacking, please dispose of all
elements of packaging in a way that
will not cause damage to the environ-
ment.
All materials used for packaging the
appliance are environmentally friendly; they are
100% recyclable and are marked with the appropri-
ate symbol.
Important! Packaging materials (bags, polyethyl-
ene, polystyrene, etc.) should be kept away from
children during unpacking.
DISPOSAL OF OLD APPLIANCE
In accordance with European Directive
2012/19/EU and local legislation re-
garding used electrical and electronic
goods, this appliance is marked with
the symbol of the crossed-out waste
container. This marking indicates that
the appliance must not be disposed of
together with other household waste
after it has been used.
The user is obliged to hand it over to waste collec-
tion centre collecting used electrical and electron-
ic goods. The collectors, including local collection
points, shops and local authority departments pro-
vide recycling schemes.
Proper handling of used electrical and electronic
goods helps avoid environmental and health haz-
ards resulting from the presence of dangerous com-
ponents and the inappropriate storage and process-
ing of such goods.

- 12 -
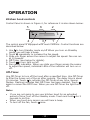
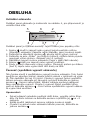
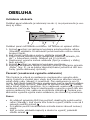
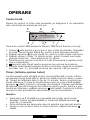
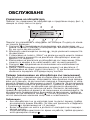
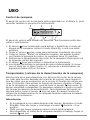
OPERATION
Kitchen hood controls
Control Panel is shown in Figure 4, for reference it is also shown below:
13
5 2
4
6
The control panel is equipped with touch controls: Control functions are
described below:
1- Use to turn Standby mode on/o When you turn on Standby
mode, you will hear a beep.
2- Touch repeatedly to increase the fan speed.
3- Slide you nger across the sensor to adjust fan speed. Fan can run
at 10 speeds.
4- O-Timer (see below for details).
5- Touch to turn light on/o
6- Fan speed indicators. When you slide your nger across the sensor
to adjust fan speed, individual LEDs of the indicator will turn on or
o.
O-Timer
Use O-Timer to turn o the hood after a specied time. Use O-Timer
to lter the fumes out of the air after cooking. The delay time is about
15 minutes. Touch to activate the O-Timer at any time. Sensor
ashes. Flashing indicates that O-Timer has been enabled. Touch
again to cancel the O-Timer. When you use O-Timer the light turns
o.
Note:
• If you are not going to use your kitchen hood for an extended
period of time, turn o the standby mode. Touch and hold for 3
seconds to do this.
• When you touch any sensor you will hear a beep.
• To turn o the fan, touch once.

- 13 -
Other important information concerning the operation of
the hood
Operation in air circulation / odour lter mode. In this mode, the ltered
air returns to the room through the outlets. Install activated charcoal
lter in this setting. It is recommended to install the air guide (available
depending on the model, mainly in chimney cooker hoods).
Air extraction operation: When cooker hood operates in extraction mode,
air is discharged outside through an extraction duct. Remove activated
charcoal lter in this setting. The cooker hood is connected to the air
outlet opening using a rigid or exible extraction duct with a diameter of
150 or 120 mm, and the appropriate clamps, which must be purchased
at a hardware store. The appliance should be installed by a qualied
installer.
Fan speed: Lowest and medium fan speed is used in normal conditions
and less intense odours, while the highest speed is used only when cook-
ing odours are very intense, such as during frying or grilling.
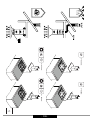
Note (applies to universal hoods only): Due to the design of universal
hoods you need to manually change the mode of operation. See Figure
8 for instructions on how to change the mode.
Note (only applies to telescopic and in-built kitchen hoods): Furniture
and telescopic cooker hoods operating in air recirculation mode require
installation of the exhaust duct. The other end of the duct should be di-
rected to the room as it will discharge ltered air.
Note: Hanging kitchen hoods operate only in air circulation / odour ab-
sorber mode

- 14 -
CLEANING AND
MAINTENANCE
Maintenance
Regular maintenance and cleaning of the appliance will ensure trou-
ble-free operation of the cooker hood and extend its life. Especially make
sure that the grease lter and activated charcoal lter are replaced ac-
cording to manufacturer's recommendations.
• Do not use a soaked cloth, sponge, or water jet.
• Do not use solvents or alcohol, as they may tarnish lacquered sur-
faces.
• Do not use caustic substances, especially for cleaning stainless steel.
• Do not use a rough or abrasive cloth.
• It is recommend to use a damp cloth and a neutral detergent.
Note: After several washes in the dishwasher, the colour of the alumini-
um lter may change. The change of colour does not indicate improprie-
ties or the necessity to change it.
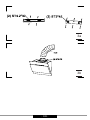
Grease lter
For normal hood operation, aluminium grease lter should be cleaned
every month in the dishwasher or by hand using a mild detergent or
liquid soap.
Dismantling of aluminium grease lter is shown on Figure 5.
Acrylic lter is used in some models. This lter should be replaced at
least once every two months or more frequently if the appliance is used
intensively.
Activated charcoal lter
Charcoal lter is used only when the cooker hood is not connected to
the ventilation duct. Activated charcoal lter can absorb odours until
saturated. Charcoal lter is not suitable for washing or regeneration and
should be replaced at least once every two months or more frequently if
the appliance is used intensively.
Dismantling of charcoal lter is shown on Figure 6.
Light
Use incandescent / halogen / LED modules of the same specication as
those factory-installed in the appliance. See Figure 7 for details how to
replace lights. If there is no such gure in this manual, please contact
authorised service to replace the lighting module.

- 15 -
WARRANTY AND AFTER
SALES SERVICE
Warranty
Warranty service as stated on the warranty card. The manufacturer shall
not be held liable for any damage caused by improper use of the product.
The manufacturer recommends that all repairs and adjust-
ments be carried out by the Factory Service Technician or the
Manufacturer's Authorized Service Point. Repairs should be
carried out by a qualied technician only.
Manufacturer’s Declaration
The manufacturer hereby declares that this product meets the re-
quirements of the following European directives:
• Low Voltage Directive 2014/35/EC
• Electromagnetic Compatibility (EMC) Directive 2014/30/EC
• ErP Directive 2009/125/EC
• Directive RoHS 2011/65/EC
and has thus been marked with the symbol and been issued with
a declaration of compliance made available to market regulators.

- 16 -
Sehr geehrter Kunde,
Von heute an werden Ihre alltäglichen Pichten einfa-
cher denn je. Dieses Gerät ist eine Verbindung
einer außergewöhnlich leichten Bedienung und einer
perfekten Ezienz. Nachdem Sie diese Bedienungsan-
leitung gelesen haben, ist die Bedienung des Gerätes
kein Problem mehr.
Bevor das Gerät das Herstellerwerk verlassen konnte,
wurde er vor dem Verpacken gründlich auf deren Si-
cherheit und Funkonalitäten an Prüfständen über-
prü.
Bevor das Gerät in Betrieb genommen wird, lesen Sie
bie die Bedienungsanleitung aufmerksam durch. Be-
folgen Sie die darin stehenden Hinweise, vermeiden
Sie verschiedene Bedienfehler. Diese Bedienungsan-
leitung ist zu erhalten und so aufzubewahren, dass sie
jederzeit bei der Hand ist.
Zur Vermeidung möglicher Unfälle befolgen Sie die
in der Bedienungsanleitung stehenden Hinweise
genau.
Mit freundlichen Grüßen

- 17 -
SICHERHEITSHINWEISE
• Bitte lesen Sie diese Anleitung vor der Installati-
on des Kaminhaube durch!
• Das Gerät ist ausschließlich für den Einsatz im
Haushalt bestimmt.
• Der Hersteller behält sich das Recht vor, Änderun-
gen vorzunehmen, die die Gerätefunktion nicht
beeinträchtigen.
• Der Hersteller übernimmt keine Haftung für even-
tuelle Schäden oder Brände, die durch das Gerät
verursacht wurden und sich aus der Nichtbeach-
tung der in dieser Gebrauchsanweisung angege-
benen Hinweise ergeben.
• Die Dunstabzugshaube dient zur Abführung von
Gerüchen und Dämpfen. Verwenden Sie die
Dunstabzugshaube nicht zu anderen Zwecken.
• Beim Abluftbetrieb muss die Dunstabzugshaube
an einen entsprechenden Lüftungskanal ange-
schlossen werden (nicht an betriebsaktive Ka-
min-, Rauch- oder Abgaskanäle anschließen!). Es
ist dabei erforderlich, eine Leitung zur Abführung
der Abluft nach außen zu installieren. Diese Ab-
luftleitung (meistens ein Rohr mit einem Durch-
messer von Ø 120 oder 150 mm) sollte maximal
4-5 m lang sein. Die Abluftleitung ist auch bei
Teleskop-und Möbeldunstabzugshauben bei Um-
luftbetrieb erforderlich.
• Beim Umluftbetrieb muss der Aktivkohlelter in-
stalliert werden. In diesem Fall ist es nicht mehr
erforderlich, die Leitung zur Abführung der Ab-
luft zu installieren. Zu empfehlen ist dagegen die
Montage des Umlenkblechs für die Abluft (nur bei
Kaminabzugshauben).
• Die Dunstabzugshaube verfügt über eine unab-
hängige Beleuchtung sowie einen Abluftventila-

- 18 -
tor mit der Möglichkeit der Einstellung einer der
mehreren Leistungsstufen.
• Je nach der Version des Gerätes ist die Dunst-
abzugshaube für eine dauerhafte Anbringung
an einer vertikalen Wand über einem Gas- oder
Elektroherd (Kaminabzugshauben und Univer-
salabzugshauben); unter der Decke über einem
Gas- oder Elektroherd (Inselabzugshauben); an
einer vertikalen Wand in einem Möbelstück über
einem Gas- oder Elektroherd (Teleskop-und Mö-
beldunstabzugshauben) bestimmt. Vergewissern
Sie sich vor der Montage, ob die Wand- oder De-
ckenkonstruktion für die Montage der Dunstab-
zugshaube geeignet ist und standhalten kann.
Manche Modelle der Dunstabzugshauben sind
sehr schwer.
• Die Montagehöhe über dem Elektroherd ist im
Produktdatenblatt (in der technischen Spezika-
tion des Gerätes) angegeben. Sollte in der Mon-
tageanleitung für Gasherde ein größerer Abstand
angegeben sein, so muss dies berücksichtigt wer-
den (Abb. 1).
• Vermeiden Sie oene Flammen unter der Dunst-
abzugshaube. Wenn Sie das Kochgeschirr von
der Gaskochstelle nehmen, stellen Sie die Flam-
me zuvor auf Minimum. Sorgen Sie immer dafür,
dass die Flamme keinesfalls über das Kochgeschirr
hinausragt, sonst kommt es zu unerwünschten
Energieverlusten und zur gefährlichen Konzent-
ration von Wärme.
• Die Zubereitung der Gerichte mit Fetten muss
stets unter Aufsicht erfolgen, da das überhitzte
Fett sich schnell selbst entzünden kann.
• Vor jeder Reinigung, Filterwechsel oder vor Durch-
führung von Reparaturen trennen Sie das Gerät
von der Stromversorgung, indem Sie den Stecker
aus der Steckdose ziehen.
• Der Fettlter der Dunstabzugshaube ist mindes-
tens einmal monatlich zu reinigen, denn er ist

- 19 -
leicht entzündlich, wenn er überfettet ist.
• Sollten im Raum gleichzeitig sowohl die Abzugs-
haube als andere nicht mit Strom gespeiste Ge-
räte (z.B. Öfen für üssige Brennstoe, Durch-
lauferhitzer, Thermen) betrieben werden, muss
für eine ausreichende Belüftung des Raumes
(Luftzufuhr) gesorgt werden. Ein sicherer Betrieb
der Abzugshaube ist nur dann möglich, wenn
bei gleichzeitigem Betrieb der Dunstabzugshau-
be und anderer, luftverbrauchender Geräte, der
Unterdruck in ihrer direkten Nähe den Wert von
max. 0,004 mB erreicht (dieser Wert gilt nicht bei
Umluftbetrieb der Dunstabzugshaube).
• Die Dunstabzugshaube darf nicht als Stützäche
für Personen, die sich gerade in der Küche ben-
den, genutzt werden.
• Die Dunstabzugshaube sollte sowohl von au-
ßen als auch von innen oft (MINDESTENS EIN-
MAL PRO MONAT, unter Beachtung der in dieser
Gebrauchsanweisung angegebenen Hinweise
zur Wartung des Gerätes) gereinigt werden. Bei
Nichtbeachtung der Grundsätze, die die Reini-
gung der Dunstabzugshaube und den Filterwech-
sel betreen, entsteht Brandgefahr.
• Wird das Netzkabel beschädigt, muss es in einer
Fachwerstatt neu besorgt werden.
• Die Möglichkeit der Trennung des Gerätes vom
Stromnetz durch Ziehen des Steckers aus der
Steckdose oder durch Ausschalten des bipolaren
Schalters muss gewährleistet werden.
• Dieses Gerät darf nicht von Personen (einschließ-
lich Kindern) bedient werden, die unter geistigen
oder körperlichen Behinderungen leiden oder die
nicht über ausreichende Erfahrungen in der Be-
dienung solcher Geräte verfügen. Eine Ausnahme
kann gemacht werden, wenn solche Personen un-
ter Aufsicht eines Verantwortlichen mit dem Ge-
rät arbeiten und/oder gründlich in die Bedienung
eingewiesen wurden.

- 20 -
• Es ist besonders darauf zu achten, dass die Kin-
der ohne Aufsicht das Gerät nicht nutzen.
• Prüfen Sie, ob die auf Typenschild gemachten
Angaben zur Spannung den örtlichen Parametern
der Stromversorgung entsprechen.
• Das Netzkabel vor der Montage ausrollen und be-
gradigen.
• Die Verpackungsmaterialien (Polyethylenbeutel,
Styroporstücke usw.) sind beim Auspacken außer
Kinderreichweite zu halten.
• Vor Anschluss der Dunstabzugshaube ans Strom-
netz muss immer kontrolliert werden, ob das
Netzkabel ordnungsmäßig installiert und während
der Montagearbeiten durch die Dunstabzugshau-
be NICHT eingeklemmt wurde. Vor der Beendi-
gung der Montage darf das Gerät ans Stromnetz
nicht angeschlossen werden.
• Es ist verboten, die Dunstabzugshauben ohne in-
stallierte Aluminiumfettlter zu nutzen.
• Es ist streng verboten, Gerichte unter Einsatz
oenen Feuers (Flambieren) unter der Dunstab-
zugshaube zuzubereiten.
• Hinsichtlich der erforderlichen technischen und
Sicherheitsmittel im Bereich der Ableitung von
Abgasen sind die von den zuständigen Behörden
erlassenen Vorschriften streng einzuhalten.
• Wenn die Schrauben und Befestigungselemente
entsprechend den vorliegenden Hinweisen und
Anleitungen nicht nachgezogen werden, kann
dies eine Gefahr für Gesundheit und Leben dar-
stellen.
• Die hängenden Dunstabzugshauben arbeiten nur
im Umluftbetrieb.
• ACHTUNG! Schrauben und Befestigungselemen-
te, die nicht in Übereinstimmung mit diesen Hin-
weisen sind, können zur elektrischen Gefährdung
führen.
Strona się ładuje...
Strona się ładuje...
Strona się ładuje...
Strona się ładuje...
Strona się ładuje...
Strona się ładuje...
Strona się ładuje...
Strona się ładuje...
Strona się ładuje...
Strona się ładuje...
Strona się ładuje...
Strona się ładuje...
Strona się ładuje...
Strona się ładuje...
Strona się ładuje...
Strona się ładuje...
Strona się ładuje...
Strona się ładuje...
Strona się ładuje...
Strona się ładuje...
Strona się ładuje...
Strona się ładuje...
Strona się ładuje...
Strona się ładuje...
Strona się ładuje...
Strona się ładuje...
Strona się ładuje...
Strona się ładuje...
Strona się ładuje...
Strona się ładuje...
Strona się ładuje...
Strona się ładuje...
Strona się ładuje...
Strona się ładuje...
Strona się ładuje...
Strona się ładuje...
Strona się ładuje...
Strona się ładuje...
Strona się ładuje...
Strona się ładuje...
Strona się ładuje...
Strona się ładuje...
Strona się ładuje...
Strona się ładuje...
Strona się ładuje...
Strona się ładuje...
Strona się ładuje...
Strona się ładuje...
Strona się ładuje...
Strona się ładuje...
Strona się ładuje...
Strona się ładuje...
Strona się ładuje...
Strona się ładuje...
Strona się ładuje...
Strona się ładuje...
Strona się ładuje...
Strona się ładuje...
Strona się ładuje...
Strona się ładuje...
Strona się ładuje...
Strona się ładuje...
Strona się ładuje...
Strona się ładuje...
Strona się ładuje...
Strona się ładuje...
Strona się ładuje...
Strona się ładuje...
Strona się ładuje...
Strona się ładuje...
Strona się ładuje...
Strona się ładuje...
Strona się ładuje...
Strona się ładuje...
Strona się ładuje...
Strona się ładuje...
Strona się ładuje...
Strona się ładuje...
Strona się ładuje...
Strona się ładuje...
Strona się ładuje...
Strona się ładuje...
Strona się ładuje...
Strona się ładuje...
Strona się ładuje...
Strona się ładuje...
Strona się ładuje...
Strona się ładuje...
Strona się ładuje...
Strona się ładuje...
Strona się ładuje...
Strona się ładuje...
-
 1
1
-
 2
2
-
 3
3
-
 4
4
-
 5
5
-
 6
6
-
 7
7
-
 8
8
-
 9
9
-
 10
10
-
 11
11
-
 12
12
-
 13
13
-
 14
14
-
 15
15
-
 16
16
-
 17
17
-
 18
18
-
 19
19
-
 20
20
-
 21
21
-
 22
22
-
 23
23
-
 24
24
-
 25
25
-
 26
26
-
 27
27
-
 28
28
-
 29
29
-
 30
30
-
 31
31
-
 32
32
-
 33
33
-
 34
34
-
 35
35
-
 36
36
-
 37
37
-
 38
38
-
 39
39
-
 40
40
-
 41
41
-
 42
42
-
 43
43
-
 44
44
-
 45
45
-
 46
46
-
 47
47
-
 48
48
-
 49
49
-
 50
50
-
 51
51
-
 52
52
-
 53
53
-
 54
54
-
 55
55
-
 56
56
-
 57
57
-
 58
58
-
 59
59
-
 60
60
-
 61
61
-
 62
62
-
 63
63
-
 64
64
-
 65
65
-
 66
66
-
 67
67
-
 68
68
-
 69
69
-
 70
70
-
 71
71
-
 72
72
-
 73
73
-
 74
74
-
 75
75
-
 76
76
-
 77
77
-
 78
78
-
 79
79
-
 80
80
-
 81
81
-
 82
82
-
 83
83
-
 84
84
-
 85
85
-
 86
86
-
 87
87
-
 88
88
-
 89
89
-
 90
90
-
 91
91
-
 92
92
-
 93
93
-
 94
94
-
 95
95
-
 96
96
-
 97
97
-
 98
98
-
 99
99
-
 100
100
-
 101
101
-
 102
102
-
 103
103
-
 104
104
-
 105
105
-
 106
106
-
 107
107
-
 108
108
-
 109
109
-
 110
110
-
 111
111
-
 112
112


Amica OKP6651S Instrukcja obsługi
- Kategoria
- Okapy kuchenne
- Typ
- Instrukcja obsługi
w innych językach
- español: Amica OKP6651S Manual de usuario
- Deutsch: Amica OKP6651S Benutzerhandbuch
- slovenčina: Amica OKP6651S Používateľská príručka
- português: Amica OKP6651S Manual do usuário
- română: Amica OKP6651S Manual de utilizare
Powiązane artykuły
-
Amica OTP6651BG Instrukcja obsługi
-
-
Amica OKP6547SW Instrukcja obsługi
-
Amica OKS6541T Instrukcja obsługi
-
Amica OME6115I Instrukcja obsługi
-
Amica OTP6641BG Instrukcja obsługi
-
-
Amica OKC6541S Instrukcja obsługi
-
Amica OMP6251BG Instrukcja obsługi
-
Amica KHF 695 600 S Instrukcja obsługi