Indesit DFG 26B10 NX EU instrukcja
- Kategoria
- Zmywarki
- Typ
- instrukcja

DFG 26B10
EN
English
Operating instructions
DISHWASHER - Contents
Operating instructions,1
Precautions and advice, 2-3
Product Data, 6
Assistance, 8
Installation, 9-10
Description of the appliance, 11
Refined salt and rinse aid, 12
Loading the racks, 13-14
Detergent and dishwasher use, 15
Wash cycles, 16
Special wash cycles and options, 17
Care and maintenance, 18
Troubleshooting, 19
Kullanım talimatları
BULAŞIK MAKİNESİ - İçindekiler
Kullanım talimatları, 1
Önlem ve öneriler, 4-5
Ürün bilgi sayfası, 7
Servis, 8
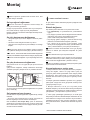
Montaj, 31-32
Cihazın tanımı, 33
Rane tuz ve
parlatıcı
, 34
Raarın yerleştirilmesi, 35-36
Deterjan ve bulaşık makinesi kullanımı, 37
Yıkama
programları
, 38
Özel programlar ve Opsiyonlar
, 39
Temizlik ve bakım, 40
Sorun Giderme, 41
PL
Polski
Instrukcja obsługi
ZMYWARKA - Spis treści
Instrukcja obsługi,1
Zalecenia i środki ostrożności, 3-4
Karta produktu, 6
Serwis Techniczny, 8
Instalacja, 20-21
Opis urządzenia, 22
Sól regeneracyjna i środek nabłyszczający, 23
Ładowanie koszy, 24-25
Środek myjący i obsługa zmywarki, 26
Programy, 27
Programy specjalne i opcje, 28
Konserwacja i obsługa, 29
Nieprawidłowe działanie i możliwe środki zaradcze, 30
TR
Türkçe

2
EN
Precautions and advice
This appliance was designed and
manufactured in compliance with international
safety standards. The following information
has been provided for safety reasons and
should be read carefully.
Keep this instruction manual in a safe place
for future reference. If the appliance is sold,
given away or moved, make sure the manual
is kept with the machine.
Read the instructions carefully, as they
include important information on safe
installation, use and maintenance.
This appliance was designed for domestic
use or similar applications, for example:
- farmhouses;
- use by guests in hotels, motels and other
residential settings;
- bed & breakfasts.
Remove the appliance from all packaging
and make sure it was not damaged during
transportation. If it was damaged, contact the
retailer and do not proceed any further with
the installation process.
General safety
• This appliance should not be operated
by children younger than 8 years, people
with reduced physical, sensory or mental
capacities, or inexperienced people who
are not familiar with the product, unless they
are given close supervision or instructions
on how to use it safely and are made aware
by a responsible person of the dangers its
use might entail.
• Children must not play with the appliance.
• It is the user's responsibility to clean and
maintain the appliance. Children should
never clean or maintain it unless they are
given supervision.
• The appliance was designed for domestic
use inside the home and is not intended for
commercial or industrial use.
• The appliance must be used to wash
domestic crockery in accordance with the
instructions in this manual.
• The appliance must not be installed
outdoors, even in covered areas. It is
extremely dangerous to leave the machine
exposed to rain and storms.
• Do not touch the appliance when barefoot.
• When unplugging the appliance always
pull the plug from the mains socket. Do not
pull on the cable.
• The water supply tap must be shut off
and the plug should be removed from
the electrical socket at the end of every
cycle and before cleaning the appliance
or carrying out any maintenance work.
• The maximum number of place settings is
shown in the product sheet.
• If the appliance breaks down, do not under
any circumstances touch the internal parts
in an attempt to perform the repair work
yourself.
• Do not lean or sit on the open door: this
may cause the appliance to overturn.
• The door should not be left open as it may
create a dangerous obstacle.
• Keep detergent and rinse aid out of reach
of children.
• The packaging material should not be used
as a toy.
• Knives and other utensils with sharp
edges must be placed either with the
points/blades facing downwards in the
cutlery basket or horizontally on the tip-up
compartments or in the tray/third basket,
if available.
• Connect the appliance to the water mains
using the new supply hose provided with
the appliance. Do not re-use the old hose.
Install the back side of a free-standing
dishwasher against a wall.
Disposal
• To dispose of any packaging materials,
follow local legislation so that the
packagings may be reused.
• The European Directive 2012/19/EU
relating to Waste Electrical and Electronic
Equipment (WEEE) states that household
appliances should not be disposed of
using the normal solid urban waste cycle.
Exhausted appliances should be collected
separately in order to optimise the cost of
reusing and recycling the materials inside
the machine, while preventing potential
damage to the atmosphere and public
health. The crossed-out dustbin symbol
shown on all products reminds the owners
of their obligations regarding separated
waste collection.
For further information relating to the correct
disposal of household appliances, owners
may contact the relevant public authority or
the local appliance dealer.

3
Saving energy and respecting the
environment
Saving water and energy
• Only begin a wash cycle when the
dishwasher is full. While waiting for the
dishwasher to be filled, prevent unpleasant
odours with the Soak cycle
(if available, see
Wash Cycles).
• Select a wash cycle that is suited to the type
of crockery and to the soil level using the
Table of Wash Cycles:
- For dishes with a normal soil level, use
the Eco wash cycle, which guarantees low
energy and water consumption levels.
- If the load is smaller than usual activate
the Half Load option
(see Special wash cycles
and options, if available).
• If your electricity supply contract gives
details of electricity-saving time bands, run
the wash cycles when electricity prices are
lower. The Delayed Start option can help
you organise the wash cycles accordingly
(see Special wash cycles and options, if available).
PL
Zalecenia i środki ostrożności
Niniejsze urządzenie zostało
zaprojektowane i wyprodukowane zgodnie z
międzynarodowymi normami bezpieczeństwa.
Poniższe ostrzeżenia podane zostały ze
względów bezpieczeństwa i należy je uważnie
przeczytać.
Należy zachować niniejszą książeczkę
instrukcji dla przyszłych konsultacji. W
przypadku sprzedaży, odstąpienia lub
przeprowadzki należy dopilnować, aby została
przekazana wraz z urządzeniem nowemu
właścicielowi.
Uważnie przeczytać instrukcję: zawiera
ona ważne informacje dotyczące instalacji,
użytkowania i bezpieczeństwa.
To urządzenie zostało zaprojektowane do
użytku domowego lub podobnych zastosowań,
na przykład:
- w domach kolonijnych;
- do użytku przez klientów w hotelach, motelach
i innych obiektach typu mieszkaniowego;
- w pensjonatach bed and breakfast.
Rozpakować urządzenie i sprawdzić, czy nie
zostało uszkodzone podczas transportu. Jeśli
okazałoby się uszkodzone, nie podłączać go,
lecz skontaktować się ze sprzedawcą.
Bezpieczeństwo ogólne
• Niniejsze urządzenie może być używane
przez dzieci powyżej 8 roku życia oraz
osoby o ograniczonych zdolnościach
fizycznych, zmysłowych i umysłowych
lub nie posiadające jego odpowiedniej
znajomości lub doświadczenia, pod
warunkiem, że znajdują się one pod ścisłym
nadzorem odpowiedzialnej za nie osoby
bądź też otrzymały instrukcje dotyczące
bezpiecznego użytkowania urządzenia oraz
zrozumiały związane z nim zagrożenia.
• Dzieci nie powinny bawić się urządzeniem.
• Czyszczenie oraz konserwację urządzenia
musi przeprowadzać użytkownik. Nie mogą
być one przeprowadzane przez dzieci bez
nadzoru.
• Urządzenie jest przeznaczone do użytku
nieprofesjonalnego wewnątrz pomieszczeń
mieszkalnych.
• Urządzenie powinno być używane do mycia
naczyń w warunkach domowych zgodnie z
niniejszymi instrukcjami.
• Urządzenia nie należy instalować na
świeżym powietrzu, nawet w miejscu
zadaszonym, gdyż wystawienie go na
działanie deszczu i burz jest bardzo
niebezpieczne.
• Nie dotykać zmywarki, stojąc boso na
podłodze.
• Przy wyjmowaniu wtyczki z gniazdka nie
ciągnąć za kabel, lecz trzymać za wtyczkę.
• Po zakończeniu każdego cyklu i przed
przystąpieniem do czyszczenia i konserwacji
urządzenia należy zamknąć zawór wody i
wyjąć wtyczkę z gniazdka.
• Maksymalna ilość nakryć jest podana w
karcie produktu.
• W razie uszkodzenia w żadnym wypadku
nie ingerować w wewnętrzne mechanizmy
urządzenia i nie próbować go samodzielnie
naprawiać.
• Nie opierać się ani nie siadać na otwartych
drzwiach: urządzenie mogłoby się
przewrócić.
• Nie należy pozostawiać otwartych drzwi
zmywarki, gdyż można się o nie potknąć.
• Trzymać detergenty i płyn nabłyszczający
z dala od dzieci.
• Opakowania nie są zabawkami dla dzieci.
• Noże i przyrządy o ostrych krawędziach
należy wkładać do kosza na sztućce, tak
aby czubki/ostrza były skierowane do
dołu, lub układać w położeniu poziomym
na półeczkach lub na tacy/trzecim koszu w
modelach, w których są one zainstalowane.

4
• Należy podłączyć urządzenie do sieci wodnej,
stosując nowy przewód doprowadzający
wodę; nie należy używać starego przewodu.
Podczas ustawiania zmywarek
wolnostojących, tylna część musi być
zwrócona w kierunku ściany.
Utylizacja
• Utylizacja materiałów opakowaniowych:
dostosować się do lokalnych przepisów;
w ten sposób opakowanie będzie mogło
zostać ponownie wykorzystane.
• Dyrektywa wspólnotowa 2012/19/EU w
sprawie zużytego sprzętu elektrycznego
i elektronicznego (WEEE) przewiduje,
że sprzęt gospodarstwa domowego nie
powinien być usuwany jako nieposortowane
odpady komunalne. Zużyte urządzenia
powinny podlegać selektywnej zbiórce w
celu uzyskania maksymalnego wskaźnika
odzysku i recyklingu ich materiałów
składowych oraz uniknięcia ewentualnych
zagrożeń dla zdrowia i środowiska. Symbol
przekreślonego kosza umieszczany jest na
wszystkich produktach w celu przypominania
o obowiązku segregacji odpadów.
W celu uzyskania bliższych informacji na
temat prawidłowego złomowania urządzeń
gospodarstwa domowego ich właściciele
mogą się zwrócić do właściwych służb
publicznych lub do sprzedawców tych
urządzeń.
Oszczędność i ochrona środowiska
Oszczędność wody i energii
• Uruchamiać zmywarkę tylko z pełnym
ładunkiem. W oczekiwaniu na napełnienie
maszyny zapobiegać przykrym zapachom
przy pomocy cyklu namaczania
(jeśli jest on
dostępny - zob. Programy).
• Wybierać programy odpowiednie do rodzaju
naczyń i stopnia zabrudzenia, stosując się
do Tabeli programów:
- dla naczyń normalnie zabrudzonych
stosować program Eco, który zapewnia
niskie zużycie energii i wody.
- przy ograniczonym ładunku włączyć opcję
Połowa ładunku
(
jeśli jest on dostępny - zob.
Programy specjalne i opcje).
• Jeśli zawarta umowa na dostawę energii
elektrycznej przewiduje strefy czasowe
oszczędności energetycznej, uruchamiać
zmywarkę w godzinach obowiązywania
niższej taryfy. Opcja Opóźnienia startu
może pomoc w takiej organizacji zmywania
(jeśli jest ona dostępny - zob. Programy specjalne i opcje).
TR
Önlem ve öneriler
Bu makine, uluslararası güvenlik
standartlarına uygun olarak tasarlanmış ve
üretilmiştir. Aşağıdaki bilgiler güvenlik
nedeniyle verilmiştir ve dikkatle okunmalıdır.
Bu kullanım kılavuzunu, gelecekte referans
olarak kullanmak üzere saklayın. Cihazı
satarsanız, birine hediye ederseniz veya
başka bir yere taşırsanız, kullanım kılavuzunu
da vermeyi ihmal etmeyin.
Güvenli montaj, kullanım ve bakım hakkında
önemli bilgiler içerdiğinden talimatları dikkatle
okuyun.
Bu cihaz, evde kullanmanın yanı sıra
benzeri uygulamalarda da kullanılmak üzere
tasarlanmıştır; örneğin:
- çiftlik evleri;
- oteller, moteller ve diğer yerleşim türü
ortamlarında müşteriler tarafından;
- oda-kahvaltı sistemiyle hizmet veren turistik
tesisler.
Cihazı ambalajından çıkarın ve nakliye
sırasında hasar görüp görmediğini kontrol
edin. Hasar görmüşse, satıcıyla temasa geçin
ve montaj işlemine başlamayın.
Genel güvenlik
• Bu cihaz, gözetim altında olmadan
veya ürünün nasıl güvenli bir şekilde
kullanılacağına dair talimatlar verilmeden
ya da kullanımının neden olacağı tehlikeler
konusunda sorumlu bir kişi tarafından
uyarılmadan 8 yaşından küçük çocuklar,
fiziksel, ruhsal veya akli durumları
yeterli olmayan kişiler ya da ürünü
tanımayan tecrübesiz kişiler tarafından
kullanılmamalıdır.
• Çocuklar cihazla oynamamalıdır.
• Cihazın temizlenmesi ve bakımı kullanıcının
sorumluluğundadır. Çocuklar gözetim
altında olmaksızın kesinlikle temizlik veya
bakım işi yapmamalıdır.
• Cihaz ev içi kullanım için tasarlanmıştır
ve ticari veya endüstriyel kullanım
amaçlanmamıştır.
• Cihaz, ev bulaşıklarının bu kullanım
kılavuzunda belirtilen şekilde yıkanması
için kullanılmalıdır.
• Cihaz, üzeri kapatılarak olsa bile açık
alanlara kurulmamalıdır. Makinenin yağmur
ve fırtınaya maruz bırakılması son derece
tehlikelidir.

5
• Ayaklarınız çıplakken cihaza dokunmayın.
• Cihazı şten çekerken, daima şi duvardaki
elektrik prizinden çekin, kablodan çekmeyin.
Kablosunu çekmeyin.
• Her yıkama çevriminden sonra, cihazı
temizlemeden önce veya bakım yapmadan
önce su musluğu kapatılmalı ve ş elektrik
prizinden çıkarılmalıdır.
• Maksimum yerleşim ayarı sayısı ürün bilgi
sayfasında belirtilmiştir.
• Makine arızalanırsa, hiçbir koşulda makineyi
kendiniz tamir etmeye çalışmayın ve
makinenin iç kısımlarına dokunmayın.
• Cihazın açık kapağına yaslanmayın,
üzerine oturmayın; cihaz devrilebilir.
• Kapak, tehlikeli bir engel yaratabileceği için
açık bırakılmamalıdır.
• Deterjan ve parlatıcıyı çocukların
erişemeyeceği bir yerde muhafaza edin.
• Ambalaj malzemeleri oyuncak gibi
kullanılmamalıdır.
• Bıçaklar ve diğer keskin kenarlı nesneler, uç
kısımları/bıçakları çatal-bıçak sepeti içinde
aşağı doğru gelecek veya açılır-kapanır
bölmelerin üzerinde ya da tepsinin/üçüncü
sepetin (varsa) içinde yatay duracak
biçimde yerleştirilmelidir.
• Cihazla birlikte verilen besleme hortumunu
kullanarak cihazı su şebekesine bağlayın.
Eski hortumu tekrar kullanmayın.
Solo bulaşık makinesini arkası bir duvara
gelecek şekilde kurun.
Elden Çıkarma
• Ambalaj malzemelerini elden çıkarırken, bu
malzemelerin yeniden kullanılabilmesi için
yerel yönetmeliklere uyun.
• Atık Elektrikli ve Elektronik Ekipmanların
(AEEE) elden çıkarılması hakkında Avrupa
birliği Direktifi 2012/19/EU, elektrikli ev
aletlerinin normal evsel atıklar gibi elden
çıkarılmaması gerektiğini belirtmektedir.
Kullanım ömrünü tamamlayan cihazlar,
halk sağlığına ve atmosfere verilebilecek
olası zararların önlenmesi ve makinenin
üretiminde kullanılan malzemelerin yeniden
kullanım ve geri dönüşüm masraarının
azaltılması için ayrı olarak toplanmalıdır.
Tüm ürünlerin üzerinde bulunan üzeri çarpı
işaretli çöp kovası simgesi, bu ürünlere ait
atıkların ayrı bir şekilde toplanması gerektiği
konusunda ürünün kullanıcılarını uyarır.
Konutlarda kullanılan elektrikli cihazların
doğru bir şekilde elden çıkarılması
konusunda ayrıntılı bilgi edinmek için
ilgili kamu kurumuna ya da yerel bayinize
başvurabilirsiniz.
Enerji tasarrufu ve çevreye saygı
Su ve enerji tasarrufu
• Sadece bulaşık makinesi dolu olduğu
zaman yıkama çevrimini başlatın. Bulaşık
makinesinin dolmasını beklerken, sudan
geçirme çevrimiyle istenmeyen kokuların
oluşmasını önleyin
(varsa, bkz. Yıkama
Çevrimleri)
.
• Yıkama Çevrimleri Tablosunu kullanarak
bulaşıkların kirlilik seviyesine ve bulaşık
tipine uygun olan yıkama çevrimini seçin:
- Normal kirlilik seviyesindeki tabaklar için,
düşük enerji ve su tüketimi seviyelerini
temin eden Ekonomik yıkama çevrimini
kullanın.
- Normalden az miktarda bulaşık varsa,
Yarım Yükleme seçeneğini kullanın
(varsa,
Özel yıkama çevrimleri ve seçeneklerine
bakın).
• Elektrik tedarikçiniz indirimli elektrik
tarifeleri hakkında bilgi vermişse, yıkama
çevrimlerini elektrik yatlarının düşük olduğu
zamanlarda gerçekleştirin. GECİKMELİ
BAŞLATMA seçeneği, yıkama çevrimlerini
buna göre organize etmenize yardımcı
olabilir
(
varsa, Özel yıkama çevrimleri ve
seçeneklerine bakın ).

6
Product Fiche
Brand
INDESIT
Model
DFG 26B10
Rated capacity in standard place settings (1)
13
Energy efciency class on a scale from A+++ (low consumption) to D (high consumption)
A+
Energy consumption per year in kWh (2)
295
Energy consumption of the standard cleaning cycle in kWh
1.04
Power consumption of the off-mode in W
0.5
Power consumption of the left-on mode in W
5.0
Water consumption per year in litres (3)
3080
Drying efcacy class on a scale from G (low efcacy) to A (high efcacy)
A
Programme time for standard cleaning cycle in minutes
190
The duration of the left-on mode in minutes
12
Noise in dB(A) Re 1pW
51
Built-in model
No
NOTES
1) The information on the label and che relates to the standard cleaning cycle, this programme is suitable to clean normally soiled
tableware and it is the most efcient programme in terms of combined energy and water consumption. The standard cleaning cycle
corresponds to the Eco cycle.
2) Based on 280 standard cleaning cycles using cold water ll and the consumption of the low power modes. Actual energy
consumption depends on how the appliance is used.
3) Based on 280 standard cleaning cycles. Actual water consumption depends on how the appliance is used.
EN
Product Data (product fiche)
Karta produktu
Marka
INDESIT
Nazwa modelu
DFG 26B10
Pojemność znamionowa, wyrażona liczbą standardowych kompletów naczyń (1)
13
Klasa efektywności energetycznej, skla od A+++ (niskie zużycie) do D (wysokie zużycie)
A+
Zużycie energii w kWh rocznie (2)
295
Zużycie energii w standardowym cyklu zmywania w kWh
1.04
Zużycie energii w trybie wyłączenia i trybie czuwania w W
0.5
Zużycie energii w trybie włączenia i trybie czuwania w W
5.0
Roczne zużycie wody w litrach rocznie (3)
3080
Klasa efektywności suszenia, skala od G (minimalna efektywność) do A (maksymalna efektywność)
A
Czas programu dla standardowego cyklu zmywania w minutach
190
Czas trwania trybu czuwania w minutach
12
Poziom emitowanego hałasu w dB(A) re1 pW
51
Model do zabudowy
Nie
Uwagi
1) Informacja, że cykl jest odpowiedni do zmywania normalnie zabrudzonych zastaw stołowych oraz że jest najbardziej efektywnym
programem pod względem łącznego zużycia energii i wody dla tego rodzaju zastawy stołowej; Standardowy cykl zmywania odpowiada
cyklowi Eco.
2) Na podstawie 280 standardowych cykli zmywania, przy użyciu zimnej wody, oraz w trybie niskiego zużycia energii. Rzeczywiste
zużycie energii zależy od sposobu użycia urządzenia.
3) Na podstawie 280 standardowych cykli zmywania. Rzeczywiste zużycie energii zależy od sposobu użycia urządzenia.
PL
Karta produktu

7
ürün bilgilerine
Marka
INDESIT
Model
DFG 26B10
Standart yer yerleşimlerinde nominal kapasite (1)
13
A+++ (düşük tüketim)’’dan D (yüksek tüketim)’’e Enerji verimlilik sınıfı
A+
kWh cinsinden yıllık enerji tüketimi (2)
295
kWh cinsinden standart temizleme programının enerji tüketimi
1.04
W’’de off-modun güç tüketimi
0.5
W’’de left-on modun güç tüketimi
5.0
Litre olarak yıllık su tüketimi (3)
3080
A (yüksek verim)’’dan G (düşük verim)’’e kurutma verimlilik sınıfı
A
Dakika cinsinden standart temizleme programı için program süresi
190
Left-on modun dakika cinsinden süresi
12
Yıkamada dB(A) re 1 pW cinsinden gürültü
51
Ankastre Model
Hayır
Notlar
1) Etiket ve ş üzerinde yer alan bilgi, standart yıkama programı ile ilişkilidir, bu programın normal olarak kirlenmiş sofra takımlarını
yıkamak için uygundur ve kombine enerji ve su tüketimi açısından en etkili programlardır. Standart yıkama programı, Eco program’’dır.
2) Soğuk su kullanılan 280 adet standart yıkama programına ve ve düşük güç modlarının tüketimine dayanmaktadır. Gerçek enerji
tüketimi cihazın nasıl kullanıldığına göre değişecektir.
3) 280 adet standart yıkama programına dayanmaktadır. Gerçel su tüketimi, cihazın nasıl kullanıldığına bağlıdır.
TR
Ürün bilgilerine

8
EN
Assistance
Before contacting Assistance:
• Check whether the problem can be resolved using the
Troubleshooting guide
(see Troubleshooting).
• Restart the programme to check whether the problem has
ceased to exist.
• If the problem persists, contact the Authorised Technical
Assistance Service.
Never use the services of unauthorised technicians.
Please have the following information to hand:
• The type of malfunction.
• The appliance model (Mod.).
• The serial number (S/N).
This information can be found on the appliance data plate
(see
Description of the appliance)
.
TR
Servis
Desteğe başvurmadan önce
• Problemin Sorun Giderme rehberi kullanılarak çözülüp
çözülmeyeceğini kontrol edin
(bkz. Sorun Giderme)
.
• Karşılaştığınız problemin devam edip etmediğini görmek
için programı baştan başlatın.
• Sorun devam ediyorsa, Yetkili Teknik Servis ile temas kurun.
Yetkisiz teknisyenlerin verdiği hizmetleri kullanmayın.
Lütfen aşağıda belirtilen bilgileri hazır edin:
• Arıza tipi.
• Cihaz Modeli (Mod).
• Seri Numarası (S/N).
Bu bilgiler, cihazın bilgi plakası üzerinde bulunur
(bkz. Cihazın
tanımı)
.
Cihazın ömrü 10 yıldır (Ürünün fonksiyonunu yerine
getirebilmesi için gerekli yedek parça bulundurma süresi)
Servis
444 50 10
Üretici Firma:
INDESIT COMPANY Spa
Viale Aristide Merloni, 47
60044 Fabriano Italy
Tel: +39 0732 6611
Ìthalatçı Firma:
INDESIT COMPANY BEYAZ EŞYA PAZARLAMA A.Ş.
Balmumcu Cad. Karahasan Sok.
No:11, 34349 - Balmumcu Beşiktaş - İstanbul
Tel: (0212) 355 53 00
Faks: (0212) 212 95 59
Satış Sonrası Hizmetler:
Indesit Company Beyaz Eşya Sanayi ve Ticaret A.Ş.
Balmumcu Cad. Karahasan Sok.
No: 11, 34349 – Balmumcu Beşiktaş – İstanbul
Tel: (0212) 355 53 00
PL
Serwis Techniczny
Przed zwróceniem się do Serwisu Technicznego:
• Sprawdzić, czy problemu nie można rozwiązać samodzielnie
(patrz Nieprawidłowości w działaniu i sposoby ich
usuwania).
• Ponownie uruchomić program, aby przekonać się, czy
usterka nie ustąpiła.
• W przeciwnym wypadku skontaktować się z autoryzowanym
Serwisem Technicznym.
Zwracać się wyłącznie do autoryzowanych techników.
Podać:
• rodzaj nieprawidłowości;
• model urządzenia (Mod.);
• numer seryjny (S/N).
Informacje te znajdują się na tabliczce znamionowej
umieszczonej na urządzeniu
(patrz Opis urządzenia).

EN
9
* Only available in selected models.
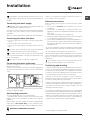
Installation
If the appliance must be moved at any time, keep it in an
upright position; if absolutely necessary, it may be tilted onto
its back.
Connecting the water supply
Adaptation of the water supply for installation should only
be performed by a qualified technician.
The water inlet and outlet hoses may be positioned towards
the right or the left in order to achieve the best possible
installation.
Make sure the dishwasher does not bend or squash the hoses.
Connecting the water inlet hose
• To a 3/4” gas cold or hot water connection point (max.
60°C).
• Run the water until it is perfectly clear.
• Screw the inlet hose tightly into position and turn off the
tap.
If the inlet hose is not long enough, contact a specialist
store or an authorised technician
(see Assistance)
.
The water pressure must be within the values indicated
in the Technical Data table - otherwise the dishwasher may
be function properly.
Make sure the hose is not bent or compressed.
Connecting the water outlet hose
Connect the outlet hose to a drain duct with a minimum
diameter of 2 cm. (A)
The outlet hose connection must be at a height ranging from
40 to 80 cm from the floor or surface where the dishwasher
rests.
Before connecting the water outlet hose to the sink drain,
remove the plastic plug (B).
Anti-flooding protection
To ensure floods do not occur, the dishwasher:
- is provided with a special system which blocks the water
supply in the event of anomalies or leaks from inside the
appliance.
Some models are also equipped with the supplementary
safety device New Acqua Stop*, which guarantees anti-
flooding protection even in the event of a supply hose rupture.
WARNING: HAZARDOUS VOLTAGE!
Under no circumstances should the water inlet hose be cut
as it contains live electrical parts.
Electrical connection
Before inserting the plug into the electrical socket, make
sure that:
• The socket is earthed and complies with current
regulations;
• the socket can withstand the maximum load of the
appliance as shown on the data plate located on the inside
of the door
(see chapter Description of the appliance);
• The power supply voltage falls within the values indicated
on the data plate on the inside of the door.
• The socket is compatible with the plug of the appliance. If
this is not the case, ask an authorised technician to replace
the plug (
see Assistance
). Do not use extension cables or
multiple sockets.
Once the appliance has been installed, the power supply
cable and the electrical socket should be easily accessible.
The cable should not be bent or compressed.
If the power supply cable is damaged, have it replaced
by the manufacturer or its authorised Technical Assistance
Service in order to prevent all potential hazards.
(See
Assistance)
The Company shall not be held responsible for any
incidents, if these regulations are not observed.
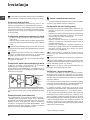
Positioning and levelling
1. Position the dishwasher on a level sturdy floor. If the floor is
uneven, the front feet of the appliance may be adjusted until
it reaches a horizontal position. If the appliance is levelled
correctly, it will be more stable and much less likely to move
or cause vibrations and noise while it is operating.
2. Before recessing the dishwasher, stick the adhesive
transparent strip* under the wooden shelf in order to protect
it from any condensation which may form.
3. Place the dishwasher so that its sides or back panel are in
contact with the adjacent cabinets or the wall. This appliance
can also be recessed under a single worktop*
(see the
Assembly instruction sheet)
.
4*. To adjust the height of the rear foot, turn the red hexagonal
bushing on the lower central part at the front of the dishwasher
using a hexagonal spanner with an opening of 8 mm. Turn the
spanner in a clockwise direction to increase the height and
in an anticlockwise direction to decrease it.
(see Building-in
instruction sheet attached to the documentation)
MIN 40 cm
MAX 80 cm

EN
10
* Only available in selected models.
Advice regarding the first wash cycle
After the installation, remove the stoppers from the racks and
the retaining elastic elements from the upper rack
(if any).
Water softener settings
Before starting the first wash cycle, set the hardness lev-
el of the water from the mains supply.
(see chapter Rinse
aid and refined salt).
First load the softener tank with water, then introduce about
1 kg of salt. It is perfectly normal for water to flow out.
As soon as this procedure is complete, run a wash cycle.
Only use salt that has been specifically designed for dish-
washers.
After the salt has been poured into the machine, the LOW
SALT indicator light* switches off.
If the salt container is not filled, the water softener and the
heating element may be damaged as a result.
Technical data
Dimensions
width 60 cm
height 85 cm
depth 60 cm
Capacity 13 standard place-settings
Water supply pressure
0,05 ÷ 1MPa (0.5 ÷ 10 bar)
7,25 – 145 psi
Power supply voltage See appliance data plate
Total absorbed power See appliance data plate
Fuse See appliance data plate
This dishwasher conforms to the
following European Community
Directives:
-2006/95/EC (Low Voltage)
-2004/108/EC (Electromagnetic
Compatibility)
-2009/125/EC (Comm. Reg.
1016/2010) (Ecodesign)
-97/17/EC (Labelling)
-2012/19/EU Waste Electrical
and Electronic Equipment
(WEEE)
The machine has a buzzer/set of tones
(depending on the
dishwasher model
) to inform the user that a command has
been implemented: power on, cycle end etc. *
The symbols/indicator lights/LEDs on the control panel/
display may vary in colour and may have a flashing or fixed
light
(depending on the dishwasher model)
.
The display* provides useful information concerning the
type of wash cycle, drying/wash-cycle phase, remaining time,
temperature etc etc.

EN
11
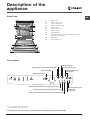
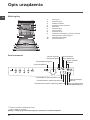
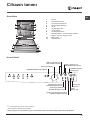
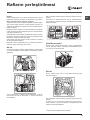
Overall view
Description of the
appliance
***Only in completely built-in models.
* Only available in selected models.
The number and type of wash cycles and options may vary depending on the dishwasher model.
1. Upper rack
2. Upper spray arm
3. Tip-up dispensers
4. Rack height adjuster
5. Lower rack
6. Lower spray arm
7. Washing filter
8. Salt dispenser
9. Detergent dispenser, rinse-aid dispenser and
Active Oxygen device*
10. Data plate
11. Control panel***
Control panel
Start/Pause button and
indicator light
ON/OFF/Reset button
Cycle select knob
Low Salt indicator light
Delayed Start option
button and indicator light
Low Rinse Aid
indicator light
Half Load option button and indicator light
Washing and Delayed Start 3h option indicator light.
Drying and Delayed Start 6h option indicator light.
Wash Cycle End and Delayed Start 9h option indicator light.

EN
12
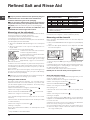
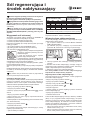
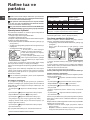
Refined Salt and Rinse Aid
Only use products which have been specifically designed
for dishwashers. Do not use table salt or industrial salt.
Follow the instructions given on the packaging.
If you are using a multi-function product, we recommend
that you add salt in any case, especially if the water is hard or
very hard.
(Follow the instructions given on the packaging.)
If you do not add salt or rinse aid, the LOW SALT* and
LOW RINSE AID* indicator lights will remain lit.
Measuring out the refined salt
The use of salt prevents the formation of LIMESCALE on the dishes
and on the machine’s functional components.
• It is important that the salt dispenser be never empty.
• It is important to set the water hardness.
The salt dispenser is located in the lower part of the dishwasher
(see Description)
and should be filled:
• When the LOW RINSE AID indicator light in the control panel
is lit *;
• When the green float* on the cap of the salt dispenser is no
longer visible.
• See autonomy in the water hardness table.
1. Remove the lower rack and unscrew the
container cap (anticlockwise).
2. Only the first time you do this: fill the water
dispenser up to the edge.
3. Position the funnel
(see figure)
and
fill the salt container right up to its edge
(approximately 1 kg); it is not unusual for a
little water to leak out.
4. Remove the funnel and wipe any salt residue away from the
opening; rinse the cap under running water and then screw it on.
It is advisable to perform this procedure every time you add salt
to the container.
Make sure the cap is screwed on tightly, so that no detergent can
get into the container during the wash cycle (this could damage
the water softener beyond repair).
Whenever you need to add salt, we recommend carrying out
the procedure before the washing cycle is started.
Setting the water hardness
For perfect water softener operation, it is essential that the
adjustment be based on the water hardness in your house. Ask
your local water supplier for this information. The factory setting
is for medium water hardness.
• Switch the dishwasher on using the On/Off button.
• Switch it off using the On/Off button
• Press and hold the START/PAUSE button for 5 seconds.
• Switch it on using the On/Off button
• The salt indicator light flashes (as many times as the current
selection.)
• Set the knob to the desired hardness level number
(see Table
on water hardness.)
• Switch it off using the On/Off button
• Setting is complete!
Even if using multi-functional tablets, the salt dispenser should
still be filled.
Measuring out the rinse aid
Rinse aid makes dish DRYING easier. The rinse aid dispenser
should be filled:
• When the LOW RINSE AID indicator light on the panel/display
is lit *;
• When the dark optical indicator* on the dispenser door “D”
becomes transparent.
1. Open the dispenser “D” by pressing and pulling up the tab
on the lid;
2. Carefully introduce the rinse aid as far as the maximum reference
notch of the filling space - avoid spilling it. If this happens, clean
the spill immediately with a dry cloth.
3. Press the lid down until you hear a click to close it.
NEVER pour the rinse aid directly into the appliance tub.
Rinse-aid dispenser setting
If you are not completely satisfied with the drying results, you can
adjust the quantity of rinse aid.
• Switch the dishwasher on using the On/Off button.
• Switch it off using the On/Off button
• Press the START/PAUSE button three times
• Switch it on using the On/Off button
• Everything is off
• Set the knob to the level number of rinse aid quantity to be
supplied.
• Switch it off using the On/Off button
• Setting is complete!
If the rinse aid level is set to ZERO (ECO), no rinse aid will be
supplied. The LOW RINSE AID indicator light will not be lit if you
run out of rinse aid.
A maximum of 4 levels can be set according to the dishwasher
model. The factory setting is for a medium level.
• If you see bluish streaks on the dishes, set a low number (1-2).
• If there are drops of water or limescale marks on the dishes,
set a high number (3-4).
Water Hardness Table
Average salt dispenser
capacity duration**
level °dH °fH mmol/l months
1 0 - 6 0 - 10 0 - 1 7 months
2 6 - 11 11 - 20 1,1 - 2 5 months
3 12 - 17 21 - 30 2,1 - 3 3 months
4 17 - 34 31 - 60 3,1 - 6 2 months
5*
34 - 50 61 - 90 6,1 - 9 2/3 weeks
For values between 0°f and 10°f, we do not recommend the use of salt.
* a setting of 5 may increase cycle duration.
** 1 wash cycle per day.
(°dH = hardness measured in German degrees - °f = hardness
measured in French degrees – mmol/l = millimoles per litre)
* Only available in selected models.
M
A
X

EN
13
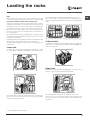
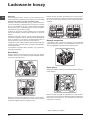
Loading the racks
Tips
Before loading the racks, remove all food residues from the
crockery and empty liquids from glasses and containers. No
preventive rinsing is needed under running water.
Arrange the crockery so that it is held in place firmly and does
not tip over; and arrange the containers with the openings facing
downwards and the concave/convex parts placed obliquely,
thus allowing the water to reach every surface and flow freely.
Make sure that the lids, handles, trays and frying pans do not
prevent the spray arms from rotating. Place any small items in
the cutlery basket.
Since plastic dishes and non-stick frying pans usually retain more
water drops, their drying will be not so good as that of ceramic
or stainless-steel dishes.
Lightweight items such as plastic containers should be placed in
the upper rack and arranged so that they cannot move.
After loading the appliance, make sure that the spray arms can
rotate freely.
Lower rack
The lower rack can hold pans, lids, dishes, salad bowls, cutlery
etc. Large plates and lids should ideally be placed at the sides.
Very soiled dishes and pans should be placed in the lower rack
because in this sector the water sprays are stronger and allow
a higher washing performance.
Several dishwasher models are fitted with tip-up sectors*.
They can be used in a vertical position when arranging dishes
or in a horizontal position (lower) to load pans and salad bowls
easily.
Cutlery basket
The basket is equipped with top grilles for improved cutlery ar-
rangement. The cutlery basket should be positioned only at the
front of the lower rack
Upper rack
Load this rack with delicate and lightweight crockery such as
glasses, cups, saucers and shallow salad bowls.
Several dishwasher models are fitted with tip-up sectors*.
They can be used in a vertical position when arranging tea/
dessert saucers or in a lower position to load bowls and food
containers.
* Only available in selected models.

EN
14
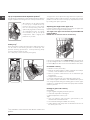
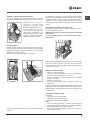
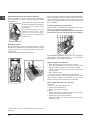
Adjusting the height of the upper rack
In order to make it easier to arrange the crockery, the upper rack
may be moved to a higher or lower position.
The height of the upper rack should be adjusted WHEN THE
RACK IS EMPTY.
NEVER raise or lower the rack on one side only.
If the rack is equipped with a Lift-Up device*
(see figure)
, lift
it up by holding its sides. To restore the lower position, press
the levers (A) at the sides of the rack and follow the rack down.
Unsuitable crockery
• Wooden crockery and cutlery.
• Delicate decorated glasses, artistic handicraft and antique
crockery. Their decorations are not resistant.
• Parts in synthetic material which do not withstand high
temperatures.
• Copper and tin crockery.
• Crockery soiled with ash, wax, lubricating grease or ink.
The colours of glass decorations and aluminium/silver pieces
can change and fade during the washing process. Some types
of glass (e.g. crystal objects) can become opaque after a number
of wash cycles too.
Damage to glass and crockery
Caused by:
• Type of glass and glass production process.
• Chemical composition of detergent.
• Water temperature of rinse cycle.
Tips:
• Only use glasses and porcelain guaranteed by the
manufacturer as dishwasher safe.
• Use a delicate detergent suitable for crockery.
• Collect glasses and cutlery from the dishwasher as soon as
the wash cycle is over.
The upper rack can be adjusted for height based on requirements:
high position to place bulky crockery in the lower rack and low
position to make the most of the tip-up compartments/sectors
by creating more space upwards.
Tip-up compartments with adjustable position*
The side tip-up compartments can be positioned at three different
heights to optimize the arrangement of crockery inside the rack.
Wine glasses can be placed safely
in the tip-up compartments by
inserting the stem of each glass
into the corresponding slots. For
optimum drying results incline the tip-
up compartments more. To change
the inclination, pull up the tip-up
compartment, slide it slightly and
position it as you wish.
Cutlery tray*
Some dishwasher models are fitted with a sliding tray which
can be used to hold serving utensils or small cups. For
optimum washing performance, avoid positioning bulky
crockery directly below the tray.
The cutlery tray can be removed
(see Figure).
*Only available in selected models with different numbers and
positions.

EN
15
* Only available in selected models.
Starting the dishwasher
1. Switch on the appliance by pressing the ON/OFF button.
2. Open the door and pour in a suitable amount of detergent
(see
Measuring out the detergent).
3. Load the racks
(see Loading the racks)
and shut the door.
4. Select the wash cycle by turning the SELECT WASH CYCLE
knob: align the notch on the knob with the number or symbol
representing the desired wash cycle. The START/PAUSE indicator
light will go on.
5. Select the wash options*
(see Options and Special Wash
Cycles).
6. Start the cycle by pressing the START button; the indicator
light will stop flashing and stay lit (fixed light). The indicator light
corresponding to the wash phase will go on, signalling that the
wash cycle has begun.
7. At the end of the wash cycle the END indicator light will go
on (fixed light). Switch off the appliance by pressing the ON/
OFF button.
8. Wait a few minutes before removing the crockery to avoid
getting burnt. Unload the racks, beginning with the lower level.
The machine will switch off automatically during long
periods of inactivity in order to minimise electricity
consumption.
Changing a wash cycle in progress
If a mistake was made in the wash-cycle selection process, it is
possible to change the cycle provided that it has only just begun:
once the wash cycle has started, in order to change the wash
cycle switch off the machine by pressing and holding the ON/
OFF/Reset button. Switch it back on using the same button and
select the desired wash cycle and options.
Adding extra crockery
Press the Start/Pause button and open the door, taking care to
avoid the escaping steam, and place the crockery inside the
dishwasher. Press the Start/Pause button: The cycle will start
again after a long beep has been emitted.
If the delayed start has been set, at the end of the countdown
the wash cycle will not start. It will stay in Pause mode.
Press the Start/Pause button to pause the machine; the wash
cycle is stopped.
At this stage the wash cycle cannot be changed.
Accidental interruptions
If the door is opened during the wash cycle or there is a power
cut, the cycle stops. It starts again from the point at which it
was interrupted once the door has been shut or the electricity
supply restored.
Measuring out the detergent
Good washing results also depend on the correct amount of
detergent being used. Exceeding the stated amount does not
result in a more effective wash and increases environmental
pollution.
The amount can be adjusted to the soil level.
In the case of normally soiled items, use approximately either
35g (powder detergent) or 35ml (liquid detergent). If tablets
are used, one tablet will be enough.
If the crockery is only lightly soiled or if it has been rinsed
with water before being placed in the dishwasher, reduce the
amount of detergent used accordingly.
For good washing results also follow the instructions shown
on the detergent box.
For further questions please ask the detergent producers.
To open the detergent dispenser use the opening device “A”.
Introduce the detergent into the dry dispenser “B” only.
Place the amount of detergent for pre-washing directly inside
the tub.
1. When measuring out the detergent refer to the Table of wash
cycles to add the proper quantity. Compartment B comprises a
level showing the maximum quantity of liquid or powder detergent
that can be added to each cycle.
2. Remove detergent residues from the edges of the dispenser
and close the cover until it clicks.
3. Close the lid of the detergent dispenser by pulling it up until
the closing device is secured in place.
The detergent dispenser automatically opens up at the right time
according to the wash cycle.
If all-in-one detergents are used, we recommend using the TABS
option, because it adjusts the cycle so that the best washing and
drying results are always achieved.
Only use detergent which has been specifically designed
for dishwashers.
DO NOT USE washing up liquid.
Using excessive detergent may result in foam residues
remaining in the machine after the cycle has ended.
To achieve the best washing and drying results, the combined
use of detergent, rinse aid liquid and refined salt is required.
We recommend using detergents that do not contain
phosphates or chlorine, as these products are harmful
to the environment.
Detergent and
dishwasher use

EN
16
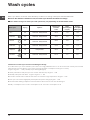
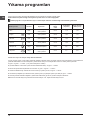
Wash cycles
The number and type of wash cycles and options may vary depending on the dishwasher model.
Wash-cycle data is measured under laboratory conditions according to European Standard EN 50242.
Based on the different conditions of use, the wash-cycle duration and data can change.
Wash Cycle Drying Options
Wash Cycle
Duration
h:min
Water
Consumption
(l/cycle)
Energy
Consumption
(kWh/cycle)
1. Eco Yes
Half Load - Delayed Start
03:10 11,0 1,04
2. Intensive Yes
Half Load - Delayed Start
02:30 16,5 1,70
3. Normal Yes
Half Load - Delayed Start
02:00 16,0 1,35
4. Delicates Yes
Half Load - Delayed Start
01:30 12,0 1,10
5. Rapid 40’ No
Delayed Start
00:40 9,0 0,95
6. Prewash No
Half Load - Delayed Start
00:10’ 4,0 0,01
Instructions on wash-cycle selection and detergent dosage
1. The ECO wash cycle is the standard cycle to which the energy label data refers. It can be used to wash crockery with a normal
soil level and is the most efficient cycle in terms of energy and water consumption for this type of crockery.
27 gr/ml + 6 gr/ml** – 1 Tab
(**Quantity of pre-washing detergent)
2. Heavily soiled dishes and pans (not to be used for delicate items). 30 gr/ml – 1 Tab
3. Normally soiled pans and dishes. 27 gr/ml + 6 gr/ml** – 1 Tab
4. Economic and fast wash for delicate items which are sensitive to high temperatures. 30 gr/ml – 1 Tab
5. Fast cycle to be used for slightly dirty dishes (ideal for 2 place settings) 25 gr/ml – 1 Tab
6. Pre-wash while awaiting completion of the load with the dishes from the next meal. No detergent.
Standby consumption: Left-on mode consumption: 5,0 W - Off mode consumption: 0.5 W

EN
17
Delayed start option
It is possible to delay the start time of the wash cycle
by 3, 6 or 9 hours:
1:After selecting the desired wash cycle and any other
options, press the DELAYED START button. the indicator
light will go on.
2: Select the desired delay time by pressing the Delayed
Start button repeatedly. The wash phase (3 hours), drying
phase (6 hours) and end (9 hours) indicator lights will go on
in succession.
If the Delayed Start button is pressed again, the option is
deselected and the indicator light goes off.
3. After the selection process, the countdown will begin if
the Start/Pause button is pressed. The selected delay-period
indicator light flashes and the Start/Pause button stops
flashing (fixed light).
3. Once this time has elapsed, the DELAYED START indicator
light goes off and the wash cycle begins.
The Delayed Start function cannot be set once a wash
cycle has started.
Wash options*
The OPTIONS may only be set, changed or reset after the
wash cycle has been selected and before the Start/Pause
button has been pressed.
Only the options which are compatible with the type of wash
cycle set may be selected. If an option is not compatible
with the selected wash cycle
(see Table of wash cycles)
, the
corresponding symbol/LED flashes rapidly 3 times.
If an option is selected which is not compatible with another
previously-selected option, it will flash 3 times and go off,
while the most recently selected option will remain active.
To deselect an option which has been set by mistake, press
the corresponding button again.
Notes:
Optimum performance levels when using the “"Rapid 40’” cycle
can be achieved by respecting the specified number of place
settings.
To reduce consumption even further, only run the dishwasher
when it is full.
Note for Test Laboratories: for information on comparative EN
testing conditions, please send an email to the following address:
Half load option
If there are not many dishes to be washed, a half
load cycle may be used in order to save water, electricity and
detergent. Select the wash cycle and press the HALF LOAD
button; the indicator light will go on.
Press the HALF LOAD button again to deselect this option.
Remember to halve the amount of detergent.
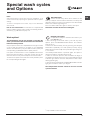
Special wash cycles
and Options
* Only available in selected models.

EN
18
Care and maintenance
* Only available in selected models.
Shutting off the water and electricity
supplies
• Turn off the water tap after every wash cycle to avoid leaks.
• Always unplug the appliance when cleaning it and when
performing maintenance work.
Cleaning the dishwasher
• The external surfaces of the machine and the control panel
can be cleaned using a non-abrasive cloth which has been
dampened with water. Do not use solvents or abrasive
products.
• Any marks on the inside of the appliance may be removed
using a cloth dampened with water and a little vinegar.
Preventing unpleasant odours
• Always keep the door of the appliance ajar in order to avoid
moisture from forming and being trapped inside the machine.
• Clean the seals around the door and detergent dispensers
regularly using a damp sponge. This will avoid food becoming
trapped in the seals, which is the main cause behind the
formation of unpleasant odours.
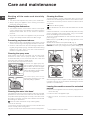
Cleaning the spray arms
Food residue may become encrusted onto the spray arms
and block the holes used to spray the water. It is therefore
recommended that you check the arms from time to time and
clean them with a small non-metallic brush.
The two spray arms may both be removed.
To remove the upper spray arm,
turn the plastic locking ring in an
anti-clockwise direction. The upper
sprayer arm should be replaced so
that the side with the greater number
of holes is facing upwards.
The lower spray arm can be
removed by pressing on the side
tabs and pulling it upwards.
Cleaning the water inlet hose*
If the water hoses are new or have not been used for an extended
period of time, let the water run to make sure it is clear and free
of impurities before performing the necessary connections. If this
precaution is not taken, the water inlet could become blocked
and damage the dishwasher.
Clean the water inlet filter at the tap outlet regularly.
- Turn off the water tap.
- Unscrew the end of the water inlet hose, remove the filter and
clean it carefully under running water.
- Re-place the filter and screw the water hose back into position.
Cleaning the filters
The filter assembly consists of three filters which remove food
residues from the washing water and then recirculate the water.
They must be cleaned if you wish to achieve the best results in
every wash.
Clean the filters regularly.
The dishwasher must not be used without filters or if the filter
is loose.
• After several washes, check the filter assembly and if necessary
clean it thoroughly under running water, using a non-metallic
brush and following the instructions below:
1. Turn the cylindrical filter C in an anti-clockwise direction and
pull it out
(fig. 1).
2. Remove the cup filter B by exerting a slight pressure on the
side flaps
(fig. 2);
3. Slide out the stainless-steel plate filter A.
(fig. 3).
4. Inspect the trap and remove any food residues. NEVER
REMOVE the wash-cycle pump protection
(black detail) (fig.4).
After cleaning the filters, re-place the filter assembly and fix it
in position correctly; this is essential for maintaining the efficient
operation of the dishwasher.
Leaving the machine unused for extended
periods
• Disconnect the appliance from the electricity supply and shut
off the water tap.
• Leave the door of the appliance ajar.
• When you return, run a wash cycle when the dishwasher is
empty.

EN
19
Troubleshooting
Whenever the appliance fails to work, check for a solution from the following list before calling for Assistance.
* Only available in selected models.
Problem: Possible causes / Solutions:
The dishwasher does not start
or cannot be controlled.
• The water supply tap is not turned on.
• Switch off the appliance by pressing the ON/OFF button, switch it back on after approximately
one minute and reset the wash cycle.
• The appliance has not been plugged in properly or another electricity socket should be used.
• The dishwasher door has not been closed properly.
The door won’t close.
• Make sure that the racks were inserted all the way.
• The lock was released. Strongly push the door until a “clacking” noise is heard.
No water drain out of the
dishwasher.
• The wash cycle has not nished yet.
• The water drain hose is bent
(see Installation).
• The drain duct is clogged up.
• The lter is clogged up with food residues.
• Check the height of the drain hose.
The dishwasher makes
excessive noise.
• The dishes are rattling against each other or against the spray arms. Place the dishes
properly and make sure the spray arms can rotate freely.
• Too much foam: the detergent has not been measured out correctly or it is not suitable for use
in dishwashers.
(See Detergent and dishwasher use.)
Do not prewash the dishes by hand.
The dishes and glasses are
covered in a white lm or
limescale deposits.
• No rened salt.
• Water hardness adjustment is not suitable: increase the relevant values.
(See Rened Salt
and Rinse Aid.)
• The salt and rinse-aid dispenser cap has not been closed properly.
• The rinse aid has been used up or the dosage is too low.
The dishes and glasses are
streaked or have a bluish
tinge.
• The rinse aid dosage is too high.
The crockery has not been
dried properly.
• A wash cycle without a drying programme has been selected.
• The rinse aid has been used up.
(See Rened Salt and Rinse Aid.)
• The rinse aid dispenser setting is not suitable.
• The crockery is made from non-stick material or plastic; the presence of water drops is
normal.
The dishes are not clean. • The crockery has not been arranged properly.
• The spray arms cannot rotate freely, being hindered by the dishes.
• The wash cycle is too gentle
(see Wash Cycles).
• Too much foam: the detergent has not been measured out correctly or it is not suitable for use
in dishwashers.
(See Detergent and dishwasher use.)
• The lid on the rinse aid compartment has not been closed correctly.
• The lter is dirty or clogged up
(see Care and maintenance.)
• The rened salt level is low
(See Rened Salt and Rinse Aid.)
• Make sure that the height of the dishes is compatible with the rack adjustment.
• The holes in the sprayer arms are clogged up.
(See Care and maintenance.)
The dishwasher won’t load
any water.
It is blocked with ashing lights.
• There is no water in the mains supply or the tap is shut off.
• The water inlet hose is bent
(see Installation).
• The lters are clogged up: they need cleaning.
(See Care and maintenance.)
• The drain duct is clogged up: it needs cleaning.
• After checking and cleaning, switch the dishwasher on and off and start a new wash cycle.
• If the problem persists, turn off the water tap, remove the plug and call the Service Centre.

20
PL
Instalacja
W przypadku przenoszenia należy trzymać urządzenie w
pozycji pionowej; w razie konieczności przechylić je do tyłu.
Połączenia hydrauliczne
Przystosowanie instalacji hydraulicznej powinno być
dokonywane wyłącznie przez wykwalikowany personel.
Wąż doprowadzający i odprowadzający wodę można skiero-
wać na prawo lub na lewo, aby umożliwić optymalną instalację.
Przewody rurowe nie mogą być zagięte ani przygniecione
przez zmywarkę.
Podłączenie węża doprowadzającego wodę
• Do zaworu wody z gwintem 3/4” GAS zimnej lub ciepłej
(max. 60°C).
• Odkręcić wodę i pozwolić płynąć aż stanie się przejrzysta.
• Przykręcić dobrze wąż doprowadzający wodę i odkręcić
kurek.
Jeśli wąż doprowadzający okaże się za krótki, zwrócić się
do specjalistycznego sklepu lub wykwalikowanego technika
(zob. Serwis)
.
Ciśnienie wody powinno mieścić się w zakresie wartości
podanych w tabeli danych technicznych, w przeciwnym
przypadku zmywarka może pracować nieprawidłowo.
Należy zwrócić uwagę, aby na przewodzie nie tworzyły
się zgięcia ani zwężenia.
Podłączenie węża odprowadzającego wodę
Podłączyć przewód odprowadzający do przewodu
kanalizacyjnego o średnicy minimum 2 cm. (A)
Złącze przewodu odprowadzającego musi znajdować się na
wysokości od 40 do 80 cm od podłogi lub podłoża, na którym
umieszczono zmywarkę.
Przed podłączeniem przewodu odprowadzającego wodę do
syfonu zlewozmywaka, należy usunąć plastikową zatyczkę
(B).
Zabezpieczenie przed zalaniem
Aby zagwarantować, że nie dojdzie do zalania, zmywarka:
- posiada system przerywający dopływ wody w przypadku
wystąpienia anomalii lub wydostawania się wody ze środka.
Niektóre modele są wyposażone także w dodatkowe
urządzenie zabezpieczające New Acqua Stop*, które
gwarantuje ochronę przed zalaniem również w przypadku
pęknięcia przewodu doprowadzającego wodę.
UWAGA: NIEBEZPIECZNE NAPIĘCIE!
Węża doprowadzającego wodę nie można w żadnym wypadku
przecinać, gdyż zawiera części pod napięciem.
Podłączenie do sieci elektrycznej
Przed włożeniem wtyczki do gniazdka należy się upewnić, czy:
• gniazdko ma uziemienie i jest zgodne z obowiązującymi
przepisami;
• gniazdko jest w stanie wytrzymać obciążenie maksymalnej
mocy urządzenia wskazane na tabliczce znamionowej
umieszczonej na drzwiach wewnętrznych
(zob. Opis zmywarki);
• napięcie zasilania zawiera się w przedziale wartości
podanych na tabliczce znamionowej umieszczonej na
drzwiach wewnętrznych;
• gniazdko jest kompatybilne z wtyczką urządzenia. W
przeciwnym wypadku zwrócić się do wykwalikowanego
technika o wymianę wtyczki
(zob. Serwis)
; nie używać
przedłużaczy ani rozgałęziaczy.
Po zainstalowaniu urządzenia przewód zasilana
elektrycznego oraz gniazdko elektryczne powinny być łatwo
dostępne.
Przewód nie powinien być powyginany ani przygnieciony.
Jeśli przewód zasilający jest uszkodzony, powinien zostać
wymieniony przez producenta lub jego serwis techniczny, aby
uniknąć wszelkiego ryzyka.
(zob. Serwis)
Producent nie ponosi żadnej odpowiedzialności w
przypadku nieprzestrzegania tych zasad.
Ustawienie i wypoziomowanie
1. Postawić zmywarkę na równym i twardym podłożu.
Skompensować nierówności odkręcając lub dokręcając
przednie nóżki, aż urządzenie znajdzie się w pozycji poziomej.
Dokładne wypoziomowanie zapewnia stabilność i zapobiega
drganiom i hałasom.
2. Po zamontowaniu zmywarki otworzyć drzwiczki i przykleić
przezroczysty pasek samoprzylepny* pod blatem drewnianym
w celu jego ochrony przed ewentualnymi skroplinami.
3. Ustawić zmywarkę, przysuwając jej boki lub tył do
sąsiadujących mebli lub do ściany. Urządzenie można również
wbudować pod blatem kuchennym*
(zob. Karta montażu)
.
4*. Aby wyregulować wysokość tylnej nóżki, należy przekręcić
sześciokątną tuleję w kolorze czerwonym, znajdującą się w
dolnej, przedniej, środkowej części zmywarki za pomocą
klucza sześciokątnego 8 mm, obracając ją w kierunku zgodnym
z ruchem wskazówek zegara, aby zwiększyć wysokość, a w
kierunku przeciwnym do ruchu wskazówek zegara, aby ją
zmniejszyć.
(patrz ulotka z instrukcjami dotyczącymi zabudowy
załączona do dokumentacji)
MIN 40 cm
MAX 80 cm
* Tylko w niektórych modelach.
Strona się ładuje...
Strona się ładuje...
Strona się ładuje...
Strona się ładuje...
Strona się ładuje...
Strona się ładuje...
Strona się ładuje...
Strona się ładuje...
Strona się ładuje...
Strona się ładuje...
Strona się ładuje...
Strona się ładuje...
Strona się ładuje...
Strona się ładuje...
Strona się ładuje...
Strona się ładuje...
Strona się ładuje...
Strona się ładuje...
Strona się ładuje...
Strona się ładuje...
Strona się ładuje...
Strona się ładuje...
Strona się ładuje...
Strona się ładuje...
-
 1
1
-
 2
2
-
 3
3
-
 4
4
-
 5
5
-
 6
6
-
 7
7
-
 8
8
-
 9
9
-
 10
10
-
 11
11
-
 12
12
-
 13
13
-
 14
14
-
 15
15
-
 16
16
-
 17
17
-
 18
18
-
 19
19
-
 20
20
-
 21
21
-
 22
22
-
 23
23
-
 24
24
-
 25
25
-
 26
26
-
 27
27
-
 28
28
-
 29
29
-
 30
30
-
 31
31
-
 32
32
-
 33
33
-
 34
34
-
 35
35
-
 36
36
-
 37
37
-
 38
38
-
 39
39
-
 40
40
-
 41
41
-
 42
42
-
 43
43
-
 44
44


Indesit DFG 26B10 NX EU instrukcja
- Kategoria
- Zmywarki
- Typ
- instrukcja